| “This site contains affiliate links for which OEMDTC may be compensated” |
NHTSA Campaign Number: 15V320
Manufacturer Honda (American Honda Motor Co.)
Components AIR BAGS
Potential Number of Units Affected 6,281,043
Driver’s Frontal Air Bag May Rupture
In the event of a crash necessitating deployment of the driver’s frontal air bag, the inflator could rupture with metal fragments striking the driver or other occupants resulting in serious injury or death.
Summary
Honda (American Honda Motor Co.) is recalling certain model year 2001-2007 Accord, 2001-2005 Civic, 2001-2004 Honda Civic GX, 2003-2005 Honda Civic Hybrid, 2002-2006 CR-V, 2003-2011 Element, 2002-2004 Odyssey, 2003-2008 Pilot, 2006 Ridgeline, 2003 Acura 3.2CL, 2003-2006 Acura MDX, and 2002-2003 Acura 3.2TL vehicles.
The affected vehicles are equipped with a dual-stage driver frontal air bag that may be susceptible to moisture intrusion and other factors, including manufacturing variability that, over time, could cause the inflator to rupture.
Remedy
Honda will notify owners, and dealers will replace the driver frontal air bag inflator, free of charge.
The recall began on July 1, 2015.
Owners may contact Honda customer service at 1-888-234-2138.
Owners may contact Acura customer service at 1-800-382-2238, select option 4.
Note: Vehicles that have had their driver frontal air bag replaced previously as part of a recall remedy prior to September 12, 2014 need to have their air bag replaced under this recall as well.
Vehicles that, on or after September 12, 2014, received a remedy for a prior driver frontal air bag inflator recall already received an inflator of a different design, and therefore are not included in this recall and do not require additional servicing.
Note: This recall fully supersedes recalls 08V-593, 09V-259, 10V-041, 11V-260, 14V-351 and 15V-153.
Notes
Owners may also contact the National Highway Traffic Safety Administration Vehicle Safety Hotline at 1-888-327-4236 (TTY 1-800-424-9153), or go to www.safercar.gov.
Check if your Honda has a Recall
A15-040
February 1, 2017
05584 Version 5
Safety Recall: Driver’s Airbag Inflator Can Be Over-Pressurized
Supersedes 15-040, dated December 19, 2015; See REVISION SUMMARY
Replaces 14-045, Recall: Driver’s Airbag Inflator May Produce Excessive Pressure After Long-Term Exposure to High Absolute Humidity
Replaces 15-022, Recall: Driver’s Airbag Inflator May Produce Excessive Pressure After Long-Term Exposure to High Absolute Humidity
Replaces 10-039, Safety Recall: Replacement Driver’s Airbag Inflator Can Be Over-Pressurized Replaces 08-093, Safety Recall: Driver’s Airbag Inflator Can Be Over-Pressurized AFFECTED
VEHICLES
| Year | Model | Trim | VIN Range |
| 2001–07 | Accord | ALL | Check the iN VIN status for eligibility |
| 2001–05 | Civic | ALL | Check the iN VIN status for eligibility |
| 2001–05 | Civic GX | ALL | Check the iN VIN status for eligibility |
| 2003–05 | Civic Hybrid | ALL | Check the iN VIN status for eligibility |
| 2002–06 | CR-V | ALL | Check the iN VIN status for eligibility |
| 2003–11 | Element | ALL | Check the iN VIN status for eligibility |
| 2002–04 | Odyssey | ALL | Check the iN VIN status for eligibility |
| 2003–08 | Pilot | ALL | Check the iN VIN status for eligibility |
| 2006 | Ridgeline | ALL | Check the iN VIN status for eligibility |
REVISION SUMMARY
As of February 1st, 2017, inflator kit part numbers that end in -305 and -306 are no longer available and have been removed from this bulletin. Refer to the PARTS INFORMATION section for the part number you need to order and a list of inflator part numbers that you may receive.
BACKGROUND
American Honda consolidated the previous airbag inflator campaigns into this current bulletin based on decisions made by NHTSA. Do an iN VIN status inquiry and, if indicated, repair the vehicle even though the vehicle may have been repaired under a previous campaign.
In certain vehicles, the driver’s (front) airbag inflator could produce excessive internal pressure during airbag deployment. If an affected airbag deploys, the increased internal pressure may cause the inflator casing to rupture. Metal fragments could pass through the airbag cushion material, possibly causing injury or fatality to vehicle occupants. NOTE: If the VIN status inquiry indicates that the vehicle is subject to any open safety recalls, including a front passenger’s airbag inflator campaign/recall, make sure to also complete those recall repairs before returning the vehicle to the customer. If you are unable to complete any open recall, advise the customer of the recall status and when the recall could be completed.
New and different inflators are available. You may receive a different part number than ordered, and the inflator may appear different. As a result, there may be different installation instructions. Make sure you review this service bulletin for installation instructions and details about model applicability. PARTS INFORMATION and REPAIR PROCEDURE were updated to reflect these new parts.
On June 18, 2015, there was a change in the return process for driver and front passenger inflators. Refer to PIB A15-0002, Inflator Kit Return Process for more information.
CUSTOMER NOTIFICATION
Owners of affected vehicles will be sent a notification of this campaign.
Do an iN VIN status inquiry to make sure the vehicle is shown as eligible.
Some vehicles affected by this campaign may be in your new or used vehicle inventory.
Failure to repair a vehicle subject to a recall or campaign may subject your dealership to claims or lawsuits from the customer or anyone else harmed as a result of such failure. Furthermore, state law may provide American Honda with the right to seek indemnification in any such claim or lawsuit. To see if a vehicle in inventory is affected by this recall, do a VIN status inquiry before selling it.
CORRECTIVE ACTION
Replace the driver’s airbag inflator, then return the original, undeployed inflator as directed.
NOTE: For Civic models only, inspect the airbag and, if necessary, replace the driver’s airbag inflator, then return the original, undeployed inflator as directed.
PARTS INFORMATION
NOTE: Always use new Torx bolts to reinstall the airbags. The new Torx bolts are coated with threadlock to make sure they do not come loose.
| Part Name | Order Part Number | You may receive any of the following | Quantity |
| 2001–02 Accord Driver’s Airbag Inflator Kit | 04770-S5A-405 | 04770-S5A-405 | 1 |
| 2003–07 Accord Driver’s Airbag Inflator Kit | 04770-SDA-406 | 04770-SDA-406 | 1 |
| 2001–05 Civic (includes GX and Hybrid) Driver’s
Airbag Inflator Kit |
04770-S5A-408 | 04770-S5A-408 | 1 |
| 2002–06 CR-V Driver’s Airbag Inflator Kit | 04770-S9A-405 | 04770-S9A-405
04770-S9A-409 |
1 |
| 2003–11 Element Driver’s Airbag Inflator Kit | 04770-SCV-405 | 04770-SCV-405
04770-SCV-409 |
1 |
| 2002–04 Odyssey Driver’s Airbag Inflator Kit | 04770-S5A-405 | 04770-S5A-405 | 1 |
| 2003–08 Pilot Driver’s Airbag Inflator Kit | 04770-S9A-405 | 04770-S9A-405
04770-S9A-409 |
1 |
| 2006 Ridgeline Driver’s Airbag Inflator Kit | 04770-SJC-406 | 04770-SJC-406 | 1 |
| Torx Bolts (For reinstalling Autoliv airbags only) | 90134-S04-A81 |
N/A | 2 |
NOTE:
- The inflator kit box must be used to return the old inflator to its supplier. Be careful not to damage the inflator kit box.
- If the defective, undeployed inflator is not returned, the warranty claim for that vehicle will be charged back to your dealership.
- To return the inflator, follow the instructions in PIB A15-0002, Inflator Kit Return Process.
- Parts staff can scan the part number and serial number from the outside of the box into the warranty claim by using the Controlled Part Serial No. screen and scanning the applicable information. Refer to the Job Aid Ordering and Managing Replacement Inflators for more information.
WARRANTY CLAIM INFORMATION
NOTE:
- Use the Autoliv claim for removing and reinstalling Autoliv airbags only. Do not use it to claim any labor on Takata airbags.
- To avoid a warranty claim being charged back to your dealership, the defective, undeployed inflator must be returned to its supplier. Follow the shipping instructions in PIB A15-0002, Inflator Kit Return Process.
- The replacement inflator part number and serial number are printed on the label that should be attached to the RO.
- To avoid non-payment of warranty claims, the new airbag inflator part number and serial number must be included in each claim. For more information, refer to step 7 of REPAIR PROCEDURE.
- The serial number is encoded into the bar code printed on the label inside of the box and on a label attached to the outside of the box. If your dealership uses a scanner, you can scan the serial number from either place into the claim.
- The part number is encoded into a barcode attached to the outside of the box. If your dealership uses a scanner, you can scan the part number into the claim.
- If you confuse the serial number and part number when entering the claim information, your claim will automatically be rejected.
- For more information about scanning and filing airbag inflator recall claims, refer to Ordering and Managing Replacement Inflators. From the iN, select Service, Warranty, then Claims Reference Guide. Under HOT TIPS/TOPICS, select Ordering and Managing Replacement Inflators.
| Year/ Model |
Operatio n Number | Replacement Part Number | Flat Rate Time | Defect Code | Symptom Code | Template ID | Failed Part Number |
| 2001–02 Accord | 7521H8 | 04770-S5A-405 | 0.5 hr | 5VZ00 | JQ900 | 15-040B | 06770-SDA-A80ZA |
| 2003–07 Accord | 7521H8 | 04770-SDA-406 | 0.5 hr | 5VZ00 | JQ900 | 15-040D | 06770-SDA-A80ZA |
| 2001–05 Civic | 7521H8 | 04770-S5A-408 | 0.5 hr | 5VZ00 | JR000 | 15-040E | 06770-S5A-A10ZA |
| 2001–05 Civic GX | 7521H8 | ||||||
| 2003–05 Civic
Hybrid |
7521H8 | ||||||
| 2002–06 CR-V | 7521H8 | 04770-S9A-405 | 0.5 hr | 5VZ00 | JR100 | 15-040G | 06770-S9A-A80ZA |
| 04770-S9A-409 | 15-040H | ||||||
| 2003–11 Element | 7521H8 | 04770-SCV-405 | 0.5 hr | 5VZ00 | JR200 | 15-040J | 06770-SCV-A80ZA |
| 04770-SCV-409 | 15-040K | ||||||
| 2002–04 Odyssey | 7521H9 | 04770-S5A-405 | 0.5 hr | 5VX00 | JR300 | 15-040M | 06770-S0X-A10ZA |
| 2003–08 Pilot | 7521H9 | 04770-S9A-405 | 0.5 hr | 5VX00 | JR400 | 15-040O | 06770-S9V-A01ZA |
| 04770-S9A-409 | 15-040P | ||||||
| 2006 Ridgeline | 7521H9 | 04770-SJC-406 | 0.5 hr | 5VX00 | JR500 | 15-040R | 06770-SJC-A10ZA |
Remove and Reinstall Autoliv Airbags Only
| 2001–05 Civic | 7521J0 | N/A | 0.3 hr | 5VZ00 | JR000 | 15-040S | 06770-S5A-A10ZA |
REPAIR PROCEDURE
NOTE:
- If the VIN status inquiry indicates that the vehicle is subject to any open safety recalls, including a passenger’s airbag inflator campaign/recall, make sure to also complete those recall repairs before returning the vehicle to the customer. If you are unable to complete any open recall, advise the customer of the recall status and when the recall could be completed.
- Be careful not to damage any parts when replacing the inflator, and follow the procedure exactly.
- If, before removing the airbag, you suspect that it may be the incorrect airbag for the vehicle or a counterfeit, do not remove the airbag. Contact your DPSM for assistance.
- Do not open the inflator kit until you have confirmed a Takata inflator is installed in the vehicle because if you have to return the inflator kit, the kit must be unopened.
- If the vehicle you are working on has an Autoliv airbag and inflator, do not disassemble the airbag because the inflator cannot be reinstalled, and you will have to replace the airbag module.
- Make sure you have reviewed the SRS Precautions and Procedures in the applicable electronic service manual before doing the REPAIR PROCEDURE.
- Turn the ignition switch to the ON (II) position and check if the SRS indicator comes on for about 6 seconds, then turns off.
- If the indicator comes on, then turns off after about 6 seconds, go to step 2.
- If the indicator does not come on, or if it stays on, contact your DPSM for assistance.
- Disconnect the battery negative cable and wait at least 3 minutes before continuing.
- Remove the driver’s airbag. Refer to the applicable electronic service manual.
- Place the airbag, face down, on a clean shop towel.
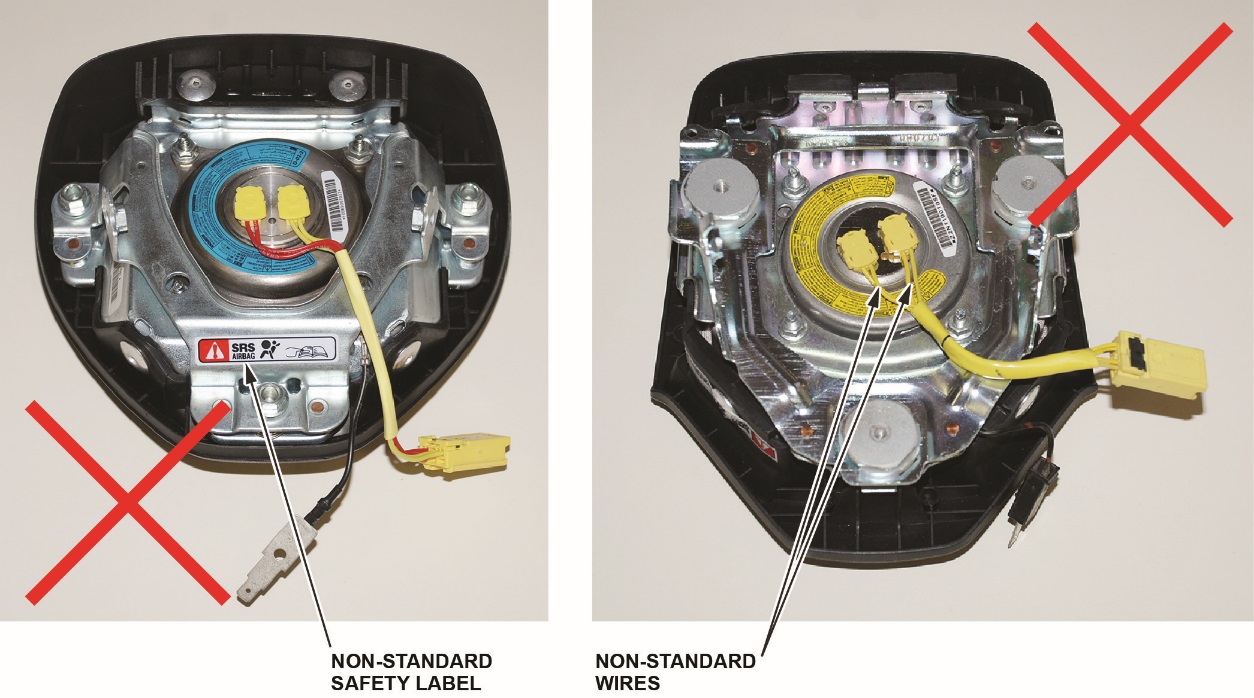
- Visually inspect the airbag and the inflator for any unusual writing or markings.

- If there is nothing unusual about the airbag or the inflator, go to step 6.
- If there are any unusual markings, like an incorrect label or a model year written in marker, the airbag and inflator may not be the correct airbag and/or inflator for the vehicle or it may be a counterfeit part. For more information about counterfeit airbags, you can refer to gov, enter keywords MANAGING COUNTERFEIT, and select Recommended Dealer Guidance for Managing Counterfeit Air Bags from the list. If you suspect that the airbag or inflator is counterfeit, do not continue this procedure. Contact your DPSM for assistance.
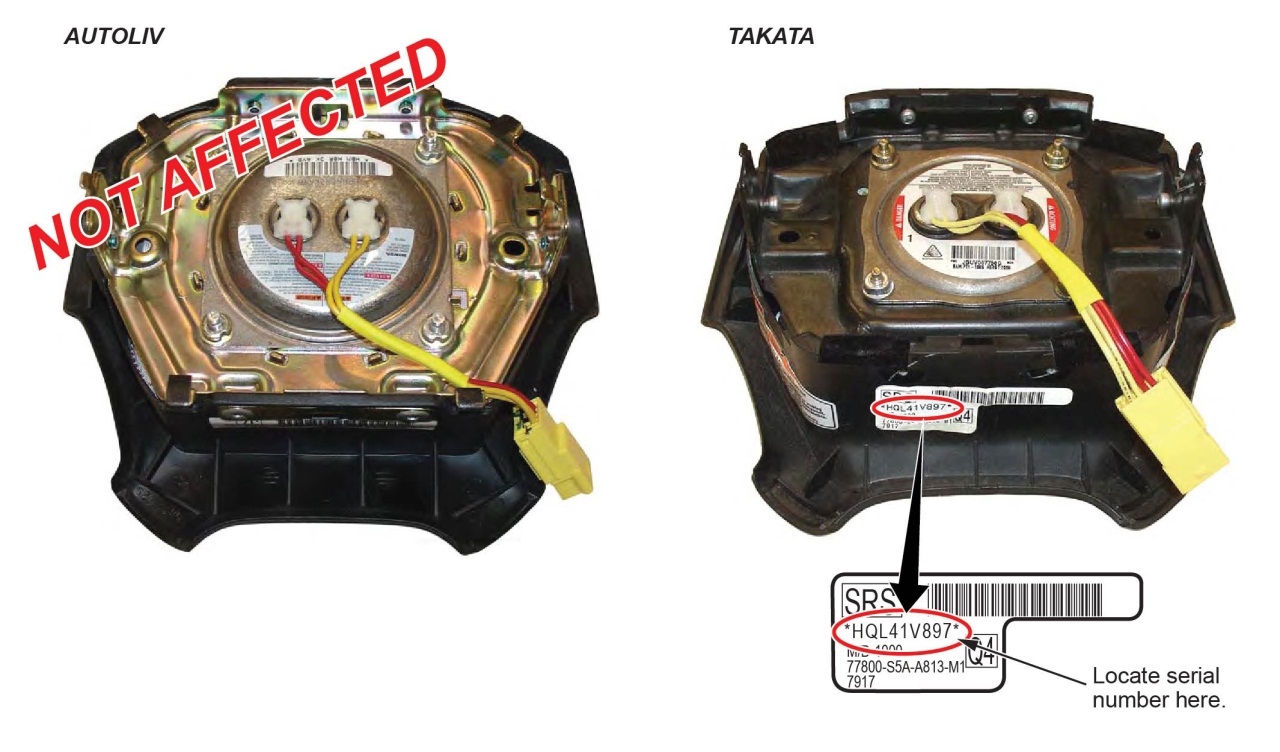
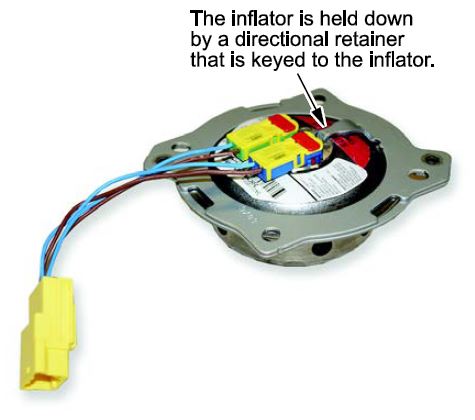
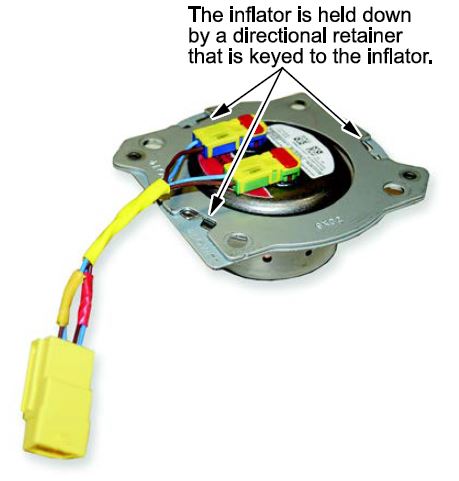
- Civic only – Determine if the airbag is made by Autoliv or Takata by comparing the inflators to those in the images below.
NOTE: The Autoliv serial number label is different from the Takata label; the Autoliv has 11 characters, the Takata has 9.
- If the airbag is made by Autoliv, the airbag is OK. Reinstall the airbag using new Torx bolts. Torque the bolts to 8 N·m (7.2 lb-ft). If you already received a replacement inflator, return the unopened kit to American Honda.
- If the airbag is made by Takata, go to step 7.
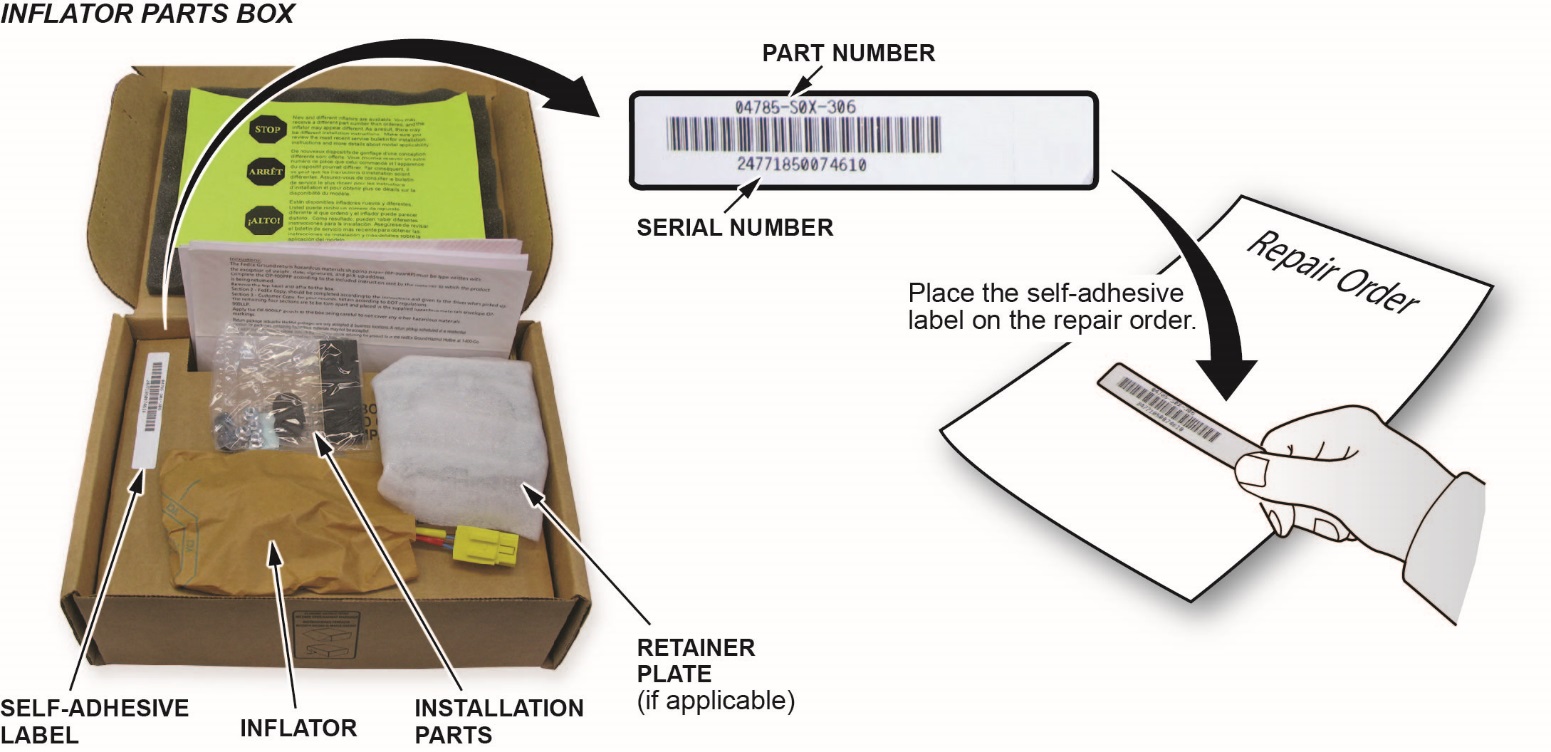
- Peel the label located inside the inflator box from its backing and attach it to the RO. For the warranty claim to be paid, the replacement inflator part number that you received must be included in the warranty claim.
NOTE:
- The replacement part number is printed on the top part of the label and the serial number is printed on the bottom. Make sure you attach the label to the RO and give it to the warranty clerk.
- There may also be a colored sticker located in the kit, ignore it because it is not used.
- Not all inflator kits have a label included. In those cases, write the serial number and part number from the side of the inflator box on the RO. The part number always starts with 047.
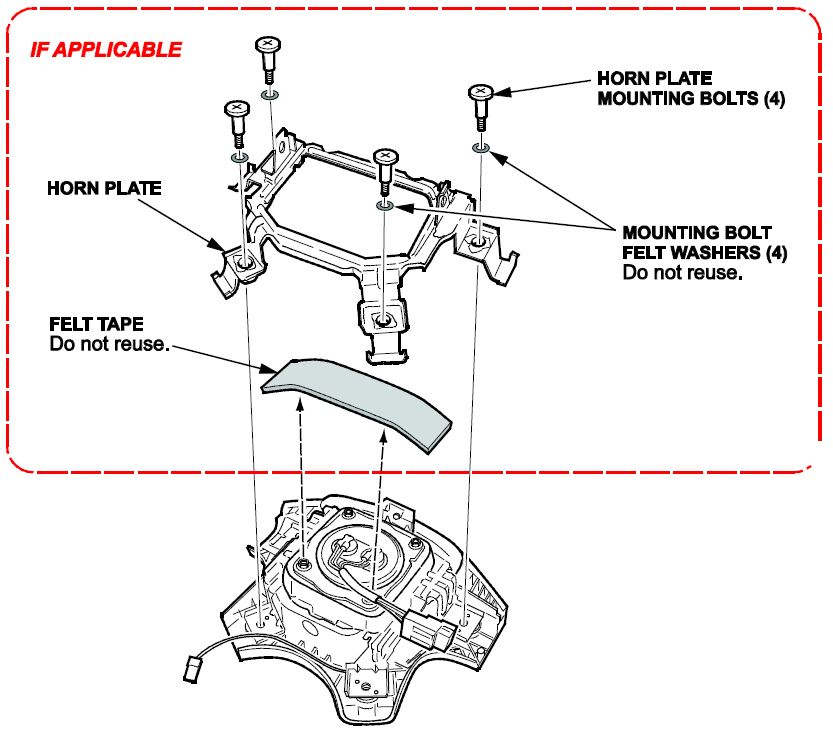
- If there is no horn plate installed, go to step 9. If there is a horn plate installed, remove the four horn plate mounting bolts, the mounting bolt felt washers, the horn plate, and remove the felt tape covering the lower two inflator locknuts. The felt washers and felt tape will not be reused.
- Using needle-nose vise grips or a 3/8 in. 6-point socket, remove the four locknuts from the inflator. The locknuts will not be reused.
NOTE: Do not remove the inflator from the airbag until you complete step 10.
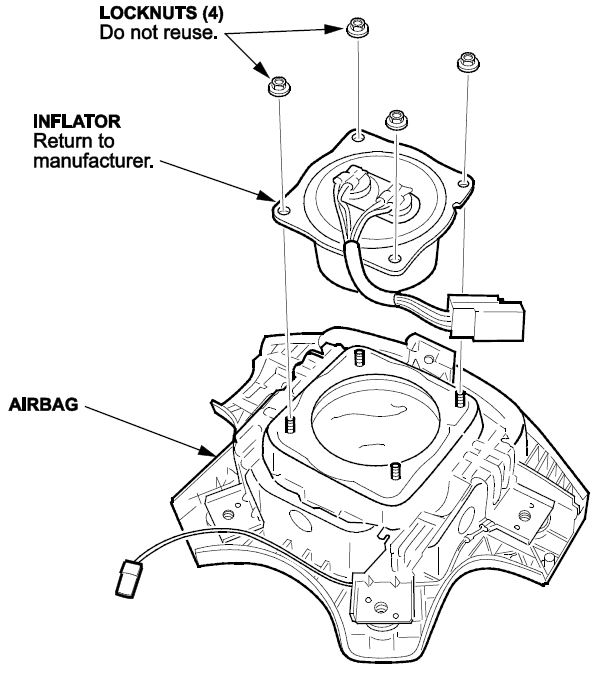
- Use shop air to clean any debris that may be on the inflator, then remove the inflator from the airbag. NOTE:
- Do not allow any debris to enter the inflator opening in the airbag.
- Do not deploy the inflator. The inflator must be returned to its supplier in the box the new inflator came in. Follow the shipping instructions supplied with the inflator kit. If you have any questions about shipping, call Warranty Parts Inspection (WPI) at 937-642-2737.
- Turn over the airbag (inflator side down), and shake it to remove any debris from the inflator opening.
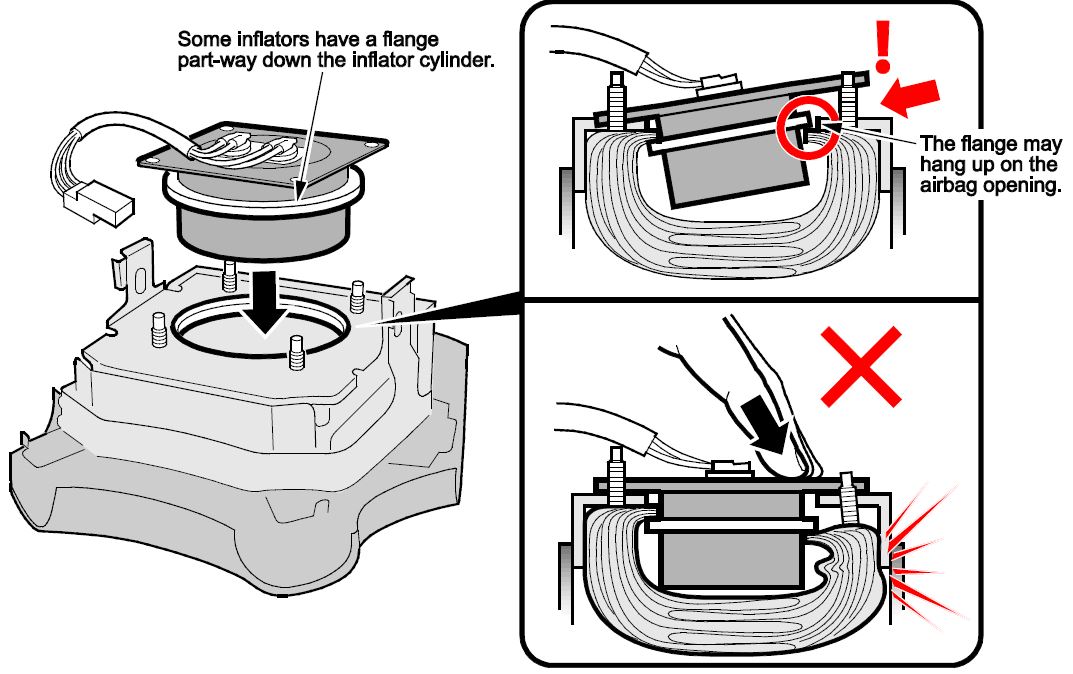
- Install the new inflator in the airbag.
NOTE: There may be some minor surface rust or corrosion on the new inflator; this is OK.
Click on the image below for a short video about the different variations of the driver’s and front passenger’s replacement inflators involved with the recalls related to Takata inflators. While both the driver’s and front passengers inflators are shown in the video, this is informational only. Replace inflators only as directed by the iN VIN status inquiry.

Check your part number against the ones listed for each installation procedure. Use the correct installation procedure for the part you received.
Part Number
04770-S5A-405
04770-SDA-406
04770-S9A-405 – Refer to Driver’s Inflator Type 2 in the video.
04770-SCV-405
04770-SJC-406
NOTE: Make sure the inflator wires are positioned toward the bottom of the airbag. If you install the inflator incorrectly, you may not be able to reconnect the SRS airbag harness.
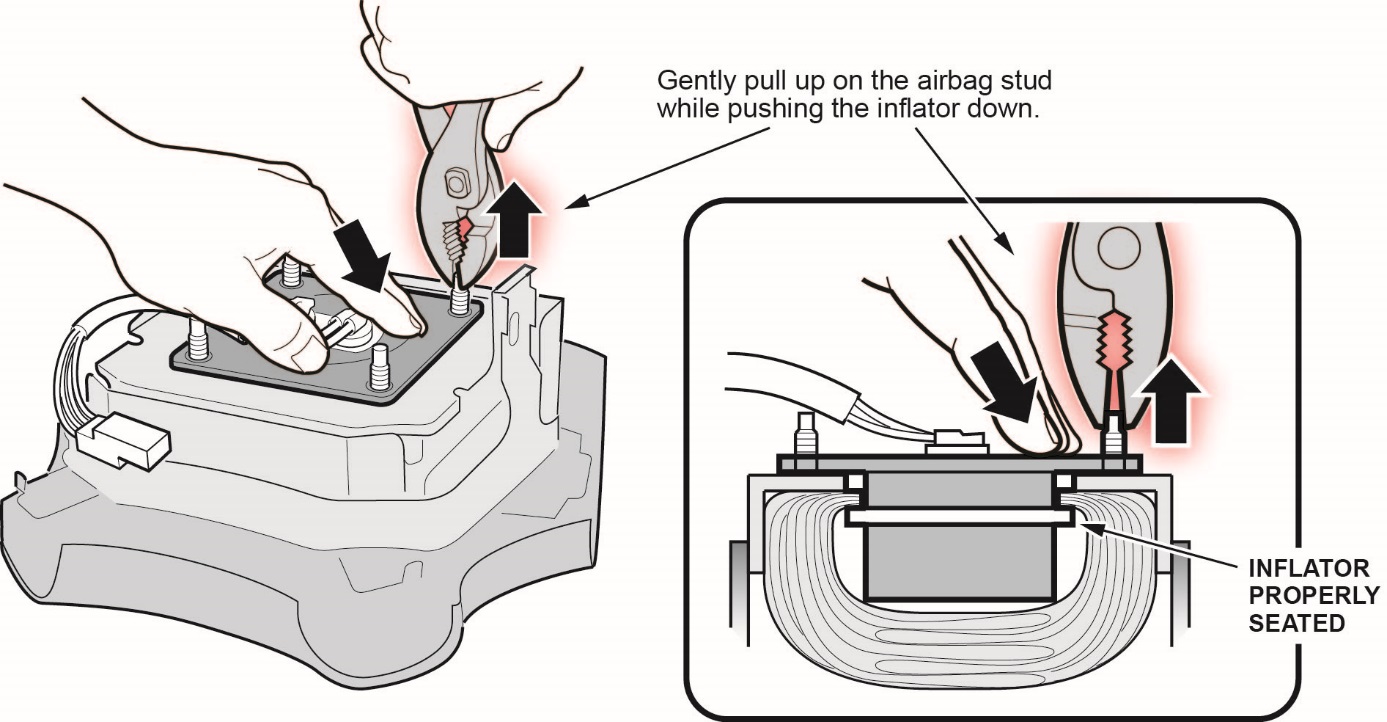
- Using a pair of pliers, gently pull up on each stud up while pushing the inflator module down until the airbag is properly seated within the airbag module.
Check your part number against the ones listed for each installation procedure. Use the correct installation procedure for the part you received.
Part Number
04770-S5A-408 – Refer to Driver’s Inflator Type 3 in the video.
- Place the inflator into the opening with the inflator harness toward the bottom of the airbag.
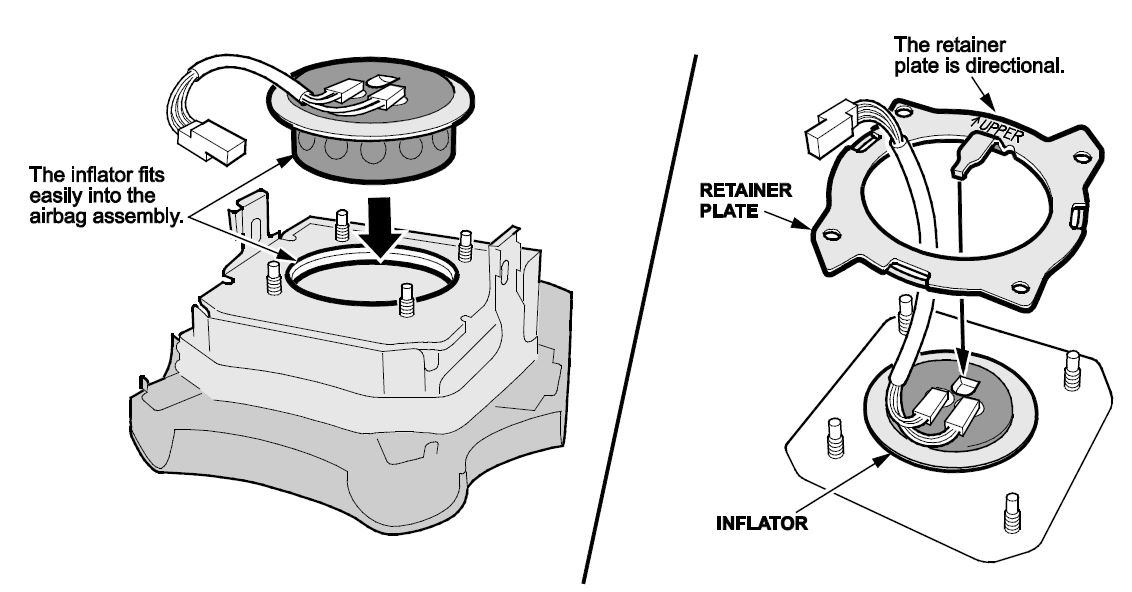
- Install the bracket onto the studs. Make sure the locator tab fits into the locator hole as shown.
NOTE: Make sure the harness comes out through the center opening. Do not install the bracket over the harness wires.
Check your part number against the ones listed for each installation procedure. Use the correct installation procedure for the part you received.
Part Number
04770-S9A-409 – Refer to Driver’s Inflator Type 4 in the video. 04770-SCV-409
- Place the inflator into the opening with the inflator harness toward the bottom of the airbag.
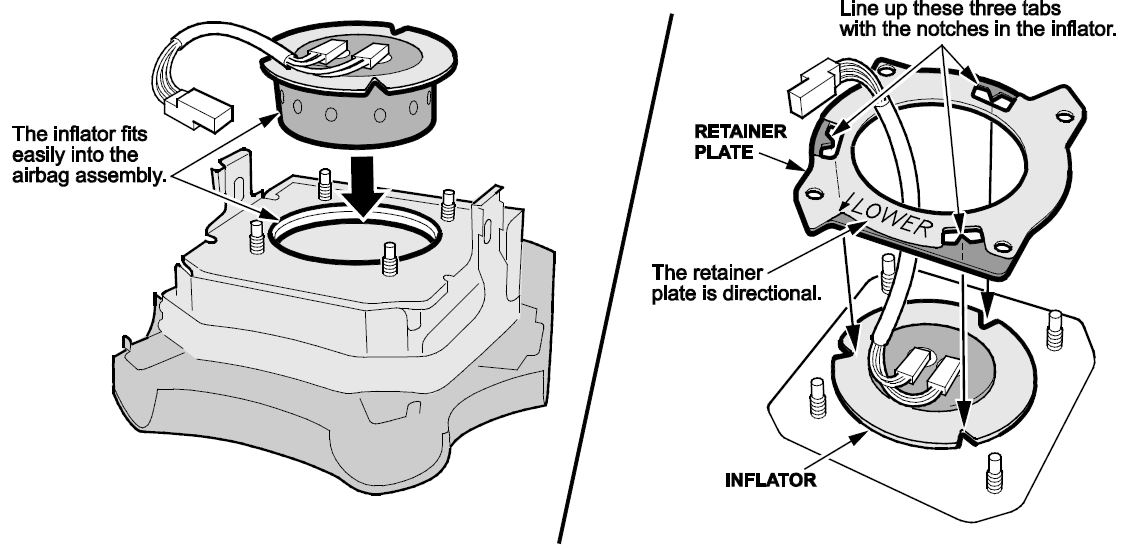
- Install the bracket onto the studs with the stamp LOWER at the bottom of the airbag.
- Make sure the three tabs and notches are properly aligned.
NOTE:
- The tabs and notches are designed to align in one direction only. If the tabs and notches are not aligned, the inflator and bracket are not installed correctly.
- Make sure the harness comes out through the center opening. Do not install the bracket over the harness wires.
- Install and torque the new locknuts to 9 N·m (2.8 lb-ft, 34 lb-in).
- If applicable, cover the lower two inflator locknuts with new felt tape.
- If applicable, reinstall the horn plate with new felt washers on its mounting bolts. Torque the mounting bolts to 3.4 N·m (2.5 lb-ft, 30 lb-in), then make sure the horn plate moves freely.
- Reinstall the driver’s airbag using new Torx bolts and torque the bolts to 8 N·m (7.2 lb-ft). Refer to the applicable electronic service manual.
- Reconnect the battery negative cable.
- Start the vehicle and check that the SRS indicator comes on for about 6 seconds, then turns off.
- Give your warranty clerk the RO that includes the replacement inflator serial number and replacement part number. For the warranty claim to be paid, the replacement inflator part number must be included in the warranty claim.
END
https://static.nhtsa.gov/odi/rcl/2015/RCRIT-15V320-2904.pdf
 Loading...
https://static.nhtsa.gov/odi/rcl/2015/RCONL-15V320-3920.pdf
Loading...
https://static.nhtsa.gov/odi/rcl/2015/RCONL-15V320-8005.pdf
Loading...
https://static.nhtsa.gov/odi/rcl/2015/RCRN-15V320-9264.pdf
Loading...
https://static.nhtsa.gov/odi/rcl/2015/RCRN-15V320-5502.pdf
Loading...
https://static.nhtsa.gov/odi/rcl/2015/RCRN-15V320-5491.pdf
Loading...
https://static.nhtsa.gov/odi/rcl/2015/RCRN-15V320-4095.pdf
Loading...
https://static.nhtsa.gov/odi/rcl/2015/RCRN-15V320-4708.pdf
Loading...
https://static.nhtsa.gov/odi/rcl/2015/RCRN-15V320-0112.pdf
Loading...
https://static.nhtsa.gov/odi/rcl/2015/RCRN-15V320-7260.pdf
Loading...
https://static.nhtsa.gov/odi/rcl/2015/RCRN-15V320-0294.pdf
Loading...
https://static.nhtsa.gov/odi/rcl/2015/RCRN-15V320-9391.pdf
Loading...
https://static.nhtsa.gov/odi/rcl/2015/RCRN-15V320-8536.pdf
Loading...
https://static.nhtsa.gov/odi/rcl/2015/RCMN-15V320-0223.pdf
Loading...
https://static.nhtsa.gov/odi/rcl/2015/RCMN-15V320-3692.pdf
Loading...
https://static.nhtsa.gov/odi/rcl/2015/RCMN-15V320-2122.pdf
Loading...
https://static.nhtsa.gov/odi/rcl/2015/RCMN-15V320-5067.pdf
Loading...
https://static.nhtsa.gov/odi/rcl/2015/RCMN-15V320-6820.pdf
Loading...
https://static.nhtsa.gov/odi/rcl/2015/RMISC-15V320-1759.pdf
Loading...
https://static.nhtsa.gov/odi/rcl/2015/RCMN-15V320-3468.pdf
Loading...
https://static.nhtsa.gov/odi/rcl/2015/RCMN-15V320-3842.pdf
Loading...
https://static.nhtsa.gov/odi/rcl/2015/RCMN-15V320-7464.pdf
Loading...
https://static.nhtsa.gov/odi/rcl/2015/RCMN-15V320-0630.pdf
Loading...
https://static.nhtsa.gov/odi/rcl/2015/RCMN-15V320-4366.pdf
Loading...
https://static.nhtsa.gov/odi/rcl/2015/RCMN-15V320-7592.pdf
Loading...
https://static.nhtsa.gov/odi/rcl/2015/RCMN-15V320-4228.pdf
Loading...
https://static.nhtsa.gov/odi/rcl/2015/RCMN-15V320-8558.pdf
Loading...
https://static.nhtsa.gov/odi/rcl/2015/RCMN-15V320-0894.pdf
Loading...
https://static.nhtsa.gov/odi/rcl/2015/RCMN-15V320-4271.pdf
Loading...
https://static.nhtsa.gov/odi/rcl/2015/RCMN-15V320-2436.pdf
Loading...
https://static.nhtsa.gov/odi/rcl/2015/RCMN-15V320-6511.pdf
Loading...
https://static.nhtsa.gov/odi/rcl/2015/RCMN-15V320-3752.pdf
Loading...
https://static.nhtsa.gov/odi/rcl/2015/RCMN-15V320-2878.pdf
Loading...
https://static.nhtsa.gov/odi/rcl/2015/RCMN-15V320-2721.pdf
Loading...
https://static.nhtsa.gov/odi/rcl/2015/RCMN-15V320-0493.pdf
Loading...
https://static.nhtsa.gov/odi/rcl/2015/RCMN-15V320-1113.pdf
Loading...
https://static.nhtsa.gov/odi/rcl/2015/RCMN-15V320-1063.pdf
Loading...
https://static.nhtsa.gov/odi/rcl/2015/RCRN-15V320-0041.pdf
Loading...
https://static.nhtsa.gov/odi/rcl/2015/RCRN-15V320-8042.pdf
Loading...
https://static.nhtsa.gov/odi/rcl/2015/RCAK-15V320-8513.pdf
Loading...

