| “This site contains affiliate links for which OEMDTC may be compensated” |
A14-022
August 25, 2015
51398-02259 Version 2
Function Buttons (PHONE, MENU, BACK, SETTINGS, Etc.) Stick
Supersedes 14-022, dated May 21, 2014, to revise the information highlighted in yellow.
AFFECTED VEHICLES
| Year | Model | Trim | VIN Range |
| 2014 | Odyssey | ALL | ALL |
| 2015 | Odyssey | EX, EX-L, Touring | 5FNRL5…FB000001 thru 5FNRL5…FB115934 |
REVISION SUMMARY
All Sections were revised; American Honda recommends that you review the entire bulletin.
SYMPTOM
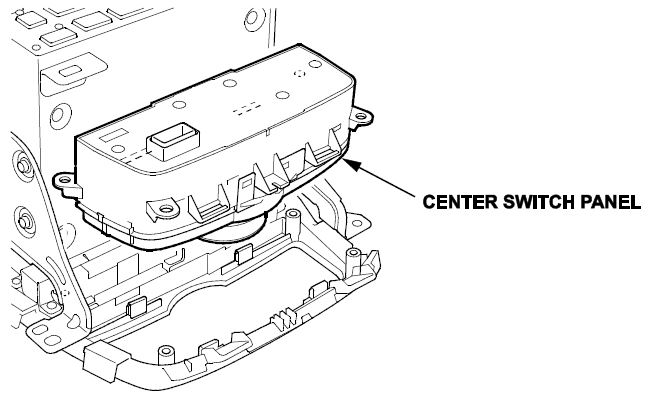
One or more of the function buttons around the center switch panel dial (PHONE, MENU, BACK, SETTINGS, Etc.) are sticking.
POSSIBLE CAUSE
The center switch panel is deformed or is not centered in the audio unit panel.
CORRECTIVE ACTION
Replace or adjust the center switch panel in the audio unit panel as needed.
NOTE: Only replace the center switch panel if the PHONE button is sticking. Replacing the panel if any other buttons are sticking may not resolve the issue.
PARTS INFORMATION
| Vehicle Trim | Part Name | Part Number | Quantity |
| EX and EX-L | Switch Assy, Multi Jog (Audio) | 39050-TK8-A31 | 1 |
| EX-L with RES | Switch Assy, Multi Jog (RES) | 39050-TK8-A21 | 1 |
| EX-L with NAVI | Switch Assy, Multi Jog (NAVI) | 39050-TK8-A11 | 1 |
| Touring | Switch Assy, Multi Jog (NAVI)(RES) | 39050-TK8-A01 | 1 |
WARRANTY CLAIM INFORMATION
The normal warranty applies.
Repair Procedure A
| Operation Number | Description | Flat Rate Time | Template ID | Failed Part Number |
| 0100A4 | Repair Procedure A
Reposition the center switch panel in the audio unit panel | 0.8 hr | 14-022A | 39050-TK8-A31 |
Repair Procedure B
| Operation Number | Description | Flat Rate Time | Template ID | Model | Replacement Part | Failed Part Number |
| 0101K1 | Repair Procedure B Replace the center switch panel in the audio unit. | 0.8 hr | 14-022B | EX and EX-L | 39050-TK8-A31 | 39050-TK8-A31 |
| 14-022C | EX-L with RES | 39050-TK8-A21 | ||||
| 14-022D | EX-L with NAVI | 39050-TK8-A11 | ||||
| 14-022E | Touring | 39050-TK8-A01 |
Defect Code: 08001
Symptom Code: 03217
Skill Level: Repair Technician
DIAGNOSIS PROCEDURE
Press each function button to see if it sticks.
- If any button(s) stick except the PHONE button, go to REPAIR PROCEDURE A.
- If the PHONE button sticks, go to REPAIR PROCEDURE B.
REPAIR PROCEDURE (Center Switch Panel Removal)
NOTE:
- When working on electronic components, make sure the work area is clean and dust free.
- Make sure your hands are clean and free of oils and grease.
- Take care not to scratch the dashboard and related parts.
- Eject the disc before removing the audio unit or audio-navigation unit to prevent damaging the CD players load mechanism.
- Make sure you have the five digit anti-theft code.
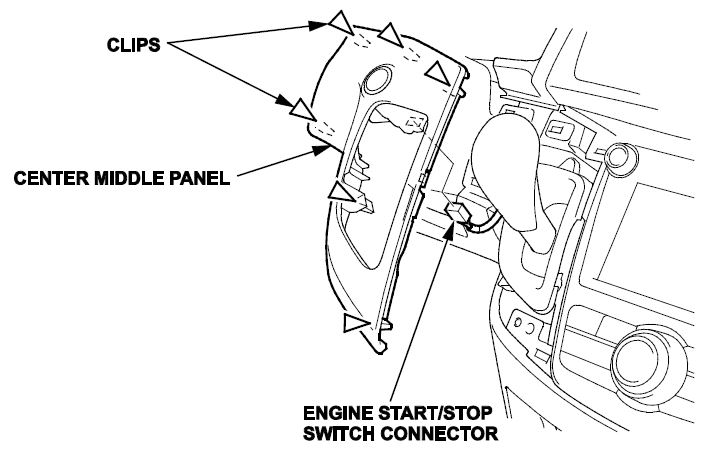
- Remove the center middle panel.
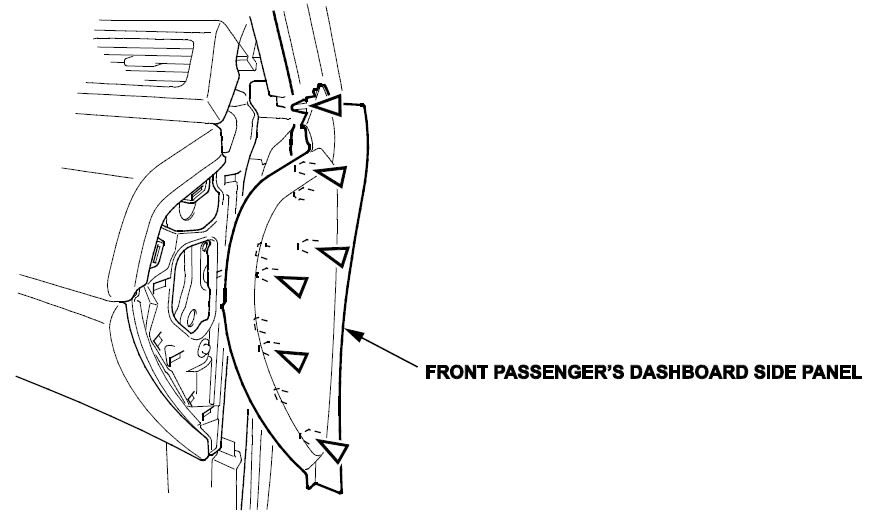
- Pull out the front passenger’s dashboard side panel to release the clips.
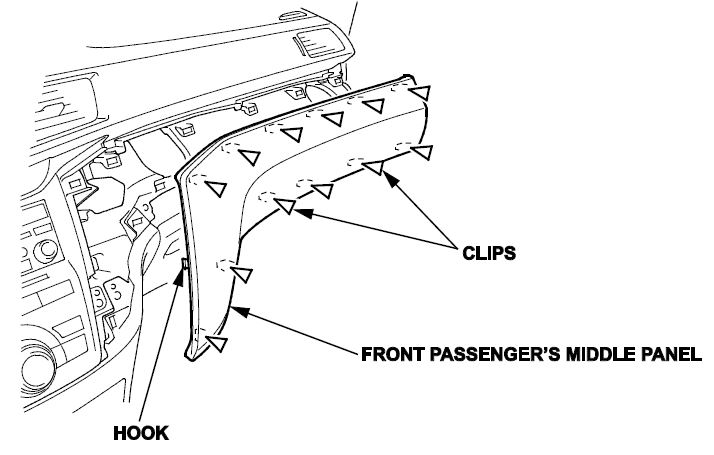
- Remove the front passenger’s middle panel.
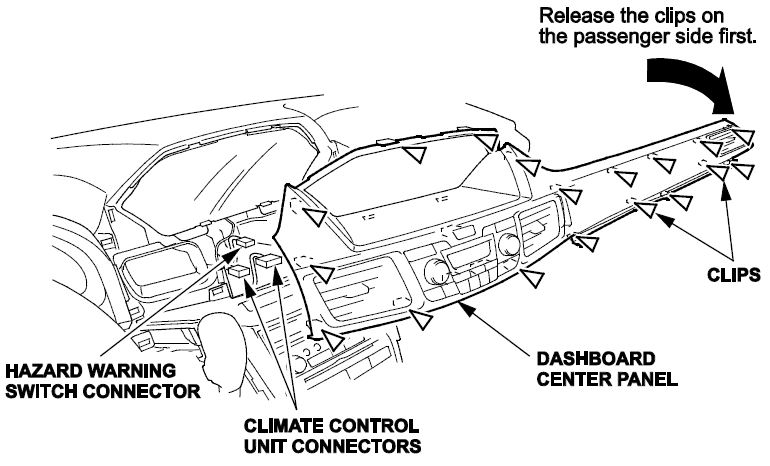
- From the front passenger’s side, pull out the dashboard center panel to release the clips. From the center area, pull out the center panel to release the clips. Then, disconnect the hazard warning switch connector and climate control unit connectors and remove the panel.
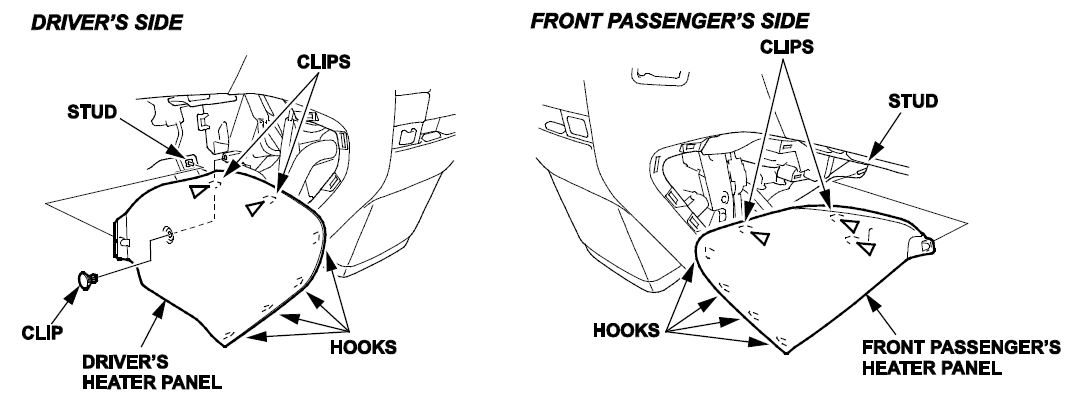
- Remove the driver’s and front passenger’s heater panels.
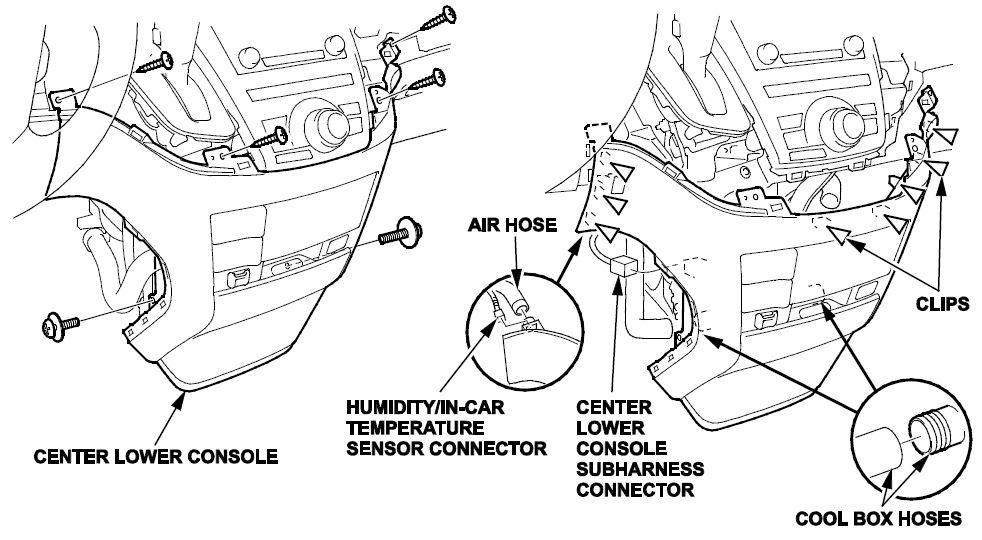
- Remove the center lower console screws.
- Pull out the center lower console as needed.
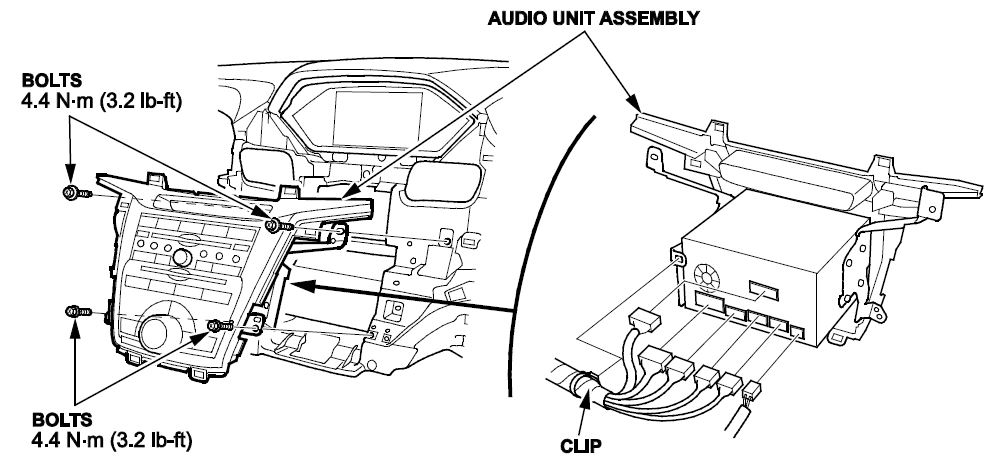
- Remove the bolts, then pull out the audio or audio-navigation unit.
REPAIR PROCEDURE A
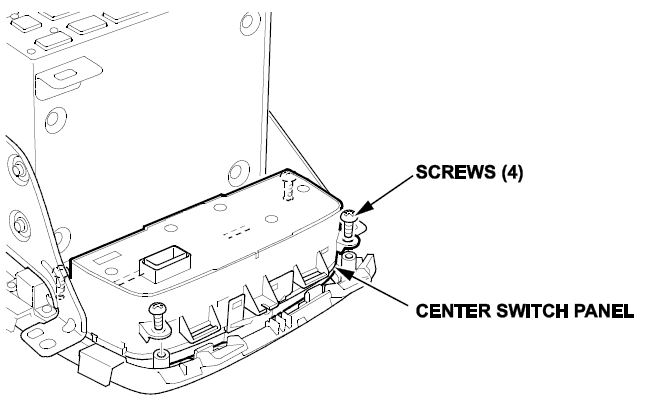
- Loosen the center switch panel screws, center the switch and retighten the screws. Make sure the switch is centered in the audio or audio-navigation unit panel opening and the buttons are no longer sticking.
- If the buttons are no longer sticking, reinstall all removed items in the reverse order of removal.
- If the vehicle is equipped with navigation, do the system initialization.
NOTE:
- While the anti-theft system screen is displayed, press and hold the VOL knob for at least 2 seconds. The audio-navigation unit automatically exist the anti-theft mode, or you can enter the five digit anti-theft code.
- GPS initialization may not be needed depending of the length of time the system was without power.
- Map matching aligns the GPS to a location on the map.
REPAIR PROCEDURE B
- Remove the four center switch panel screws and remove the center switch panel.
- Install a new center switch panel.
- Reinstall all removed items in the reverse order of removal.
- If the vehicle is equipped with navigation, do the system initialization.
NOTE:
- While the anti-theft system screen is displayed, press and hold the VOL knob for at least 2 seconds, the audionavigation unit will automatically exit the anti-theft mode. Alternatively, you can also enter the five digit antitheft code.
- GPS initialization may not be needed depending of the length of the time the system was without power.
- Map matching aligns the GPS to a location on the map.
END.
 Loading...

