| “This site contains affiliate links for which OEMDTC may be compensated” |
NHTSA Campaign Number: 18V599
Manufacturer Honda (American Honda
 Motor Co.)
Components ELECTRICAL SYSTEM, EXTERIOR LIGHTING
Potential Number of Units Affected 793
Loss of Brake Lights/FMVSS 108
Brake lights that do not work increase the risk of a crash.
Summary
Honda (American Honda
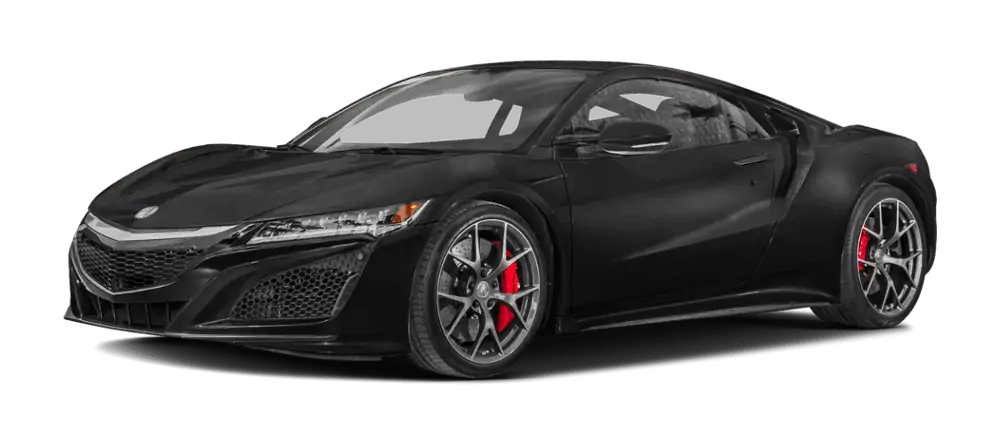
 Motor Co.) is recalling certain 2017 Acura
 NSX vehicles. Road vibrations may cause the metal screws that secure the printed circuit board for the high mounted center brake light to loosen and contact the circuitry, possibly resulting in the brake light fuse blowing and the brake lights not functioning. As such, these vehicles fail to comply with the requirements of Federal Motor Vehicle Safety Standard (FMVSS) number 108, “Lamps, Reflective Devices, and Associated Equipment.”
Remedy
Honda will notify owners, and dealers will replace the center high mount brake light, free of charge. The recall is expected to begin November 6, 2018. Owners may contact Acura
 Client Relations at 1-844-682-2872. Honda
 ’s number for this recall is B2B.
Notes
Owners may also contact the National Highway Traffic Safety Administration Vehicle Safety Hotline at 1-888-327-4236 (TTY 1-800-424-9153), or go to www.safercar.gov.
Check if your Acura has a Recall
B18-049
September 12, 2018
Version 2
Safety Recall: High Mount Brake Light
Supersedes 18-049, dated September 8, 2018, to include the Repair Procedure, Parts Information, and Warranty Claim Information
AFFECTED VEHICLES
| Year | Model | Trim | VIN Range |
| 2017 | NSX | ALL | Check the iN VIN status for eligibility. |
BACKGROUND
There is an internal issue with the circuit board in the high mount brake light (center high mount brake light). This may cause all the brake lights to stop working, turn on several indicators, and the vehicle may not start. If the brake lights stop working, this may reduce the braking visibility from behind, increasing the potential risk of a collision.
CLIENT NOTIFICATION
Owners of affected vehicles will be sent a notification of this campaign.
Do an iN VIN status inquiry to make sure the vehicle is shown as eligible.
Some vehicles affected by this campaign may be in your new or used vehicle inventory.
Failure to repair a vehicle subject to a recall or campaign may subject your dealership to claims or lawsuits from the client or anyone else harmed as a result of such failure. To see if a vehicle in inventory is affected by this safety recall, do a VIN status inquiry before selling it.
CORRECTIVE ACTION
Replace the high mount brake light.
PARTS INFORMATION
| Part Name | Part Number | Quantity |
| High Mount Brake Light Assembly | 34270-T6N-A03 | 1 |
| High Mount Brake Light Kit (Includes flange nuts, door lining clips, template, and cardboard shims) | 06100-T6N-A00 | 1 |
TOOL INFORMATION
| Part Name | Part Number | Quantity |
| 14 mm Rotabroach Cutter (included in the Metric Rotabroach Master Hole Cutting Kit) | BLR11201SO | 1 |
| 3 mm ( 1/8 in.) Drill Stop Collar (commercially available) | SBS8865A132 | 1 |
| Hex L-Key 3/32 in. (commercially available) | SBS7122A42 | 1 |
| 3 mm (1/8 in.) Drill Bit (commercially available) | SBS2901A115 | 1 |
| Rear Fender Cover Set | 07AAZ-T6NA200 | 1 |
NOTES
- Each dealer should have a Rotabroach kit. If you need additional kits, contact the Honda
 Tool and Equipment Program at 888-424-6857.
 - Each dealer received at least one 3 mm (1/8 in.) drill bit, one drill stop collar, and one hex L-key free of charge. If you need any additional drill tools, purchase them through your local tool supplier.
WARRANTY CLAIM INFORMATION
| Operation Number | Description | Flat Rate Time | Defect Code | Symptom Code | Template ID | Failed Part Number |
| 7141E4 | Replace the high mount brake light (no drilling required). | 0.3 hr | 6SL00 | B2B00 | B18049A | 34270-T6N-A02 |
| 7141E5 | Replace the high mount brake light (drilling required). | 1.2 hrs | 6SL00 | B2B00 | B18049B | 34270-T6N-A02 |
Skill Level: Repair Technician
REPAIR PROCEDURE
- Open the rear hatch.
- Disconnect the 12-volt battery using the terminal disconnection procedure. Refer to the service information.
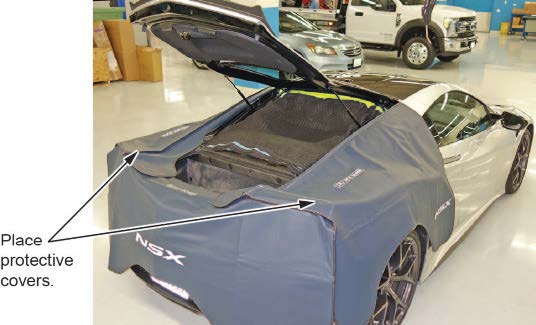
- Install the NSX fender covers.
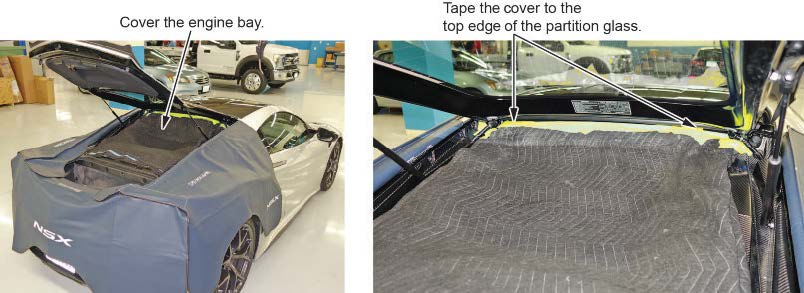
- Install another fender cover over the engine bay area. Secure the cover using automotive masking tape to the top of the rear glass area under the hatch as shown.
NOTES
- The cover prevents any hardware or tools from falling into the engine area.
- This cover is not part of the fender cover set. Use an extra cover to protect the engine area.
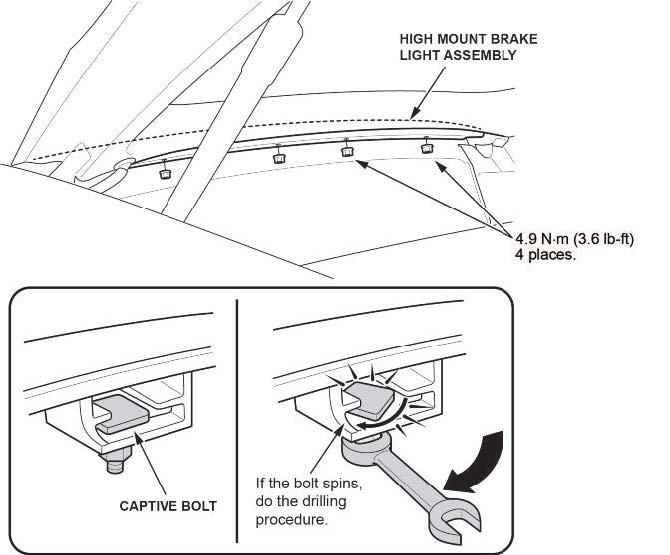
- Remove the four high mount brake light mounting nuts.
NOTICE
- If the nuts spin and do not come off, stop. Continuing to spin the nuts may damage the roof.
- Do not try to pry the high mount brake light or the nuts. If you try to pry the light, you may damage or bend the aluminum body.
- Remove the high mount brake light.
6.1 Close the hatch.
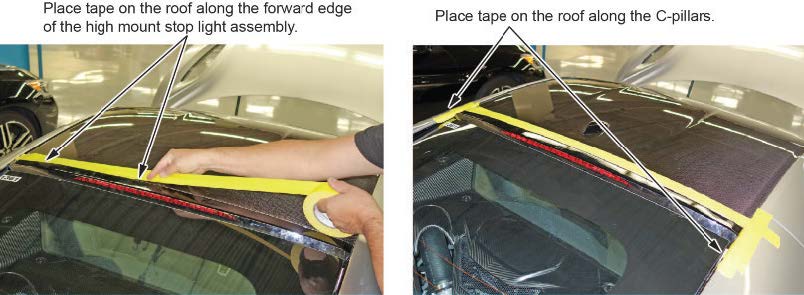
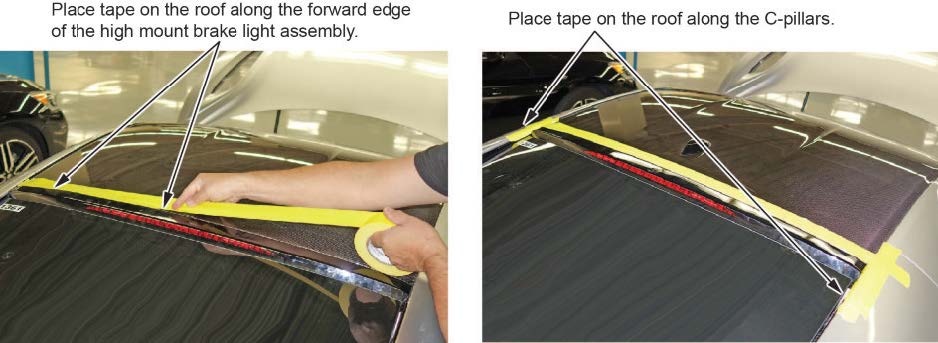
6.2 Before removing the high mount brake light, apply masking tape around the edges of the C-pillar and the roof to protect the paint.
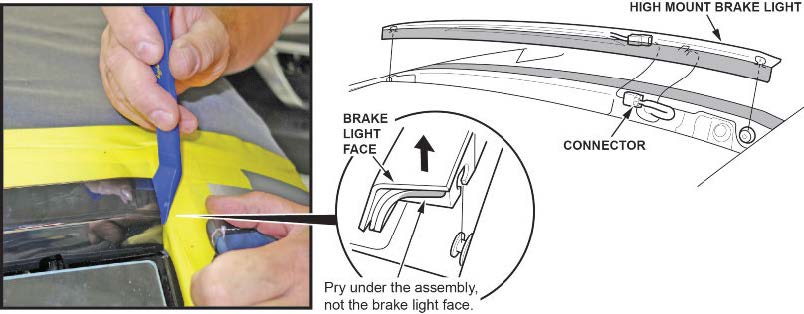
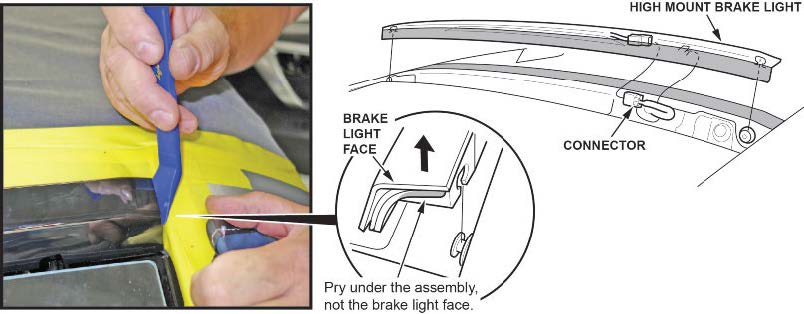
6.3 Remove the high mount brake light.
NOTICE
Do not pry up on the high mount brake light face. Carefully insert the appropriate trim tool under the high mount brake light.
6.4 Disconnect the connector.
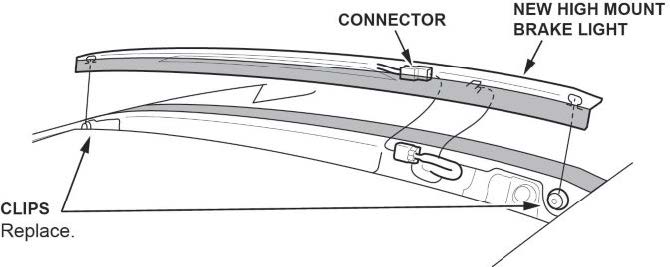
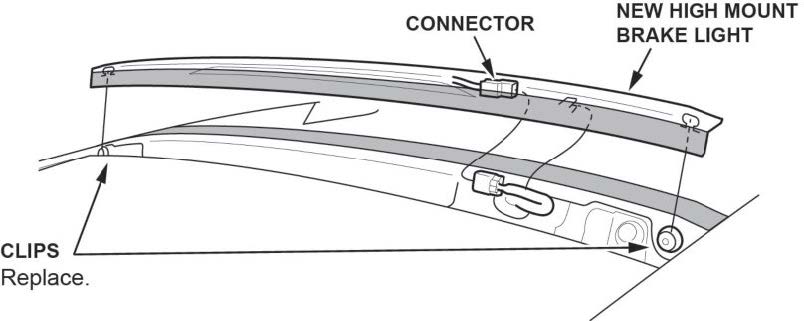
- Replace the two clips indicated below.
- Install the new high mount brake light.
8.1 Connect the connector.
8.2 Install the high mount brake light.
8.3 Install, and torque the new mounting nuts to 9 N·m (3.6 lb-ft).
- Do the 12-volt battery terminal reconnection procedure.
High Mount Brake Light Drilling and Removal Procedure
NOTE
Use this drilling procedure only on the nuts that you could not remove.
- Place another fender cover over the roof, and secure it with masking tape. Apply masking tape to the C pillars surrounding the perimeter of the high mount brake light.
NOTE
Make sure the windows are closed and the fender cover fully covers the engine compartment area. The drilling process creates debris that may fall into the interior or the engine compartment.
- Close the hatch, and tape a protective cover to protect the hatch glass.
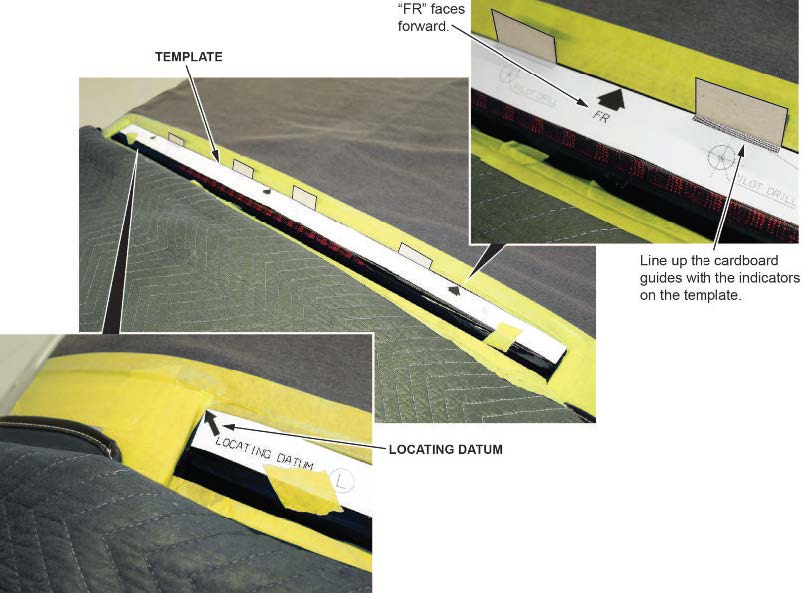
- Using the template provided in the kit (P/N 06100-T6N-A00), line up the template with the high mount brake light.
- Make sure the edge marked FR faces the front of the vehicle.
- Line up the LOCATING DATUM with the front left corner of the high mount brake light.
- Insert the four cardboard guides (included in the kit) between the high mount brake light and the template where the mounting bolts are located (as indicated by the shaded parts of the template).
- Make sure the front edge of the template contacts the cardboard guides, then secure the template with masking tape.
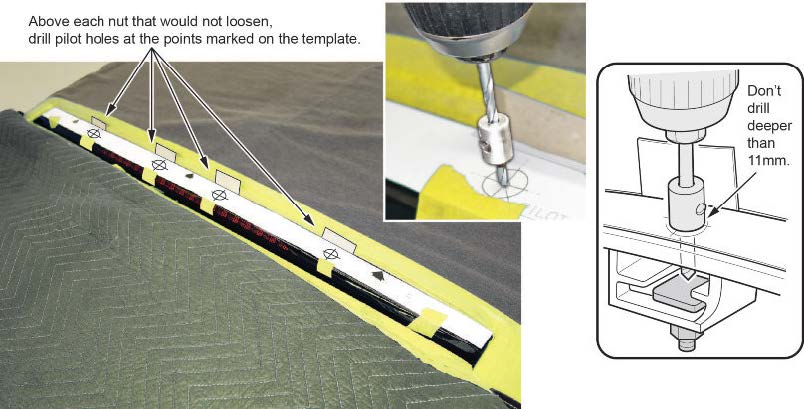
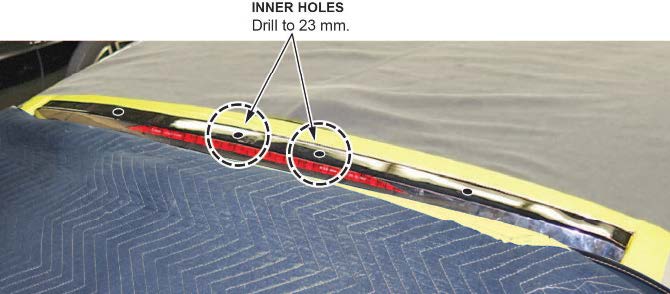
- Drill the pilot hole(s) in the high mount brake light.
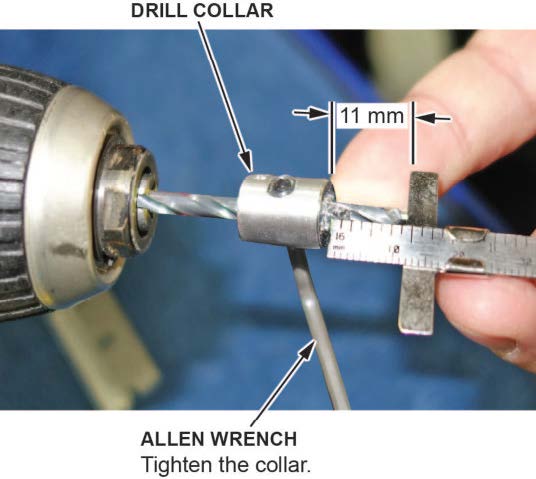
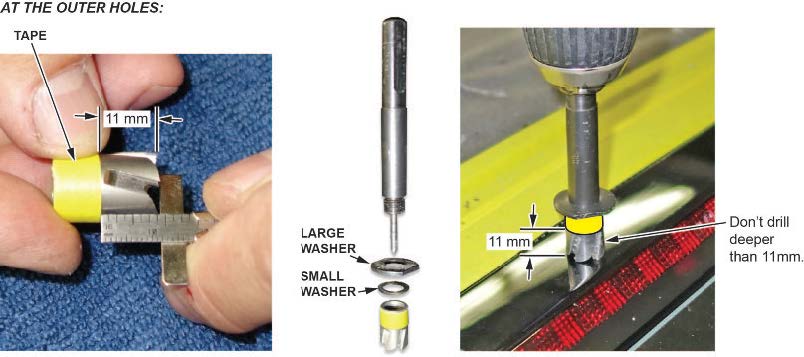
6.1 Place a drill collar(drill stop) on a 3 mm drill bit. Secure the collar 11 mm from the cutting tip.
6.2 Carefully drill a hole in the center of the applicable holes marked on the template.
NOTES
- Only drill the holes where you could not remove the nut.
- The high mount brake light is made of thin, soft plastic. Do not use a lot of force as the drill bit will cut through the material easily.
- Do not drill deeper than 11 mm as you may damage the body.
6.3 Remove the template.
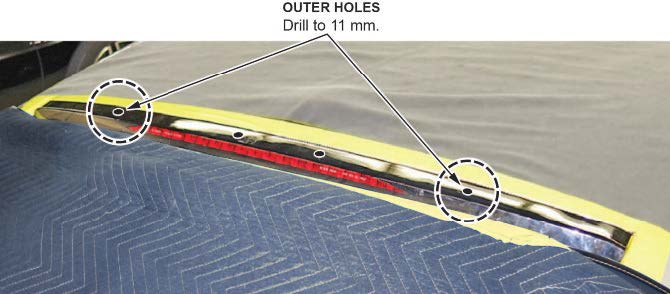
6.4 If you are drilling either of the outer nuts on the high mount brake light (holes closest to the C-pillar) follow these steps:
6.4.1 Install the two stop washers in the Rotabroach kit. Measure and confirm that the distance between the cutting edge of the Rotabroach bit and washers is 23 mm.
6.4.2 Create a soft depth gauge on the 14 mm Rotabroach bit by wrapping it with tape. Wrap the tape 11 mm from the cutting edge of the Rotabroach bit.
6.4.3 Carefully drill the hole to a depth of 11 mm.
NOTE
Drilling the outer holes deeper than 11 mm may cause damage to the body.
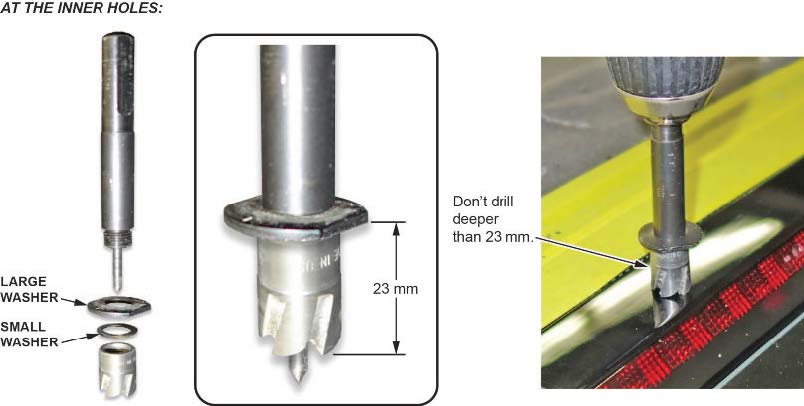
6.5 If you are drilling either of the inner nuts on the high mount brake light follow these steps:
5.6.1 Remove any tape from the 14 mm Rotabroach bit.
NOTES
- The distance from the cutting edge of the Rotabroach bit to the large washer surface should measure 23 mm.
- Drilling the inner holes deeper than 23 mm may cause damage to the body.
6.5.2 Carefully drill the hole to a depth of 23 mm (the large washer will meet the high mount brake light surface).
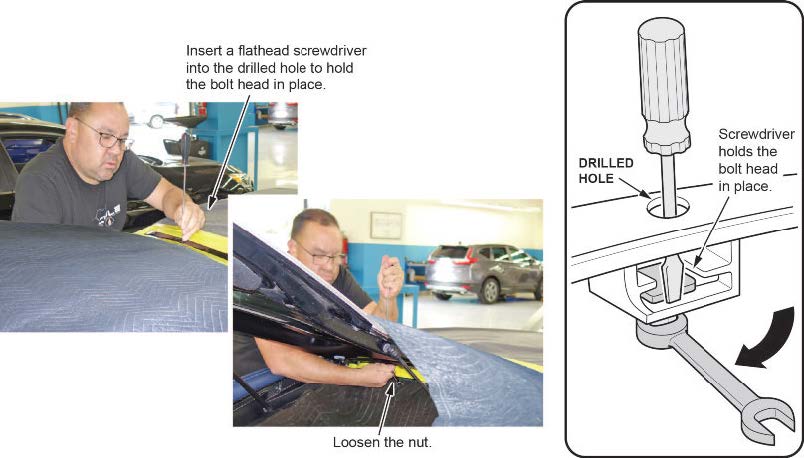
- Open the hatch.
- Remove the applicable nut(s) by placing a flat head (flat tip) screwdriver against the edge of the bolt head to hold it in place while removing the nut.
- Remove the high mount brake light.
NOTE
Do not pry up on the high mount brake light face. Carefully insert the appropriate trim tool under the high mount brake light.
9.1 Close the hatch.
9.2 Remove the high mount brake light.
9.3 Disconnect the connector.
- Vacuum any debris present from the drilling, and carefully remove the covers on the roof, the hatch glass, and the engine to prevent any material from falling into the engine area.
- Replace the two clips indicated below.
- Install the new high mount brake light.
12.1 Connect the connector.
12.2 Install the high mount brake light.
12.3 Install, and torque the new mounting nuts to 9 N·m (3.6 lb-ft).
- Do the 12-volt battery terminal reconnection procedure.
END
B18-049
Version 2
September 12, 2018
 Loading...
B18-049
Version 1
September 8, 2018
 Loading...
Manufacturer Notice
September 12, 2018
 Loading...
Manufacturer Notice
September 8, 2018
 Loading...
Statement by Acura Regarding Center High Mount Brake Light Recall: 2017 Acura
 NSX
NSX
Sept. 8, 2018
 Loading...
Manufacturer Notice
 Loading...
DEFECT INFORMATION REPORT
 Loading...
Recall Acknowledgement
September 24, 2018
 Loading...
- Lights Dim Over Time, Replace In Pairs: Your lights are a pair, one is never turned on without the other. If one bulb burns out, the other isn't far behind
- Easy To Replace: Sylvania Long Life miniature bulbs are easy to install and show instant results
- Low Maintenance And High Durability: Designed for durability, greater safety, and lower maintenance by the leading supplier of automotive lighting
- Longer Life Than Most Standard Bulbs: Long Life bulbs perform twice as long as any other standard miniature bulbs
- The Sylvania Standard Of Quality: With over 100 years in business, Sylvania is the world leader in automotive lighting for Original Equipment Manufacturers (OEMs) and the aftermarket
- 12 pack 3157 bulbs turn signal brake tail light bulb (GE3157K 12V 27/7W bulbs base=W3.0x16q). 3157/3457 lamps are multipurpose Lighting Designed for wide range of interior and exterior automotive lighting applications like turn signals, taillights, brake lights and cargo lights.
- Cross Reference P27/7W, 3157,3157LL,3157K,3157a,3157all,3157ak,3157na,3157nall,3157nak,3157r,3047 3057 3457,3457ll,3457k,3457a,3457all,3457ak,3457na,3457nak 3757 4057 4114 4114LL 4114K 4157 4157LL
- 3157 automotive meter Auxiliary light bulbs are made of high quality material with long time life.3157 3457 Tail Light Bulbs Suitable for Jeep Grand Cherokee Wrangler Commander Compass Journey Primus Edge and many American SUV 11-19 models .
- 3157 brake lamps also fits forFord F-series 2003 Ford Windstar, Ford F250,-350,2006 Nissan Altima,Ram Pickup,Chevrolet Silverado 2007 classic /2006-2003/2002/2001-2000,toyota
 Corolla、Camry and 2012 Jeep Liberty, Jeep Grand Cherokee Wrangler Commander Compass Journey Primus Edge
 - Unlike led bulbs,3157 halogen bulbs can be installed without any canbus error.These bulbs can be easily installed,play and plug.Please choose the right bulbs before you made the order.
- Lights Dim Over Time, Replace In Pairs: Your lights are a pair, one is never turned on without the other. If one bulb burns out, the other isn't far behind
- Easy To Replace: Sylvania Long Life miniature bulbs are easy to install and show instant results
- Low Maintenance And High Durability: Designed for durability, greater safety, and lower maintenance by the leading supplier of automotive lighting
- Longer Life Than Most Standard Bulbs: Long Life bulbs perform twice as long as any other standard miniature bulbs
- The Sylvania Standard Of Quality: With over 100 years in business, Sylvania is the world leader in automotive lighting for Original Equipment Manufacturers (OEMs) and the aftermarket
- See Sylvania’s Application Guide in the Technical Details below to confirm compatibility
- Specifically designed to withstand road vibration and provide longer life than traditional bulbs
- Filament and gas mixture have been engineered for improved longevity
- Meets industry regulations for performance, while bettering life expectancy
- Produced by a trusted OEM automotive lighting manufacturer
- Adequate packaging:Rafeal Auto offers a package of 10 194 premium bulbs for your replacement needs, which you can also share or keep as a spare.
- Ultra-long life:Our 194 car bulbs are made of high quality materials, and the high precision manufacturing process makes our car light bulbs have a super long service life, allowing you to use them for a long time!
- Multi-functional applications:Rafeal Auto's high quality 194 bulbs have a wide range of applications and can be used as signal bulbs, tail bulbs, side marker bulbs, brake bulbs and more!
- Fine Appearance:The well-designed 194 bulb has an attractive appearance and durable characteristics, allowing you to forget about maintenance and drive your car better!
- gentle reminder:Please confirm your car model before purchase, 194 168 2825 car light bulb is suitable for specific car models, confirm your car is suitable or not!
- 30pcs 194 led bulbs, Canbus LED bulb, Fitment: The 194 LED bulb is ideal replacement for all T10 wedge type: T10, 194, 168, 921, 147, 152, 158, 159, 161,168,175, 192, 193, 184, 259, 280, 285, 447, 464, 501, 555, 558, 585, 655, 656, 657, 1250, 1251, 1252, 2450, 2652, 2921, 504, 2821, 2825, 2827, 12256, 12961, M158, M155, 3652LL, 194NALL, 194ST, PC175, 168A, 194LL, 2886X, 175, pc195, 658, 912, W5W,etc.
- High Brightness :The T10 LED 194 bulb built in high precision fiber glass circuit board, fast heat dissipation. 360 degree lighting angle, no blind spot, bright but not dizzying, 300% brighter than original halogen bulbs. Super bright LED bulbs ensure safe night driving.
- Plug and Play: 194 led bulb canbus error free & Non-polarity,The T10 LED bulb is almost same size as halogen bulbs. easy installation. built in constant current IC driver, the 194 led bulbs no error, no extra decoder needed, no error after installation for 99% vehicles. Non-polarity design。
- Long Lifetime :These T10 194 W5W 168 white led bulbs are built-in constant current drive and external aluminum alloy radiator, Current stability, Fast heat dissipation, Extend the LED bulb service life. 194 led automotive interior light bulbs can be used for license plate light, dome light, map light, front/rear side marker light, trunk cargo light, turn signal light, courtesy step light, glove box light, inner tail light bulb, etc.
- Buy with Confidence :1 year no hassle service on return or refund for our products to make your purchase without risk. Any question, feel free to contact us. We are glade to provide 100% satisfaction solution for you.
- What you receive: package comes with 10 pieces 3157 miniature bulbs, enough quantity to meet your multi usages, you can share them with your friends or as backup
- Durable to use: our miniature light bulb is made of quality material, can be applied for longer time than most standard bulbs, which can serve you for long time
- Nice design: the filament and gas mixture of the long time bulb have been engineered for withstanding road vibration and provide longer life than traditional bulbs
- Low Maintenance: our mini light bulbs are designed for durability, requires low maintenance, so you needn't to spend much time and effort on repairing these 3157 light bulbs
- Warm Note: the 3157 light bulb can only be applied for specific models, please make sure whether your models fit before purchase
- Adequate packaging:Rafeal Auto offers a package of 10 1156 7506 premium bulbs for your replacement needs, which you can also share or keep as a spare.
- Ultra-long life:Our 1156 brake light bulbs are made of high quality materials, and the high precision manufacturing process makes our car light bulbs have a super long service life, allowing you to use them for a long time!
- Multi-functional applications:Rafeal Auto's high quality 1156 bulbs have a wide range of applications and can be used as signal bulbs, tail bulbs, side marker bulbs, brake bulbs and more!
- Fine Appearance:The well-designed 1156 bulb has an attractive appearance and durable characteristics, allowing you to forget about maintenance and drive your car better!
- Gentle Reminder:Please confirm your car model before purchase,1156 P21W car light bulb is suitable for specific car models, confirm your car is suitable or not!
- Fit bulb size: T10, 147, 152, 158, 159, 161, 168, 175, 184, 192, 193, 194, 2825, W5W, 194 LED bulb can fit map light, dome light, license plate light, trunk light, courtesy light, side marker light, interior door light, parking light
- Notice: 194 led bulbs could fit most of positions of car, do not fit all positions of your car, according to the year and model of your car, please double check owner's manual, for 12V vehicle
- Better beam pattern: each bulb has 5 pcs high power SMD led, color temperature: 6000K(xenon white), voltage: 12V
- No polarity no flip: it is truly no polarity, can light on two sides, no need more modification or flip, plug and play, easy install within 5 minutes
- Tips: 10 packs of 194 led bulbs of one set, for some vehicles, It may need a canbus decoder to fix flickering or error code
- High-quality Materials: The shell of this bulb is made of high-quality materials, which is resistant to high temperature, insulated, and has particularly good visible light transmittance. It is impact-resistant, vibration-resistant, not easy to break, provides good protection for the filament, and is durable.
- High Brightness: This bulb provides brighter and more comfortable light, which is more conspicuous when braking. Even in bad weather such as rain, snow, fog, etc., it can clearly show the driving status of the vehicle. No flash or glare, improve your driving safety.
- Easy to Install: This bulb is easy to install and can be replaced directly. The design is simple and convenient. Just insert the lamp holder for easy installation, improving the performance and safety of indoor and outdoor bulb applications.
- Wide Application: This bulb can be used as daytime running lights, side lights, brake lights, tail lights, turn signals, indicator lights. Suitable for cars equipped with brake bulbs. Please check your original bulbs and sizes before ordering to ensure that they are suitable.
- Packaging Details: You will receive 10 12v 3w miniature bulbs, which are enough to meet your multiple uses. You can share with friends or use them as spares. It is a good choice.
Last update on 2025-05-08 / Affiliate links / Images from Amazon Product Advertising API
This product presentation was made with AAWP plugin.
