| “This site contains affiliate links for which OEMDTC may be compensated” |
NHTSA Campaign Number: 17V030
Manufacturer Honda (American Honda Motor Co.)
Components AIR BAGS
Potential Number of Units Affected 977,708
Passenger Frontal Air Bag Inflator May Rupture
An inflator rupture may result in metal fragments striking the vehicle occupants resulting in serious injury or death.
Summary
Honda (American Honda Motor Co.) is recalling certain 2009-2012 Acura TSX, 2011-2012 Acura TSX Wagon, 2010-2012 Acura ZDX, 2008-2012 Honda Accord, 2010-2012 Honda Accord Crosstour and Honda Insight, 2009-2012 Honda Fit, 2009-2012 Pilot, 2007-2011 Honda CR-V, 2012 Honda FCX Clarity and 2006-2011 Honda Civic, Civic Hybrid, Civic NGV vehicles originally sold, or ever registered, in Alabama, California, Florida, Georgia, Hawaii, Louisiana, Mississippi, South Carolina, Texas, Puerto Rico, American Samoa, Guam, the Northern Mariana Islands (Saipan), and the U.S. Virgin Islands, or “Zone A.”
Additionally, if not included in “Zone A” above, Honda is recalling certain 2009 Acura TSX, Honda Fit and Pilot, 2008-2009 Honda Accord, 2006-2009 Civic, Civic Hybrid and Civic NGV, and 2007-2009 Honda CR-V vehicles originally sold, or ever registered, in Arizona, Arkansas, Delaware, District of Columbia, Illinois, Indiana, Kansas, Kentucky, Maryland, Missouri, Nebraska, Nevada, New Jersey, New Mexico, North Carolina, Ohio, Oklahoma, Pennsylvania, Tennessee, Virginia, and West Virginia, or “Zone B.”
Additionally, if not included in “Zone B” above, Honda is recalling certain 2008 Honda Accord, 2006-2008 Honda Civic, Civic Hybrid and Civic NGV and 2007-2008 Honda CR-V vehicles originally sold, or ever registered, in Alaska, Colorado, Connecticut, Idaho, Iowa, Maine, Massachusetts, Michigan, Minnesota, Montana, New Hampshire, New York, North Dakota, Oregon, Rhode Island, South Dakota, Utah, Vermont, Washington, Wisconsin, and Wyoming.
These vehicles are equipped with certain air bag inflators assembled as part of the passenger frontal air bag modules used as original equipment or replacement equipment. In the event of a crash necessitating deployment of the front air bags, these inflators may rupture due to propellant degradation occurring after long-term exposure to absolute humidity and temperature cycling.
Remedy
Honda will notify owners, and dealers will replace the front passenger side air bag inflator, free of charge.
The manufacturer has not yet provided a notification schedule.
Owners may contact Honda customer service at 1-888-234-2138.
Honda’s numbers for this recall are KE1 and KE2.
Notes
Owners may also contact the National Highway Traffic Safety Administration Vehicle Safety Hotline at 1-888-327-4236 (TTY 1-800-424-9153), or go to www.safercar.gov.
Check if your Honda has a Recall
A17-002
January 11, 2017
05458 Version 1
Safety Recall: Takata Front Passenger’s Airbag Inflator (Phase 2)
Following NHTSA direction, there are now five phases based on three different zones.
If the iN VIN status inquiry directs you to do this campaign, follow the applicable procedure regardless of where the vehicle is currently located because it may have moved between different states. Make sure you file a claim using the correct warranty claim information to avoid your claim being rejected.
AFFECTED VEHICLES
Zone A
| Year | Model | Trim | VIN Range |
| 2008–12 | Accord | ALL | Check the iN VIN status for eligibility |
| 2010–12 | Accord Crosstour | ALL | Check the iN VIN status for eligibility |
| 2006–11 | Civic | ALL | Check the iN VIN status for eligibility |
| 2006–11 | Civic CNG | ALL | Check the iN VIN status for eligibility |
| 2006–11 | Civic Hybrid | ALL | Check the iN VIN status for eligibility |
| 2007–11 | CR-V | ALL | Check the iN VIN status for eligibility |
| 2009–12 | Fit | ALL | Check the iN VIN status for eligibility |
| 2010–12 | Insight | ALL | Check the iN VIN status for eligibility |
| 2009–12 | Pilot | ALL | Check the iN VIN status for eligibility |
Zone A applies to model year 2005 through 2012 vehicles that are located or have ever been registered in Alabama, California, Florida, Georgia, Hawaii, Louisiana, Mississippi, South Carolina, Texas, Puerto Rico, American Samoa, Guam, the Northern Mariana Islands (Saipan), and the U.S. Virgin Islands.
Zone B
| Year | Model | Trim | VIN Range |
| 2008–09 | Accord | ALL | Check the iN VIN status for eligibility |
| 2006–09 | Civic | ALL | Check the iN VIN status for eligibility |
| 2006–09 | Civic CNG | ALL | Check the iN VIN status for eligibility |
| 2006–09 | Civic Hybrid | ALL | Check the iN VIN status for eligibility |
| 2007–09 | CR-V | ALL | Check the iN VIN status for eligibility |
| 2009 | Fit | ALL | Check the iN VIN status for eligibility |
| 2009 | Pilot | ALL | Check the iN VIN status for eligibility |
Zone B applies to model year 2005 through 2009 vehicles that are located or have ever been registered in Arizona, Arkansas, Delaware, District of Columbia, Illinois, Indiana, Kansas, Kentucky, Maryland, Missouri, Nebraska, Nevada, New Jersey, New Mexico, North Carolina, Ohio, Oklahoma, Pennsylvania, Tennessee, Virginia, and West Virginia.
Zone C
| Year | Model | Trim | VIN Range |
| 2008 | Accord | ALL | Check the iN VIN status for eligibility |
| 2006–08 | Civic | ALL | Check the iN VIN status for eligibility |
| 2006–08 | Civic CNG | ALL | Check the iN VIN status for eligibility |
| 2006–08 | Civic Hybrid | ALL | Check the iN VIN status for eligibility |
| 2007–08 | CR-V | ALL | Check the iN VIN status for eligibility |
Zone C applies to model year 2005 through 2008 vehicles that are located in Alaska, Colorado, Connecticut, Idaho, Iowa, Maine, Massachusetts, Michigan, Minnesota, Montana, New Hampshire, New York, North Dakota, Oregon, Rhode Island, South Dakota, Utah, Vermont, Washington, Wisconsin, and Wyoming.
BACKGROUND
NHTSA and its independent expert reviewed the findings of three independent investigations into the Takata air bag inflator ruptures. According to NHTSA, the combination of time, high temperature fluctuations, and humidity contribute to the degradation of the propellant in the inflators. NHTSA has concluded that this degradation can cause the propellant to burn too quickly, creating more pressure than the inflator can withstand and, in extreme cases, causing the inflator to rupture and send shrapnel through the airbag toward vehicle occupants. NHTSA is prioritizing the recall of airbag inflators based on the risk of injury or death to vehicle occupants.
To comply with NHTSA’s direction, American Honda has combined two previous campaigns related to airbag inflators that may produce excessive pressure after long-term exposure to high absolute humidity. Currently there are five planned phases to this campaign. The subsequent phases will launch at a future date according to NHTSA direction, but it will be several years before the final phase launches. Additionally, AHM may add new affected models or affected years to each phase. Always do an iN VIN status inquiry to see if a vehicle is affected.
For more information about these inflator recalls, go to www.safercar.gov and use keyword TAKATA.
NOTE: If the VIN status inquiry indicates that the vehicle is subject to any open safety recalls, including the driver’s airbag inflator, make sure to also complete those recall repairs before returning the vehicle to the customer. If you are unable to complete any open recall, advise the customer of the recall status and when the recall could be completed.
New and different inflators are available. You will receive a different part number than ordered, and the inflator may physically look different from previous replacement parts. As a result, there will be different installation instructions. Make sure you review this service bulletin for installation instructions and details about model applicability. PARTS INFORMATION and REPAIR PROCEDURE were updated to reflect these new parts.
On June 18, 2015, there was a change in the return process for driver and front passenger inflators. Refer to PIB A15-0002, Inflator Kit Return Process for more information.
Follow the instructions on the page of the vehicle/model you are working on.
| Models | Pages |
| Accord/Accord Crosstour | 6 thru 15 |
| Civic/Civic CNG/Civic Hybrid | 16 thru 25 |
| CR-V | 26 thru 35 |
| Fit | 36 thru 45 |
| Insight | 60 thru 70 |
| Pilot | 46 thru 59 |
CUSTOMER NOTIFICATION
Owners of affected vehicles will be sent a notification of this campaign.
Do an iN VIN status inquiry to make sure the vehicle is shown as eligible.
Some vehicles affected by this campaign may be in your new or used vehicle inventory.
Failure to repair a vehicle subject to a recall or campaign may subject your dealership to claims or lawsuits from the customer or anyone else harmed as a result of such failure. Furthermore, state law may provide American Honda with the right to seek indemnification in any such claim or lawsuit. To see if a vehicle in inventory is affected by this recall, do a VIN status inquiry before selling it.
CORRECTIVE ACTION
Replace the front passenger’s airbag inflator, then return the original, undeployed inflator as directed.
REQUIRED TOOLS
| Tool Name | Part Number | Quantity |
| PSPI6 Gauge Tool | 070AJ-TA00A00 or 07AAJ-TA0AA00 | 1 |
NOTE:
- Each dealer was sent over 10 tools over the past year. If you need more, the gauge is available for dealer ordering.
- This tool is for use on the inflators with blue collars only. The Civic inflator has green collars and this tool is not needed.
PARTS INFORMATION
| Part Name | Part Number | Quantity |
| 2008–12 Accord Front Passenger’s Airbag Inflator Kit | 04790-TA0-407 | 1 |
| 2010–12 Accord Crosstour Front Passenger’s Airbag Inflator Kit | 04790-TA0-407 | 1 |
| 2006–11 Civic Front Passenger’s Airbag Inflator Kit (Applies Civic, Civic CNG and Civic Hybrid) | 04790-SNA-407 | 1 |
| 2007–11 CR-V Front Passenger’s Airbag Inflator Kit | 04790-SWA-407 | 1 |
| 2009–12 Fit Front Passenger’s Airbag Inflator Kit | 04790-TK6-407 | 1 |
| 2010–12 Insight Front Passenger’s Airbag Inflator Kit | 04790-TM8-407 | 1 |
| 2009–12 Pilot Front Passenger’s Airbag Inflator Kit | 04790-SZA-407 | 1 |
NOTE:
- The inflator kit box must be used to return the recalled inflator to its supplier. Be careful not to damage the inflator kit box.
- If the recalled, undeployed inflator is not returned, the warranty claim for that vehicle will be charged back to your dealership.
- To return the undeployed inflators, follow the shipping instructions outlined in PIB A15-0002, Inflator Kit Return Process.
- Parts staff can scan the part number and serial number from the outside of the box into the warranty claim by using the Controlled Part Serial No. screen and scanning the applicable information. Refer to the Job Aid Ordering and Managing Replacement Inflators for more information.
WARRANTY CLAIM INFORMATION
NOTE:
- Process claims as quickly as possible so that resources can be properly allocated.
- To avoid non-payment of warranty claims, the serial number on the box of the new airbag inflator must be entered into the warranty claim. For more information, refer to step 6 (Accord, Civic, CR-V, and Fit), step 9 (Insight), and step 7 (Pilot) of REPAIR PROCEDURE.
- To avoid a warranty claim being charged back to your dealership, you must return the recalled, undeployed inflator to its supplier. Follow the shipping instructions outlined in PIB A15-0002, Inflator Kit Return Process.
- The serial number is encoded into the bar code printed on the label inside of the box and on a label attached to the outside of the box. If your dealership uses a scanner, you can scan the serial number from either place into the claim.
- The part number is encoded into a barcode attached to the outside of the box. If your dealership uses a scanner, you can scan the part number into the claim.
- If you confuse the serial number and part number when entering the claim information, your claim will automatically be rejected.
- For more information about scanning and filing airbag inflator recall claims, refer to Ordering and Managing Replacement Inflators. From the iN, select Service, Warranty, then Claims Reference Guide. Under HOT TIPS/TOPICS, select Ordering and Managing Replacement Inflators.
- Each VIN is assigned to a specific campaign. Make sure you file a claim using the correct warranty claim information to avoid your claim being rejected. Replacing the front passenger’s airbag inflator
| Year/ Model | Operation Number | Replacement Part Number | Flat Rate Time | Defect Code | Symptom Code | Template ID | Failed Part Number |
|---|---|---|---|---|---|---|---|
| 2008–12 Accord | 7540A3 | 04790-TA0-407 | 0.7 hr. | 6EB00 | KE100 | 17-002A | 77820-TA0-A80ZC |
| 2010–12 Accord | 7540A3 | 04790-TA0-407 | 0.7 hr. | 6EB00 | KE100 | 17-002B | 77820-TA0-A80ZC |
| 2006–11 Civic
(Includes CNG & Hybrid) |
7540A3 | 04790-SNA-407 | 0.8 hr. | 6EB00 | KE100 | 17-002C | 77820-SNA-A82ZA |
| 2007–11 CR-V | 7540A3 | 04790-SWA-407 | 0.7 hr. | 6EB00 | KE100 | 17-002D | 77820-SWA-A80ZA |
| 2009–12 Fit | 7540A3 | 04790-TK6-407 | 0.9 hr. | 6EB00 | KE100 | 17-002E | 77820-TK6-A80ZA |
| 2010–12 Insight | 7540A3 | 04790-TM8-407 | 0.6 hr. | 6EB00 | KE100 | 17-002F | 77820-TM8-A80ZB |
| 2009–12 Pilot | 7540A3 | 04790-SZA-407 | 0.6 hr. | 6EB00 | KE100 | 17-002G | 77851-SZA-A12 |
Skill Level: Repair Technician
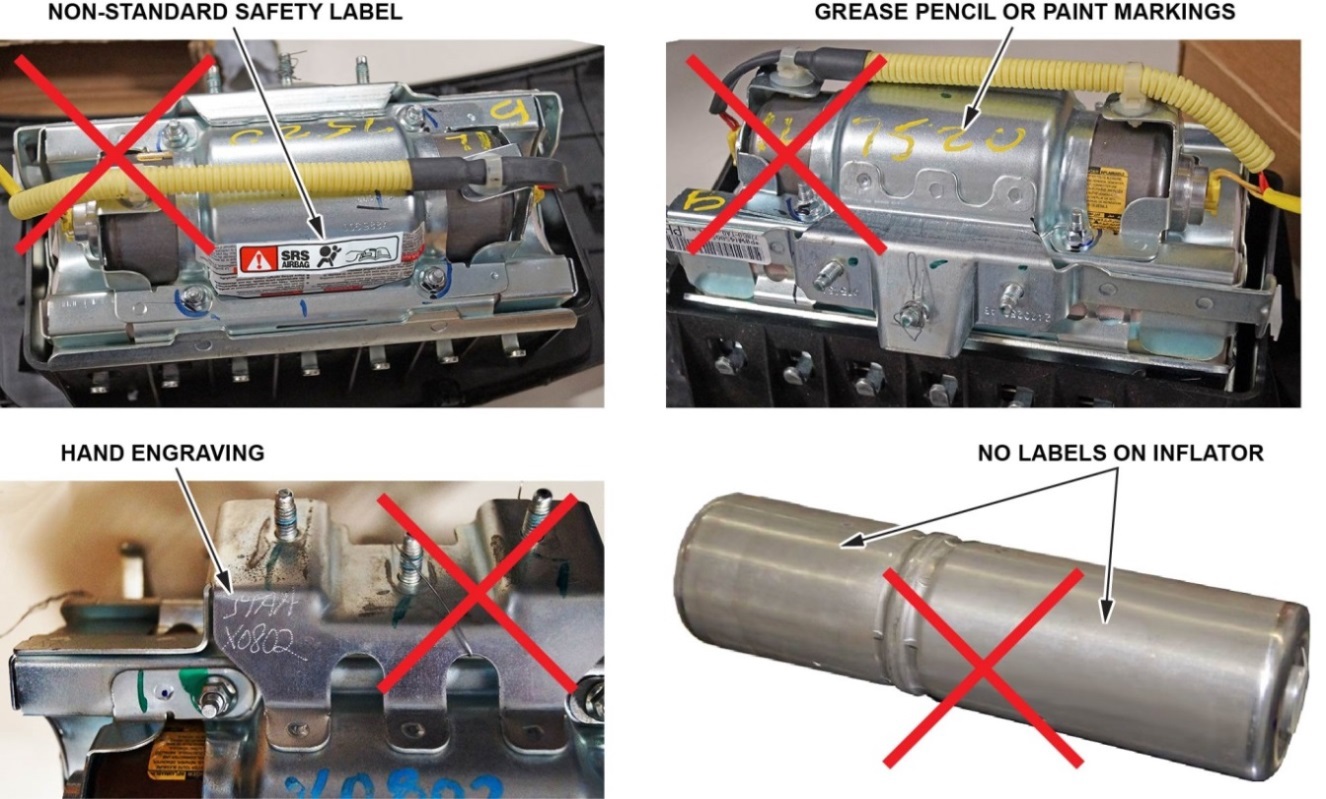
IDENTIFYING COUNTERFEIT AIRBAGS
This section goes over the steps to identify counterfeit airbags and applies to all vehicles in this service bulletin. It is referred to in each vehicle’s repair procedure.

- If there is nothing unusual about the airbag or the inflator, go to the corresponding model repair procedure.
- If there are any unusual markings, like an incorrect label or a model year written in marker, the airbag and inflator may not be the correct airbag and/or inflator for the vehicle or it may be a counterfeit part. For more information about counterfeit airbags, you can refer to gov, enter keywords MANAGING COUNTERFEIT, and select Recommended Dealer Guidance for Managing Counterfeit Air Bags from the list. If you suspect that the airbag or inflator is counterfeit, do not continue this procedure. Contact your DPSM for assistance.
REPAIR PROCEDURE ACCORD/ACCORD CROSSTOUR
NOTE:
- If the VIN status inquiry indicates that the vehicle is subject to any open safety recalls, including a driver’s airbag inflator campaign/recall, make sure to also complete those recall repairs before returning the vehicle to the customer. If you are unable to complete any open recall, advise the customer of the recall status and when the recall could be completed.
- Make sure you have the anti-theft code for the audio and navigation system (if applicable), then write down the frequencies for the audio unit’s preset buttons.
- Be careful not to damage any parts when replacing the inflator, and follow the procedure exactly.
- If, before removing the airbag, you suspect that it may be the incorrect airbag for the vehicle or a counterfeit, do not remove the airbag. Contact your DPSM for assistance.
- Make sure you have reviewed the SRS Precautions and Procedures in the service information before doing the REPAIR PROCEDURE.
- Turn the ignition to ON (II) and check if the SRS indicator comes on for about 6 seconds, then turns off.
- If the indicator comes on, then turns off after about 6 seconds, go to step 2.
- If the indicator does not come on, or if it stays on, contact your DPSM for assistance.
- Disconnect the battery negative cable and wait at least 3 minutes before continuing.
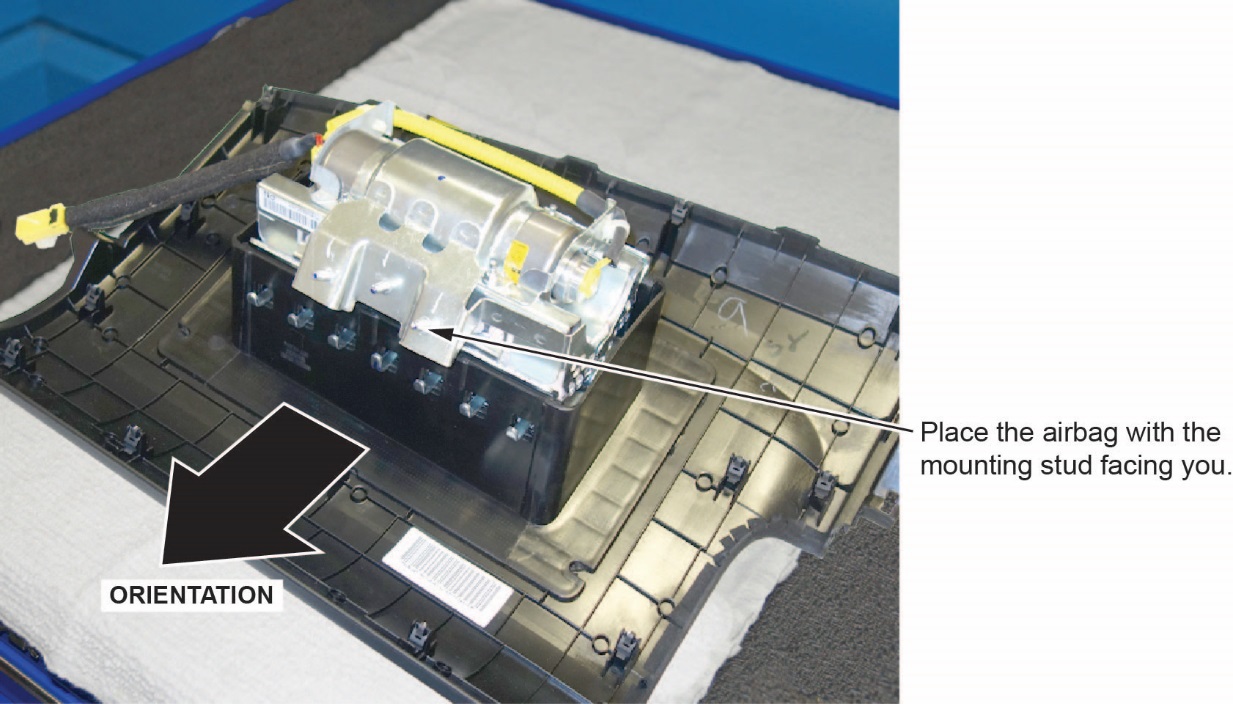
- Remove the front passenger’s airbag by referring to the service information.
- Place the airbag, face-down, on a clean shop towel.
NOTE:
- The orientation of the airbag is critical because if the inflator is installed incorrectly, the harness will be too short when you reinstall the airbag.
- The brackets between the various models are similar but may differ from the example shown.
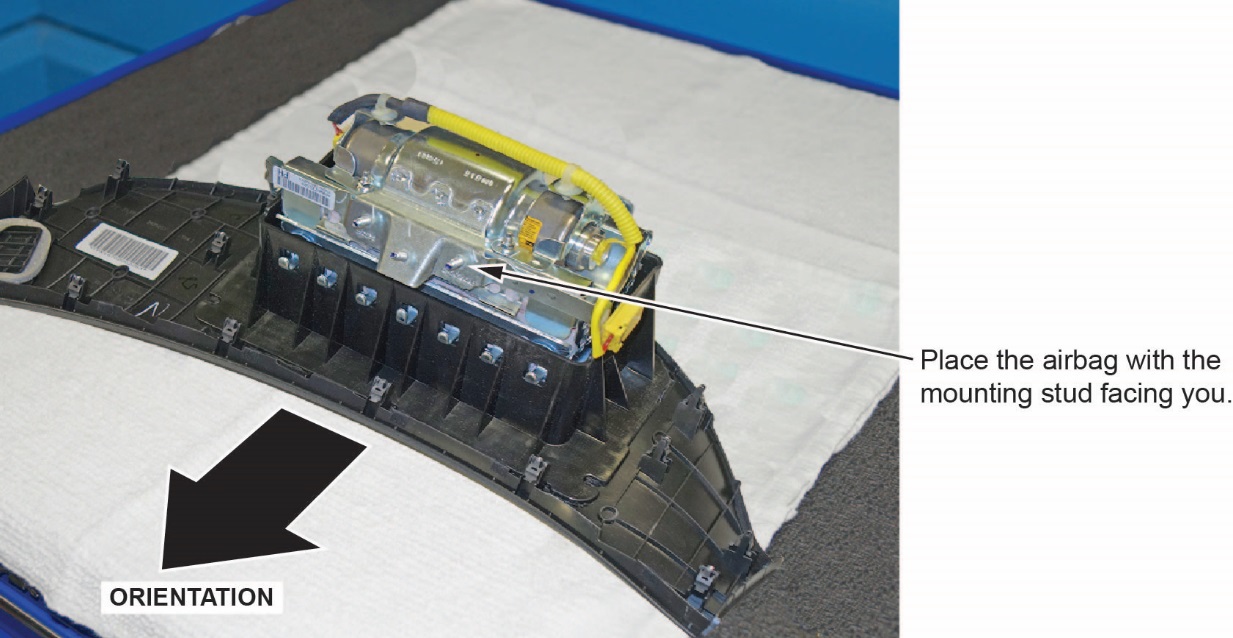
- Visually inspect the airbag and the inflator for any unusual writing or markings. Refer to IDENTIFYING COUNTERFEIT AIRBAGS.
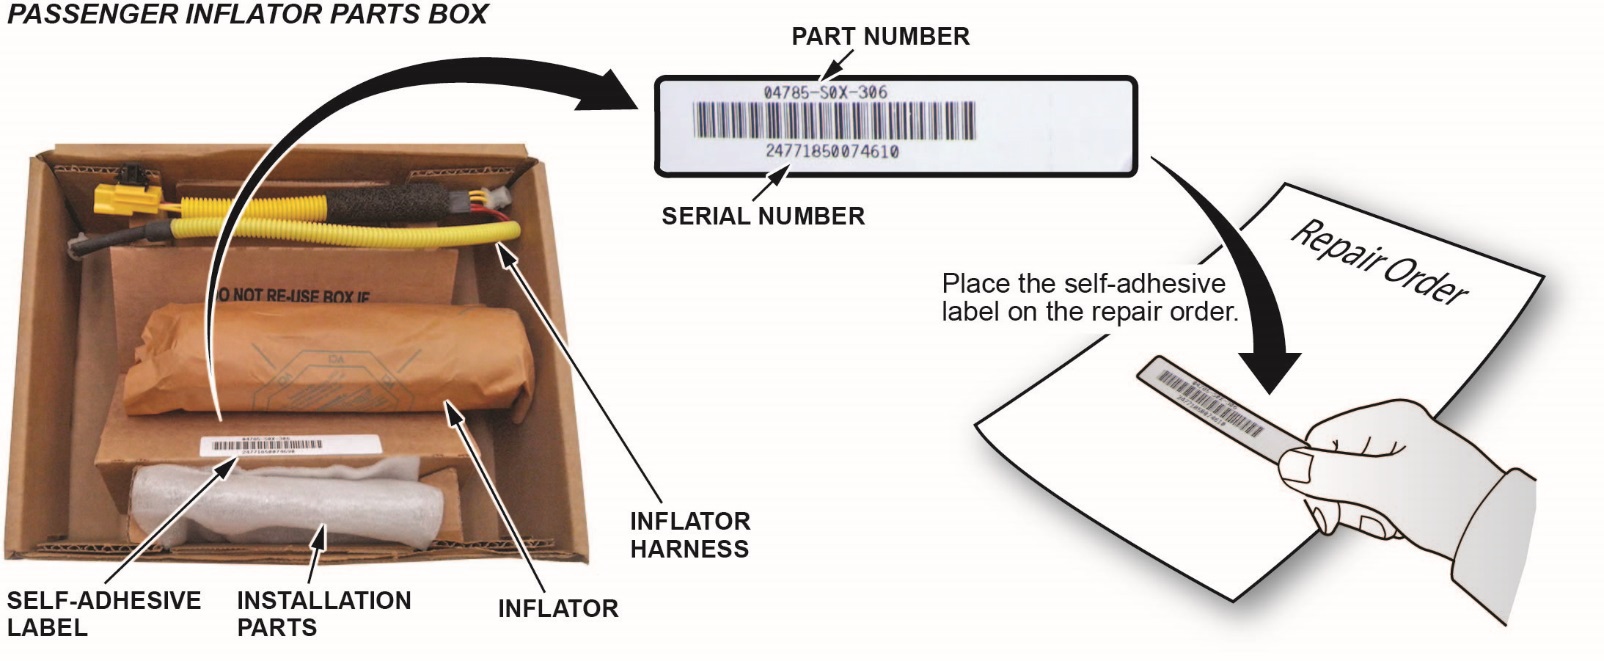
- Peel the label located inside the inflator box from its backing and attach it to the RO. For the warranty claim to be paid, the replacement inflator part number that you received must be included in the warranty claim. NOTE:
- The replacement part number is printed on the top part of the label and the serial number is printed on the bottom. Make sure you attach the label to the RO and give it to the warranty clerk.
- There may also be a colored sticker located in the kit; ignore it because it is not used.
- Not all inflator kits have a label included. In those cases, write the serial number and part number from the side of the inflator box on the RO. The part number always starts with 047.

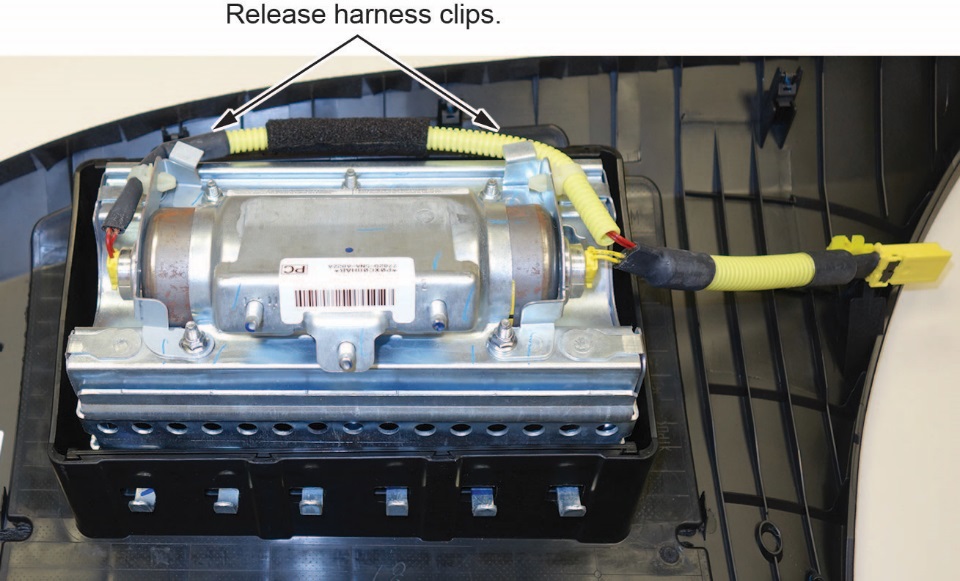
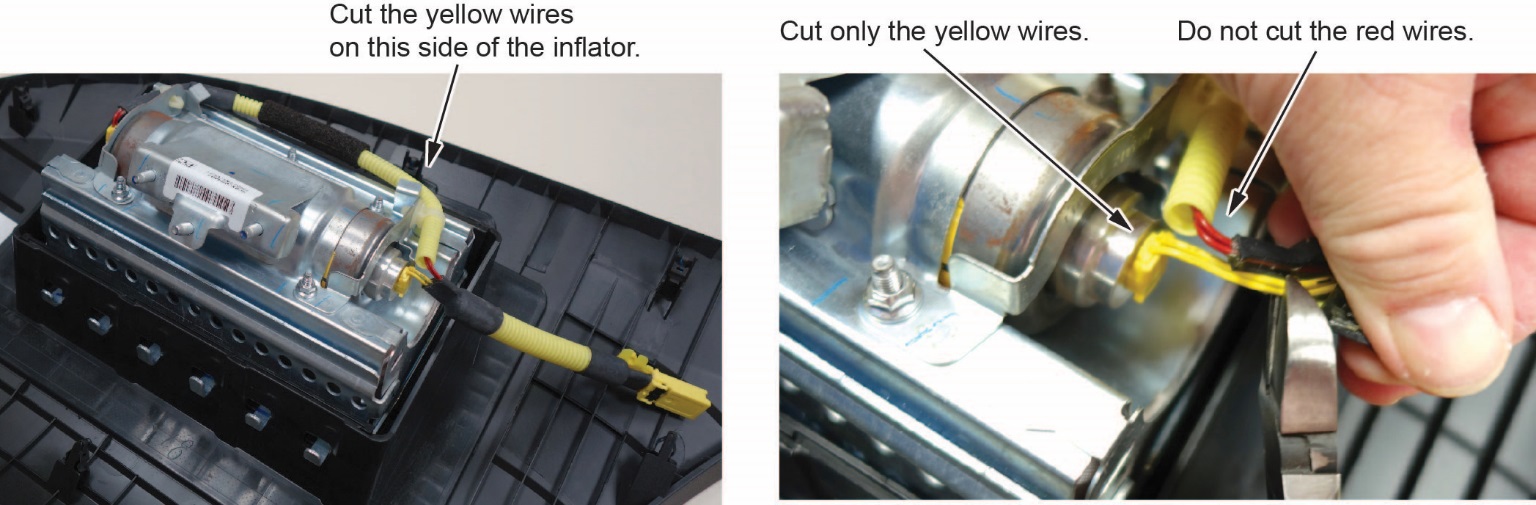
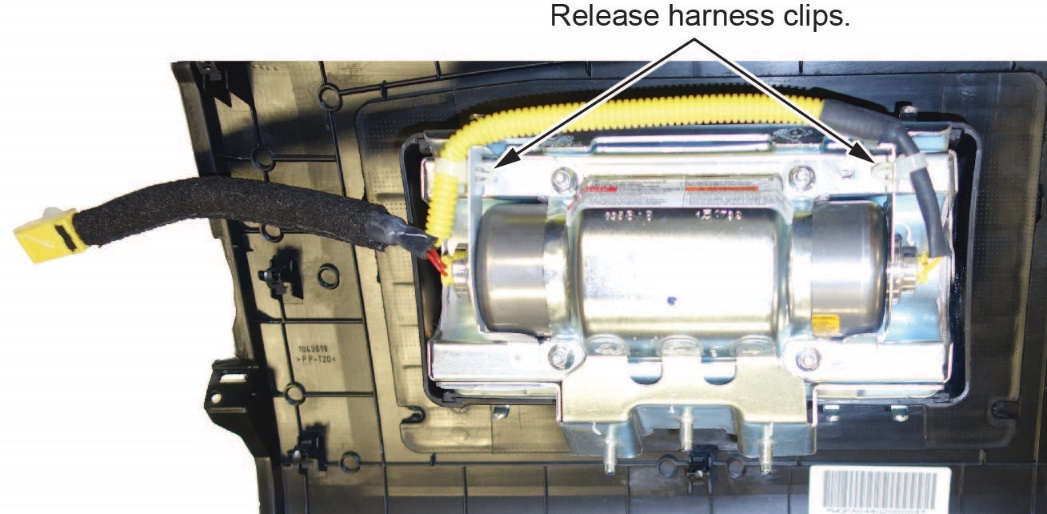
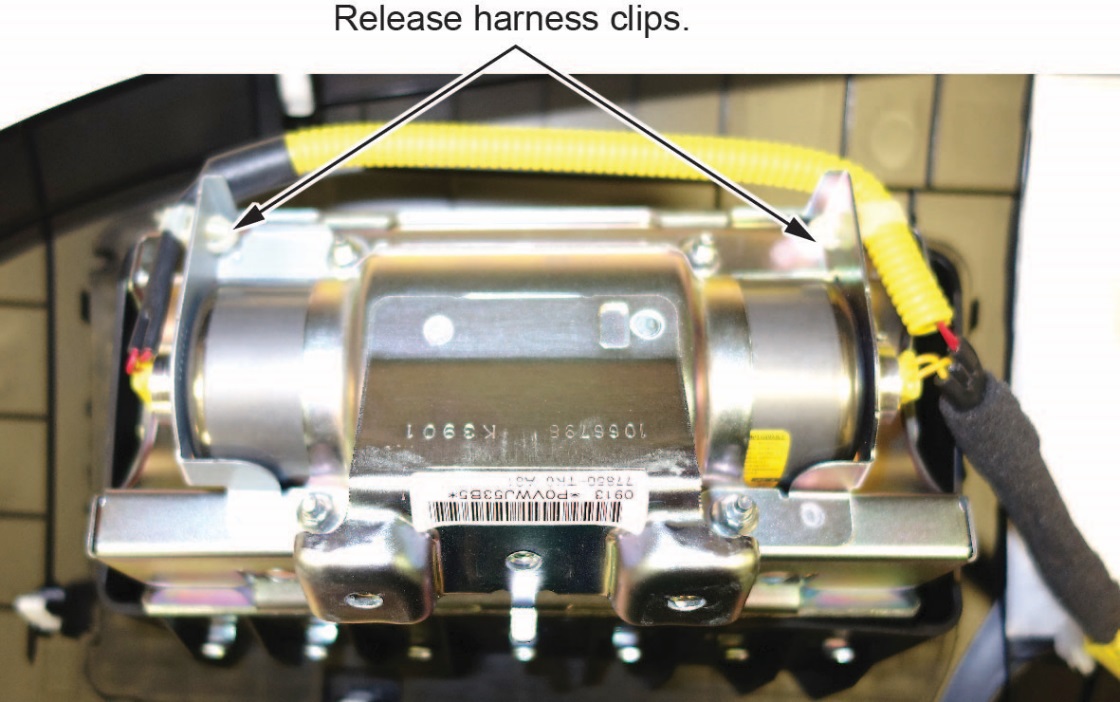
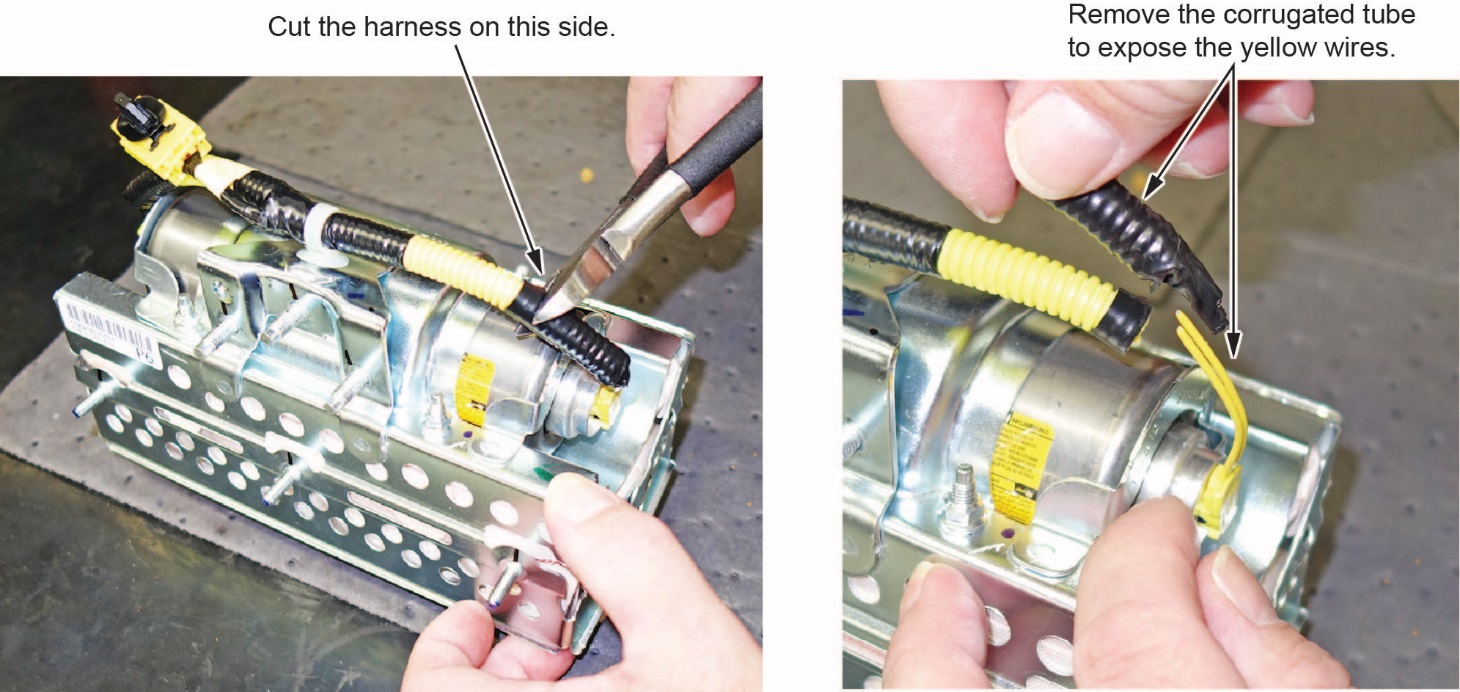
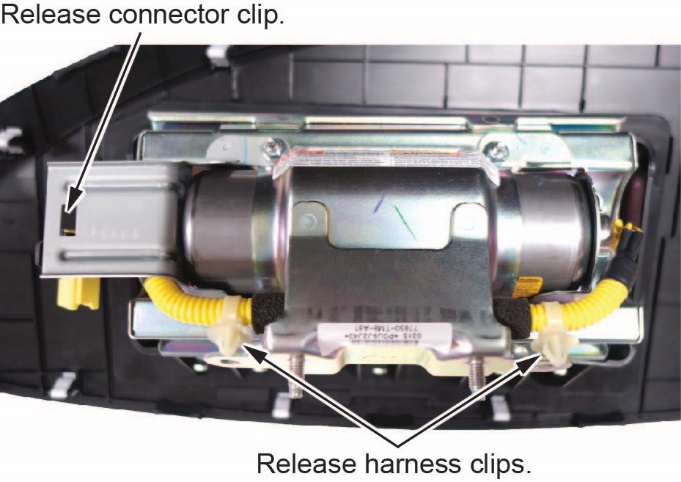
- Remove the harness from both ends of the inflator bracket and release the connector clip.
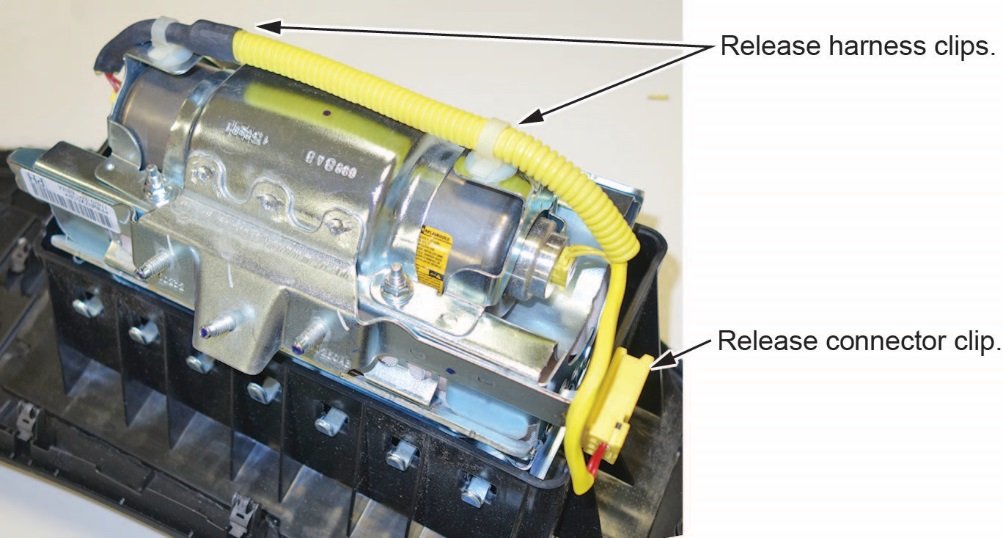
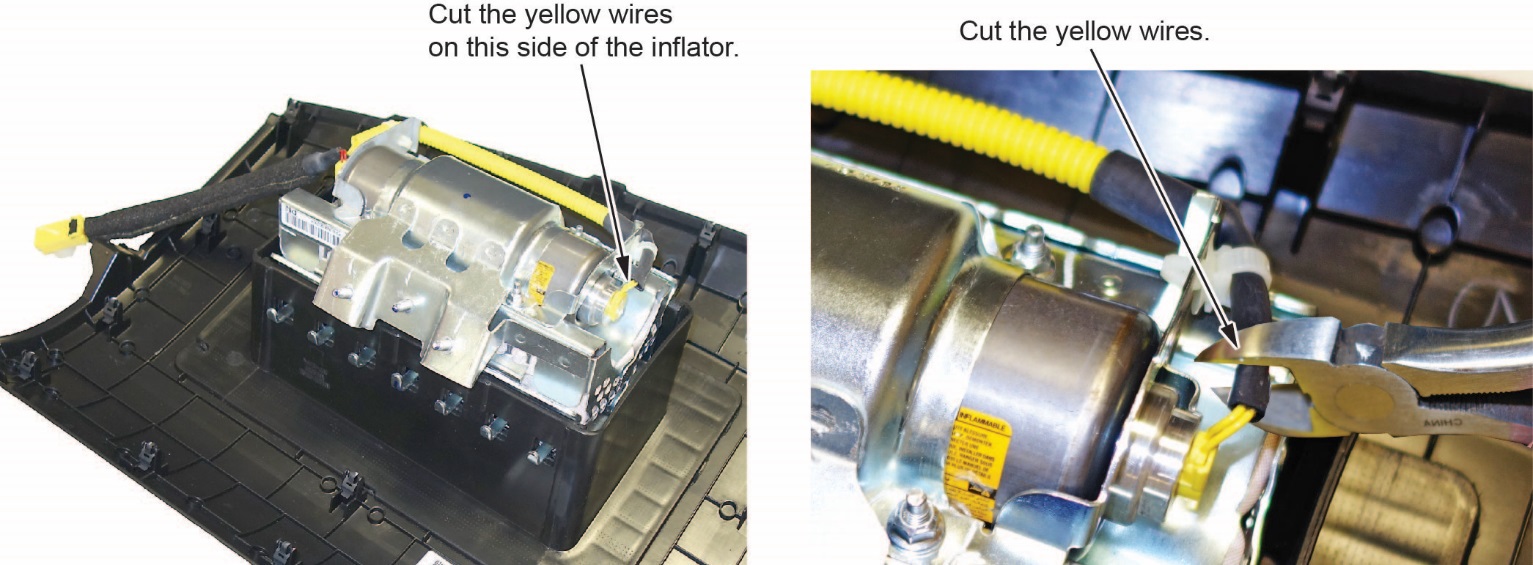
- Short the yellow wires.
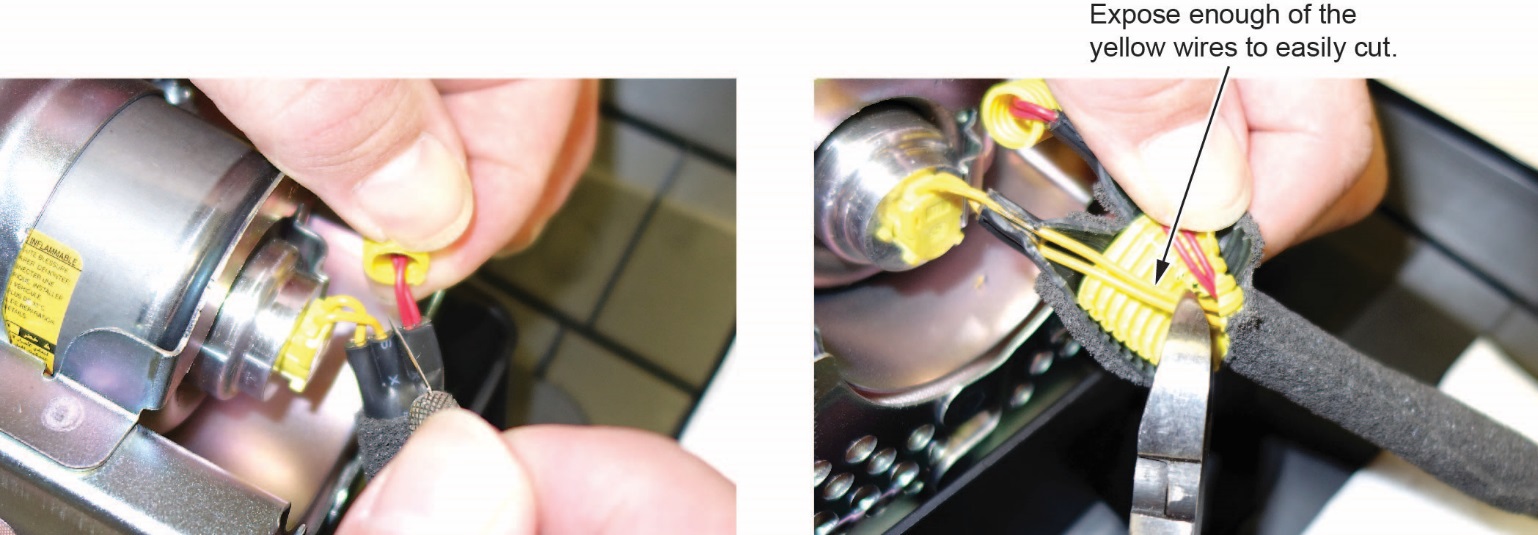
NOTE:
- You must cut the yellow wires for inflator removal and short the yellow wires on the inflator side as indicated to prevent accidental deployment.
- Do not cut the red wires because the airbag connector shorts these inflator wires.
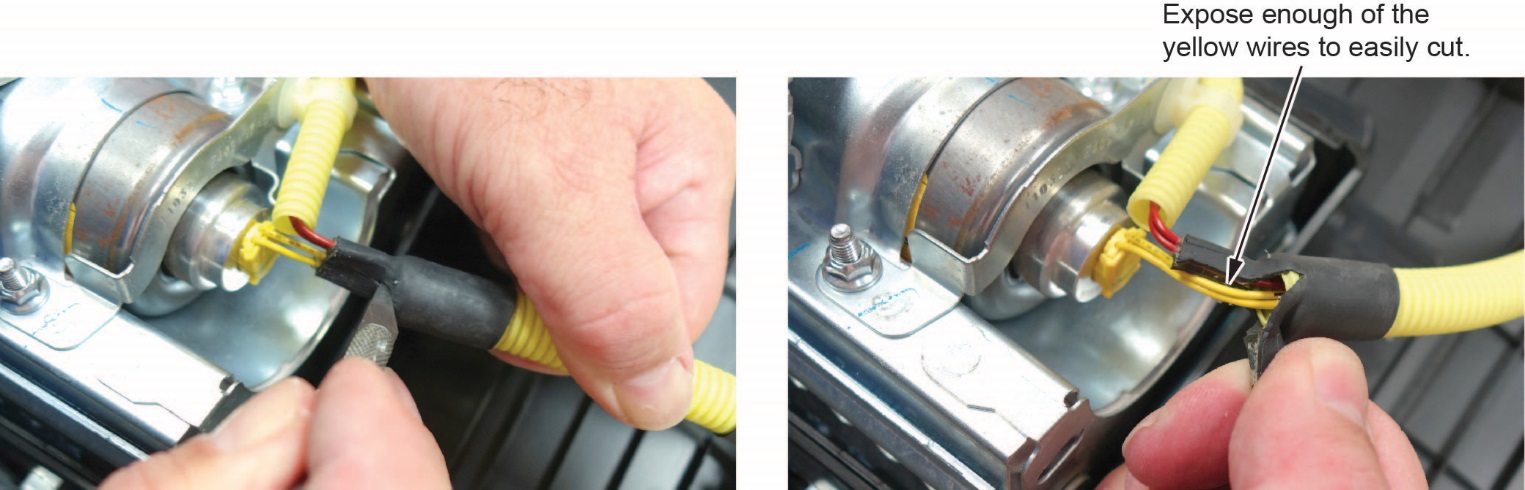
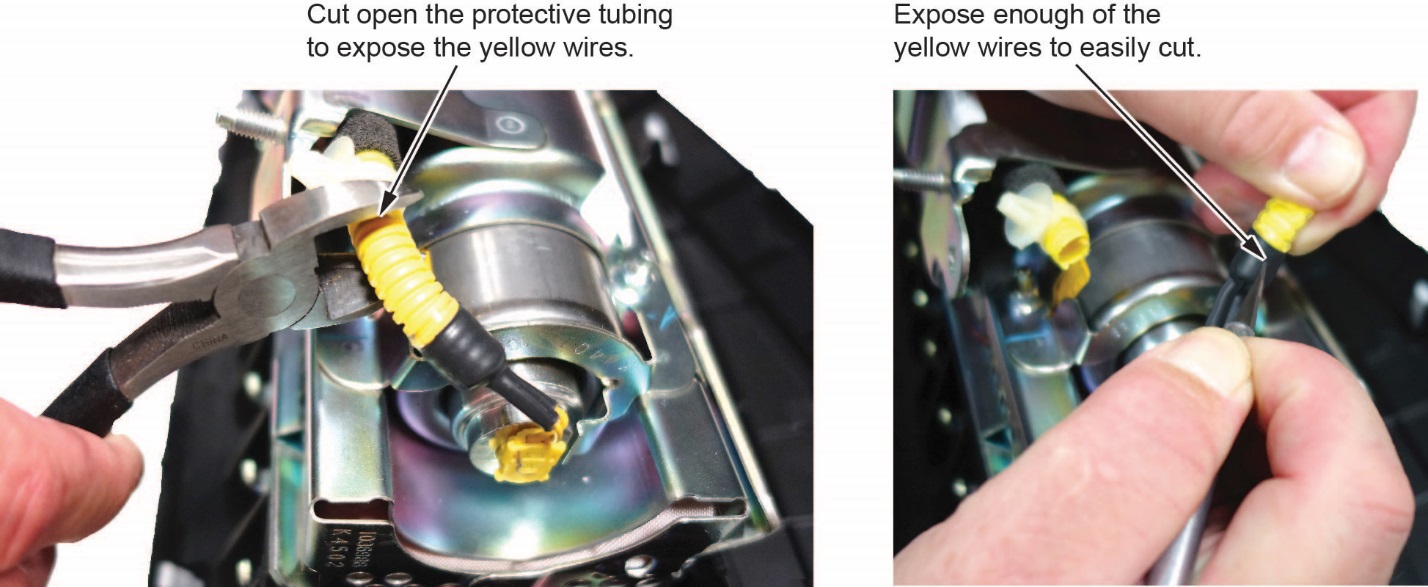
- Cut 1–2 inches of the protective tube to access the yellow wires.
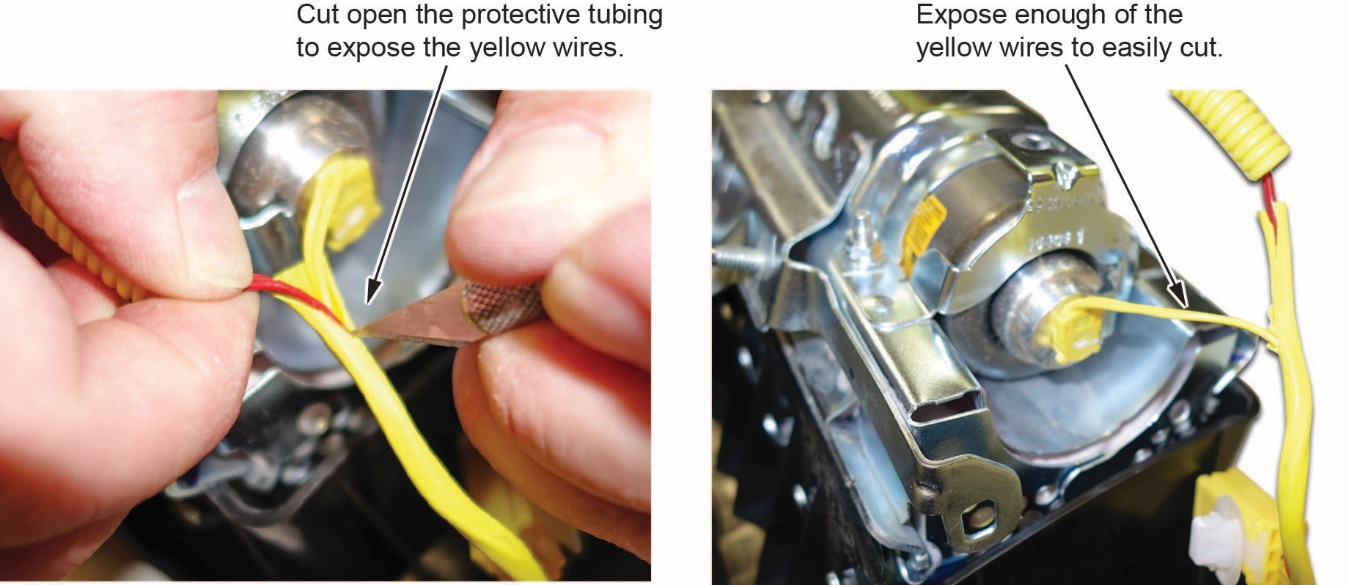
- Cut the yellow wires as shown.
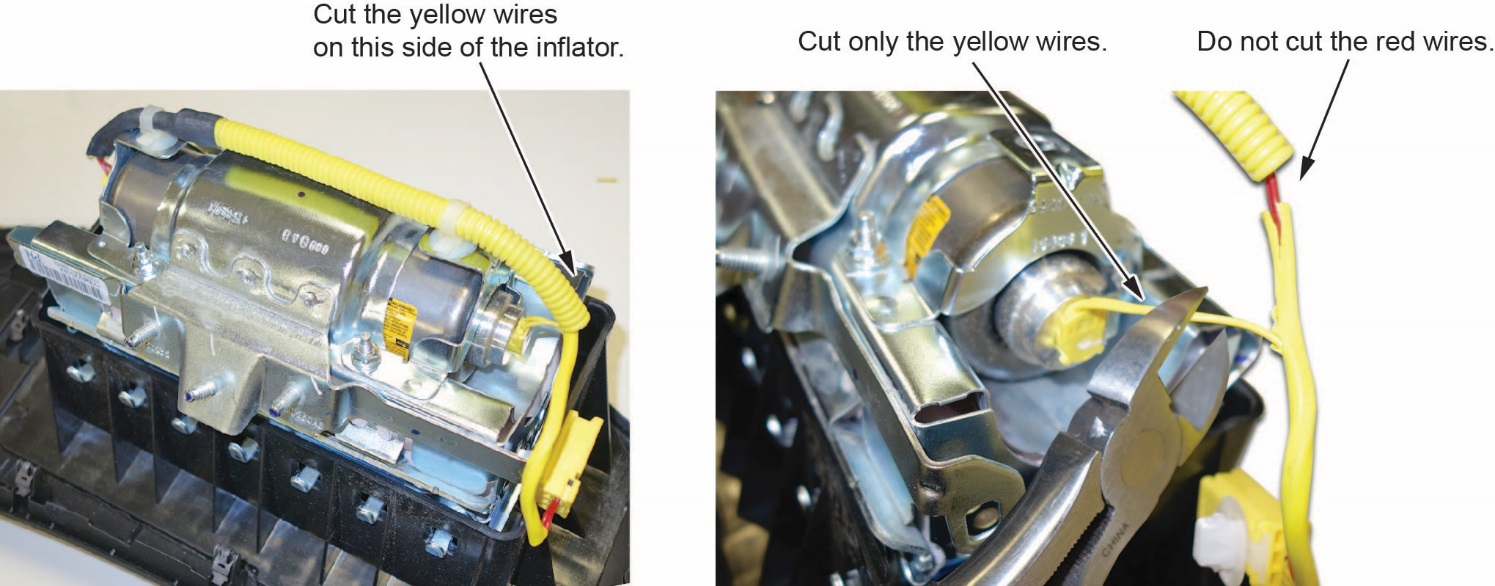
- Strip away about 1 inch of the yellow wire insulation, then twist the wires together.

- Tape the twisted ends with electrical tape.
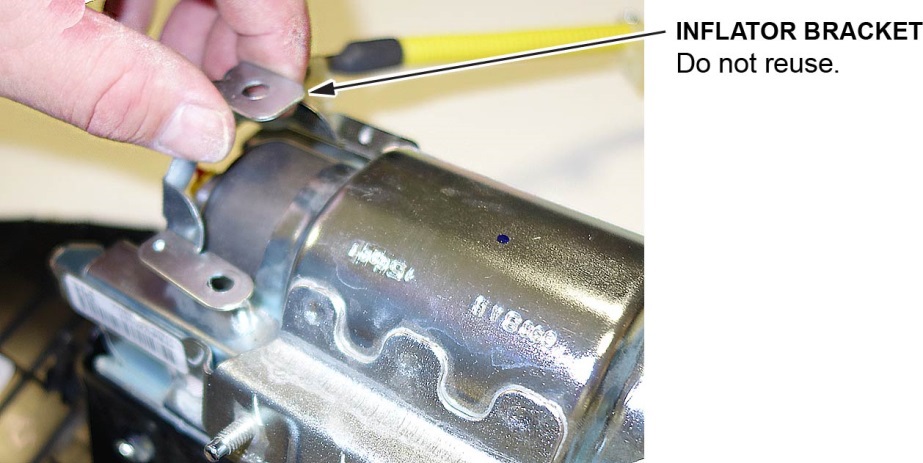
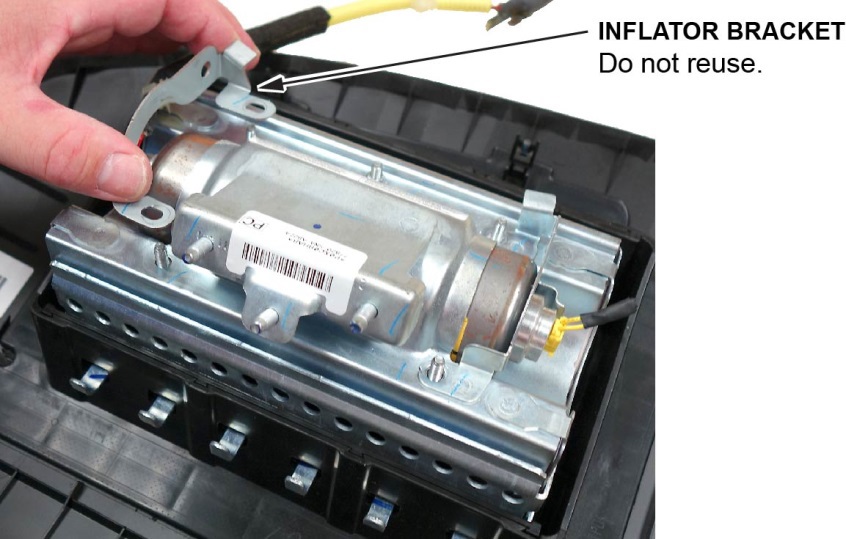
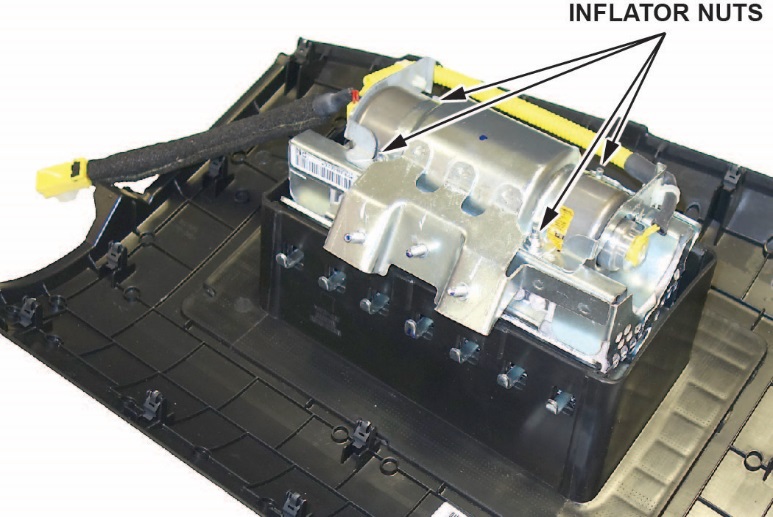
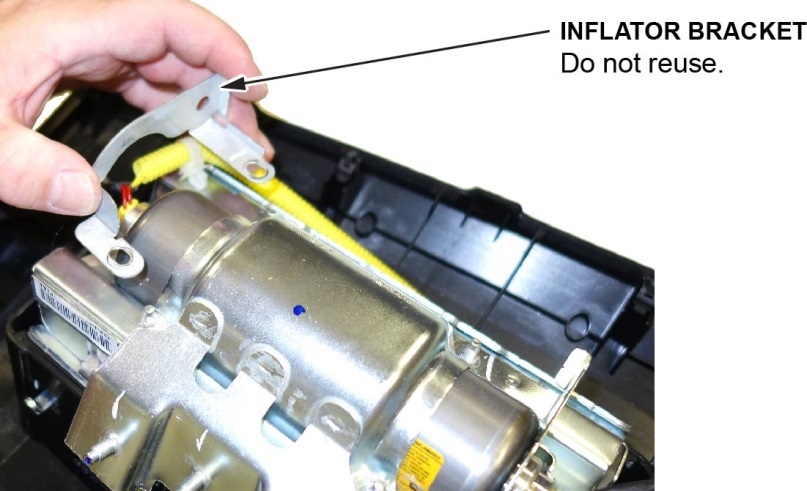
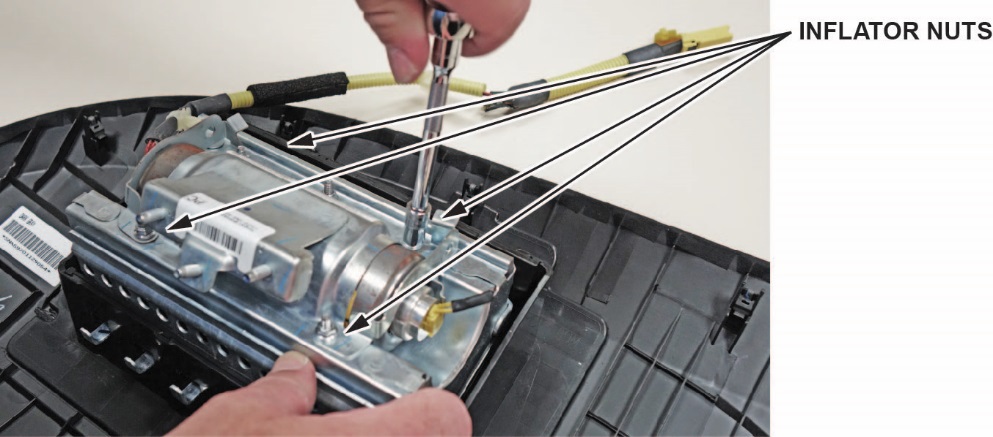
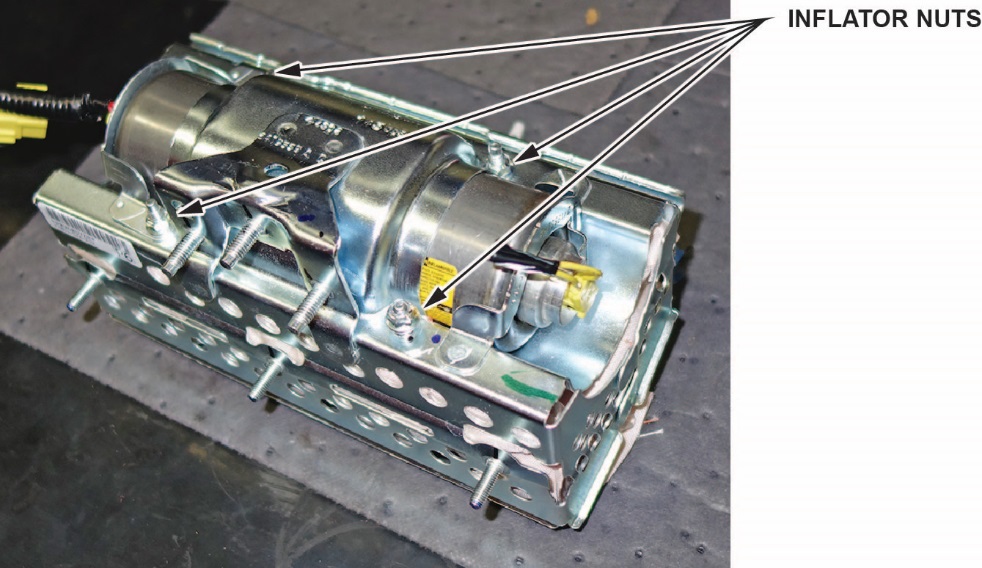
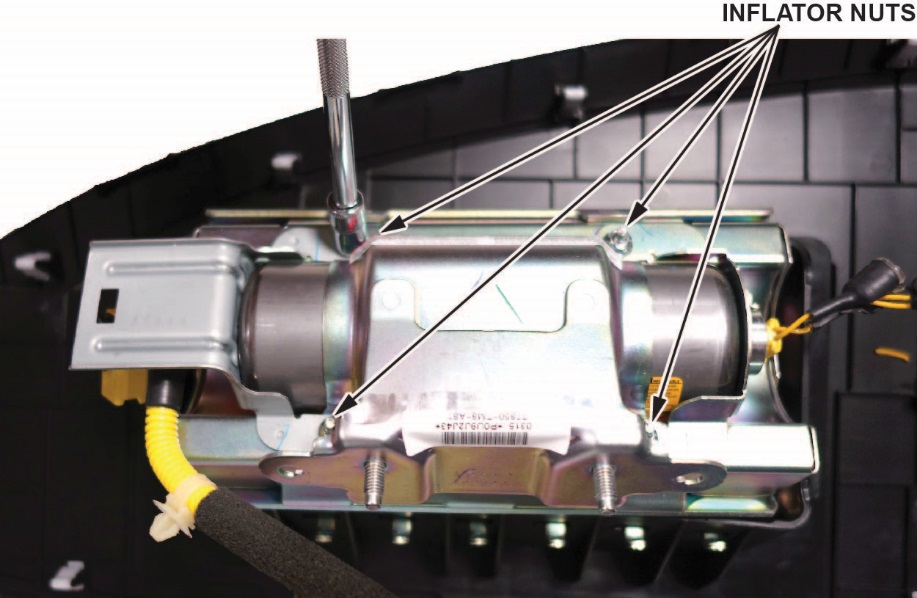
- Remove the four inflator nuts.
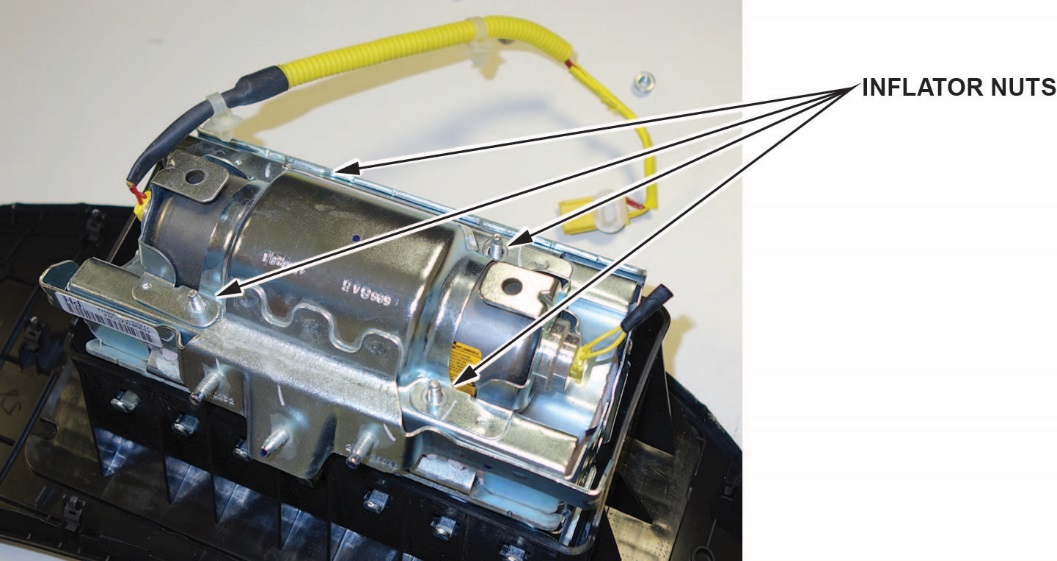
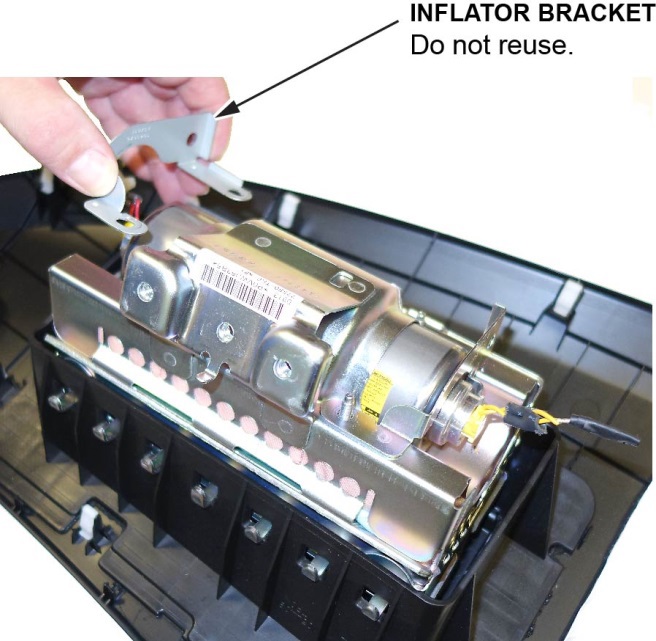
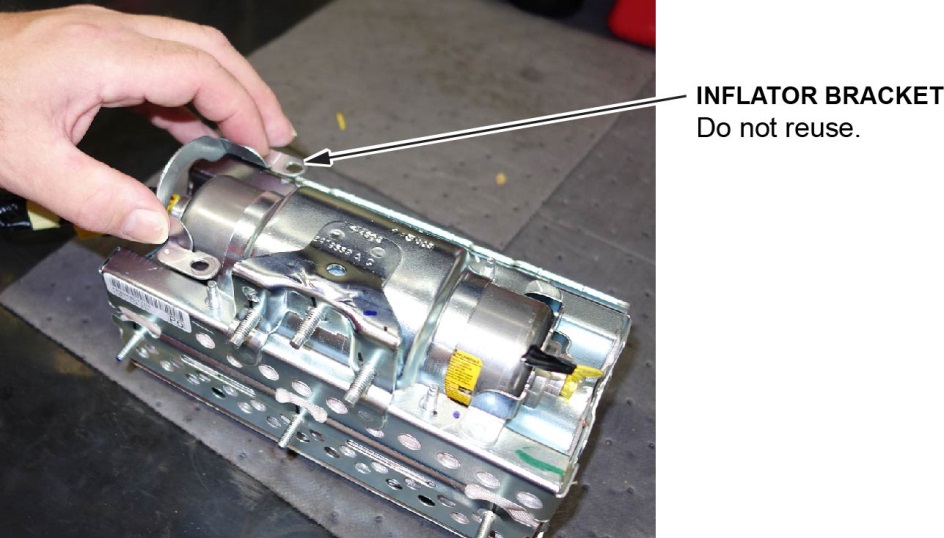
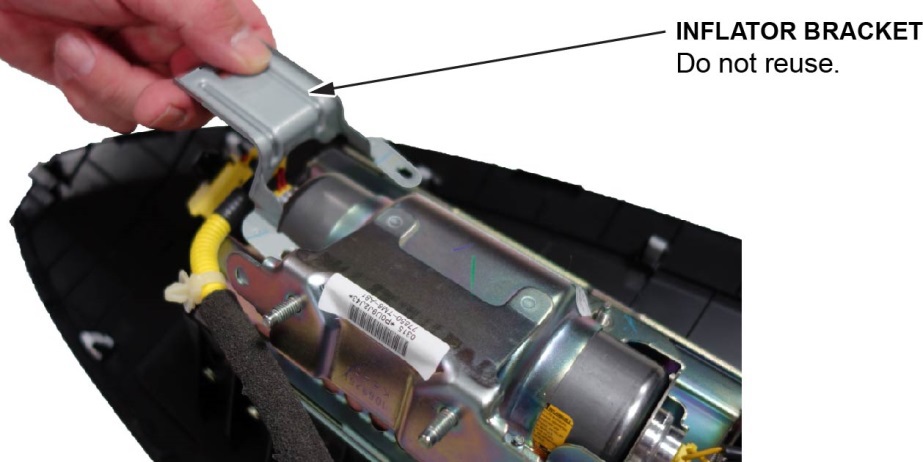
- Remove the inflator bracket.
NOTE:
- You can only remove one of the brackets, as the other is welded to the airbag housing.
- Do not reuse the bracket; use the new one that came in the inflator kit.
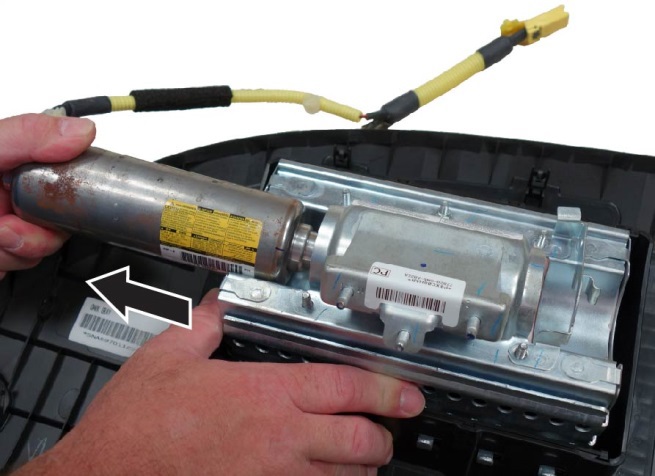
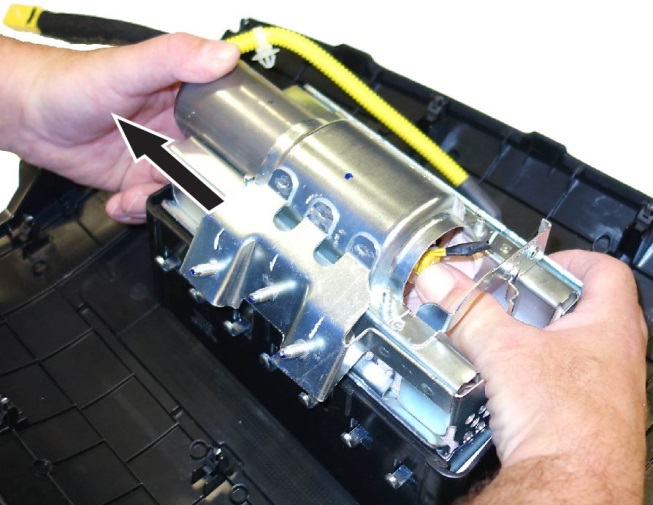
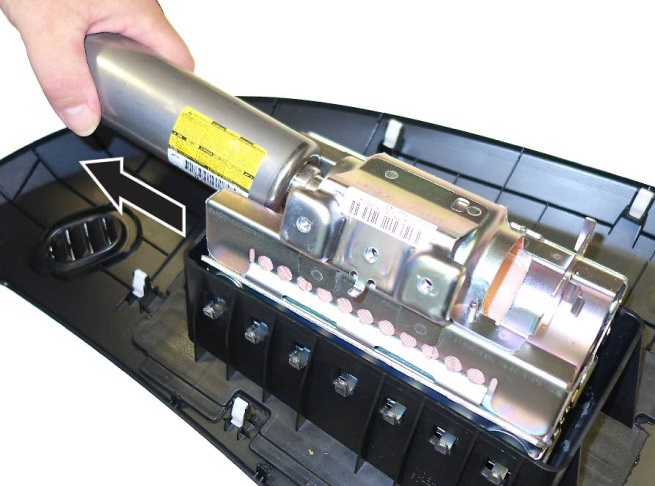
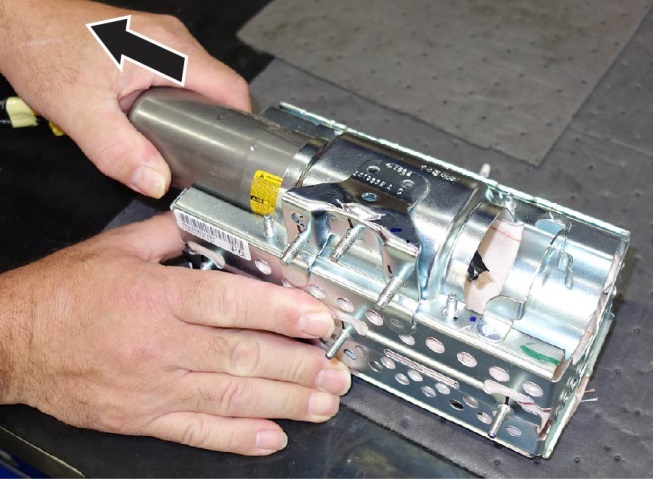
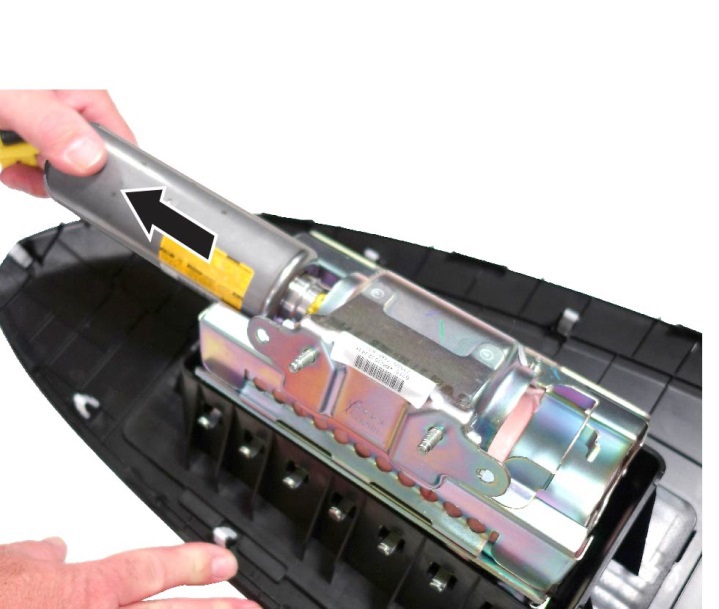
- Remove the inflator by pulling it out.
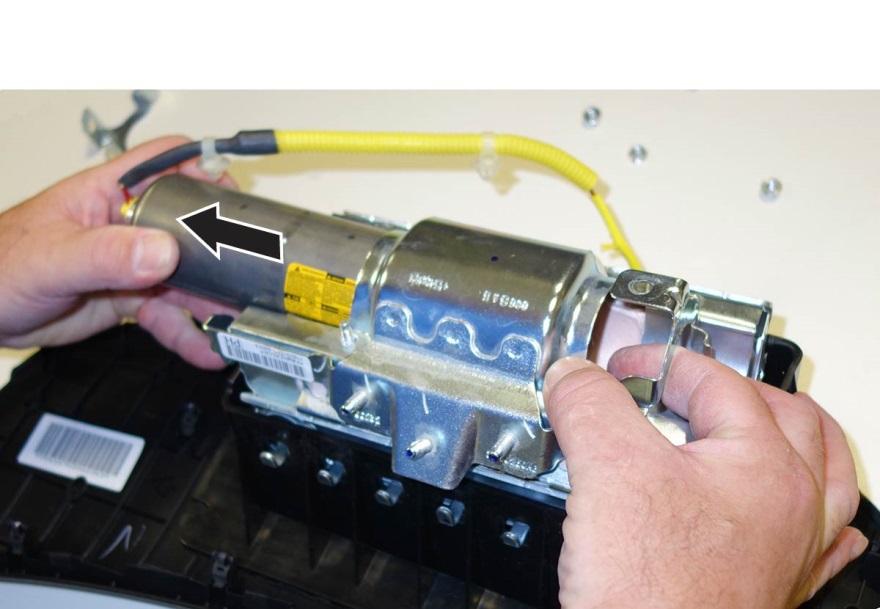
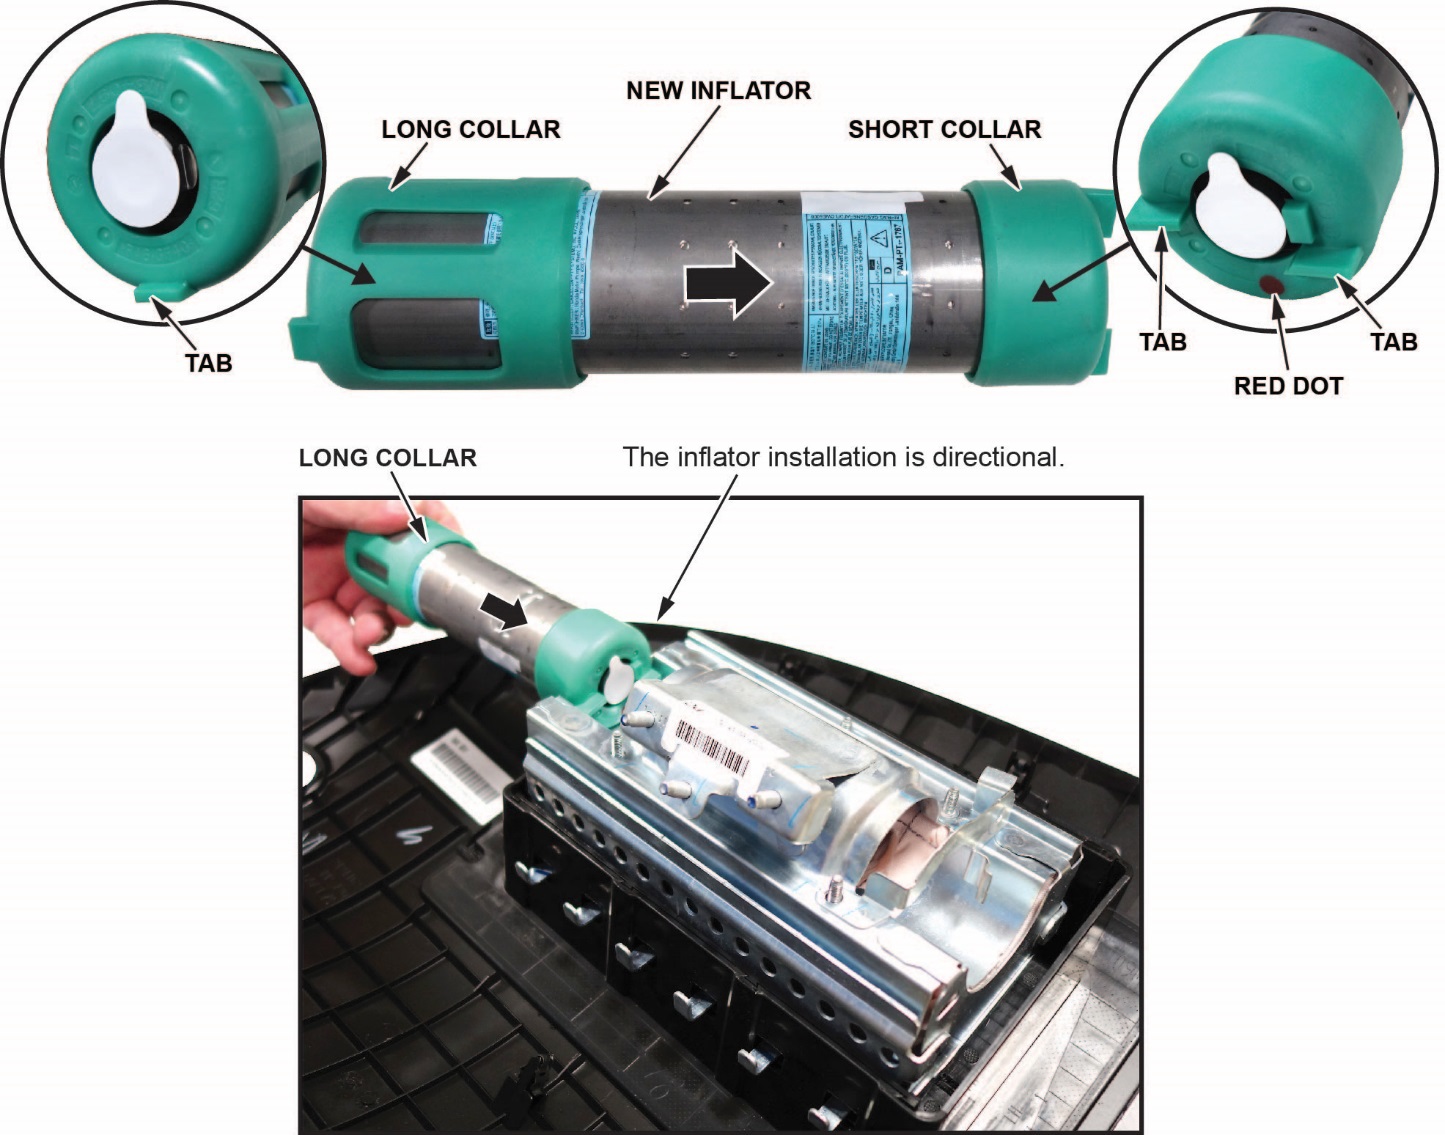
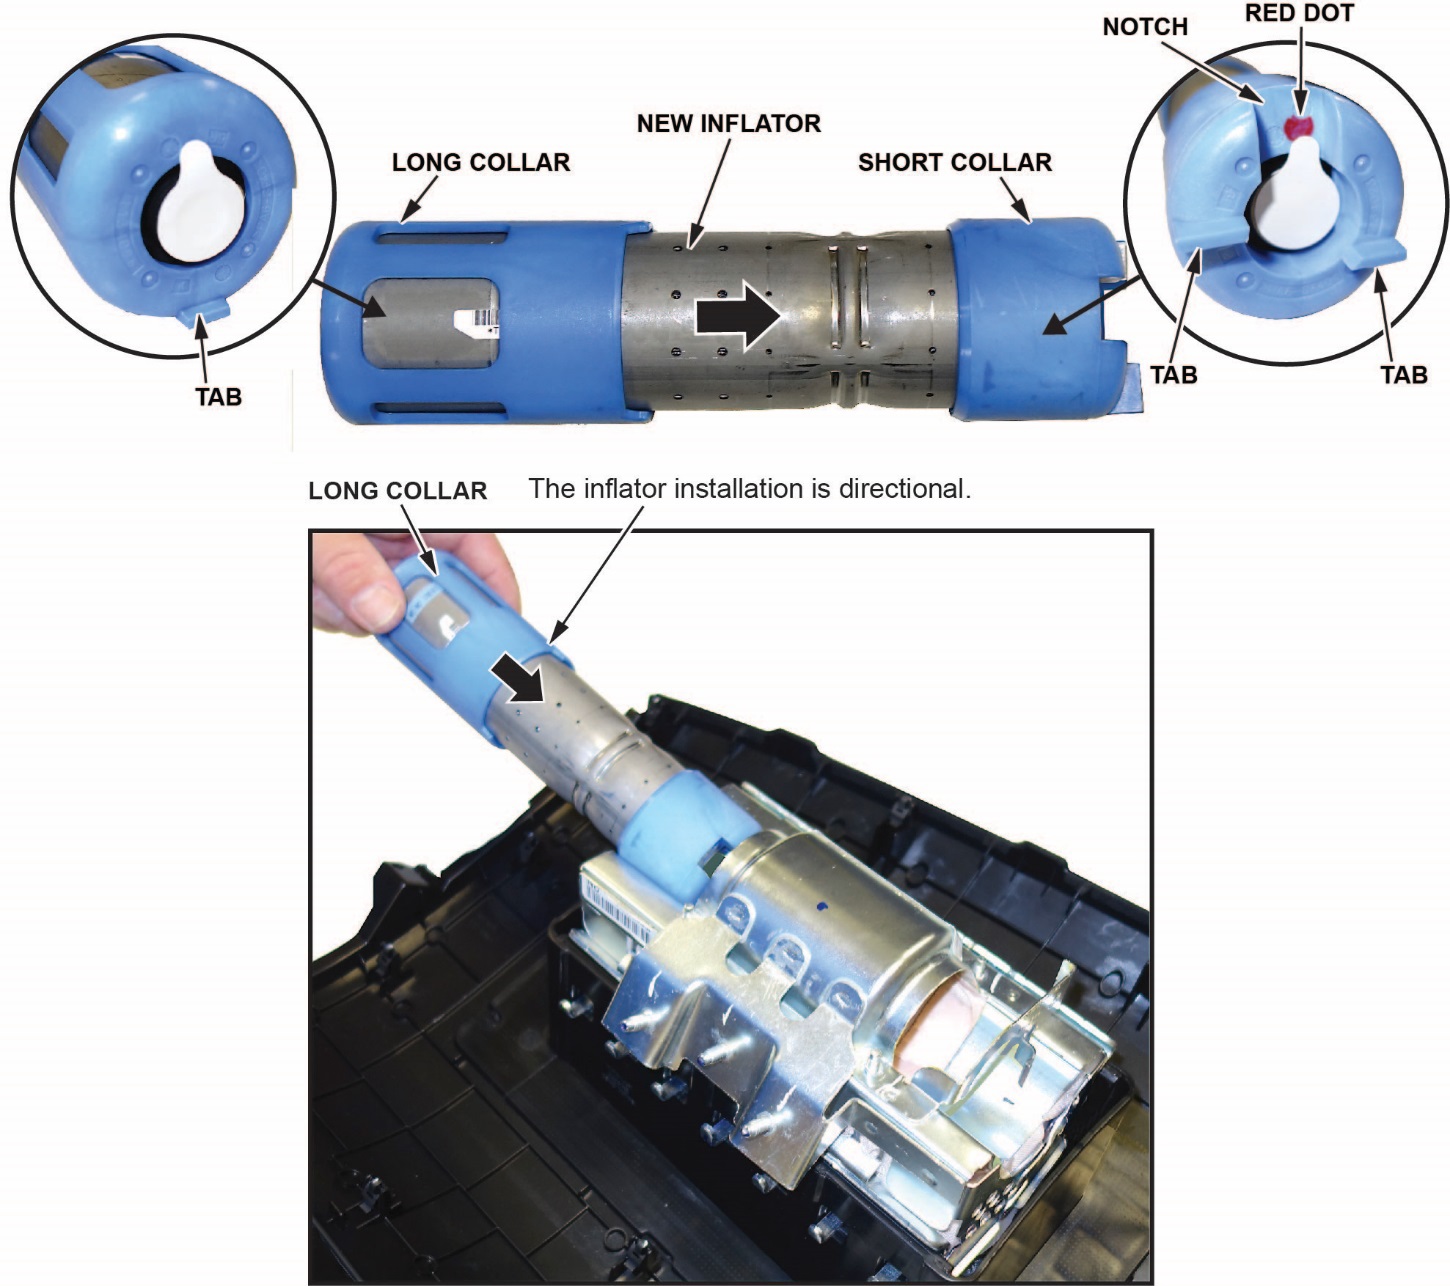
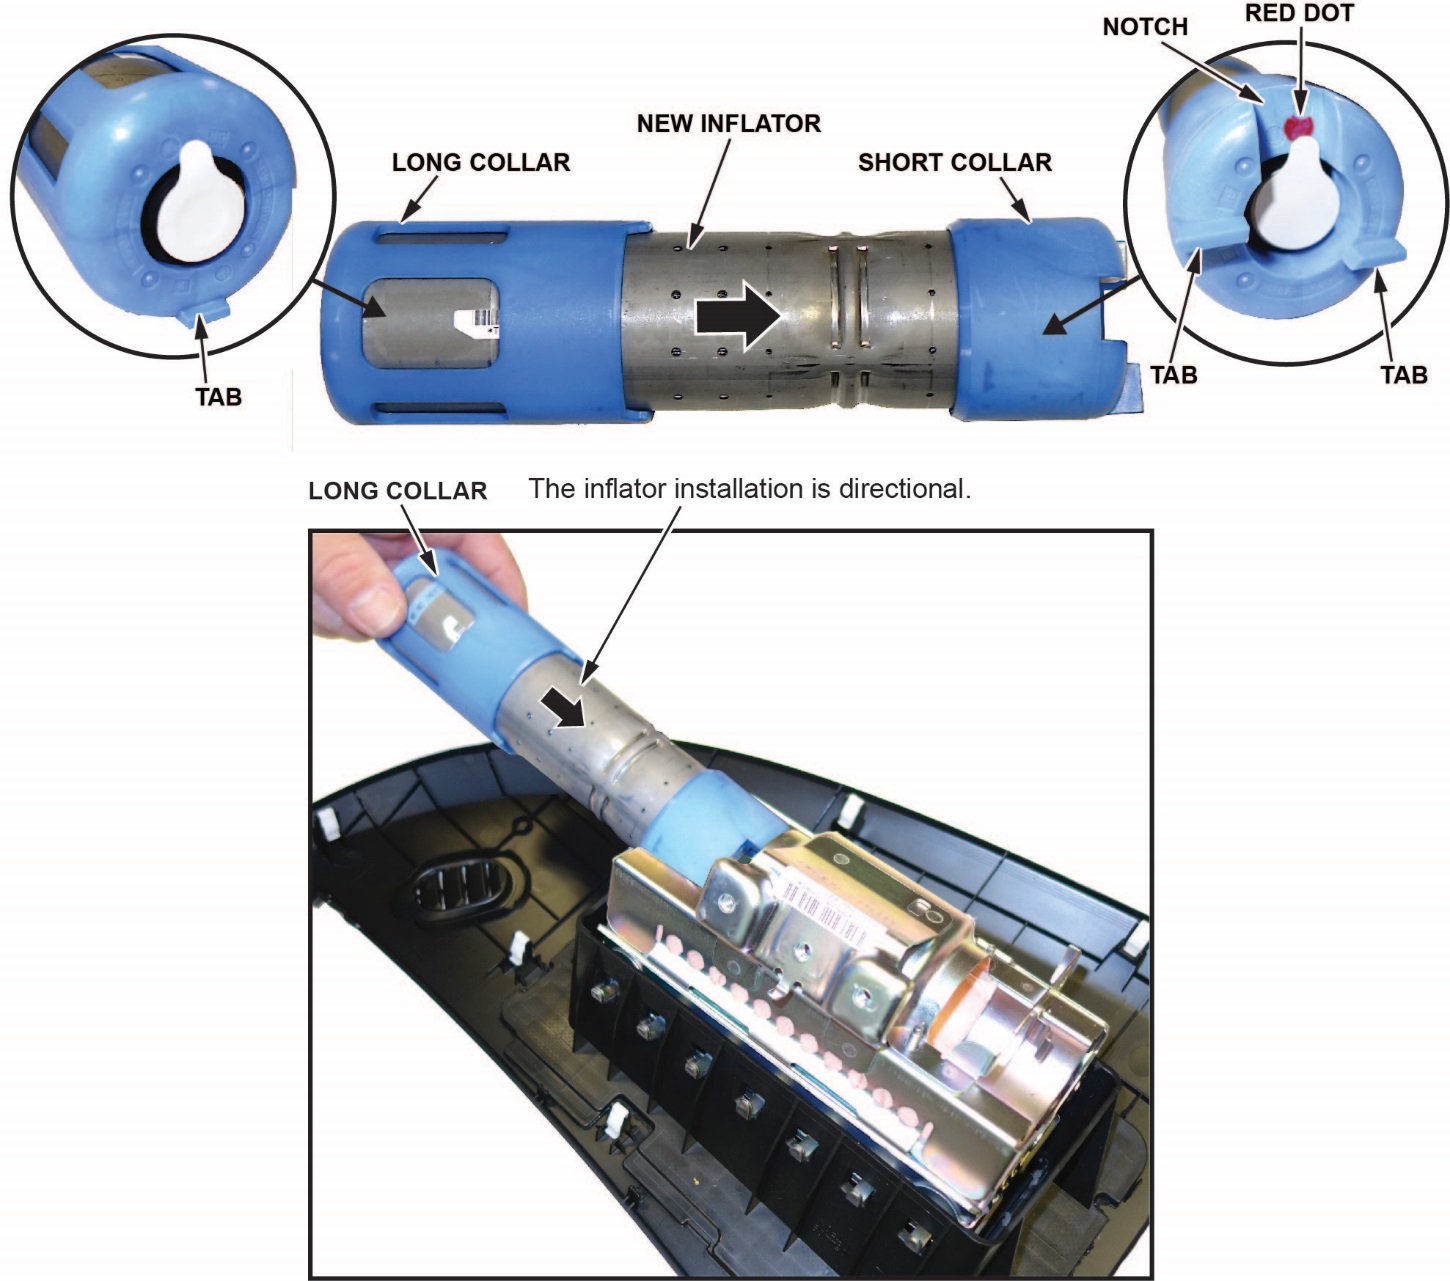
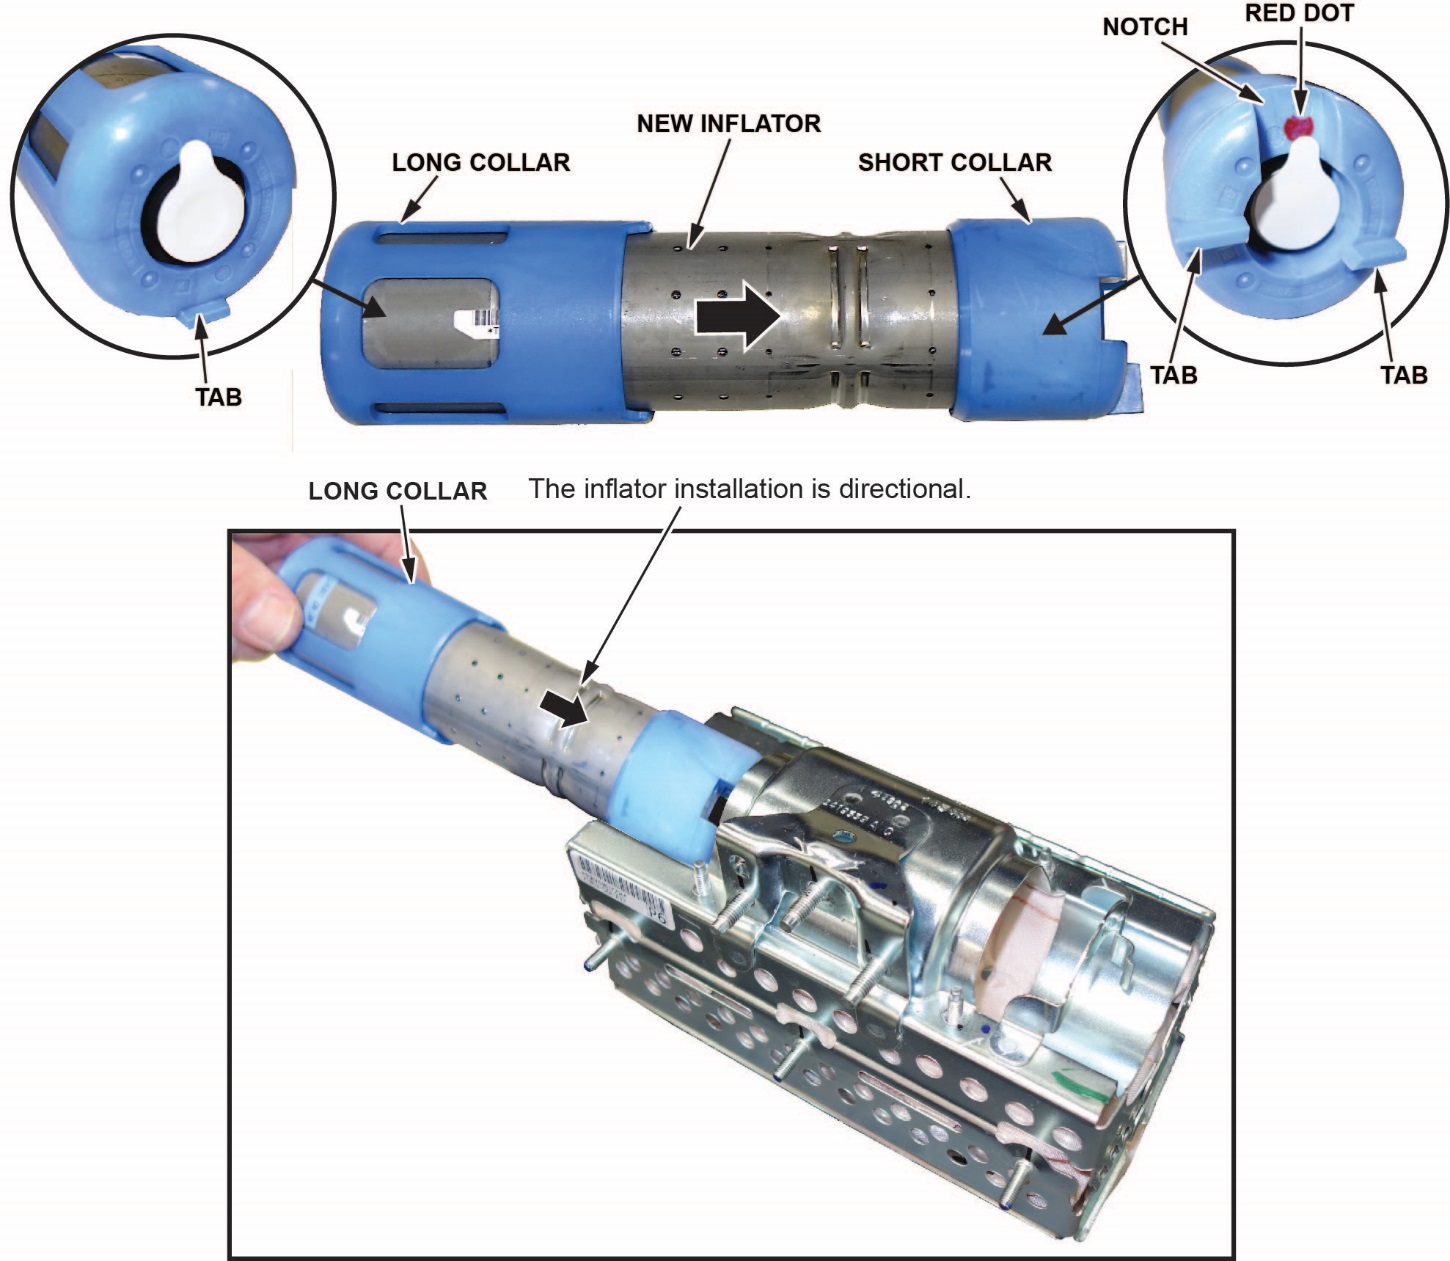
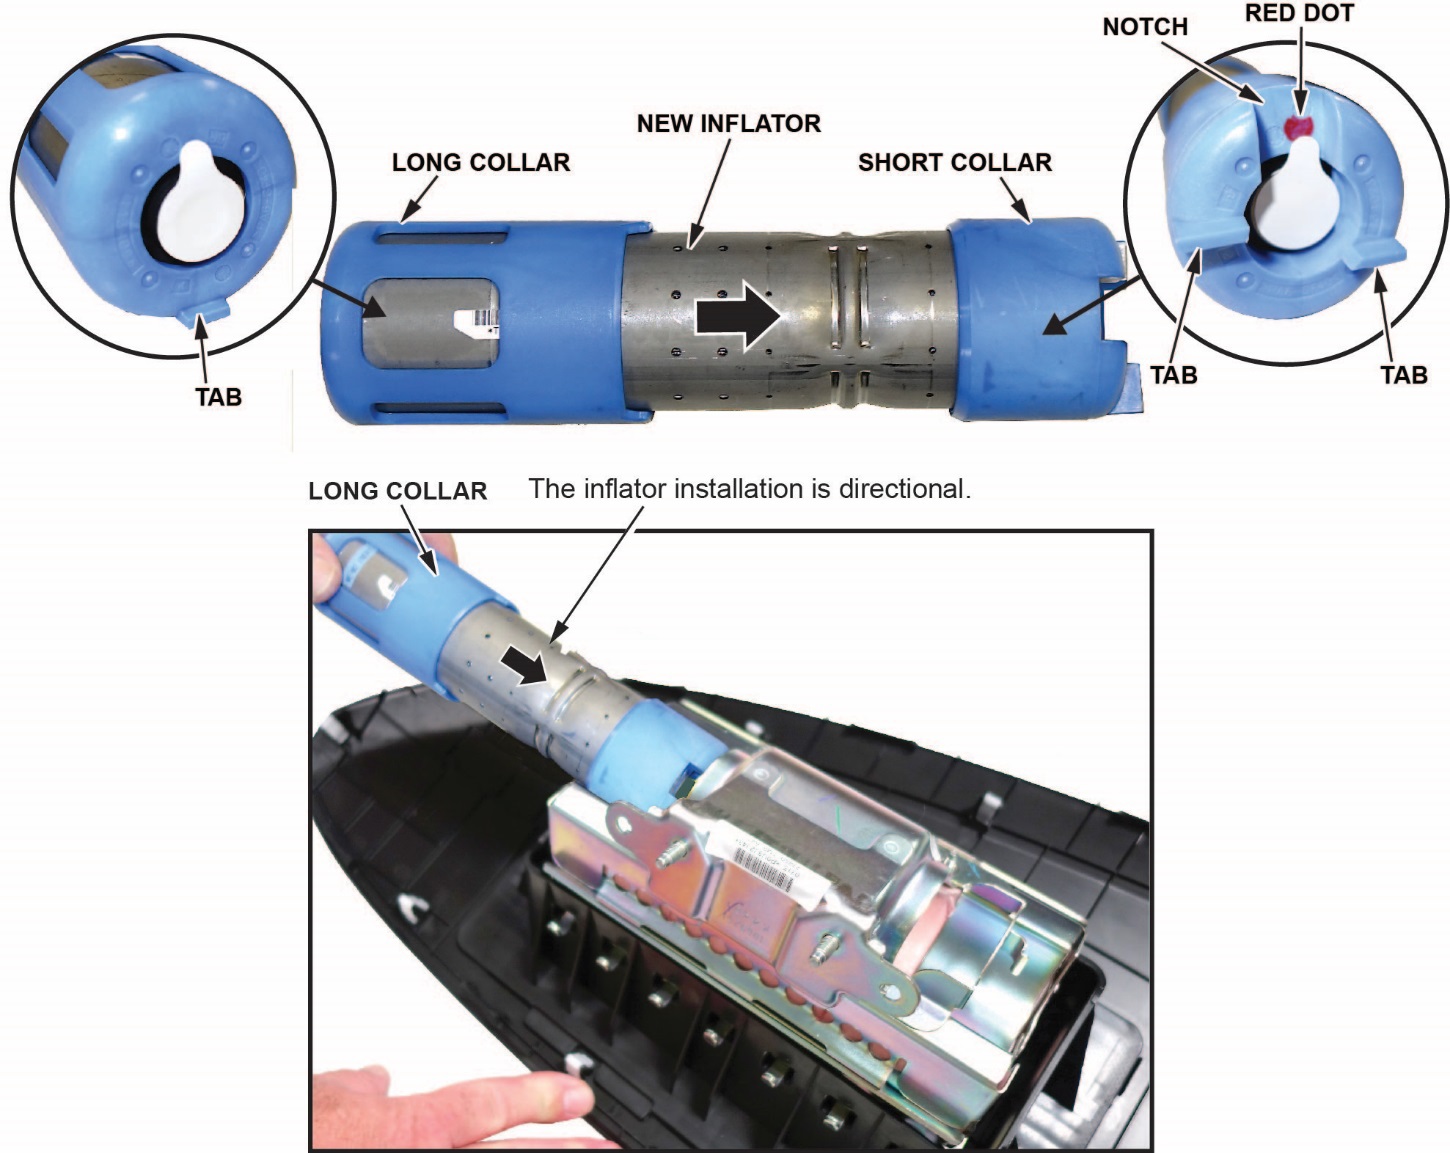
- Install the new inflator.
P/N 04790-TA0-407
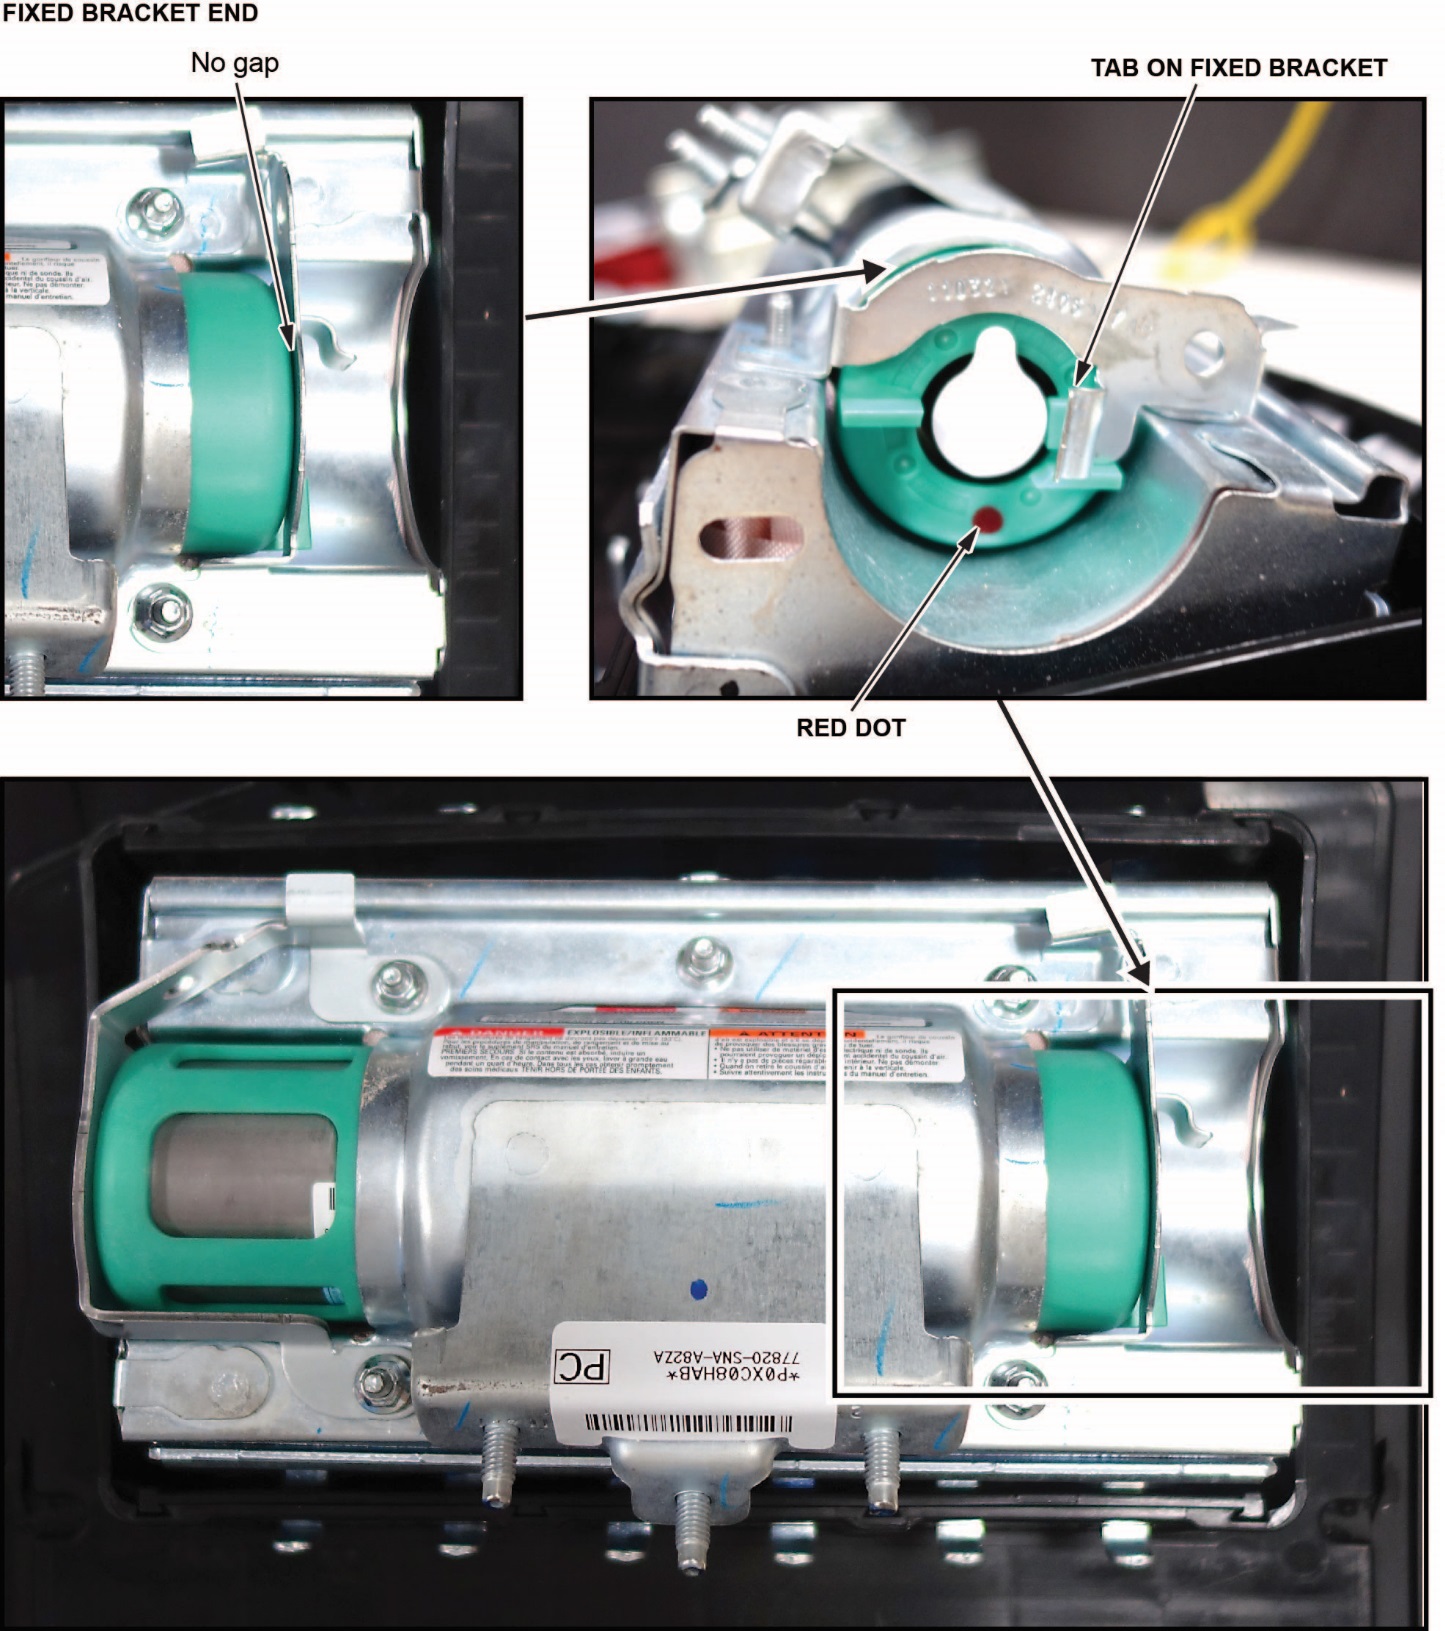
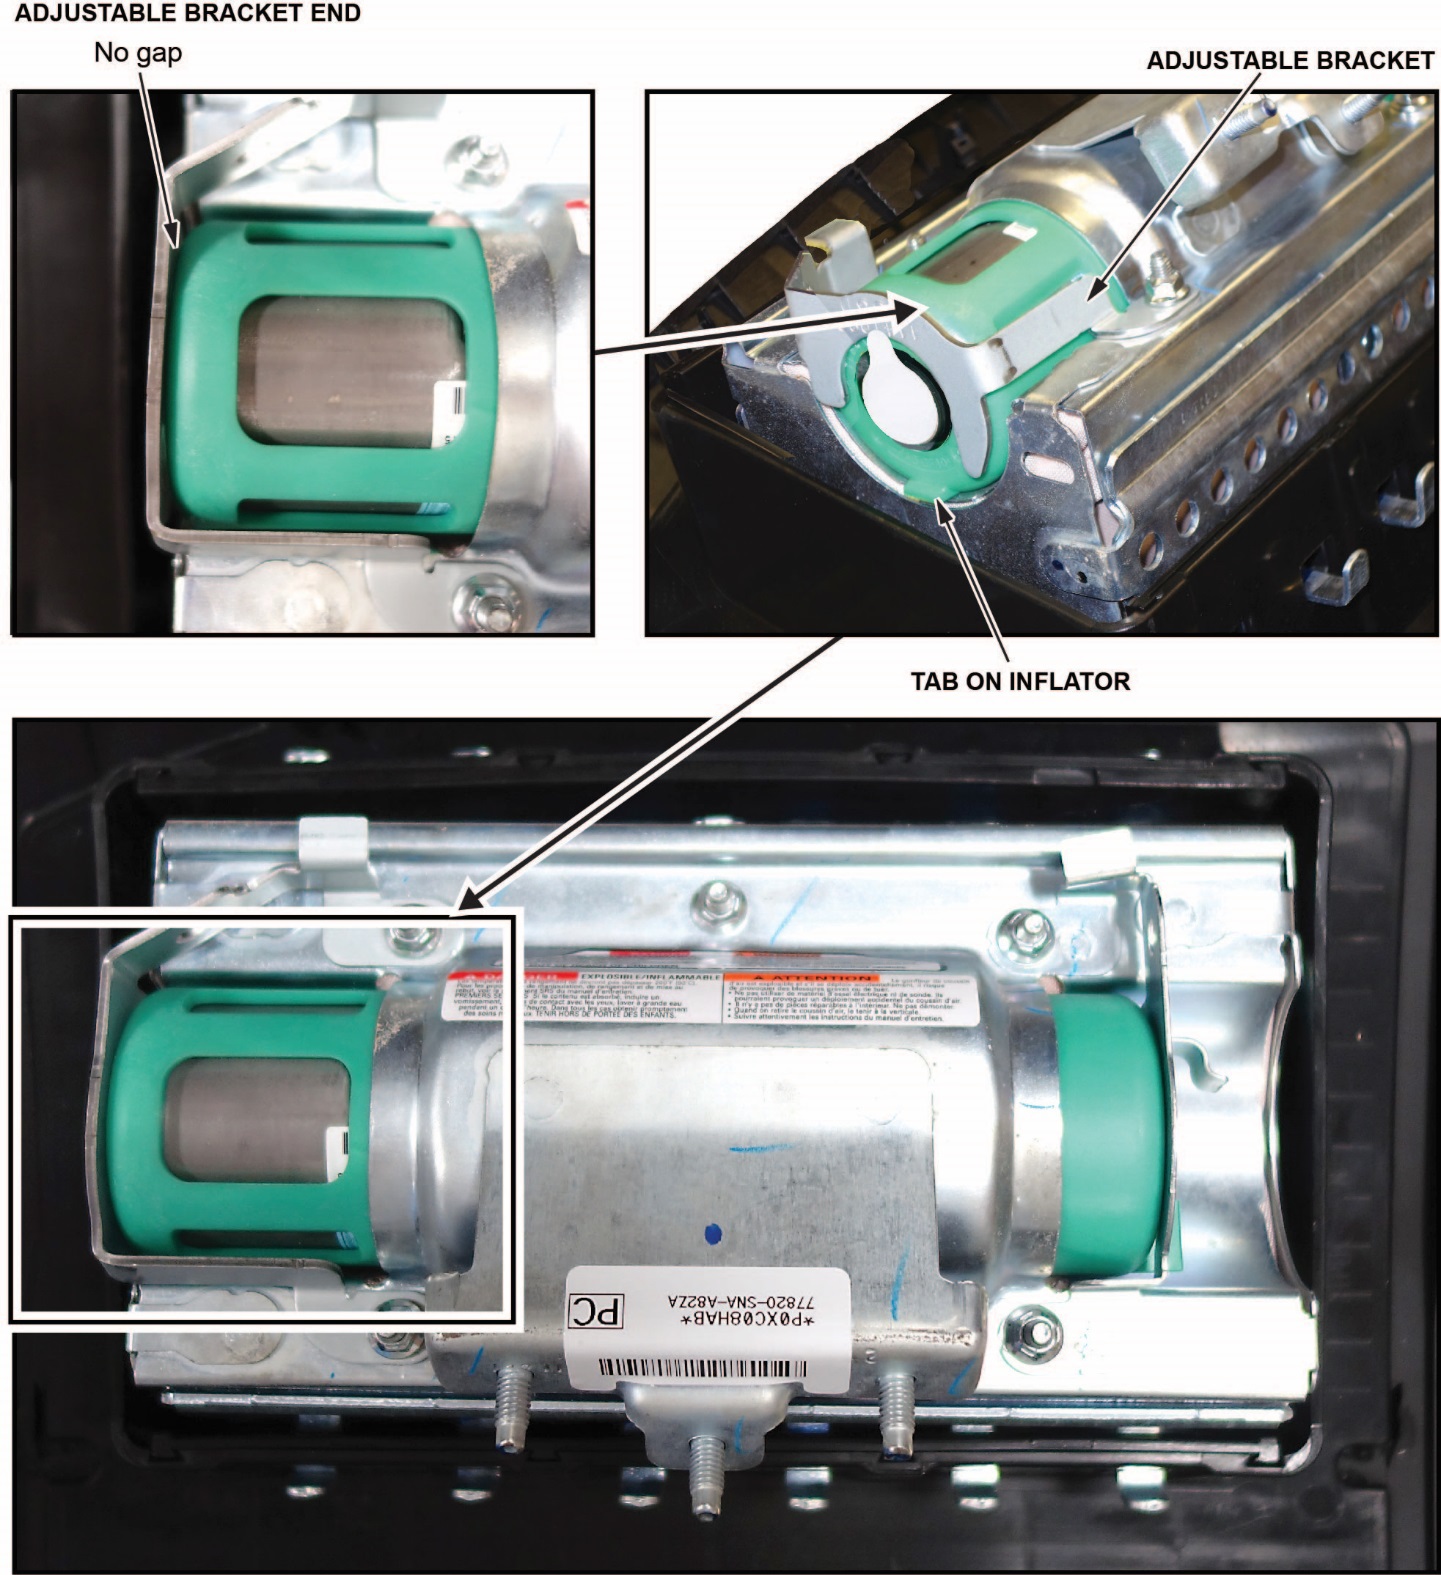
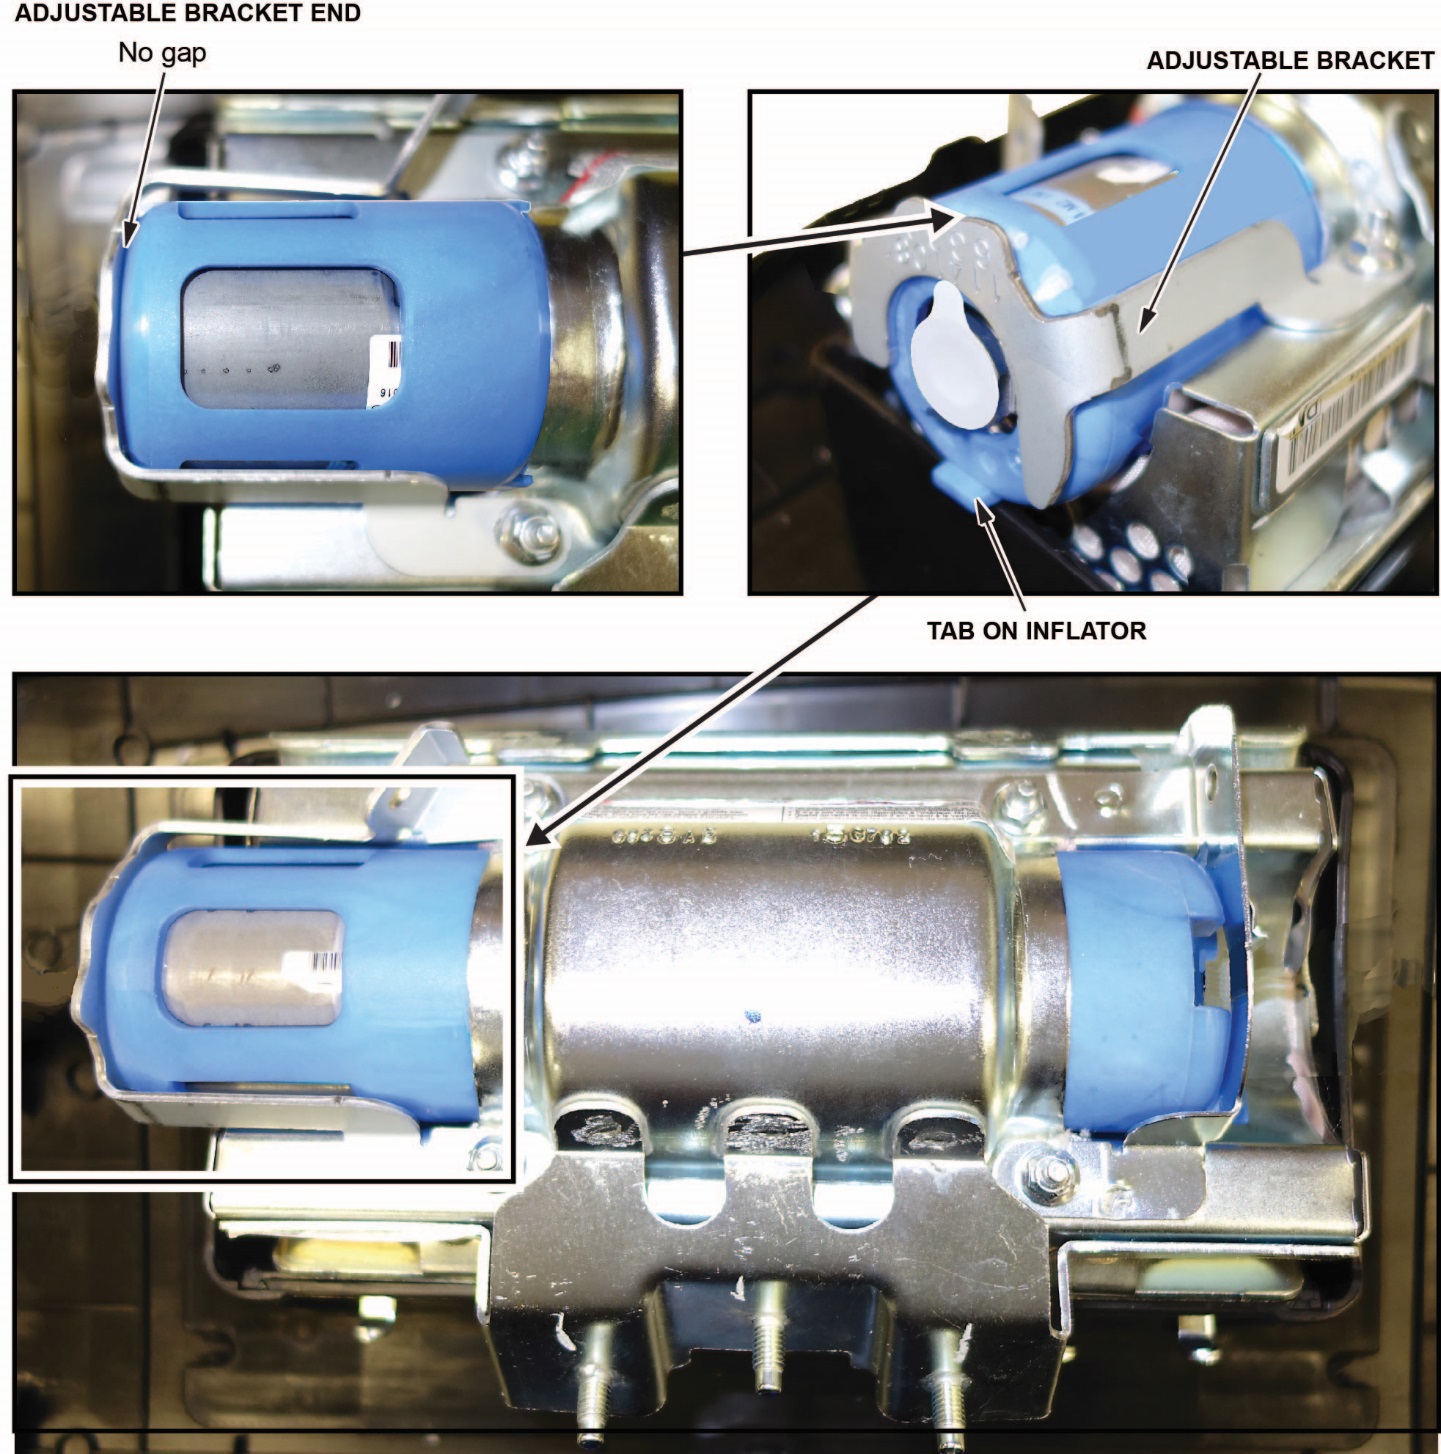
- One side of the inflator has a longer collar, a single tab, a plastic cutout, and a small flat spot on the connector. The other side of the inflator has a shorter collar, two tabs, and a red dot. Make sure you insert the end with the shorter collar into the airbag first.
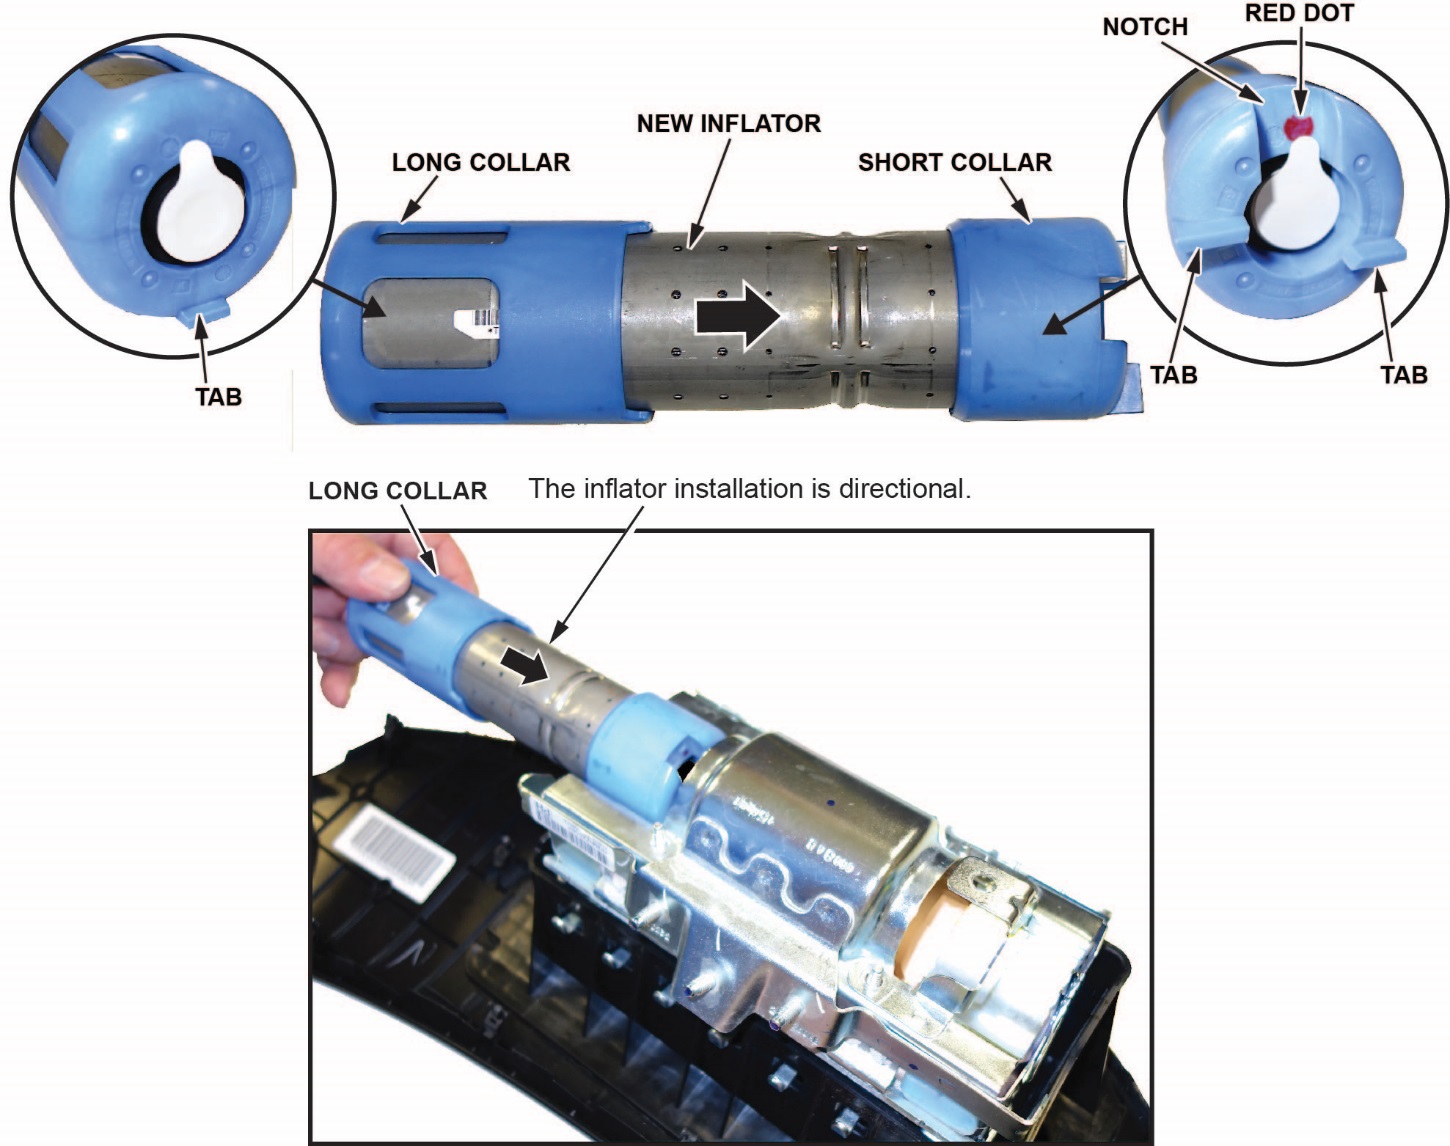
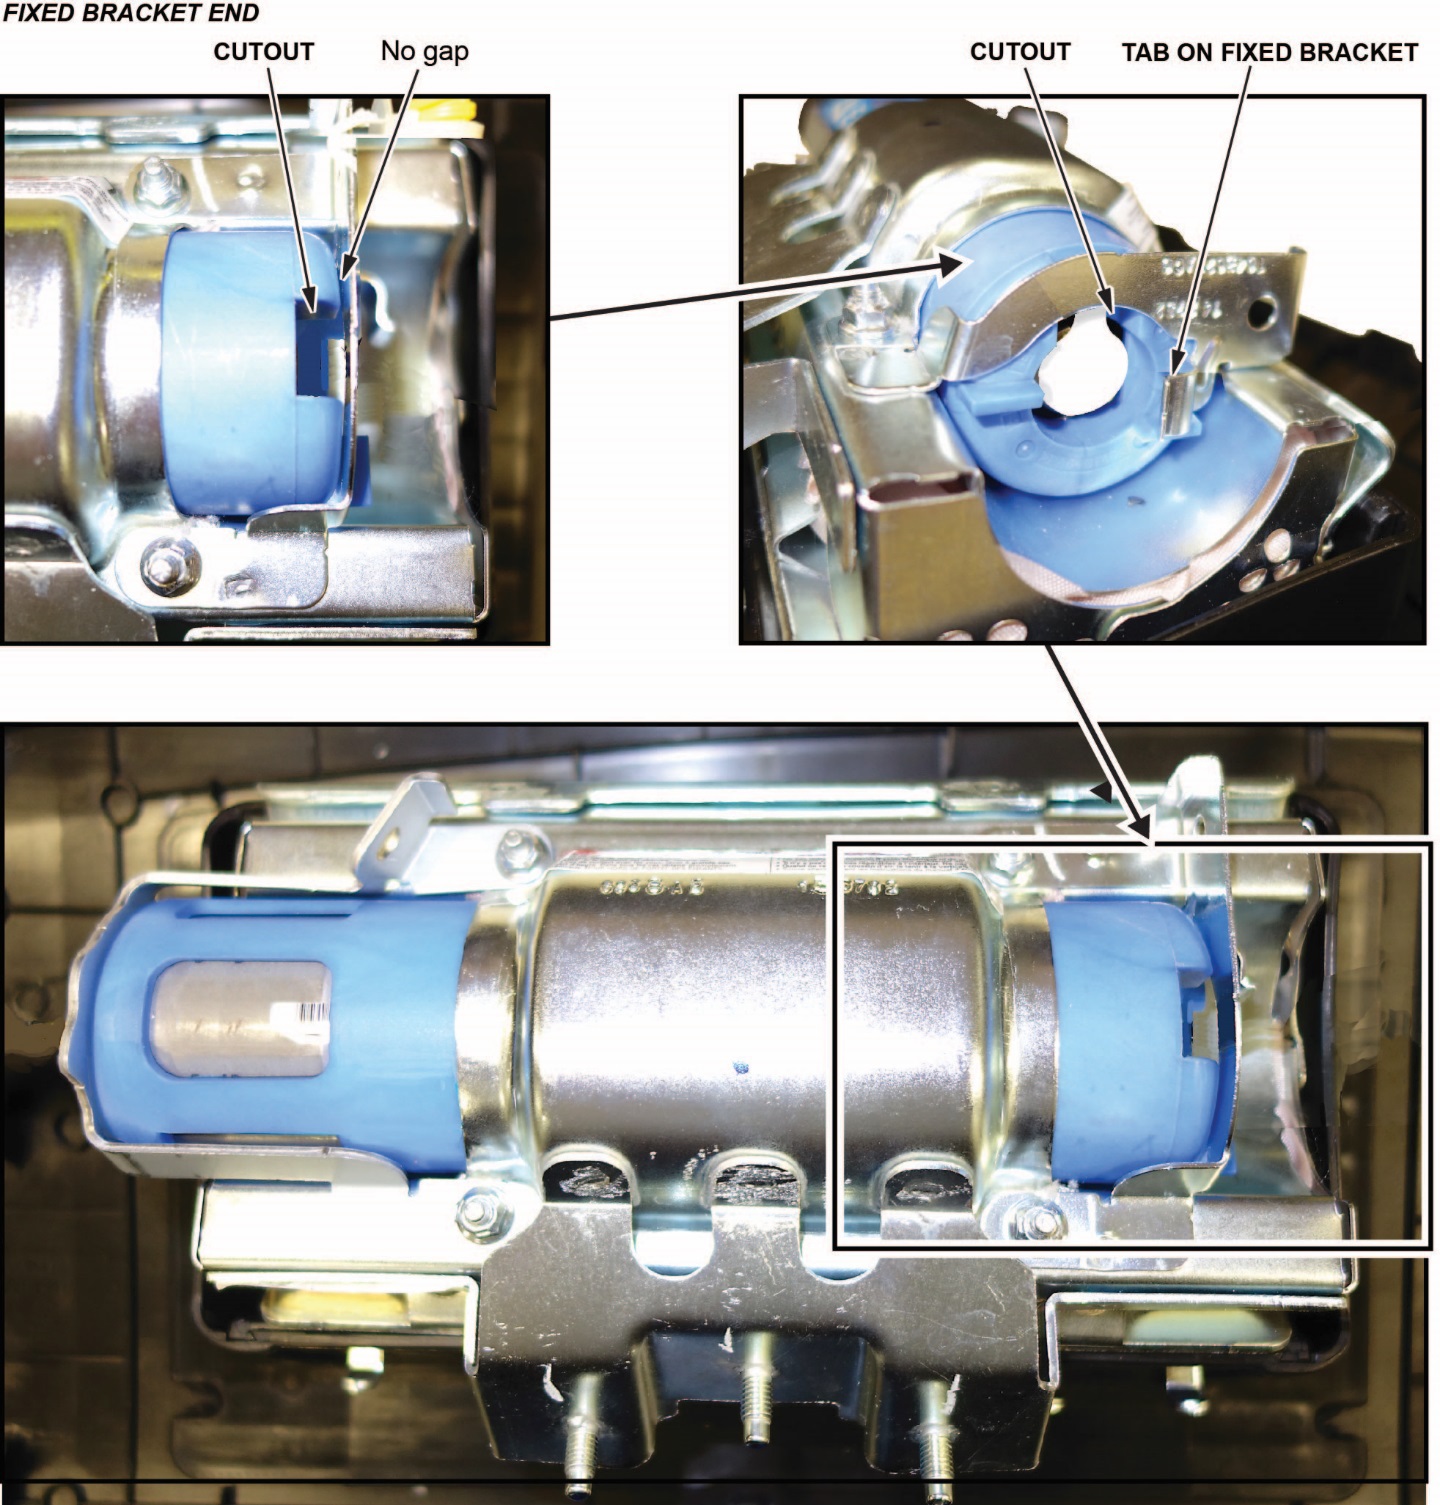
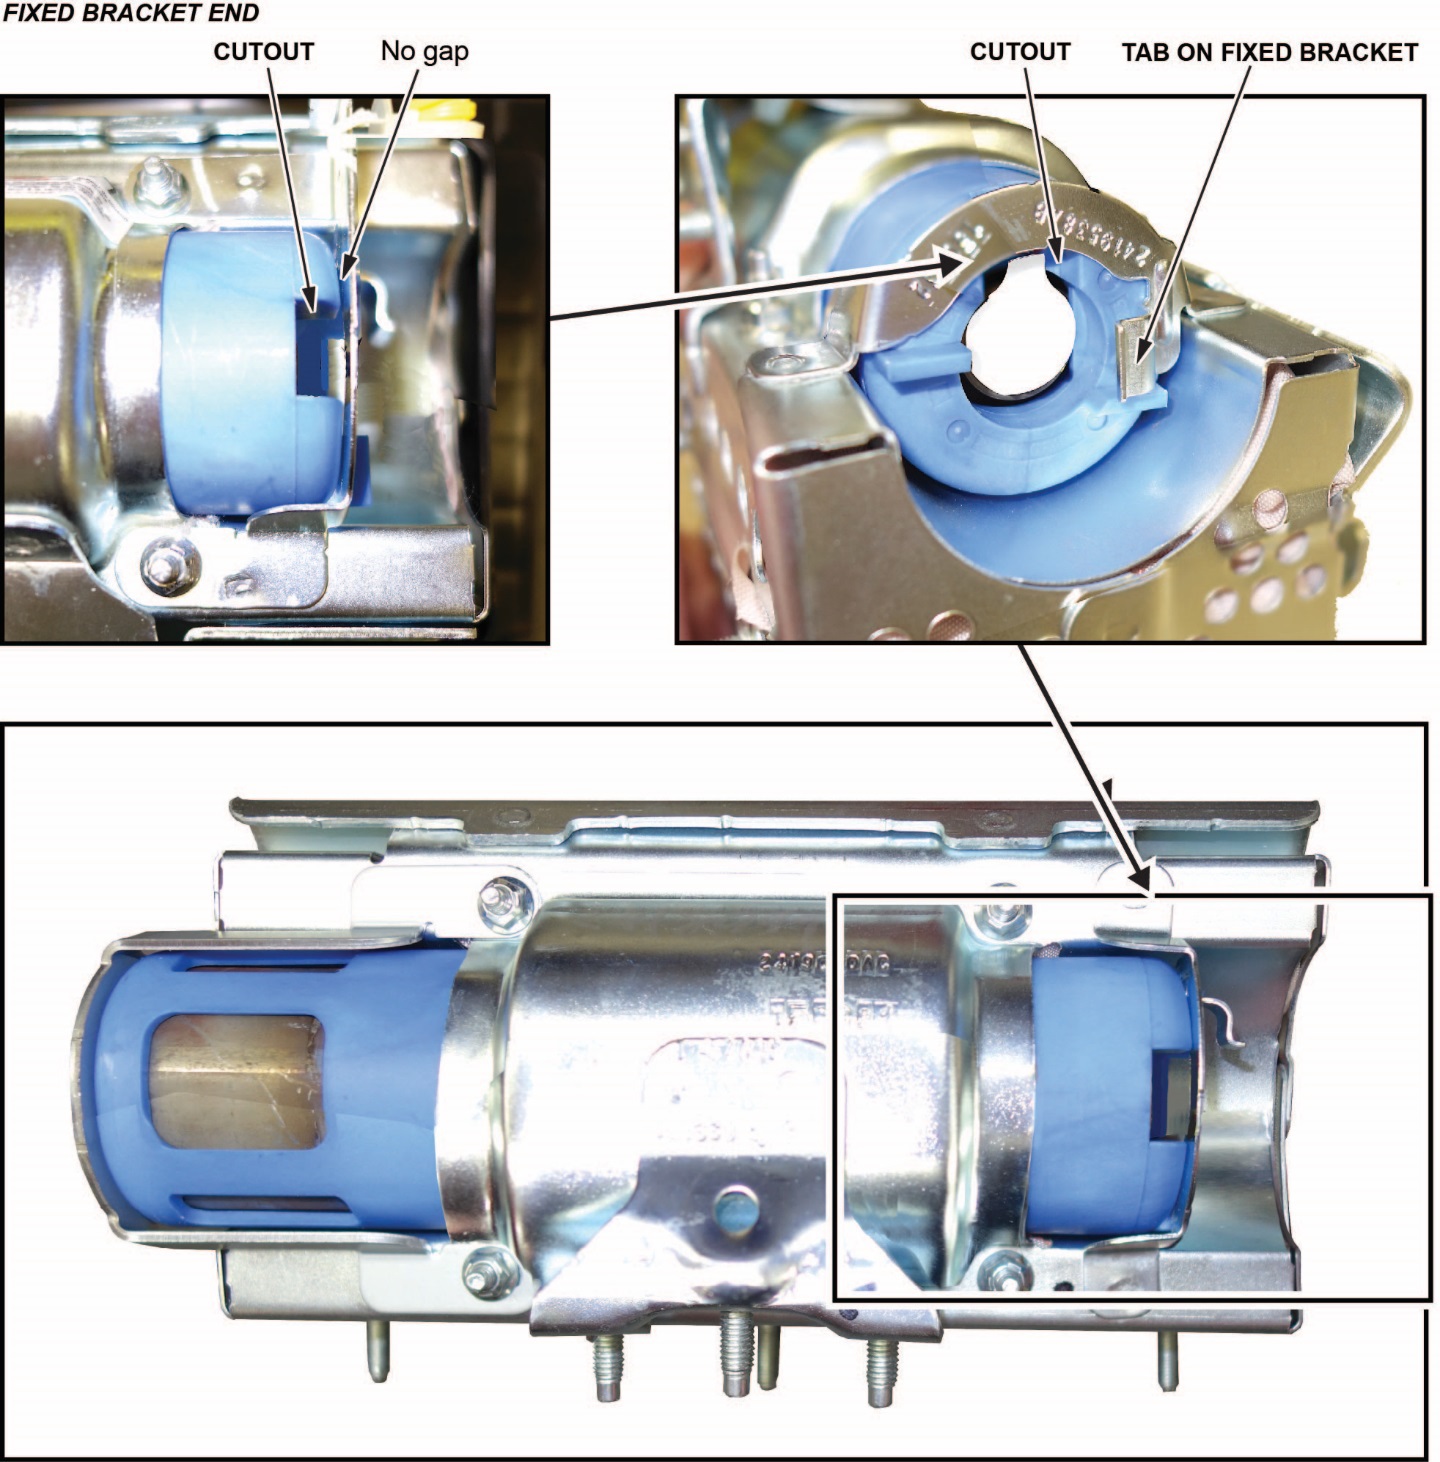
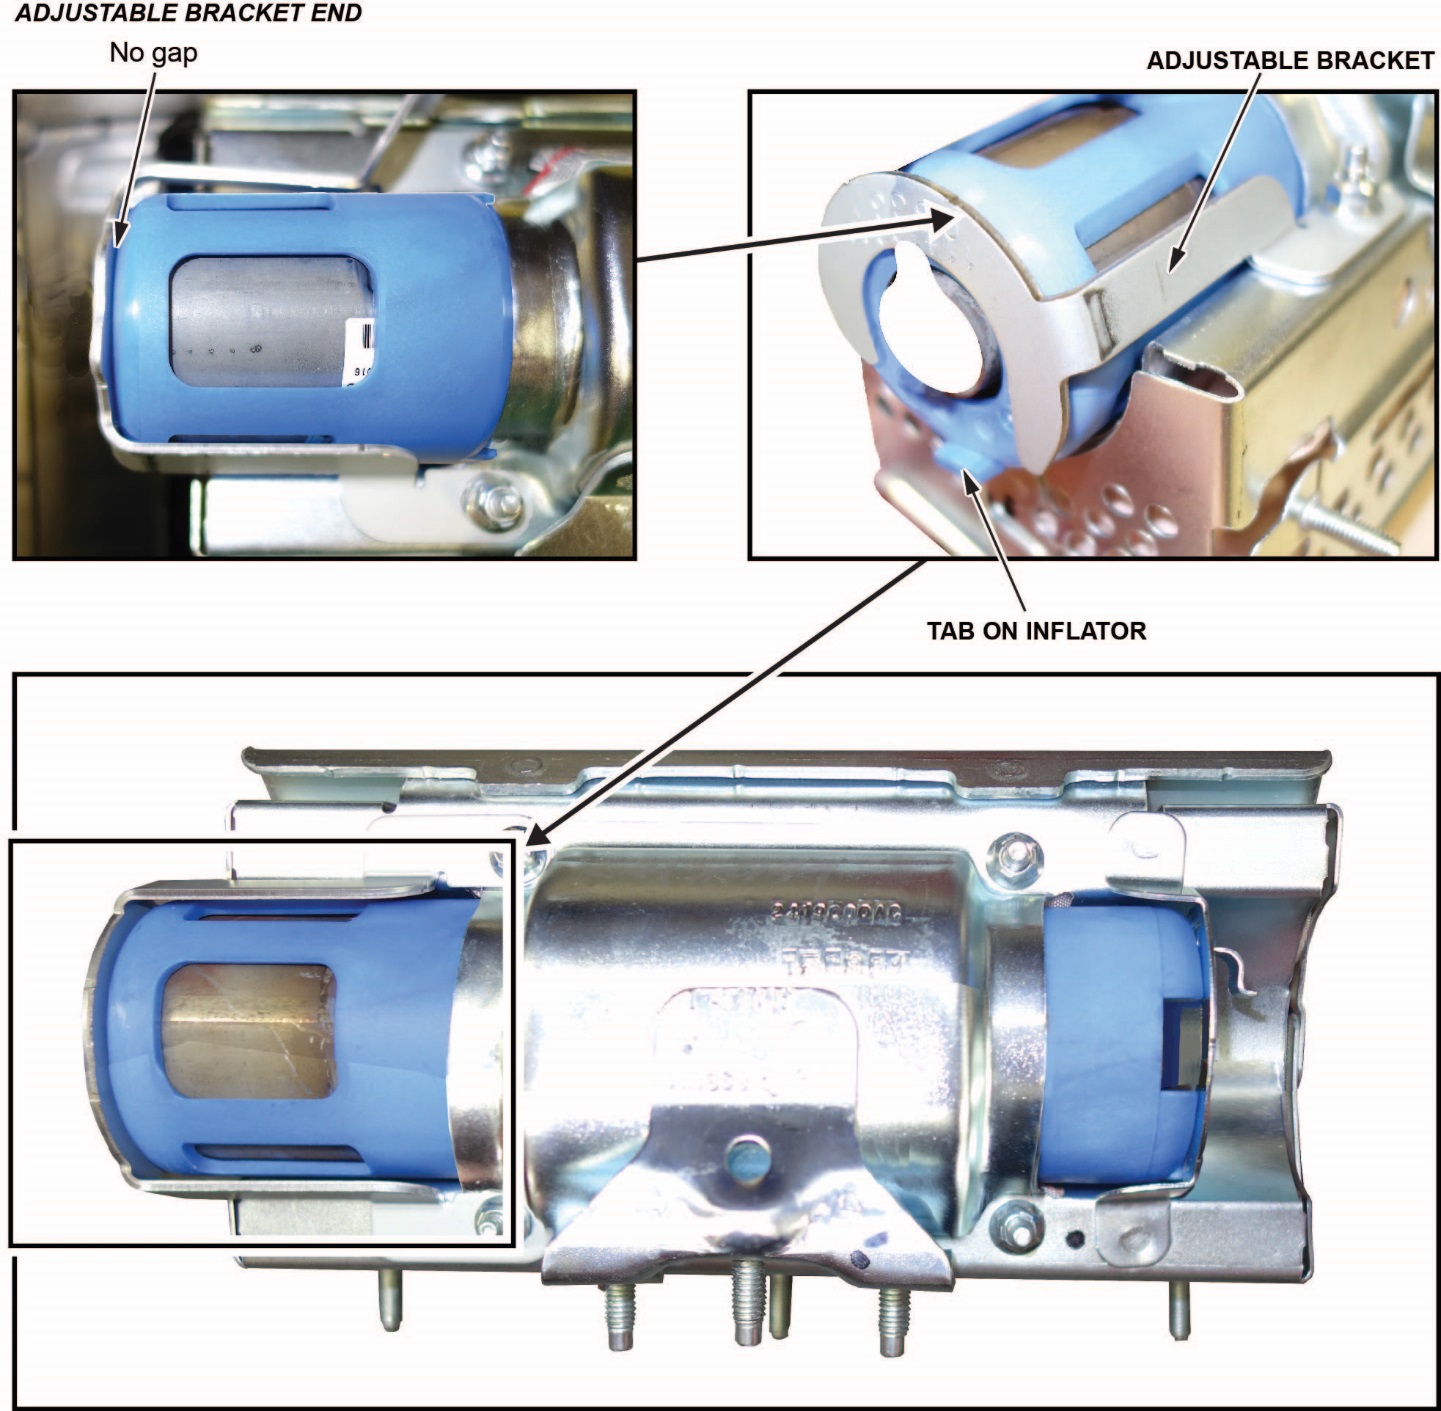
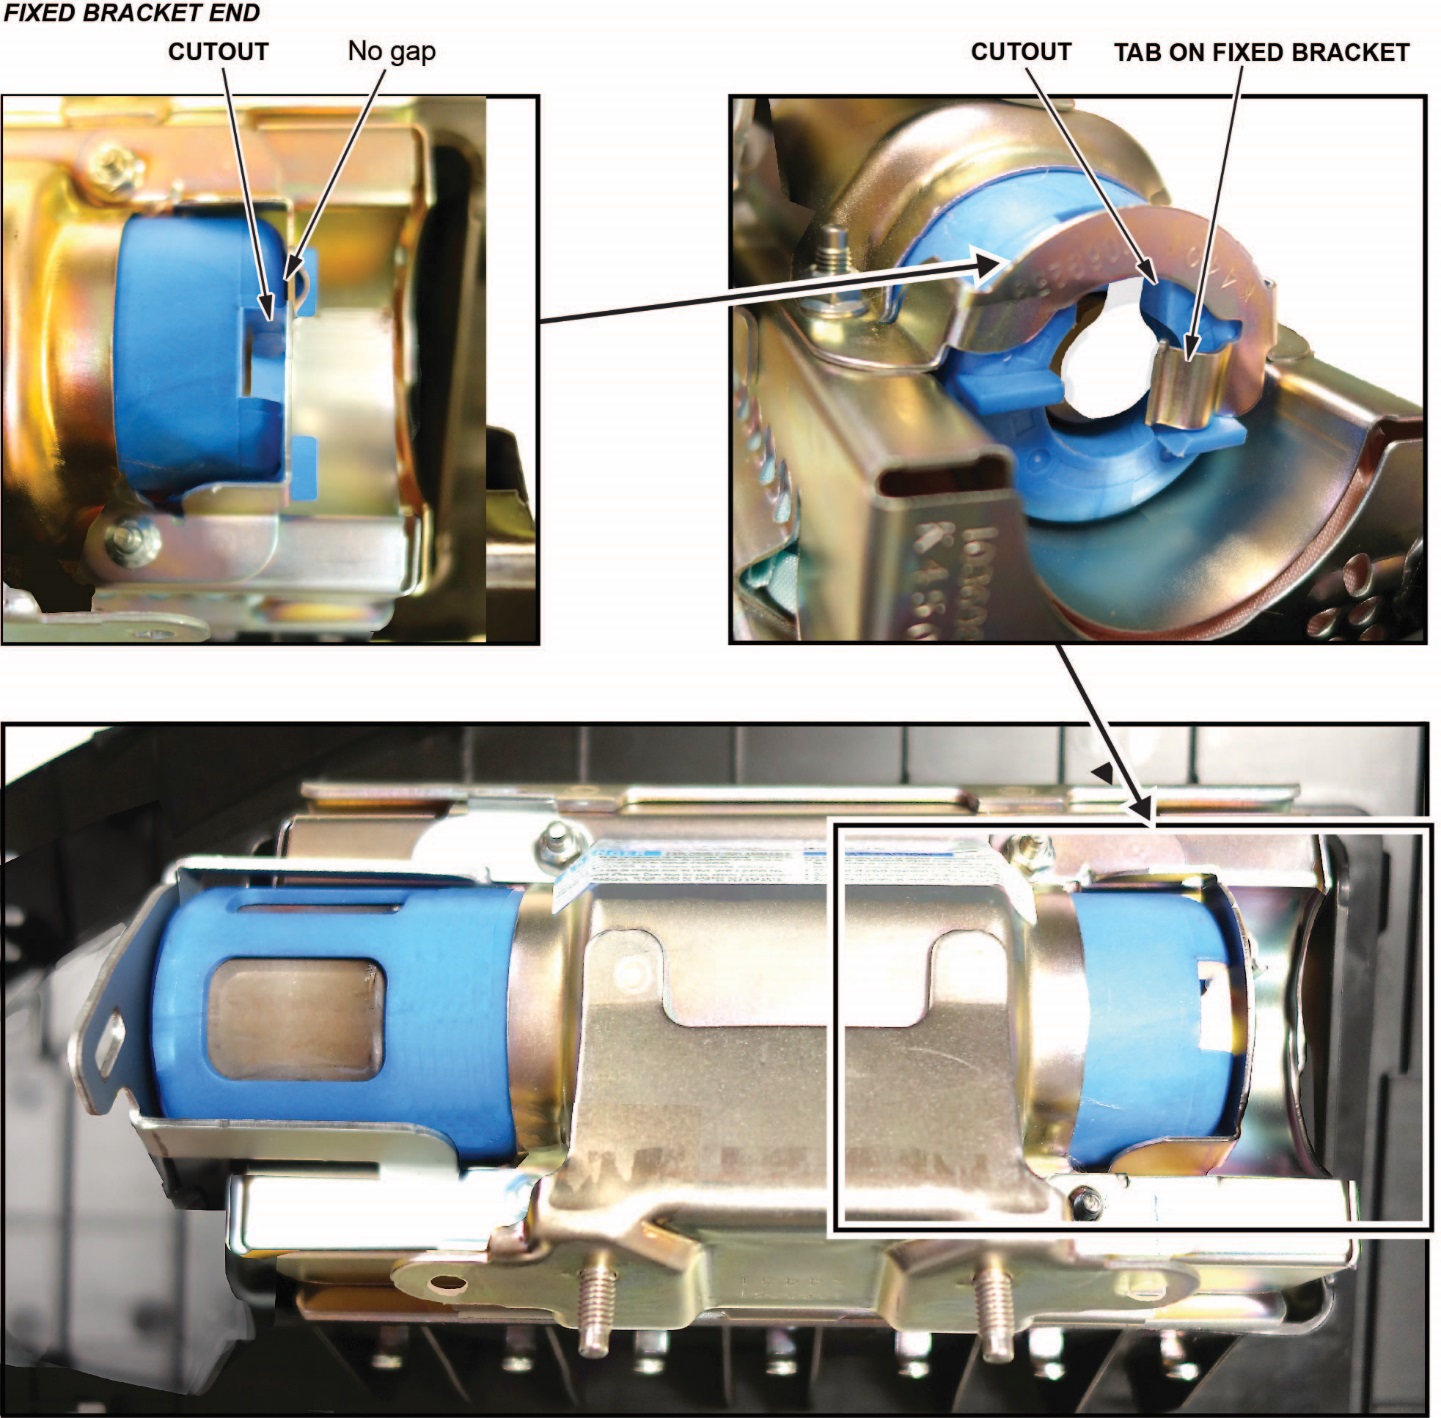
- Slide the inflator in until the plastic collar contacts the bracket. The two tabs should align with the side of the airbag module and the metal tab as shown. There should be no space or gap between the inflator and bracket.

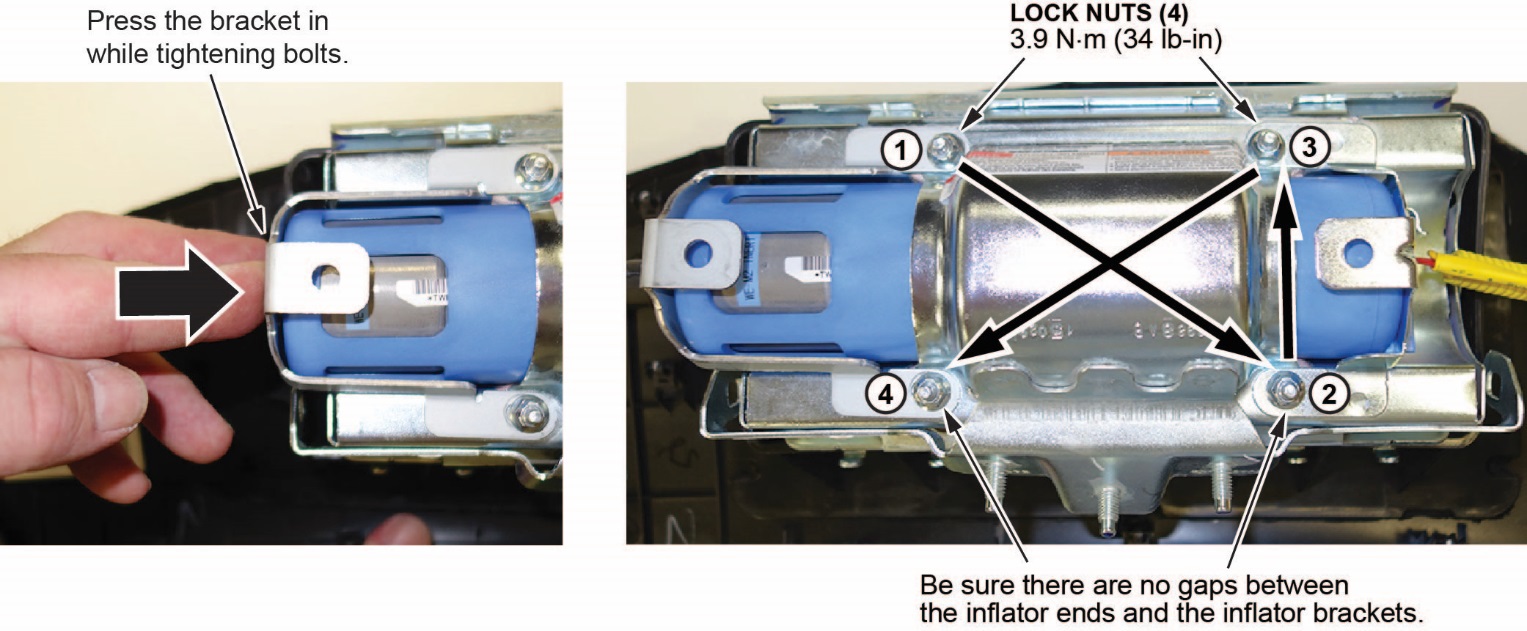
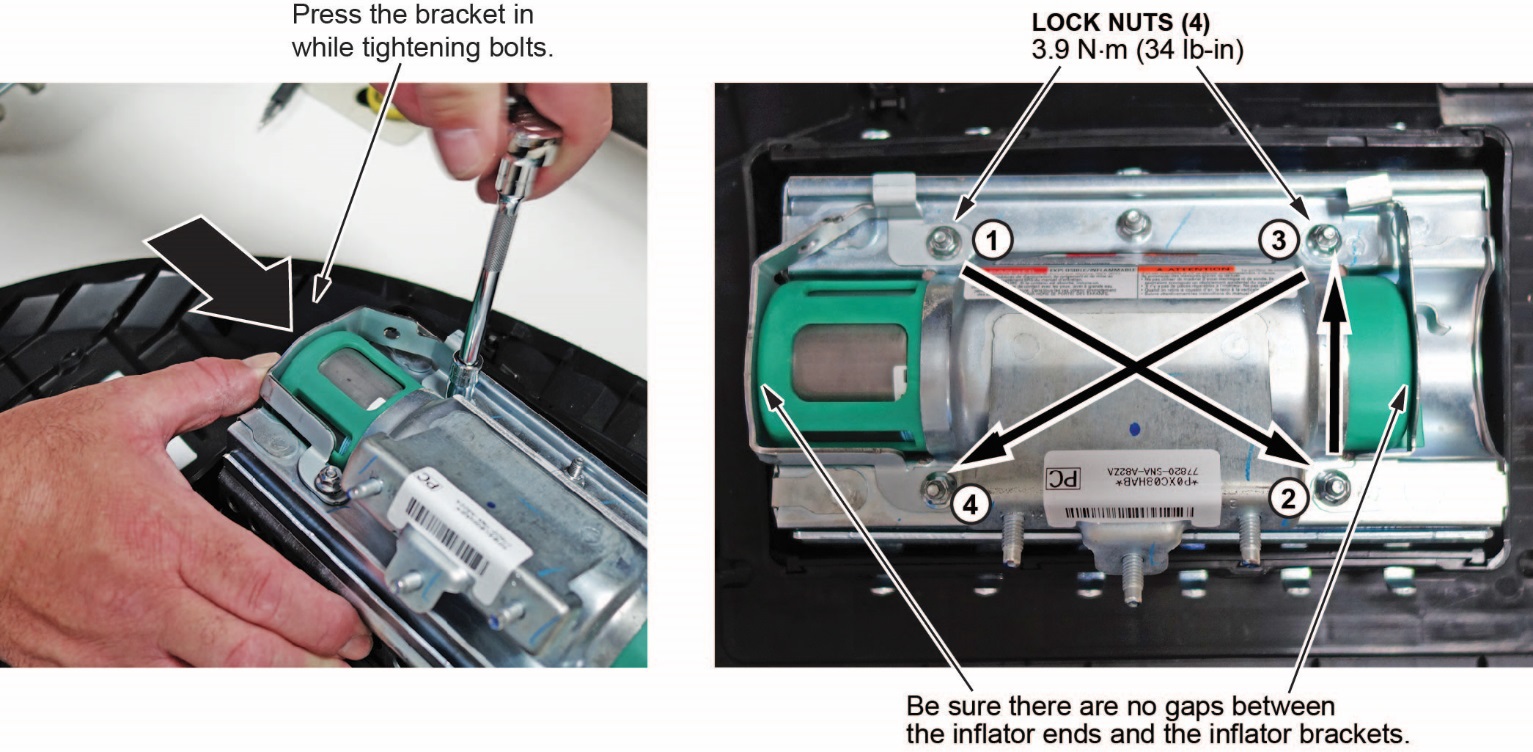
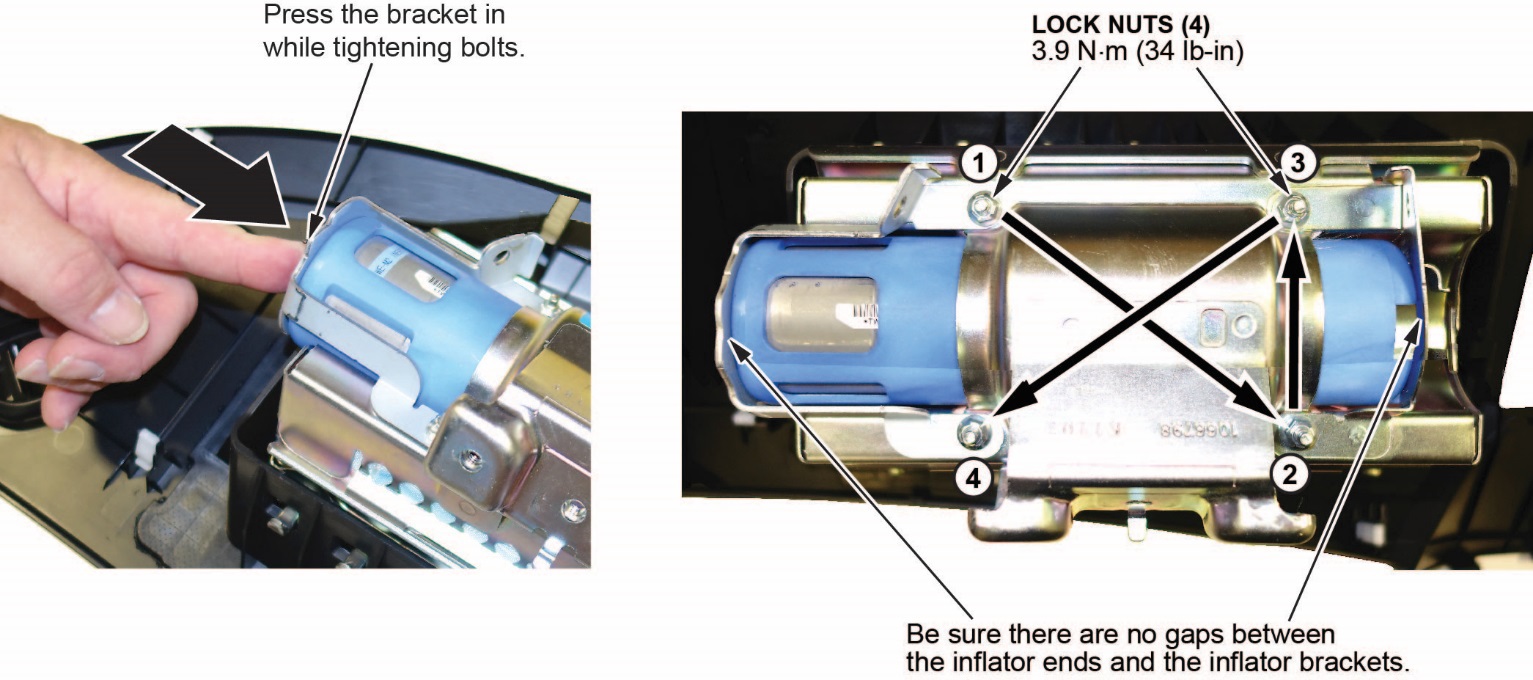
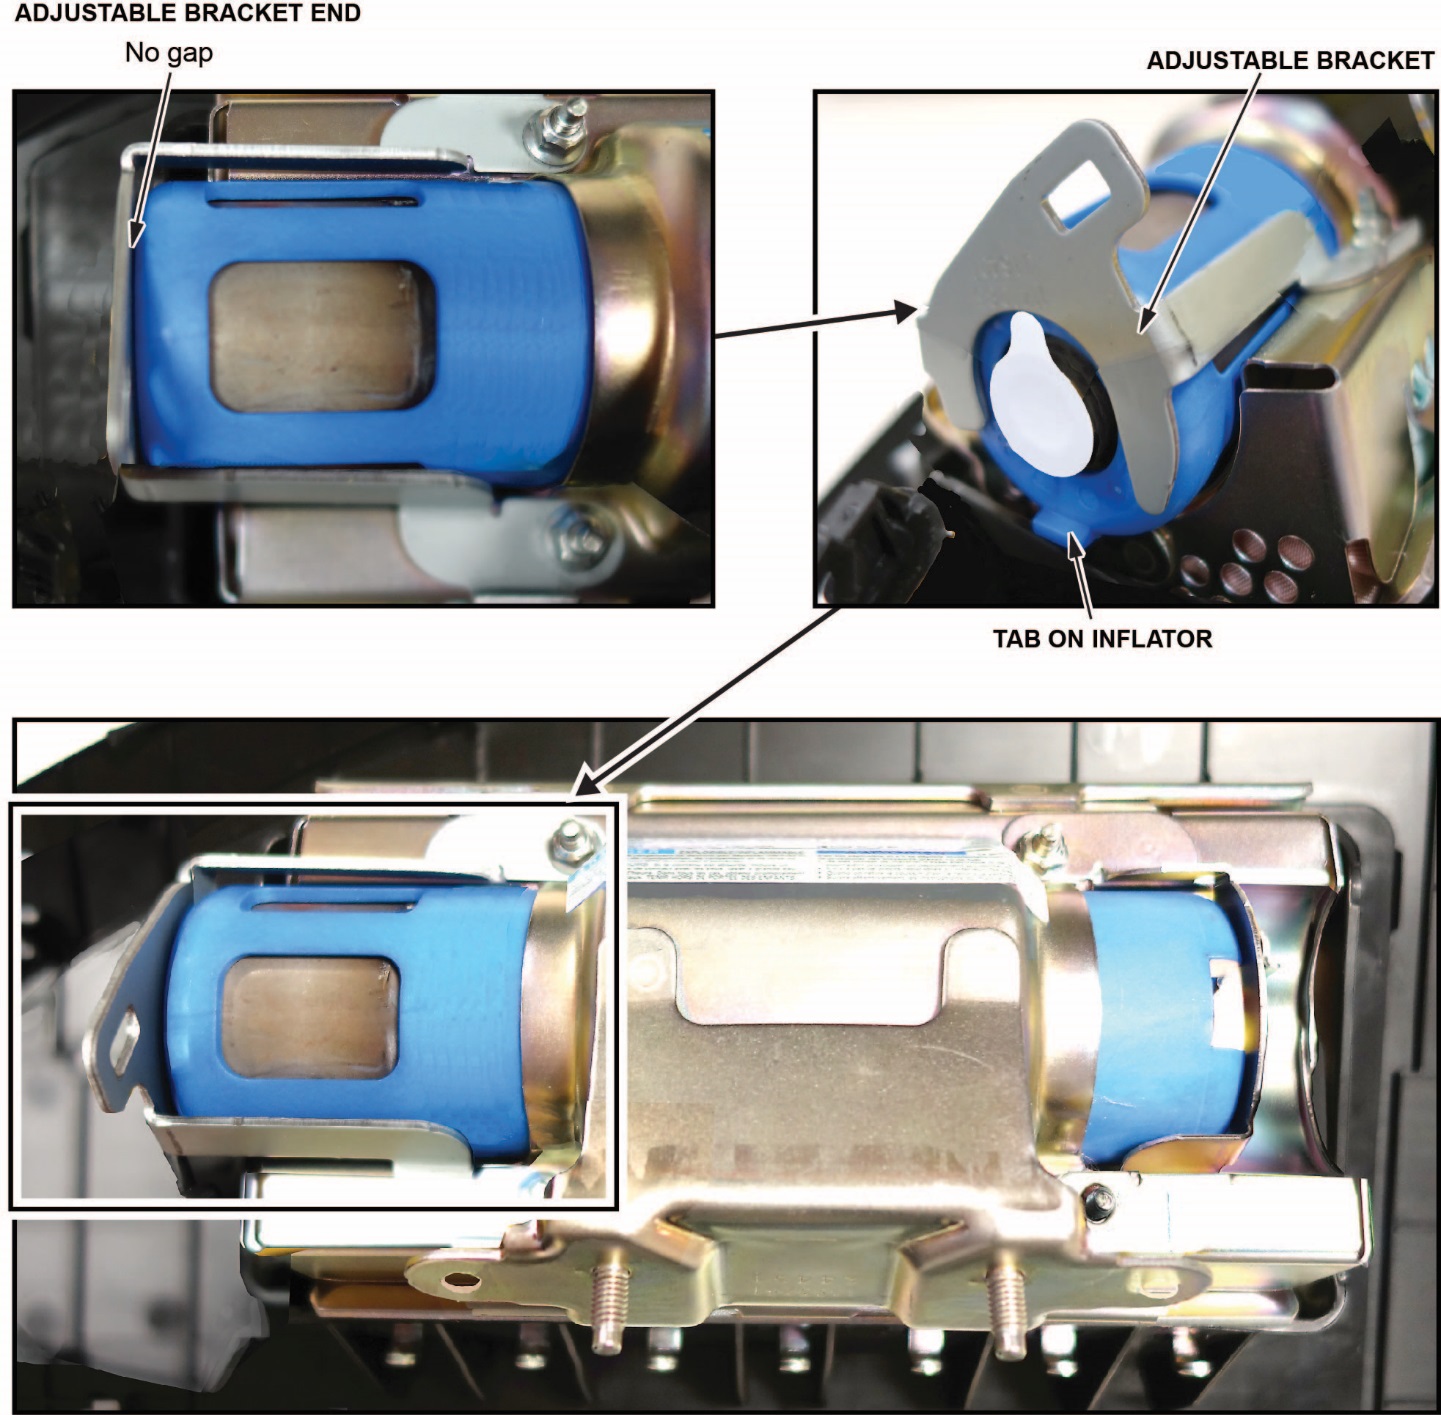
- Install the new bracket included in the kit onto the airbag module. Check there is no space or gap between the inflator and bracket by pushing the bracket against the inflator.
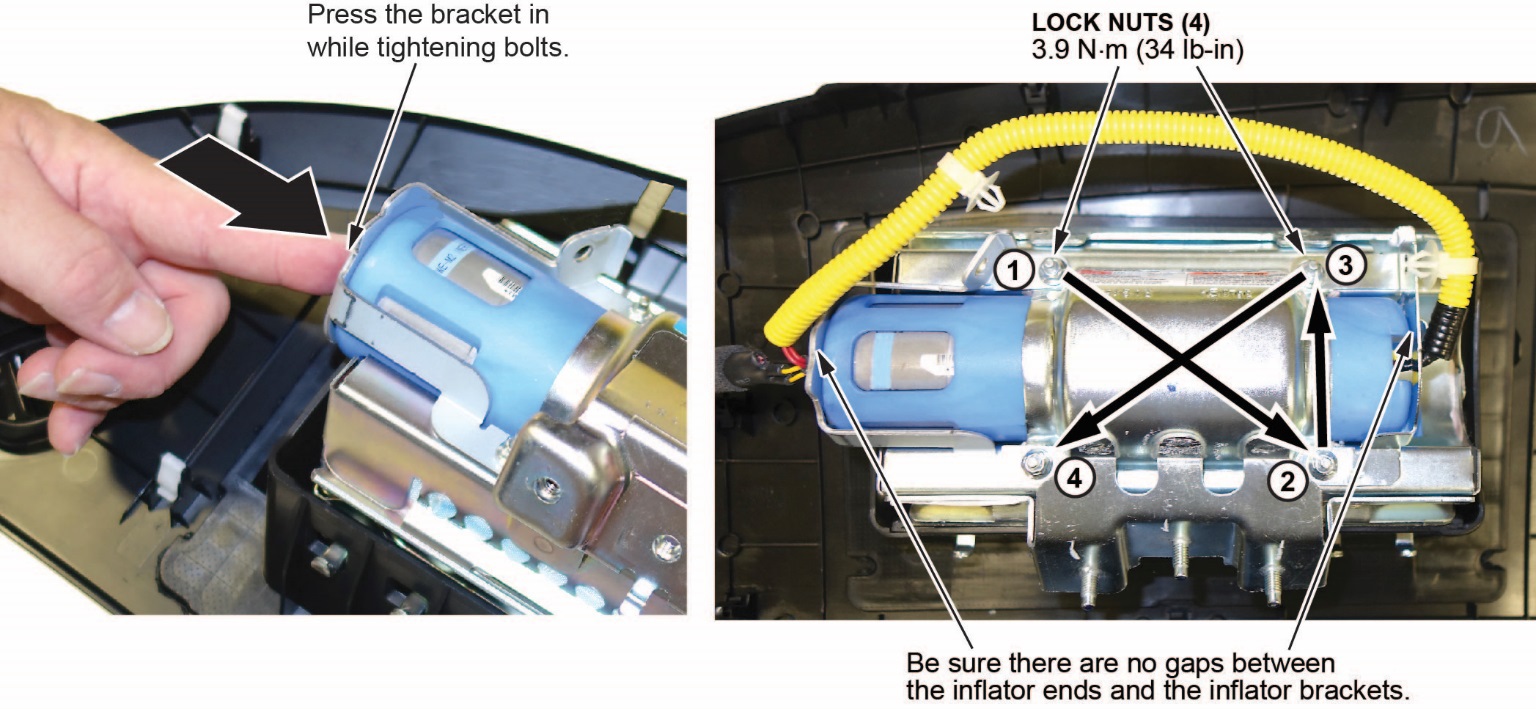
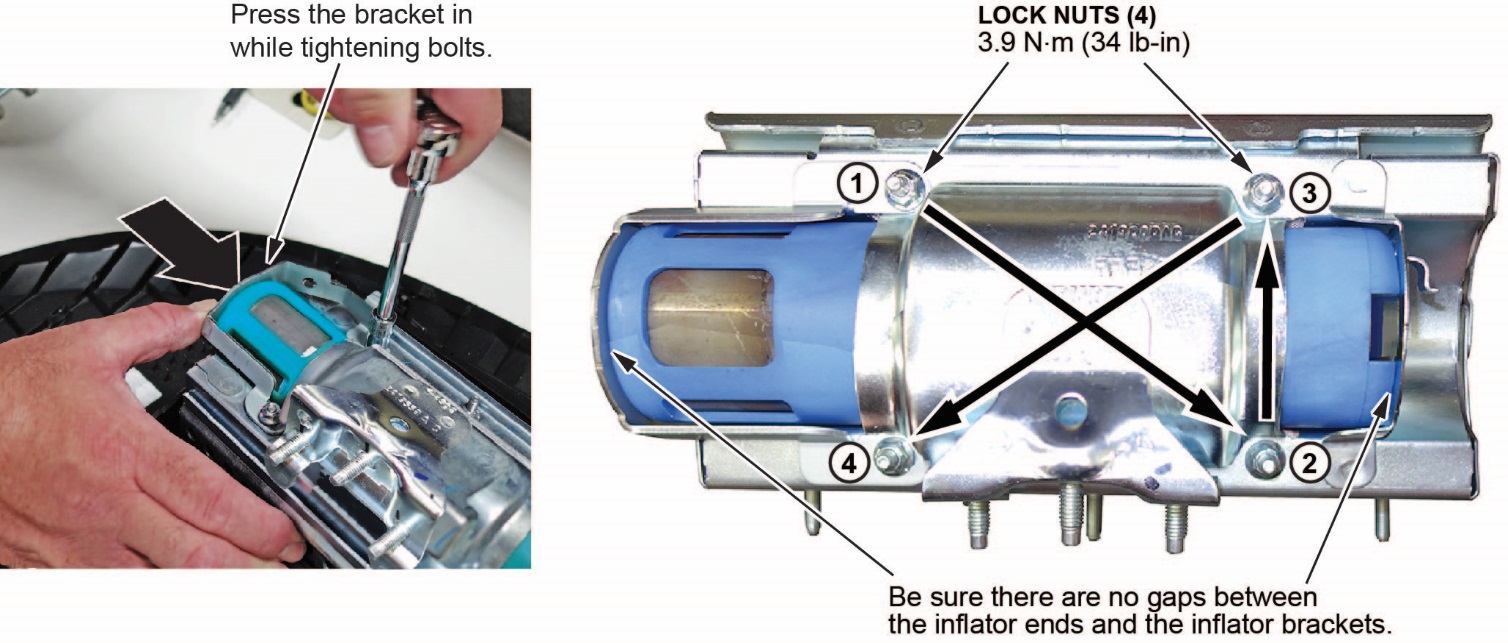
NOTE: The bracket may have a little bit of play before you install the new nuts.

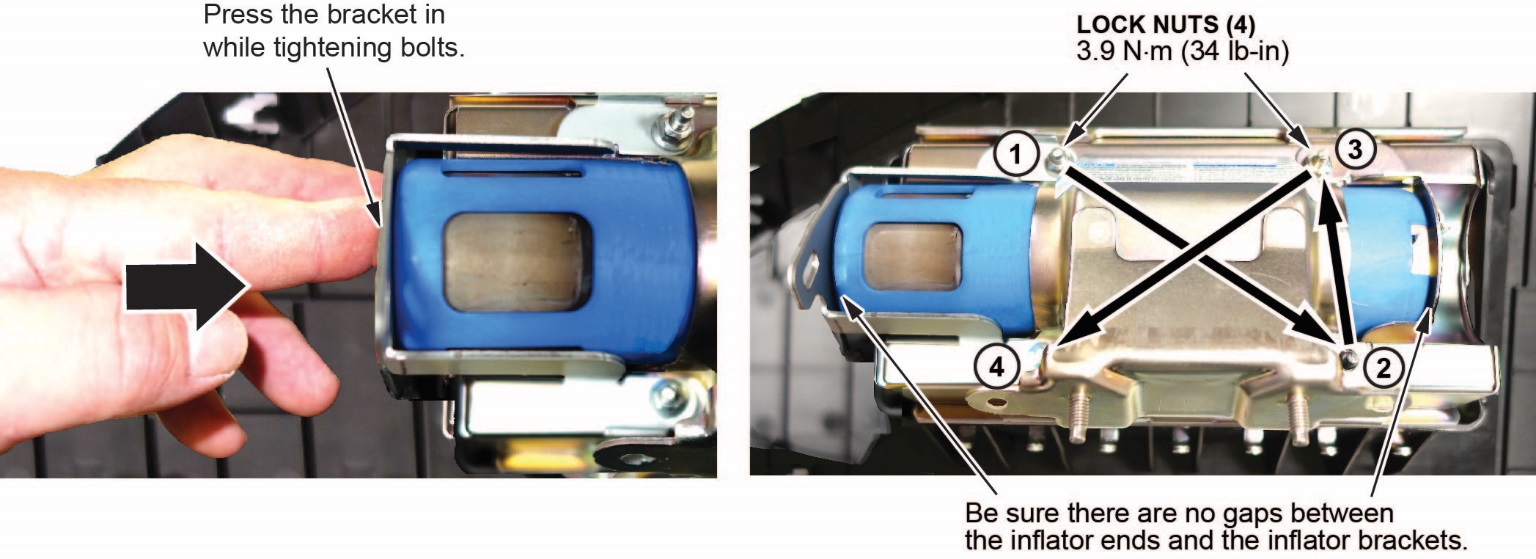
- Hold the bracket against the inflator, then install the new 5 mm locknuts and torque them in sequence to 4.0 N•m (34 lb-in).
NOTE: Make sure you push the bracket against the inflator to ensure there are no gaps between the brackets and inflator when torqueing the nuts.
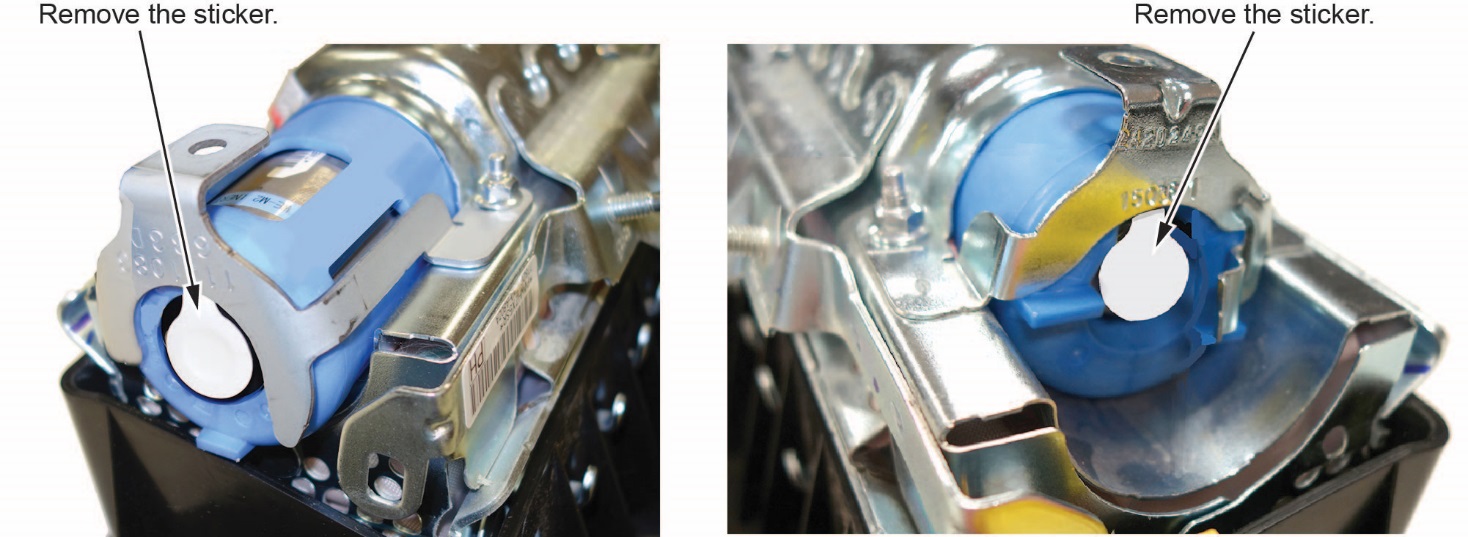
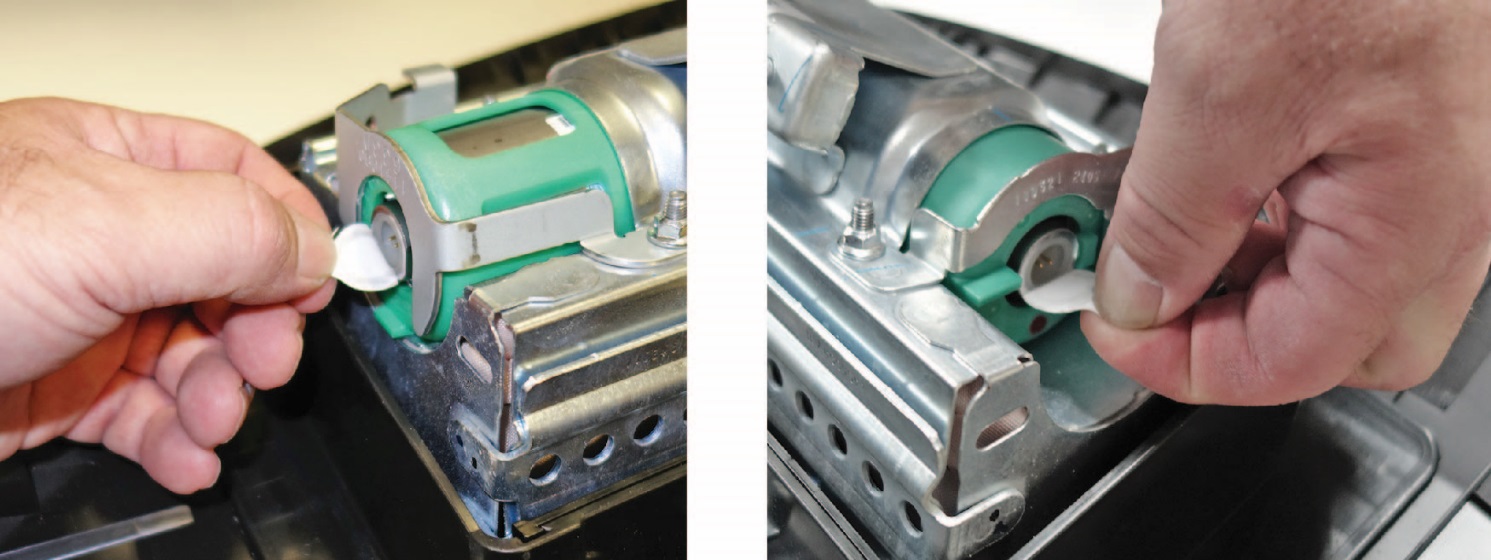
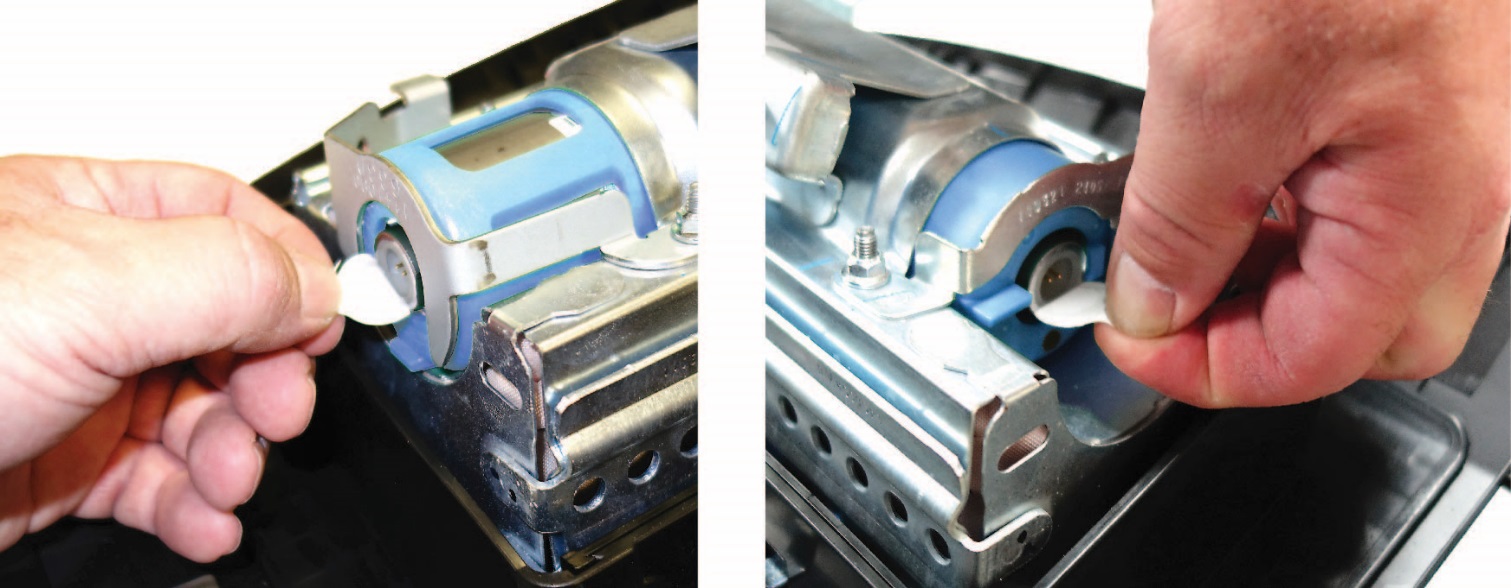
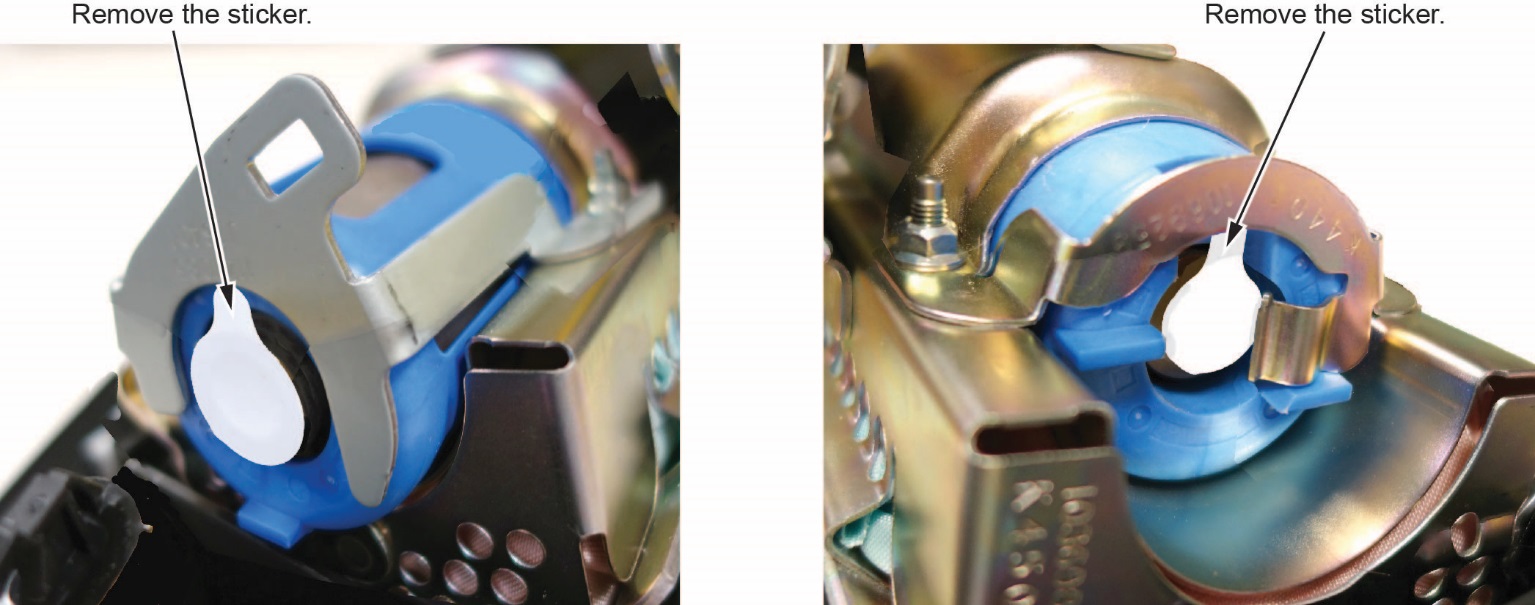
- Remove the stickers covering the terminals on both sides of the new inflator.
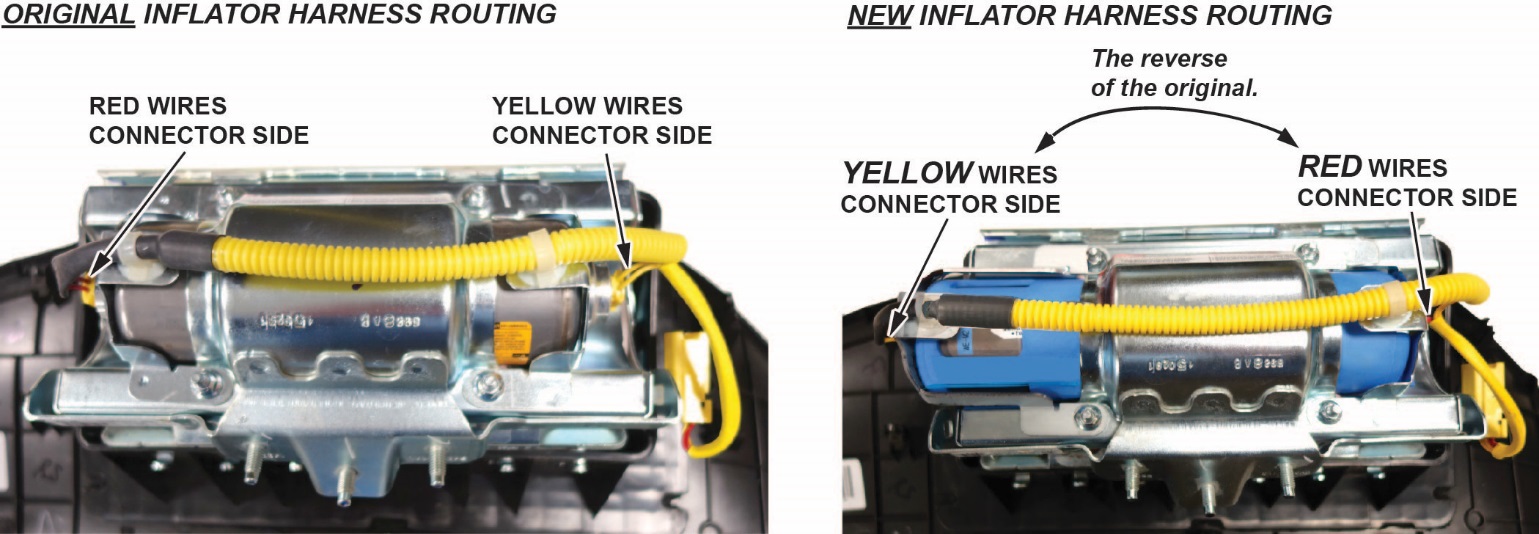
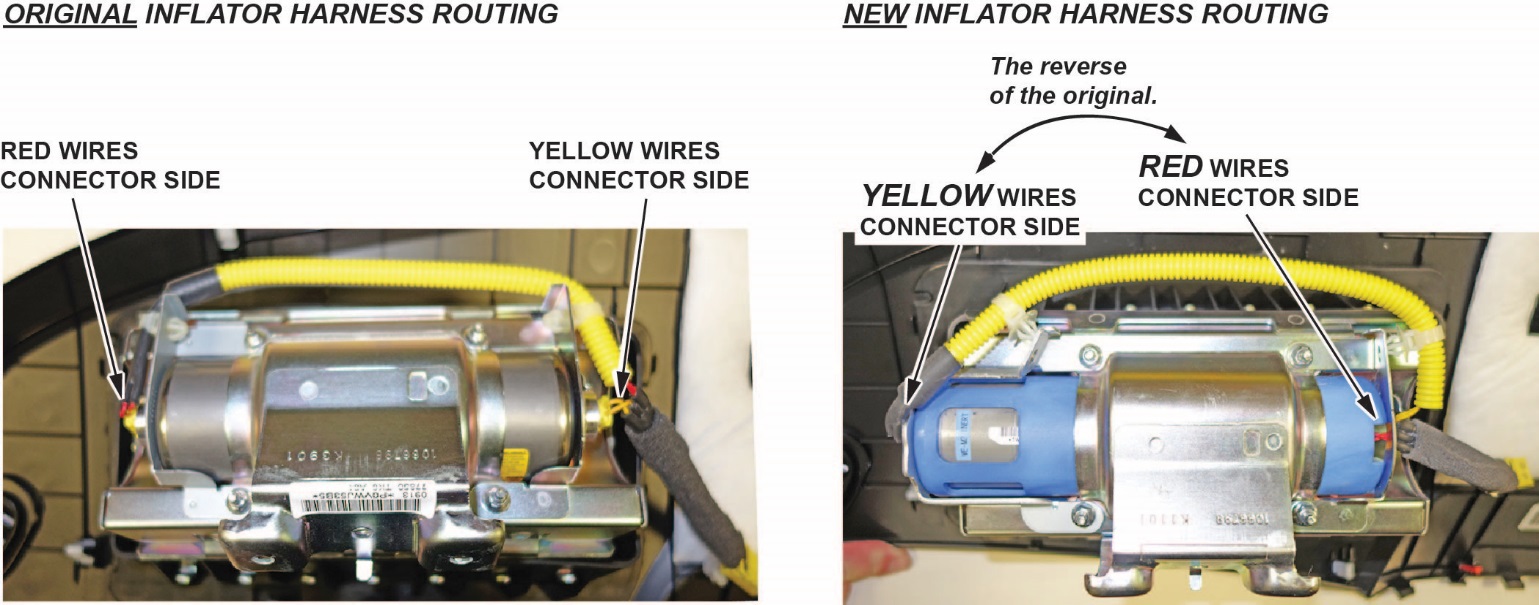
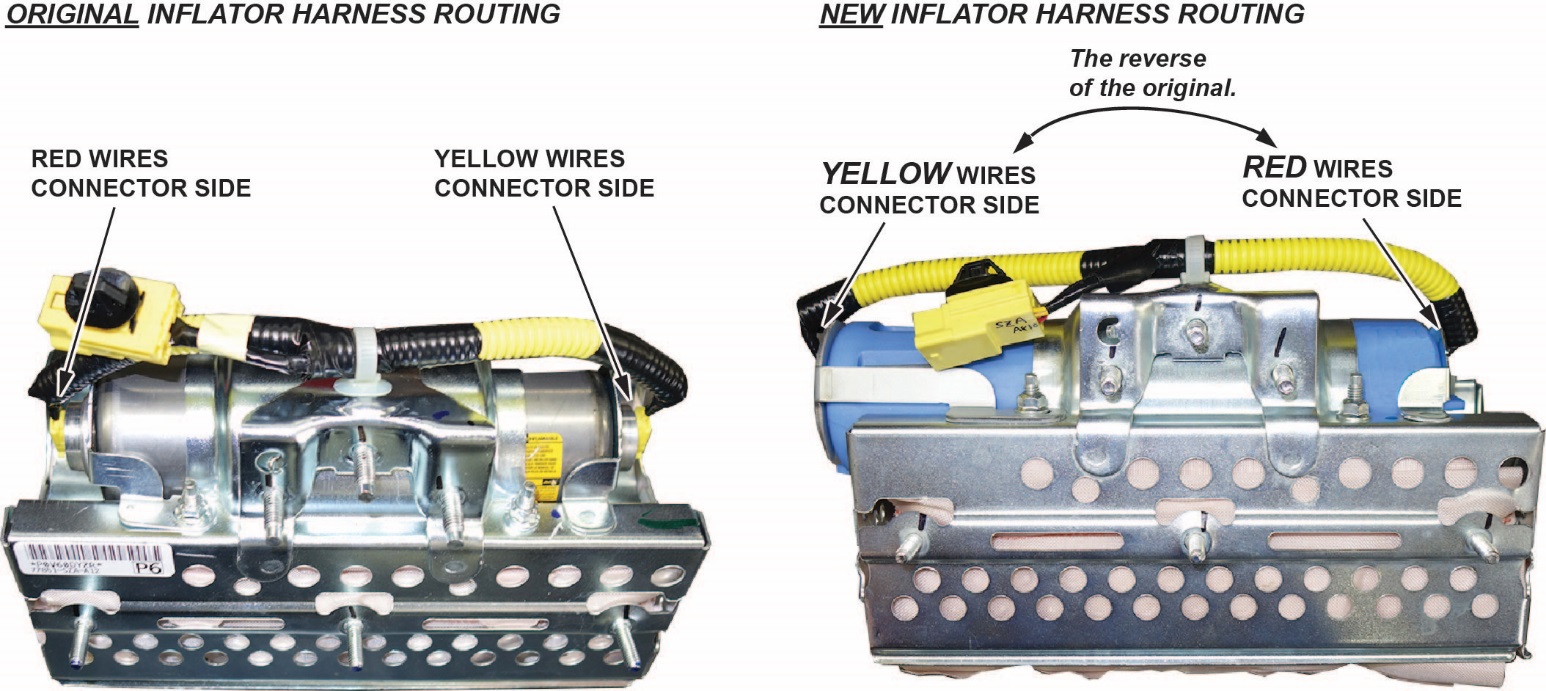
- Install the new inflator harness.
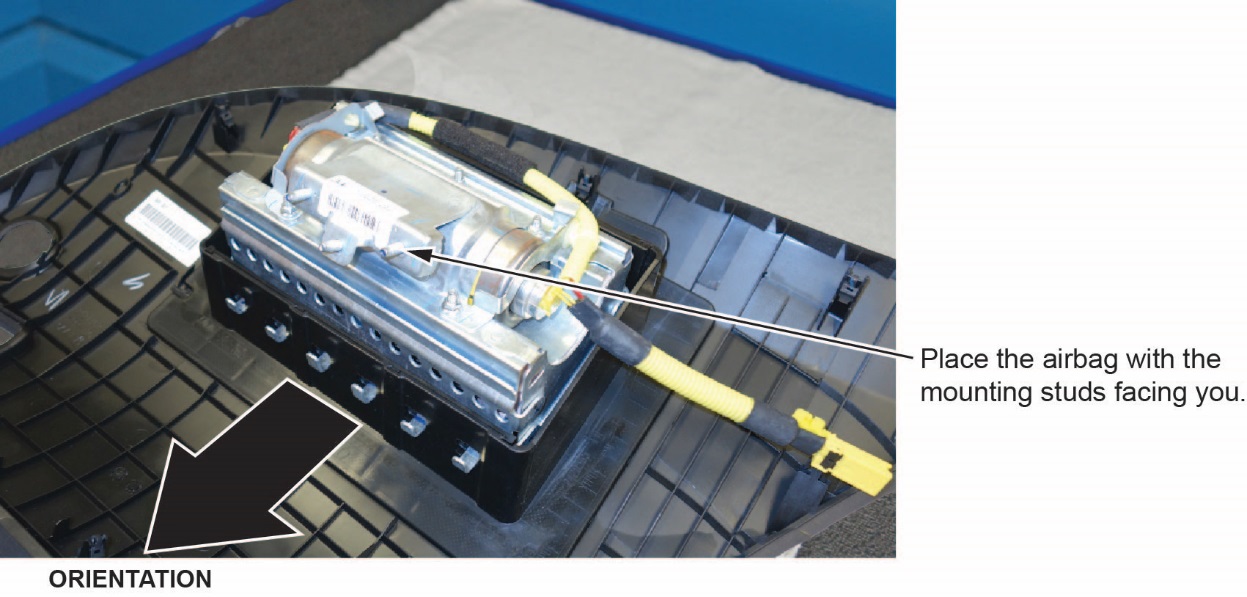
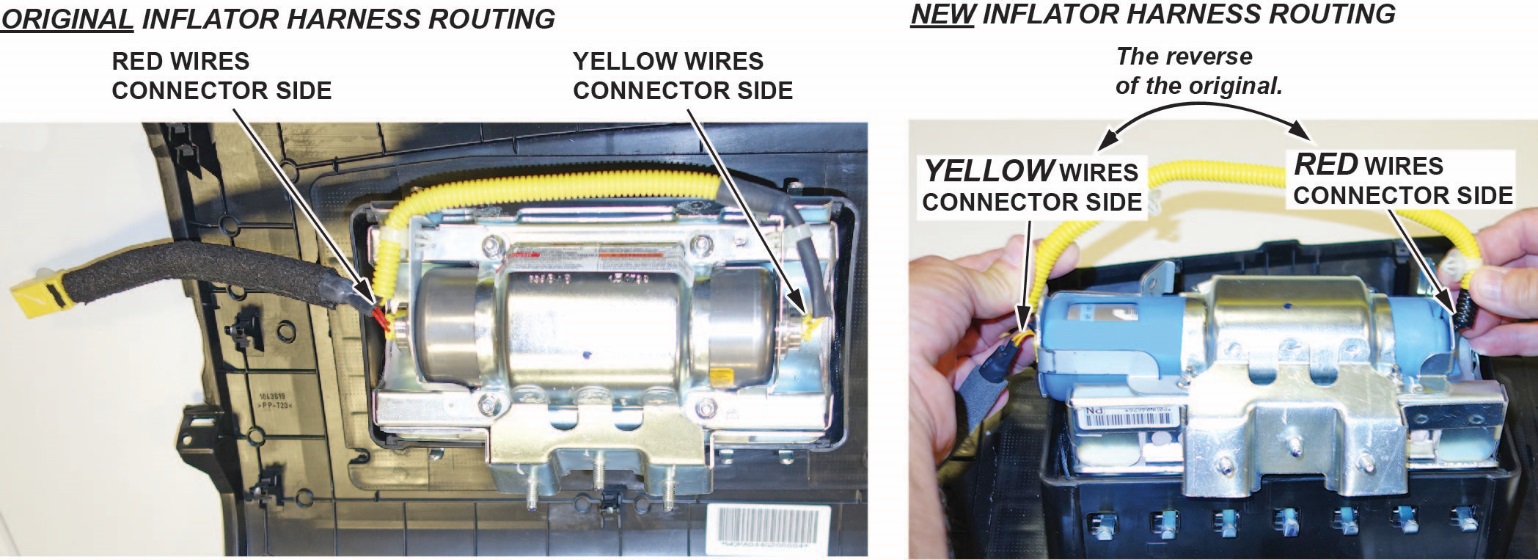
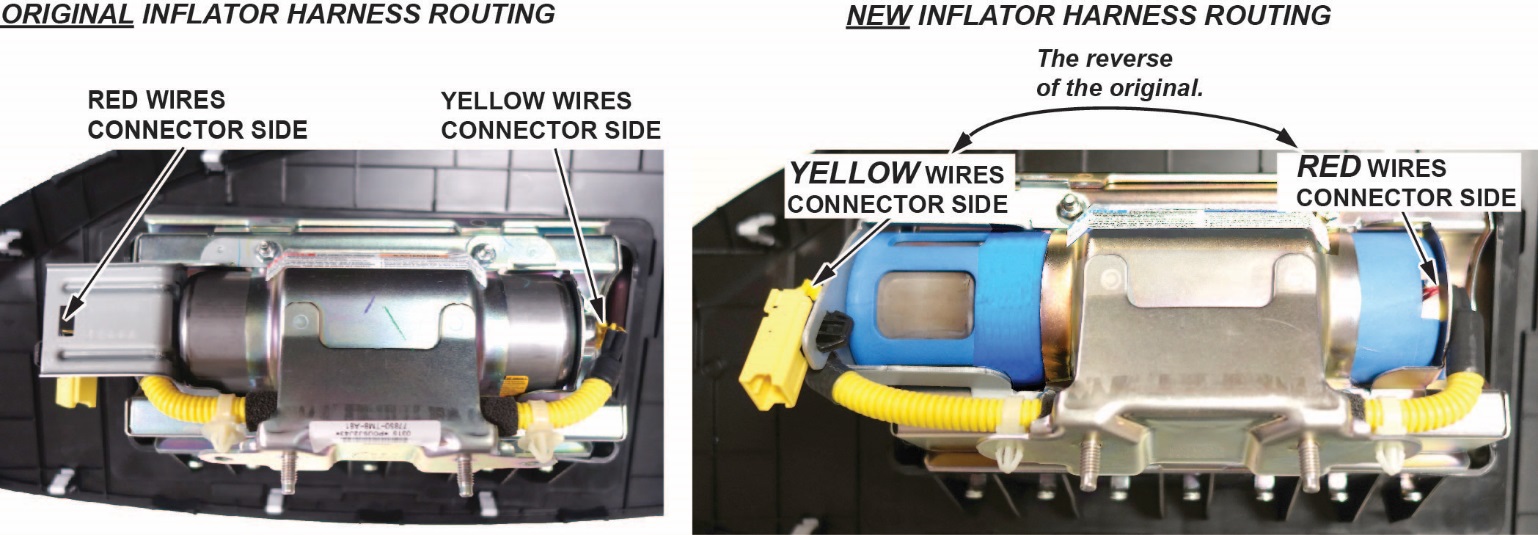
- Make sure the airbag and harness are aligned as shown.
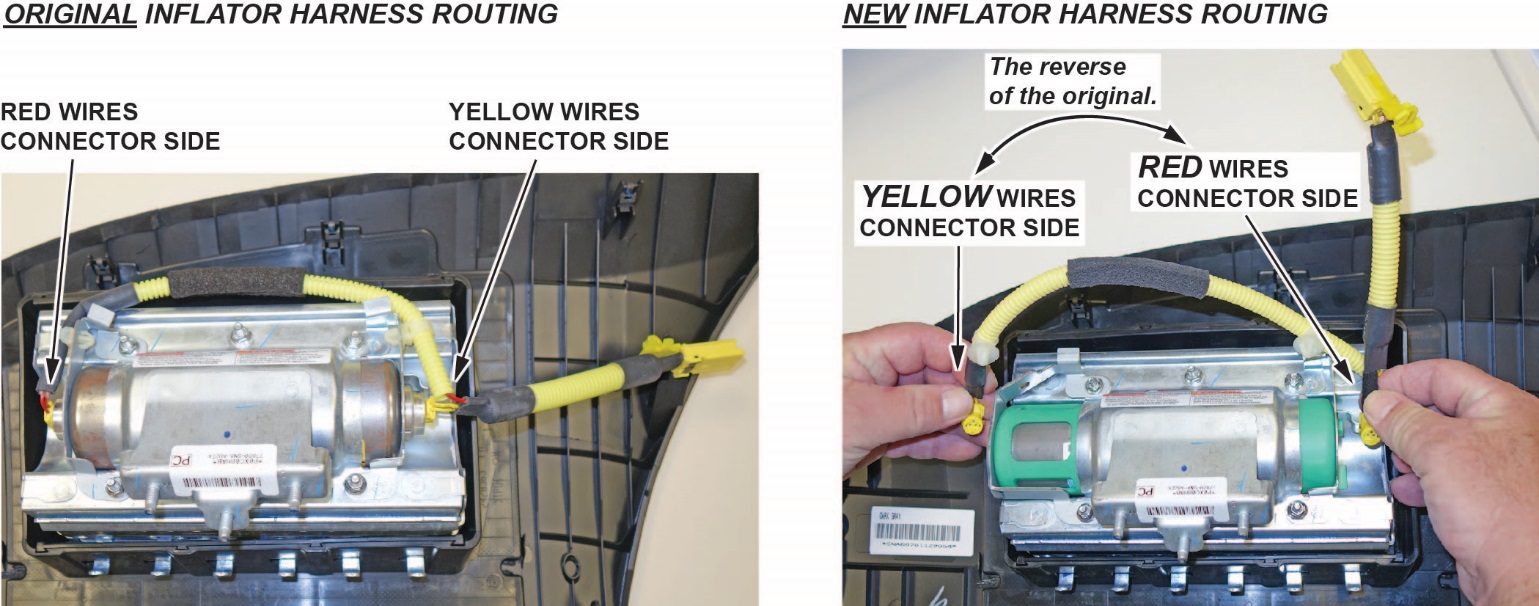
NOTE:
- The replacement inflator harnesses have the wire colors in the opposite positions of the original harness. If you connect the harness incorrectly, the harness cannot be removed and you will not be able to reinstall the airbag because the harness will be too short.
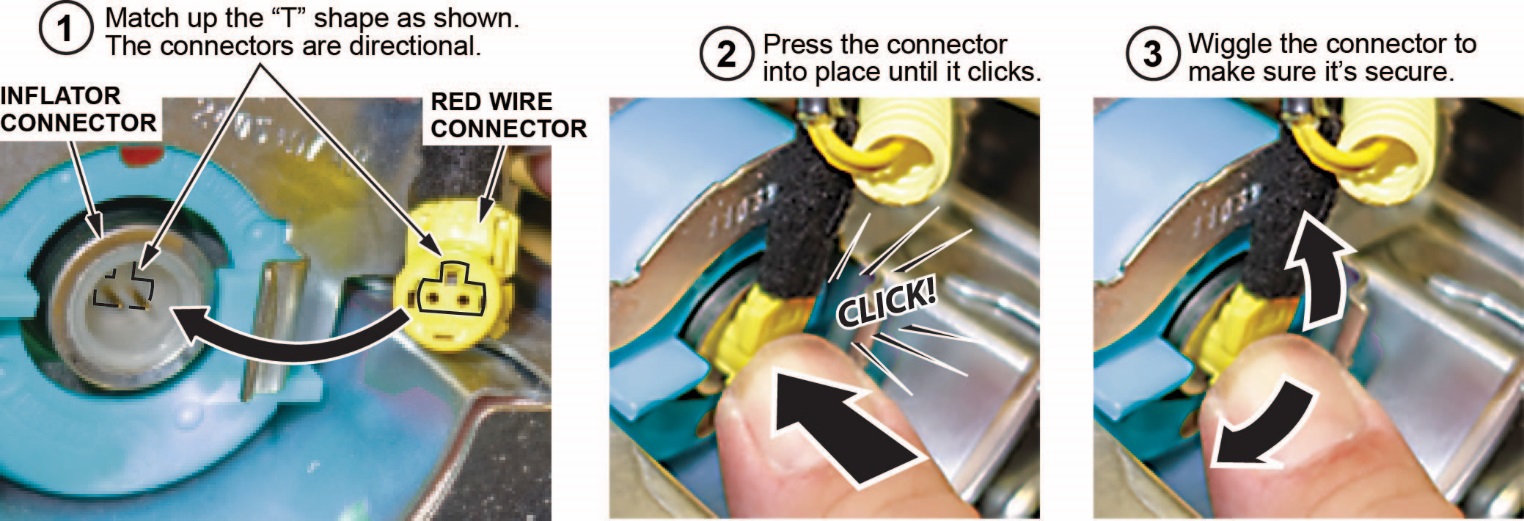
- Connect the red wire connector to the side of the inflator with the red dot.
- On vehicles with the blue inflator, the red dot is not visible because it is covered by the bracket.
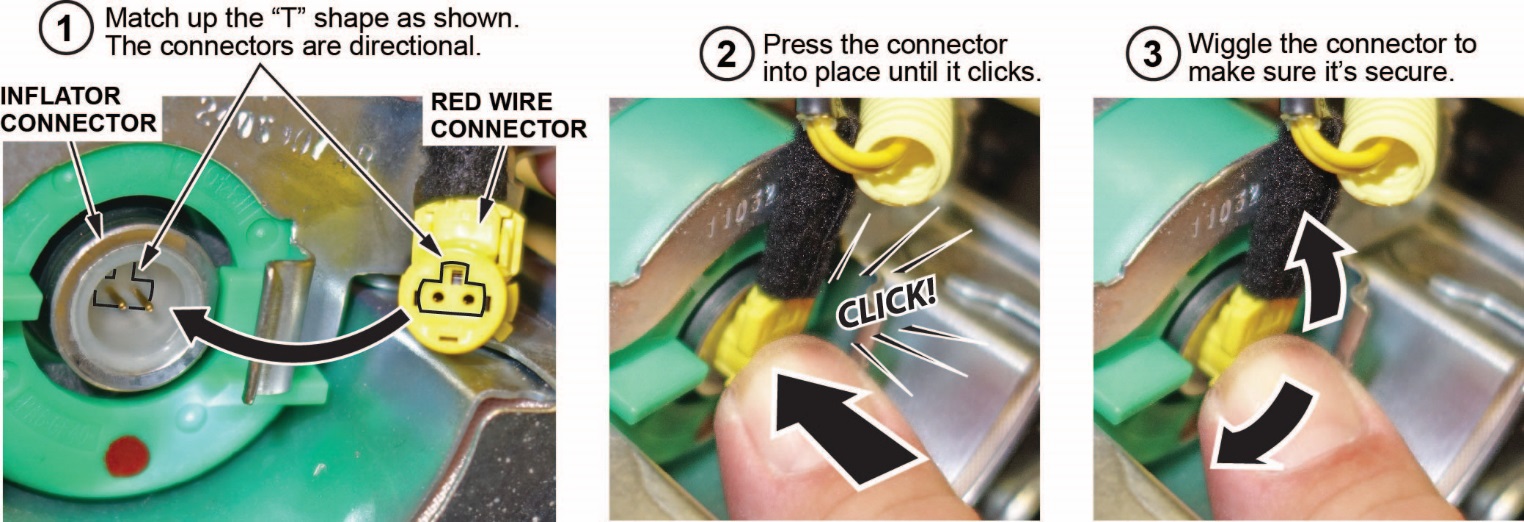
- Connect the red wire connector to the connector on the side with the short plastic cap. Align the “T” shape in the inflator harness connector with the T-shaped inflator connector, then press the connector into place.

- Connect the yellow wire connector to the connector on the side with the long plastic cap.
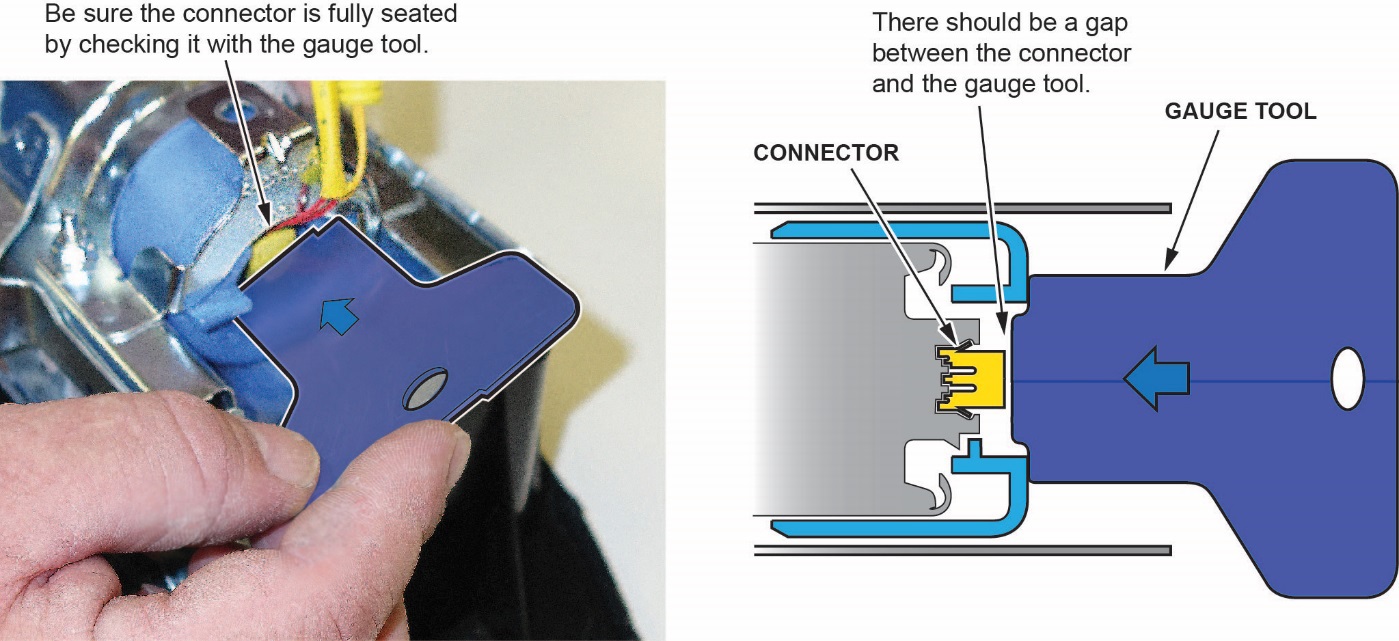
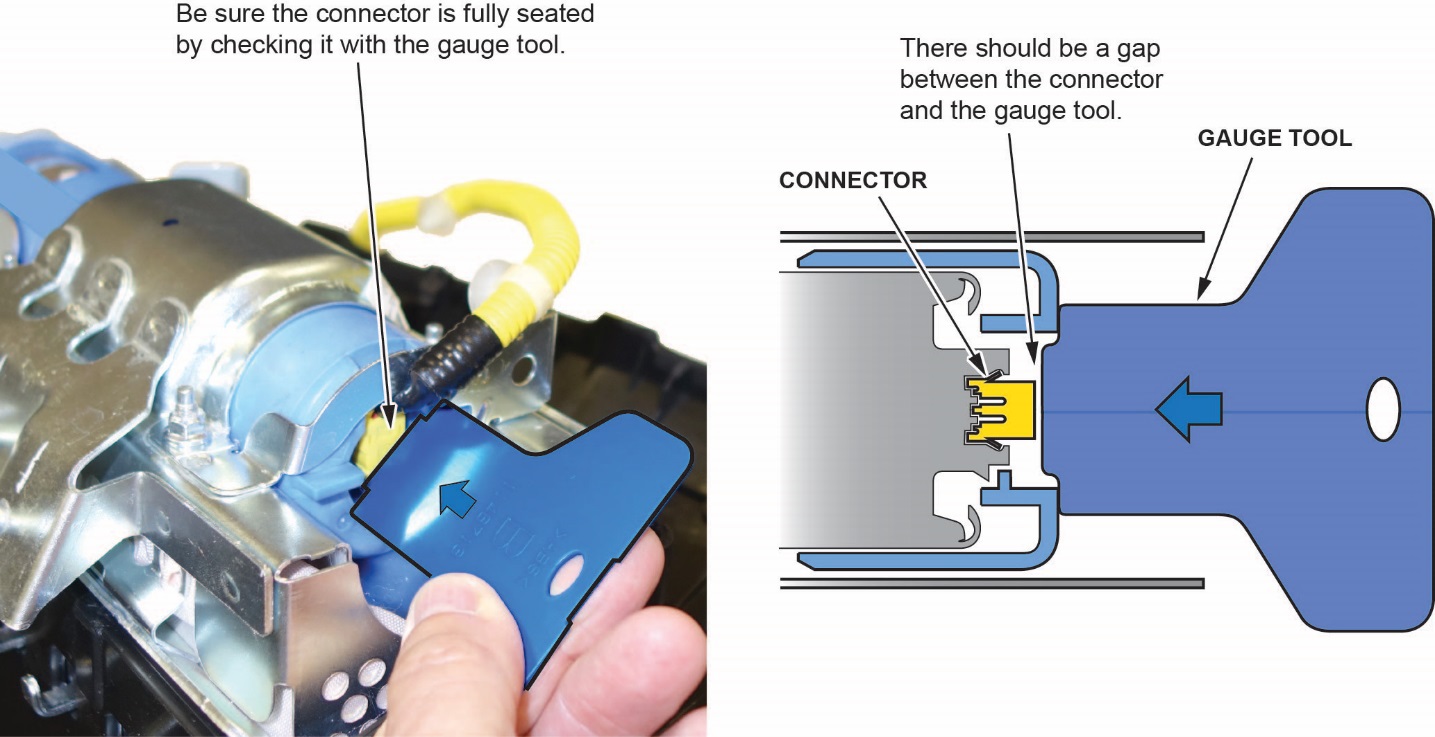
- After you hear each connector click, wiggle it to make sure it is secure.
NOTE: If the connector is not properly aligned, it will come out.
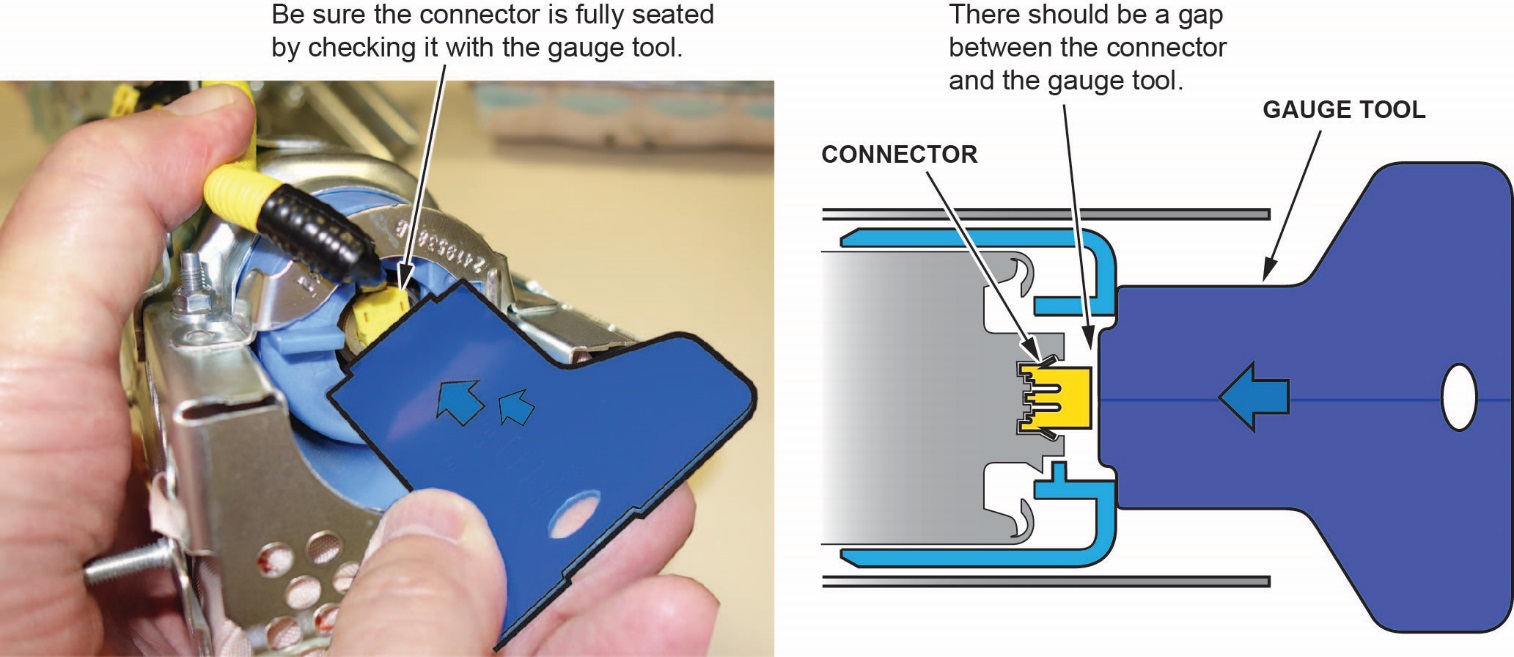
- Make sure the connector is secure and in place by using the gauge tool. (PSPI6 Gauge Tool P/N: 070AJ-TA00A00 or 07AAJ-TA0AA00).
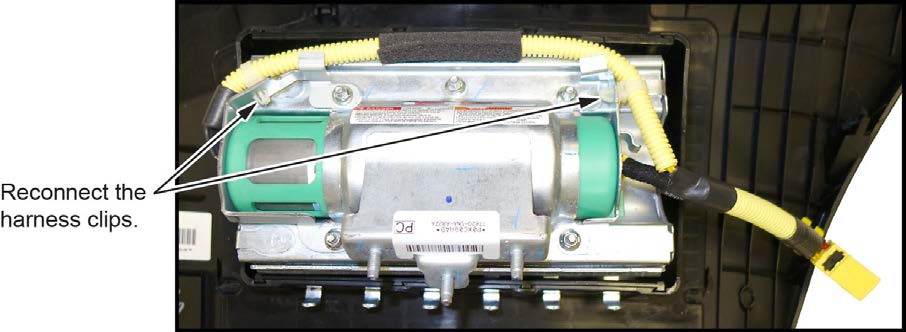
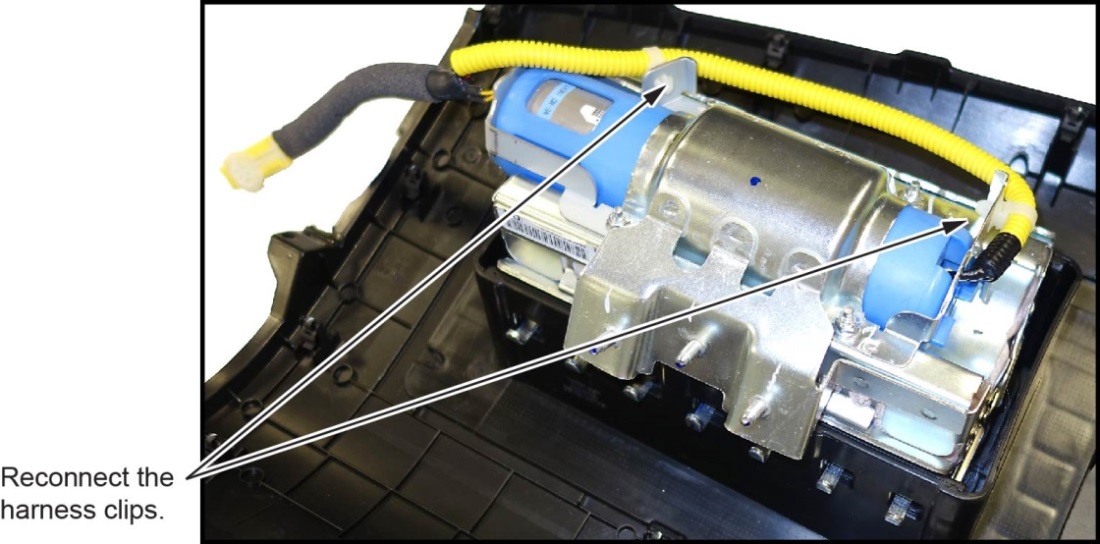
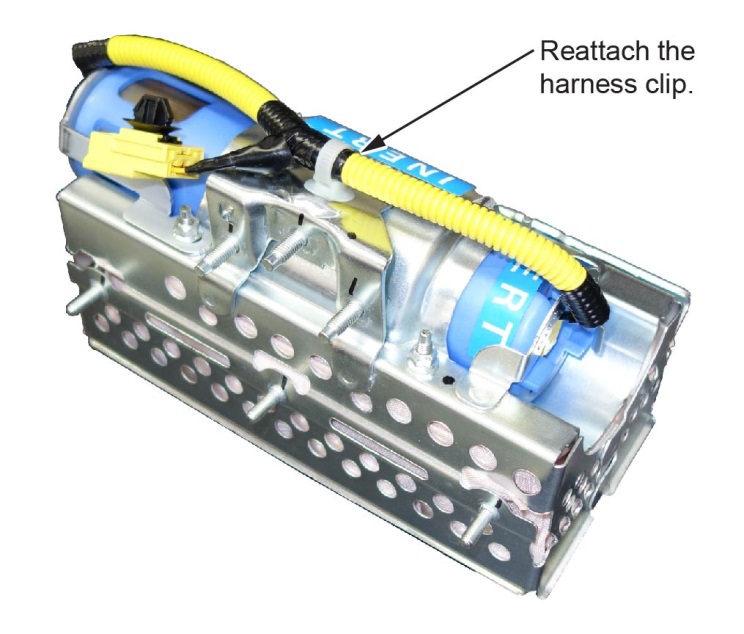
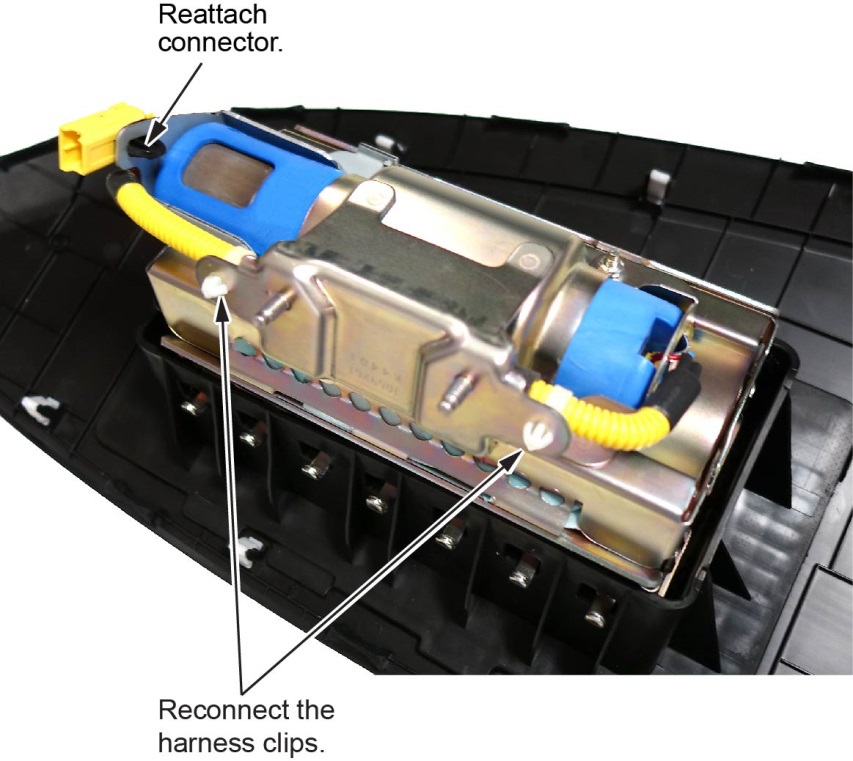
- Connect the harness to the inflator brackets as shown.
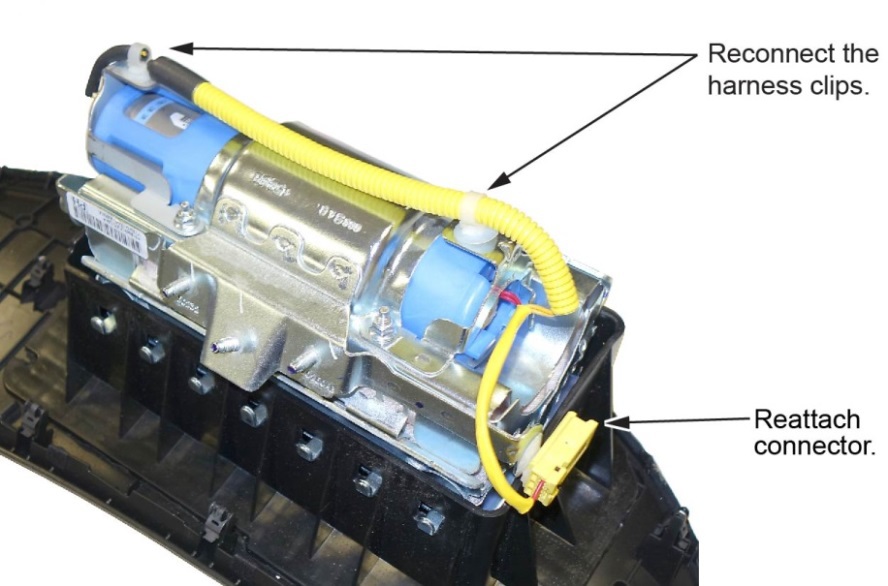
- Reinstall the passenger’s airbag into the vehicle and torque the new locknuts to 8 N•m (7.2 lb-ft).
- Reconnect the battery negative cable.
- Turn the ignition to ON and make sure the SRS indicator comes on for about 6 seconds, then goes off.
- Set the clock (for vehicles without navigation) and enter the anti-theft code for the audio and navigation system (if applicable).
- Put the original inflator into the box the new one came in. Make sure there is no other hardware in the box because if the package rattles, it will not be accepted by the courier.
- Follow the shipping instructions outlined in PIB A15-0002 to return the undeployed inflator.
- Give your warranty clerk the RO that includes the replacement inflator serial number and replacement part number. For the warranty claim to be paid, the replacement inflator part number must be included in the warranty claim.
END
REPAIR PROCEDURE CIVIC/CIVIC CNG/CIVIC HYBRID
NOTE:
- If the VIN status inquiry indicates that the vehicle is subject to any open safety recalls, including a driver’s airbag inflator campaign/recall, make sure to also complete those recall repairs before returning the vehicle to the customer. If you are unable to complete any open recall, advise the customer of the recall status and when the recall could be completed.
- Make sure you have the anti-theft code for the audio and navigation system (if applicable), then write down the frequencies for the audio unit’s preset buttons.
- Be careful not to damage any parts when replacing the inflator and follow the procedure exactly.
- If, before removing the airbag, you suspect that it may be the incorrect airbag for the vehicle or a counterfeit, do not remove the airbag. Contact your DPSM for assistance.
- Make sure you have reviewed the SRS Precautions and Procedures in the service information before doing the REPAIR PROCEDURE.
- Turn the ignition to ON and check if the SRS indicator comes on for about 6 seconds, then goes off.
- If the indicator comes on, then turns off after about 6 seconds, go to step 2.
- If the indicator does not come on, or if it stays on, contact your DPSM for assistance.
- Disconnect the battery negative cable and wait at least 3 minutes before continuing.
- Remove the front passenger’s airbag by referring to the service information.
- Place the airbag, face-down, on a clean shop towel. NOTE:
- Visually inspect the airbag and the inflator for any unusual writing or markings. Refer to IDENTIFYING COUNTERFEIT AIRBAGS.
- Peel the label located inside the inflator box from its backing and attach it to the RO. For the warranty claim to be paid, the replacement inflator part number that you received must be included in the warranty claim. NOTE:
- The replacement part number is printed on the top part of the label and the serial number is printed on the bottom. Make sure you attach the label to the RO and give it to the warranty clerk.
- There may also be a colored sticker located in the kit; ignore it because it is not used.
- Not all inflator kits have a label included. In those cases, write the serial number and part number from the side of the inflator box on the RO. The part number always starts with 047.

- Remove the harness from both ends of the inflator bracket.
- Short the yellow wires.
NOTE:
- You must cut the yellow wires for inflator removal and short the yellow wires on the inflator side as indicated to prevent accidental deployment.
- Do not cut the red wires because the airbag connector shorts these inflator wires.
- Cut 1–2 inches of the corrugated tube to access the yellow wires.
- Cut the yellow wires as shown.
- Strip away about 1 inch of the yellow wire insulation, then twist the wires together.

- Tape the twisted ends with electrical tape.
- Remove the four inflator nuts.

- Remove the inflator bracket.
NOTE:
- You can only remove one of the brackets, as the other is welded to the airbag housing.
- Do not reuse the original bracket; use the new one that came in the inflator kit.
- Remove the inflator by pulling it out.
- Install the new inflator.
P/N 04790-SNA-407
- One side of the inflator has a longer collar, a single tab, a plastic cutout, and a small flat spot on the connector. The other side of the inflator has a shorter collar, two tabs, and a red dot. Make sure you insert the end with the shorter collar into the airbag first.
- Slide the inflator in until the plastic collar contacts the bracket. The two tabs should align with the side of the airbag module and the metal tab as shown. There should be no space or gap between the inflator and bracket.
- Install the new bracket included in the kit onto the airbag module. Check there is no space or gap between the inflator and bracket by pushing the bracket against the inflator.
NOTE: The bracket may have a little bit of play before you install the new nuts.
- Hold the bracket against the inflator, then install the new 5 mm locknuts and torque them in sequence to 4.0 N•m (34 lb-in).
NOTE: Make sure you push the bracket against the inflator to ensure there are no gaps between the brackets and inflator when torqueing the nuts.
- Remove the stickers covering the terminals on both sides of the new inflator.
- Install the new inflator harness.
- Make sure the airbag and harness are aligned as shown.
NOTE:
- The replacement inflator harnesses have the wire colors in the opposite positions of the original harness. If you connect the harness incorrectly, the harness cannot be removed and you will not be able to reinstall the airbag because the harness will be too short.
- Connect the red wire connector to the side of the inflator with the red dot.
- On vehicles with the blue inflator, the red dot is not visible because it is covered by the bracket.
- Connect the red wire connector to the connector on the side with the short plastic cap. Align the “T” shape in the inflator harness connector with the T-shaped inflator connector, then press the connector into place.
- Connect the yellow wire connector to the connector on the side with the long plastic cap.
- After you hear each connector click, wiggle it to make sure it is secure.
NOTE: If the connector is not properly aligned, it will come out.
- Connect the harness to the inflator brackets as shown.
- Reinstall the passenger’s airbag into the vehicle and torque the new locknuts to 8 N•m (7.2 lb-ft).
- Reconnect the battery negative cable.
- Turn the ignition to ON and make sure the SRS indicator comes on for about 6 seconds, then goes off.
- Set the clock (for vehicles without navigation) and enter the anti-theft code for the audio and navigation system (if applicable).
- Put the original inflator into the box the new one came in. Make sure there is no other hardware in the box because if the package rattles, it will not be accepted by the courier.
- Follow the shipping instructions outlined in PIB A15-0002 to return the undeployed inflator.
- Give your warranty clerk the RO that includes the replacement inflator serial number and replacement part number. For the warranty claim to be paid, the replacement inflator part number must be included in the warranty claim.
END
REPAIR PROCEDURE CR-V
NOTE:
- If the VIN status inquiry indicates that the vehicle is subject to any open safety recalls, including a driver’s airbag inflator campaign/recall, make sure to also complete those recall repairs before returning the vehicle to the customer. If you are unable to complete any open recall, advise the customer of the recall status and when the recall could be completed.
- Make sure you have the anti-theft code for the audio and navigation system (if applicable), then write down the frequencies for the audio unit’s preset buttons.
- Be careful not to damage any parts when replacing the inflator and follow the procedure exactly.
- If, before removing the airbag, you suspect that it may be the incorrect airbag for the vehicle or a counterfeit, do not remove the airbag. Contact your DPSM for assistance.
- Make sure you have reviewed the SRS Precautions and Procedures in the applicable electronic service manual before doing the REPAIR PROCEDURE.
- Turn the ignition ON and check if the SRS indicator comes on for about 6 seconds, then goes off.
- If the indicator comes on, then turns off after about 6 seconds, go to step 2.
- If the indicator does not come on, or if it stays on, contact your DPSM for assistance.
- Disconnect the battery negative cable and wait at least 3 minutes before continuing.
- Remove the front passenger’s airbag by referring to the service information.
- Place the airbag, face-down, on a clean shop towel.
NOTE:
- The orientation of the airbag is critical because if the inflator is installed incorrectly, the harness will be too short when you reinstall the airbag.
- The brackets between the various models are similar but may differ from the example shown.
- Visually inspect the airbag and the inflator for any unusual writing or markings. Refer to IDENTIFYING COUNTERFEIT AIRBAGS.
- Peel the label located inside the inflator box from its backing and attach it to the RO. For the warranty claim to be paid, the replacement inflator part number that you received must be included in the warranty claim. NOTE:
- The replacement part number is printed on the top part of the label and the serial number is printed on the bottom. Make sure you attach the label to the RO and give it to the warranty clerk.
- There may also be a colored sticker located in the kit ignore it because it is not used.
- Not all inflator kits have a label included. In those cases, write the serial number and part number from the side of the inflator box on the RO. The part number always starts with 047.

- Remove the harness from both ends of the inflator bracket.
- Short the yellow wires.
NOTE:
- You must cut the yellow wires for inflator removal and short the yellow wires on the inflator side as indicated to prevent accidental deployment.
- Do not cut the red wires because the airbag connector shorts these inflator wires.
- Cut the yellow wires as shown.
- Strip away about 1 inch of the yellow wire insulation, then twist the wires together.

- Tape the twisted ends with electrical tape.
- Remove the four inflator nuts.
- Remove the inflator bracket.
NOTE:
- You can only remove one of the brackets, as the other is welded to the airbag housing.
- Do not reuse the bracket; use the new one that came in the inflator kit.
- Remove the inflator by pulling it out.
- Install the new inflator.
P/N 04790-SWA-407
- One side of the inflator has a longer collar, a single tab, a plastic cutout, and a small flat spot on the connector. The other side of the inflator has a shorter collar, two tabs, and a red dot. Make sure you insert the end with the shorter collar into the airbag first.
- Slide the inflator in until the plastic collar contacts the bracket. The two tabs should align with the side of the airbag module and the metal tab as shown. There should be no space or gap between the inflator and bracket.
- Install the new bracket included in the kit onto the airbag module. Check there is no space or gap between the inflator and bracket by pushing the bracket against the inflator.
NOTE: The bracket may have a little bit of play before you install the new nuts.
- Hold the bracket against the inflator, then install the new 5 mm locknuts and torque them in sequence to 4.0 N•m (34 lb-in).
NOTE: Make sure you push the bracket against the inflator to ensure there are no gaps between the brackets and inflator when torqueing the nuts.
- Remove the stickers covering the terminals on both sides of the new inflator.

- Install the new inflator harness.
- Make sure the airbag and harness are aligned as shown.
NOTE:
- The replacement inflator harnesses have the wire colors in the opposite positions of the original harness. If you connect the harness incorrectly, the harness cannot be removed, and you will not be able to reinstall the airbag because the harness will be too short.
- Connect the red wire connector to the side of the inflator with the red dot.
- On vehicles with the blue inflator, the red dot is not visible because it is covered by the bracket.
- Connect the red wire connector to the connector on the side with the short plastic cap. Align the “T” shape in the inflator harness connector with the T-shaped inflator connector, then press the connector into place.
- Connect the yellow wire connector to the connector on the side with the long plastic cap.
- After you hear each connector click, wiggle it to make sure it is secure.
NOTE: If the connector is not properly aligned, it will come out.
- Make sure the connector is secure and in place by using the gauge tool. (PSPI6 Gauge Tool P/N: 070AJ-TA00A00 or 07AAJ-TA0AA00)
- Connect the harness to the inflator brackets as shown.
- Reinstall the passenger’s airbag into the vehicle and torque the new locknuts to 8 N•m (7.2 lb-ft).
- Reconnect the battery negative cable.
- Turn the ignition ON and make sure the SRS indicator comes on for about 6 seconds, then goes off.
- Set the clock (for vehicles without navigation) and enter the anti-theft code for the audio and navigation system (if applicable).
- Put the original inflator into the box the new one came in. Make sure there is no other hardware in the box because if the package rattles, it will not be accepted by the courier.
- Follow the shipping instructions outlined in PIB A15-0002 to return the undeployed inflator.
- Give your warranty clerk the RO that includes the replacement inflator serial number and replacement part number. For the warranty claim to be paid, the replacement inflator part number must be included in the warranty claim.
END
REPAIR PROCEDURE FIT
NOTE:
- If the VIN status inquiry indicates that the vehicle is subject to any open safety recalls, including a driver’s airbag inflator campaign/recall, make sure to also complete those recall repairs before returning the vehicle to the customer. If you are unable to complete any open recall, advise the customer of the recall status and when the recall could be completed.
- Make sure you have the anti-theft code for the audio and navigation system (if applicable), then write down the frequencies for the audio unit’s preset buttons.
- Be careful not to damage any parts when replacing the inflator and follow the procedure exactly.
- If, before removing the airbag, you suspect that it may be the incorrect airbag for the vehicle or a counterfeit, do not remove the airbag. Contact your DPSM for assistance.
- Make sure you have reviewed the SRS Precautions and Procedures in service information before doing the REPAIR PROCEDURE.
- Turn the ignition to ON and check if the SRS indicator comes on for about 6 seconds, then goes off.
- If the indicator comes on, then goes off after about 6 seconds, go to step 2.
- If the indicator does not come on, or if it stays on, contact your DPSM for assistance.
- Disconnect the battery negative cable and wait at least 3 minutes before continuing.
- Remove the front passenger’s airbag by referring to the service information.
- Place the airbag, face-down, on a clean shop towel.
NOTE:
- The orientation of the airbag is critical because if the inflator is installed incorrectly, the harness will be too short when you reinstall the airbag.
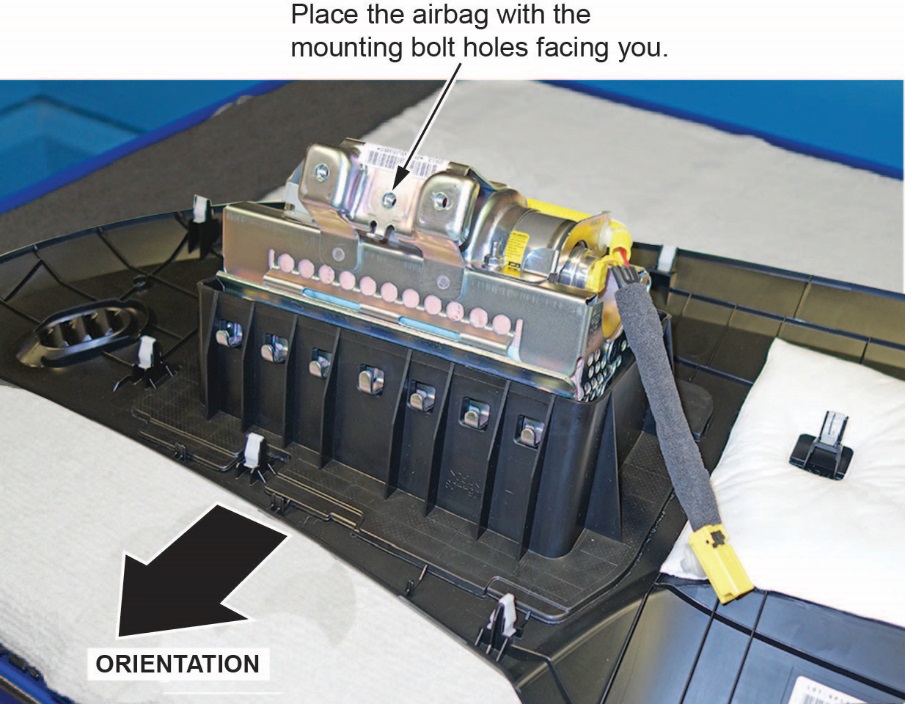
- The Fit does not have mounting studs. It is secured in the vehicle with bolts, so make sure the mounting bolt holes are facing you.
- Visually inspect the airbag and the inflator for any unusual writing or markings. Refer to IDENTIFYING COUNTERFEIT AIRBAGS.
- Peel the label located inside the inflator box from its backing and attach it to the RO. For the warranty claim to be paid, the replacement inflator part number that you received must be included in the warranty claim.
NOTE:
- The replacement part number is printed on the top part of the label and the serial number is printed on the bottom. Make sure you attach the label to the RO and give it to the warranty clerk.
- There may also be a colored sticker located in the kit; ignore it because it is not used.
- Not all inflator kits have a label included. In those cases, write the serial number and part number from the side of the inflator box on the RO. The part number always starts with 047.
- Remove the harness from both ends of the inflator bracket.
- Short the yellow wires.
NOTE:
- You must cut the yellow wires for inflator removal and short the yellow wires on the inflator side as indicated to prevent accidental deployment.
- Do not cut the red wires because the airbag connector shorts these inflator wires.
- There is glue securing the black insulation to the yellow wires. Be careful not to cut the wires when removing the insulation.
- Cut 1–2 inches of the corrugated tube to access the yellow wires.
- Cut the yellow wires as shown.
- Strip away about 1 inch of the yellow wire insulation, then twist the wires together.

- Tape the twisted ends with electrical tape.
- Remove the four inflator nuts.
- Remove the inflator bracket.
NOTE:
- You can only remove one of the brackets, as the other is welded to the airbag housing.
- Do not reuse the bracket; use the new one that came in the inflator kit.
- Remove the inflator by pulling it out.
- Install the new inflator.
P/N 04790-TK6-407
- One side of the inflator has a longer collar, a single tab, a plastic cutout, and a small flat spot on the connector. The other side of the inflator has a shorter collar, two tabs, and a red dot. Make sure you insert the end with the shorter collar into the airbag first.
- Slide the inflator in until the plastic collar contacts the bracket. The two tabs should align with the side of the airbag module and the metal tab as shown. There should be no space or gap between the inflator and bracket.

- Install the new bracket included in the kit onto the airbag module. Check there is no space or gap between the inflator and bracket by pushing the bracket against the inflator.
NOTE: The bracket may have a little bit of play before you install the new nuts.

- Hold the bracket against the inflator, then install the new 5 mm locknuts and torque them in sequence to 4.0 N•m (34 lb-in).
NOTE: Make sure you push the bracket against the inflator to ensure there are no gaps between the brackets and inflator when torqueing the nuts.
- Remove the stickers covering the terminals on both sides of the new inflator.

- Install the new inflator harness.
- Make sure the airbag and harness are aligned as shown.
NOTE:
- The replacement inflator harnesses have the wire colors in the opposite positions of the original harness. If you connect the harness incorrectly, the harness cannot be removed, and you will not be able to reinstall the airbag because the harness will be too short.
- Connect the red wire connector to the side of the inflator with the red dot.
- On vehicles with the blue inflator, the red dot is not visible because it is covered by the bracket.
- Connect the red wire connector to the connector on the side with the short plastic cap. Align the “T” shape in the inflator harness connector with the T-shaped inflator connector, then press the connector into place.

- Connect the yellow wire connector to the connector on the side with the long plastic cap.
- After you hear each connector click, wiggle it to make sure it is secure.
NOTE: If the connector is not properly aligned, it will come out.
- Make sure the connector is secure and in place by using the gauge tool. (PSPI6 Gauge Tool P/N: 070AJ-TA00A00 or 07AAJ-TA0AA00)

- Connect the harness to the inflator brackets as shown.
- Reinstall the passenger’s airbag into the vehicle and torque the new locknuts to 8 N•m (7.2 lb-ft).
- Reconnect the battery negative cable.
- Turn the ignition ON and make sure the SRS indicator comes on for about 6 seconds, then goes off.
- Set the clock (for vehicles without navigation) and enter the anti-theft code for the audio and navigation system (if applicable).
- Put the original inflator into the box the new one came in. Make sure there is no other hardware in the box because if the package rattles, it will not be accepted by the courier.
- Follow the shipping instructions outlined in PIB A15-0002 to return the undeployed inflator.
- Give your warranty clerk the RO that includes the replacement inflator serial number and replacement part number. For the warranty claim to be paid, the replacement inflator part number must be included in the warranty claim.
END
REPAIR PROCEDURE PILOT
NOTE:
- If the VIN status inquiry indicates that the vehicle is subject to any open safety recalls, including a driver’s airbag inflator campaign/recall, make sure to also complete those recall repairs before returning the vehicle to the customer. If you are unable to complete any open recall, advise the customer of the recall status and when the recall could be completed.
- Make sure you have the anti-theft code for the audio and navigation system (if applicable), then write down the frequencies for the audio unit’s preset buttons.
- Be careful not to damage any parts when replacing the inflator and follow the procedure exactly.
- If, before removing the airbag, you suspect that it may be the incorrect airbag for the vehicle or a counterfeit, do not remove the airbag. Contact your DPSM for assistance.
- Make sure you have reviewed the SRS Precautions and Procedures in the service information before doing the REPAIR PROCEDURE.
- Turn the ignition ON and check if the SRS indicator comes on for about 6 seconds, then goes off.
- If the indicator comes on, then turns off after about 6 seconds, go to step 2.
- If the indicator does not come on, or if it stays on, contact your DPSM for assistance.
- Disconnect the battery negative cable and wait at least 3 minutes before continuing.
- Remove the front passenger’s dashboard trim by referring to the service information.
- Remove the front passenger’s airbag.
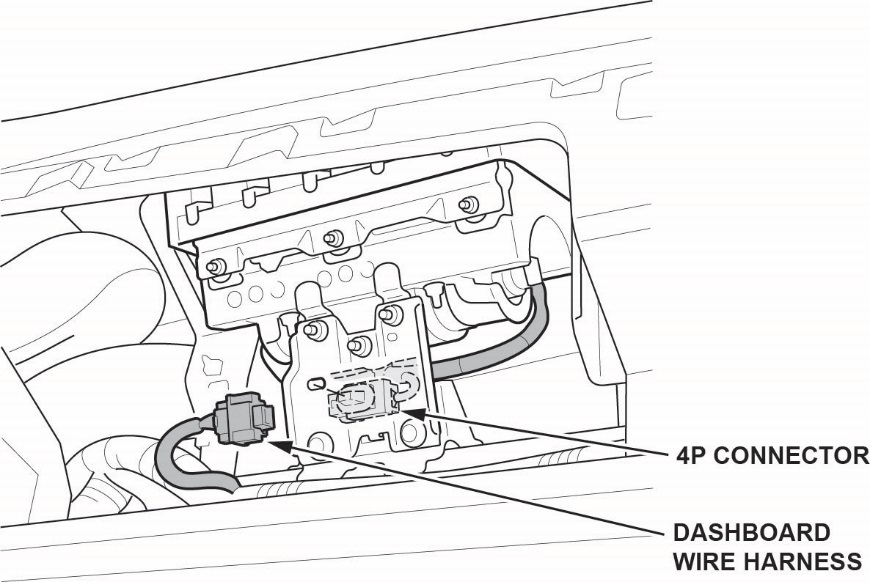
- Disconnect the front passenger’s airbag 4P connector from the dashboard wire harness.
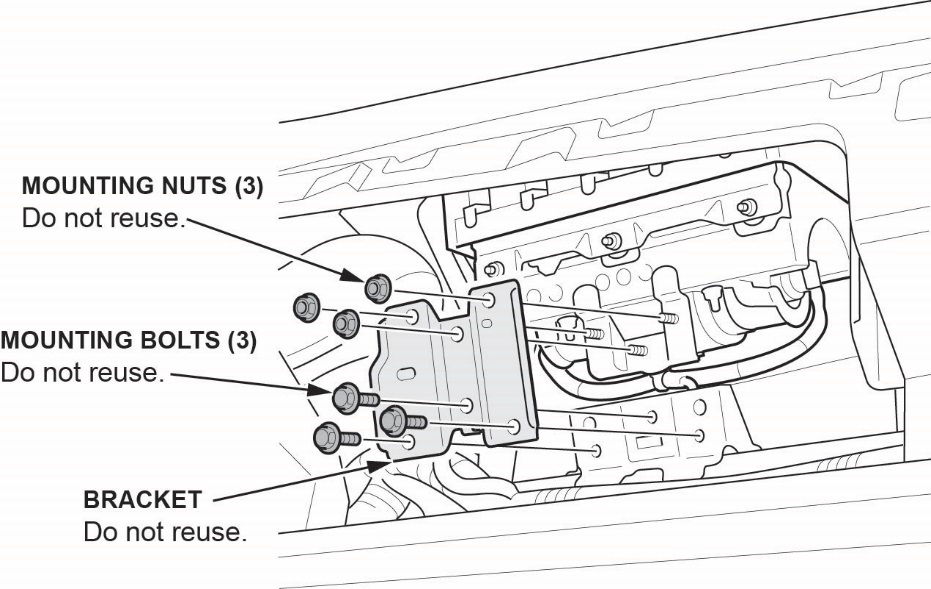
- Remove the mounting nuts and bolts to remove the bracket.
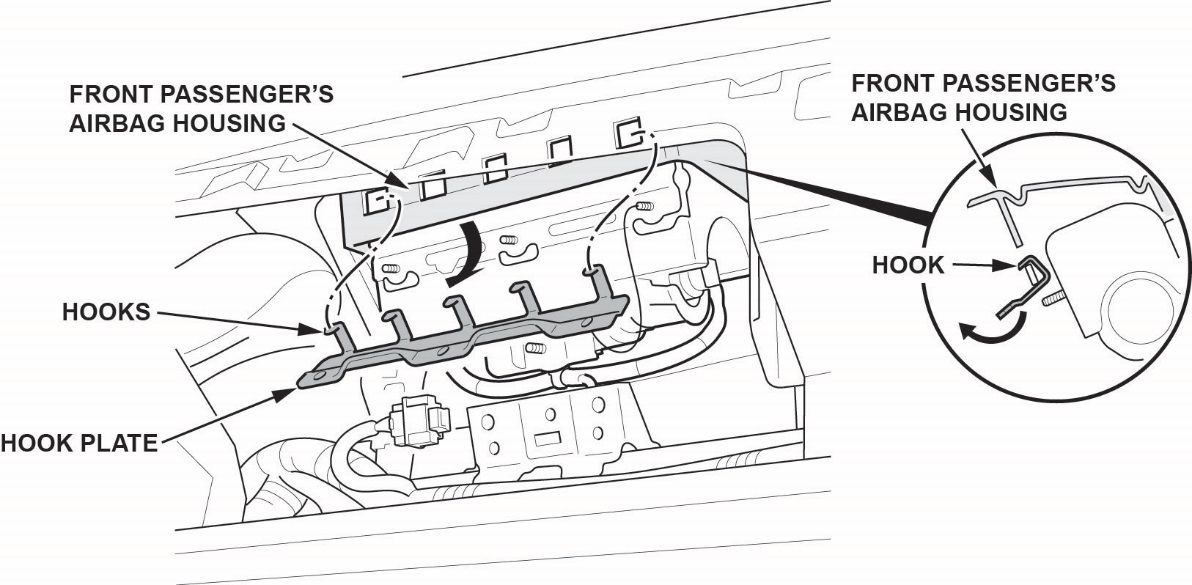
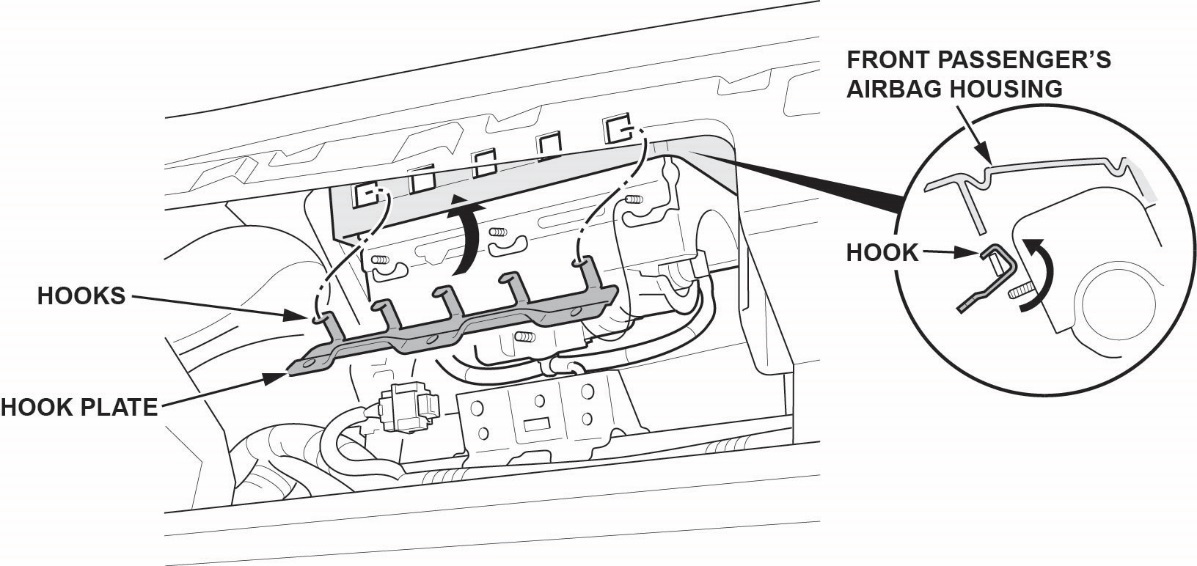
- Remove the mounting nuts from the hook plate.
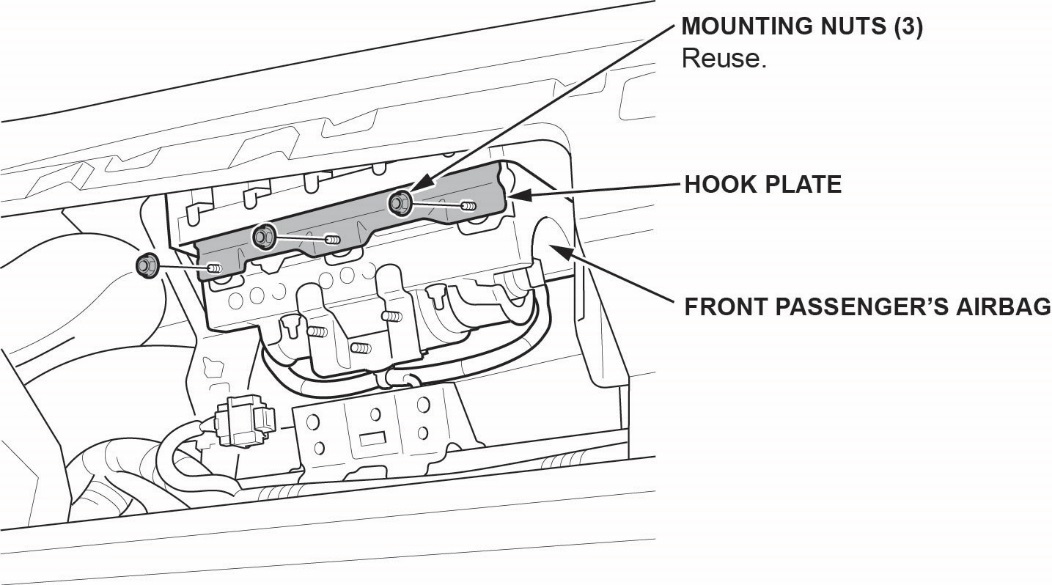
- Release the hooks on the hook plate from the front passenger’s airbag housing and remove the hook plate.
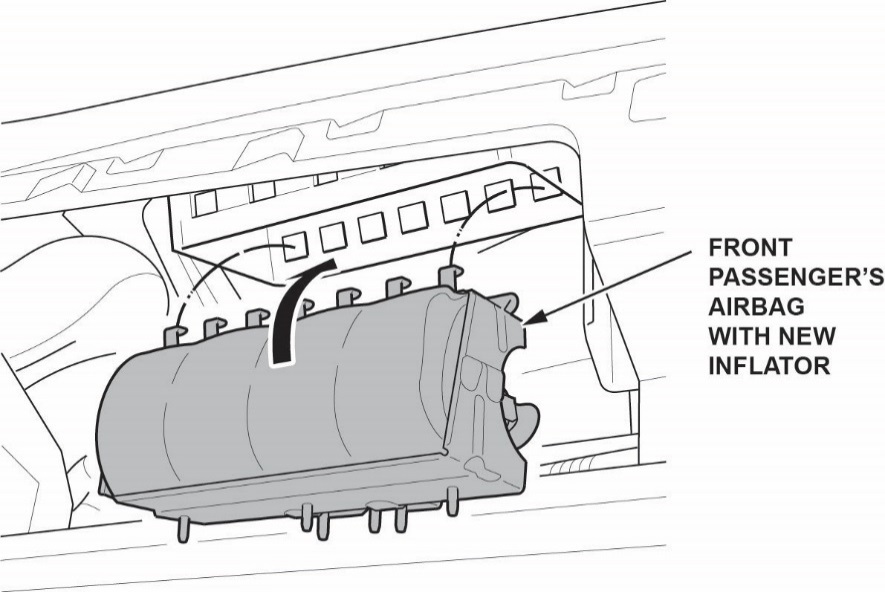
- Remove the front passenger’s airbag.
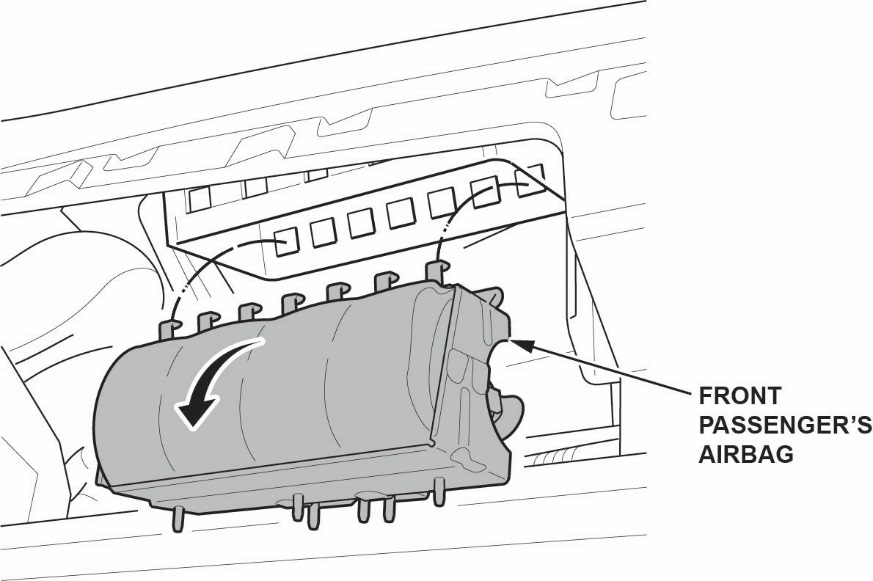
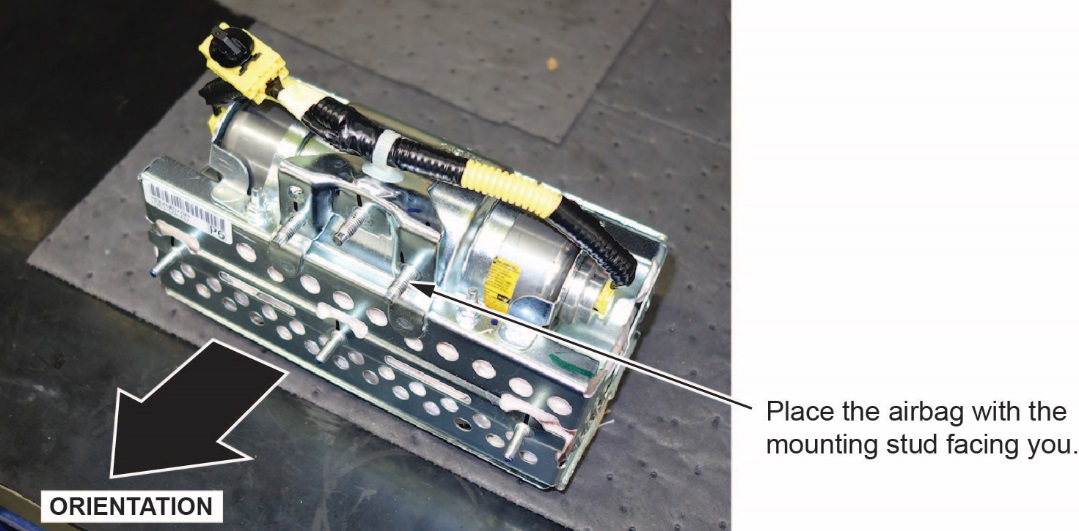
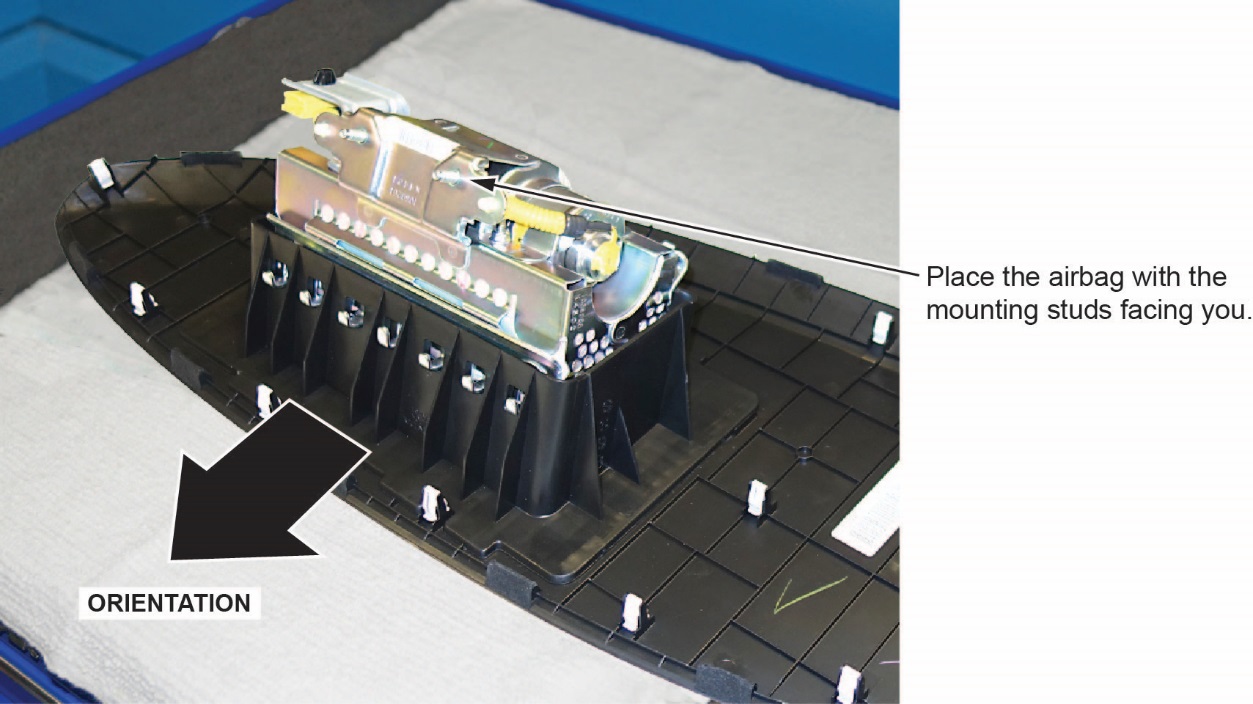
- Place the airbag, face-down, on a clean shop towel.
NOTE:
- The orientation of the airbag is critical because if the inflator is installed incorrectly, the harness will be too short when you reinstall the airbag.
- The brackets between the various models are similar, but may differ from the example shown.
- Visually inspect the airbag and the inflator for any unusual writing or markings. Refer to IDENTIFYING COUNTERFEIT AIRBAGS.
- Peel the label located inside the inflator box from its backing and attach it to the RO. For the warranty claim to be paid, the replacement inflator part number that you received must be included in the warranty claim.
NOTE:
- The replacement part number is printed on the top part of the label and the serial number is printed on the bottom. Make sure you attach the label to the RO and give it to the warranty clerk.
- There may also be a colored sticker located in the kit; ignore it because it is not used.
- Not all inflator kits have a label included. In those cases, write the serial number and part number from the side of the inflator box on the RO. The part number always starts with 047.

- Remove the harness from both ends of the inflator bracket.
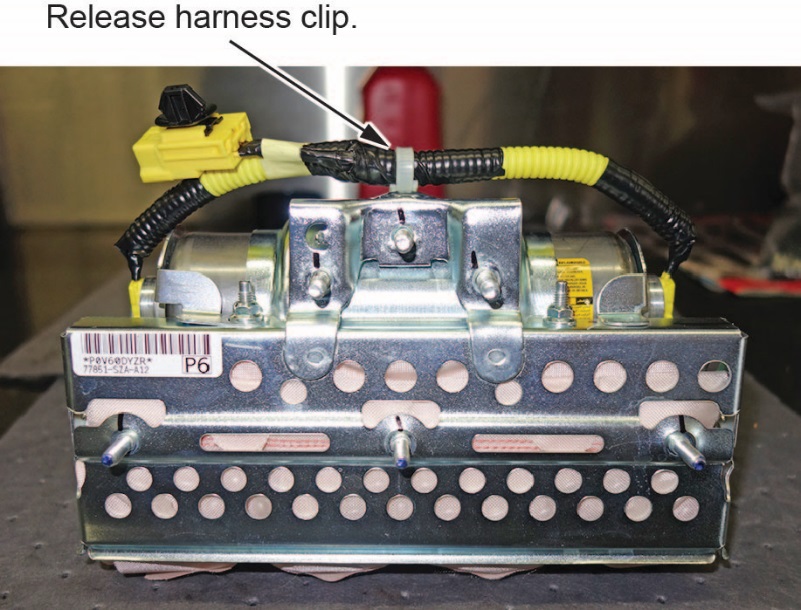
- Short the yellow wires.
NOTE:
- You must cut the yellow wires for inflator removal and short the yellow wires on the inflator side as indicated to prevent accidental deployment.
- Do not cut the red wires because the airbag connector shorts these inflator wires.
- Cut the yellow wires as shown.
- Strip away about 1 inch of the yellow wire insulation, then twist the wires together.

- Tape the twisted ends with electrical tape.
- Remove the four inflator nuts.
- Remove the inflator bracket.
NOTE:
- You can only remove one of the brackets, as the other is welded to the airbag housing.
- Do not reuse the bracket, use the new one that came in the inflator kit.
- Remove the inflator by pulling it out.
- Install the new inflator.
P/N 04790-SZA-407
- One side of the inflator has a longer collar, a single tab, a plastic cutout, and a small flat spot on the connector. The other side of the inflator has a shorter collar, two tabs, and a red dot. Make sure you insert the end with the shorter collar into the airbag first.
- Slide the inflator in until the plastic collar contacts the bracket. The two tabs should align with the side of the airbag module and the metal tab as shown. There should be no space or gap between the inflator and bracket.
- Install the new bracket included in the kit onto the airbag module. Check there is no space or gap between the inflator and bracket by pushing the bracket against the inflator.
NOTE: The bracket may have a little bit of play before you install the new nuts.
- Hold the bracket against the inflator, then install the new 5 mm locknuts and torque them in sequence to 4.0 N•m (34 lb-in).
NOTE: Make sure you push the bracket against the inflator to ensure there are no gaps between the brackets and inflator when torqueing the nuts.
- Remove the stickers covering the terminals on both sides of the new inflator.
- Install the new inflator harness.
- Make sure the airbag and harness are aligned as shown.
NOTE:
- The replacement inflator harnesses have the wire colors in the opposite positions of the original harness. If you connect the harness incorrectly, the harness cannot be removed and you will not be able to reinstall the airbag because the harness will be too short.
- Connect the red wire connector to the side of the inflator with the red dot.
- On vehicles with the blue inflator, the red dot is not visible because it is covered by the bracket.
- Connect the red wire connector to the connector on the side with the short plastic cap. Align the “T” shape in the inflator harness connector with the T-shaped inflator connector, then press the connector into place.

- Connect the yellow wire connector to the connector on the side with the long plastic cap.
- After you hear each connector click, wiggle it to make sure it is secure.
NOTE: If the connector is not properly aligned, it will come out.
- Make sure the connector is secure and in place by using the gauge tool. (PSPI6 Gauge Tool P/N: 070AJ-TA00A00 or 07AAJ-TA0AA00)
- Connect the harness to the inflator bracket as shown.
- Install the front passenger’s airbag with the new inflator.
- Install the hooks of the front passenger’s airbag into the front passenger’s airbag housing.
- Insert the hooks of the hook plate into the front passenger’s airbag housing.
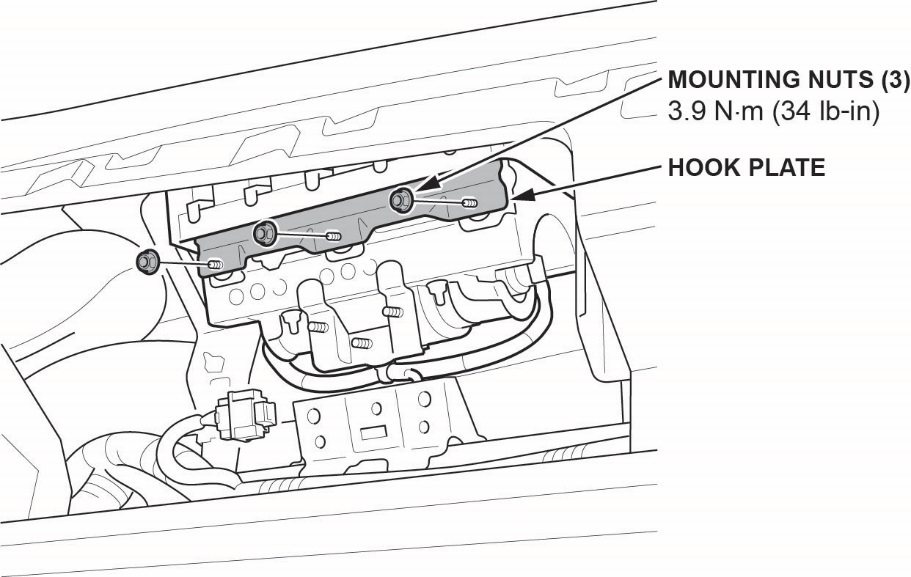
- Install the hook plate with the original mounting nuts.
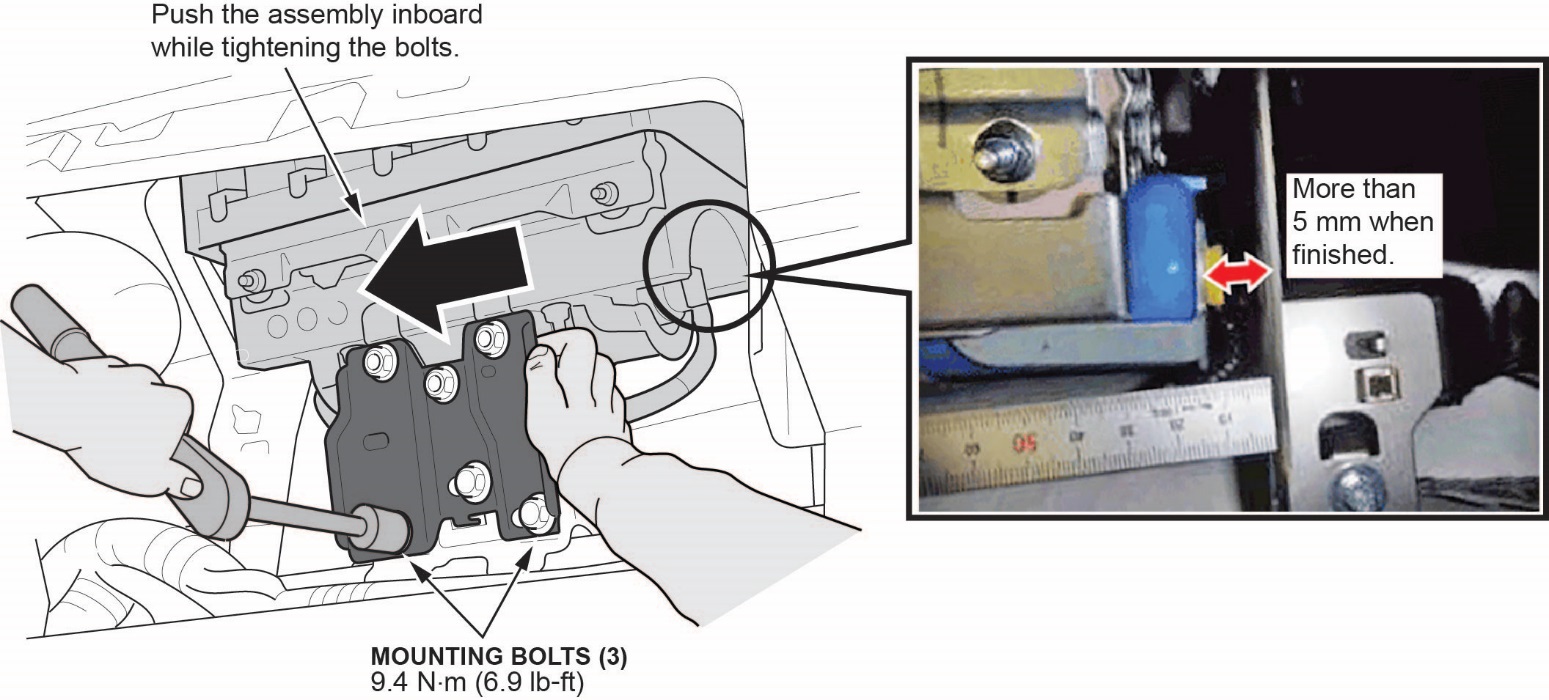
- Install the new support bracket with the new mounting nuts and torque them to 4 N·m (6.9 lb-ft), then loosely install the new bolts.
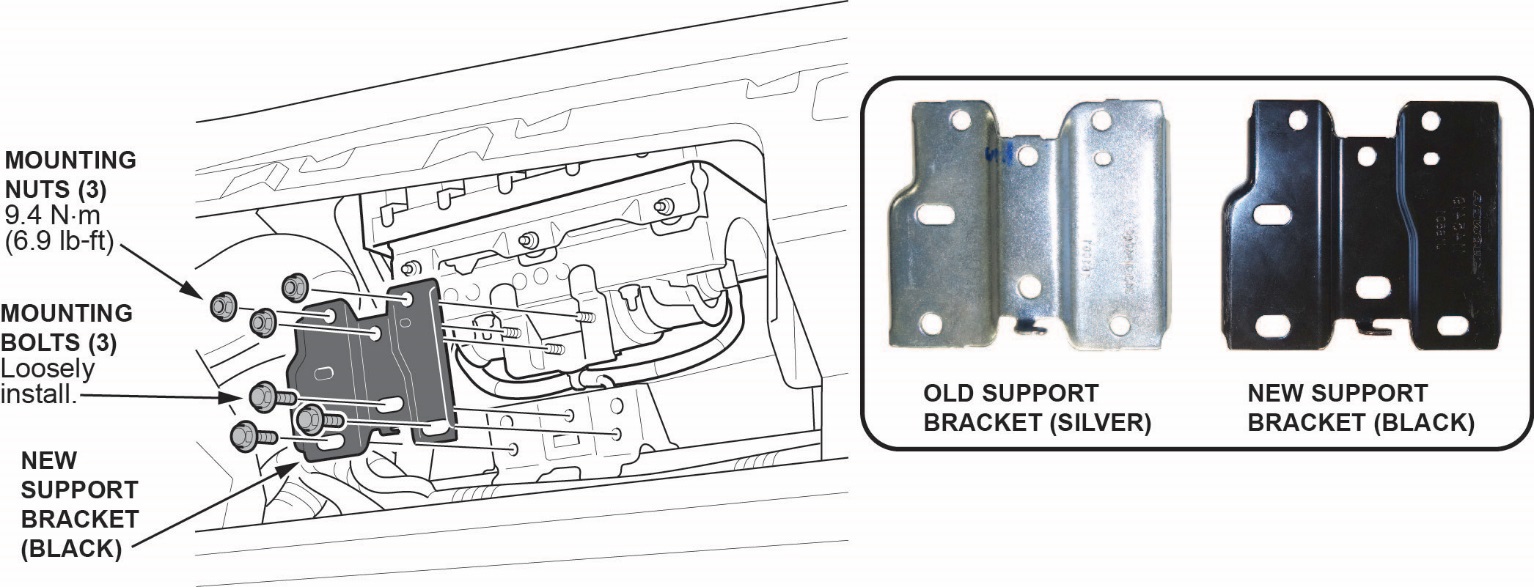
- Push the bracket to the left and hold it while torqueing the mounting bolts to 4 N·m (6.9 lb-ft).
NOTE: You must keep the bracket pushed to the left to make sure there is more than 5 mm between the inflator connector and the bracket as shown.
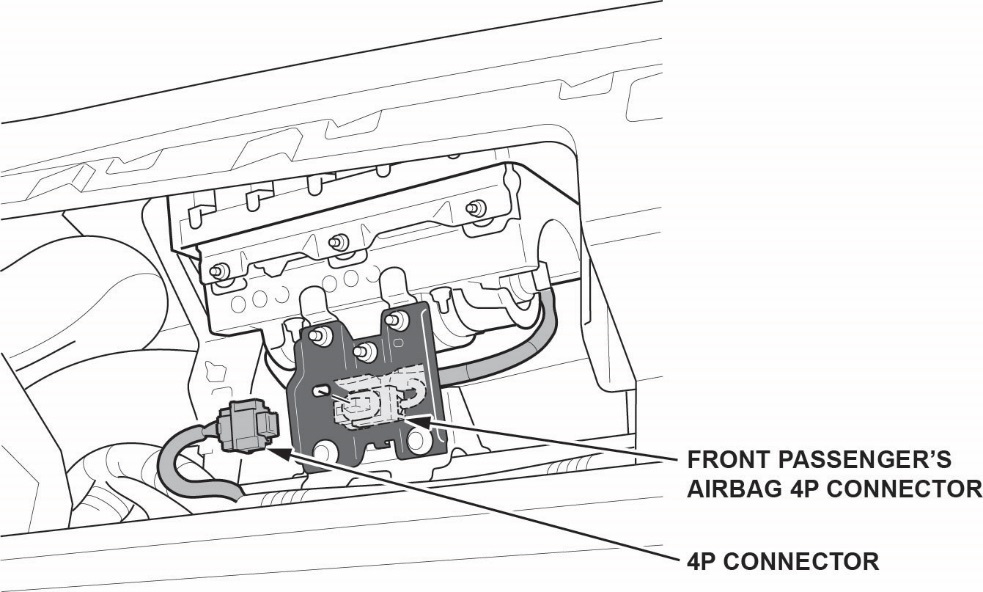
- Connect the dashboard wire harness 4P connector to the front passenger’s airbag 4P connector then install the connector clip.
- Install the passenger’s dashboard trim by referring to the service information.
- Reconnect the battery negative cable.
- Turn the ignition to ON and make sure the SRS indicator comes on for about 6 seconds, then goes off.
- Set the clock (for vehicles without navigation) and enter the anti-theft code for the audio and navigation system (if applicable).
- Put the original inflator into the box the new one came in. Make sure there is no other hardware in the box because if the package rattles, it will not be accepted by the courier.
- Follow the shipping instructions outlined in PIB A15-0002 to return the undeployed inflator.
- Give your warranty clerk the RO that includes the replacement inflator serial number and replacement part number. For the warranty claim to be paid, the replacement inflator part number must be included in the warranty claim.
END
REPAIR PROCEDURE INSIGHT
NOTE:
- If the VIN status inquiry indicates that the vehicle is subject to any open safety recalls, including a driver’s airbag inflator campaign/recall, make sure to also complete those recall repairs before returning the vehicle to the customer. If you are unable to complete any open recall, advise the customer of the recall status and when the recall could be completed.
- Make sure you have the anti-theft code for the audio and navigation system (if applicable), then write down the frequencies for the audio unit preset buttons.
- Be careful not to damage any parts when replacing the inflator and follow the procedure exactly.
- If, before removing the airbag, you suspect that it may be the incorrect airbag for the vehicle or a counterfeit, do not remove the airbag. Contact your DPSM for assistance.
- Make sure you have reviewed the SRS Precautions and Procedures in the service information before doing the REPAIR PROCEDURE.
- Turn the ignition to ON and check if the SRS indicator comes on for about 6 seconds, then goes off.
- If the indicator comes on, then turns off after about 6 seconds, go to step 2.
- If the indicator does not come on, or if it stays on, contact your DPSM for assistance.
- Disconnect the battery negative cable and wait at least 3 minutes before continuing.
- While holding the glove box, release the glove box stops on each side from the dashboard by pushing them in, then lower the glove box.
- Disconnect the dashboard wire harness 4P connector from the front passenger’s airbag.
- Remove the two mounting nuts from the bracket.
- Remove the front passenger’s airbag assembly from the dashboard.
NOTE:
- The front passenger’s lid has pawls on each side that attach it to the dashboard.
- Take care not to scratch the dashboard or the front passenger’s lid.
- Place the airbag, face-down, on a clean shop towel.
NOTE:
- The orientation of the airbag is critical because if the inflator is installed incorrectly, the harness will be too short when you reinstall the airbag.
- The harness routing for Insight goes under the support bracket.
- Visually inspect the airbag and the inflator for any unusual writing or markings. Refer to IDENTIFYING COUNTERFEIT AIRBAGS.
- Peel the label located inside the inflator box from its backing and attach it to the RO. For the warranty claim to be paid, the replacement inflator part number that you received must be included in the warranty claim.
NOTE:
- The replacement part number is printed on the top part of the label and the serial number is printed on the bottom. Make sure you attach the label to the RO and give it to the warranty clerk.
- There may also be a colored sticker located in the kit ignore it because it is not used.
- Not all inflator kits have a label included. In those cases, write the serial number and part number from the side of the inflator box on the RO. The part number always starts with 047.

- Remove the harness from both ends of the inflator bracket.
NOTE: The harness for the Insight goes under the support bracket.
- Short the yellow wires.
NOTE:
- You must cut the yellow wires for inflator removal and short the yellow wires on the inflator side as indicated to prevent accidental deployment.
- Do not cut the red wires because the airbag connector shorts these inflator wires.
- Cut the yellow wires next to the white harness clip as shown.
- Strip away about 1 inch of the yellow wire insulation, then twist the wires together.

- Tape the twisted ends with electrical tape.
- Remove the four inflator nuts.
- Remove the inflator bracket.
NOTE:
- You can only remove one of the brackets, as the other is welded to the airbag housing.
- Do not reuse the bracket; use the new one that came in the inflator kit.
- Remove the inflator by pulling it out.
- Install the new inflator.
P/N 04790-TM8-407
- One side of the inflator has a longer collar, a single tab, a plastic cutout, and a small flat spot on the connector. The other side of the inflator has a shorter collar, two tabs, and a red dot. Make sure you insert the end with the shorter collar into the airbag first.
- Slide the inflator in until the plastic collar contacts the bracket. The two tabs should align with the side of the airbag module and the metal tab as shown. There should be no space or gap between the inflator and bracket.
- Install the new bracket included in the kit onto the airbag module. Check there is no space or gap between the inflator and bracket by pushing the bracket against the inflator.
NOTE: The bracket may have a little bit of play before you install the new nuts.
- Hold the bracket against the inflator, then install the new 5 mm locknuts and torque them in sequence to 4.0 N•m (34 lb-in).
NOTE: Make sure you push the bracket against the inflator to ensure there are no gaps between the brackets and inflator when torqueing the nuts.
- Remove the stickers covering the terminals on both sides of the new inflator.
- Install the new inflator harness.
- Make sure the airbag and harness are aligned as shown.
NOTE:
- The replacement inflator harnesses have the wire colors in the opposite positions of the original harness. If you connect the harness incorrectly, the harness cannot be removed, and you will not be able to reinstall the airbag because the harness will be too short.
- Make sure the harness is routed through the airbag assembly bracket before you connect the harness to the inflator.
- Connect the red wire connector to the side of the inflator with the red dot.
- On vehicles with the blue inflator, the red dot is not visible because it is covered by the bracket.
- Connect the red wire connector to the connector on the side with the short plastic cap. Align the “T” shape in the inflator harness connector with the T-shaped inflator connector, then press the connector into place.

- Connect the yellow wire connector to the connector on the side with the long plastic cap.
- After you hear each connector click, wiggle it to make sure it is secure.
NOTE: If the connector is not properly aligned, it will come out.
- Make sure the connector is secure and in place by using the gauge tool. (PSPI6 Gauge Tool P/N: 070AJ-TA00A00 or 07AAJ-TA0AA00)

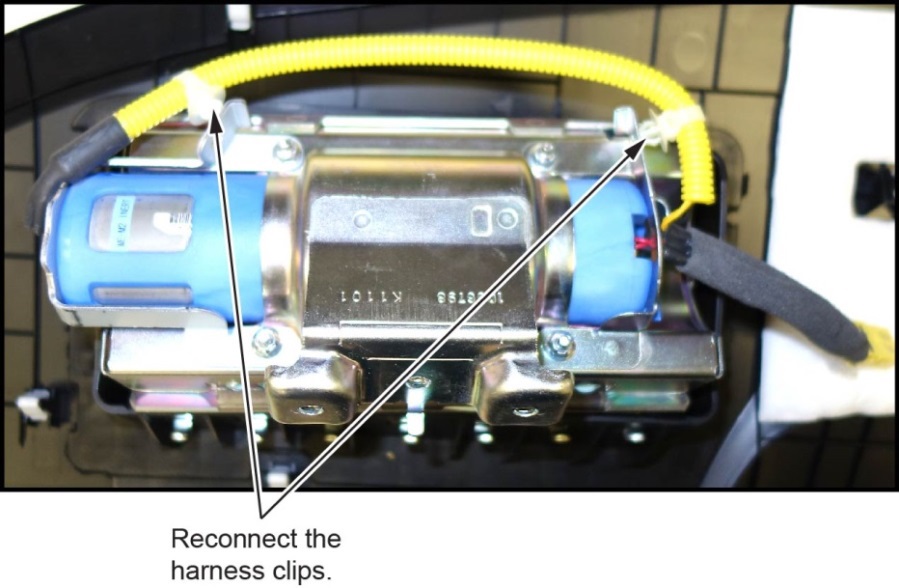
- Connect the harness to the inflator brackets.
- Connect the harness clips as shown.
- Attach the 4-pin connector to the bracket as shown.
- Reinstall the passenger’s airbag into the vehicle and torque the new locknuts to 8 N•m (7.2 lb-ft).
- Connect the dashboard wire harness 4P connector to the front passenger’s airbag. Reinstall the glove box.
- Reconnect the battery negative cable.
- Turn the ignition to ON and make sure the SRS indicator comes on for about 6 seconds, then goes off.
- Set the clock (for vehicles without navigation) and enter the anti-theft code for the audio and navigation system (if applicable).
- Put the original inflator into the box the new one came in. Make sure there is no other hardware in the box because if the package rattles, it will not be accepted by the courier.
- Follow the shipping instructions outlined in PIB A15-0002 to return the undeployed inflator.
- Give your warranty clerk the RO that includes the replacement inflator serial number and replacement part number. For the warranty claim to be paid, the replacement inflator part number must be included in the warranty claim.
END
https://static.nhtsa.gov/odi/rcl/2017/RCRIT-17V030-8175.pdf
 Loading...
https://static.nhtsa.gov/odi/rcl/2017/RCSB-17V030-1592.pdf
Loading...

