March 28, 2019
Posisble Loss of a Tailgate Lid Light
Loss of the taillights reduces the vehicle’s visibility, increasing the risk of crash.
NHTSA Campaign Number: 19V256
Manufacturer Honda (American Honda Motor Co.)
Components EXTERIOR LIGHTING
Potential Number of Units Affected 322,897
Summary
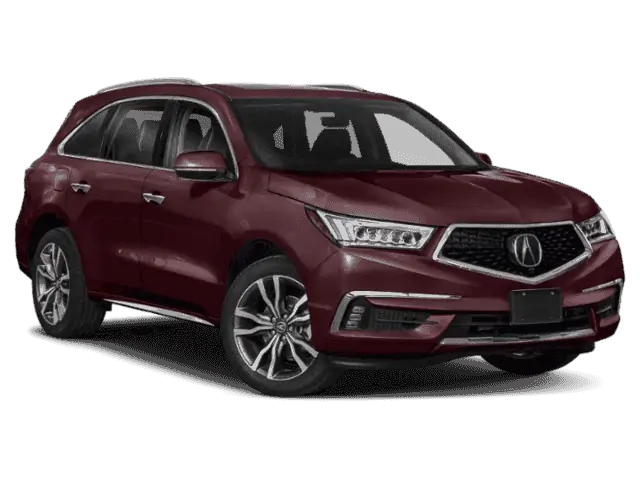
Honda (American Honda Motor Co.) is recalling certain 2014-2019 Acura MDX and 2017-2019 Acura MDX Sport Hybrid vehicles. Moisture may enter the tailgate lid lights, possibly causing a loss of the tailgate lid lights and the tailights.
Remedy
Acura will notify owners, and dealers will modify the tailgate lid lights and install updated gaskets and a wiring sub-harness or will replace both tailgate lid lights. The repairs will be performed free of charge. The recall began May 7, 2019. Owners may contact Acura customer service at 1-888-234-2138. Acura’s number for this recall is M49.
Notes
Owners may also contact the National Highway Traffic Safety Administration Vehicle Safety Hotline at 1-888-327-4236 (TTY 1-800-424-9153), or go to www.safercar.gov.
Check if your Acura has a Recall
Service Bulletin
B19-019
March 29, 2019
Version 1
Safety Recall: 2014-19 MDX Inner Taillights
AFFECTED VEHICLES
| Year | Model | Trim | VIN Range |
| 2014-19 | MDX | ALL | Check the iN VIN status for eligibility. |
| 2017-19 | MDX Sport Hybrid | ALL | Check the iN VIN status for eligibility. |
BACKGROUND
An uneven sealing surface allows moisture to enter the inner taillight(s), causing one or all of the taillights not to work.
CLIENT NOTIFICATION
Owners of affected vehicles will be sent a notification of this campaign.
Do an iN VIN status inquiry to make sure the vehicle is shown as eligible.
Some vehicles affected by this campaign may be in your new or used vehicle inventory.
Failure to repair a vehicle subject to a recall or campaign may subject your dealership to claims or lawsuits from the client or anyone else harmed as a result of such failure. To see if a vehicle in inventory is affected by this safety recall, do a VIN status inquiry before selling it.
CORRECTIVE ACTION
Following the inspection procedures and based on the results, do one or more of the following:
- Replace the inner taillights.
- Remove moisture from the inner taillight(s).
- Modify a portion of the inner taillight sealing surface, and install new updated taillight gasket.
- Install a new inner taillight sub harness.
PARTS INFORMATION
| Part Name | Quantity | Part Number |
| Right Inner Taillight (Right Lid Light Assembly) | 1 | 34150-TZ5-H03 |
| Left Inner Taillight (Left Lid Light Assembly) | 1 | 34155-TZ5-H03 |
| Right Inner Taillight (Right Lid Light Assembly) (A-Spec) | 1 | 34150-TZ5-A72 |
| Left Inner Taillight (Left Lid Light Assembly) (A-Spec) | 1 | 34155-TZ5-A72 |
| Inner Taillight Repair Kit | 1 | 06340-TZ5-A00 |
| Fuse (7.5 A) (depending on trim level) | 1 | 38221-SNA-A31 |
| Fuse (10 A) (depending on trim level) | 1 | 38221-SNA-A41 |
TOOL INFORMATION
| Part Name | Part Number | Quantity |
| MDX Taillight Jig Set | 07AAG-TZ5A100 | 1 |
| Right Angle Grinder with 1/4″ Chuck | Commercially Available | 1 |
NOTES
- Two MDX taillight jig sets will be provided to each dealer. The part number is provided only in case additional sets are needed to be ordered.
- If replacement bits are needed, use ROTOZIP ZB8 1/8″ Drywall Bit or equivalent (Commercially Available).
INSPECTION PROCEDURE
Turn on the headlights, and check taillight operation.
- If all of the taillights come on, do REPAIR PROCEDURE A (MODIFY BOTH INNER TAILLIGHTS).
- If none of the taillights come on, check the Small Light Fuse in the under-hood fuse box (depending on the trim level, this will be either C22 (10 A) in the under-hood fuse/relay box or B11 (7.5 A) in the main under-hood fuse box). Replace the fuse, and do REPAIR PROCEDURE B (REPLACE BOTH INNER TAILLIGHTS).
NOTE
If the fuse is not blown, follow normal system troubleshooting, then do the inspection procedure again.
- If one or both of the outer taillights come on but the inner taillights do not, do REPAIR PROCEDURE B (REPLACE BOTH INNER TAILLIGHTS).
- If both outer taillights and one of the inner taillights come on, do REPAIR PROCEDURE B (REPLACE BOTH INNER TAILLIGHTS).
REPAIR PROCEDURE A (MODIFY BOTH INNER TAILLIGHTS)
- Open the tailgate.
NOTE
Manually open and close the tailgate. Do not use the power tailgate function (if equipped) during the repair to avoid damaging the tailgate support struts.
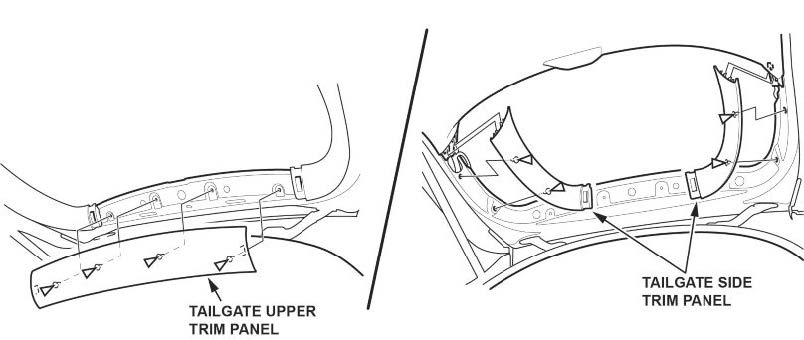
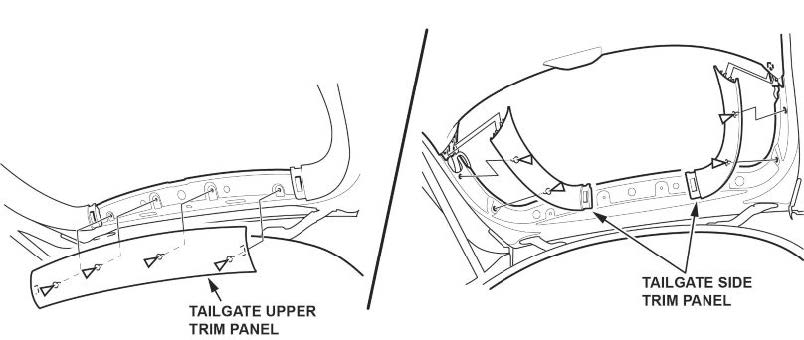
- Remove the tailgate upper trim panel, then remove the side trim panels.
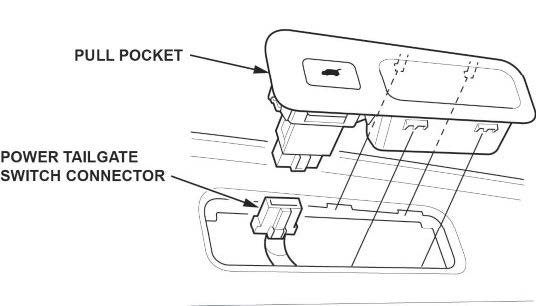
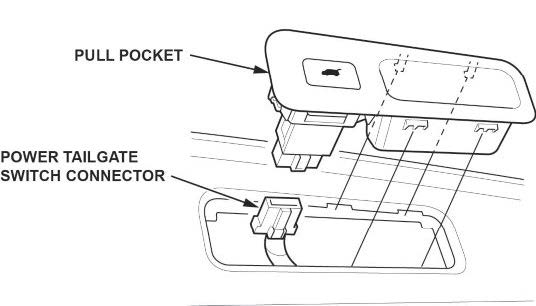
- Remove the pull pocket, and disconnect the power tailgate switch connector.
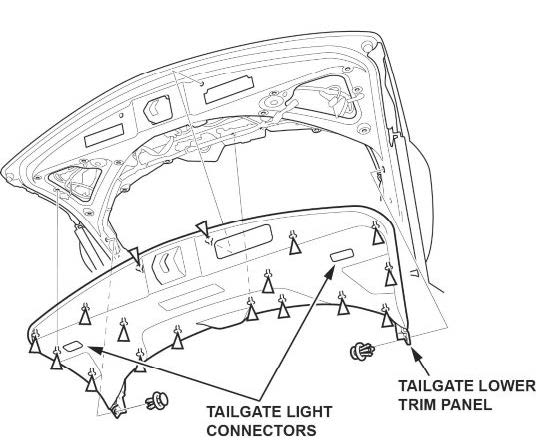
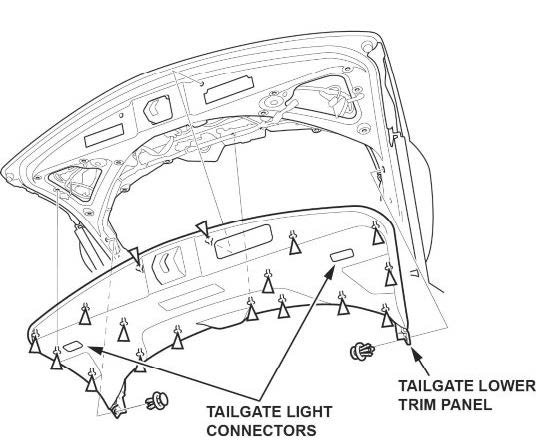
- Remove the tailgate lower trim panel, then disconnect the tailgate light connectors.
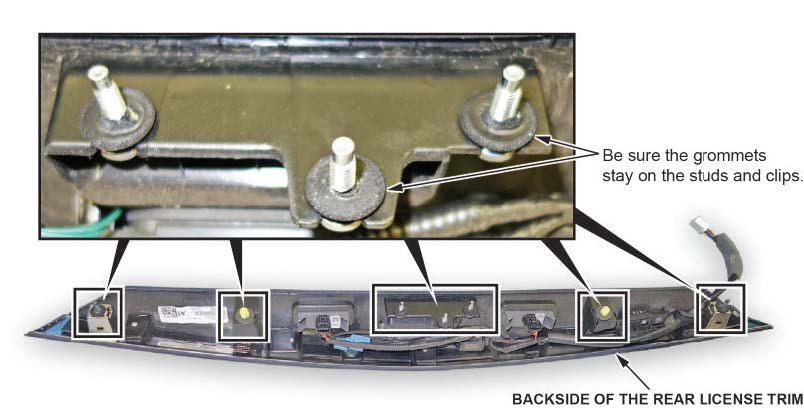
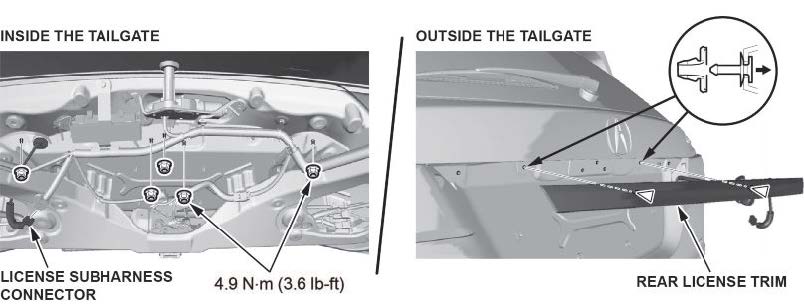
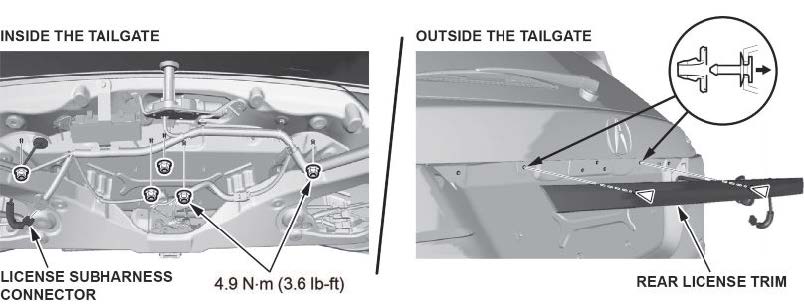
- Disconnect the license sub harness connector, remove the five nuts, release the pins from the clips, then remove the rear license trim.
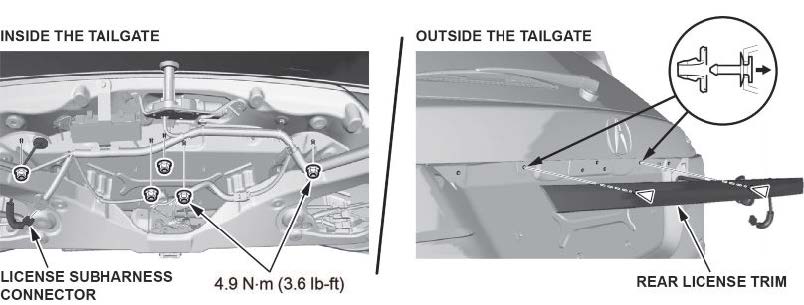
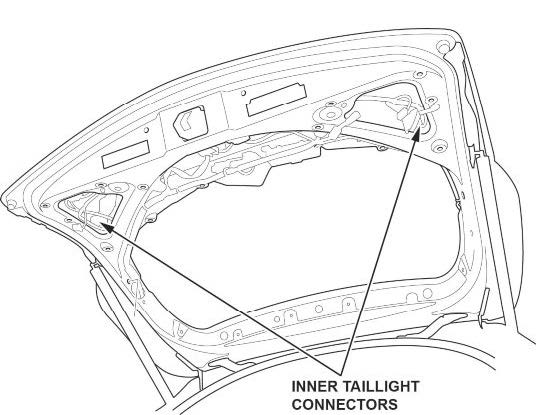
- Disconnect both inner taillight connectors.
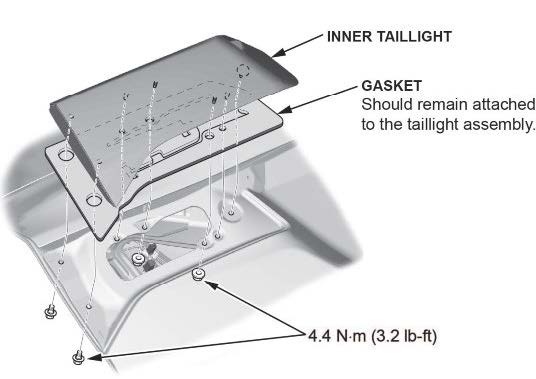
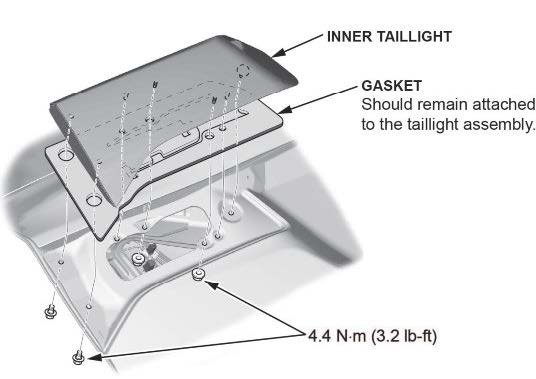
- Remove the two bolts and two nuts behind each inner taillight, then remove the inner taillights.
NOTE
Be sure to completely remove the old inner taillight gasket.
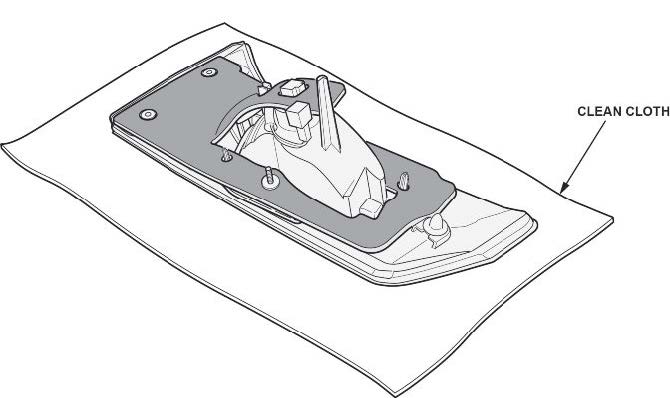
- Place the inner taillight on a soft, clean cloth to prevent lens damage.
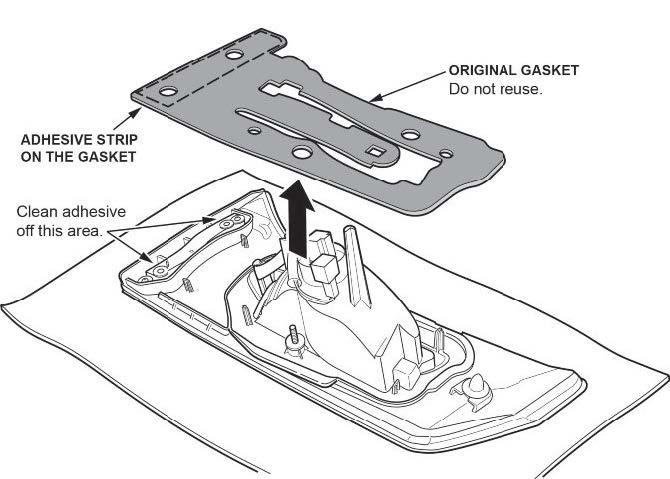
- Remove the original gasket from the inner taillight, and remove any remaining gasket material/adhesive.
NOTE
Do not use commercial adhesive removing chemicals, they could damage the plastic light body.
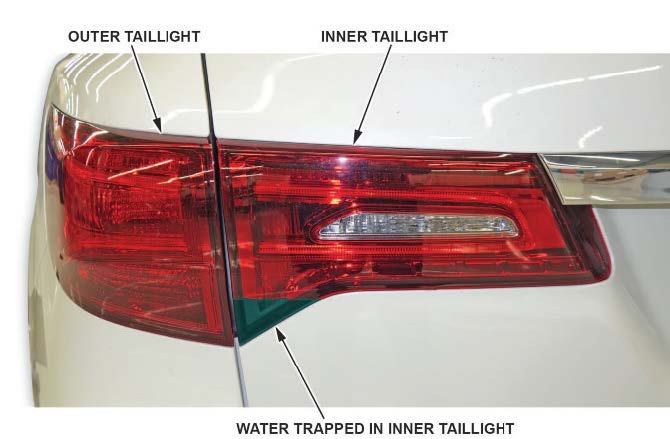
- Hold the inner taillight upright, and check for trapped water.
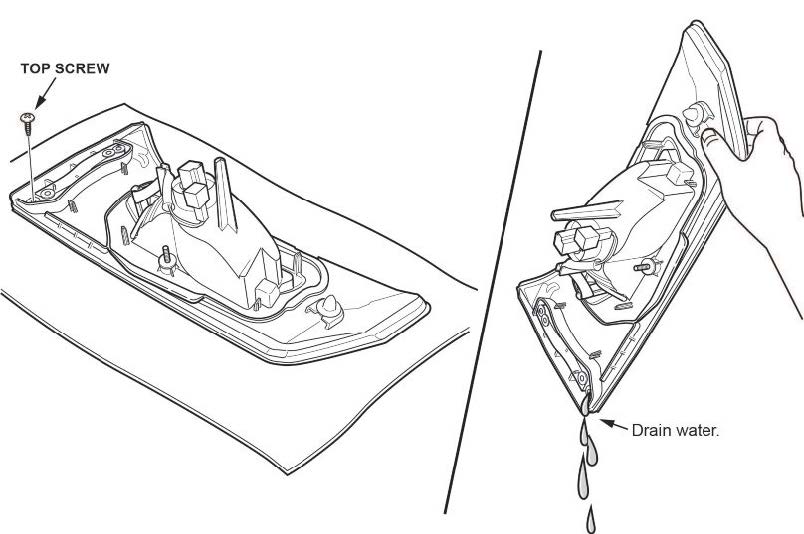
If there is trapped water, remove the top screw and turn the light upside down to drain it. Then, install the screw.
NOTE
Remove as much water as possible, any remaining moisture will eventually evaporate.
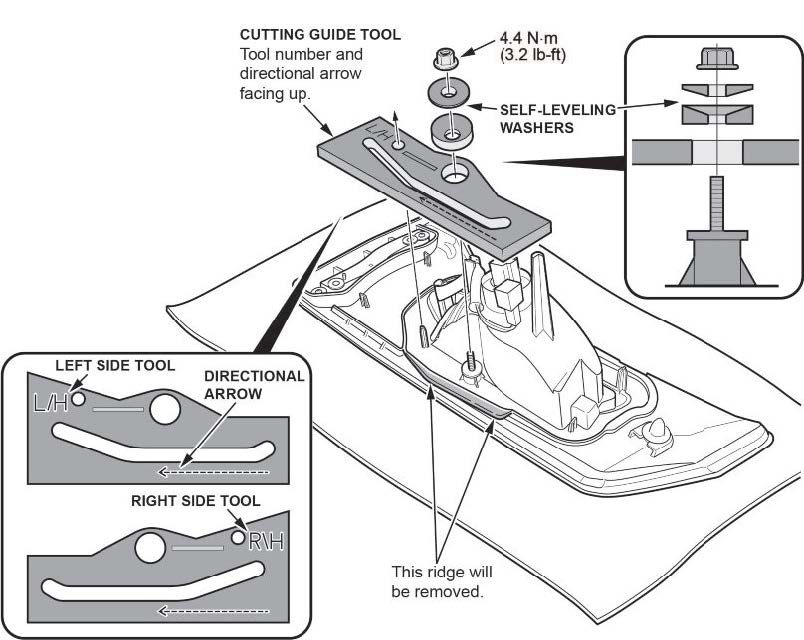
- Install the correct cutting guide tool (left side or right side) with the part number and cutting direction arrow facing up.Line up the pin and the screw, install the self-leveling washers and nut (included in the repair kit), and torque it to 4 N-m (3.2 lb-ft).
NOTE
Do not overtighten the nut, this will cause the stud to pull out of the inner taillight.
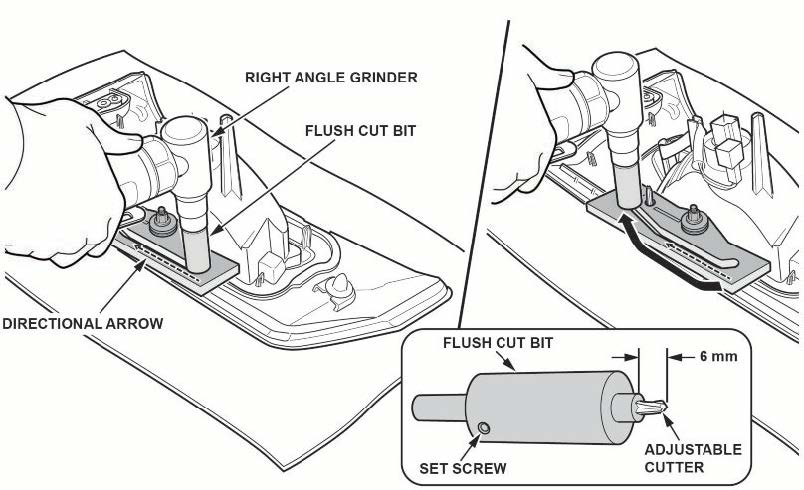
- Using the flush cut bit attached to a commercially available right angle grinder or similar tool, remove the excess material from the inner taillight housing. Make sure the cutter depth is set to 6 mm. If needed, loosen the set screw and adjust the height and tighten.
NOTE
Not all of the ridge will be removed, a very small portion should remain.
| CAUTION |
| Make sure to wear eye protection and stay away from any flammable materials. They can ignite from the sparks produced from grinding. |
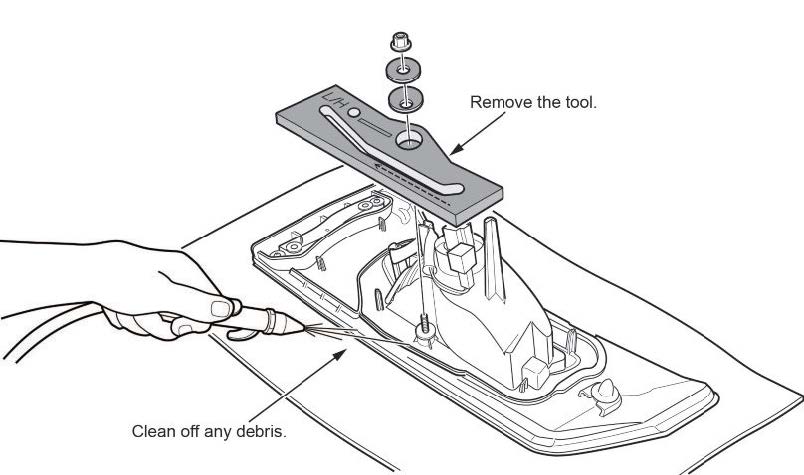
- Remove the cutting tool, and clean off any debris.
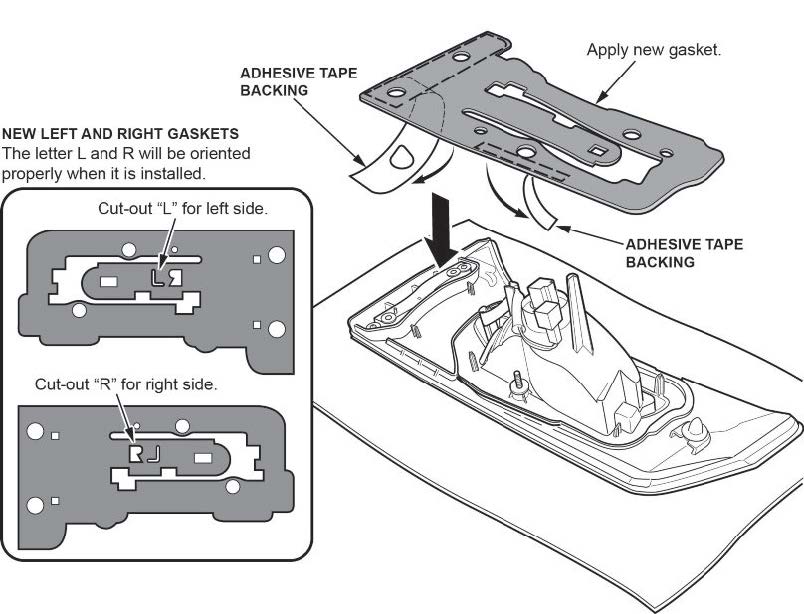
- Clean inner taillight mating surface with isopropyl alcohol, and install the new light gasket. Remove the adhesive tape backing, and attach it to the taillight.
NOTE
The gaskets are marked L for left and R for right. Make sure to use the correct side.
- Repeat steps 7 thru 14, and modify the second inner taillight.
- Install the inner taillights, and torque the nuts and bolts to 4 N-m (3.2 lb-ft).
NOTE
Make sure the gasket is properly attached to the inner taillight.
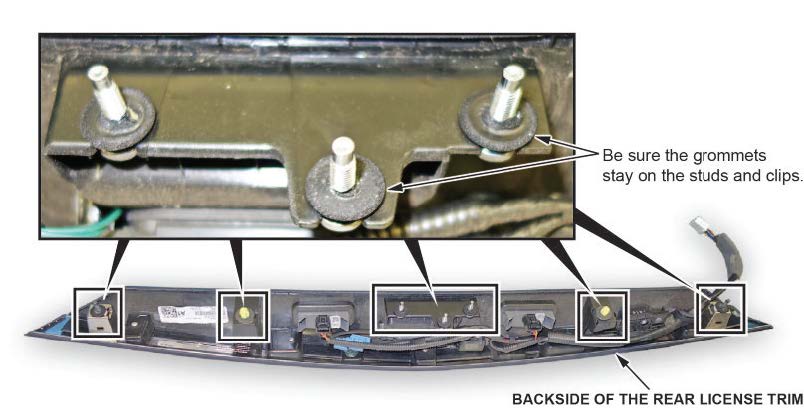
- Install the rear license plate trim. Make sure the grommets are attached to the studs and clips, then connect the connector, and torque the nuts to 9 N-m (3.6 lb-ft).
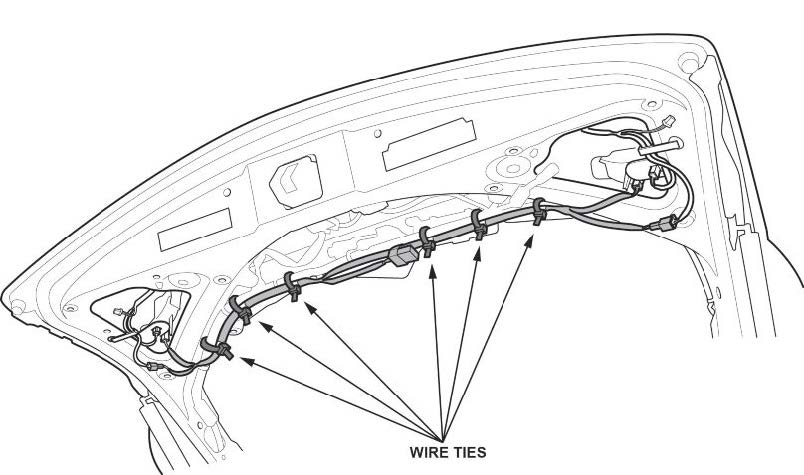
- Install and route the new inner taillight sub harness (included in the service kit) to the existing tailgate harness as shown.
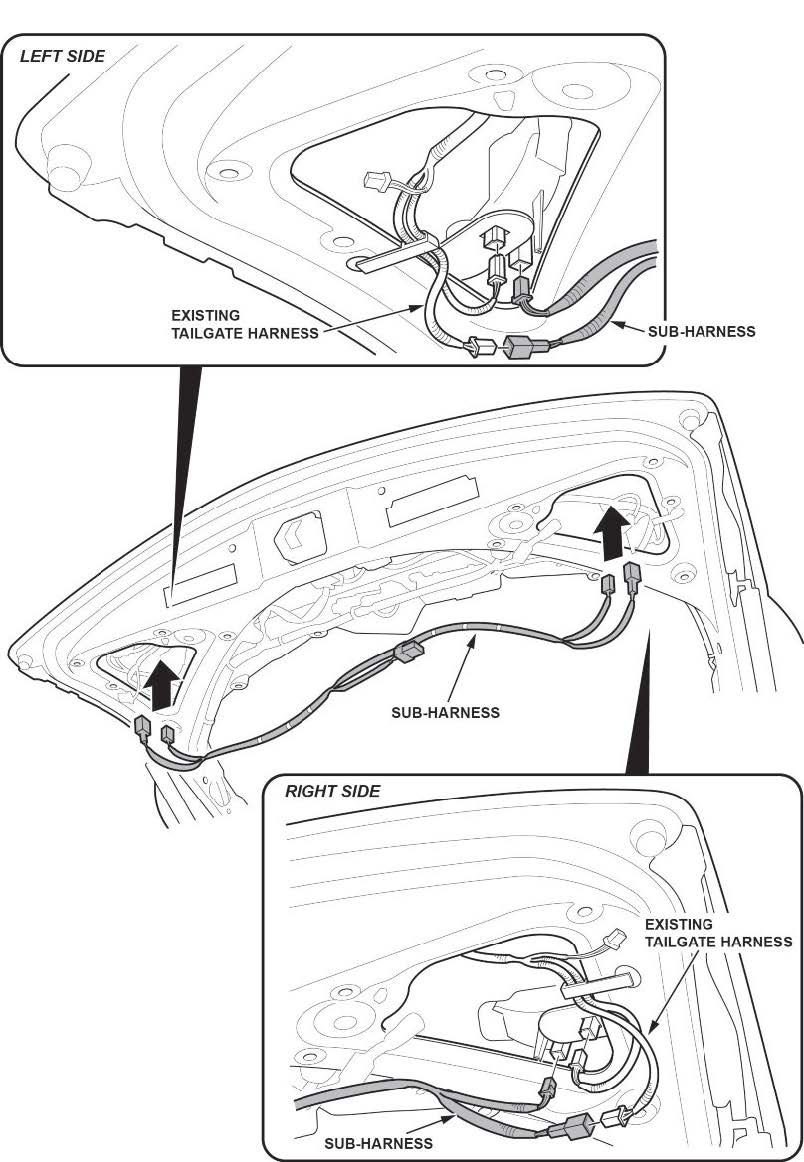
- Secure the new inner taillight sub harness. Use the supplied wire ties on each of the white pieces of tape found on the new harness, starting from the center and moving out toward the connectors as shown.
NOTE
Trim any excess from the wire ties.
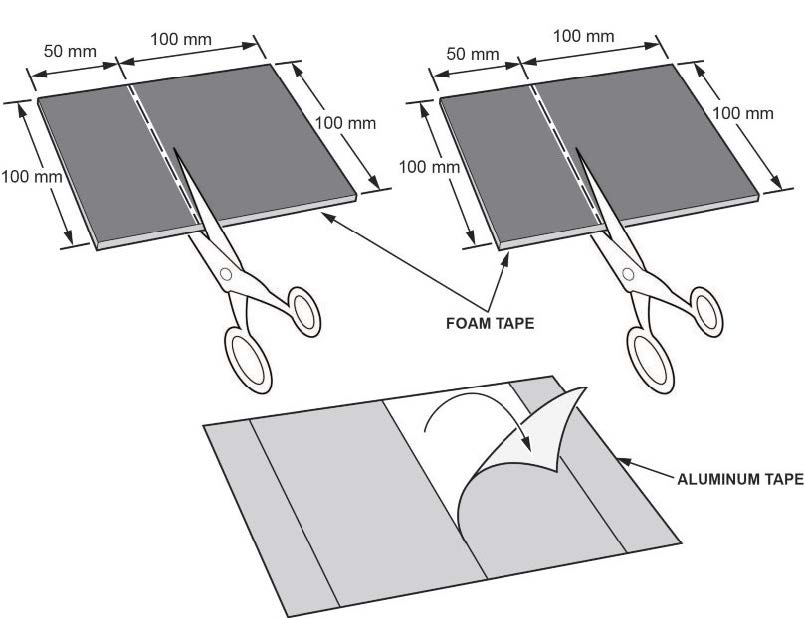
- Cut two pieces of the foam tape supplied in service kit as shown.
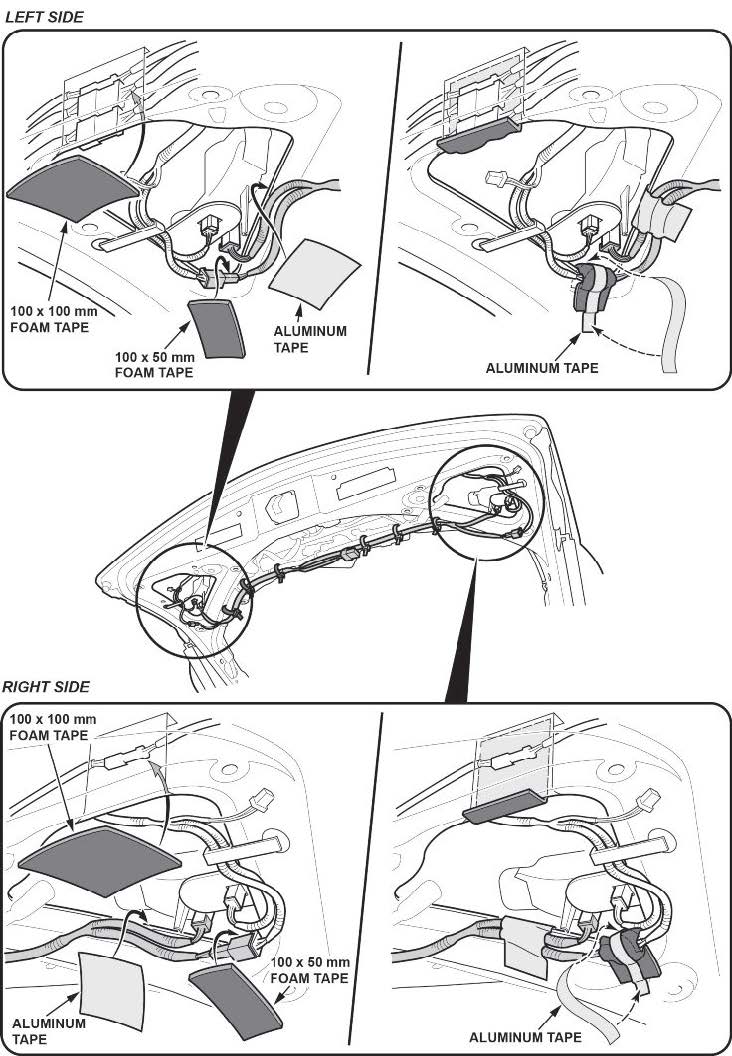
- Clean the areas shown below with isopropyl alcohol, and attach the foam tape pieces. Then, secure the harness and connectors to the body with aluminum tape as shown.
NOTE
To prevent water intrusion, make sure the foam tape covers the entire connector. The aluminum tape should wrap around the foam wrapped connector to the back side of the metal, this will prevent rattles.
- Make sure all of the taillights come on. If any of them do not come on, check all of the connections and the small light fuse again.
- Install the tailgate trim and any other removed parts in the reverse order of removal.
REPAIR PROCEDURE B (REPLACE BOTH INNER TAILLIGHTS)
- Open the tailgate.
NOTE
Manually open and close the tailgate. Do not use the power tailgate function (if equipped) during the repair to avoid damaging the tailgate support struts.
- Remove the tailgate upper trim panel, then remove the side trim panels.
- Remove the pull pocket, and disconnect the power tailgate switch connector.
- Remove the tailgate lower trim panel, then disconnect the tailgate light connectors.
- Disconnect the license sub harness connector, remove the five nuts, release the pins from the clips, then remove the rear license plate trim.
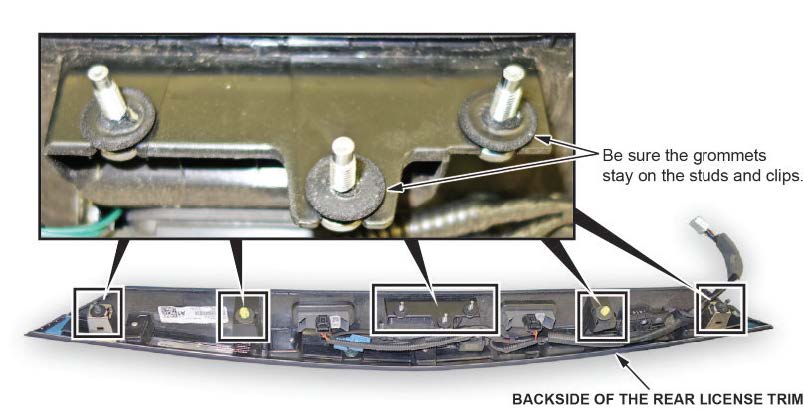
- Disconnect both inner taillight connectors.
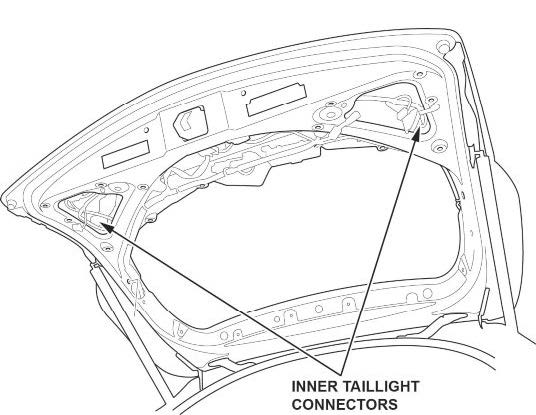
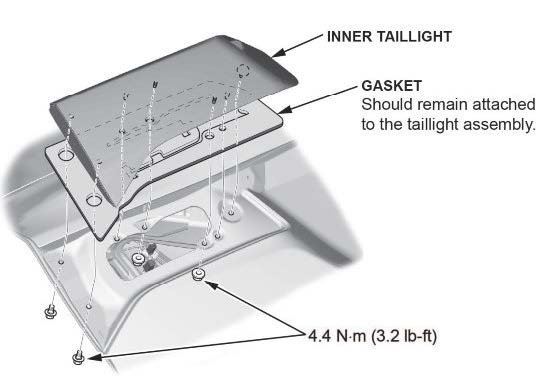
- Remove the two bolts and two nuts behind each inner taillight, then replace both inner taillights and torque the nuts and bolts to 4 N-m (3.2 lb-ft)
NOTE
Be sure to completely remove the old inner taillight gasket. The new inner taillight will come with a new gasket installed.
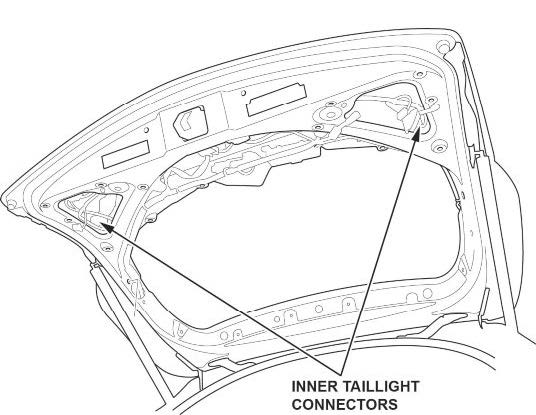
- Connect the inner taillight connectors.
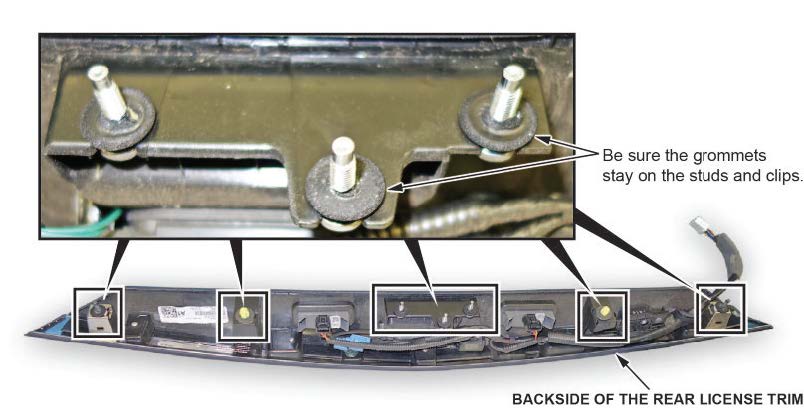
- Install the rear license trim. Make sure the grommets are attached to the studs and clips, then connect the connector, and torque the nuts to 9 N-m (3.6 lb-ft).
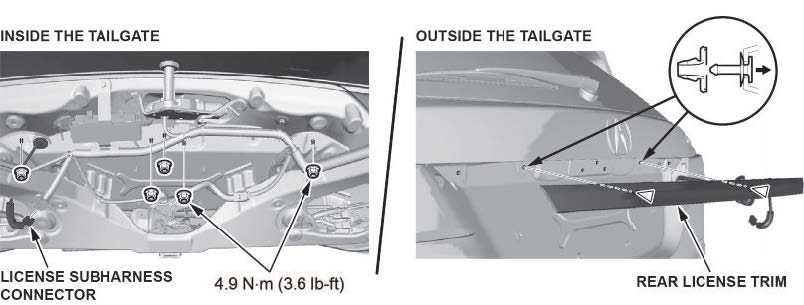
- Make sure all of the taillights come on. If any of them do not, check all of the connections and the small light fuse again.
- Install the tailgate trim and any other removed parts in the reverse order of removal.
END
B19-027
May 2, 2019
Version 1
Service Manual Update: 2014-19 MDX and 2017-19 MDX Sport Hybrid Inner Taillight Sub Harness
APPLIES TO
| Year | Model | Trim |
| 2014-19 | MDX | ALL |
| 2017-19 | MDX Sport Hybrid | ALL |
BACKGROUND
Due to repairs made under safety recall bulletin, 19-019 Safety Recall: 2014-19 MDX Inner Taillights, some vehicles will have an in-line, inner taillight sub harness installed which includes a (5 A) fuse.
Before troubleshooting the taillight circuit or doing repairs to the tailgate area, inspect the vehicle and verify if it has the added in-line taillight sub harness.
INSPECTION
- Remove the tailgate lower trim panel. Refer to the Interior Trim Removal and Installation – Tailgate Areas in service information.
- Check for a harness.
- If the vehicle has the inner taillight sub harness, continue to Vehicles with Inner Taillight Sub Harness and make sure to review all of the information.
- If the vehicle does not have the inner taillight sub harness, this bulletin does not apply. Follow normal system troubleshooting, and repairs.
VEHICLES WITH INNER TAILLIGHT SUB HARNESS
Harness Installation/Replacement
Follow the below guidelines when performing any repairs, replacements and troubleshooting around the tailgate area.
| Repair Condition | Action | Remarks | ||
| The left or right inner taillight requires replacement. | Replace the affected inner taillight and REINSTALL the sub harness if it was removed. | • You must order and install a new inner taillight from Acura. DO NOT
install a used or aftermarket inner taillight • Order and install the wire ties, foam tape and aluminum tape to reinstall the sub harness. See parts information below. | ||
| Both inner taillights require replacement. | Replace both inner taillights,
REMOVE the sub harness and return the vehicle back to it’s original factory condition. See page 6 for additional information. | • You must order and install a new inner taillight from Acura. DO NOT
install a used or aftermarket inner taillight • Discard the removed sub harness. | ||
| Both inner taillights do not require replacement. | REINSTALL the sub harness if it was removed. | Order and install the wire ties, foam tape and aluminum tape to reinstall the sub harness. See parts information below. | ||
| The inner taillight sub harness requires replacement. | Order and INSTALL a new Inner
Taillight Repair Kit. | See parts information below. | ||
| Part Name | Part Number | QTY |
| Inner Taillight Repair Kit | 06340-TZ5-A00 | 1 |
| Wire Ties | 91551-R1A-A01 | 6 |
| 100 x 100 mm or 100 x 50 mm Foam Tape | 06990-SA5-000

Genuine Honda Parts - Ept Sealer (3T) (06990-SA5-000)
| Cut as needed |
| Aluminum Tape | 91902-TZ3-A21 | 2 |
NOTES
- Parts can be ordered through normal parts ordering.
- The Inner Taillight Repair Kit includes the inner taillight sub harness and all of the individual items (wire ties, foam tapes, and aluminum tapes). The kit also includes the right and left taillight foam gaskets that can be installed if needed or discarded.
Installation Procedure
- Connect and route the inner taillight sub harness to the existing tailgate harness.
- Secure the inner taillight sub harness. Use the wire ties on each of the white pieces of tape found on the harness, starting from the center and moving out toward the connectors.
- Cut two pieces of the foam tape to the measurements shown.
- Clean the areas shown below with isopropyl alcohol, and attach the foam tape pieces. Then, secure the harness and connectors to the body with aluminum tape.
NOTE
To prevent water intrusion, make sure the foam tape covers the entire connector. The aluminum tape should wrap around the foam wrapped connector to the back side of the metal, this will prevent rattles.
Removal Procedure
If you determined that the inner taillight sub harness needs to be removed on page 2, follow the procedure below. Remove all tapes and discard the sub harness.
Electrical Troubleshooting
When doing any electrical troubleshooting for the taillight circuit, refer to this wiring diagram in conjunction with the EWD or circuit diagram.
END
9 Affected Products
Vehicles
| MAKE | MODEL | YEAR |
| ACURA | MDX | 2014-2019 |
| ACURA | MDX SPORT HYBRID | 2017-2019 |
11 Associated Documents
Manufacturer Notices(to Dealers,etc) – March 29, 2019 Subject Safety Recall: 2014-19 MDX and 2017-19 MDX Sport Hybrid Inner Taillight(s)
RCMN-19V256-9003.pdf 148.113KB
Recall Acknowledgement
RCAK-19V256-6028.pdf 361.898KB
Remedy Instructions and TSB
RCRIT-19V256-2915.pdf 2264.946KB
DEFECT INFORMATION REPORT
RMISC-19V256-4861.pdf 145.608KB
Remedy Instructions and TSB
RCRIT-19V256-4504.pdf 1325.426KB
Statement by Acura Regarding Position Light Recall: 2014-2019 Acura MDX
RMISC-19V256-8822.pdf 32.875KB
Owner Notification Letter(Part 577)
RCONL-19V256-8639.pdf 315.932KB
Manufacturer Notices(to Dealers,etc) – 04 12 2019 Information for SB19-019: MDX Lid Light Safety Recall Bulletin
Recall Quarterly Report #1, 2019-2
RCLQRT-19V256-8767.PDF 211.153KB
Recall Quarterly Report #3, 2019-4
RCLQRT-19V256-3815.PDF 211.355KB
Recall Quarterly Report #2, 2019-3
RCLQRT-19V256-0540.PDF 211.258KB
Latest Recalls Documents

- Lights Dim Over Time, Replace In Pairs: Your lights are a pair, one is never turned on without the other. If one bulb burns out, the other isn't far behind
- Verify fitment: Navigate to the Amazon Confirmed Fit tool at the top of the page (desktop) or under the images (mobile). Plug in your vehicle info and check the bulb fitment location to ensure this product will work for your needs
- Easy To Replace: Sylvania Long Life miniature bulbs are easy to install and show instant results
- Low Maintenance And High Durability: Designed for durability, greater safety, and lower maintenance by the leading supplier of automotive lighting
- Longer Life Than Most Standard Bulbs: Long Life bulbs perform twice as long as any other standard miniature bulbs

- LIGHTS DIM OVER TIME, REPLACE IN PAIRS: Your lights are a pair, one is never turned on without the other. If one bulb burns out, the other isn't far behind.
- EASY TO REPLACE: Sylvania Long Life miniature bulbs are easy to install and show instant results.
- LOW MAINTENANCE AND HIGH DURABILITY: Designed for durability, greater safety, and lower maintenance by the leading supplier of automotive lighting.
- LONGER LIFE THAN MOST STANDARD BULBS: Long Life bulbs perform twice as long as any other standard miniature bulbs.
- THE SYLVANIA STANDARD OF QUALITY: With 100+ years in business, Sylvania is the world leader in automotive lighting for Original Equipment Manufacturers (OEMs) and the aftermarket.

- Lights Dim Over Time, Replace In Pairs: Your lights are a pair, one is never turned on without the other. If one bulb burns out, the other isn't far behind.
- Easy To Replace: Sylvania Long Life miniature bulbs are easy to install and show instant results.
- Low Maintenance And High Durability: Designed for durability, greater safety, and lower maintenance by the leading supplier of automotive lighting.
- Longer Life Than Most Standard Bulbs: Long Life bulbs perform twice as long as any other standard miniature bulbs.
- The Sylvania Standard Of Quality: With over 100 years in business, Sylvania is the world leader in automotive lighting for Original Equipment Manufacturers (OEMs) and the aftermarket.

- Excellent Lighting: With a color temperature of 3000K and a brightness of 54lm, this 3157 taillight bulb provides even and stable light, significantly improving visibility when braking. Its 360-degree lighting effect ensures that the surrounding environment is fully illuminated, and the non-flickering light effectively improves night driving safety
- Quartz Glass Material: High temperature resistant, impact resistant, compact in size, with good light transmission and light gathering effect, and featuring a waterproof design that adapts to humid environments for long-term stable lighting, this rear turn signal bulb made of quartz glass meets diversified needs
- Product Parameters: Rated at 12V, with 21W power, 3000K color temperature, 54lm lumen, and a service time of about 500 hours, this break light bulb replacement model 3157 comes in a pack of 10 for daily use. Please verify compatibility with your model before purchasing
- Non-destructive Installation: Designed with a standard plug for easy installation, causing no CAN-Bus error codes or bulb flickering, and preserving the car’s original control circuit system, this 3157 halogen bulb ensures stable operation with its good thermal conductivity and heat dissipation
- Widely Universal: Used as a tail light, side marker light, brake light and instrument light for most types of vehicles such as cars, SUVs, trucks and more, this automotive brake bulb has a wide range of applications and is an ideal universal automotive lighting accessory
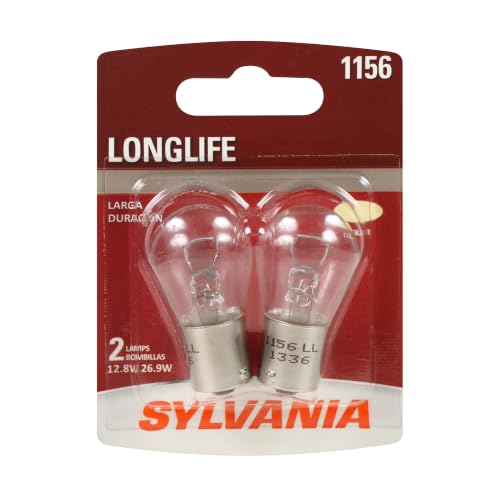
- Lights Dim Over Time, Replace In Pairs: Your lights are a pair, one is never turned on without the other. If one bulb burns out, the other isn't far behind.
- Easy To Replace: Sylvania Long Life miniature bulbs are easy to install and show instant results.
- Low Maintenance And High Durability: Designed for durability, greater safety, and lower maintenance by the leading supplier of automotive lighting.
- Longer Life Than Most Standard Bulbs: Long Life bulbs perform twice as long as any other standard miniature bulbs.
- The Sylvania Standard Of Quality: With over 100 years in business, Sylvania is the world leader in automotive lighting for Original Equipment Manufacturers (OEMs) and the aftermarket.
SEOCONTENT-START
WARRANTY CLAIM INFORMATION
| Operation Number |
Description | Flat Rate Time |
Defect Code |
Symptom Code |
Template ID |
Failed Part Number |
| 7140B0 | REPAIR PROCEDURE A
Inspect taillight operation, modify left and right inner taillights, and install tailgate sub harness. |
0.9 hr | 6LL00 | M4900 | B19019A | 34150-TZ5-H02 |
| 7140B0 | REPAIR PROCEDURE A Inspect taillight operation, modify left and right inner taillights, and install tailgate sub harness. |
0.9 hr | 6LL00 | M4900 | B19019B | 34150-TZ5-H02 |
| A | Drain water from one or both taillights. | 0.2 hr | ||||
| 7141E6 | REPAIR PROCEDURE B (NON A-SPEC)
Inspect taillight operation, and replace left and right inner taillights. |
0.6 hr | 6LL00 | M4900 | B19019C | 34150-TZ5-H02 |
| 7141E6 | REPAIR PROCEDURE B (A-SPEC)
Inspect taillight operation, and replace left and right inner taillights. |
0.6 hr | 6LL00 | M4900 | B19019D | 34150-TZ5-H02 |
Skill Level: Repair Technician
1919 Torrance Boulevard, Torrance, CA 90501-2765 Tel. 310.783.3170 FAX 310.783.3622
M E D I A I N F O R M A T I O N
For more information:
[email protected]
For Immediate Release:
Statement by Acura Regarding Position Light Recall:
2014-2019 Acura MDX
• Approximately 323,000 vehicles affected in the United States by issue
that can cause rear tailgate lid lights and/or exterior position lights to
become inoperative due to water intrusion
• Rear tailgate lid lights will be repaired, or, if needed, replaced, free of
charge
• No related crashes or injuries have been reported
TORRANCE, Calif. – April 8, 2019 – Acura will voluntarily recall
approximately 323,000 model-year 2014-2019 MDX vehicles in the United
States to repair, or, if needed, replace the rear tailgate lid lights and, if also
needed, associated wiring sub harnesses, free of charge.
Due to body variation in tailgate manufacturing, the rear tailgate lid
light seals may deform and allow water to leak into the light assemblies and
reach certain electrical components. Contact with water can lead to an open
circuit, causing rear tailgate lid light failure, and, in some cases, a short
circuit that trips the position light fuse, deactivating the exterior position
lights and some interior lighting. Without functional rear tailgate lid lights
and/or exterior position lighting, a vehicle may not be visible to other traffic
at night, increasing the risk of a crash. Acura has received no reports of
crashes or injuries related to this issue.
Acura dealers will replace the gasket seals in both rear tailgate lid
lights with updated parts, or, if a light is found to be inoperable due to
1919 Torrance Boulevard, Torrance, CA 90501-2765 Tel. 310.783.3170 FAX 310.783.3622
moisture intrusion, replace the lid light assembly and, if also needed, an
associated wiring sub harness. The recall repair is free of charge.
Acura is announcing this recall to encourage owners of affected
vehicles to take them to an authorized dealer for repair as soon as they
receive notification from Acura. Mailed notification will occur in early-May
2019. Owners of 2014-2019 MDX vehicles can also determine if their
vehicles require repair by visiting www.recalls.acura.com or by calling (888)
234-2138.
# # #
May 2019 NHTSA Recall 19V-256
This notice applies to your vehicle: XXXXXXXXXXXXXXXXX
Dear FIRSTNAME LASTNAME,
This notice is sent to you in accordance with the National Traffic and Motor Vehicle Safety Act.
WHAT IS THE REASON FOR THIS NOTICE?
Acura has decided that a defect which relates to motor vehicle safety exists in certain 2014-2019 model year
MDX and 2017-2019 model year MDX Sport Hybrid vehicles. Due to slight body variations in the tailgate, the gasket that seals the tailgate light from moisture can deform. Exposure to low ambient temperatures and moisture may further compromise the gasket. A deformed/compromised gasket can allow for moisture to enter the tailgate lights, possibly resulting in:
- a blown fuse, which disables the front and rear position lights (including the tailgate lights and taillights), and some interior lighting (such as illumination of the climate control and electronic gear selector buttons); or
- the failure of one or both of the tailgate
Loss of a tailgate light and/or taillight reduces vehicle visibility and increases the risk of a crash.
WHAT WILL ACURA DO?
The dealer will inspect the tailgate lights. If either tailgate light has failed, the dealer will replace both tailgate lights and inspect/replace the corresponding fuse for free. If both tailgate lights operate properly, the dealer will modify the tailgate lights and install updated gaskets and a wiring sub-harness for free.
WHAT SHOULD YOU DO?
Please call any Acura dealer and make an appointment to have your vehicle’s tailgate lights inspected and either replaced or modified for free. Once you make an appointment for your vehicle, and it is determined that both tailgate lights need replacement, be advised that the total replacement process may take approximately 45 minutes. If both tailgate lights operate properly, be advised that the total repair process to modify the taillights and install updated gaskets and a wiring sub-harness may take approximately 1 hour and 15 minutes. However, your dealer can provide you with a better estimate of the overall time for this service visit, as it may be necessary to make your vehicle available for a longer period of time. If you are not the only driver of this vehicle, please advise all other drivers and passengers of this important information!
CHECK YOUR VEHICLE FOR OPEN RECALLS
You can check your vehicle’s eligibility for repair under this or any other recall. Please visit the Acura Recall Lookup tool at www.recalls.acura.com and enter your Vehicle Identification Number (VIN).
OWNER INFORMATION
You received this notice because government regulations require that notification be sent to the last known owner of record. Our records are based primarily on state registration and title data, which indicate that you are the current owner of this vehicle. If this is not the case, or if any of the information is not correct, please complete, sign and return the Information Change Card and we will then update our records. If you are a lessor of this vehicle, federal regulations require you to forward this notice to your lessee within ten days.
DO YOU STILL HAVE MORE QUESTIONS?
If you have questions or concerns, we encourage you to:
- contact your local Acura dealer; or
- call American Honda’s Customer Support & Campaign Center at 1-888-234-2138; or
- visit Twitter @AcuraClientCare; or
- visit recalls.acura.com to use “Ask Us”, our 24/7 virtual agent.
If you believe that American Honda or the dealer has failed or is unable to remedy the defect in your vehicle, without charge, within a reasonable period of time (60 days from the date you first contact the dealer for a repair appointment), you may submit a complaint to the Administrator, National Highway Traffic Safety Administration, 1200 New Jersey Ave., SE, Washington, DC 20590. Alternatively, you may call the NHTSA’s toll-free Safety Hotline at 888-327-4236 (TTY 800-424-9153), or go to https://www.safercar.gov.
We apologize for any inconvenience this recall may cause you.
Sincerely,
American Honda Motor Co., Inc.
Campaign #M49 / Service Bulletin #19-019
Mayo del 2019
Campaña de seguridad NHTSA 19V-256
Esta notificación aplica a su vehículo: XXXXXXXXXXXXXXXXX
Estimado FIRSTNAME LASTNAME,
Esta notificación ha sido enviada a usted de acuerdo con el decreto de la oficina de Administración Nacional de Seguridad del Tráfico en las Carreteras (National Highway Traffic Safety Administration o NHTSA por sus siglas en inglés).
¿CUÁL ES EL MOTIVO DE ESTA NOTIFICACIÓN?
Acura ha determinado que existe un defecto el cual está relacionado con la seguridad del vehículo en algunos vehículos MDX año modelo 2014-2019 y MDX Sport Hybrid año modelo 2017-2019. Debido a variaciones ligeras de la carrocería en la puerta trasera, la empacadura que sella la luz de la puerta trasera de la humedad, puede deformarse. La exposición a temperaturas ambientales bajas y la humedad podría comprometer la empacadura. Una empacadura comprometida/deformada puede permitir que ingrese humedad a las luces de la puerta trasera, posiblemente ocasionando:
- un fusible fundido, lo cual deshabilita las luces de posición delantera y trasera (incluyendo las luces de la puerta trasera y las luces traseras), y algunas luces interiores (tales como la iluminación del control de clima y los botones del selector electrónico de engranajes) o;
- la falla de una o ambas luces
La pérdida de una luz de la puerta trasera y/o las luces traseras reduce la visibilidad y aumenta el riesgo de un choque.
¿QUÉ HARÁ ACURA?
El concesionario inspeccionará las luces de la puerta trasera. Si alguna de las luces de la puerta trasera ha fallado, el concesionario reemplazará ambas luces de la puerta trasera e inspeccionará/reemplazará el fusible correspondiente sin costo alguno. Si ambas luces de la puerta trasera funcionan adecuadamente, el concesionario modificará las luces de la puerta trasera e instalará las empacaduras actualizadas y un sub-arnés de cables sin costo alguno.
¿QUÉ DEBE HACER USTED?
Por favor llame a cualquier concesionario Acura y haga una cita para la inspección de las luces de la puerta trasera de su vehículo y realizar bien sea el reemplazo o la modificación, de forma gratuita. Una vez que programe una cita para su vehículo, y se determine que ambas luces de la puerta trasera necesitan reemplazo, le avisamos que el proceso de reemplazo total podría tardar aproximadamente 45 minutos. Si ambas luces de la puerta trasera funcionan adecuadamente, le avisamos que el proceso de reparación total para modificar las luces traseras e instalar las empacaduras actualizadas y un sub-arnés de cables puede tomar aproximadamente 1 hora y 15 minutos. No obstante, su concesionario le puede ofrecer un mejor estimado del tiempo total de esta visita de servicio, ya que pudiera ser necesario que su vehículo esté disponible por un periodo más largo. ¡Si usted no es el único conductor de este vehículo, por favor informe a todos los conductores y pasajeros sobre esta información importante!
VERIFIQUE SI SU VEHÍCULO TIENE UNA CAMPAÑA DE SEGURIDAD PENDIENTE
Puede verificar la elegibilidad de su vehículo para que sea reparado bajo esta campaña de seguridad o bajo cualquier otra. Por favor visite la herramienta “Acura Recall Lookup” en www.recalls.acura.com e ingrese su número de identificación del vehículo (VIN).
INFORMACIÓN PARA EL PROPIETARIO
Usted recibió esta notificación porque las regulaciones gubernamentales requieren que esta notificación sea enviada al último propietario registrado. Nuestros registros están basados principalmente en los datos de título y registro en el estado, el cual indica que usted es el propietario actual de este vehículo. Si no es el caso o si la información no está correcta, por favor complete, firme y devuelva la tarjeta de Cambio de información anexa y nosotros actualizaremos nuestros registros. Si usted es el arrendador de este vehículo, las regulaciones federales requieren que usted envié una copia de esta notificación a su arrendatario en un lapso de diez días.
¿USTED TODAVÍA TIENE MÁS PREGUNTAS?
Si usted tiene preguntas o inquietudes, le recomendamos que:
- se comuníquese con su concesionario Acura local; o
- se comuníquese con el Centro de Apoyo al Cliente y Campañas de American Honda al 1-888-234-2138; o
- visite Twitter @AcuraClientCare; o
- Para más información también puede visitar wrecalls.acura.com
Si usted cree que American Honda o el concesionario ha fallado o no le es posible reparar el defecto en su vehículo, sin cobro alguno, dentro de un período de tiempo razonable (60 días desde la fecha en que usted contactó por primera vez el concesionario para la cita de la reparación), usted puede enviar una queja a: Administrator, National Highway Traffic Safety Administration, 1200 New Jersey Ave., SE, Washington, DC 20590. Alternativamente, usted también puede comunicarse con el número de llamada sin costo (Toll-free) Safety Hotline de NHTSA al 888-327-4236 (TTY 800-424-9153), o visitar la página web https://www.safercar.gov.
Le pedimos disculpas por cualquier inconveniente que esta campaña de seguridad pudiera causarle. Atentamente,
American Honda Motor Co., Inc.
Campaña #M49 / Boletín de Servicio #19-019
SEOCONTENT-END
This product presentation was made with AAWP plugin.