| “This site contains affiliate links for which OEMDTC may be compensated” |
March 13, 2018 NHTSA CAMPAIGN NUMBER: 18V170000
Walk-In Seatbacks May Stay Unlatched
An unlocked second row left outboard seatback increases the risk of injury to the seat occupant during a crash.
NHTSA Campaign Number: 18V170
Manufacturer Honda (American Honda
 Motor Co.)
Components SEATS
Potential Number of Units Affected 254,568
Summary
Honda (American Honda
 Motor Co.) is recalling certain 2014-2016 Honda
 Odyssey vehicles. The second row outboard seats have a lever to fold the seatback and slide the seat forward to access the third row seats. Due to a manufacturing error, if the walk-in release lever is used to fold a fully reclined left outboard seatback forward, the seatback may stay in the unlocked position (free-folding) or unexpectedly unlock without engaging the walk-in or recliner lever.
Remedy
Honda will notify owners, and dealers will confirm proper operation of the second row left outboard seatback, and install a support bracket to the seat recliner. If the seatback cannot lock, dealers will replace the seatback frame assembly. These repairs will be performed free of charge. The recall began May 7, 2018. Owners may contact Honda
 customer service at 1-888-234-2138. Honda
 ’s number for this recall is X0R.
Notes
Owners may also contact the National Highway Traffic Safety Administration Vehicle Safety Hotline at 1-888-327-4236 (TTY 1-800-424-9153), or go to www.safercar.gov.
Check if your Honda has a Recall
A18-026
Version 5
April 24, 2018
Safety Recall: Left (Driver Side) Second Row Seat Recliner Does Not Lock
Supersedes 18-026, dated April 7, 2018 to revise the information highlighted in yellow
There are several campaigns for Odyssey seats. Be sure to do an iN VIN status inquiry and complete any open campaigns.
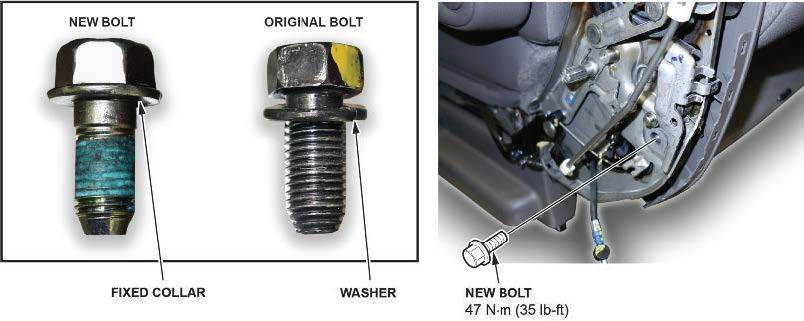
When installing the bracket, the bolt must be replaced with the new one from the bracket kit.
AFFECTED VEHICLES
| Year | Model | Trim | VIN Range |
| 2014-16 | Odyssey | ALL | Check the iN VIN status for eligibility. |
REVISION SUMMARY
- The CORRECTIVE ACTION section was added.
- Significant changes were made to the INSPECTION PROCEDURES. American Honda
 recommends reading the bulletin in its entirety.
 - Some additions and deletions were made to the WARRANTY CLAIM INFORMATION and REPAIR PROCEDURES
BACKGROUND
Some 2014-16 Odyssey vehicles have an internal problem in the recliner mechanism on the left (driver side) second row seat that may prevent the seat-back from locking. If a vehicle with an unlocked seat-back is involved in a crash, the seat will not operate as designed to protect the occupant, leading to increased potential for injury or death.
CUSTOMER NOTIFICATION
Owners of affected vehicles will be sent a notification of this campaign.
Do an iN VIN status inquiry to make sure the vehicle is shown as eligible.
Some vehicles affected by this campaign may be in your new or used vehicle inventory.
Failure to repair a vehicle subject to a recall or campaign may subject your dealership to claims or lawsuits from the customer or anyone else harmed as a result of such failure. To see if a vehicle in inventory is affected by this safety recall, do a VIN status inquiry before selling it.
CORRECTIVE ACTION
Do the inspection procedure, and based on the results, either install a recliner bracket kit or, in rare cases, replace the seat-back frame because the recliner mechanism is damaged.
NOTE
Damaged recliner mechanisms that require replacing the seat-back are very rare. Order a seat-back and push nut only after confirming that replacement is needed.
PARTS INFORMATION
| Part Name | Part Number | Quantity |
| Mid Seat (2nd row) Recliner Function Kit (Bracket Kit) | 81751-TK8-305 | 1 |
WARRANTY CLAIM INFORMATION
Install Bracket Kit
| Operation Number | Description | Flat Rate Time | Defect Code | Symptom Code | Template ID | Failed Part Number |
| 8600A5 | Do the inspection procedure, install the recliner bracket kit, and reinspect the recliner function. | 0.3 hr | 6RL00 | X0R00 | A18026A | 81726-TK8-A22 |
Replace Seat-Back (No Bracket Kit Installed)
NOTE
Damaged recliner mechanisms that require replacing the seat-back are very rare. Order a seat-back and push nut only after confirming that replacement is needed.
| Operation Number | Description | Flat Rate Time | Defect Code | Symptom Code | Template ID | Failed Part Number |
| 8600A6 | All except LX Models: Do the inspection procedure and replace the seat-back frame. | 1.0 hr | 6RL00 | X0R00 | A18026B | 81726-TK8-A22 |
| 8600A6 | LX Models Only: Do the inspection procedure and replace the seat-back frame. | 1.0 hr | 6RL00 | X0R00 | A18026D | 81726-TK8-A02 |
Install Bracket Kit, Then Replace Seat-Back
NOTE
In very rare cases, after installing the bracket kit, the recliner function may not work, requiring the seat-back to be replaced.
| Operation Number | Description | Flat Rate Time | Defect Code | Symptom Code | Template ID | Failed Part Number |
| 8600A7 | All except LX Models: Do the inspection procedure and install the recliner bracket kit, reinspect the recliner function, then replace the seat-back frame after the recliner function failed the reinspection. | 1.1 hr | 6RL00 | X0R00 | A18026C | 81726-TK8-A22 |
| 8600A7 | LX Models Only: Do the inspection procedure and install the recliner bracket kit, reinspect the recliner function, then replace the seat-back frame after the recliner function failed the reinspection. | 1.1 hr | 6RL00 | X0R00 | A18026E | 81726-TK8-A02 |
Skill Level: Repair Technician
INSPECTION PROCEDURE
NOTE
If the seat recliner binds or becomes stuck at any time during the inspection, replace the seat-back frame using the REPAIR PROCEDURE – SEAT-BACK FRAME REPLACEMENT.
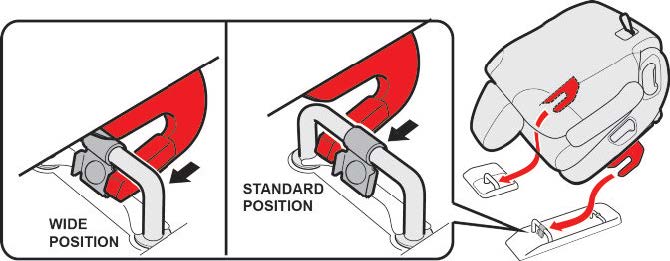
- Remove any child or booster seats that are installed in the second row center and left seats, and place them in the cargo area for the customer to install. Note which position the seat is installed; Standard (inner) or Wide (outer) position. If the seat is installed in the wide position, reinstall it in the wide position before returning the vehicle to the customer for their convenience.
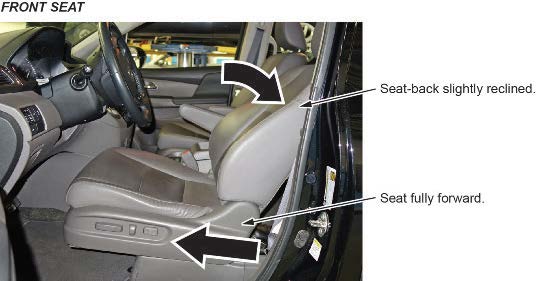
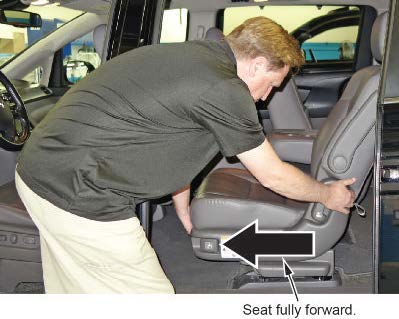
- Slide the front seat fully forward, and slightly recline the seat-back.
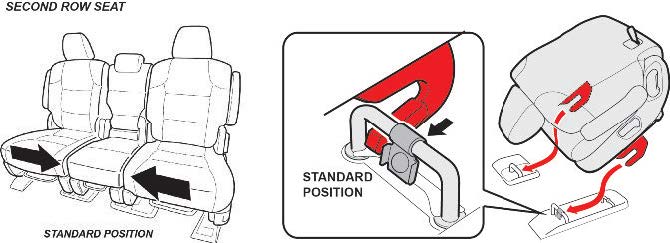
- If the second row seat is installed in the wide (outer) position, move it to the standard (inner) position.
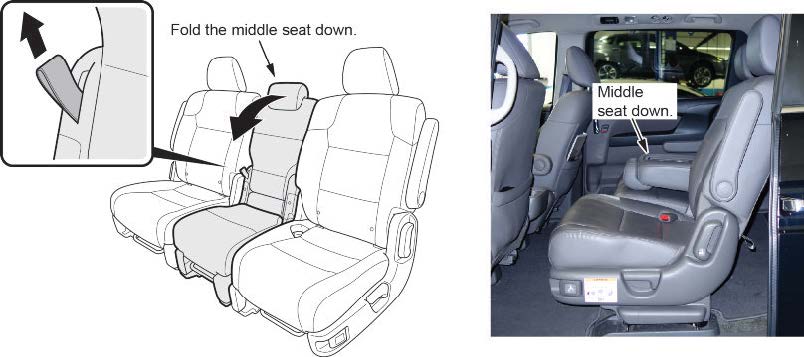
- Fold down the second row middle seat.
- Start with the seat-back in an upright position.
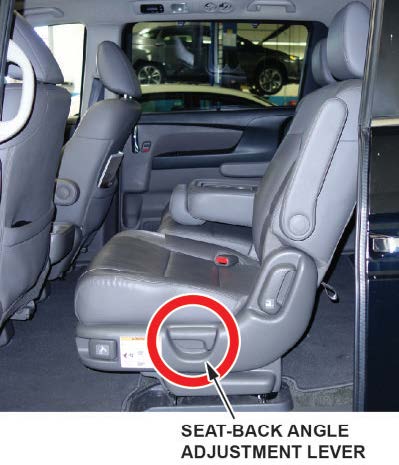
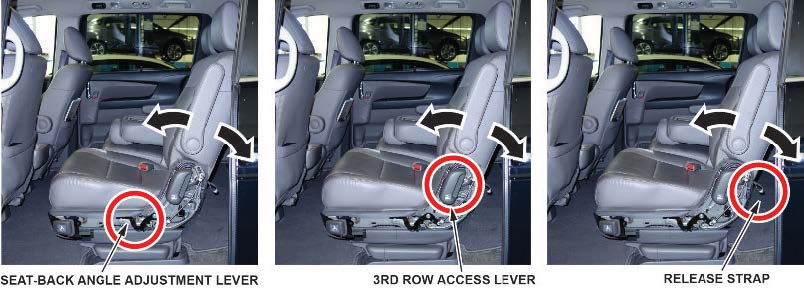
- Check the seat-back angle adjustment lever function.
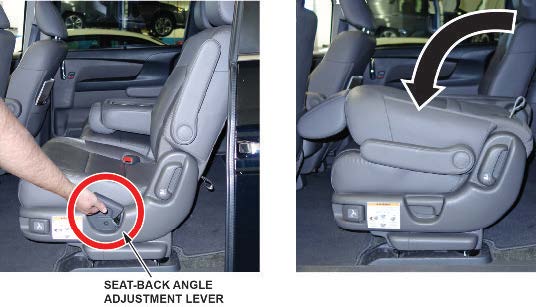
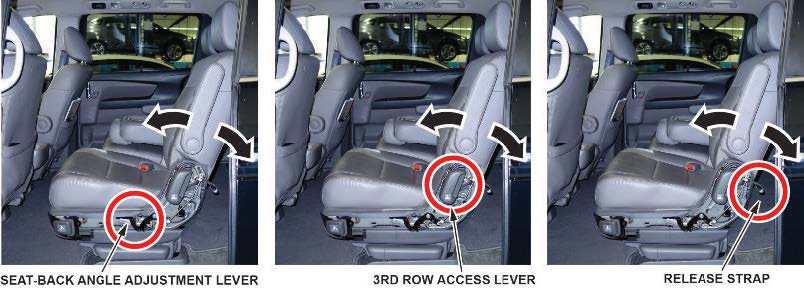
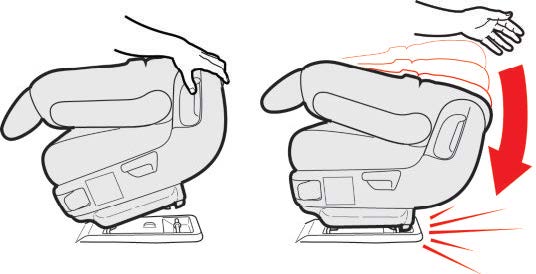
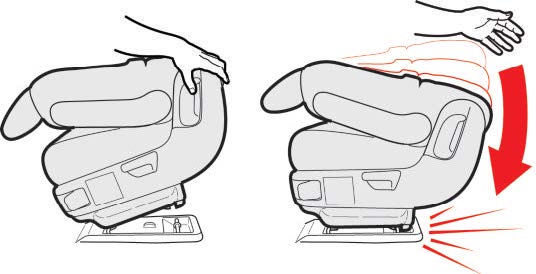
7.1 Pull the seat-back angle adjustment lever, and allow the seat-back to fold.
NOTE
Don’t let the seat-back slam down.
- If the seat-back does not fold, folds slowly, or requires assistance to fold it down, the recliner mechanism must be replaced. Go to REPAIR PROCEDURE – SEAT-BACK FRAME REPLACEMENT.
- If the seat folds normally, go to step 7.2.
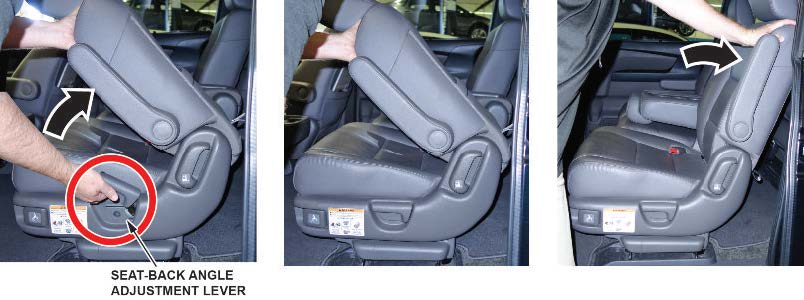
7.2 Pull the seat-back adjustment lever, and lift up on seat-back to release it from the folded position. Release the adjustment lever, and continue to push the seat-back until it locks in the upright position.
- If the seat-back does not lift up easily, binds, or requires significant effort to lift it up and push it back to the upright position, the recliner mechanism must be replaced. Go to REPAIR PROCEDURE – SEAT-BACK FRAME REPLACEMENT.
- If the seat-back lifts up and locks normally in the upright position, go to step 8.
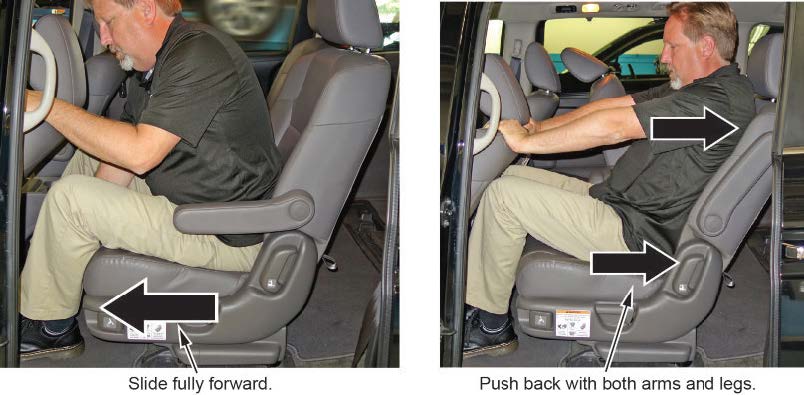
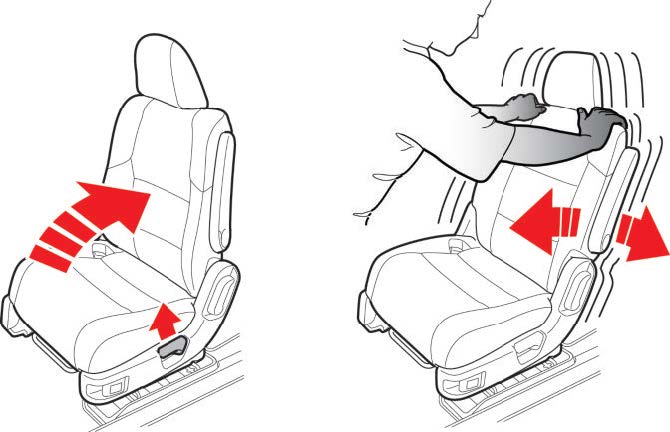
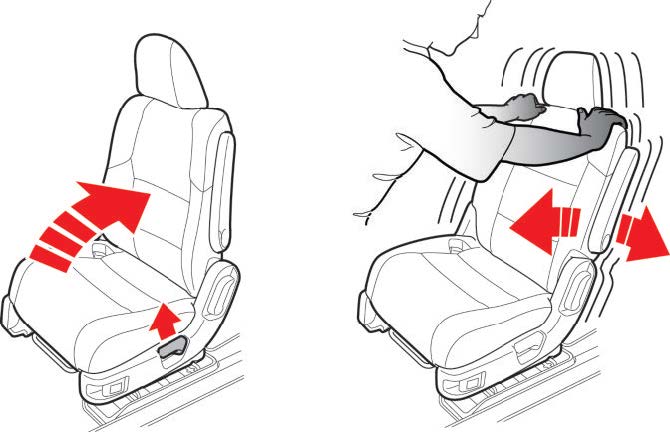
- Sit in the seat, lift the slide lever, and make sure the seat is all the way forward. Using your arms and legs, push against the seat-back to confirm that the seat recliner mechanism holds its position and doesn’t recline when a rearward force is applied.
NOTES
Recline the driver’s seat as needed to assist applying pressure against the seat-back.
- If the seat-back does not hold its position and/or there is a ratcheting sound, the recliner mechanism must be replaced. Go to REPAIR PROCEDURE – SEAT-BACK FRAME REPLACEMENT.
- If the seat-back holds its position and there is no ratcheting sound, go to step 9.
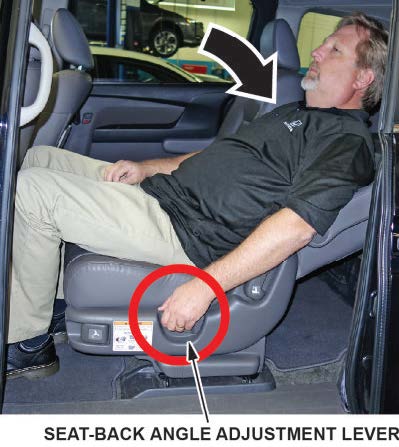
9.1While seated, pull the seat-back angle adjustment lever, lean back until the seat is fully reclined, then release the lever.
- If the seat-back recliner binds or requires significant effort to recline, the recliner mechanism must be replaced. Go to REPAIR PROCEDURE – SEAT-BACK FRAME REPLACEMENT.
- If the recliner function operates normally, go to step 9.2.
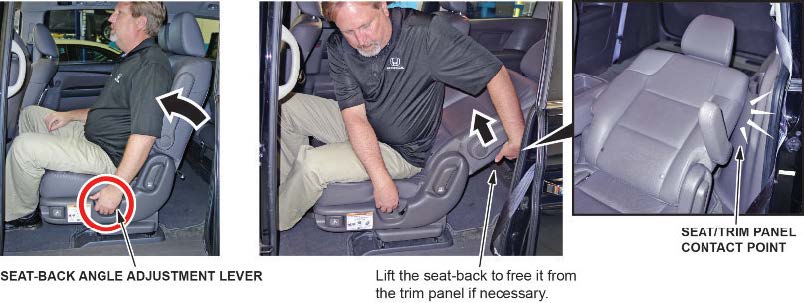
9.2 While seated, pull the recliner handle to return the seat-back to the upright position and exit the seat.
NOTE
When the seat-back is fully reclined, it contacts the rear side trim panel near the 3rd row cup holder. This may prevent the seat-back from freely returning to the upright position. If this occurs, lift the seat-back until it is not contacting the trim panel and allow the recliner to return to the upright position unassisted.
- After the seat-back is free from the side trim panel, if the seat-back recliner does not fold, binds, or requires continuous assistance to return the seat to the upright position, the recliner mechanism must be replaced. Go to REPAIR PROCEDURE – SEAT-BACK FRAME REPLACEMENT.
- If the seat-back returns to the upright position normally, go to step 10.
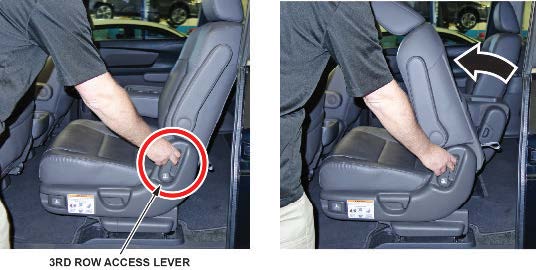
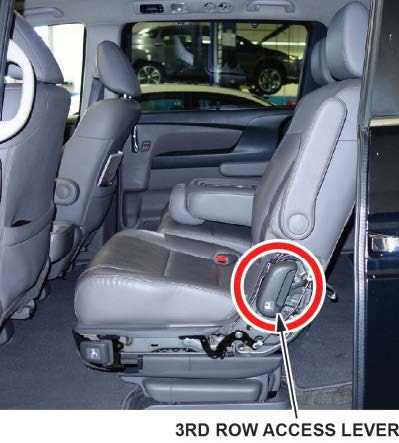
- Check the 3rd row access lever function.
10.1 Pull the 3rd row access lever, and allow the seat-back to fold forward.
NOTES
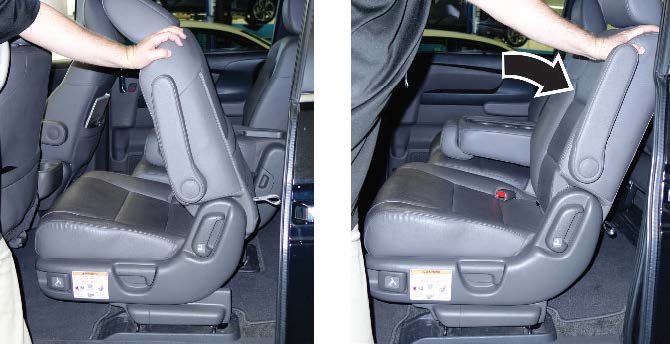
The seat-back should fold forward as shown. It will not fold flat.
- If the seat-back does not fold forward by itself, binds, and/or requires assistance to fold forward, the recliner mechanism must be replaced. Go to REPAIR PROCEDURE – SEAT-BACK FRAME REPLACEMENT.
- If the seat-back folds forward normally, go to step 10.2.
10.2 Push the seat-back toward the rear of the vehicle until the seat-back locks in the upright position.
- If the seat-back does not lock in the upright position normally, the recliner mechanism must be replaced. Go to REPAIR PROCEDURE – SEAT-BACK FRAME REPLACEMENT.
- If the seat-back locks in the upright position normally, go to REPAIR PROCEDURE – RECLINER BRACKET KIT.
REPAIR PROCEDURE – RECLINER BRACKET KIT
NOTES
- Put on gloves to protect your hands.
- Take care not to tear or damage the seat covers.
- Use the appropriate tool from the KTC trim tool set to avoid damage when removing components.
- Remove the recliner cover.
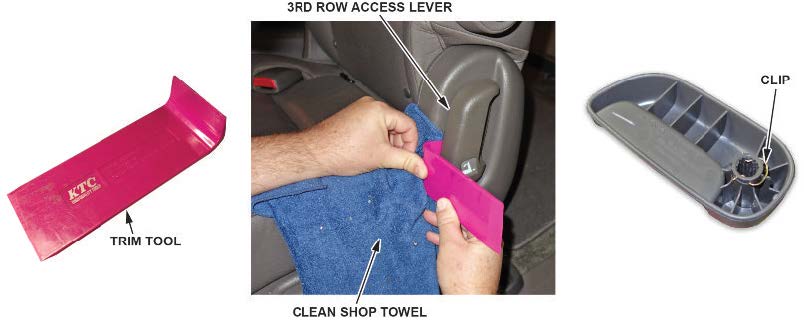
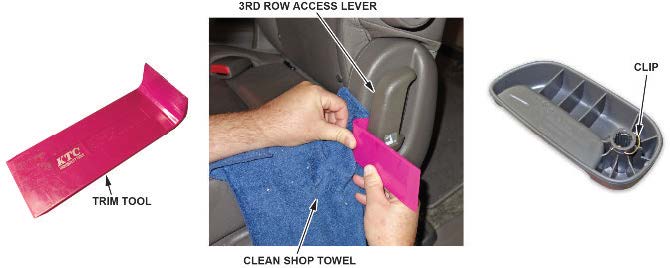
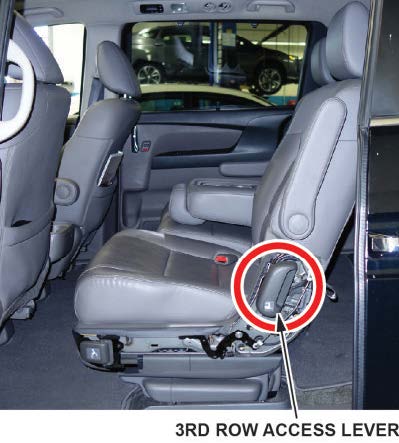
- Make sure the seat-back is in an upright position. Using a trim tool and a clean shop towel as shown, remove the 3rd row access lever.
NOTES
- Use a clean shop towel to make sure the recliner cover and 3rd row access lever are not damaged.
- Be careful not to lose the clip on the back of the 3rd row access lever. If the clip is lost, the handle will not lock when you install it.
1.2 Lower the seat-back to the folded position.
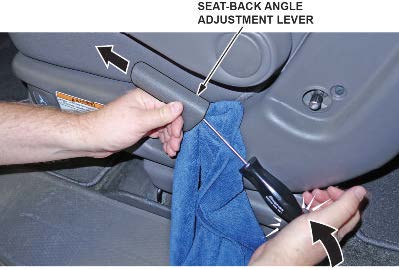
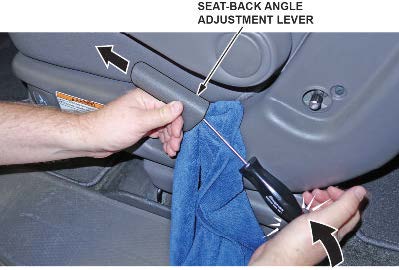
1.3 Remove the seat-back angle adjustment lever handle by inserting a medium length Phillips screwdriver into the handle, then striking the screwdriver handle with your hand to slide the adjustment lever handle off.
NOTES
- Place a clean shop towel between the screwdriver and the recliner cover to avoid damaging the recliner cover.
- To avoid damaging the recliner cover, do not strike the screwdriver with a hammer .
- Make sure the recliner lever is pulled up slightly so the handle doesn’t hit the recliner cover when it comes off.
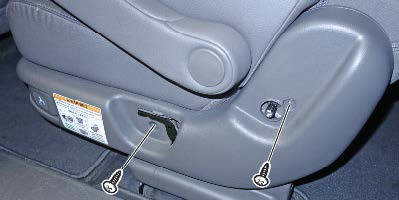
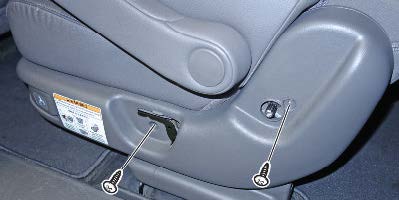
1.4 Remove the screws.
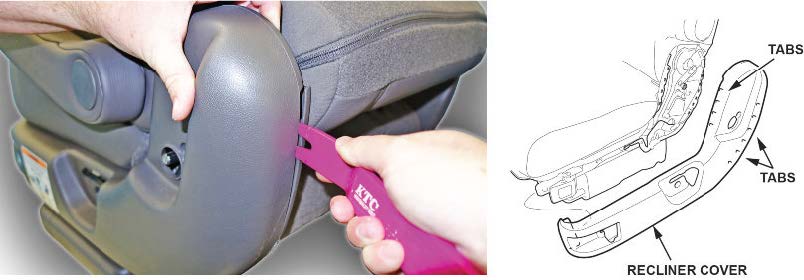
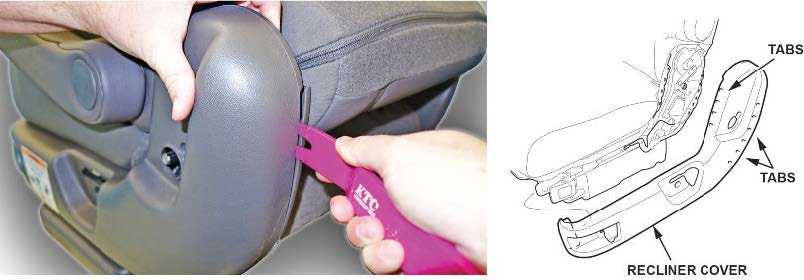
1.5 Starting at the back of the recliner cover, insert a trim tool as shown to separate the outer and inner covers.
1.6 Move toward the front of the recliner cover using the trim tool to separate the inner and outer covers.
1.7 Remove the recliner cover.
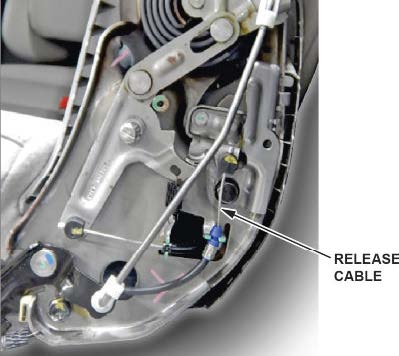
- Disconnect the release cable.
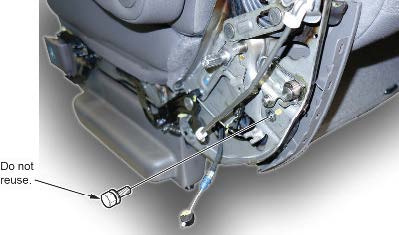
- Remove the bolt. Do not reuse it. It must be replaced with the new bolt included in the kit.
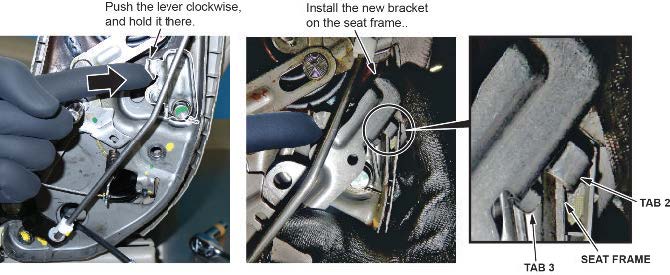
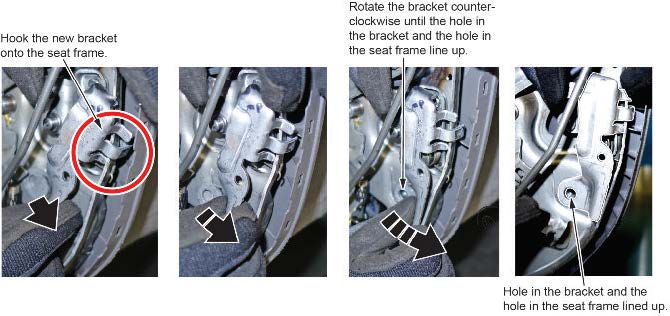
- Lift the lever and hold it as shown, then install the bracket, starting at an angle with center tab 2 and lower tab 3 positioned as shown.
- Rotate the bracket counterclockwise into position until the bolt hole on the new bracket aligns with the bolt hole in the seat frame.
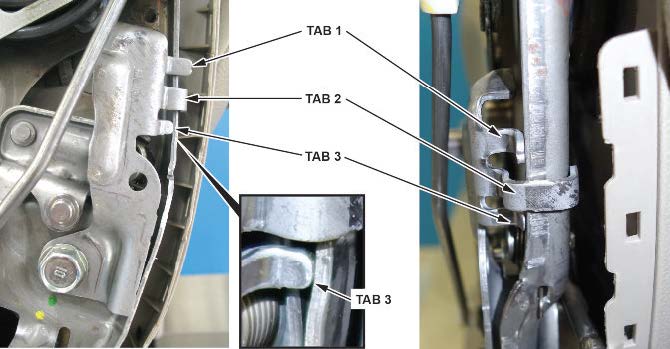
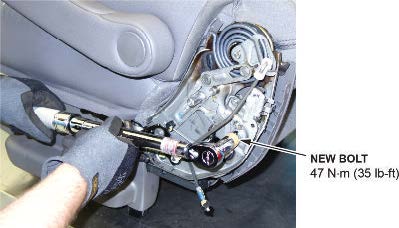
- Check to make sure the three tabs are in position, install and hand tighten the new bolt from the kit.
NOTES
- Tab 1 sits on the edge of the seat frame, tab 2 wraps around the seat frame, and tab 3 is on the inside of the frame.
- The new bolt has a fixed collar and is coated with threadlock and must be used to install the bracket. Do not use the original bolt.
- Torque the new bolt to 47 N·m (35 lb-ft).
NOTE
The bolt is coated with thread lock, which allows bolt adjustment for up to 10 minutes after it is initially torqued. After 10 minutes, the thread lock sets. If the bolt needs adjustment after 10 minutes, replace it with a new one.
- Install the lock release cable.
- Temporarily install the 3rd row access lever. Install the seat if it was removed from the vehicle.
- Confirm the seat-back recliner function activates using the seat-back angle adjustment lever, the 3rd row access lever and the release strap.
- If the seat-back recliner does not activate with the seat-back angle adjustment lever, the 3rd row access lever and the release strap, replace the recliner mechanism. Go to SEAT-BACK FRAME REPLACEMENT.
- If the seat-back recliner activates using the seat-back angle adjustment lever, the 3rd row access lever and the release strap, go to step 11.
- Remove the 3rd row access lever and install the recliner cover in the reverse order of removal.
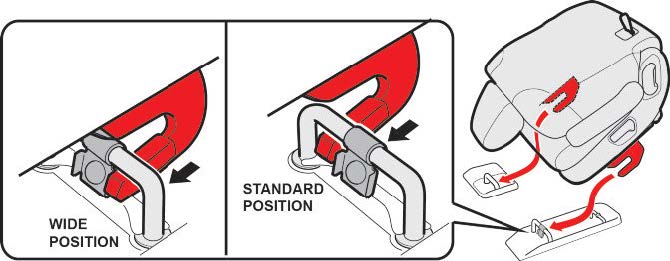
- If the second row seat was installed in the wide (outer) position noted in step 1 of the INSPECTION PROCEDURE, move it to the wide (outer) position and do the following to make sure it is properly secured.
NOTE
Make sure S/B 18-021, Safety Recall: Second Row Outer Seat Striker Bracket (Seat Tipping) is completed.
12.1 With the seat-back folded down and adjusted to the rearmost position, insert the hooks into the floor strikerswith the outer hook in the standard or wide position.
12.2 After confirming both front hooks are fully inserted into the front strikers, begin to lower the seat then allow it todrop and lock to the rear floor strikers.
12.3 Raise the seat-back to an upright position, then rock the seat back and forth to confirm both the inner andouter latches are securely locked into position.
REPAIR PROCEDURE – SEAT-BACK FRAME REPLACEMENT
NOTES
- Put on gloves to protect your hands.
- Take care not to tear or damage the seat covers.
- Use the appropriate tool from the KTC trim tool set to avoid damage when removing components.
- Note which position the seat is installed; Standard (inner) or Wide (outer) position so that you can reinstall the seat in the same position after the repair.
- Remove the second row seat.
- If not already done, remove the recliner cover.
3.1 Make sure the seat-back is in an upright position. Using a trim tool and a clean shop towel as shown, remove the 3rd row access lever.
NOTES
- Use a clean shop towel to make sure the recliner cover and 3rd row access lever are not damaged.
- Be careful not to lose the clip on the back of the 3rd row access lever. If the clip is lost, the lever will not lock when you install it.
3.2 Lower the seat-back to the folded position.
3.3 Remove the seat-back angle adjustment lever handle by inserting a medium length Phillips screwdriver into the handle, then striking the screwdriver handle with your hand to slide the adjustment lever handle off.
NOTES
- Place a clean shop towel between the screwdriver and the recliner cover to avoid damaging the recliner cover.
- To avoid damaging the recliner cover, do not strike the screwdriver with a hammer.
- Make sure the recliner lever is pulled up slightly so the handle doesn’t hit the recliner cover when it comes off.
3.4 Remove the screws.
3.5 Starting at the back of the recliner cover, insert a trim tool as shown to separate the outer and inner covers.
3.6 Move toward the front of the recliner cover using the trim tool to separate the inner and outer covers.
3.7 Remove the recliner cover.
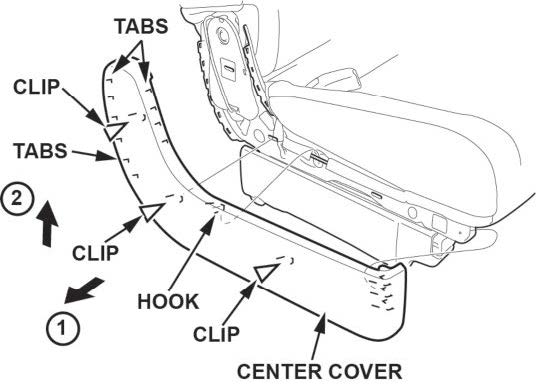
- Remove the center cover.
4.1 Detach the clips.
4.2 Pull up the cover, then release the tabs and the hook.
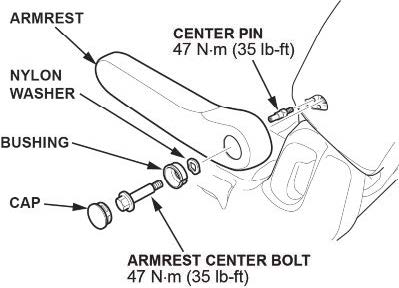
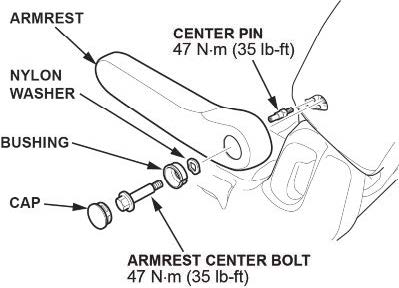
- Remove the armrest and armrest center pin.
5.1 Remove the cap with a trim tool.
5.2 Remove the armrest center bolt and , then remove the armrest.
5.3 Remove the center pin.
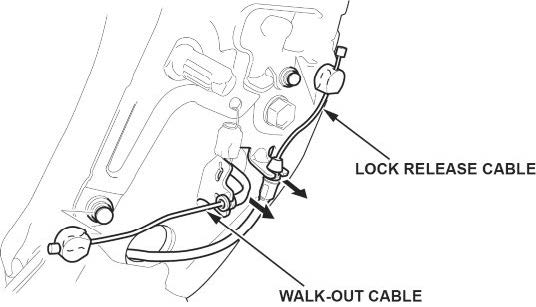
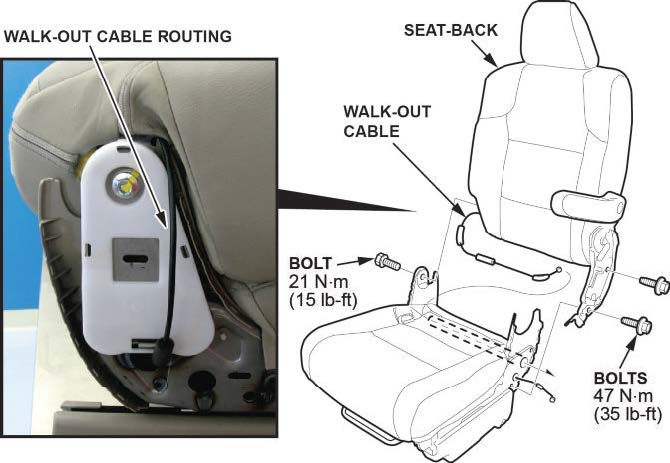
- Disconnect the lock release cable and the walk-out cable from the seat-back frame.
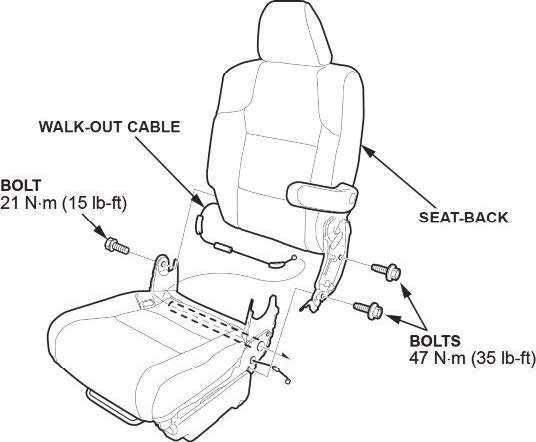
- Remove the bolts, pull out the walk-out cable, then separate the seat-back.
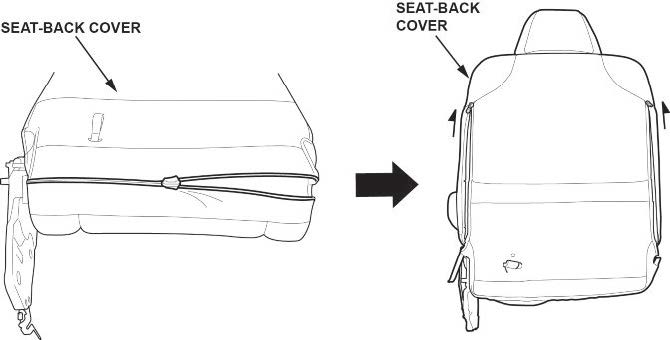
- Unzip the bottom and both sides of the seat-back cover.
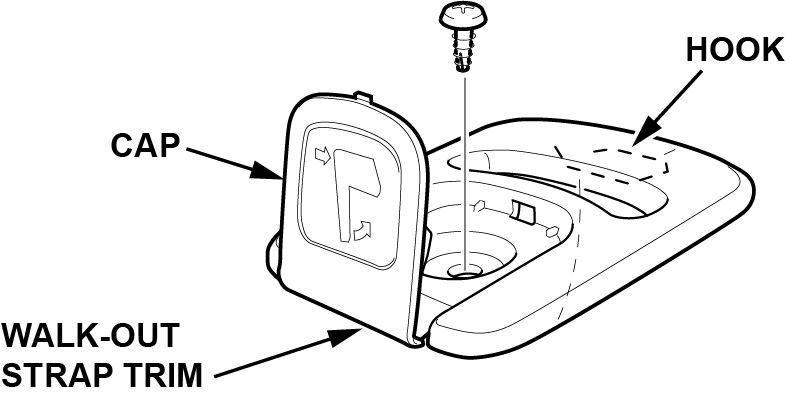
- Pry up the cap on the walk-out strap trim, and remove the screw.
- Feed the walk-out strap trim through the opening in the seat cover.
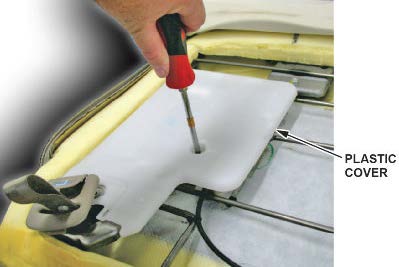
- Remove the plastic cover.
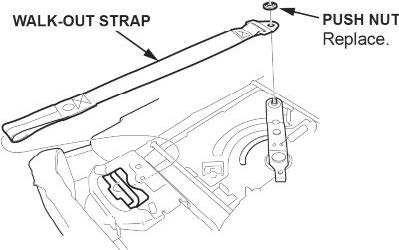
- Remove the push nut, then remove the walk-out strap.
NOTE
Replace the push nut you removed with a new one.
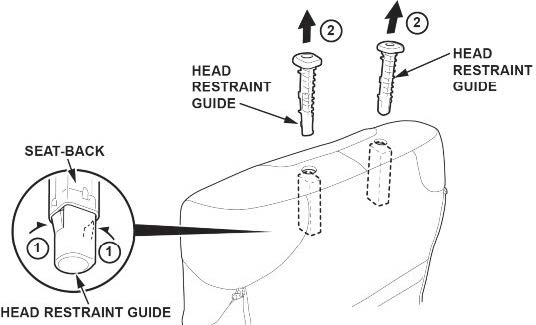
- Pinch the tabs on the ends of the head restraint guides, and remove them from the seat-back.
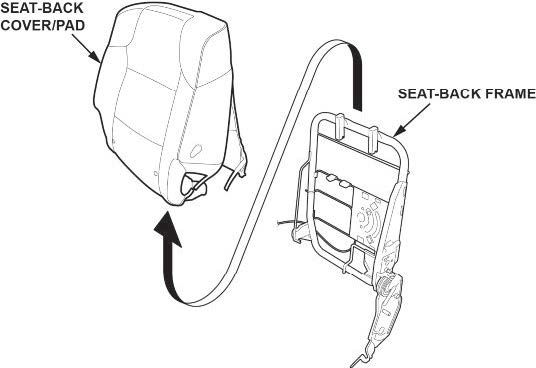
- Remove the seat-back cover/pad from the seat-back frame.
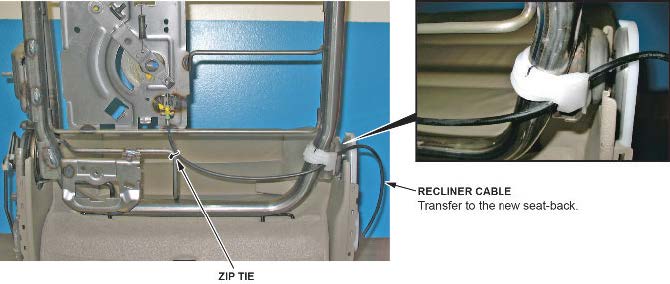
- Cut the zip tie, and disconnect the plastic clamp. Then disconnect the recliner cable and install it onto the new seatback recliner mechanism.
NOTE
Use a new zip-tie to secure the recliner cable when reassembling the seat.
- Assemble the seat-back in the reverse order of removal, and note the following:
- Route the walk-out strap under the metal bar as shown.
- Install the walk-out strap using a new 6 mm push nut.
- Install the armrest center pin and torque it to the specified torque, then install the armrest and tighten the armrest center bolt to the specified torque.
- Install the seat-back onto the base.
NOTE
The bracket kit does not need to be installed on a new seat-back frame.
- Install the seat, and temporarily install the 3rd row access lever.
- Confirm the seat-back recliner function activates using the seat-back angle adjustment lever, the 3rd row access lever, and the release strap.
- Remove the 3rd row access lever, and install the recliner cover and center cover in the reverse order of removal.
- If the second row seat was installed in the wide (outer) position noted in step 1 of the INSPECTION PROCEDURE, move it to the wide (outer) position and do the following to make sure it is properly secured.
NOTE
Make sure S/B 18-021, Safety Recall: Second Row Outer Seat Striker Bracket (Seat Tipping) is completed.
21.1 With the seat-back folded down and adjusted to the rearmost position, insert the hooks into the floor strikerswith the outer hook in the standard or wide position.
21.2 After confirming both front hooks are fully inserted into the front strikers, begin to lower the seat then allow it todrop and lock to the rear floor strikers.
21.3 Raise the seat-back to an upright position, then rock the seat back and forth to confirm both the inner andouter latches are securely locked into position.
END
3 Affected Products
Vehicle
| HONDA | ODYSSEY | 2014-2016 |
17 Associated Documents
Manufacturer Notices(to Dealers,etc) – Sent on 03 07 2018 Subject Safety Recall: 2014–16 Odyssey: Driver Side Second Row Outer Seat Recliner
 Loading...
Remedy Instructions and TSB – Honda Service Bulletin 18-026 March 7, 2018 Version 1
RCRIT-18V170-3206.pdf 186.228KB
 Loading...
Chronology
RMISC-18V170-3064.pdf 68.255KB
 Loading...
Manufacturer Notices(to Dealers,etc) – Sent on 03 06 2018 Subject Odyssey Stop Sales
RCMN-18V170-7630.pdf 188.288KB
 Loading...
Defect Notice 573 Report
RCLRPT-18V170-2643.PDF 216.435KB
 Loading...
DEFECT INFORMATION REPORT
RMISC-18V170-2154.pdf 62.194KB
 Loading...
Recall Acknowledgement
RCAK-18V170-8220.pdf 285.391KB
 Loading...
Manufacturer Notices(to Dealers,etc) – Sent on 04 06 2018 Subject Parts Available: Safety Recall: 14–16 Odyssey Driver Side Second Row Outer Seat
 Loading...
Remedy Instructions and TSB – Service Bulletin 18-026 April 7, 2018 Version 4
RCRIT-18V170-5962.pdf 2299.209KB
 Loading...
Manufacturer Notices(to Dealers,etc) – Sent on 03 27 2018 Subject Odyssey Stop Sale (Campaign Bulletin 18-026)
 Loading...
Remedy Instructions and TSB – Service Bulletin 18-026 March 30, 2018 Version 3
RCRIT-18V170-2625.pdf 4677.377KB
 Loading...
Statement by American Honda Regarding Driver’s Side Second Row Seatback Recall: 2014-2016 Honda Odyssey
RMISC-18V170-0027.pdf 70.236KB
 Loading...
Remedy Instructions and TSB – Honda Service Bulletin 18-026 April 24, 2018 Version 5
RCRIT-18V170-4881.pdf 2304.654KB
 Loading...
Recall Quarterly Report #3, 2018-4
RCLQRT-18V170-2569.PDF 211.361KB
 Loading...
Recall Quarterly Report #2, 2018-3
RCLQRT-18V170-2698.PDF 211.263KB
 Loading...
ISSUED Owner Notification Letter(Part 577)
RCONL-18V170-6105.pdf 139.637KB
 Loading...
Recall Quarterly Report #4, 2019-1
RCLQRT-18V170-0824.PDF 211.47KB
 Loading...
Recalls Documents
- [Pro OBD2 Scanner] - BlueDriver is the easiest way to scan and understand your vehicle like a professional mechanic. Read and clear your car’s trouble codes and check engine light.
- [Read & Clear All The Codes] - BlueDriver's enhanced vehicle diagnostics gives you access to information normally available only to mechanics on their OBD2 scan tools. Now you can read and clear ABS, Airbag, SRS, TPMS codes, and many more.
- [Get The Right Fix & View Live Data] - Much more than a car code reader, BlueDriver is a diagnostic tool. You’ll get unlimited repair reports with possible causes and fixes, plus real-time health monitoring while you drive with the live data feature.
- [Wireless & Bluetooth Enabled] - Say goodbye to wires. BlueDriver connects with Bluetooth via your phone/tablet to a sensor that plugs into your car's OBDII port. Get all of the capabilities of an expensive code reader & scan tool without any annoying wires.
- [User-Friendly App and Repair Videos] - BlueDriver gives you more ways to scan and fix your vehicle. Our iOS & Android app connects you to a large database of repair videos with step-by-step directions of repairs.
- [Easy to Use--Work out of box] + [FOXWELL 2025 New Version] FOXWELL NT604 Elite scan tool is the 2025 new version from FOXWELL, which is designed for those car owners who want to figure out the cause issue before fixing the car problem via scanning the most common systems like abs srs engine and transmission.The NT604 Elite diagnostic tool comes with latest software, which can be used out of box. No need to waste time to download the software first.
- [Affordable] + [Reliable Car Health Monitor] Will you be confused what happen when the warning light of abs/srs/transmission/check engine flashes? Instead of taking your cars to dealership, this foxwell scanner will help you do a thorough scanning and detection for your cars and pinpoint the root cause. It will t-urn off the warning light car after the problem is fixed.👉TIPS: Airbag crash/collision data can NOT be cleared even you replace the new airbag.
- [5 in 1 Diagnostic Scanner] Compared with those auto scanners (50-100), NT604 Elite code scanner not only includes their OBDII diagnosis but also it can be an abs/srs scanner, transmission and check engine code reader. When it’s an odb2 scanner, you can use it to check if your car is ready for annual test through I/M readiness menu. In addition, live data stream, built-in DTC library, data play back and print, all these features are a big plus for it. Note: doesn't support maintenance function.
- [Fantastic AUTOVIN] + [No extra software fee] Through the AUTOVIN menu, this NT604 Elite car scanner allows you to get your V-IN and vehicle info rapidly, no need to take time to find your V-IN and input one by one. What's more, the NT604 Elite abs srs scanner supports 60+ car makes from worldwide (America/Asia/Europe). You don’t need to pay extra software fee.
- [Solid protective case KO plastic carrying bag] + [Lifetime update] Almost all same price-level obd scanner diagnostic tool only offers plastic bag to hold on the scanner.However, NT604 Elite automotive scanner is equipped with solid protective case, preventing your obd2 scanner from damage. Then you don’t need to pay extra money to buy a solid toolbox.
- 【Best Bang For Your Buck!-FOXWELL NT614 Elite】1. 2025 New software-faster than old one. 2. One click lifetime WIFI f-ree update, no need to use the annoying Micro SD card. 3. New Update-No need to register on the FOXWELL website before use, more convenient! 4. More intuitive viewing with new interface, you can find I/M, Battery Test, DTC Lookup directly.
- 【UPGRADE OF NT604-POWERFUL 5 RESETS】Wanna to do maintenance service for your car however the basic 4 system scanner tool can't do it? Then FOXWELL NT614 Elite-the upgraded version of nt604, was born for providing you with 5 special functions-ABS Bleeding/Oil Reset/SAS Calibration/EPB Reset/Throttle Reset. These functions are enough for your daily needs. No need to buy those 300-600 dollors obd2 scanner. Saving your unnecessary repair fee with FOXWELL nt614 car scanner diagnostic tool!
- 【ENGINE/ABS/SRS/TRANSMISSION CODE READER】Don't know what's wrong with your car when the warning light of ABS, transmission, SRS, Engine flashes? NT614 Elite obd2 scanner can pinpoint the problem components. It boasts many functions of engine, abs, srs and transmission such as read & erase fault codes and grapgh live data like engine temp, wheel speed sensor, read transmission temperature, etc. Compared with car repairs, using foxwell nt614 elite is more convenient and a-ffordable.
- 【ABS BLEEDING OBD SCANNER】Do you always feel the brake pedal was slowly sinking to floor or it's loose after doing a complete front & rear brake job? And then you need to take more time than normal to stop your car, which is very dangerous. That's because when you open the brake system to replace components, air gets inside. To get a firm brake pedal, the air need to be removed by bleeding the brakes. NT614 Elite odb2 scanner can do ABS BLEEDING perfectly for your cars.
- 【SMART AUTOVIN & LIFETIME F-REE WIFI UPDATE & PERFECT GIFT CHOICE】With the fantastic AUTOVIN function, this nt614 scan tool can get your VIN and vehicle info rapidly. No need to spend much time in finding your VIN and input it one by one. Also, the lifetime f-ree wifi update is provided for more vehicle coverage, bug fixes, newly added parameters. SAVE AT LEAST 1000+ PER YEAR. And this automotive scanner is a best gift for your Dad, Husband, Boyfriend and Handy Men.
- [Transform Your Car Care Experience] - With BLCKTEC, instantly become your own professional mechanic. Effortlessly read and clear your car’s trouble codes and check engine light, ensuring your vehicle stays in top condition.
- [Empower Yourself with Comprehensive Diagnostics] - Unlock the full potential of your vehicle with the BLCKTEC 430. Access detailed diagnostics previously exclusive to professional mechanics’ OBD2 scan tools, including ABS, Airbag, SRS, TPMS codes, and beyond, right at your fingertips.
- [Drive with Confidence] - The BLCKTEC 430 is more than just a car code reader; it's your personal vehicle health advisor. Receive tailored repair reports with potential causes and verified solutions for your specific make and model, guiding you to the right fix every time.
- [Seamless Connectivity, Ultimate Convenience] - Experience the freedom of wireless diagnostics with this portable car scanner. Easily connect via Bluetooth to our intuitive sensor and enjoy all the functionalities of high-end scan tools without the clutter of wires, directly from your smartphone or tablet. To connect the tool to the App, please DO NOT go to device's Bluetooth settings, instead, open RepairSolutions2 App and follow the instructions on the App to pair the BLCKTEC 430.
- [DIY Repairs Made Easy] - Navigate car maintenance with ease using our premium app. Access a vast library of easy-to-follow repair videos, guiding you through each step of the repair process, compatible with both iOS & Android devices.
- Updated New Version AD600S: Discover the improved version of TOPDON AD600S OBD2 scanner. Now immerse yourself in a seamlessly diagnostic experience with Android 11.0 OS. With an upgraded 32G ROM, this scan tool offers ample storage and faster performance. The 5-inch display with 1280x720 resolution offers high-definition clarity, ensuring easy readability for every diagnostic detail
- Professional 4 Systems Diagnostics: For car owners dealing with common issues such as engine, transmission, ABS, and SRS, the TOPDON AD600S code scanner delivers professional diagnostic services. It easily reads and clears fault codes, analyzes data streams and more, ensuring a quick identification of problems. Additionally, the DTC Lookup function provides corresponding fault code analysis
- 9 Hot Reset Functions: Say goodbye to costly trips to the repair shop for resetting after routine maintenance such as changing oil, replacing tires, or installing new brake pads. The AD600S diagnostic tool effortlessly tackles common automotive challenges with just one click. Cut costs and cut the hassle with its 9 reset functions: Oil/BMS/ABS/SAS/EPB/DPF/TPMS/Throttle/injector coding
- Support for 10,000+ Car Models: The upgraded AD600S car scanner now supports 67+ global brands and 10,000+ models, ensuring compatibility with a diverse range of vehicles. Whether American, German, French, or Japanese, the AD600S diagnostic scanner has you covered. (Note: Contact TOPDON customer service for vehicle compatibility inquiries before purchase)
- Life time Free Updates: The AD600S diagnostic tool offers free upgrades with convenient one-click updates via Wi-Fi. Our dedicated TOPDON technical team continuously enhances our product's software, providing users with expanded vehicle support and an improved user experience through regular updates
- 【Great Ideal For Every Car Owner】Prefect choice for your father, husband, brother or boyfriend. EVERY CAR OWNER WILL NEED IT! Also, the lifetime update is provided for more vehicle coverage, bug fixes. SAVE AT LEAST $1000+ PER YEAR!Get LAUNCH CRP123 V2.0 Elite car diagnostic scanner and give your lover a surprise!*R each us to Get the Extra Gifts :Protective Case Storage Bag.
- 【2025 Newly Added 3 Reset Functions】CRP123 V2.0 obd2 scanner with upgrades it offers Throttle Adaptation,Oil Reset and SAS Reset functions for FREE now!! Optimize your engine performance with Throttle Adaptation, reset your oil life system with ease to save time and money on maintenance, and enhance your vehicle's handling and safety with SAS Reset.Covering more daily repairs,become the most cost-effective product in its price range,save your time and money!
- 【 Read & Clear/Reset Engine/ABS/SRS/Transmission Diagnostic Scan Tool 】LAUNCH CRP123 V2.0 OBD2 Scanner can test Engine, Transmission, ABS and Airbag four systems, also reads and resets code, displays data stream graphic, stores and playbacks dynamic data stream,helps to quick analysis and diagnosis.
- 【 Error Fault Code Reader】Except the full 10 modes OBD2 diagnostic functions like, retrieving I/M readiness, Freeze Frame Data, Read Dynamic Data stream and V-ehicle Information, O2 Sensor Test, EVAP Test of F-uel Tank System (Mode 8) and Advanced On-board Monitoring (Mode 6), launch crp123 v2.0 obd2 scanner can not only reveal what error codes your car is producing, but also erase your v-ehicle’s check engine light after problem fixed, the DTC help and explanation also tell you the exact problem.
- 【 Live Data Graphing + Read/Record/Playback Data stream + Print diagnostic data 】Live Data Graphing,more intuitive to know your vehicle’s problem.Large size Color Screen ;Print Function:Print the diagnose result easily; with user manual and register & update tutorial video uploaded in the link by us,you can Look up it anytime by ONE-CLICK.
- 【2025 UPGRADED VERSION, NEW CHIPS, ADD MORE FUNCTIONS, No Extra Software Fee】Faster! The 2025 CRP123I V2.0 car diagnostic scanner has a new processor, Android 8.1, 32GB of memory, 5-inch touchscreen (720P), 6000mAh rechargeable battery, One-touch Wi-Fi Lifetime Free update for more vehicle coverage, bug fixes,newly added parameters, and functionality to help you access, diagnose and fix more vehicles faster,upgrade of CRP123I.
- 【Newly Added 7 RESET FUNCTIONS】+ 【BATTERY VOLTAGE TEST】2025 New Ver. scan tool CRP123I V2.0 ADDS NEW SPECIAL FUNCTIONS-Throttle Adaptation,Oil Reset,SAS Reset,ABS Bleeding,BMS Reset,EPB Reset, D.P.F Regeneration,to maintain your vehicle system safely and efficiently.Graphing the battery voltage easier and more intuitive for the real-time monitors to check.It does not only reveal what error codes your car is producing,but also erase your vehicle's check engine light after the problem is fixed.
- 【Multi System Diagnostic Tool】LAUNCH CRP123I V2.0 obd2 scanner check ABS/SRS/AT/ENG systems &10 OBD2 modes, read/clear fault codes,Online Google Search, 4 IN 1 Graphing.Store and playback of dynamic data stream help to quick analysis and diagnosis. Generate vehicle health reports with one click and share them with your email via W-ifi which helps avoid blind maintenance. CRP123I costs less, in the long run, saving you up to $2000 each year.
- 【Fre-e Lifetime Update + AutoAuth for FCA SGW+ Auto Vin】This scan tool features One-click w-ifi update and fre-e for fixing more bugs; Realtime battery voltage graphing helps to Judge the state of the battery; Auto Vin,facilitate accurate diagnosis and provide useful information.Besides,CRP123I V2.0 support AutoAuth for FCA SGW,For 2017 and later FCA Vehicles with Secure Gateway Module (SGW),with no limitation.
- 【Cover 10000+ Models & 90+ Car Brands】CRP123I V2.0 Elite launch scanner is capable of diagnosing fault codes on more than 10000+ vehicles from 1996 to 2025 and 90+ car makes worldwide. Support almost all OBDII cars such as SUVs, minivans, light-duty trucks, etc. It's an excellent tool for all types of mechanics from novice to pros. NOTICE: Compatibility will vary on vehicles' model and year, pls c-ontact us via Q&A/message before purchase.
- 【Professional 4 Systems Diagnostics】For DIYers addressing typical concerns like engine, transmission, ABS, and SRS, the TOPDON AD500 vehicle scanner provides specialized diagnostic solutions. It effortlessly interprets and eliminates fault codes and scrutinizes data streams, ensuring the prompt detection of issues.
- 【6 Reset Functions】The AD500 car diagnostic tool offers essential features like Oil Reset, Throttle Adaptation, SAS/TPMS/BMS/EPB Reset. Easily reset oil change indicators, fine-tune throttle response, and recalibrate steering angle sensors for optimal vehicle performance and maintenance convenience.
- 【Works Easier with AD500】The AD500 scanner combines a 5” touchscreen with buttons for easier and seamless operation. Elevate your diagnostic experience with DTC Lookup, Diagnostic data record, and printing diagnostic reports via email. Stay up to date with lifetime free upgrades via Wi-Fi, ensuring your tool is always equipped with the latest features.
- 【Fast Diagnostics, Instant Support】With AutoVIN, instantly obtain crucial vehicle details for expedited diagnostic processes. The AD500 code reader not only facilitates data stream recording for later review but also acts as a battery voltage monitor, providing valuable insights into your vehicle's battery health. If you encounter any diagnostic hurdles, share feedback with TOPDON for prompt professional support.
- 【Unlock FCA Secure Gateway】Supports cutting-edge CAN FD protocol, making it compatible with modern vehicles including 2020+ GM & Chrysler. It bypasses the FCA Secure Gateway to stay up to date with newer models from Chrysler, Jeep, Fiat, and others.
- 【Designed for Volkswagen
 (VAG) Cars Diagnostics】The VD500 OBD2 scanner is specifically designed to diagnose Volkswagen
 Group (Fits for VW
 /Audi
/Audi /Skoda/ SEAT) 12-volt 16-pin vehicles, but can also be used with other 12-volt (non-Volkswagen
 ) and light trucks (non-electric) vehicles manufactured in 1996 or later that are OBD II -compliant with standard 16-pin OBD II protocols (J1850 VPM, J1850PWM, ISO9141, KWP 2000 and CAN)
 - 【Basic + Special Advanced Functions for VAG Vehicle】The ANCEL VD500 scan tool for vw
 can not only read and clear codes on engine, ABS, transmission, SAS (not all cars), ESP, TPMS and other systems, but also reset the oil, brake pad(epb service) and throttle position adaption. If you don't know how to do it, please con-tact us in time. Include your car model, year and the function you want to do
 - 【Plug and Play, No Complex Connection】The ANCEL VD500 is truly plug-and-play—no complicated networking or batteries required. Simply connect it and use it anywhere in your car, anytime. Fast, easy, and convenient
- 【Full Access, No Hidden Costs】Unlike other detectors that charge extra for features, the ANCEL VD500 is 100% no extra additional charges, with no hidden costs. The full functionality is accessible, and the system upgrade is included, a favorite choice among customers
- 【Wide Compatibility for Volkswagen
 Cars】The VD500 diagnostic scanner for audi
 offering for Volkswagen
 vehicles covers the following vehicles: fits for VW
 (CC, EOS, Golf, GTI, Jetta, Passat, Phaeton, Polo, Rabbit, Sharan, Tiguan, Touran, Touareg); fits for Audi
 (A3, A4, A6, A7, A8, A5, Q3, Q5, Q7, R8, RS3, TT, RS, RS5, S4, S6); fits for Skoda (Octavia, Rapid, Yeti, Kodiaq, Fabio, Superb); fits for SEAT (Leon, Ateca, Ibiza, Altea, Cushion, Cord, Alhambra) Diagnostics
- Comprehensive OBD2 Scanner with 15 Resets: The XTOOL D5S car code reader and vehicle reset tool provides an advanced diagnostic solution with 15 high demand reset functions, including Electronic Parking Brake Reset (EPB), SAS, BMS Reset, Throttle Body Relearn, TPMS Reset, ABS Bleeding, Injector Coding, Gearbox Match, Suspension Adjustment, Headlight, Window Initialization, Crank Sensor Relearn and more. Equipped with CAN FD Protocol and FAC AutoAuth, the D5S obdii scanner diagnostic tool ensures compatibility with a broad range of modern vehicles, allowing users to address common maintenance needs quickly.
- 4 Main System Car Diagnostic Scanner & Full OBD2 Diagnostics: The XTOOL D5S vehicle code reader is ideal for home mechanics, DIYers, and professionals, providing access to Transmission/Engine/ABS/SRS to read dtcs, and live data can be displayed in text or up to 4 pid data graphs, along with full OBD2 diagnostics to check the engine light on, other obd2 issues and routine maintenance. This scan tool ensures you can keep your vehicles in top condition, avoiding costly repairs or unexpected breakdowns. NOTE: Some vehicles display three systems after connection because the transmission and engine of some vehicles are integrated into one
- One-Tap W!Fi Updates + No Software Fees: Enjoy a 5.45” high-resolution touchscreen (1440x720) that’s easy to read, even in low light. Free lifetime software updates over Wi-Fi keep your D5S OBD2 Scanner Diagnostic Tool updated with the latest features—no hidden fees. Ample 32GB storage plus expandable memory ensures room for all your diagnostic data, while durable silicone grips provide comfortable, secure handling. This makes D5S a cost-effective, long-term investment for continuous diagnostic support, a reli~able automotive scanner diagnostic tool for your family
- Wide Compatibility Across 90+ Vehicle Brands: The XTOOL D5S Scanner for cars and trucks works with OBDII-equipped vehicles built after 1996, covering over 90 vehicle brands, including 12V diesel and SUVs, minivans, and light-duty trucks. It supports most of protocols include CAN FD for broad compatibility. For vehicle-specific compatibility, send us your vehicle information to check the compatibility before purchase
- Super Clear Navigation Display: The XTOOL D5S car scanner enhances your diagnostic workflow with a super clear navigation display, designed for convenience and speed. TOP Capability include a Voltage Display for real-time monitoring of your vehicle’s electrical system, a “My Vehicle” Menu for adding and managing vehicle information, and Quick Button Interfaces for both Auto Scan and OBD2 Diagnostics, ensuring you can quickly access the menu you need. These features streamline the diagnostic process, allowing you to focus on what matters most—Efficient vehicle maintenance
Last update on 2025-05-08 / Affiliate links / Images from Amazon Product Advertising API
This product presentation was made with AAWP plugin.

