B15-005
January 21, 2015
01358 Version 1
2016 MDX: TQI of the Navigation System
AFFECTED VEHICLES
| Year | Model | Trim Level |
| 2016 | MDX | All with Navigation |
INTRODUCTION
This bulletin covers the total quality inspection (TQI), including testing, of the navigation system. It includes these topics:
For more information about this system, see these resources:
- Navigation Manual – Besides the one that comes on the Owner’s CD, this manual is also online. Select Search by Vehicle, select the vehicle, then enter keywords NAVI MANUAL.
- Owner’s Manual – Besides the one that comes on the Owner’s CD, this manual is also online. Select Search by Vehicle, select the vehicle, then enter keywords OWN MANUAL.
- Online University – Log in and select SALES. Under Quick Links, select Course Catalog, then enter keyword NAVI in the search box.
CLAIM INFORMATION
The flat rate time for the TQI of the navigation system is included as part of the regular TQI of the vehicle.
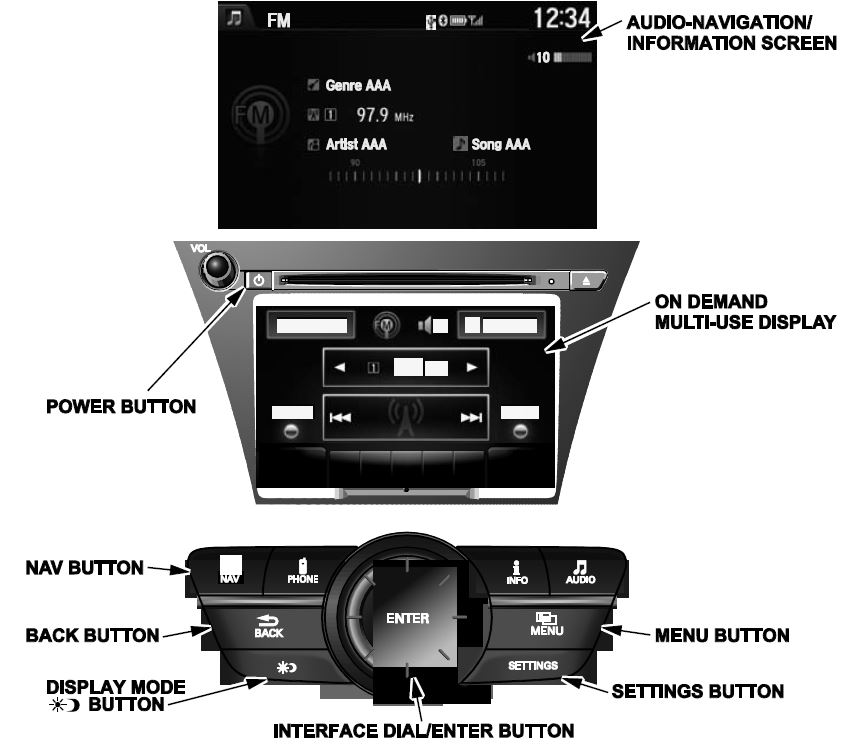
1. NAVIGATION SYSTEM CONTROLS
Use the following buttons to operate the navigation system. For more information about them, see “Getting Started” in the navigation manual.
2. VOICE CONTROL SYSTEM
The navigation system features a voice control system that lets you work most of the navigation, HVAC, and audio controls with just your voice. To interact with the system, use the Talk and Hang-Up/Back buttons. This is the primary way to give commands to the system.
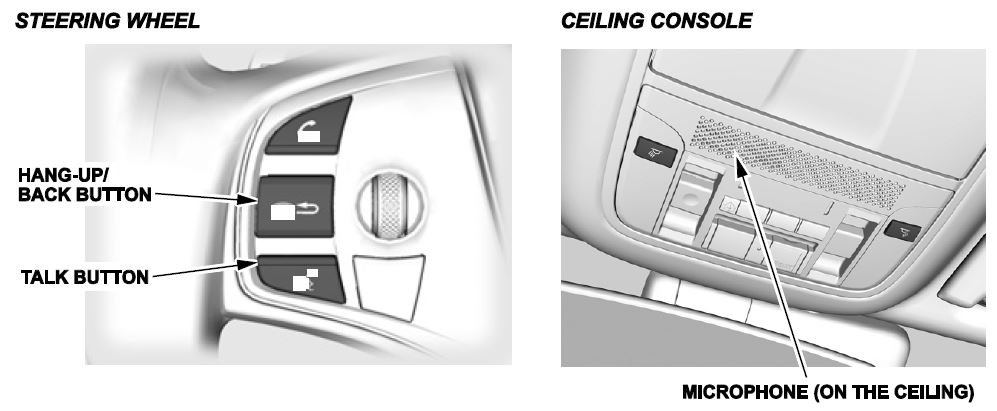
Talk button – To give a voice command, press and release this button, wait for the beep, and give the command. Hang-Up/Back button – Press and release this button to return to the previous screen. Microphone – Picks up your voice commands
NOTE: If the system does not understand your commands, see “Improving Voice Recognition” in the navigation manual.
3. NAVIGATION SYSTEM SETUP AT THE TQI
The navigation system is basically ready to use when the vehicle is delivered to the dealership. The system has features to reduce the chance of driver distraction. Some touch screens menus are limited or unavailable (grayed out) while driving to encourage using voice commands for the navigation and audio systems.
Since the navigation system interfaces with other vehicle systems, it is important that all of the systems are initialized.
To initialize the navigation system, follow these steps:
- Do the regular TQI of the vehicle.
- You may see the factory In Line Diag screen below. If so, complete the in-line diagnosis by doing the following. If not, go to step 3.
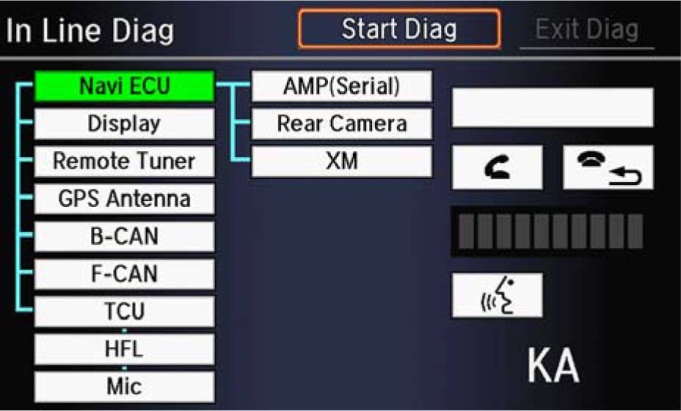
- Select Start Diag.
- Press all of the buttons on the steering wheel that are shown in the In Line Diag The icons should turn green.
- Make a loud sound (like snapping your fingers or clapping your hands) by the microphone to complete the mic test.
- When you have completed all of the tests, the icons will be green. Select Exit Diag to exit the screen.
- Turn the ignition to OFF, then to ON to make sure the In Line Diag screen does not reappear.
- Start the engine, and park the vehicle in an open area away from trees, power lines, and tall buildings. Remove loose articles, cell phones, and electrical accessories near the GPS antenna. If needed, press the audionavigation power button to turn on the audio-navigation unit. When the Enter code screen appears, press and hold the power button for about 2 seconds. This lets the PCM check that the vehicle’s VIN matches the one saved in the unit. You will hear a long beep when the unit exits the anti-theft mode. Release the button.
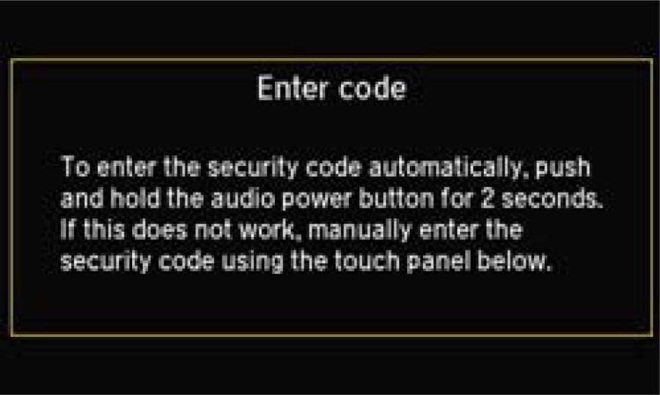
NOTE:
- If the audio-navigation unit does not exit the anti-theft mode, enter the anti-theft code using the audio touch screen display.
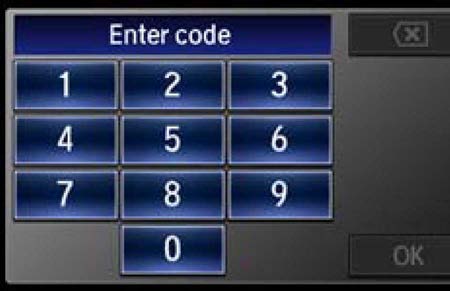
- Anti-theft code labels are no longer included in the vehicle.
- If you need the anti-theft code, you can get it from the iN (Interactive Network) using the navigation system serial number. You can easily get that number without removing the audio-navigation unit. To get the serial number and the code do this:
- Press and hold the MENU, NAV, and BACK buttons at the same time.
- At the Select Diagnosis Items screen, select Detail Information & Settings, Unit Check, then ECU Info. The system runs a short diagnostic then the navigation system serial number appears at the bottom of the screen.
- Go to Anti-theft Code Inquiry on the iN, and look up the five-digit anti-theft code.
- If the code does not work, call the American Honda warranty department at 310-783-3240. Do not call Tech Line.
- Once you enter the code, this screen appears, telling you the system is initializing (acquiring its location from the GPS satellites). Keep watching the screen.
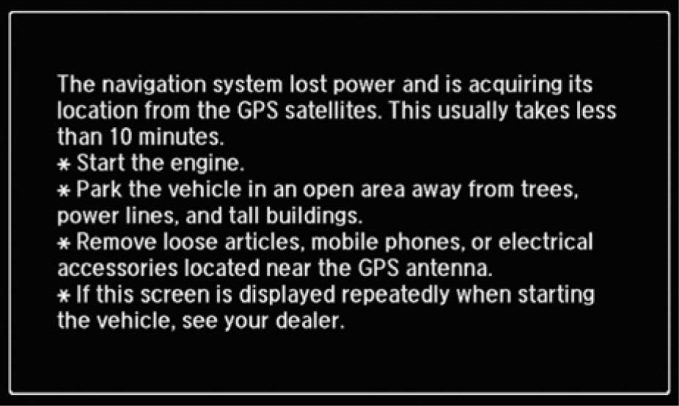
NOTE: Initialization averages about 10 minutes, but it can take as long as 45 minutes. If it completes within 10 minutes, the screen changes to the globe screen.
- If the system does not initialize within 10 minutes, a second screen (shown below) appears. The system is still initializing, but it will not automatically change to the globe screen when the initialization is complete. Do not follow the screen instructions right away. After 30 minutes, try restarting the engine to see if the system completed the initialization. If it did not, then follow the screen instructions.
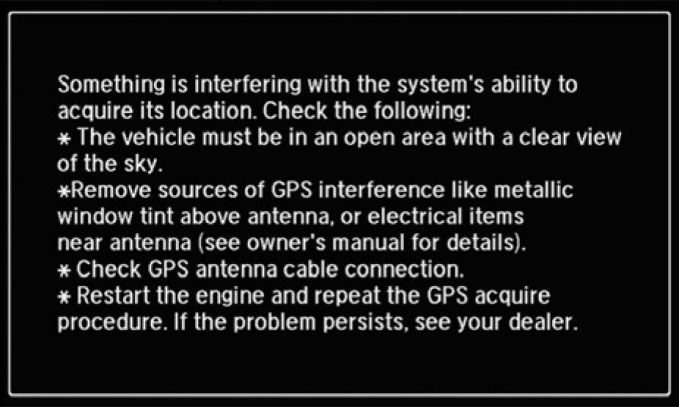
NOTE: The initialization screen may appear after battery voltage to the audio-navigation unit has been disconnected for more than 5 minutes. If this happens, follow the screen instructions. If you are still unable to get GPS initialization, see the electronic service manual for diagnostic information.
- When initialization is complete, this screen appears. Select OK.
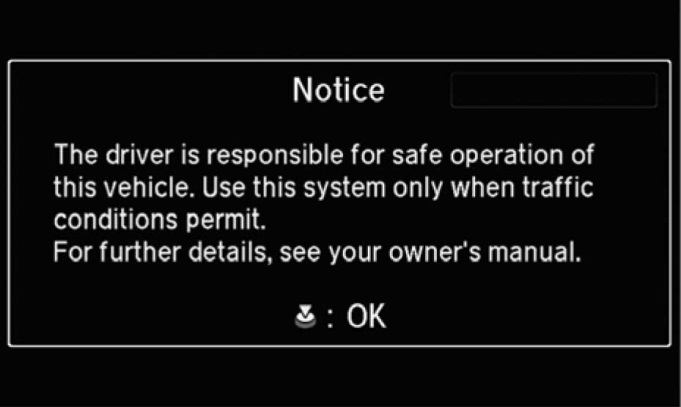
NOTE: Do not enter a destination yet. For the navigation system to calculate a route, it must align the current location to a mapped road (map matching). This happens when you start driving.
- Make sure the XM Satellite Radio dealer demo account is active by tuning to several channels within the full XM lineup. To see the full list of channels, go to siriusxm.com. If you get those channels, the demo account is fully active.
NOTE: XM Satellite Radio is free to clients for the first 90 days. To keep getting coverage after that, they must subscribe by calling 800-852-9696 or going to www.siriusxm.com. They will need their eight-character radio ID (shown when tuned to channel 0) and a major credit card.
- Drive the vehicle at least a half-mile from your dealership, and find a safe place to park. Then set the map scale to 1/20.
- Make sure the VP (vehicle position) icon moves smoothly as you drive and does not jerk from one point to another. Also make sure the icon points in the direction the vehicle is traveling; it should not dog track or spin.
- After driving a few hundred feet, you should see the name of the road you are driving on at the bottom of the screen. The system is now map-matched.
NOTE: If the system fails to map-match after driving for more than a couple of miles on a displayed road, see the electronic service manual symptom troubleshooting.
- With the map screen shown, press and release the Talk button.
- When you hear the beep, say “Find the nearest Acura dealer.” You should see a list of Acura dealers.
- Turn the interface dial to select your dealership, then press the ENTER button.
- On the Calculate Route To screen, select OK. The system then calculates a route and shows it as a blue line. If you are in an area with unverified roads, you may see a blue vector line or a blue/pink dotted line pointing in the direction of your destination.
- Follow the voice guidance back to your dealership. It should work even with the audio system turned off.
- With the map screen shown, check the system interaction with the audio system and the On Demand Multi-Use Display™ (ODMD). Press and release the Talk button. After the beep, say “XM channel 115.” The ODMD should show XM channel 115.
- With the map screen shown, check the system interaction with the climate control system. Turn it on by selecting AUTO. Then press and release the Talk button. After the beep, say “Temperature 68 degrees.” The ODMD should show 68 degrees.
- Make sure the time shown in the navigation display is correct; the system gets it from the GPS satellites. For areas that do not follow daylight saving time, you may have to adjust the time settings. Go to Clock Adjustment in the Setup screen, and set Auto Daylight to OFF.
NOTE: If your dealership is near a time zone boundary, set Auto Time Zone by GPS to OFF. The clock then keeps the home time if the client routinely drives across the time zone boundary.
- Press the DISPLAY MODE button to make sure the display changes between the Day, Night, and OFF
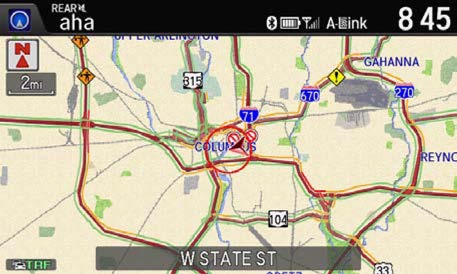
- If the dealer traffic account is activated and if your dealership is near a metropolitan area that has traffic incident or traffic flow data available (see ACURALINK REAL-TIME TRAFFIC INFORMATION), do this:
- Turn the interface dial to select one of the traffic map scales (1/20-, 1/8-, 1/4-, 1/2-, 1-, 2-, or 5-mile).
- Use the interface dial to scroll to the downtown area of your city. If your metro area has traffic flow data, freeways and other main roads should show this data as red, yellow, or green lines in one or both directions.
- You may see small diamond-shaped traffic incident icons. If so, scroll over one and press in the interface dial to see the details.
- Partially shown traffic data does not mean a problem with the navigation system. Traffic flow and density varies from day to day and from one road to another. If your area has traffic, but you cannot see it on the screen, do an online search using keyword TRAFFIC.
- Clear the HDD to delete any information that was saved during the TQI:
- Turn the ignition to ACCESSORY.
- Turn on the audio-navigation unit.
- Press and hold the MENU, NAV, and BACK buttons at the same time until the Select Diagnosis Items screen appears. Then release the buttons.
- Select Detail Information & Setting, then Functional Setup.
- Select All Clear. A confirmation screen appears, select Yes.
- A second confirmation screen appears. Select Yes again.
4. REARVIEW CAMERA
With the ignition turned to ON, shift into Reverse. The rearview image appears on the navigation screen. Make sure the distance guidelines appear on the screen. Change the camera views by pushing in on the interface dial. Turn the dial to adjust the image brightness. This adjustment is not affected by the screen brightness adjustment in Setup. NOTE:
- When in Reverse, only the interface dial works; the other buttons are locked out.
- If the image is foggy or dirty, clean the camera lens.
5. TROUBLESHOOTING
If you think you found any problems with the navigation system during the TQI or after installing replacement parts to repair it, go to the electronic service manual and enter keywords HOW TO TROUBLESHOOT. From the list, select How to Troubleshoot the Navigation System.
6. MAP COVERAGE AREAS
The map database covers the United States, Mexico, Puerto Rico, and Canada. The map coverage for the U.S. contains accurately mapped (verified) metropolitan areas and less accurate (unverified) rural coverage. For a list of current detailed coverage areas by country and state/province, see the navigation manual or go to www.acuranavi.com. Online, select the Model and Year, Map Coverage, then Map Coverage Details. You do not need to change the navigation settings when relocating to or from these locations.
7. BLUETOOTH® HANDSFREELINK® (HFL)
HFL works with most Bluetooth-enabled cell phones to let you receive and make phone calls through the audio system without ever taking your hands off of the wheel.
With a compatible phone, a simple one-time pairing process using the navigation screen is all it takes to connect the phone to the vehicle. When you make or receive a call, the audio system will automatically mute, and you will hear the call through the audio system speakers.
You can pair up to six phones to HFL. You view and work HFL functions through the navigation screen. A phonebook from a compatible phone(s) can be synched with the audio-navigation unit when the phone is first paired. For a list of approved phones, go to www.acura.com/handsfreelink.
8. ACURALINK REAL-TIME TRAFFIC INFORMATION
Traffic information is available in many metropolitan areas. The amount and type of coverage varies. Traffic incidents (diamond-shaped icons) are shown on the screen for most major metropolitan cities (typically during daytime commutes). Many of these cities also show traffic flow, shown as red, yellow, or green bands, alongside major roads or freeways. NOTE:
- Traffic information will not be shown if the XM Satellite Radio dealer demo service is not active.
- See the electronic service manual to troubleshoot real-time traffic problems.
The amount of traffic coverage varies from city to city and time of day. The Acura website contains a link that provides an up-to-date list of the current cities with traffic coverage and the actual roads covered within each city. The link also provides a demonstration of the system that explains traffic flow color bands and incident icons shown on the map. You can find this link at www.acura.com/realtimetraffic.
9. ACURALINK
AcuraLink delivers remote services to the vehicle using an embedded cellular module and the client’s smartphone. The module provides access to emergency services, remote vehicle functions, enhanced navigation services, remote vehicle diagnosis, and client relation services.
The client’s smartphone provides access to Pandora and Aha, and vehicle finder and tracking services through individual apps.
All of the functions are combined in the vehicle using overhead console buttons along with the navigation screen and ODMD.
NOTE: Enrollment is required for AcuraLink. On the iN, go to Service, AcuraLink Next Gen, and Enrollment.
AcuraLink System Status Indicator
The AcuraLink System Status indicator shows you the status of AcuraLink. When the system is booted up, the indicator blinks red and green alternately once.
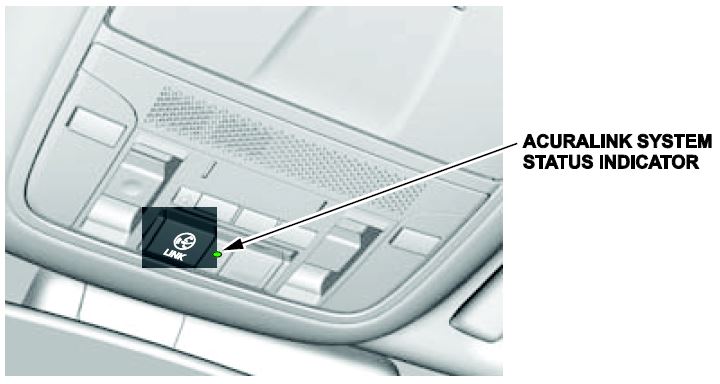
- Solid Green: The system is ready to use.
- Blinking Green: A call is being connected or in progress.
- Solid Red: There is a problem in the system.
- Alternately Blinks Red and Green: The self-diagnosis function is in use.
10. PANDORA® AND AHA™ INTERFACE
Clients can stream Pandora or Aha through the audio system. Clients need to pair their Acura-approved phones to HFL. To find an approved phone that supports streaming Pandora or Aha, go to www.acura.com/handsfreelink.
The Aha app works best if the client downloads the AcuraLink Streams app available in the Google Play Store or the Apple App Store.

NOTE: Not all approved phones support all of Pandora’s or Aha’s features. Make sure you check the phone’s supported features on the website to avoid replacing good components in the vehicle during troubleshooting.
For more information about playing Pandora or Aha through your audio system, see “Playing Internet Radio” in the owner’s manual.
11. SHORT MESSAGE SERVICE (SMS) TEXT MESSAGING/E-MAIL FUNCTION
An integrated SMS text message function lets clients respond to incoming text messages with reduced driver distraction.
Clients who pair Acura-approved phones to HFL can get incoming text messages and e-mails, as well as respond to messages by way of the audio-navigation unit by selecting one of six possible responses.
For more information about text messages, see the owner’s manual. For a list of approved phones, go to www.acura.com/handsfreelink.

- 【Applicable Car Models】This radio is compatible with the original factory-style car radio for Honda Accord 2008-2013. Before purchasing, please verify the year, dimensions, and shape of your vehicle's center console. If you are unsure about compatibility, feel free to contact us with a message or picture for further assistance.
- 【Powerful Functions】This infotainment system for Honda Accord features a 10.2-inch IPS touchscreen with a Linux operating system, delivering a smooth and responsive user experience. The unit is designed for plug-and-play installation with no extra accessories required, ensuring a straightforward upgrade to your vehicle’s infotainment system.
- 【Wired/Wireless CarPlay & Android Auto】This radio for Honda Accord supports both wired and wireless CarPlay & Android Auto, enabling seamless integration with your smartphone. You can easily use voice control to operate apps, make calls, send messages, cast navigation from your phone via CarPlay or Android Auto, and control music playback—all for a safer, hands-free driving experience.
- 【1280*720 HD Display】This car stereo for Honda Accord features a high-definition display with 1280*720 resolution. Compared with standard screens, it delivers sharper, smoother visuals and more vibrant colors, providing an exceptional viewing experience.
- 【AHD 1080P Backup Camera】This car stereo for Honda Accord comes with an IP69 waterproof AHD 1080P rear camera. It features a 170° wide-angle optical glass lens for crystal-clear rear vision. The large aperture and wide-angle design enhance image clarity, while the AHD signal ensures sharp 1080P display for safer reversing and parking.
- 【Applicable Car Models】This radio is compatible with factory-style head units for Honda Accord 2008 to 2012 models. Before purchasing, please verify the year, dimensions, and shape of your vehicle’s center console. If you are unsure, contact us with a message or photo for assistance.
- 【Powerful Functions】This Android infotainment system features a 10.2-inch IPS touchscreen with 2GB RAM and 32GB ROM, providing smooth, responsive performance for Honda Accord vehicles. The unit supports plug-and-play installation with no additional parts required, making it simple to upgrade your car’s infotainment system.
- 【Wired/Wireless CarPlay & Android Auto】This car radio supports both wired and wireless CarPlay & Android Auto for seamless smartphone connectivity. You can use voice control to access GPS navigation, phone calls, messages, and music, helping you stay focused on the road. FCC and CE certified for safe and reliable use.
- 【1280*720 QLED HD Display】This car stereo for Honda Accord is equipped with a 1280x720 high-resolution QLED screen, which presents clearer images, more natural transitions and richer colors for an improved in-car viewing experience.
- 【AHD 1080P Rear Camera】The IP69 waterproof AHD1080P rear camera features a 170° wide-angle optical glass lens for high-definition viewing. Its large aperture and fisheye design enhance image clarity and technology aesthetic. This aftermarket camera supports AHD signal output for 1080P display.
![[2G+64G] for Honda Civic 2006-2011 Wireless Carplay Android 15.0 Car Stereo](https://m.media-amazon.com/images/I/41uEvl6hnfL._SL160_.jpg "2016 Acura MDX: TQI of the Navigation System 15")
- Car Radio for Honda Civic Upgrade: 10.1 inch touchscreen car stereo fits for Honda Civic 2006 2007 2008 2009 2010 2011. No need additional frame, it includes a Plug and Play wiring harness for a effortless installation experience. PLEASE NOTE: For vehicles equipped with a factory passenger airbag switch, the installation frame may cause obstruction. Minor trimming of the frame is required to ensure the switch remains fully accessible.
- Wireless Carplay / Android Auto: This car audio for Honda Civic supports Wireless CarPlay and Android Auto which allows you to access map navigation, phone contacts, email, music and more. Meanwhile, the intelligent voice control assistant helps you focus on the road and have fun along the way
- GPS Navigation / 5GHz-WiFi: The latest Android 15.0 system with 4 Core 2GB RAM and 64GB storage this head unit, equipped with GPS for direct use of offline and online maps. It also supports WiFi/hotspot for app installation, video streaming, and online navigation from the Play Store
- HiFi Audio: The car play radio for Honda Civic equipped with high fidelity HiFi technology and EQ options, which aims to capturing the nuances and details of the original recording with exceptional clarity and accuracy, providing an immersive and authentic listening experience
- More Functions: Full HD rear view camera; Bluetooth hands-free call and music; Steering Wheel Control; Mirroring link; FM RDS radio; EQ Settings; GPS; WiFi; Subwoofer output; Dual USB ports; Customize UI interface; 1280*720P high resolution IPS Touchscreen; Split screen
![[2G+64G] Android 15 Car Stereo for Honda CRV 2007-2011](https://m.media-amazon.com/images/I/41H7ZVccrhL._SL160_.jpg "2016 Acura MDX: TQI of the Navigation System 16")
- Applicable Car Models: This car head unit is compatible with Honda CRV 2007 2008 2009 2010
- Android 15.0 Car Stereo: The latest Android System, Quad-core CPU, 2G Ram and 64G Rom for more APPs installed, ensures smooth operation and faster response
- GPS Navigation & WiFi: Built-in offline map app, allowing free download of worldwide offline map data. Online maps are also supported, once connected to Wi-Fi or hotspot, you can use GPS navigation anywhere. This android car radio allows you to install or delete Android apps from the Application Store, just like a smartphone
- Wireless Carplay / Android Auto: The car play radio for Honda CRV supports wireless Carplay and Android Auto, allowing easy access to your phone's apps, such as real-time online map, music, call, and enabling voice control, enhancing your driving safety and comfort
- HiFi Audio: The car audio receiver equipped with high fidelity HiFi technology and EQ options, which aims to capturing the nuances and details of the original recording with exceptional clarity and accuracy, providing an immersive and authentic listening experience

- ✅ 【Compatible Vehicle Models & Years】 Car radio suitable for Honda Civic radio:2016 2017 2018 2019 2020 2021 providing Used Car Owners with a practical replacement choice when upgrading outdated factory stereos. Designed for drivers looking to refresh their vehicle interior, this upgrade offers a simpler way to replace older audio systems with a more suitable solution for daily driving needs.
- ✅ 【Wireless CarPlay & Android Auto】 Daily commutes can be frustrating for No CarPlay Drivers who still need to plug in their phones before accessing maps, music, or calls. The wireless honda civic apple carplay offers easier phone integration during morning traffic and busy drives, while compatible honda civic accessories help maintain a cleaner and more convenient cabin setup.
- ✅ 【Upgrade Android 15 & Quad-Core CPU 64GB ROM System】 Slow loading and delayed responses are common frustrations for Slow System Users relying on older factory screens during everyday driving. The upgraded honda civic stereo improves performance when switching between navigation, entertainment, and apps, while honda civic car accessories help bring a more updated and practical dashboard experience.
- ✅ 【Faster 5GWiFi & Bluetooth Connectivity】 Staying connected throughout multiple stops is important for Delivery Drivers who depend on hands-free calls, navigation, and online features during work routes. The faster connection of the honda civic radio helps maintain reliable Bluetooth and wireless functions, while compatible pantalla para honda civic support a more organized in-car technology setup.
- ✅ 【Online/Offline GPS Navigation & HD Rearview Camera】 Family outings and weekend drives can be challenging for Parents with Kids when they need quick directions and better visibility in busy parking areas. The civic android car radio combines online and offline GPS navigation with HD rear camera support, while compatible touch screen radio for civic help create a more practical setup for daily family driving.
This product presentation was made with AAWP plugin.