| “This site contains affiliate links for which OEMDTC may be compensated” |
B14-016
August 12, 2015
52632-02241 Version 2
2015 TLX: TQI and New Model Service Information
Supersedes 14-016, dated September 24, 2014, to revise the information highlighted in yellow.
AFFECTED VEHICLES
| Year | Model | Trim Level | ||
|---|---|---|---|---|
| 2015 | TLX | 4-Cylinder 2WD – P-AWS,
8-Speed DCT | 6-Cylinder 2WD – P-AWS,
9-Speed A/T | 6-Cylinder AWD – SH-AWD,
Auto Idle Stop, 9-Speed A/T |
| Base | Base | N/A | ||
| Technology | Technology | Technology | ||
| N/A | Advance | Advance | ||
REVISION SUMMARY
Under TQI PROCEDURES, 10. Do the Idle Learn Procedure, revised the text to cover models with 9-speed automatic transmission (6-cylinder models).
INTRODUCTION
This bulletin covers the total quality inspection (TQI) of the 2015 TLX. It includes these procedures:
To do a TQI on a model with a navigation system, be sure to complete Service Bulletin 14-017, 2015 TLX: TQI of the Navigation System.
This bulletin also includes this new model service information:
CLAIM INFORMATION
Reimbursement Time: 1.4 hours
NOTE: This time includes the TQI of the navigation system, if equipped.
TQI PROCEDURES
Before Starting Review these items:
- Perfect Delivery documents, especially the information on battery maintenance and tire pressures
- TQI checklist in the maintenance journal
Make sure you record the TQI on the appropriate pages of the maintenance journal. The TQI is not done until this bulletin and the TQI checklist are both complete. Note on the repair order any repairs or problems that cannot be fixed within a few minutes.
Remove all TQI items from the trunk and glove box.
Starting the Vehicle Without the Backup Fuse
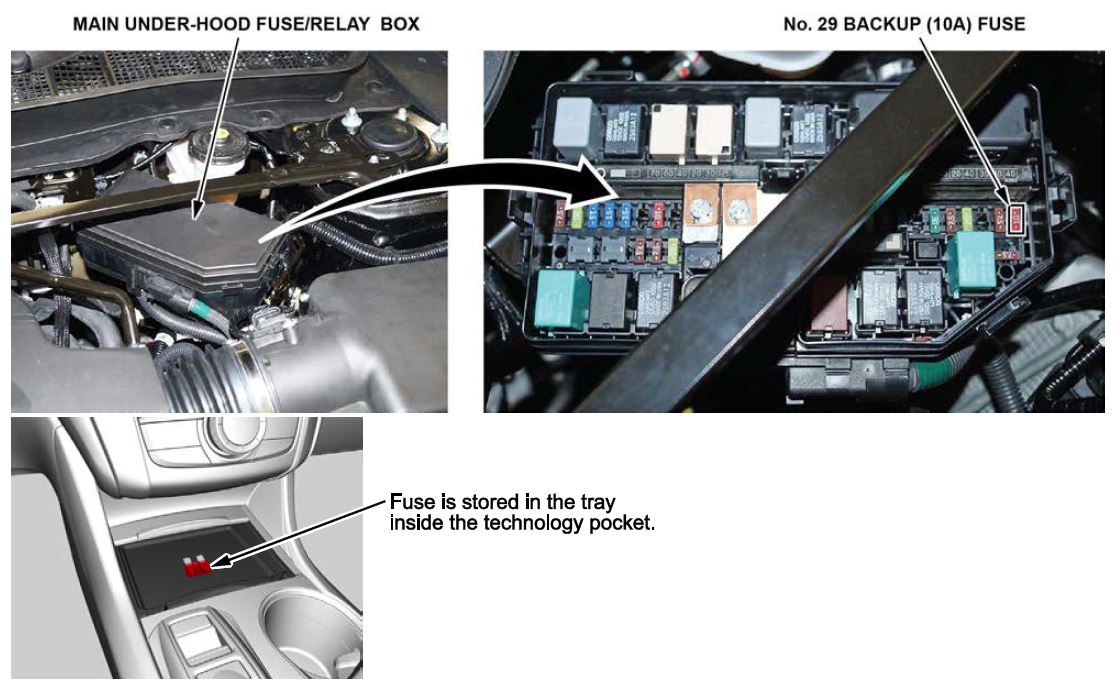
To prevent parasitic draw, the vehicle comes from the factory with the No. 29 BACKUP (10 A) fuse removed from the main under-hood fuse/relay box. With it removed, the engine will not start when you apply the brake pedal and press the ENGINE START/STOP button.
If you need to move the vehicle before doing the TQI, follow these steps:
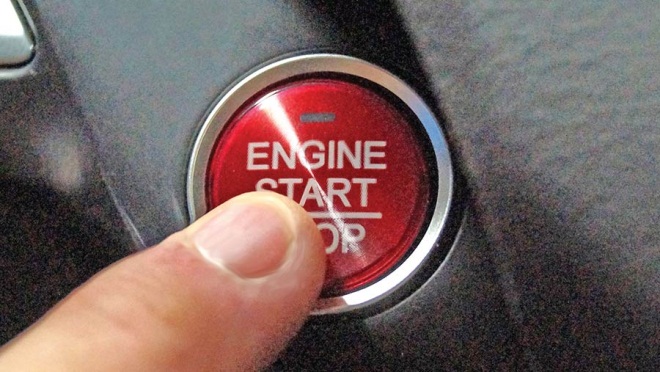
- Press the ENGINE START/STOP button once.
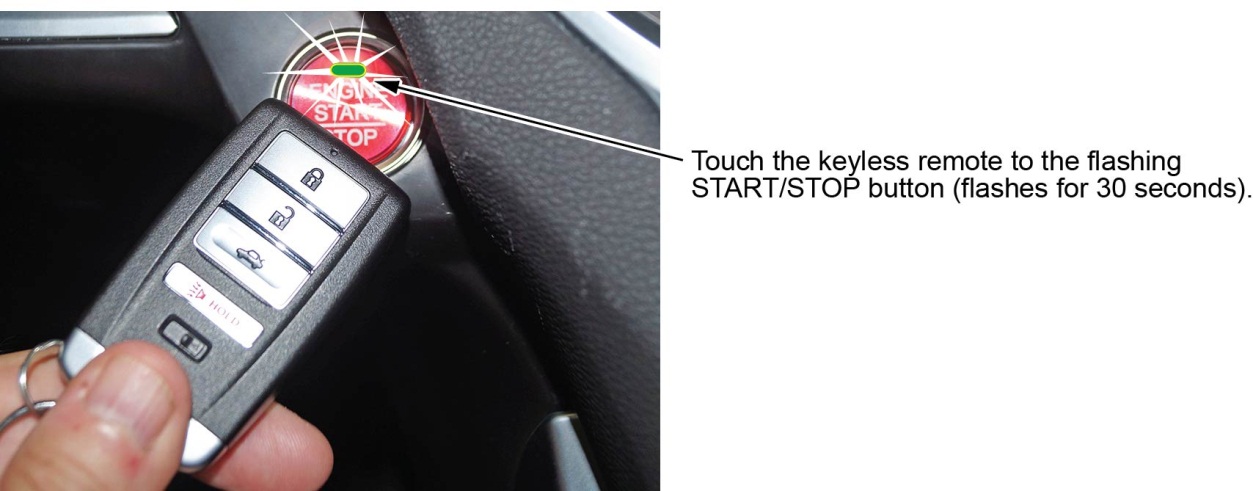
- When the indicator flashes, touch the end of the keyless remote to the ENGINE START/STOP button.
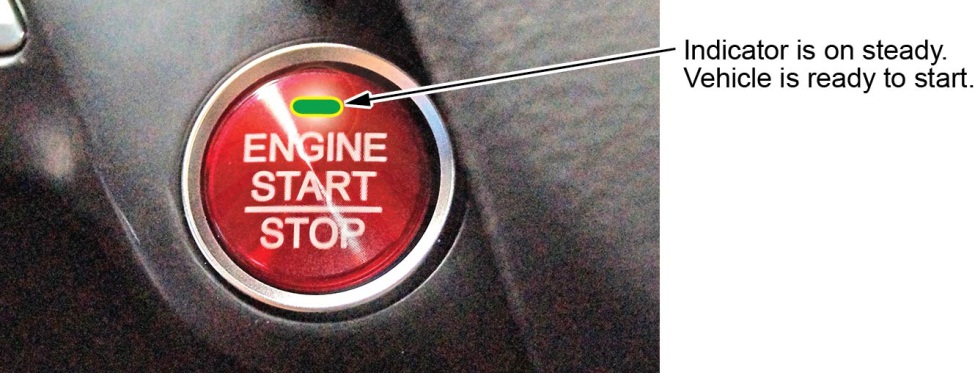
NOTE: The indicator will change from flashing to steady when communication is complete.
- Start the engine by pressing the ENGINE START/STOP button while applying the brake pedal. You must start the engine within 10 seconds. If you press the button without applying the brake pedal, the ACCESSORY power mode will set.
1. Remove the Exterior Protective Coatings
Carefully remove all of the exterior protective coatings. See S/B 96-009, Removal of Protective Coatings During TQI.
2. Install the Backup Fuse
To prevent battery drain during vehicle shipping, the No. 29 BACKUP (10 A) fuse is removed from the main under-hood fuse/relay box and stored in the tray inside the technology pocket, ahead of the electronic gear selector (6-cylinder models) or shift lever (4-cylinder models). Make sure the power mode is set to OFF before reinstalling this fuse.
Vehicle Interior
3. Remove the Interior Protective Coverings
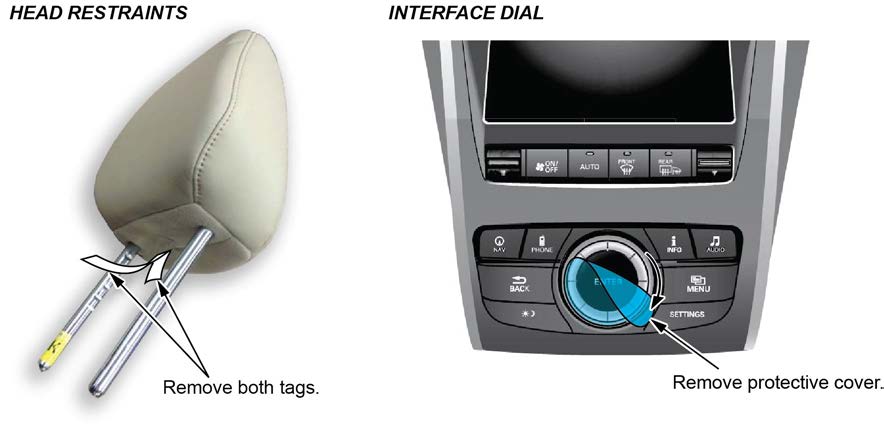
There are several protective coverings on the interior trim pieces and some areas of the carpet. A couple of new items were added. One is the protective cover on the interface dial. The other is two paper tags on each of the front head restraints (one at the front and one at the rear). Carefully remove all items with clean hands to avoid soiling any surfaces. If any of the interior is dirty, clean it with mild soap or an Acura cleaning product such as Leather & Vinyl Cleaner (P/N 08700-9214A) or Carpet Spot Remover (P/N 08700-9215A).
4. Install the Floor Mats
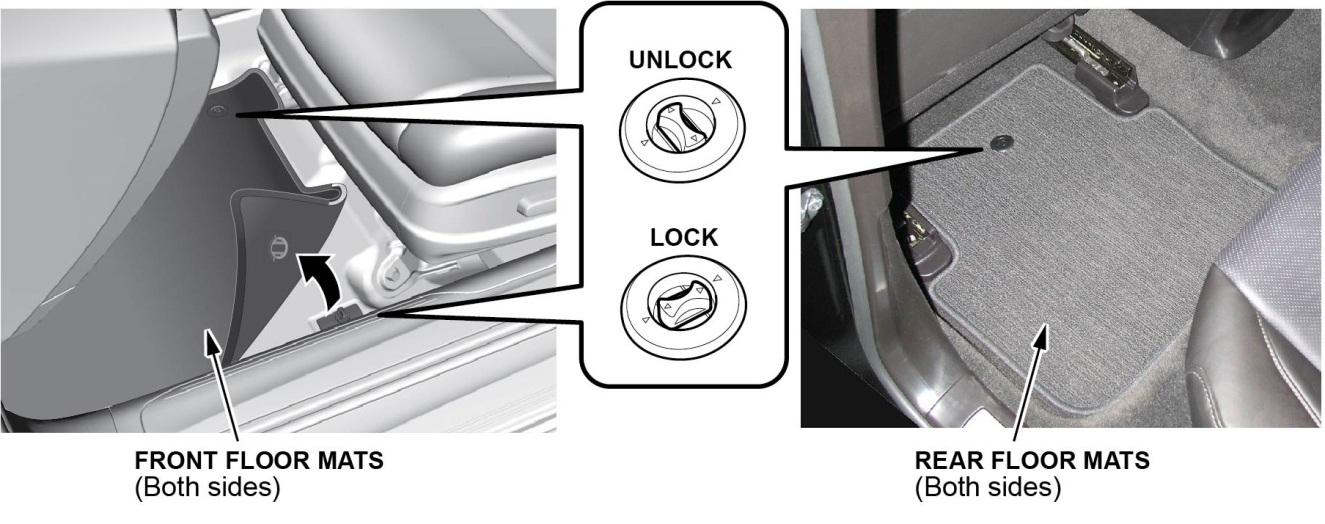
Install the floor mats in the appropriate positions. Place the driver’s and front passenger’s floor mat eyelets over the anchors on the floor, then turn the knobs clockwise to the lock position. Do the same for the rear seat floor mats. The anchors for those mats are on the floor under the front seats.
Under-Hood (Engine Cold)
5. Check the Battery
This vehicle comes with either a conventional flooded lead acid (FLA) battery or the new absorbent glass mat (AGM) battery, depending on the trim level. Here is the breakdown:
- 4-cylinder 2WD models: FLA
- 6-cylinder 2WD models: FLA
- 6-cylinder AWD models: AGM
Each battery type has its own uniquely tuned charging and battery management systems, therefore cannot be interchanged.
To ensure long battery life and that the client gets a fully charged battery as outlined in S/B 89-006, Battery Maintenance at Dealers, it must be checked at these times:
- When the vehicle first arrives at the dealership
- During the TQI, if done at a later date
- At regular intervals
- Just before vehicle delivery
If you plan to keep the vehicle in long-term storage, be sure to remove the No. 29 BACKUP (10 A) fuse.
Test the battery with the ED-18 battery tester using S/B 88-016, Battery Testing and Replacement. Make sure the ED-18 has the latest software installed before using it. See S/B 09-027, ED-18 Battery Tester Update Information.
If the test results show GR8 DIAGNOSTIC NEEDED, you must charge the battery with the GR8 battery diagnostic station. Make sure the GR8 has the latest software installed before using it. See S/B 09-034, GR8 Battery Diagnostic Station Update Information.
NOTE: When charging an AGM battery, always select AGM Battery. Serious damage can result if you select Standard Battery (FLA). Also, make sure the negative battery lead is connected to the negative battery post. The temperature probe is in the handle of the negative lead. The GR8 monitors battery temperature during charging so that it does not overheat and destroy the battery.
Write down the GOOD BATTERY 10-digit code in the maintenance journal. During the TQI, write down the code in the “Under Hood (Engine Cold)” section. Then, at vehicle delivery, write it down in the “Final Inspection (At Delivery)” section.
Vehicle Exterior (Vehicle Raised to Full Height)
6. Install the Body Plugs
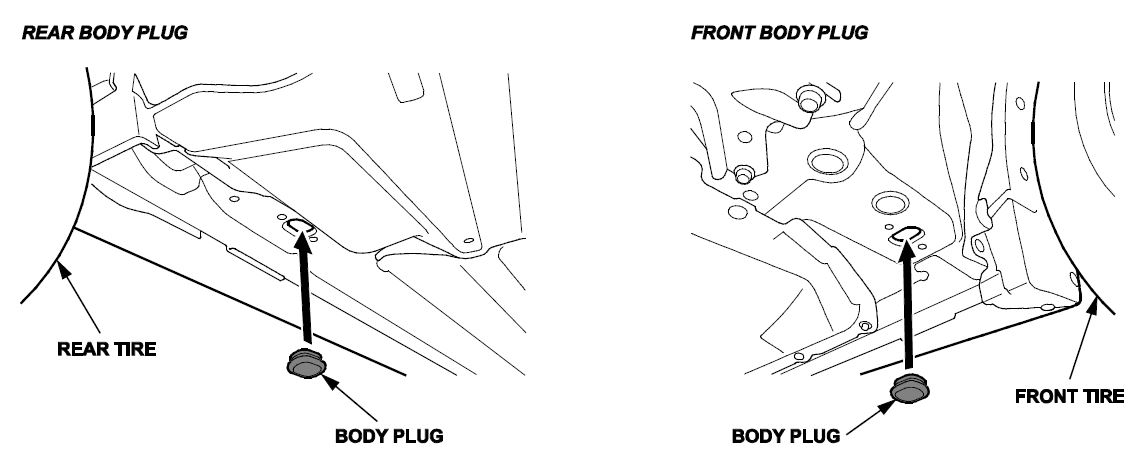
Install the four body plugs as shown. If they are not installed, the vehicle could make a wind noise that is hard to troubleshoot.
7. Install the Front Strakes
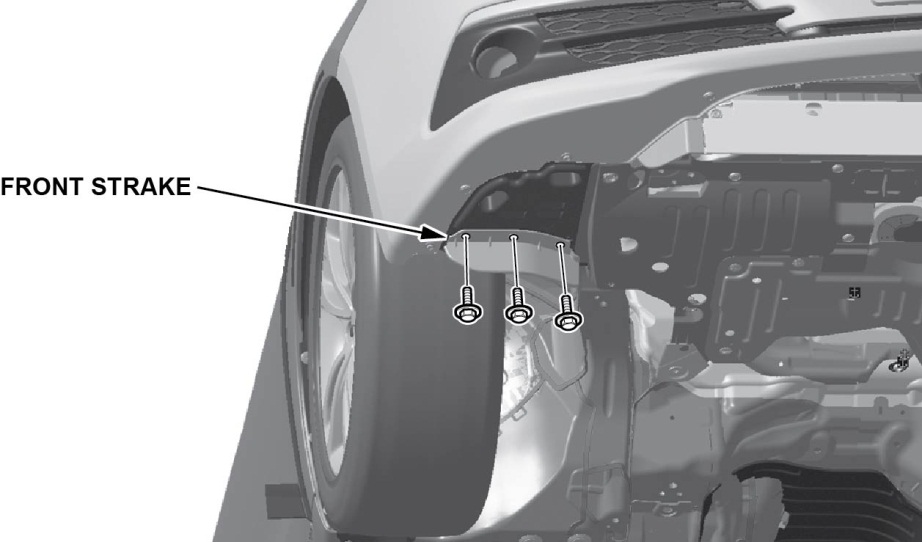
Install the front strakes as shown.
Vehicle Exterior (Vehicle Lowered to Half-Height)
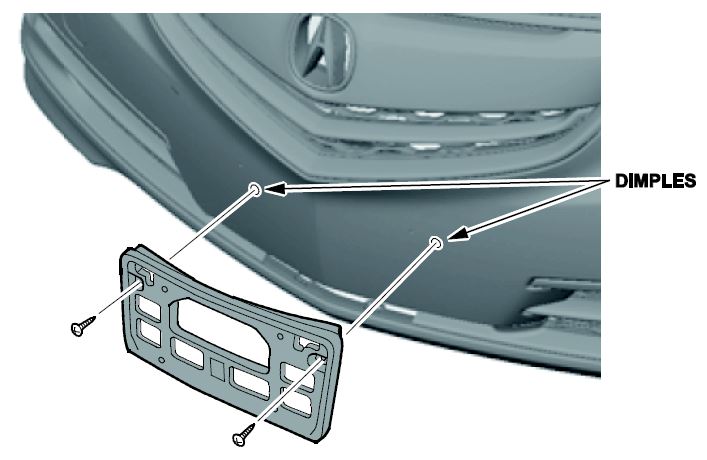
8. Install the Front License Plate Holder
If state regulations require the use of a front license plate, install the front license plate holder as shown.
Vehicle Exterior (Vehicle Lowered to Ground)
9. Set the Tire Pressures
To prevent flat spots during vehicle shipping and storage, the tires are inflated to over 40 psi. If the vehicle is going into dealer storage, leave the tire pressures at 40 psi until it is sold (see the “Perfect Delivery Action Plan”).
If the vehicle is moved to the sales lot or is sold, set the tire pressures as follows.
NOTE:
- You must do these steps exactly as written to enable full function of the TPMS Fill Assist System.
- If you are in a cold climate region, make sure the tires are at the same temperature as the outside air before adjusting the pressures; otherwise, the Low Tire Pressure/TPMS indicator may come on in cold weather.
- Set the power mode to ON.
- Use a tire pressure gauge with a bleeder valve to quickly lower the pressure in each tire to around 28 psi.
- Set the pressure in each tire to the recommended value listed on the driver’s doorjamb label and check it with a hand-held gauge.
- Test-drive the vehicle for at least 2 minutes above 15 mph. If the MID does not show the tire pressures, make sure you completed the test drive as specified.
NOTE: This vehicle does not have a spare tire; it comes with a tire repair kit stored under the trunk lining. An optional spare tire wheel kit can be ordered separately.
Under-Hood (Engine Idling)
10. Do the Idle Learn Procedure
To ensure a steady engine idle, do the applicable idle learn procedure after installing the No. 29 BACKUP (10 A) fuse:
NOTE: This procedure must also be done after updating or replacing the PCM. It does not need to be done after clearing DTCs.
4-Cylinder Models
- Make sure all electrical items (A/C, audio unit, rear window defogger, lights, etc.) are turned off.
- Start the engine, and let it reach operating temperature (the cooling fans cycle twice).
- Let the engine idle for 10 minutes with the throttle fully closed.
6-Cylinder Models
- Make sure all electrical items (A/C, audio unit, rear window defogger, lights, etc.) are turned off.
- Start the engine, and let it reach operating temperature (the cooling fans cycle twice).
- Let the engine idle for 10 minutes with the throttle fully closed.
- Turn the ignition to OFF.
- Jump the SCS line with the HDS.
- Wait 60 seconds, then exit the SCS mode.
Vehicle Interior
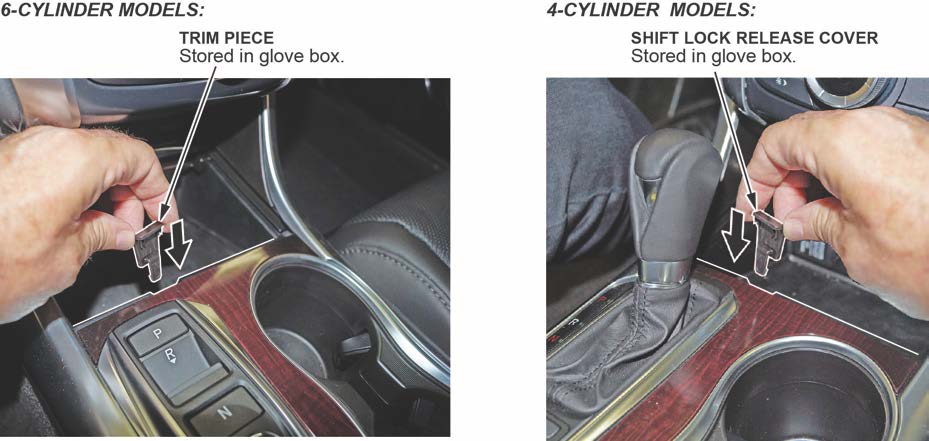
11. Install the Shift Lock Release Cover
Install the shift lock release cover as shown.
NOTE: For 6-cylinder models, this cover just serves as a trim piece.
12. Initialize the Audio-Navigation Unit Anti-Theft Function, and Set the AM/FM Audio Unit Presets
Models Without Navigation
- After installing the No. 29 BACKUP (10 A) fuse, set the power mode to ON, then press and hold the audio unit power button for at least 2 seconds. This synchronizes the audio unit with the vehicle and initializes the system for use.
NOTE: In the glove box, you will find a small sheet of two labels. Each label has the five-digit anti-theft code and the audio-navigation unit serial number printed on it. Remove one label, and attach it to the RO. The other one should be given to the client for safekeeping, rather than left in the vehicle.
- Enter a local AM or FM station on all of the audio unit presets (AM, FM1 and FM2). To enter a station, tune to it, change the screen to the preset screen, then press and hold the preset number that you want to store that station.
Models with Navigation
- Do S/B 14-017, 2015 TLX: TQI of the Navigation System.
- Enter a local AM or FM station on all of the audio unit presets (AM, FM1 and FM2). To enter a station, tune to it, change the screen to the preset screen, then press and hold the preset number that you want to store that station.
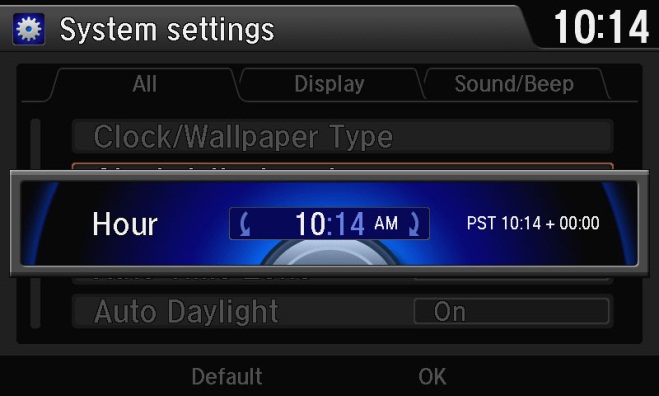
13. Set the Clock (Models Without Navigation)
To set the clock, follow these steps:
- Press the SETTINGS button.
- Turn the interface dial to select Systems Settings, then press the ENTER button.
- Turn the interface dial to select Clock, Clock Adjustment, then press the ENTER button.
- Turn the interface dial to select the hour, then press the ENTER button.
- Turn the interface dial to select the minutes, then press the ENTER button.
14. Set the Compass Zone (Models Without Navigation)
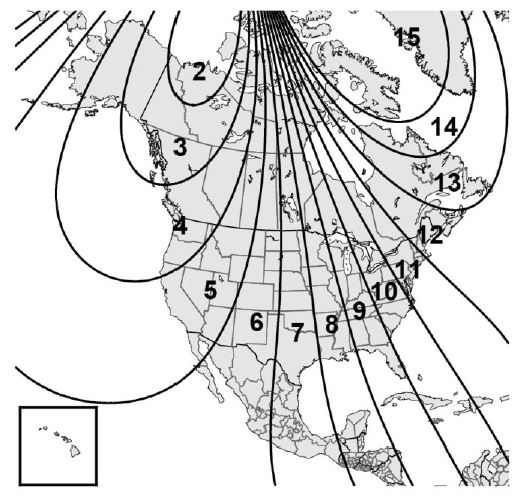
In most areas, there is a variation between magnetic north and true north. At the TQI, the compass zone needs to be set to your geographic zone to compensate for this variation.
To set the compass zone, do this:
- Set the power mode to ON.
- Press and hold the MENU button for about 5 seconds until the display shows the compass setting menu items.
- Find the zone number in this map.
- Turn the interface dial to select ZONE, then press the ENTER button. The display will show the currently selected compass zone number.
- Turn the interface dial to select your zone, then press the ENTER button.
- Press the BACK button to return the display to normal.
15. Check the Compass Calibration (Models Without Navigation)
If the compass shows the wrong direction or the CAL indicator blinks, manually calibrate the system with this procedure:
NOTE: Do this procedure in an open area, away from buildings, power lines, and other vehicles.
- Set the power mode to ON.
- From the top screen of any audio source, press and hold the ENTER button for 10 seconds. The display will switch to the Compass Settings screen.
- Turn the interface dial to select Calibration, then press the ENTER button.
- When the display changes to Calibration, Start, press the ENTER button. Drive the vehicle slowly, in two complete circles. The compass should show a direction and the CAL indicator should go off.
16. Check/Refresh the XM Satellite Radio Dealer Demo Service (Except in Alaska and Hawaii)
The audio system comes from the factory activated with the XM Satellite Radio dealer demo service. Once you install the No. 29 BACKUP (10 A) fuse, the XM radio should receive the full range of available XM channels. You can see a full list of channels at siriusxm.com.
While watching the audio unit display, tune to several channels within the full XM lineup. If you can tune to all of the XM channels, the dealer demo service is activated.
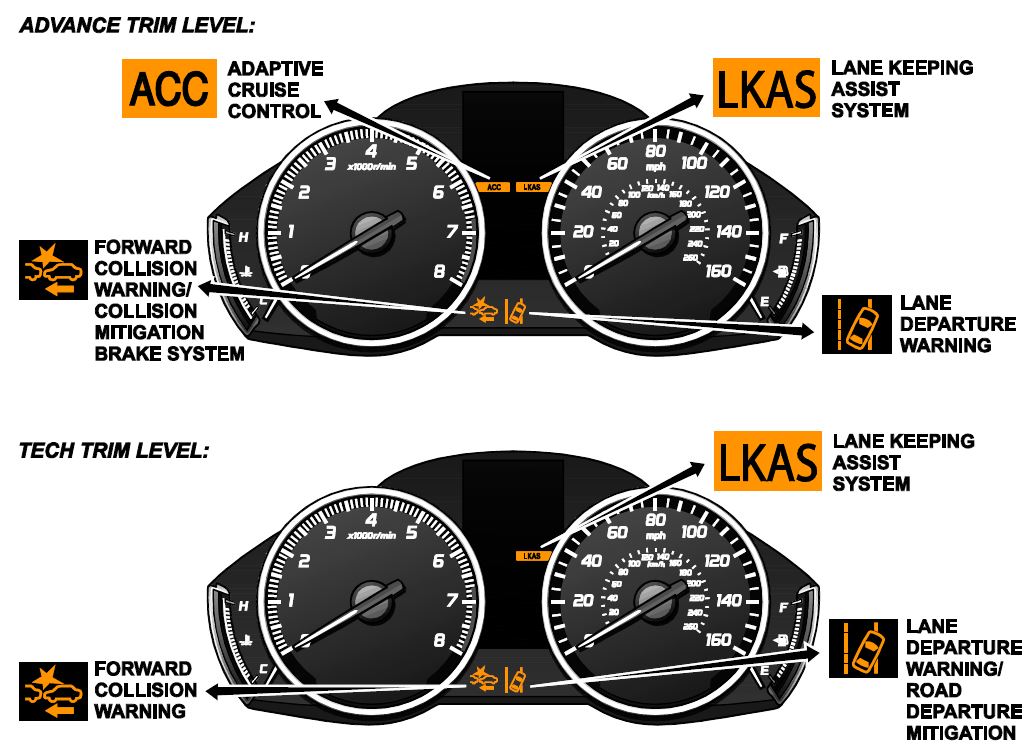
17. Check the ACC, LKAS, LDW, FCW, and CMBS Indicators (If Equipped)
When you first set the power mode to ON, these indicators should come on for a few seconds and then go off:
- ACC (Adaptive Cruise Control [with low speed follow]) (Advance models)
- LKAS (Lane Keeping Assist System) (Technology and Advance models)
- LDW (Lane Departure Warning) (Technology and Advance models)
- FCW (Forward Collision Warning) (Technology and Advance models)
- CMBS (Collision Mitigation Braking System) (Advance models)
- RDM (Road Departure Mitigation) (Technology models)
18. Check Bluetooth® HandsFreeLink® (HFL)
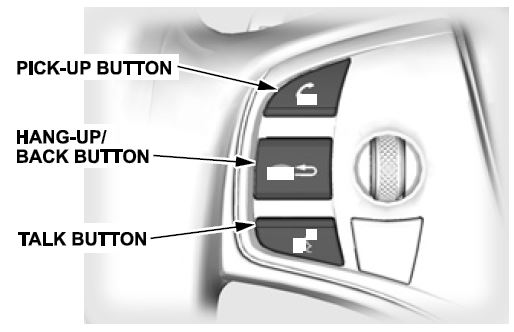
To ensure HFL is working, start the engine, then press and hold the Hang-up/Back button on the steering wheel for about 10 seconds. You should hear “TCU is OK.” (models with navigation) or “The HFT is OK” (models without navigation). If you do not hear this message, see the electronic service manual for troubleshooting information.
NEW MODEL SERVICE INFORMATION
1. VIN Location
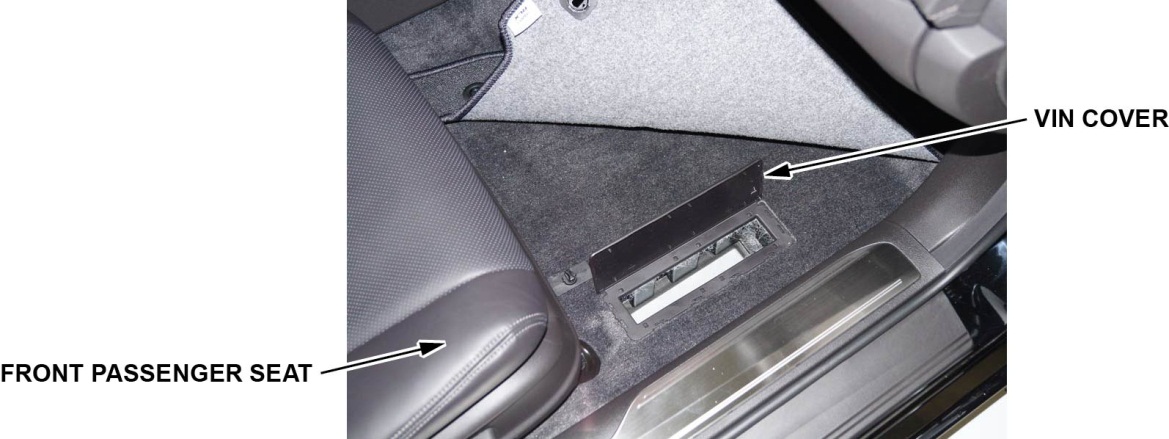
The VIN is on the floor panel under the floor mat in front of the front passenger’s seat.
2. ATF
This vehicle uses two different ATFs, depending on the model.
- 4-cylinder 2WD models: ATF Type 2.0
- 6-cylinder 2WD models: ATF Type 3.0
- 6-cylinder AWD models: ATF Type 3.0 These two ATFs are not interchangeable.
3. 9-Speed A/T (6-Cylinder Models)
There is no need to check the ATF level in a 9-speed A/T. Just inspect it for external fluid leaks. If you find any leaks, see the service information for troubleshooting information.
4. Auto Idle Stop (6-Cyllinder AWD Models)
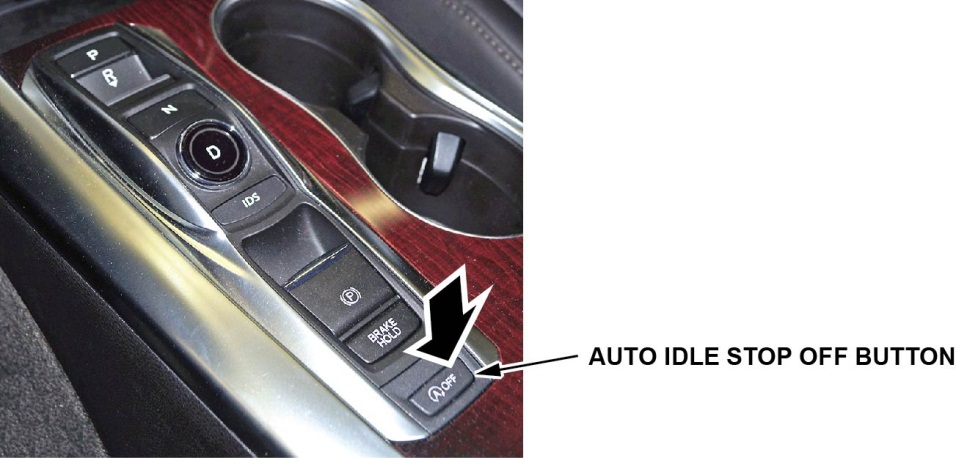
Auto idle stop automatically stops and restarts the engine to help maximize fuel economy, depending on environmental and vehicle conditions. Press the Auto Idle Stop Off button on the center console to turn the system on or off.
5. Battery Group and Rating
Battery selections are different, depending on the trim level.
- 6-Cylinder Models: Use a European specification size battery (Group: H6/L3, CCA: 650). These batteries are housed inside a box to help cool it down from the under-hood temperatures and to promote longer battery life.
- 4-Cylinder Models: Use the North American conventional specification size battery (Group: 70D/23L, CCA: 440).
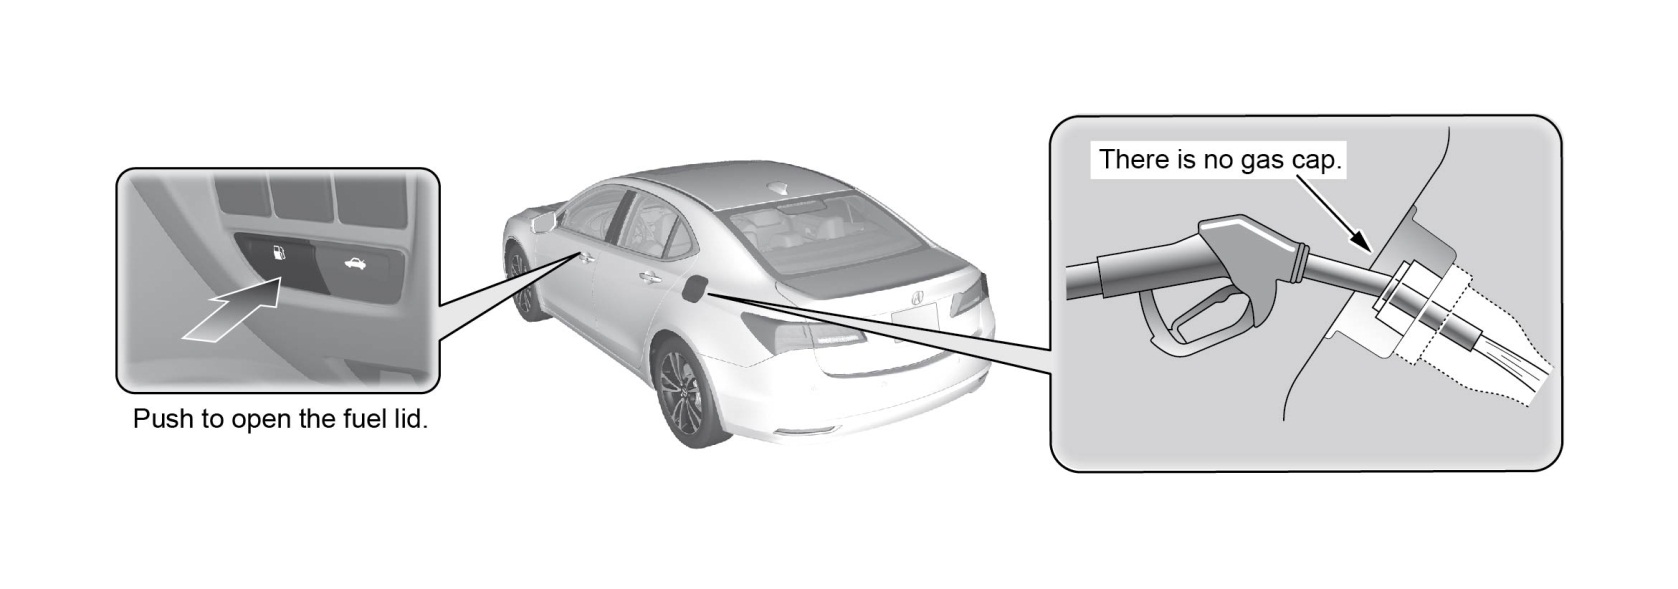
6. Capless Fueling System
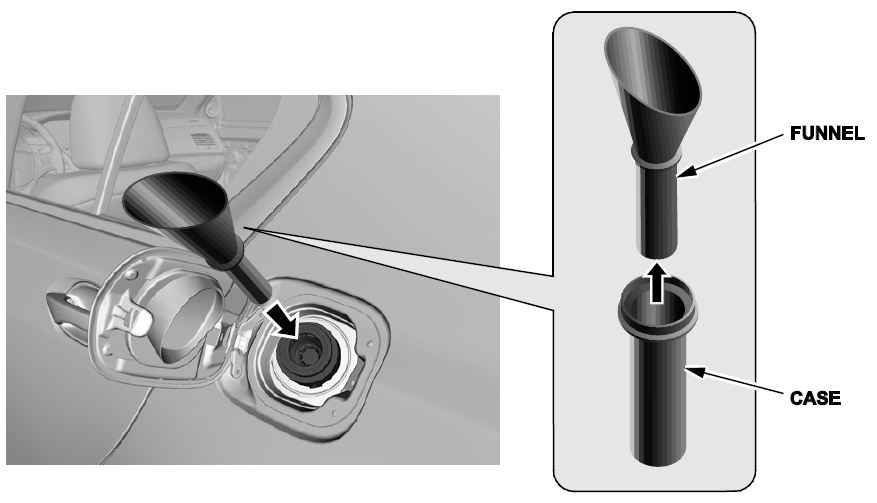
This vehicle does not have a gas cap.
A funnel is included to allow manual refueling from a gas container. It is stored in the tool case in the trunk luggage area. For more information, see the owner’s manual.
7. Electric Parking Brake
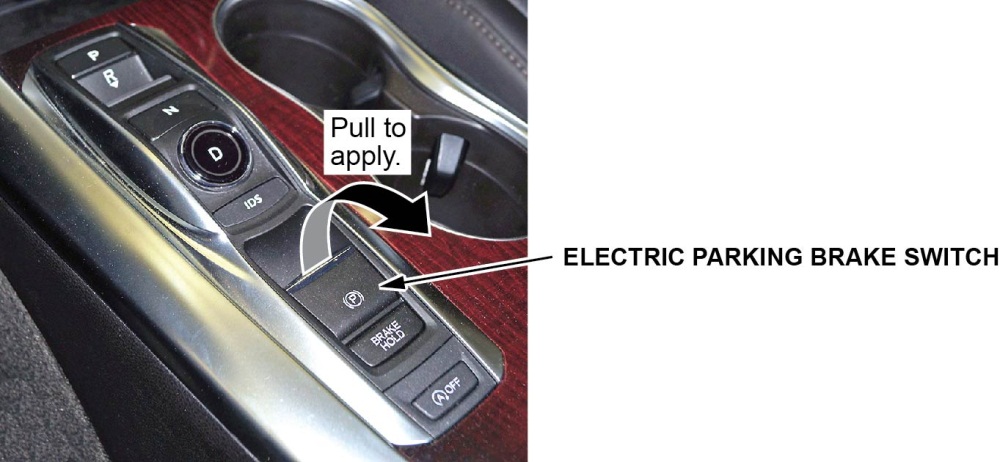
To manually apply:
Gently and securely pull up the electric parking brake switch. The PARK indicator comes on in the instrument panel.
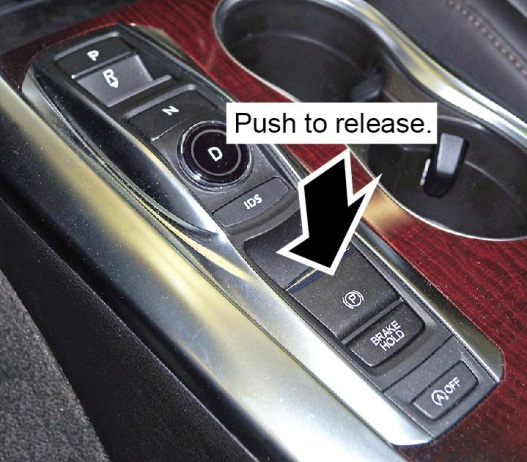
To manually release:
Press down on the brake pedal, then push down on the electric parking brake switch. The PARK indicator goes off.
To automatically release:
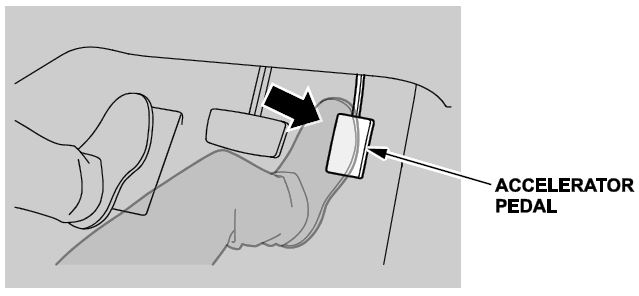
Gently press the accelerator pedal. The PARK indicator goes off and the parking brake releases.
The parking brake can be automatically released under these conditions:
- The driver’s seat belt is buckled.
- The engine is running.
- The electronic gear selector is not set to Park or Neutral.
8. Temporary Tire Repair Kit
This vehicle comes with a temporary tire repair kit. A temporary spare tire wheel kit is available as an accessory.
9. Remote Engine Start (Advance Models)
The remote engine start comes standard on Advance models and is available as an accessory on other models. The system has an increased range of up to 328 feet, and uses LEDs on the bidirectional remote to provide feedback to the client under certain conditions.
Starting the Engine
NOTE: Make sure all doors, the hood, and the trunk are closed before remotely starting the engine.
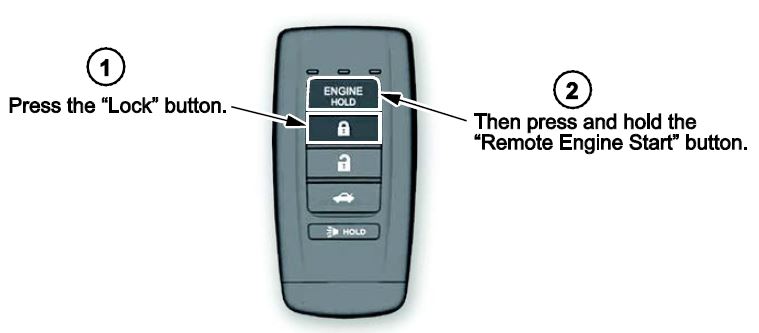
Press the Lock button, then press and hold the Remote Engine Start button for 1 second. The amber LED will blink, then, when the engine starts, the green LED will come on for 1 second. The engine will run for 10 minutes. If the red LED comes on, the engine did not start. If it blinks, the remote was not able to communicate with the vehicle.
While the remote engine start is on, the climate control system can cool/heat the interior, the security system stays on, and the exterior lights, the gauges, and the accessories stay off. Even though the engine keeps running when you open the driver’s door with the remote, you need to press down on the brake pedal and press the ENGINE START/STOP button to turn on the lights, gauges, and accessories, and to shift out of Park. Stopping the Engine
The engine will stop running after 10 minutes. If you want to stop the engine before that time is up, press and hold the Remote Engine Start button for 1 second. The amber LED will blink once, then the red LED will come on for 1 second. If the red LED blinks three times, the remote was unable to communicate with the vehicle.
10. Adaptive Cruise Control (ACC) with Low Speed Follow (LSF), Collision Mitigation Braking System (CMBS), and Road Departure Mitigation (RDM) (Advance Models)
The ACC, CMBS, and RDM all work using a windshield-mounted multipurpose camera, a radar unit mounted behind the front grille, and the VSA system.
11. Lane Keeping Assist System (LKAS), Forward Collision Warning (FCW), and Lane Departure Warning (LDW) (Technology and Advance Models)
The LKAS, FCW, and LDW all use a windshield-mounted multipurpose camera.
12. Auto Park Mode (6-Cylinder Models)
By design, Park is automatically engaged when the power mode is set to OFF or when all of these conditions are met:
Always apply the brake pedal and shift to Park when idling or when exiting the vehicle. If you select any gear other than Park with the driver’s door open and the driver’s seat belt unbuckled, Park is reengaged when you release the brake pedal.
13. Car Wash Mode (6-Cylinder Models)
If you need to run the vehicle through an unattended conveyor-style car wash, make sure the wiper lever is set to OFF, then follow these steps:
- With the engine running, apply the brake pedal and select Neutral on the electronic gear selector.
- Within 5 seconds, press the ENGINE START/STOP button. The power mode goes to ACCESSORY.
- Look for the message Shift to Park in the MID. This tells you that car wash mode is set. You will then have 15 minutes before the vehicle automatically shifts into park and shuts off. You may now exit the vehicle.
 Loading...

