| “This site contains affiliate links for which OEMDTC may be compensated” |
May 16, 2019 NHTSA CAMPAIGN NUMBER: 19V378000
Improperly Installed Passenger Air Bag Inflator
An incorrectly installed air bag inflator may not properly deploy the passenger frontal air bag in the event of a crash, increasing the risk of injury.
NHTSA Campaign Number: 19V378
Manufacturer Honda (American Honda
 Motor Co.)
Components AIR BAGS
Potential Number of Units Affected 19,086
Summary
Honda (American Honda
 Motor Co.) is recalling certain 2009-2014 Acura
 TSX, 2011-2013 TSX Sport Wagon, and 2010-2012 ZDX and 2008-2012 Honda
 Accord, 2010-2011 Accord Crosstour, 2006-2011 Civic, Civic Hybrid and Civic NGV, 2012-2014 Crosstour, 2007-2011 CR-V, 2009-2013 Fit, 2010-2013 Insight, and 2009-2015 Pilot vehicles. The front passenger air bag inflator may have been installed incorrectly during replacement.
Remedy
Honda will notify owners, and dealers will inspect the inflator installation and, if necessary, replace the passenger frontal air bag module assembly, free of charge. The recall began July 5, 2019. Owners may contact Honda
 customer service at 1-888-234-2138. Honda
 ’s numbers for this recall are M4O, P4R, T4Q, and W4P.
Notes
Owners may also contact the National Highway Traffic Safety Administration Vehicle Safety Hotline at 1-888-327-4236 (TTY 1-800-424-9153), or go to www.safercar.gov.
Check if your Acura has a Recall
Service Bulletin
B19-031
May 17, 2019
Version 1
Safety Recall: 2010-12 ZDX Incorrect Installation of the Takata Front Passenger’s Airbag Inflator
AFFECTED VEHICLES
| Year | Model | Trim | VIN Range |
| 2010-12 | ZDX | ALL | Check the iN VIN status for eligibility. |
BACKGROUND
Some dealers incorrectly installed passenger front airbag inflators under various campaigns to replace the inflators. The incorrect installation of the inflators may have damaged the airbag assembly. Additionally, the airbag may not deploy as designed. If the inspection reveals the inflator is not installed correctly, do not replace only the inflator. If the inflator is incorrectly installed make sure to replace the front passenger’s airbag module assembly.
There are several bulletins with similar years and models. Make sure to do an iN VIN status inquiry and follow the indicated service bulletin.
CLIENT NOTIFICATION
Owners of affected vehicles will be sent a notification of this campaign.
Do an iN VIN status inquiry to make sure the vehicle is shown as eligible.
Some vehicles affected by this campaign may be in your used vehicle inventory.
Failure to repair a vehicle subject to a recall or campaign may subject your dealership to claims or lawsuits from the client or anyone else harmed as a result of such failure. To see if a vehicle in inventory is affected by this safety recall, do a VIN status inquiry before selling it.
CORRECTIVE ACTION
Inspect the front passenger airbag inflator and, if the inflator is not installed correctly, replace the airbag module assembly.
NOTES
These notes are applicable only when the airbag assembly is replaced:
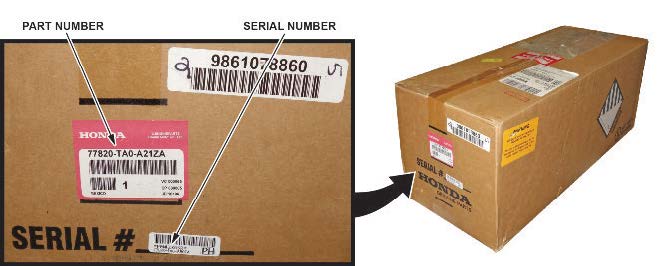
- Write the serial number and part number from the side of the new replacement front passenger’s airbag module box on the repair order.
- To properly dispose of the original inflator, you must remove it from the airbag module. See REMOVE THE INFLATOR FROM THE ORIGINAL AIRBAG MODULE.
- A new inflator box must be ordered and the original inflator must be returned in the box.
- To return the inflator, follow the shipping instructions outlined in the parts information bulletin B15-0006, Inflator Kit Return Process.
- Place the original airbag module (without the inflator) in the airbag module box that the replacement came in. It may be called in by American Honda
 .
.
PARTS INFORMATION
Inspection Only
| Part Name | Part Number | Quantity |
| Washer Bolt (6 x 16 mm) | 90178-STX-003 | 2 |
| Nut-Washer (6 mm) | 90321-SP0-A80 | 3 |
Airbag Module Replacement
| Part Name | Part Number |
| Refer to the parts catalog using the VIN to ensure the correct airbag module and ancillary parts are ordered. | Refer to the parts catalog. |
- Make sure the airbag inflator is removed from the original airbag module. See Remove the Inflator From the Original Airbag Module section of this bulletin.
- The new airbag module box must be used to return the old airbag module without the inflator to American Honda
 (if requested). Be careful not to damage the airbag module box.
 - To return the inflator, follow the shipping instructions outlined in the parts information bulletin B15-0006, Inflator Kit Return Process.
- Parts staff can scan the part number and serial number from the outside of the box into the warranty claim by using the Controlled Part Serial No. screen and scanning the applicable information. Refer to the Job Aid Ordering and Managing Replacement Inflators for more information.
WARRANTY CLAIM INFORMATION
- To avoid non-payment of warranty claims for airbag module assembly replacement, the new airbag module part number and serial number must be included in each claim. For more information, refer to step 1 of AIRBAG MODULE INSTALLATION.
- To avoid a warranty claim being charged back to your dealership, follow the normal warranty part retention rules. American Honda
 may call in the original airbag module.
 - The serial number is encoded into the bar code label attached to the outside of the box. If your dealership uses a scanner, you can scan the serial number into the claim.
- The part number is encoded into a bar code attached to the outside of the box. If your dealership uses a scanner, you can scan the part number into the claim.
- If you confuse the serial number and part number when entering the claim information, your claim will automatically be rejected.
- Template IDs are not included because there are many model/trim/color variations.
- There are several service bulletins with similar years and models. Make sure you file your warranty claim under the correct bulletin. If you file your claim under the wrong bulletin, your claim will be debited.
| Operation Number | Description | Flat Rate Time | Defect Code | Symptom Code | Failed Part Number |
| 7540A4 | ZDX Inspect the original airbag inflator installation. | 0.6 hr | 6NG00 | P4R00 | 77851-SZN-A30 |
| 7541F7 | ZDX – Inspect the inflator and replace the original airbag module. | 0.6 hr | 6NG00 | P4R00 | 77851-SZN-A30 |
Skill Level: Repair Technician
INSPECTION PROCEDURE ZDX
NOTES
- If the VIN status inquiry indicates that the vehicle is subject to any open safety recalls, including a driver’s airbag inflator campaign/recall, make sure to also complete those recall repairs before returning the vehicle to the client. If you are unable to complete any open recall, advise the client of the recall status and when the recall could be completed.
- Some systems store data in memory that is lost when the battery is disconnected. Do the following procedures before disconnecting the battery.
- Make sure you have the anti-theft code for the audio or the audio-navigation unit.
- Make sure the ignition switch is in LOCK (0).
- Disconnect and isolate the negative cable from the battery.
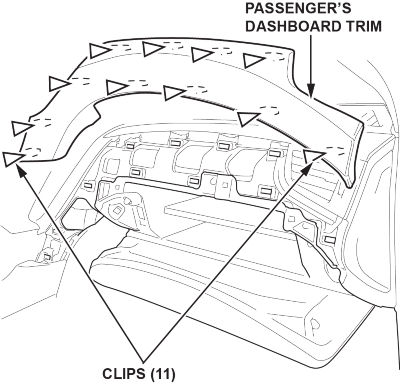
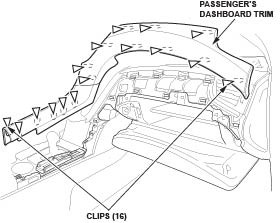
- Open the glove box, and remove the passenger’s dashboard trim.
2010-11 ZDX
2012 ZDX
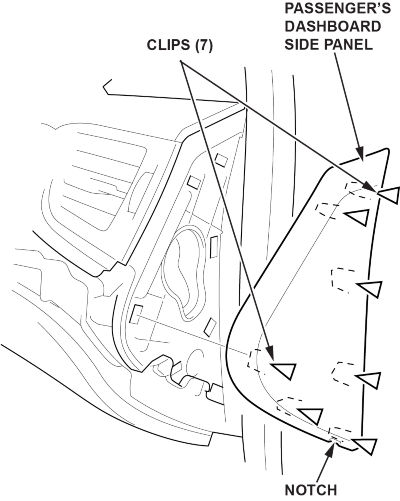
- Remove the passenger’s dashboard side panel.
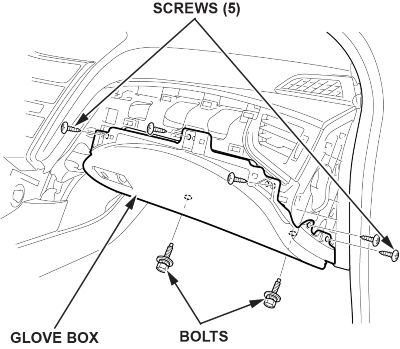
- Remove the bolts and screws.
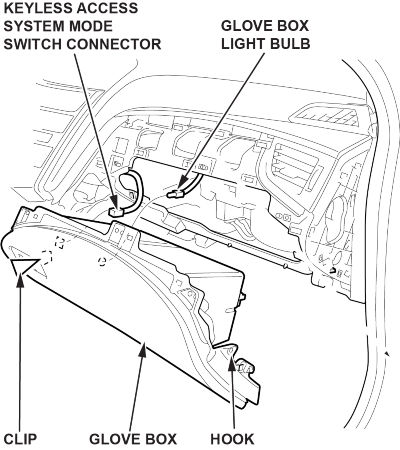
- Release the hook and pull the glove box out to detach the clip.
- Disconnect the glove box light connector and the keyless access system mode switch connector (if equipped).
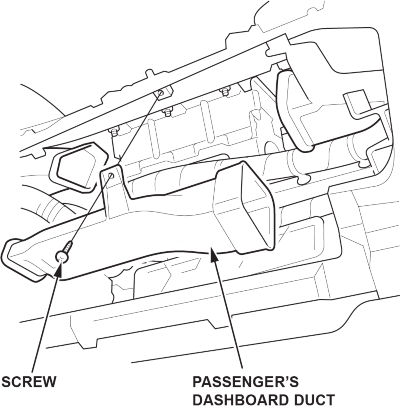
- Remove the passenger’s dashboard duct by removing the screw.
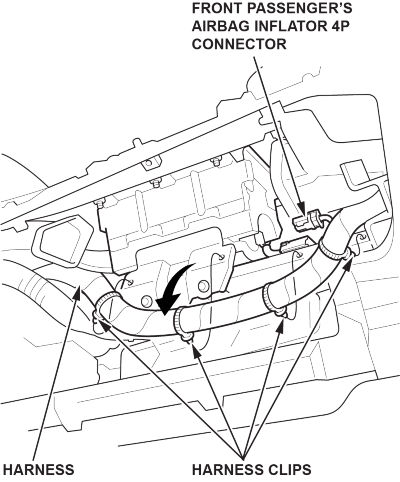
- Detach the airbag harness clips. Pull down the wire harness, then disconnect the front passenger’s inflator connector.
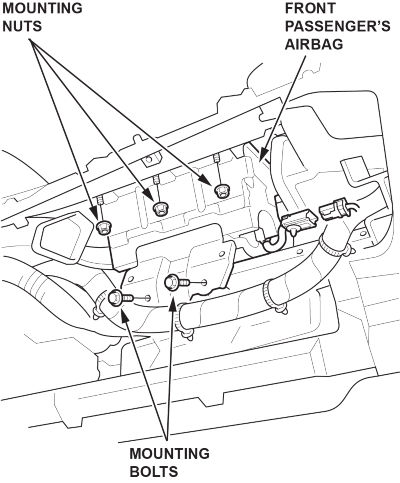
- Remove the mounting nuts and mounting bolts from the front passenger’s airbag.
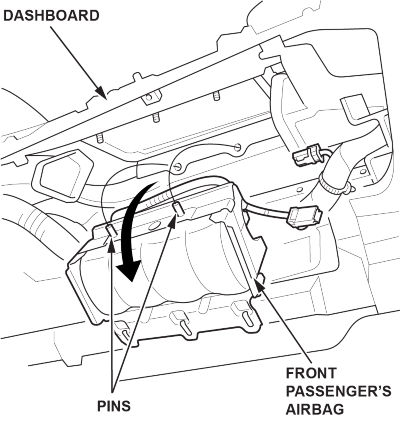
- Release the pins and remove the front passenger’s airbag.
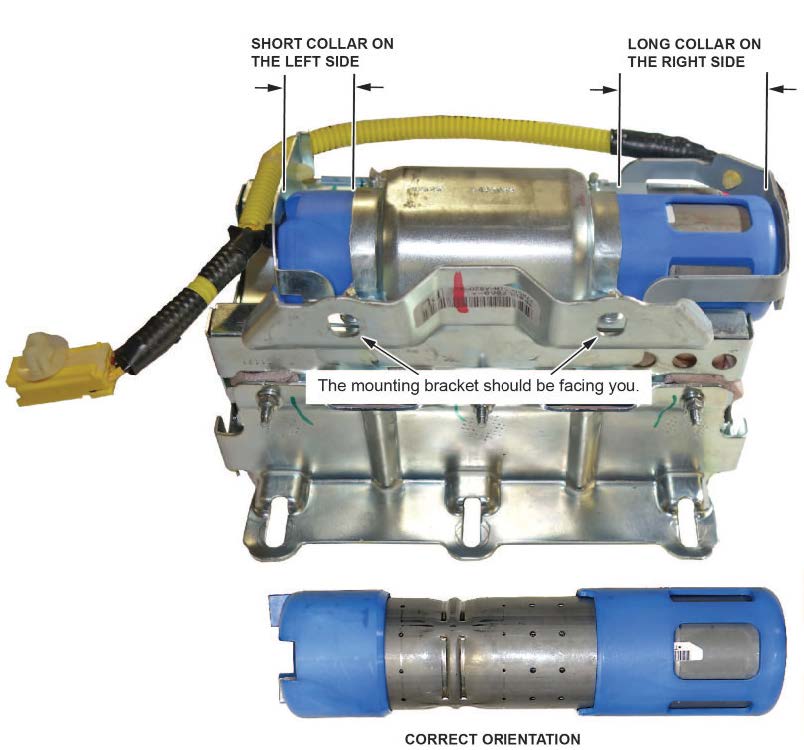
- Place the airbag, face-down, on a clean shop towel with the mounting bracket facing toward you, and inspect the plastic collars on the passenger’s airbag inflator.
- If the long collar is on your right side (closer to the driver’s side when installed in the vehicle), the inflator installation is GOOD. Reassemble the glove box in the reverse order of removal.
- If the long collar is on your left side (closer to the front passenger’s door when installed in the vehicle), the inflator installation is NO GOOD. Go to AIRBAG MODULE INSTALLATION.
AIRBAG MODULE INSTALLATION
- For airbag module replacement only – Write the serial number and part number from the side of the new front replacement passenger’s airbag module box on the RO. For the warranty claim to be paid, the new front passenger’s airbag module part number and serial number must be included in the warranty claim.
- Install the passenger’s airbag module (assembly). Refer to the applicable model’s service information.
- After reconnecting the 12-volt battery, turn the ignition to ON, and check if the SRS indicator comes on for about 6 seconds, then goes off. If the indicator does not come on, or comes on and stays on, follow normal troubleshooting.
- Set the clock (for vehicles without navigation), and enter the anti-theft code for the audio and navigation system (if applicable).
- For airbag module replacement only – Remove the inflator from the original airbag module. Refer to REMOVE THE INFLATOR FROM THE ORIGINAL AIRBAG MODULE.
- For airbag module replacement only – Give your warranty clerk the RO that includes the replacement front passenger’s airbag module serial number and replacement part number. For the warranty claim to be paid the new front replacement passenger’s airbag module part number and serial number must be included in the warranty claim.
REMOVE THE INFLATOR FROM THE ORIGINAL AIRBAG MODULE
NOTE
If you replaced the original airbag module because of an incorrectly installed inflator, you must remove the inflator from the original airbag module, and return the inflator as part of your pallet shipment to its supplier.
- Order a new inflator box from XPO to return the original airbag module inflator. Use the contact information below:
Primary Contact: Tel#: 1-210-250-5079
Email: SCFieldAction.14305@xpo.com
- Remove the harness from the inflator bracket.
- Short the red and yellow wires.
NOTE
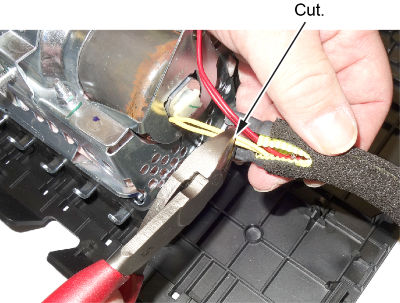
Depending on the vehicle, you must cut the red or yellow wires to remove the inflator, and both sets of wires must be shorted to prevent accidental deployment.
3.1 Cut the red wires about 2 inches from the inflator.
NOTE
There may be some protective tube covering the wires that needs to be cut away to access the wires.
3.2 Strip away about 1 inch of the red wire insulation, then twist the wires together.
3.3 Tape the twisted ends with electrical tape.
3.4 Cut the yellow wires about 2 inches from the inflator.
3.5 Strip away about 1 inch of the yellow wire insulation, then twist the wires together.
3.6 Tape the twisted ends with electrical tape.
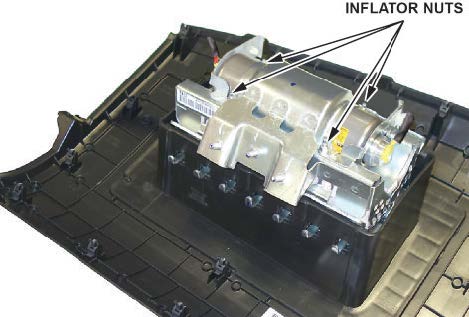
3.7 Remove the four inflator nuts.
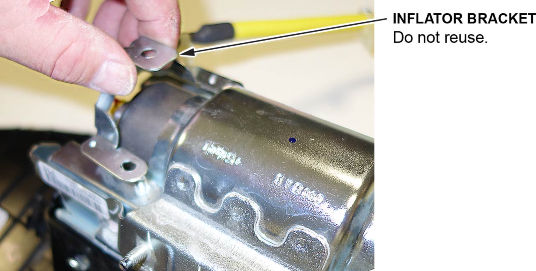
- Remove the inflator bracket.
NOTE
You can only remove one of the brackets, as the other is welded to the airbag housing.
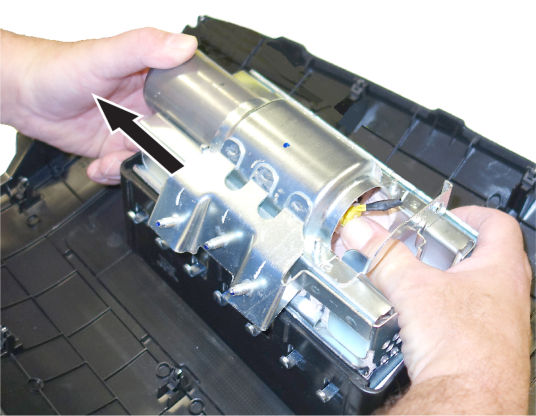
- Remove the inflator by pulling it out.
- Put the original inflator into the new inflator box acquired from XPO. Make sure there is no other hardware in the box because if the package rattles, it will not be accepted by the courier.
- Follow the shipping instructions outlined in PIB B15-0006 to return the undeployed inflator.
- Place the original airbag module (without the inflator) in the airbag module box that the replacement came in. Properly fill out and attach a warranty claim tag to it. The original airbag module may be called in by AHM.
END
61 Affected Products
Vehicles
ACURA | TSX | 2009-2014 |
ACURA | TSX SPORTSWAGON | 2011-2013 |
ACURA | ZDX | 2010-2012 |
HONDA | ACCORD | 2008-2012 |
HONDA | ACCORD CROSSTOUR | 2010-2011 |
HONDA | CIVIC | 2006-2011 |
HONDA | CIVIC GX | 2006-2011 |
HONDA | CIVIC HYBRID | 2006-2011 |
HONDA | CR-V | 2007-2011 |
HONDA | CROSSTOUR | 2012-2014 |
HONDA | FIT | 2009-2013 |
HONDA | INSIGHT | 2010-2013 |
HONDA | PILOT | 2009-2015 |
22 Associated Documents
DEFECT INFORMATION REPORT
RMISC-19V378-9475.pdf 265.225KB
 Loading...
Remedy Instructions and TSB
RCRIT-19V378-4386.pdf 1439.682KB
 Loading...
Recall Acknowledgement
RCAK-19V378-9796.pdf 363.762KB
 Loading...
Defect Notice 573 Report
RCLRPT-19V378-7804.PDF 265.654KB
 Loading...
Remedy Instructions and TSB
RCRIT-19V378-9007.pdf 2645.852KB
 Loading...
Remedy Instructions and TSB
RCRIT-19V378-3310.pdf 1325.69KB
 Loading...
Remedy Instructions and TSB
RCRIT-19V378-3241.pdf 1719.995KB
 Loading...
Manufacturer Notices(to Dealers,etc) – May 17, 2019 Subject Stop Sale/Safety Recall:09-14 Acura Multi-Model Pass. Frt. Inflator Mis-Install.
 Loading...
Statement by American Honda Regarding Passenger Airbag Inflator Kit Installation Error Recall
RMISC-19V378-2182.pdf 108.628KB
 Loading...
Manufacturer Notices(to Dealers,etc) – May 17, 2019 Subject Stop Sale/Safety Recall:06-15 Honda Multi-Model Pass. Frt.Inflator Mis-Install.
 Loading...
Recall Quarterly Report #2, 2019-4
RCLQRT-19V378-2138.PDF 211.274KB
 Loading...
Recall 573 Report-Amendment 1
RCLRPT-19V378-1048.PDF 242.373KB
 Loading...
Remedy Instructions and TSB
RCRIT-19V378-5549.pdf 1662.846KB
 Loading...
Remedy Instructions and TSB
RCRIT-19V378-5367.pdf 1439.728KB
 Loading...
Manufacturer Notices(to Dealers,etc) – November 9, 2019 Subject Stop Sale/Safety Recall: 2009-13 TSX, TSX Sport Wagon, 2010 ZDX Passenger Front
RCMN-19V378-5191.pdf 197.121KB
 Loading...
Chronology
RMISC-19V378-2207.pdf 15.494KB
 Loading...
 .oemdtc.com/wp-content/plugins/embed-any-document/images/EAD-logo.svg" alt="EAD Logo" width="36" height="23" title="Safety Recall: 2010-2012 Acura ZDX Incorrect Installation of the Takata Front Passenger's Airbag Inflator 21">
Taking too long?
 ZDX Incorrect Installation of the Takata Front Passenger's Airbag Inflator 23"> Open in new tab
AMENDED DEFECT INFORMATION REPORT November 8, 2019
RMISC-19V378-8933.pdf 191.831KB
 Loading...
ISSUED Owner Notification Letter(Part 577) – W4P
RCONL-19V378-0327.pdf 126.222KB
 Loading...
ISSUED Owner Notification Letter(Part 577) – M4O
RCONL-19V378-4460.pdf 126.393KB
 Loading...
ISSUED Owner Notification Letter(Part 577) – T4Q
RCONL-19V378-2422.pdf 147.828KB
 Loading...
Recall Quarterly Report #1, 2019-3
RCLQRT-19V378-5059.PDF 211.168KB
 Loading...
ISSUED Owner Notification Letter(Part 577) – P4R
RCONL-19V378-1168.pdf 147.502KB
 Loading...
Latest Recalls Documents
- [Pro OBD2 Scanner] - BlueDriver is the easiest way to scan and understand your vehicle like a professional mechanic. Read and clear your car’s trouble codes and check engine light.
- [Read & Clear All The Codes] - BlueDriver's enhanced vehicle diagnostics gives you access to information normally available only to mechanics on their OBD2 scan tools. Now you can read and clear ABS, Airbag, SRS, TPMS codes, and many more.
- [Get The Right Fix & View Live Data] - Much more than a car code reader, BlueDriver is a diagnostic tool. You’ll get unlimited repair reports with possible causes and fixes, plus real-time health monitoring while you drive with the live data feature.
- [Wireless & Bluetooth Enabled] - Say goodbye to wires. BlueDriver connects with Bluetooth via your phone/tablet to a sensor that plugs into your car's OBDII port. Get all of the capabilities of an expensive code reader & scan tool without any annoying wires.
- [User-Friendly App and Repair Videos] - BlueDriver gives you more ways to scan and fix your vehicle. Our iOS & Android app connects you to a large database of repair videos with step-by-step directions of repairs.
- [Easy to Use--Work out of box] + [FOXWELL 2025 New Version] FOXWELL NT604 Elite scan tool is the 2025 new version from FOXWELL, which is designed for those car owners who want to figure out the cause issue before fixing the car problem via scanning the most common systems like abs srs engine and transmission.The NT604 Elite diagnostic tool comes with latest software, which can be used out of box. No need to waste time to download the software first.
- [Affordable] + [Reliable Car Health Monitor] Will you be confused what happen when the warning light of abs/srs/transmission/check engine flashes? Instead of taking your cars to dealership, this foxwell scanner will help you do a thorough scanning and detection for your cars and pinpoint the root cause. It will t-urn off the warning light car after the problem is fixed.👉TIPS: Airbag crash/collision data can NOT be cleared even you replace the new airbag.
- [5 in 1 Diagnostic Scanner] Compared with those auto scanners (50-100), NT604 Elite code scanner not only includes their OBDII diagnosis but also it can be an abs/srs scanner, transmission and check engine code reader. When it’s an odb2 scanner, you can use it to check if your car is ready for annual test through I/M readiness menu. In addition, live data stream, built-in DTC library, data play back and print, all these features are a big plus for it. Note: doesn't support maintenance function.
- [Fantastic AUTOVIN] + [No extra software fee] Through the AUTOVIN menu, this NT604 Elite car scanner allows you to get your V-IN and vehicle info rapidly, no need to take time to find your V-IN and input one by one. What's more, the NT604 Elite abs srs scanner supports 60+ car makes from worldwide (America/Asia/Europe). You don’t need to pay extra software fee.
- [Solid protective case KO plastic carrying bag] + [Lifetime update] Almost all same price-level obd scanner diagnostic tool only offers plastic bag to hold on the scanner.However, NT604 Elite automotive scanner is equipped with solid protective case, preventing your obd2 scanner from damage. Then you don’t need to pay extra money to buy a solid toolbox.
- 【Best Bang For Your Buck!-FOXWELL NT614 Elite】1. 2025 New software-faster than old one. 2. One click lifetime WIFI f-ree update, no need to use the annoying Micro SD card. 3. New Update-No need to register on the FOXWELL website before use, more convenient! 4. More intuitive viewing with new interface, you can find I/M, Battery Test, DTC Lookup directly.
- 【UPGRADE OF NT604-POWERFUL 5 RESETS】Wanna to do maintenance service for your car however the basic 4 system scanner tool can't do it? Then FOXWELL NT614 Elite-the upgraded version of nt604, was born for providing you with 5 special functions-ABS Bleeding/Oil Reset/SAS Calibration/EPB Reset/Throttle Reset. These functions are enough for your daily needs. No need to buy those 300-600 dollors obd2 scanner. Saving your unnecessary repair fee with FOXWELL nt614 car scanner diagnostic tool!
- 【ENGINE/ABS/SRS/TRANSMISSION CODE READER】Don't know what's wrong with your car when the warning light of ABS, transmission, SRS, Engine flashes? NT614 Elite obd2 scanner can pinpoint the problem components. It boasts many functions of engine, abs, srs and transmission such as read & erase fault codes and grapgh live data like engine temp, wheel speed sensor, read transmission temperature, etc. Compared with car repairs, using foxwell nt614 elite is more convenient and a-ffordable.
- 【ABS BLEEDING OBD SCANNER】Do you always feel the brake pedal was slowly sinking to floor or it's loose after doing a complete front & rear brake job? And then you need to take more time than normal to stop your car, which is very dangerous. That's because when you open the brake system to replace components, air gets inside. To get a firm brake pedal, the air need to be removed by bleeding the brakes. NT614 Elite odb2 scanner can do ABS BLEEDING perfectly for your cars.
- 【SMART AUTOVIN & LIFETIME F-REE WIFI UPDATE & PERFECT GIFT CHOICE】With the fantastic AUTOVIN function, this nt614 scan tool can get your VIN and vehicle info rapidly. No need to spend much time in finding your VIN and input it one by one. Also, the lifetime f-ree wifi update is provided for more vehicle coverage, bug fixes, newly added parameters. SAVE AT LEAST 1000+ PER YEAR. And this automotive scanner is a best gift for your Dad, Husband, Boyfriend and Handy Men.
- [Transform Your Car Care Experience] - With BLCKTEC, instantly become your own professional mechanic. Effortlessly read and clear your car’s trouble codes and check engine light, ensuring your vehicle stays in top condition.
- [Empower Yourself with Comprehensive Diagnostics] - Unlock the full potential of your vehicle with the BLCKTEC 430. Access detailed diagnostics previously exclusive to professional mechanics’ OBD2 scan tools, including ABS, Airbag, SRS, TPMS codes, and beyond, right at your fingertips.
- [Drive with Confidence] - The BLCKTEC 430 is more than just a car code reader; it's your personal vehicle health advisor. Receive tailored repair reports with potential causes and verified solutions for your specific make and model, guiding you to the right fix every time.
- [Seamless Connectivity, Ultimate Convenience] - Experience the freedom of wireless diagnostics with this portable car scanner. Easily connect via Bluetooth to our intuitive sensor and enjoy all the functionalities of high-end scan tools without the clutter of wires, directly from your smartphone or tablet. To connect the tool to the App, please DO NOT go to device's Bluetooth settings, instead, open RepairSolutions2 App and follow the instructions on the App to pair the BLCKTEC 430.
- [DIY Repairs Made Easy] - Navigate car maintenance with ease using our premium app. Access a vast library of easy-to-follow repair videos, guiding you through each step of the repair process, compatible with both iOS & Android devices.
- Updated New Version AD600S: Discover the improved version of TOPDON AD600S OBD2 scanner. Now immerse yourself in a seamlessly diagnostic experience with Android 11.0 OS. With an upgraded 32G ROM, this scan tool offers ample storage and faster performance. The 5-inch display with 1280x720 resolution offers high-definition clarity, ensuring easy readability for every diagnostic detail
- Professional 4 Systems Diagnostics: For car owners dealing with common issues such as engine, transmission, ABS, and SRS, the TOPDON AD600S code scanner delivers professional diagnostic services. It easily reads and clears fault codes, analyzes data streams and more, ensuring a quick identification of problems. Additionally, the DTC Lookup function provides corresponding fault code analysis
- 9 Hot Reset Functions: Say goodbye to costly trips to the repair shop for resetting after routine maintenance such as changing oil, replacing tires, or installing new brake pads. The AD600S diagnostic tool effortlessly tackles common automotive challenges with just one click. Cut costs and cut the hassle with its 9 reset functions: Oil/BMS/ABS/SAS/EPB/DPF/TPMS/Throttle/injector coding
- Support for 10,000+ Car Models: The upgraded AD600S car scanner now supports 67+ global brands and 10,000+ models, ensuring compatibility with a diverse range of vehicles. Whether American, German, French, or Japanese, the AD600S diagnostic scanner has you covered. (Note: Contact TOPDON customer service for vehicle compatibility inquiries before purchase)
- Life time Free Updates: The AD600S diagnostic tool offers free upgrades with convenient one-click updates via Wi-Fi. Our dedicated TOPDON technical team continuously enhances our product's software, providing users with expanded vehicle support and an improved user experience through regular updates
- 【Great Ideal For Every Car Owner】Prefect choice for your father, husband, brother or boyfriend. EVERY CAR OWNER WILL NEED IT! Also, the lifetime update is provided for more vehicle coverage, bug fixes. SAVE AT LEAST $1000+ PER YEAR!Get LAUNCH CRP123 V2.0 Elite car diagnostic scanner and give your lover a surprise!*R each us to Get the Extra Gifts :Protective Case Storage Bag.
- 【2025 Newly Added 3 Reset Functions】CRP123 V2.0 obd2 scanner with upgrades it offers Throttle Adaptation,Oil Reset and SAS Reset functions for FREE now!! Optimize your engine performance with Throttle Adaptation, reset your oil life system with ease to save time and money on maintenance, and enhance your vehicle's handling and safety with SAS Reset.Covering more daily repairs,become the most cost-effective product in its price range,save your time and money!
- 【 Read & Clear/Reset Engine/ABS/SRS/Transmission Diagnostic Scan Tool 】LAUNCH CRP123 V2.0 OBD2 Scanner can test Engine, Transmission, ABS and Airbag four systems, also reads and resets code, displays data stream graphic, stores and playbacks dynamic data stream,helps to quick analysis and diagnosis.
- 【 Error Fault Code Reader】Except the full 10 modes OBD2 diagnostic functions like, retrieving I/M readiness, Freeze Frame Data, Read Dynamic Data stream and V-ehicle Information, O2 Sensor Test, EVAP Test of F-uel Tank System (Mode 8) and Advanced On-board Monitoring (Mode 6), launch crp123 v2.0 obd2 scanner can not only reveal what error codes your car is producing, but also erase your v-ehicle’s check engine light after problem fixed, the DTC help and explanation also tell you the exact problem.
- 【 Live Data Graphing + Read/Record/Playback Data stream + Print diagnostic data 】Live Data Graphing,more intuitive to know your vehicle’s problem.Large size Color Screen ;Print Function:Print the diagnose result easily; with user manual and register & update tutorial video uploaded in the link by us,you can Look up it anytime by ONE-CLICK.
- 【2025 UPGRADED VERSION, NEW CHIPS, ADD MORE FUNCTIONS, No Extra Software Fee】Faster! The 2025 CRP123I V2.0 car diagnostic scanner has a new processor, Android 8.1, 32GB of memory, 5-inch touchscreen (720P), 6000mAh rechargeable battery, One-touch Wi-Fi Lifetime Free update for more vehicle coverage, bug fixes,newly added parameters, and functionality to help you access, diagnose and fix more vehicles faster,upgrade of CRP123I.
- 【Newly Added 7 RESET FUNCTIONS】+ 【BATTERY VOLTAGE TEST】2025 New Ver. scan tool CRP123I V2.0 ADDS NEW SPECIAL FUNCTIONS-Throttle Adaptation,Oil Reset,SAS Reset,ABS Bleeding,BMS Reset,EPB Reset, D.P.F Regeneration,to maintain your vehicle system safely and efficiently.Graphing the battery voltage easier and more intuitive for the real-time monitors to check.It does not only reveal what error codes your car is producing,but also erase your vehicle's check engine light after the problem is fixed.
- 【Multi System Diagnostic Tool】LAUNCH CRP123I V2.0 obd2 scanner check ABS/SRS/AT/ENG systems &10 OBD2 modes, read/clear fault codes,Online Google Search, 4 IN 1 Graphing.Store and playback of dynamic data stream help to quick analysis and diagnosis. Generate vehicle health reports with one click and share them with your email via W-ifi which helps avoid blind maintenance. CRP123I costs less, in the long run, saving you up to $2000 each year.
- 【Fre-e Lifetime Update + AutoAuth for FCA SGW+ Auto Vin】This scan tool features One-click w-ifi update and fre-e for fixing more bugs; Realtime battery voltage graphing helps to Judge the state of the battery; Auto Vin,facilitate accurate diagnosis and provide useful information.Besides,CRP123I V2.0 support AutoAuth for FCA SGW,For 2017 and later FCA Vehicles with Secure Gateway Module (SGW),with no limitation.
- 【Cover 10000+ Models & 90+ Car Brands】CRP123I V2.0 Elite launch scanner is capable of diagnosing fault codes on more than 10000+ vehicles from 1996 to 2025 and 90+ car makes worldwide. Support almost all OBDII cars such as SUVs, minivans, light-duty trucks, etc. It's an excellent tool for all types of mechanics from novice to pros. NOTICE: Compatibility will vary on vehicles' model and year, pls c-ontact us via Q&A/message before purchase.
- 【Professional 4 Systems Diagnostics】For DIYers addressing typical concerns like engine, transmission, ABS, and SRS, the TOPDON AD500 vehicle scanner provides specialized diagnostic solutions. It effortlessly interprets and eliminates fault codes and scrutinizes data streams, ensuring the prompt detection of issues.
- 【6 Reset Functions】The AD500 car diagnostic tool offers essential features like Oil Reset, Throttle Adaptation, SAS/TPMS/BMS/EPB Reset. Easily reset oil change indicators, fine-tune throttle response, and recalibrate steering angle sensors for optimal vehicle performance and maintenance convenience.
- 【Works Easier with AD500】The AD500 scanner combines a 5” touchscreen with buttons for easier and seamless operation. Elevate your diagnostic experience with DTC Lookup, Diagnostic data record, and printing diagnostic reports via email. Stay up to date with lifetime free upgrades via Wi-Fi, ensuring your tool is always equipped with the latest features.
- 【Fast Diagnostics, Instant Support】With AutoVIN, instantly obtain crucial vehicle details for expedited diagnostic processes. The AD500 code reader not only facilitates data stream recording for later review but also acts as a battery voltage monitor, providing valuable insights into your vehicle's battery health. If you encounter any diagnostic hurdles, share feedback with TOPDON for prompt professional support.
- 【Unlock FCA Secure Gateway】Supports cutting-edge CAN FD protocol, making it compatible with modern vehicles including 2020+ GM & Chrysler. It bypasses the FCA Secure Gateway to stay up to date with newer models from Chrysler, Jeep, Fiat, and others.
- 【Designed for Volkswagen
 (VAG) Cars Diagnostics】The VD500 OBD2 scanner is specifically designed to diagnose Volkswagen
 Group (Fits for VW
 /Audi
/Audi /Skoda/ SEAT) 12-volt 16-pin vehicles, but can also be used with other 12-volt (non-Volkswagen
 ) and light trucks (non-electric) vehicles manufactured in 1996 or later that are OBD II -compliant with standard 16-pin OBD II protocols (J1850 VPM, J1850PWM, ISO9141, KWP 2000 and CAN)
 - 【Basic + Special Advanced Functions for VAG Vehicle】The ANCEL VD500 scan tool for vw
 can not only read and clear codes on engine, ABS, transmission, SAS (not all cars), ESP, TPMS and other systems, but also reset the oil, brake pad(epb service) and throttle position adaption. If you don't know how to do it, please con-tact us in time. Include your car model, year and the function you want to do
 - 【Plug and Play, No Complex Connection】The ANCEL VD500 is truly plug-and-play—no complicated networking or batteries required. Simply connect it and use it anywhere in your car, anytime. Fast, easy, and convenient
- 【Full Access, No Hidden Costs】Unlike other detectors that charge extra for features, the ANCEL VD500 is 100% no extra additional charges, with no hidden costs. The full functionality is accessible, and the system upgrade is included, a favorite choice among customers
- 【Wide Compatibility for Volkswagen
 Cars】The VD500 diagnostic scanner for audi
 offering for Volkswagen
 vehicles covers the following vehicles: fits for VW
 (CC, EOS, Golf, GTI, Jetta, Passat, Phaeton, Polo, Rabbit, Sharan, Tiguan, Touran, Touareg); fits for Audi
 (A3, A4, A6, A7, A8, A5, Q3, Q5, Q7, R8, RS3, TT, RS, RS5, S4, S6); fits for Skoda (Octavia, Rapid, Yeti, Kodiaq, Fabio, Superb); fits for SEAT (Leon, Ateca, Ibiza, Altea, Cushion, Cord, Alhambra) Diagnostics
- Comprehensive OBD2 Scanner with 15 Resets: The XTOOL D5S car code reader and vehicle reset tool provides an advanced diagnostic solution with 15 high demand reset functions, including Electronic Parking Brake Reset (EPB), SAS, BMS Reset, Throttle Body Relearn, TPMS Reset, ABS Bleeding, Injector Coding, Gearbox Match, Suspension Adjustment, Headlight, Window Initialization, Crank Sensor Relearn and more. Equipped with CAN FD Protocol and FAC AutoAuth, the D5S obdii scanner diagnostic tool ensures compatibility with a broad range of modern vehicles, allowing users to address common maintenance needs quickly.
- 4 Main System Car Diagnostic Scanner & Full OBD2 Diagnostics: The XTOOL D5S vehicle code reader is ideal for home mechanics, DIYers, and professionals, providing access to Transmission/Engine/ABS/SRS to read dtcs, and live data can be displayed in text or up to 4 pid data graphs, along with full OBD2 diagnostics to check the engine light on, other obd2 issues and routine maintenance. This scan tool ensures you can keep your vehicles in top condition, avoiding costly repairs or unexpected breakdowns. NOTE: Some vehicles display three systems after connection because the transmission and engine of some vehicles are integrated into one
- One-Tap W!Fi Updates + No Software Fees: Enjoy a 5.45” high-resolution touchscreen (1440x720) that’s easy to read, even in low light. Free lifetime software updates over Wi-Fi keep your D5S OBD2 Scanner Diagnostic Tool updated with the latest features—no hidden fees. Ample 32GB storage plus expandable memory ensures room for all your diagnostic data, while durable silicone grips provide comfortable, secure handling. This makes D5S a cost-effective, long-term investment for continuous diagnostic support, a reli~able automotive scanner diagnostic tool for your family
- Wide Compatibility Across 90+ Vehicle Brands: The XTOOL D5S Scanner for cars and trucks works with OBDII-equipped vehicles built after 1996, covering over 90 vehicle brands, including 12V diesel and SUVs, minivans, and light-duty trucks. It supports most of protocols include CAN FD for broad compatibility. For vehicle-specific compatibility, send us your vehicle information to check the compatibility before purchase
- Super Clear Navigation Display: The XTOOL D5S car scanner enhances your diagnostic workflow with a super clear navigation display, designed for convenience and speed. TOP Capability include a Voltage Display for real-time monitoring of your vehicle’s electrical system, a “My Vehicle” Menu for adding and managing vehicle information, and Quick Button Interfaces for both Auto Scan and OBD2 Diagnostics, ensuring you can quickly access the menu you need. These features streamline the diagnostic process, allowing you to focus on what matters most—Efficient vehicle maintenance
Last update on 2025-05-08 / Affiliate links / Images from Amazon Product Advertising API
This product presentation was made with AAWP plugin.
