| “This site contains affiliate links for which OEMDTC may be compensated” |
NHTSA Campaign Number: 18V600
Manufacturer Honda (American Honda
 Motor Co.)
Components FUEL SYSTEM, GASOLINE
Potential Number of Units Affected 967
Fuel Tank Crossover Couplings may Leak Fuel
A fuel leak in the presence of an ignition source can increase the risk of a fire.
Summary
Honda (American Honda
 Motor Co.) is recalling certain 2017-2018 Acura
 NSX vehicles. The crossover pipe couplers between the left and right fuel tanks may leak.
Remedy
Honda will notify owners, and dealers will replace the left and right fuel tanks, free of charge. The recall is expected to begin November 6, 2018. Owners may contact Honda
 customer service at 1-888-234-2138. Honda
 ’s numbers for this recall are U29, and Z28.
Notes
Owners may also contact the National Highway Traffic Safety Administration Vehicle Safety Hotline at 1-888-327-4236 (TTY 1-800-424-9153), or go to www.safercar.gov.
Check if your Acura has a Recall
B18-053
September 13, 2018
Version 3
Safety Recall: 2017-18 NSX Fuel Tank
Supersedes 18-053, dated September 12, 2018, to revise the information highlighted in yellow
AFFECTED VEHICLES
| Year | Model | Trim | VIN Range |
| 2017-18 | NSX | ALL | Check the iN VIN status for eligibility. |
REVISION SUMMARY
Under WARRANTY CLAIM INFORMATION, information was added about claiming alignment shims.
Under TOOL INFORMATION, a tool was added.
Under REPAIR PROCEDURE, additional steps were added.
BACKGROUND
The welds in the fuel tank for the crossover pipe are improperly sealed. Clients may notice a strong fuel smell.
California residents only: This safety recall also affects emissions. Have the service consultant give the certificate to the client as proof that the recall was completed.
CLIENT NOTIFICATION
Owners of affected vehicles will be sent a notification of this campaign.
Do an iN VIN status inquiry to make sure the vehicle is shown as eligible.
Some vehicles affected by this campaign may be in your used vehicle inventory.
Failure to repair a vehicle subject to a recall or campaign may subject your dealership to claims or lawsuits from the client or anyone else harmed as a result of such failure. To see if a vehicle in inventory is affected by this safety recall, do a VIN status inquiry before selling it.
CORRECTIVE ACTION
Replace the fuel tanks.
PARTS INFORMATION
| Part Name | Part Number | Quantity |
| Fuel Tank Assembly Repair Parts Kit | 06170-T6N-305 | 1 |
| Left Fuel Tank | 17044-T6N-A01 | 1 |
| Right Fuel Tank | 17044-T6N-A13 | 1 |
REQUIRED MATERIALS
| Part Name | Part Number | Quantity |
Acura Long-Life Antifreeze/Coolant Type 2 Long-Life Antifreeze/Coolant Type 2 | OL999-9011A | 4 |
Acura Gear Oil GO-Type Gear Oil GO-Type | 08200-9018A | 2 |
TOOL INFORMATION
| Part Name | Tool Number | Quantity |
| Tank Removal Adapter | 07AAK-T6NA300 | 1 |
| Arm Holder | 07AAB-T6NA400 | 1 |
| Brake Disc Covers (set of 4) | 07AAZ-T6NA800 | 1 |
| Hose Plug Set | 07AAZ-T6NA600 | 1 |
| Fender Covers | 07AAZ-T6NA200 | 1 |
| Lug Nut Cap Removal Tool | 07AAC-T6NA100 | 1 |
| Fuel Tank Unit Locknut | 07AAA-SNAA100 | 1 |
| Fuel Pump Module Locknut Wrench | 070AA-T0AA100 | 1 |
| Wheel Stud Guide Pins (set of 2) | 07AAB-T6NA200 | 1 |
WARRANTY CLAIM INFORMATION
Fuel Tank Replacement
To file a warranty claim for fuel reimbursement, you must do the following:
- Select O1 from the Sublet Code drop-down.
- Enter the total MILES driven for refueling (ex. 15MILE) in the Work Description
- Enter the fuel receipt, invoice, transaction, or sequence etc. number in the Invoice No.
- Enter the amount in the Sublet Amount field
- Upload a image of the fuel receipt (required).
Alignment shims maybe needed to properly do the alignment, the shims were added under the material reimbursement section in the template.
| Operation Number | Description | Flat Rate Time | Defect Code | Symptom Code | Template ID | Failed Part Number |
| 3101GP | Replace the right and left side fuel tanks (includes alignment, VSA sensor neutral position procedure, fluid drain/refill and test drive). | 10.3 hrs | 6TK00 | U2900 | B18053A | 17044-T6N-A01 |
| Only use the templates below if fuel fill-up is required. | ||||||
| B | Travel 1-10 miles for fuel | 0.2 hr | 6TK00 | U2900 | B18053B | 17044-T6N-A01 |
| C | Travel 11-20 miles for fuel | 0.4 hr | 6TK00 | U2900 | B18053C | 17044-T6N-A01 |
| D | Travel 21-30 miles for fuel | 0.6 hr | 6TK00 | U2900 | B18053D | 17044-T6N-A01 |
Skill Level: Repair Technician
REPAIR PROCEDURE
- Set the vehicle on the lift. Refer to the service information.
- Protect and cover the body panels surrounding the engine compartment.
- Remove the engine room covers. Refer to the service information.
- Remove the driver’s side air cleaner assembly. Refer to the service information.
- Drain the fuel from both fuel tanks.
5.1 Remove the PGM-FI main relay 3 (UNDER HOOD).
5.2 Remove the PGM-FI main relay 2 (CABIN).
5.3 In Maintenance Mode do the Forced PI Idling Mode, then let the engine idle until it stalls.
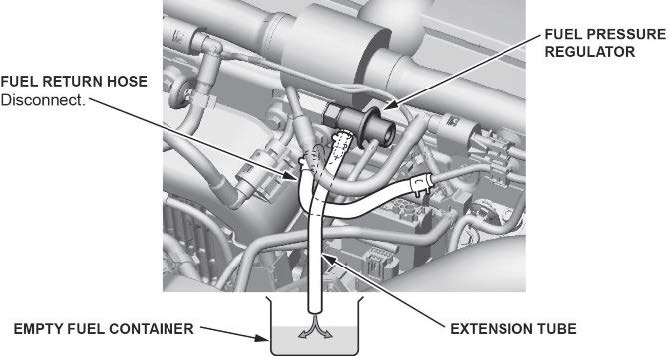
5.4 Remove the fuel return hose from the fuel pressure regulator, and add an extension tube to an empty fuel container.
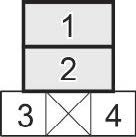
5.5 Jump the PGM-FI main relay 3 (UNDER HOOD) 4-pin connector terminal No.1 and No. 2 with a jumper wire, and turn the ignition to ON.
5.6 Wait until all the fuel is drained.
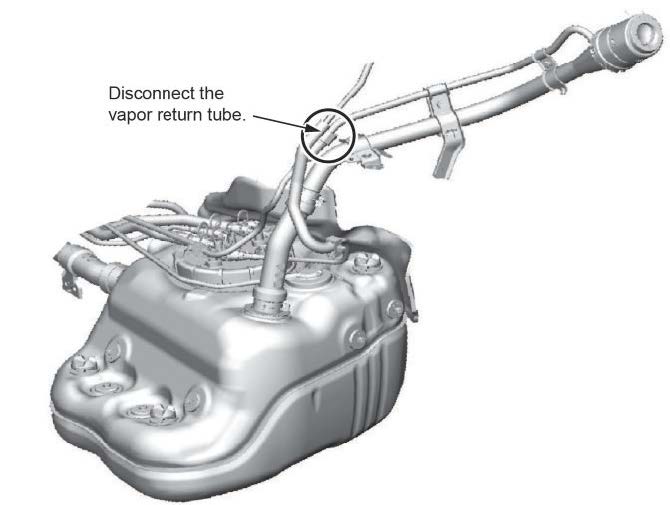
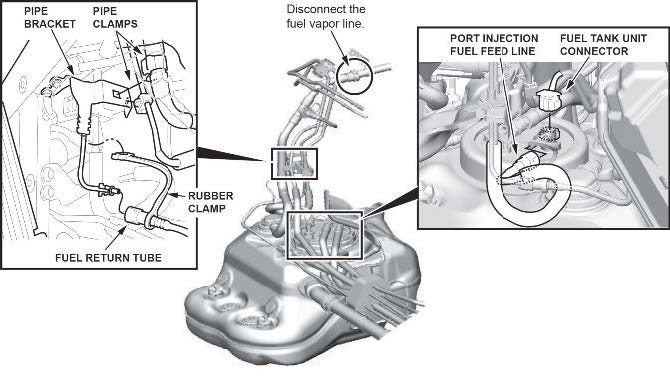
- Disconnect the fuel vapor line (located below the removed driver’s air cleaner assembly).
- Turn off the IMA service plug.
7.1 Move the driver’s seat all the way forward.
7.2 Remove the lower portion of driver’s door seal. Refer to the service information.
NOTE
Do not completely remove the driver’s door seal.
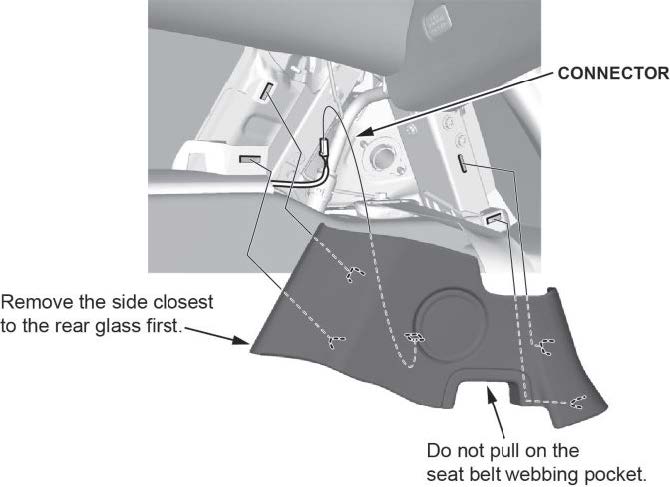
7.3 Remove the driver’s C-pillar trim.
NOTE
To avoid damage when removing the C-pillar trim make sure you detach it from the outer edge near the rear glass and not at the seat belt webbing pocket.
7.4 Remove the driver’s rear side trim panel. Refer to the service information.
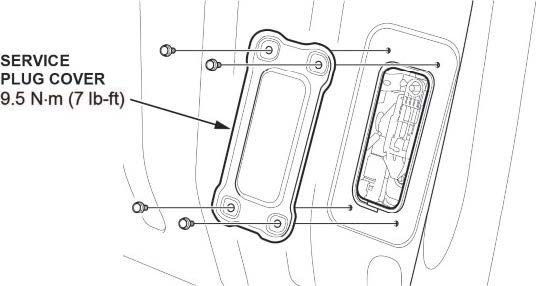
7.5 Pull the rear bulkhead carpet up to access and remove the service plug cover.
7.6 Remove the service plug. Refer to the service information.
- Disconnect the 12-volt terminals to the battery. Refer to the service information.
- Raise the vehicle.
- Remove the rear wheels.
NOTE
Protect the brake disk from damage and install the brake disk cover.
- Remove both left and right inner fender liners. Refer to the service information.
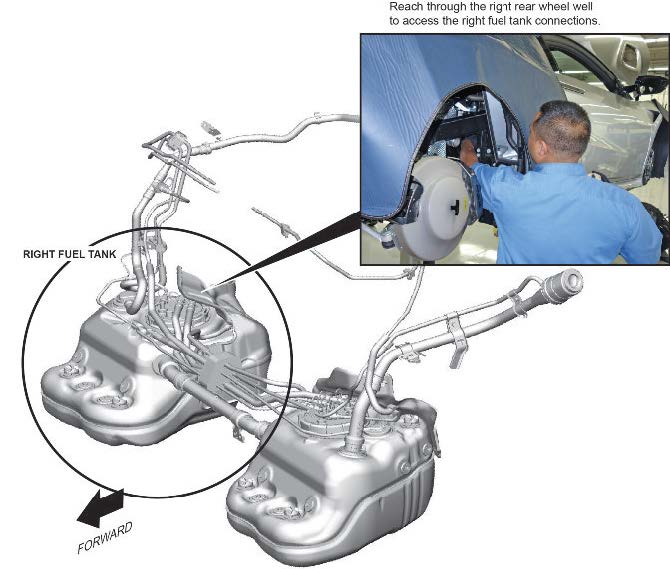
- On the passenger side rear wheel well, disconnect the following:
- OVR tube (next to frame beam)
- Lower intercooler hose (Unclamp and move.)
- PI fuel feed pipe
- Fuel tank unit connector
- Clip harness tab for the OVR
- Clip harness tab for the fuel line return
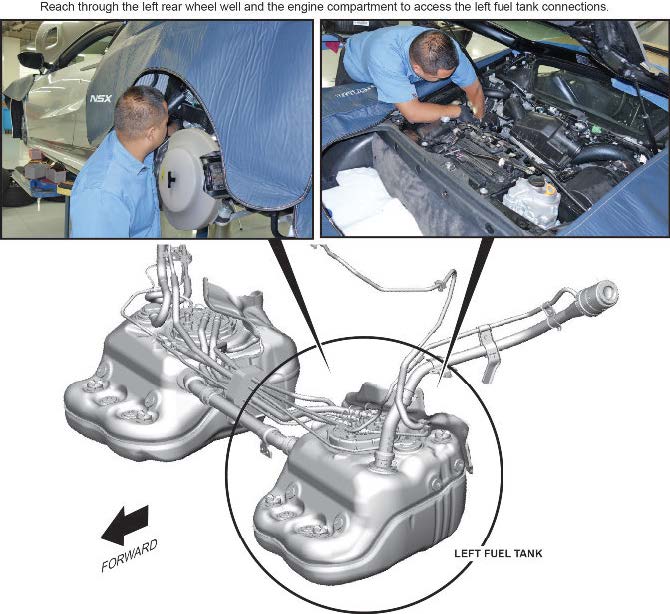
- On the driver’s side rear wheel well, do the following:
- Unclamp and move the intercooler hose.
- Remove the black bracket holding the fuel tank (top side fasteners).
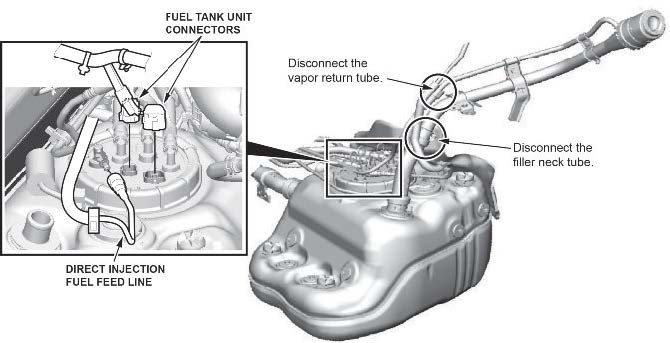
- Disconnect the two electrical connectors.
- Disconnect the fuel filler neck.
- Disconnect the PI fuel feed pipe to the fuel pump.
- Unhook the tube clamp on the firewall side.
- Remove the engine undercover. Refer to the service information.
- Remove the (rear) center tunnel reinforcement. Refer to the service information.
- Remove the two gear oil thermostat housing fasteners.
- Remove the (front) rear subframe. Refer to the service information.
NOTE
Pay attention to the bolt length and locations.
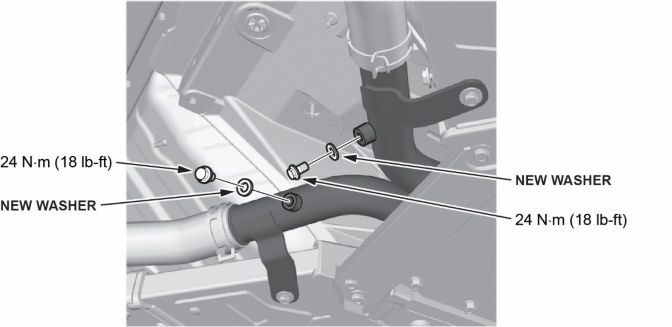
- Drain the engine coolant only from the water pipe underneath the vehicle.
NOTE
After the coolant has drained, reinstall the drain bolts with new washers included in the kit.
- Disconnect the water hoses from the center pipes and cap off the ends.
- Disconnect the two gear oil pipes in the center tunnel. Refer to the service information.
- Disconnect the coolant heater hose and cap off.
- Disconnect the rear motor power cable. Refer to the service information.
- Remove the rear bulkhead upper brace, rear bulkhead lower brace, and fuel pipe separator bracket. Refer to the service information.
- Remove the crossover pipe bracket bolts. Refer to the service information.
- Remove the fuel tank separator braces. Refer to the service information.
- Place the tank removal adapter and the powertrain lift table under the fuel tank assembly. Refer to the service information.
- Remove the fuel tank strap bolts.
- Slightly lower the fuel tank assembly, On the passenger side tank, reach over and disconnect the fuel return tube.
- Completely lower the fuel tank assembly, making sure none of the remaining hardlines and hoses get snagged.
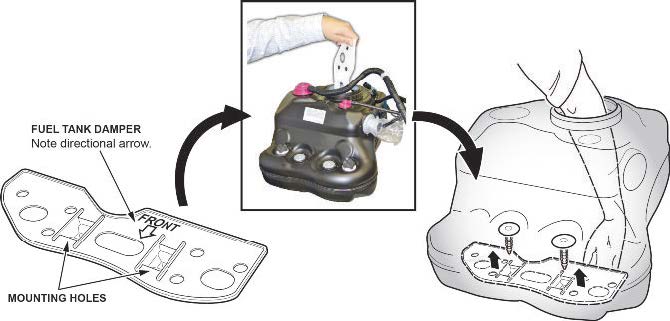
- Install the fuel tank damper (supplied with the new fuel tanks) as shown.
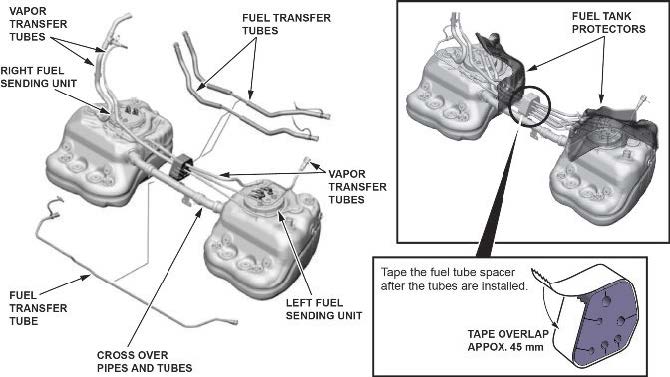
- Refer to the service information, and transfer the following to the new fuel tank assembly:
- Fuel sending units (left and right)
- Fuel tank protectors
- Fuel transfer tubes
- Vapor transfer tube
- Cross over pipe and tubes
NOTE
Install the supplied tape around the fuel tube spacer as shown.
- Install the new fuel tank assembly in to the vehicle, and install the parts in the reverse order of removal.
- Top off the transmission fluid. Refer to the service information.
- Fill the coolant, and air bleed the system. Refer to the service information.
- Refuel the vehicle.
NOTE
Make sure to note the mileage driven to refuel the vehicle; it is required for warranty reimbursement.
- Do an alignment check, and make adjustments as needed.
NOTE
The fuel tanks must be fully fueled when doing an alignment. Also, be sure to follow the pre-alignment checks. Refer to the service information.
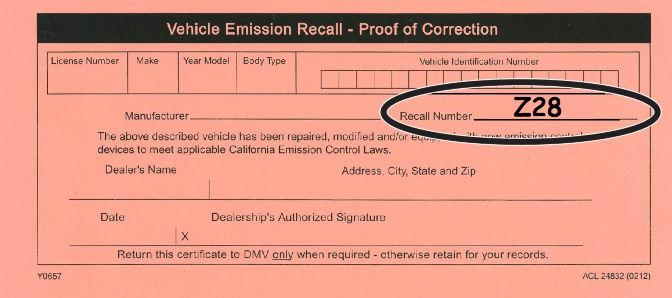
- California residents only: Fill out a Vehicle Emissions Recall – Proof of Correction certificate, and use Z28 as the recall number. Have the service consultant give the certificate to your client, and advise him or her to keep it as proof that the recall was completed. Your client will need to submit this certificate to the DMV only if the DMV requests it. If you need more certificates, use reorder number Y0657.
END
B18-053
Version 3
September 13, 2018
 Loading...
B18-053
Version 1
September 8, 2018
 Loading...
Manufacturer Notice
September 12, 2018
 Loading...
Manufacturer Notice
September 8, 2018
 Loading...
Statement by Acura Regarding Fuel Tank Recall: 2017-2018 Acura
 NSX
NSX
Sept. 8, 2018
 Loading...
Manufacturer Notice
 Loading...
Manufacturer Notice
 Loading...
DEFECT INFORMATION REPORT
 Loading...
Recall Acknowledgement
September 27, 2018
 Loading...
- The world’s #1 fuel additive for both gasoline and diesel engines
- A great tune-up in a bottle – treats gasoline, diesel fuel and increases MPG
- Cleans and lubricates the fuel system, including fuel injectors, carburetor and combustion chamber
- Improves fuel economy by burning excess exhaust emissions
- Increases power and acceleration by improving fuel flow and reducing deposit buildup
- ALL-ROUND ENGINE SOLUTION - Works in all engines and all fuels, making it the ideal fuel treatment and stabilizer for any vehicle or gas powered tool
- ETHANOL PROBLEM SOLVER - Prevents and cures most ethanol-related issues, including poor performance and decreased fuel economy
- OLD FUEL REVITALIZER - Stabilizes fuel up to 2 years and can help rejuvenate old, sub-spec fuel, even after months of inactivity
- FUEL ECONOMY MAXIMIZER - Removes and prevents gum, carbon deposits, and varnish build-up, resulting in improved fuel economy
- WATER BUILD-UP PREVENTION - Disperses water throughout fuel as submicron-sized droplets that are safely eliminated while the engine operates
- Clean fuel injectors and keeps them clean
- Reduces intake valve deposits and combustion chamber deposits
- Lubricates critical components in the fuel system and engine
- Stops knocking and hesitation
- Lessens oil contamination in older engines
- Add Sea Foam Motor Treatment to all fuel and oil systems to safely clean and lubricate critical engine areas.
- Cleans fuel injector and carburetor passageways, intake valves, and chamber deposits. Lubricates upper cylinders.
- Works in crankcase oil to liquefy harmful residues and deposits.
- Stabilizes gas and diesel fuels up to 2 years.
- Safe and effective in any gas or diesel fuel blend, and all motor oils, conventional or synthetic.
- Save gas by keeping fuel intake system clean
- Helps restore performance
- Removes deposits from entire fuel system
- Helps inhibit corrosion
- Compatible with cap-less fuel tanks
- QUALITY ASSURED
- Reduces: rough idle, engine surge, hesitation, and spark plus fouling
- 20 oz. bottle.
- Improves: cold start performance, and fuel stability for up to one year
Last update on 2025-05-08 / Affiliate links / Images from Amazon Product Advertising API
This product presentation was made with AAWP plugin.


