| “This site contains affiliate links for which OEMDTC may be compensated” |
A15-033
October 23, 2015
01944 Version 3
2016 Pilot: PDI and New Model Service Information
Supersedes 15-033, dated August 12, 2015, to revise the information highlighted in yellow.
AFFECTED VEHICLES
| Year | Model | Trim Level | |
|---|---|---|---|
| 2016 | Pilot | 2WD | 4WD |
| LX | LX | ||
| EX | EX | ||
EX with Honda Sensing Sensing | EX with Honda Sensing Sensing | ||
| EX-L | EX-L | ||
EX-L with Honda Sensing Sensing | EX-L with Honda Sensing Sensing | ||
| EX-L with Rear Entertainment System | EX-L with Rear Entertainment System | ||
| EX-L with Navigation | EX-L with Navigation | ||
| Touring | Touring | ||
| Elite | |||
REVISION SUMMARY
- Under PDI PROCEDURES, 1. Remove the Exterior Protective Coatings, added text and art to cover removal of factory sticker from roof.
- Under PDI PROCEDURES, 9. Do the Idle Learn Procedure, added note on consequences of incorrectly doing procedure.
- Under PDI PROCEDURES, 10. Do the CKP-Pattern Learn Procedure, revised text to cover models with 9-speed automatic transmission (Touring and Elite)
INTRODUCTION
This bulletin covers the pre-delivery inspection (PDI) of the 2016 Pilot. It includes these procedures:
To do a PDI on a model with a navigation system, be sure to complete Service Bulletin 15-034, 2016 Pilot: PDI of the Navigation System.
This bulletin also includes this new model service information:
CLAIM INFORMATION
Reimbursement Time: 1.4 hours
NOTE: This time includes the PDI of the navigation system, if equipped.
PDI PROCEDURES
Before Starting
Review these items:
- Perfect Delivery documents, especially the information on battery maintenance and tire pressures
- Checklist in the PDI and Final Delivery Checklist booklet
Make sure you record the PDI on the appropriate pages of the checklist. The PDI is not done until this bulletin and the checklist are both complete. Note on the repair order any repairs or problems that cannot be fixed within a few minutes. Remove all PDI items from the cargo area and glove box.
Models Equipped with Push Button Start
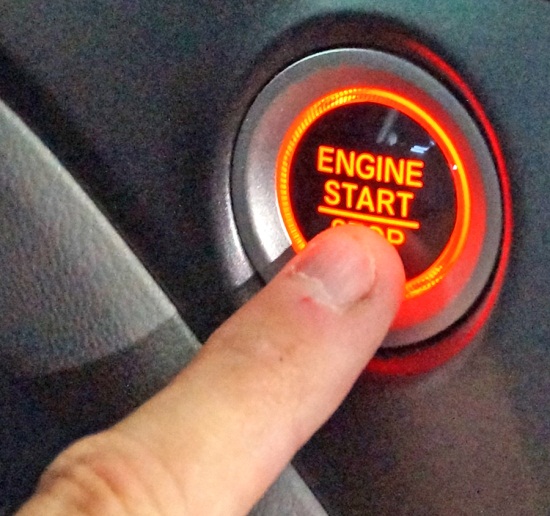
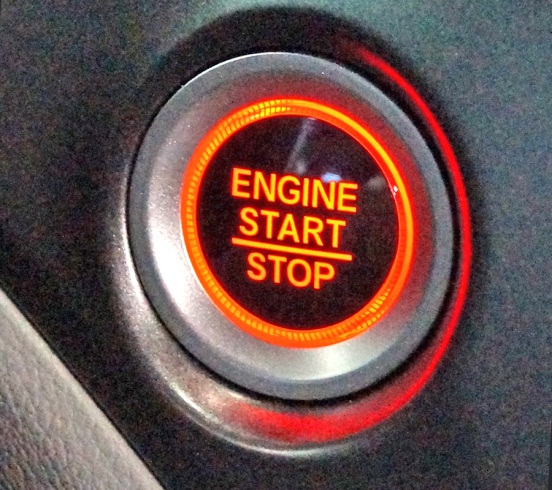
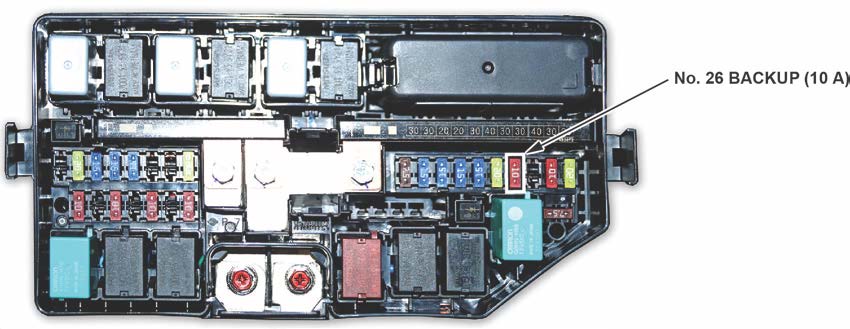
To prevent parasitic draw, the vehicle comes from the factory with the No. 26 BACKUP (10 A) fuse removed from the main under-hood fuse box. With it removed, the engine will not start when you apply the brake pedal and press the ENGINE START/STOP button.
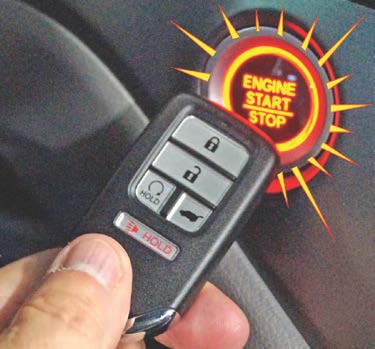
To start the engine with the No. 26 fuse removed, you must do this:
- Press the ENGINE START/STOP button once.
- When the indicator blinks, touch the keyless remote to the ENGINE START/STOP button.
NOTE: The indicator will switch from blinking to steady when communication is complete.
- Start the engine by pressing the ENGINE START/STOP button while pressing the brake pedal. You must start the engine within 10 seconds of touching the remote to the button.
1. Remove the Exterior Protective Coatings
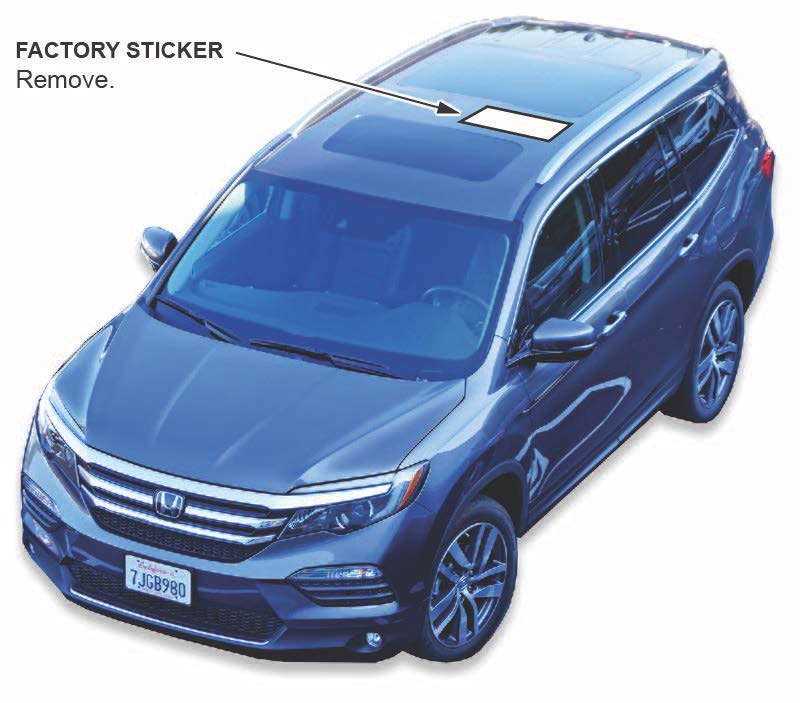
Carefully remove the exterior protective coatings. See S/B 03-080, Removal of Protective Coatings During PDI. Also, be sure to remove the factory sticker from the roof.
2. Install the Fuses
To prevent battery drain during vehicle shipping, the No. 26 BACKUP (10 A) fuse is removed from the under-hood fuse box and stored in the glove box. Make sure the ignition is turned to OFF before reinstalling the fuse.
Vehicle Interior
3. Remove the Interior Protective Coverings
There are several protective coverings on the interior trim pieces and some areas of the carpet. Carefully remove all of them with clean hands to avoid soiling any surfaces. If any of the interior is dirty, clean it with mild soap or a Honda cleaning product such as Leather & Vinyl Cleaner (P/N 08700-9214) or Carpet Spot Remover (P/N 08700-9215).
4. Install the Floor Mats
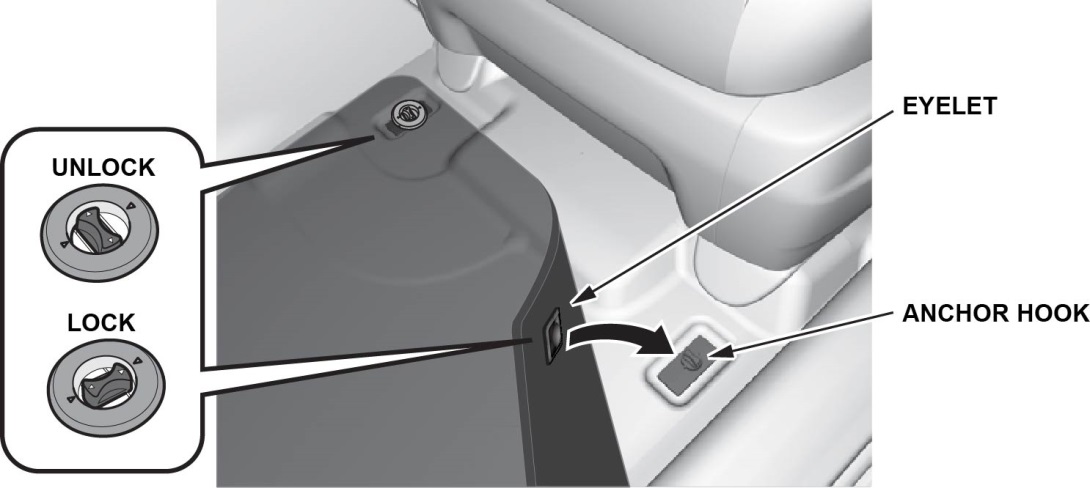
Be sure to place the eyelets in the driver’s and front passenger’s floor mats over the anchors in the floor and turn the knobs clockwise to the lock position. Also do the same for the second row floor mats. The anchors for those mats are under the front seats.
5. Check the Battery
Depending on the trim level, this vehicle comes with either a conventional flooded lead acid (FLA) battery or the new absorbed glass mat (AGM) battery. Here is the breakdown:
- LX, EX, and EX-L: FLA
- Touring and Elite: AGM
Each battery type has its own uniquely tuned charging and battery management systems, therefore cannot be interchanged.
To ensure long battery life and that the customer gets a fully charged battery as outlined in S/B 89-003, Battery Maintenance at Dealers, it must be checked at these times:
- When the vehicle first arrives at the dealership
- During the PDI, if done at a later date
- At regular intervals
- Just before vehicle delivery
If the vehicle will be kept in long-term storage, be sure to remove the No. 26 BACKUP (10 A) fuse.
Test the battery with the ED-18 battery tester using S/B 88-023, Battery Testing and Replacement. Make sure the ED-18 has the latest software installed before using it. See S/B 09-045, ED-18 Battery Tester Update Information.
If the test results show GR8 DIAGNOSTIC NEEDED, you must charge the battery with the GR8 battery diagnostic station. Make sure the GR8 has the latest software installed before using it. See S/B 09-060, GR8 Battery Diagnostic Station Update Information.
NOTE: When charging an AGM battery, always select AGM. Serious damage can result if you select FLOODED (FLA). Also, make sure you connect the negative battery lead to the negative battery post; its handle contains a temperature probe. The GR8 monitors battery temperature during charging so that it does not overheat and destroy the battery.
Write down the GOOD BATTERY 10-digit code in the PDI and Final Delivery Checklist booklet. During the PDI, write down the code in the “Under Hood (Engine Cold)” section. Then, at vehicle delivery, write it down in the “Final Inspection (At Delivery)” section.
Vehicle Exterior (Vehicle Raised to Full Height)
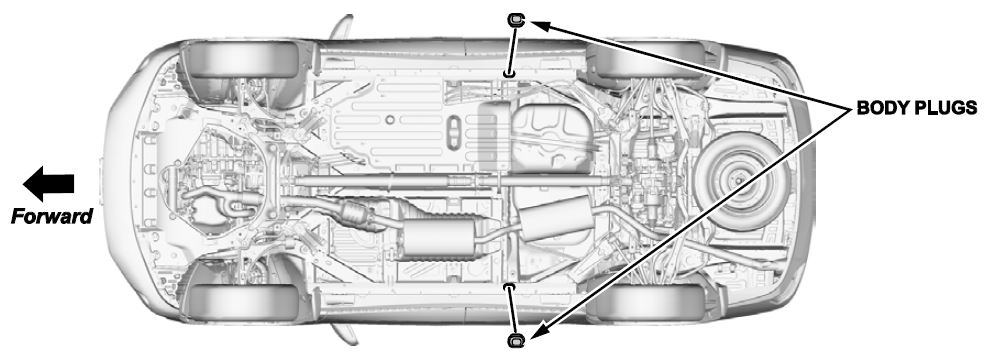
6. Install the Body Plugs
Install the body plugs on each side of the vehicle as shown.
Vehicle Exterior (Vehicle Lowered to Half-Height)
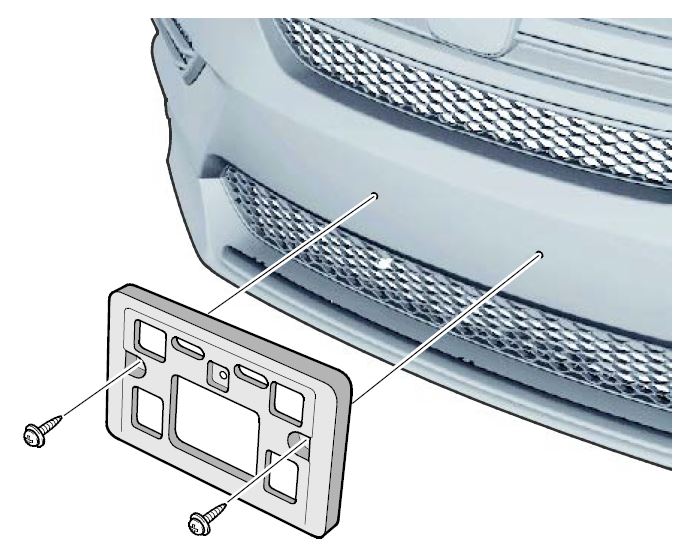
7. Install the Front License Plate Holder
If state regulations require the use of a front license plate, do this:
- Find the two dimples near the middle of the front bumper.
- Center the holes in the front license plate over the dimples, then attach the holder with the two long Philips-head screws.
The remaining screws in the kit are for attaching the front and rear license plates.
Vehicle Exterior (Vehicle Lowered to Ground)
8. Set the Tire Pressures
To prevent flat spots during vehicle shipping and storage, the tires are inflated to over 40 psi. If the vehicle is going into dealer storage, leave the tire pressures at 40 psi until it is sold (see the “Perfect Delivery Action Plan”).
If the vehicle is moved to the sales lot or is sold, adjust the tire pressures as follows:
NOTE:
- Be sure to follow this procedure exactly as written. If you fail to do this, the MID may not show the tire pressures.
- If you are in a cold climate region, make sure the tires are at the same temperature as the outside air before adjusting the pressures; otherwise, the Low Tire Pressure/TPMS indicator may come on in cold weather.
- Turn the ignition to ON.
- Use a tire pressure gauge with a bleeder valve to quickly lower the pressure in each tire to around 28 psi.
- Set the pressure in each tire to the recommended value listed on the driver’s doorjamb label and check it with a hand-held gauge.
- Test-drive the vehicle for at least 2 minutes above 15 mph. If the MID does not show the tire pressures, make sure you completed the test drive as specified.
Be sure to check the pressure in the spare tire (if equipped).
9. Do the Idle Learn Procedure
To ensure a steady engine idle, do the applicable idle learn procedure after installing the No. 26 BACKUP (10 A) fuse.
NOTE:
- This procedure must also be done after updating or replacing the PCM. If does not need to be done after clearing DTCs.
- Failure to do this procedure correctly may result in poor shift quality and DTC P2638 (torque management feedback signal A range performance).
All Except Touring and Elite
- Make sure all electrical items (A/C, audio unit, rear window defogger, lights, etc.) are turned off.
- Start the engine and let it reach operating temperature (the cooling fans cycle twice).
- Let the engine idle for 10 minutes with the throttle fully closed.
Touring and Elite
- Make sure all electrical items (A/C, audio unit, rear window defogger, lights, etc.) are turned off.
- Start the engine and let it reach operating temperature (the cooling fans cycle twice).
- Let the engine idle for 10 minutes with the throttle fully closed.
- Turn the ignition to OFF.
- Jump the SCS line with the HDS.
- Wait 60 seconds, then exit the SCS mode.
10. Do the CKP-Pattern Learn Procedure
To ensure proper engine operation, do the CKP-pattern learn procedure after doing the idle learn procedure. NOTE:
- Make sure all electrical loads (A/C, heated seats, audio unit, etc.) are turned off before doing this procedure.
- Failure to do this procedure correctly may result in poor drivability along with misfire DTCs.
All Except Touring and Elite
- While driving on a level road, decelerate (with the throttle fully closed) from 2,500 rpm to 1,000 rpm with the shift lever in Low.
- Repeat step 1 three times.
Touring and Elite
- While driving on a level road, decelerate (with the throttle fully closed) from 2,500 rpm to 1,000 rpm with the transmission in 2nd gear.
- Repeat step 1 three times.
Vehicle Interior
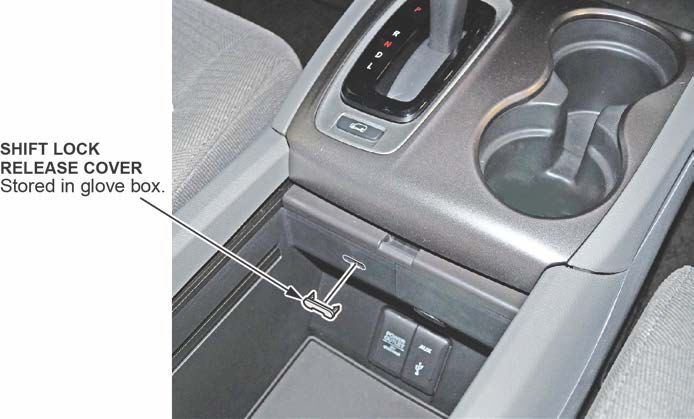
11. Install the Shift Lock Release Cover
Install the shift lock release cover as shown.
SHIFT LEVER MODEL SHOWN
12. Check Remote Engine Start Operation (All Except LX)
Starting the Engine
NOTE: Make sure all doors, the hood, and the tailgate are closed before remotely starting the engine.
Press the Lock button, then, within 5 seconds, press and hold the Remote Engine Start button. When the engine starts to crank, release the Remote Engine Start button. The engine will run for 10 minutes. If the engine did not start, the remote was not able to communicate with the vehicle.
While the remote engine start is on, the climate control system adjusts the cabin temperature, the security system stays on, and the gauges, exterior lights, and accessories stay off. Even though the engine keeps running when you open the driver’s door with the remote, you need to press down on the brake pedal and press the ENGINE START/STOP button to turn on the gauges, exterior lights, and accessories, and to shift out of Park.
Stopping the Engine
The engine will stop running after 10 minutes. If you want to stop the engine before that time is up, press and hold the Remote Engine Start button until the engine shuts off. If the engine does not shut off, the remote was unable to communicate with the vehicle.
13. Check Parking Brake Adjustment
The parking brake pedal should lock within 9 to 11 clicks with 294 N·m (66 lb-ft) of force applied. If it does not lock within this specification, adjust the parking brake cable.
Remember that cable tension is critical. If you adjust the cable too loose, the parking brake might not sufficiently hold the vehicle and the cable may rattle while driving. If you adjust it too tight, the parking brake may drag or overheat. An over-tightened cable can also cause the parking brake shoes to lift off the anchor block and rattle while driving.
14. Initialize the Audio-Navigation Unit Anti-Theft Function and Set the AM/FM Audio Unit Presets
Models Without Navigation
- After installing the No. 26 BACKUP (10 A) fuse, turn the ignition to ON, then press and hold the audio unit power button for at least 2 seconds. This synchronizes the audio unit with the vehicle and initializes the system for use.
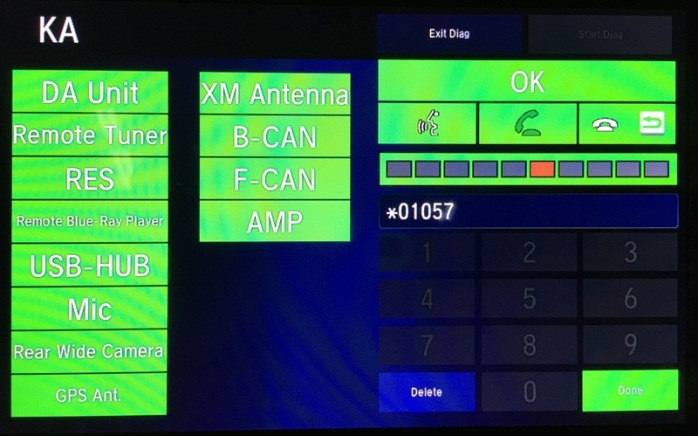
NOTE: You may see the factory In Line Diag screen. If so, follow these steps to complete the in-line diagnosis. If not, skip them and go to step 2.
- Select Start Diag.
- Press all of the buttons on the steering wheel that you see on the screen. The icons should turn green.
- Make a loud sound (like snapping your fingers or clapping your hands) next to the microphone to complete the mic test.
- When you have completed all of the tests, the icons will be green. Select Exit Diag to exit the screen.
- Turn the ignition to OFF, then to ON, to make sure the In Line Diag screen does not reappear.
- Enter a local AM or FM station on all of the audio unit presets. To enter a station, tune to it, change the screen to the preset screen, then press and hold the preset number that you want that station stored at.
Models with Navigation
- Do S/B 15-034, 2016 Pilot: PDI of the Navigation System.
- Enter a local AM or FM station on all of the audio unit presets. To enter a station, tune to it, change the screen to the preset screen, then press and hold the preset number that you want that station stored at.
15. Set the Clock (Models Without Navigation)
To set the clock, follow these steps:
- Turn the ignition to ON.
- Press the MENU/CLOCK button.
- Select Adjust Clock.
- Select the hour and adjust as needed.
- Select the minutes and adjust as needed.
- Select Set when done.
16. Set the Compass Zone (Models Without Navigation)
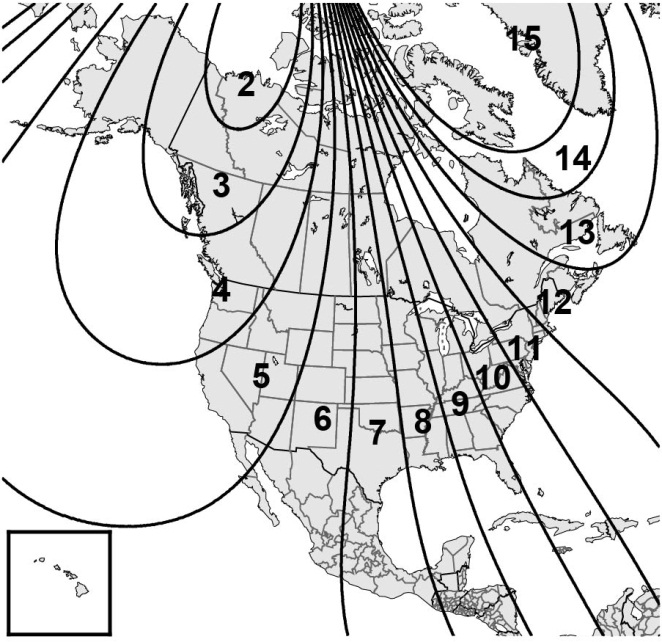
In most areas, there is a variation between magnetic north and true north. At the PDI, the compass zone needs to be set to your geographic zone to compensate for this variation. To set the compass zone, do this:
- Turn the ignition to ON.
- From the top screen of any audio source, press and hold MENU for 5 seconds. The display switches to the Compass settings
- Select Zone Adjust. The display shows the current zone number the system is set to.
- Select the zone number of your area.
- Select BACK to exit the menu.
17. Check the Compass Calibration (Models Without Navigation)
If the compass shows the wrong direction or the CAL indicator blinks, manually calibrate the system with this procedure:
- Turn the ignition to ON.
- On the top screen of any audio source, press and hold MENU for 5 seconds. The display switches to the Compass settings
- Select Calibration, then Calibration Start. The CAL indicator should start blinking above the compass direction box.
- Drive the vehicle slowly in two complete circles. The compass should show a direction and the CAL indicator should go off.
18. Check/Refresh the SiriusXM® Radio Dealer Demo Service (Except in Alaska and Hawaii)
The audio system comes from the factory activated with the SiriusXM® Radio dealer demo service. Once you install the No. 26 BACKUP (10 A) fuse, the system receives the full range of available channels. You can see a full list of channels at www.siriusxm.com.
While watching the display, tune to several channels within the full channel lineup. If you can tune to all of the channels, the dealer demo service is activated.
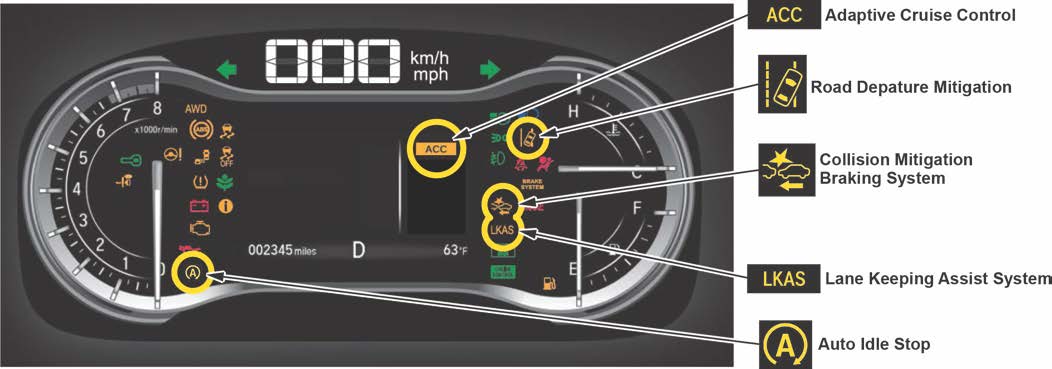
19. Check the ACC, Collision Mitigation Braking System, LKAS, Road Departure Mitigation, and Auto Idle Stop Indicators (If Equipped)
When you first turn the ignition to ON, these indicators should come on for a few seconds and then go off:
- ACC (Adaptive Cruise Control)
- Collision Mitigation Braking System
- LKAS (Lane Keeping Assist System)
- Road Departure Mitigation
- Auto Idle Stop
20. Check Bluetooth® HandsFreeLink® (HFL)
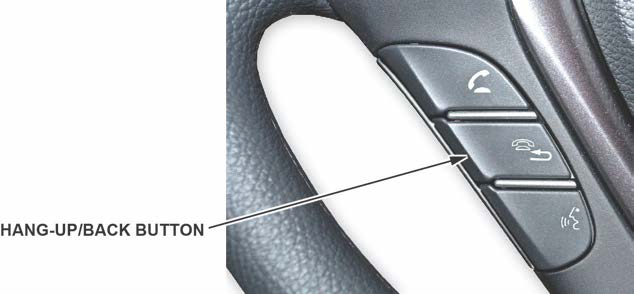
To ensure HFL works and is ready to use, start the engine, then press and hold the Hang-up/Back button on the steering wheel for 10 seconds. You should hear “The TCU is OK.” If you do not hear this message, see the service information for troubleshooting information.
21. Check the Driver’s and Front Passenger’s Window Auto Up/Down Feature
Make sure the driver’s and front passenger’s window auto up/down feature works right. From the main switch control, when you firmly press the window switch and then release it, the window should fully open; when you firmly pull back the switch and release it, the window should fully close.
If it does not work right, initialize the auto up/down feature for each front window (once from the driver’s seat and once from the front passenger’s seat) as follows:
- Make sure the window is fully closed, then press and hold the window switch until the window opens all the way.
- Pull back the window switch and hold it until the window is fully closed. Keep holding the switch for another 2 seconds.
- Check the auto up/down feature. When you firmly press the window switch and release it, the window should fully open; when you firmly pull back the switch and then release it, the window should fully close. If the window does not work this way, repeat the initialization.
NOTE: Initialize the auto up/down feature after replacing any window parts or installing accessory door visors. Initialization is not needed after disconnecting/reconnecting the battery.
22. Check the Moonroof One-Touch Feature (EX-L, Touring, Elite)
Make sure the moonroof one-touch feature works properly:
- When you firmly pull the moonroof switch back and release it, the moonroof should fully open.
- When you firmly push the switch forward and release it, the moonroof should fully close.
- When you push up on the switch and release it, the moonroof should tilt.
If the moonroof does not work properly, do this procedure to reset the control unit:
NOTE: This procedure must be done after replacing any moonroof component or after installing the accessory moonroof visor. It does not need to be done after disconnecting the battery.
- Close the driver’s door and leave it closed until the procedure is finished.
- Push up on the moonroof switch to put the moonroof in the tilt position.
- Turn the ignition to OFF.
- While pushing up and holding the switch, turn the ignition to ON.
- Release the switch and turn the ignition to OFF.
- Repeat steps 3 and 4 four more times.
- Firmly pull the switch back and hold it until the moonroof fully opens.
23. Check the Panoramic Glass Roof Sunshade Auto Feature (Elite)
Make sure the sunshade auto feature works properly:
- When you firmly pull the sunshade switch back and release it, the sunshade should fully open.
- When you firmly push the sunshade switch forward and release it, the sunshade should fully close. If the sunshade auto feature does not work properly, do this procedure to reset the control unit:
NOTE: This procedure must be done after replacing any sunshade component. It does not need to be done after disconnecting the battery.
- Firmly pull the sunshade switch back and hold it.
- Turn the ignition to ON.
- Release the sunshade switch.
- Turn the ignition to OFF.
- Repeat steps 1 thru 4 at least four times. This should clear the sunshade position from the control unit’s memory and allow just manual operation.
- To relearn the position, firmly push the sunshade switch forward until the sunshade fully closes and you hear the motor shut off.
The sunshade auto feature should now work properly.
24. Set Up the Rear Entertainment System (If Equipped)
The rear entertainment system (RES) lets front seat passengers listen to one audio source through the speakers, while the second and third row passengers watch a DVD or listen to a different audio source through wireless headphones. The vehicle comes with two sets of headphones. There are also two audio jacks with individual volume controls at the back of the center console for wired headphones. For more information, see the navigation manual.
To ensure the RES is working right, follow this procedure:
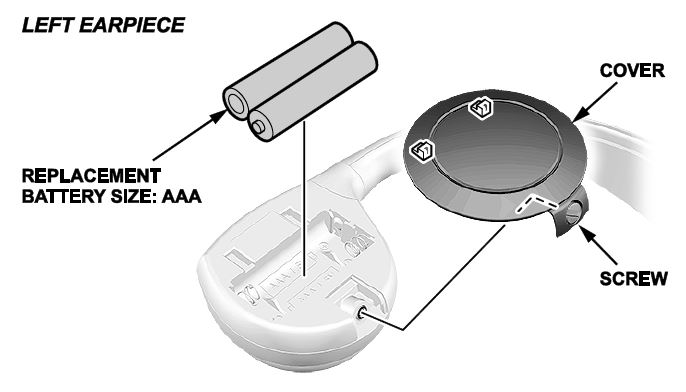
- Install two AAA batteries into the left earpiece of each set of headphones as shown.
- Turn the ignition to ACCESSORY or ON, then insert a DVD into the DVD player. Press the OPEN button on the overhead screen to lower it.
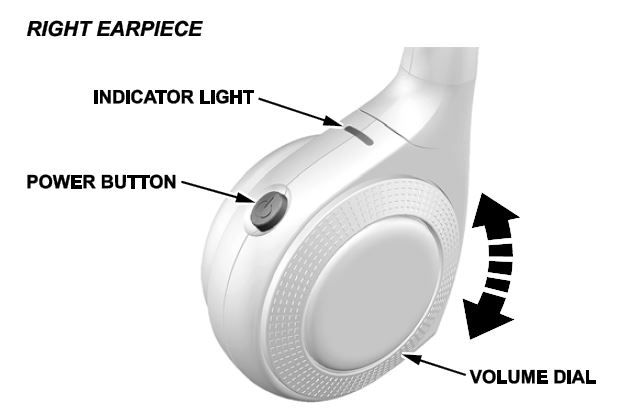
- Press the power button on the right earpiece and adjust the volume with the volume dial.
- Repeat step 3 for the other set of headphones.
NOTE: The wireless headphones work only in the second and third row seats. They do not work in the front seats or outside the vehicle. Customers can order extra headphones from your parts department.
NEW MODEL SERVICE INFORMATION
1. New A/T and ATF (Touring, Elite)
The Touring and Elite models are the first Hondas to come with a 9-speed A/T. Use only ATF Type 3.1 or higher. Do not use ATF Type 2.0 or any other ATF.
There is no need to check the ATF level in this transmission. Just inspect it for external leaks. If you find any, see the service information for troubleshooting information.
2. Auto Park Mode (Touring, Elite)
By design, Park is automatically engaged when the ignition is turned to OFF or when all of these conditions are met:
Always apply the brake pedal and shift to Park when idling or when exiting the vehicle. If you select any gear other than Park with the driver’s door open and the driver’s seat belt unbuckled, Park is reengaged when you release the brake pedal.
3. Car Wash Mode (Touring, Elite)
If you need to run the vehicle through an unattended conveyor-style car wash, make sure the wiper lever is turned to OFF, then follow these steps:
- With the engine running, apply the brake pedal and select Neutral on the electronic gear selector.
- Within 5 seconds, press the ENGINE START/STOP button. The ignition goes to ACCESSORY.
- Look for the message Shift to Park in the MID. This tells you the car wash mode is set. You will then have 15 minutes before the vehicle automatically shifts to Park and shuts off. You may now exit the vehicle.
4. Auto Idle Stop Feature (Touring, Elite)
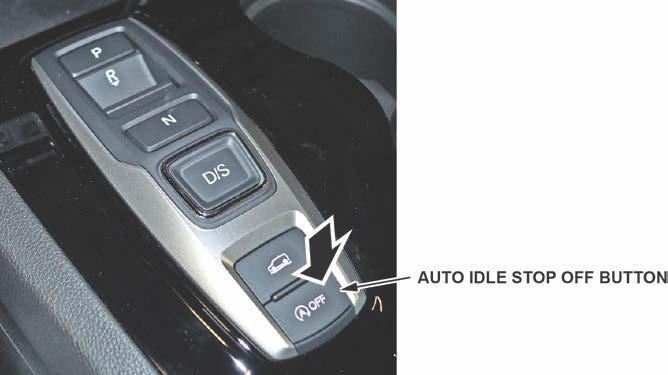
The auto idle stop feature automatically stops and restarts the engine to help maximize fuel economy, depending on environmental and vehicle operating conditions. Press the Auto Idle Stop OFF button on the electronic gear selector to turn the system on or off.
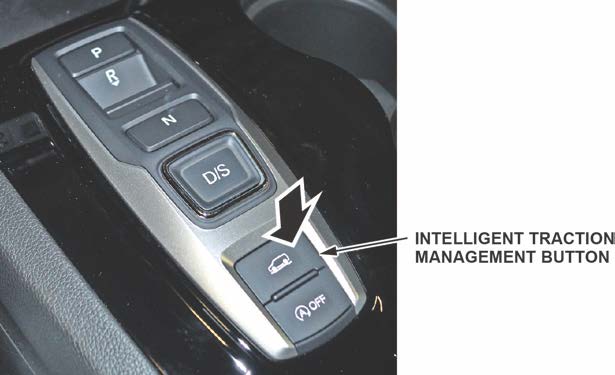
5. Intelligent Traction Management (All Except LX)
This system adjusts vehicle handling and performance to maximize the use of available traction when accelerating from a stop and while driving on different road surfaces.
Press the Intelligent Traction Management button to select the appropriate mode.
The mode you select appears on the MID:
- Normal (2WD, 4WD): Provides balanced driving performance on most road surfaces.
- Snow (2WD, 4WD): Use when driving on snowy road surfaces.
- Mud (4WD): Use when driving on muddy road or off-road surfaces. • Sand (4WD): Use when driving on soft, sandy road or off-road surfaces.
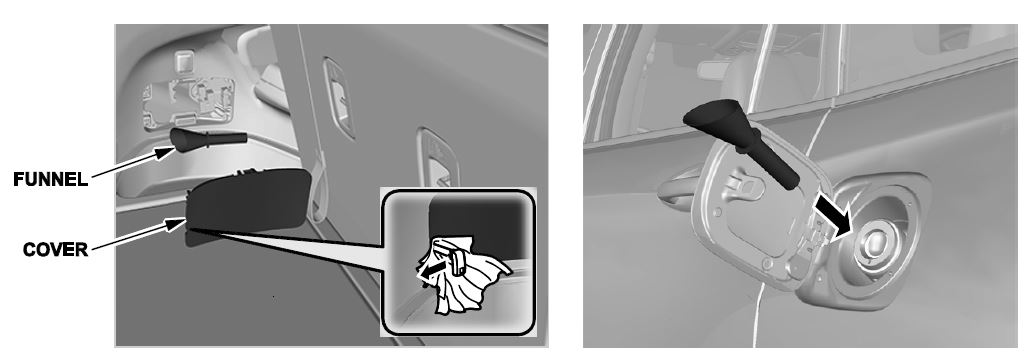
6. Capless Fueling System
This vehicle does not have a fuel fill cap. The system is sealed with an internal flapper instead.
A funnel is included to allow manual refueling from a portable fuel container. It is stored on the inside of the cover for the manual fuel door release. For more information, see the owner’s manual.
7. Blind Spot Information with Cross-Traffic Monitoring (Elite)
This vehicle comes with a blind spot information/cross-traffic monitoring system. For details, see Online University self-study module ECC05, BSI/CTM System.
8. Adaptive Cruise Control (ACC) and Collision Mitigation Braking System (CMBS) (If Equipped)
The ACC and CMBS work using a windshield-mounted camera, a radar unit mounted behind the front grille, and the VSA system.
9. Lane Keeping Assist System (LKAS) and Road Departure Mitigation (RDM) (If Equipped)
The LKAS and RDM use a windshield-mounted camera.
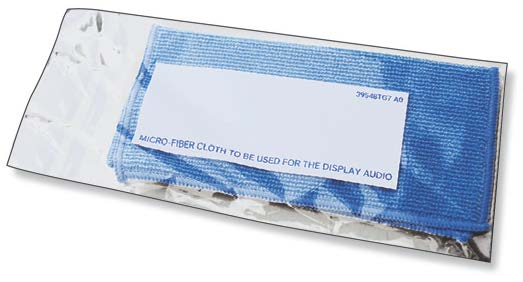
10. Micro-Fiber Cloth
The Display Audio (DA) has a high-gloss, anti-glare touch screen. However, smudges may still occur from use. To help customers care for this screen, the vehicle comes with a micro-fiber cloth in the glove box for cleaning. Insert this cloth in the Owner Information Kit. Do not remove this cloth from the vehicle.
 Loading...
- [Pro OBD2 Scanner] - BlueDriver is the easiest way to scan and understand your vehicle like a professional mechanic. Read and clear your car’s trouble codes and check engine light.
- [Read & Clear All The Codes] - BlueDriver's enhanced vehicle diagnostics gives you access to information normally available only to mechanics on their OBD2 scan tools. Now you can read and clear ABS, Airbag, SRS, TPMS codes, and many more.
- [Get The Right Fix & View Live Data] - Much more than a car code reader, BlueDriver is a diagnostic tool. You’ll get unlimited repair reports with possible causes and fixes, plus real-time health monitoring while you drive with the live data feature.
- [Wireless & Bluetooth Enabled] - Say goodbye to wires. BlueDriver connects with Bluetooth via your phone/tablet to a sensor that plugs into your car's OBDII port. Get all of the capabilities of an expensive code reader & scan tool without any annoying wires.
- [User-Friendly App and Repair Videos] - BlueDriver gives you more ways to scan and fix your vehicle. Our iOS & Android app connects you to a large database of repair videos with step-by-step directions of repairs.
- [Easy to Use--Work out of box] + [FOXWELL 2025 New Version] FOXWELL NT604 Elite scan tool is the 2025 new version from FOXWELL, which is designed for those car owners who want to figure out the cause issue before fixing the car problem via scanning the most common systems like abs srs engine and transmission.The NT604 Elite diagnostic tool comes with latest software, which can be used out of box. No need to waste time to download the software first.
- [Affordable] + [Reliable Car Health Monitor] Will you be confused what happen when the warning light of abs/srs/transmission/check engine flashes? Instead of taking your cars to dealership, this foxwell scanner will help you do a thorough scanning and detection for your cars and pinpoint the root cause. It will t-urn off the warning light car after the problem is fixed.👉TIPS: Airbag crash/collision data can NOT be cleared even you replace the new airbag.
- [5 in 1 Diagnostic Scanner] Compared with those auto scanners (50-100), NT604 Elite code scanner not only includes their OBDII diagnosis but also it can be an abs/srs scanner, transmission and check engine code reader. When it’s an odb2 scanner, you can use it to check if your car is ready for annual test through I/M readiness menu. In addition, live data stream, built-in DTC library, data play back and print, all these features are a big plus for it. Note: doesn't support maintenance function.
- [Fantastic AUTOVIN] + [No extra software fee] Through the AUTOVIN menu, this NT604 Elite car scanner allows you to get your V-IN and vehicle info rapidly, no need to take time to find your V-IN and input one by one. What's more, the NT604 Elite abs srs scanner supports 60+ car makes from worldwide (America/Asia/Europe). You don’t need to pay extra software fee.
- [Solid protective case KO plastic carrying bag] + [Lifetime update] Almost all same price-level obd scanner diagnostic tool only offers plastic bag to hold on the scanner.However, NT604 Elite automotive scanner is equipped with solid protective case, preventing your obd2 scanner from damage. Then you don’t need to pay extra money to buy a solid toolbox.
- Pro-level ABS SRS OBD2 Scanner - Based on the NT301 FOXWELL Scanner, this car scanner takes OBD-II diagnostics to the next level by in-depth insights on reading ABS SRS Diagnostic Trouble Codes, display the Live Data: Wheel Speed Sensor, Airbag Issues, Wiring Faults, clear the ABS error codes after the car faults repaired, etc... NOTE: This code reader can only read SRS codes but CANNOT reset any Airbag crash codes. Please check the functions coverage BEFORE purchasing. NO Need to Register &Subscription.
- Full-Feature ABS Diagnostics - Real-time tracking of wheel speed sensor, brake force distribution, and brake pressure with dynamic graphs for easy analysis. Effortlessly read ABS trouble codes and access freeze frame data to identify and resolve system issues. This ABS scanner diagnostic tool also monitors ABS performance during emergency braking or on slippery surfaces, providing alerts for potential problems.
- Basic OBDII Scanner Functions - This obd2 scanner diagnostic tool also can Check Engine Fault Light, diagnose OBD-II modules instantly, display the Live Data with graph (engine RPM, coolant temperature, fuel trim, and sensor readings), locate bad sensors and indicate I/M readiness status before the annual inspection. Reducing the potential driving risk and keep a peak performance on the road.
- Top ABS Bleed Scan Tool - After replacing the ABS pump or adding brake fluid, air can enter the ABS module, causing the pedal to feel weak or slow to return. This OBD2 scanner with ABS auto bleed will restore your brake pedal’s firmness by efficiently removing air from the ABS module. For vehicle coverage, check the FOXWELL Diagnostic Coverage List under Support on the official site. NOTE: This feature is NOT compatible with vehicles that support manual bleed.
- User-Friendly & Budget-Friendly - Enjoy software updates without subscription for newer vehicle models(Any more issues about update, please let us know). This car code reader comes with a sturdy case for easy carrying. The code reader for cars will also save diagnostic data to avoid unnecessary diagnostic costs when you must to find the professional mechanic to fix the car faults instead of addressing them by yourself.
- [ABS Diagnosis] - Quickly identify and resolve ABS-related issues, including sensor faults (such as wheel speed sensors), wiring problems (faulty circuits or connectors within the ABS system), or ABS pump failures (malfunctions in the ECU controlling the ABS). Ensure proper system operation, restore optimal braking performance, and clear any warning lights.
- [SRS Diagnosis] - Quickly detect the airbag ECU itself, airbag sensor failure, airbag system plug disconnection or poor contact, seat belt sensor failure, or system error, etc, to ensure that the SRS (Supplemental Restraint system) is working properly. After repair, reset the system to clear the warning light and restore full safety performance. NOTE: It cannot reset Airbag crash or transmission codes.
- [Full OBD2 Function] - Read and clear trouble codes for all OBD2 systems, including show real-time data, freeze frame data, I/M Readiness, DTC lookup, test results for o-xygen sensor, On-board monitor test, request vehicle information, component test, modules present and e-vap test. Allowing you to quickly identify and troubleshoot vehicle issues.
- [AutoVIN Technology] - It simplifies diagnostics by automatically identifying the vehicle’s model and configuration, eliminating the need for manual input, and ensures accurate diagnostics by applying the correct data and algorithms, reducing errors caused by manual entry. Improves efficiency and streamlines the diagnostic process.
- [ABS Auto Bleeding] - Helps bleed your vehicle's Anti-lock Braking System (ABS), removing air from the brake lines to ensure optimal brake performance. It helps prevent brake issues such as spongy pedals, inconsistent braking, and reduced stopping power, and enhances vehicle safety by ensuring the ABS system is working properly, especially during critical driving situations. NOTE: It’s not compatible with vehicles that only support manual bleeding.
- [Transform Your Car Care Experience] - With BLCKTEC, instantly become your own professional mechanic. Effortlessly read and clear your car’s trouble codes and check engine light, ensuring your vehicle stays in top condition.
- [Empower Yourself with Comprehensive Diagnostics] - Unlock the full potential of your vehicle with the BLCKTEC 430. Access detailed diagnostics previously exclusive to professional mechanics’ OBD2 scan tools, including ABS, Airbag, SRS, TPMS codes, and beyond, right at your fingertips.
- [Drive with Confidence] - The BLCKTEC 430 is more than just a car code reader; it's your personal vehicle health advisor. Receive tailored repair reports with potential causes and verified solutions for your specific make and model, guiding you to the right fix every time.
- [Seamless Connectivity, Ultimate Convenience] - Experience the freedom of wireless diagnostics with this portable car scanner. Easily connect via Bluetooth to our intuitive sensor and enjoy all the functionalities of high-end scan tools without the clutter of wires, directly from your smartphone or tablet. To connect the tool to the App, please DO NOT go to device's Bluetooth settings, instead, open RepairSolutions2 App and follow the instructions on the App to pair the BLCKTEC 430.
- [DIY Repairs Made Easy] - Navigate car maintenance with ease using our premium app. Access a vast library of easy-to-follow repair videos, guiding you through each step of the repair process, compatible with both iOS & Android devices.
- 【UPGRADE OF NT604-POWERFUL 5 RESETS】Wanna to do maintenance service for your car however the basic 4 system scanner tool can't do it? Then FOXWELL NT614 Elite-the upgraded version of nt604, was born for providing you with 5 special functions-ABS Bleeding/Oil Reset/SAS Calibration/EPB Reset/Throttle Reset. These functions are enough for your daily needs. No need to buy those 300-600 dollors obd2 scanner. Saving your unnecessary repair fee with FOXWELL nt614 car scanner diagnostic tool!
- 【ENGINE/ABS/SRS/TRANSMISSION CODE READER】Don't know what's wrong with your car when the warning light of ABS, transmission, SRS, Engine flashes? NT614 Elite obd2 scanner can pinpoint the problem components. It boasts many functions of engine, abs, srs and transmission such as read & erase fault codes and grapgh live data like engine temp, wheel speed sensor, read transmission temperature, etc. Compared with car repairs, using foxwell nt614 elite is more convenient and a-ffordable.
- 【Best Bang For Your Buck!-FOXWELL NT614 Elite】1. 2025 New software-faster than old one. 2. One click lifetime WIFI f-ree update, no need to use the annoying Micro SD card. 3. New Update-No need to register on the FOXWELL website before use, more convenient! 4. More intuitive viewing with new interface, you can find I/M, Battery Test, DTC Lookup directly.
- 【ABS BLEEDING OBD SCANNER】Do you always feel the brake pedal was slowly sinking to floor or it's loose after doing a complete front & rear brake job? And then you need to take more time than normal to stop your car, which is very dangerous. That's because when you open the brake system to replace components, air gets inside. To get a firm brake pedal, the air need to be removed by bleeding the brakes. NT614 Elite odb2 scanner can do ABS BLEEDING perfectly for your cars.
- 【SMART AUTOVIN & LIFETIME F-REE WIFI UPDATE & PERFECT GIFT CHOICE】With the fantastic AUTOVIN function, this nt614 scan tool can get your VIN and vehicle info rapidly. No need to spend much time in finding your VIN and input it one by one. Also, the lifetime f-ree wifi update is provided for more vehicle coverage, bug fixes, newly added parameters. SAVE AT LEAST 1000+ PER YEAR. And this automotive scanner is a best gift for your Dad, Husband, Boyfriend and Handy Men.
- 2025 FOXWELL Scanner NT716: New Bidirectional Scan Tool – Get active test capabilities for ABS, Airbag, Transmission, and Engine systems, easily perform various tests such as injectors, Cooling Fan, Fuel Pump, etc.The price of $ 200+ enjoys a $ 300-500 code reader service! With the NT716 Scanner Diagnostic Tool, You only need to plug in the device to accurately obtain real -time data information. To understand whether your car's system actuator is normal, prevent danger in advance, and drive with confidence. 👉P.S. The active test function needs to be upgraded before it can be used.
- 4-System Car Scanner for ABS, Airbag, Transmission, and Engine – Easily read error codes and ECU information, view 4-in-1 live data, and save or download data for later reference. The built-in DTC library explains fault codes clearly, and once issues are fixed, you can clear codes and turn off warning lights with just one tap. FOXWELL NT716 Code Scanner empowers you to handle most diagnostics on your own, saving you time and money instead of relying on an elusive mechanic.
- 9 Reset Functions – Unlike other obd2 scanner diagnostic tools in this price range that offer only 5–7 resets, FOXWELL NT716 scan tool supports 9 essential reset functions, including ABS Bleeding, SAS, Oil Light, EPB, BMS, DPF, Throttle Relearn, Injector Coding, and TPMS. You can monitor the running status of various systems of the car by live data flow, identify potential problems, reset system data, and extinguish the flashing oil lamp fault light! ❗Notice:This product does NOT have special functions for car k-ey p-rogramming.
- Full OBD2 Scanner with Plug-and-Play – Enjoy comprehensive OBDii functions, including AutoVIN for automatic vehicle info recognition, one-click I/M Readiness for emissions checks, real-time data, and freeze frame capture… Scanner FOXWELL NT716 makes it easy to prepare for annual inspections, helping you stay road-ready with confidence each year.
- 5.5" HD Touchscreen Tablet Diagnostic Scanner– Get rid of the confusion caused by the 2.8" scanner with multi - button operation; Built -in 4000mAh battery, the new version of the battery life is greatly enhanced; No subscription fee, no additional charges, share reports anytime, one - click free WiFi upgrade; Android 9.0 system, 24+language , support 100+ car brands from 1996 to 2025.
- All New AD610 Pro - This remarkable tool has entirely new technology. Unlike other OBD2 scanners that merely support USB upgrades on PC and demand registration, ours offers WiFi updates without any registration requirements, thus saving 90% of the time it takes. Additionally, the operating speed of our new software has increased by 30% and the vehicles' compatibility has risen by 20%. The compatibility depends year and model, please inform VIN for compatible check.
- ABS Diagnosis & Reset - Effectively read and clear ABS error codes or reset ABS-related sensors after repairs. Addresses issues such as front or rear wheel speed sensor failure, sensor voltage irregularities, steering angle sensor faults, yaw rate, or G sensor malfunctions. Ensure safe driving with reliable system performance.
- SRS Diagnosis & Reset - Read and clear SRS error codes or reset SRS-related sensors after repairs. Resolves issues like crash data recorded on the driver side (airbag replacement required), occupant classification system defects, or seat track position sensor malfunctions. Helps avoid airbag failure in an accident.
- Optimal ABS Bleed, Smooth Braking - When there's air in the ABS, it affects braking performance. Our tool helps auto bleed the brake system by purging the air, ensuring no air bubbles in the brake lines, for proper operation and optimal performance. This maintenance task is typically done when replacing brake fluid or servicing brake components, to ensure braking system stability and reliability. Note: this feature is not compatible with vehicles that only support manual bleeding.
- SAS Calibration Essential - Enjoy precision steering and enhanced safety through our SAS calibration feature. By ensuring accurate alignment of your vehicle's steering angle sensor (SAS), SAS calibration delivers precise control, eliminates steering drift, and prevents uneven tire wear. Improve handling and maneuverability on the road, even in challenging conditions, while driving with confidence knowing that your steering system is finely tuned for maximum performance and safety.
- 【User-Friendly CRP123 V2.0 ELITE】Ready to use right out of the box, to the LAUNCH CRP123E/CRP123i, includes Lifetime Software Updates,4 System Scan+3 Reset Services and 5 Years of Backup.
- 【Newly Added 3 HOT Resets】All Level-up LAUNCH CRP123 V2.0 obd2 scanner with 3 Resets : Oil Reset ,Throttle Adaptation,and SAS Reset for LIFETIME! Reset your Oil life system, Optimize your engine with Throttle Adaptation and enhance your vehicle's handling and safety with SAS Reset.
- 【Intuitive Live Data Stream】 The CRP123 V2.0 OBD2 scanner offers a great balance of functionality and affordability. It allows you to view live data streams for the ENGINE, AT, ABS, and SRS systems, including preset or user-oriented data. You can graph, record, playback, and print this data, as well as read and reset codes for the engine, ABS, SRS, and transmission systems.
- 【Comprehensive OBDII Code Reader】 The LAUNCH CRP123 V2.0 scan tool supports all 10 modes of the OBDII standard, ensuring thorough and precise system diagnostics. It can read and clear DTCs, perform smog tests, check I/M readiness, and conduct O2 sensor and EVAP system tests. Additionally, it includes an OBDII code lookup tool and an acronym database to facilitate faster diagnosis and repair.
- 【Engine/ABS/SRS/Transmission Diagnostic Tool】 The Launch CRP123 V2.0 scanner supports generic OBDII codes (P0, P2, P3, and U0) and manufacturer-specific codes (P1, P3, and U1), as well as pending codes and freeze frame data. It monitors I/M readiness, provides live PCM stream data, and graphs up to four live data streams, such as Engine Coolant Temperature, Long & Short Fuel Trim, Accelerator Pedal Position Sensor, Throttle Valve Position, Generator Load Signal, Fuel Tank Pressure, Engine RPM, and Intake Air Temperature. It also clears DTC codes, turns off the MIL, resets monitors, and provides hints for the Data Link Connector (DLC) location.
- Looking for More Professional Vehicle Scan Tool?- iCarsoft OBD2 scan tool can do it all-reads and clears trouble codes on engine system, ABS systems and airbag system, And with ASA reset and EPB reset function. iCarsoft E660 covers more than 40 vehicle makes from 1996-2018 models ( included all USA/ Asia / EU vehicle brand) with OBDII.
- Need Vehicle Full Diagnosis?-Connect to the OBD2 port directly. E660 abs scanner will diagnose all OBDII / EOBD Ten modes of operation modules instantly, live data with full ECU diagnosis, locates bad sensors and guides your maintenance work, Customized diagnostic reports reduces the potential driving risk on the road.
- Updated OBD Scanner, Ideal for Home Mechanics - E660 srs abs scanner auto read vehicle module informaiton & privedes in-depth insights on error code OBD diagnosis- specially abs and srs depth diagnosis on Anti-Lock Brake System & Supplemental Restraint System
- Yes, Easy Car Diagnose - Anti-collision and easy-clean for diagnose work to test all hidden car faults in system. Unique button press sound about the command has been executed or scanning result provides simple clear operation.Extra adding battery checking function, the car scanner will help to enhace safty of car.
- Convenience & Lifetime Upgrade to More Newly Vehicle Models- The obd2 scanner with DTC library for lookup, save & support diagnostic data and data print, avoids second diagnostic fee.Fit for most vehicle models. F-ree upgrade and 5 languages for selection.
Last update on 2025-04-17 / Affiliate links / Images from Amazon Product Advertising API
This product presentation was made with AAWP plugin.

