| “This site contains affiliate links for which OEMDTC may be compensated” |
B15-025
March 31, 2017
06115 Version 2
2016 RLX Sport Hybrid: TQI and New Model Service Information
Supersedes 15-025, dated May 20, 2015, to revise the information highlighted in yellow
REVISION SUMMARY
Under Fluids, the oil was changed to Full Synthetic Engine Oil, P/N 08798-9073.
AFFECTED VEHICLES
| Year | Model | Trim Level |
| 2016 | RLX Sport Hybrid | With Technology Package |
| With Advance Package |
INTRODUCTION
This bulletin covers the total quality inspection (TQI) of the 2016 RLX Sport Hybrid. It includes these procedures:
To do the TQI of the navigation system, be sure to complete Service Bulletin 15-026, 2016 RLX Sport Hybrid: TQI of the Navigation System.
This bulletin also includes this new model service information:
| 1. | VIN Location | 5. | Electronic Parking Brake Operation |
| 2. | Rear Door Sun Shade | 6. | Electronic Gear Selector Operation |
| 3. | Electric Glove Box | 7. | Fluids |
| 4. | Capless Fueling System | 8. | Shift Override |
CLAIM INFORMATION
Flat Rate Time: 1.4 hours
NOTE: This flat rate time includes the TQI of the navigation system.
TQI PROCEDURES
Before Starting Review these items:
- Perfect Delivery documents, especially the information on battery maintenance and tire pressures
- TQI checklist in the maintenance journal
Make sure you record the TQI on the appropriate pages of the maintenance journal. The TQI is not done until this bulletin and the TQI checklist are both complete. Note on the repair order any repairs or problems that cannot be fixed within a few minutes.
Remove all TQI items from the trunk and glove box.
Assemble the Remotes
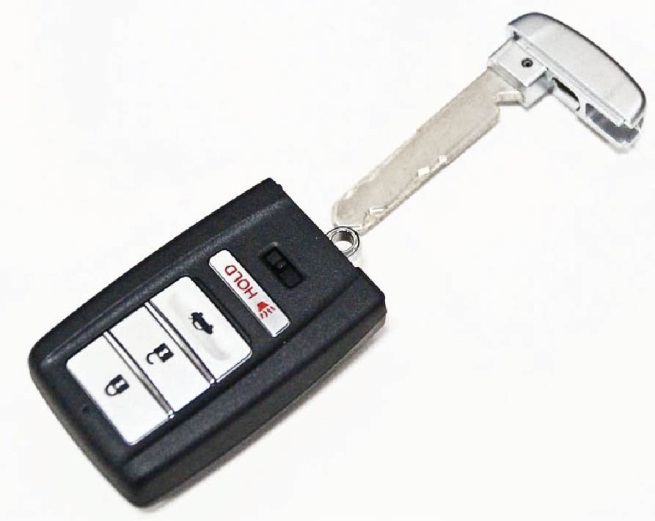
The two remotes and keys are separately packaged and are on the front passenger’s seat. Insert a key into the body of each remote.
Starting the Vehicle Without the Backup Fuse
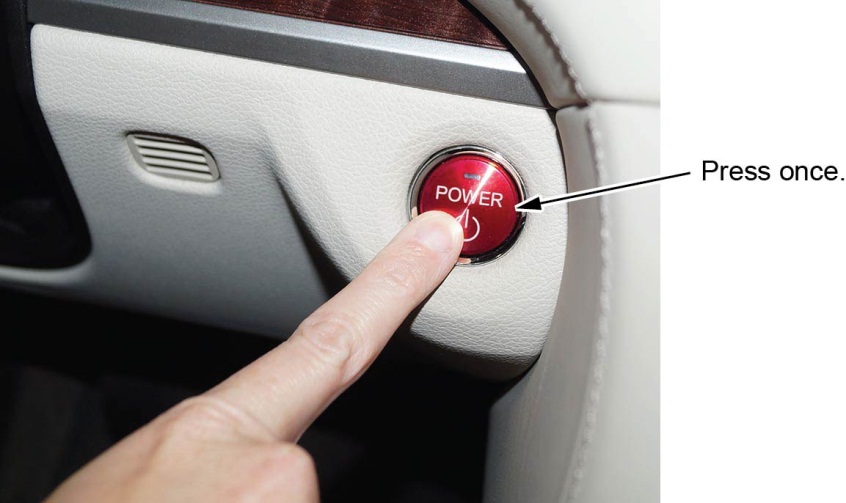
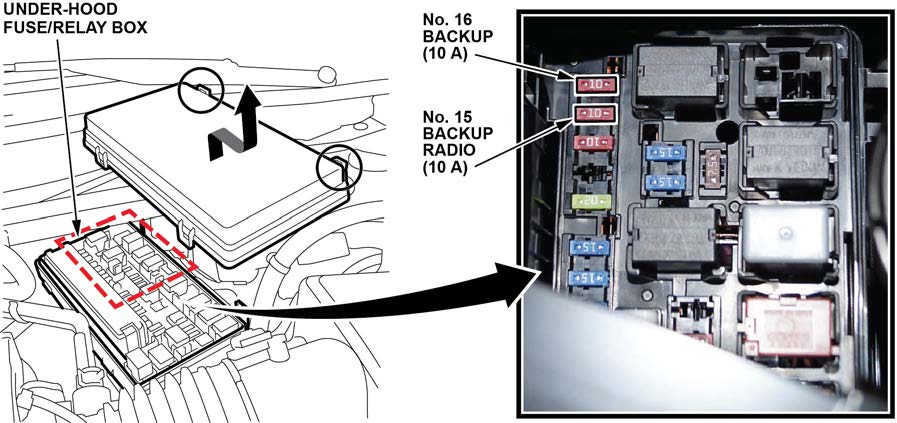
To prevent battery drain during vehicle shipping, the vehicle comes from the factory with the No. 16 BACKUP (10 A) fuse removed from the under-hood fuse/relay box. With it removed, the engine will not start when you apply the brake pedal and press the POWER button.
If you need to move the vehicle before doing the TQI, follow these steps:
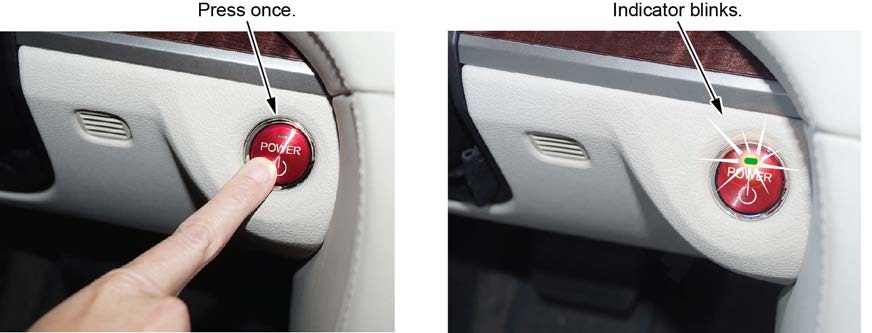
- Press the POWER button once.
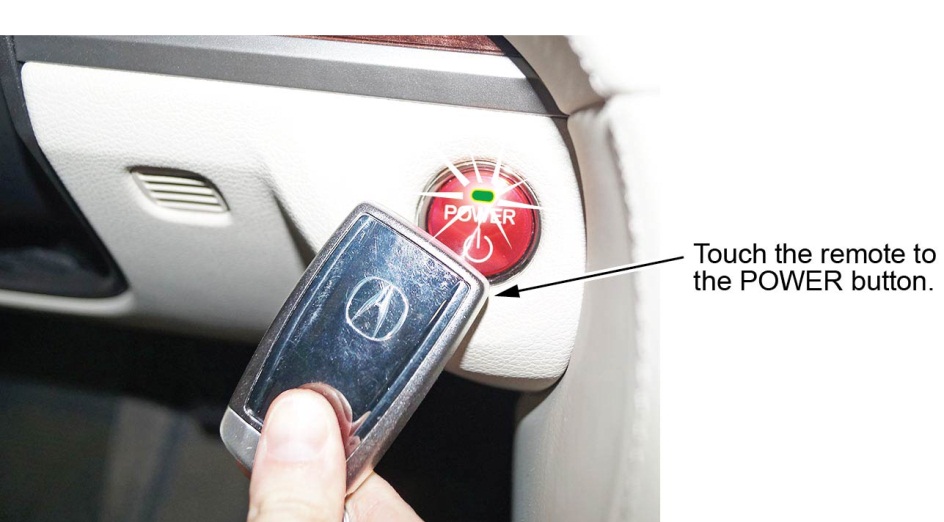
- When the indicator blinks, touch the remote to the POWER button.
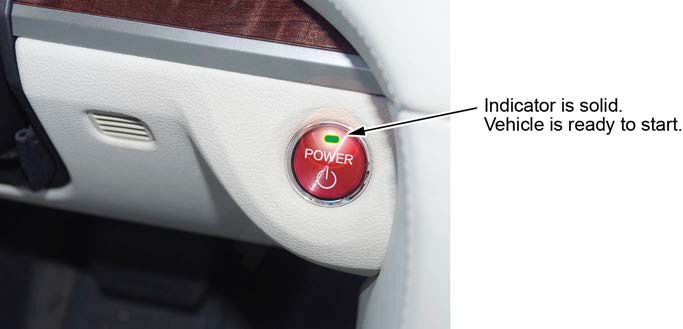
NOTE: The indicator will go from blinking to steady when communication is complete.
- Start the engine by pressing the POWER button while applying the brake pedal. You must start the engine within 10 seconds. If you press the button without applying the brake pedal, the ignition goes to ACCESSORY.
1. Fuel the Vehicle
Make sure the No. 16 BACKUP (10 A) fuse is installed before filling up the fuel tank. If the tank was filled without that fuse, turn the ignition to OFF and let the vehicle sit for 10 minutes. Install the fuse, then turn the ignition to ON. This will ensure accurate fuel gauge readings.
2. Remove the Exterior Protective Coatings
Carefully remove the plastic wheel coverings and the exterior Clear Guard protective coatings. See S/B 96-009, Removal of Protective Coatings During TQI.
3. Install the Fuses
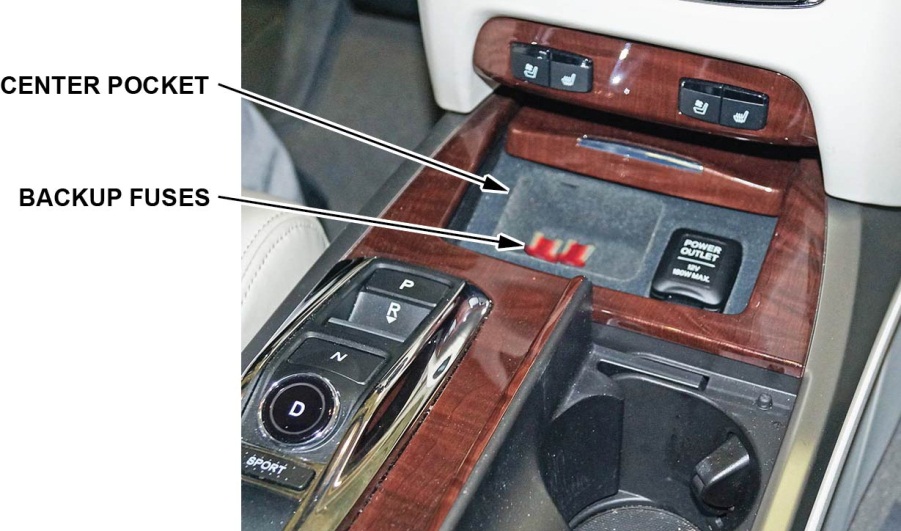
To prevent battery drain during vehicle shipping, the No. 15 BACKUP RADIO (10 A) fuse and the No. 16 BACKUP (10 A) fuse are removed from the under-hood fuse/relay box and stored in the center pocket. Make sure the ignition is turned to OFF before reinstalling these fuses.
NOTE: The glove box is electrically actuated and will not open until these fuses are installed.
Vehicle Interior
4. Remove the Interior Protective Coverings
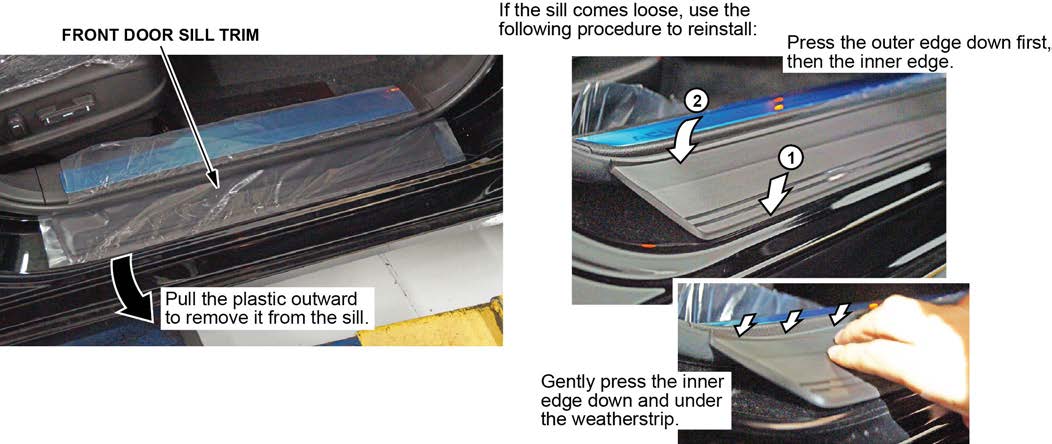
There are several protective coverings on the interior trim pieces and some areas of the carpet. Carefully remove all of them with clean hands to avoid soiling any surfaces. If any of the interior is dirty, clean it with mild soap or an Acura cleaning product such as Leather & Vinyl Cleaner (P/N 08700-9214A) or Carpet Spot Remover (P/N 08700-9215A). When removing the outboard plastic front door sill coverings, slowly pull the plastic out from the sill, and not up.
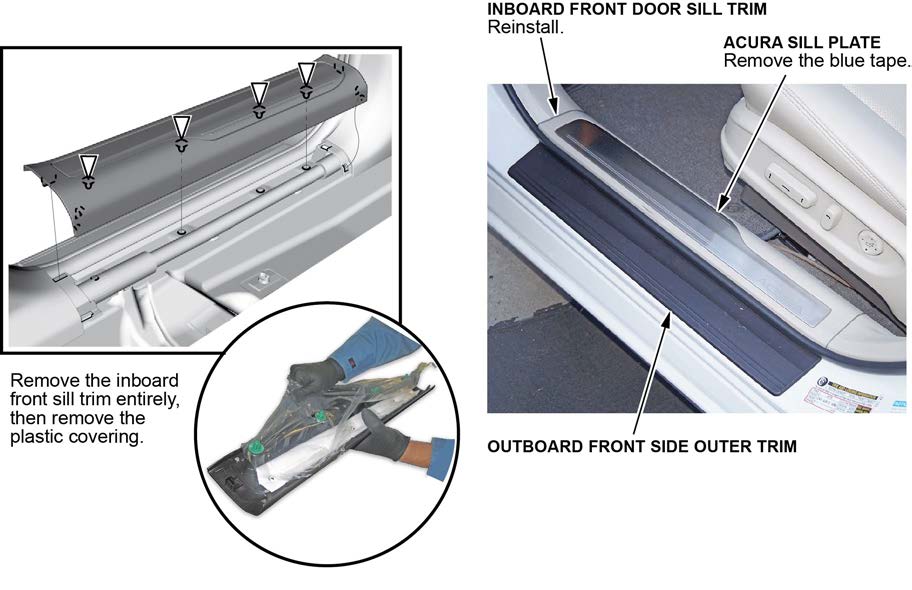
When removing the inboard plastic coverings, use a trim tool to gently remove the plastic sill piece, leaving the ACURA sill plate intact. After removing that piece, carefully remove the plastic, making sure you do not damage any clips. Once you have fully removed the plastic, gently snap the piece back into place and pull the blue tape from the silver sill plate. If there is any remaining residue from the adhesive tape, gently remove it with a clean shop towel and some adhesive remover.
5. Install the Floor Mats
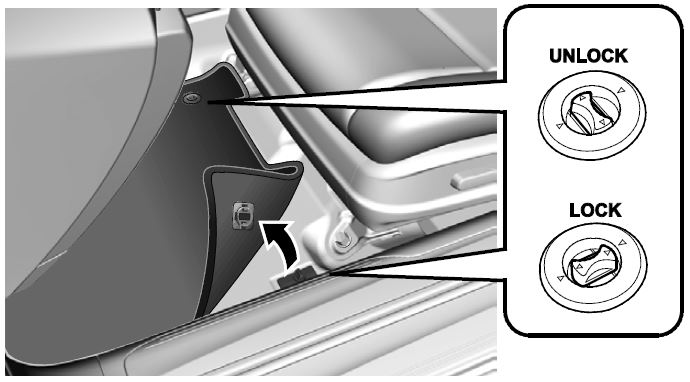
Install the floor mats in the appropriate positions. Place the driver’s and front passenger’s floor mat eyelets over the anchors on the floor, then turn the knobs clockwise to the lock position. Do the same for the rear seat floor mats. The anchors for those mats are on the floor under the front seats.
Under-Hood (Engine Cold)
6. Check the 12-Volt Battery
To ensure long battery life and that the client gets a fully charged battery, it must be checked at these times:
- When the vehicle first arrives at the dealership
- During the TQI (if done at a later date)
- At regular intervals
- Just before vehicle delivery
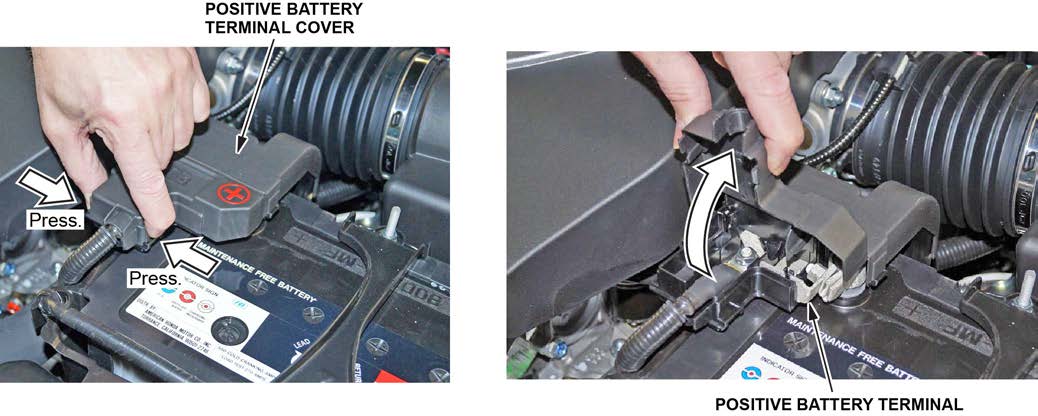
The positive battery terminal has a plastic cover. To avoid breaking it, open the cover as shown:
Test the battery with the ED-18 battery tester using S/B 88-016, Battery Testing and Replacement. Make sure the ED-18 has the latest software installed before using it. See S/B 09-027, ED-18 Battery Tester Update Information. If the test results show GR8 DIAGNOSTIC NEEDED, you must charge the battery with the GR8 battery diagnostic station. Make sure the GR8 has the latest software installed before using it. See S/B 09-034, GR8 Battery Diagnostic Station Update Information.
Write down the GOOD BATTERY 10-digit code in the maintenance journal. During the TQI, write down the code in the “Under Hood (Engine Cold)” section. Then, at vehicle delivery, write it down in the “Final Inspection (At Delivery)” section.
Vehicle Exterior (Vehicle Raised to Full Height)
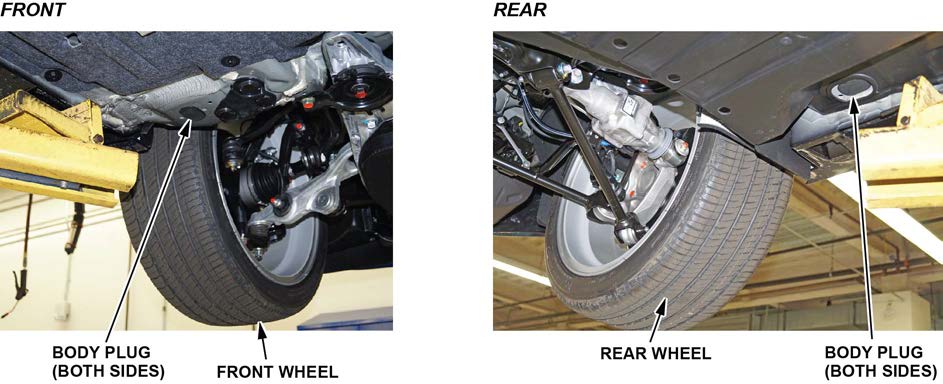
7. Install the Body Plugs
Install the four body plugs as shown. If they are not installed, the vehicle could make a wind noise that is hard to diagnose.
Vehicle Exterior (Vehicle Lowered to Half-Height)
8. Install the Front License Plate Holder
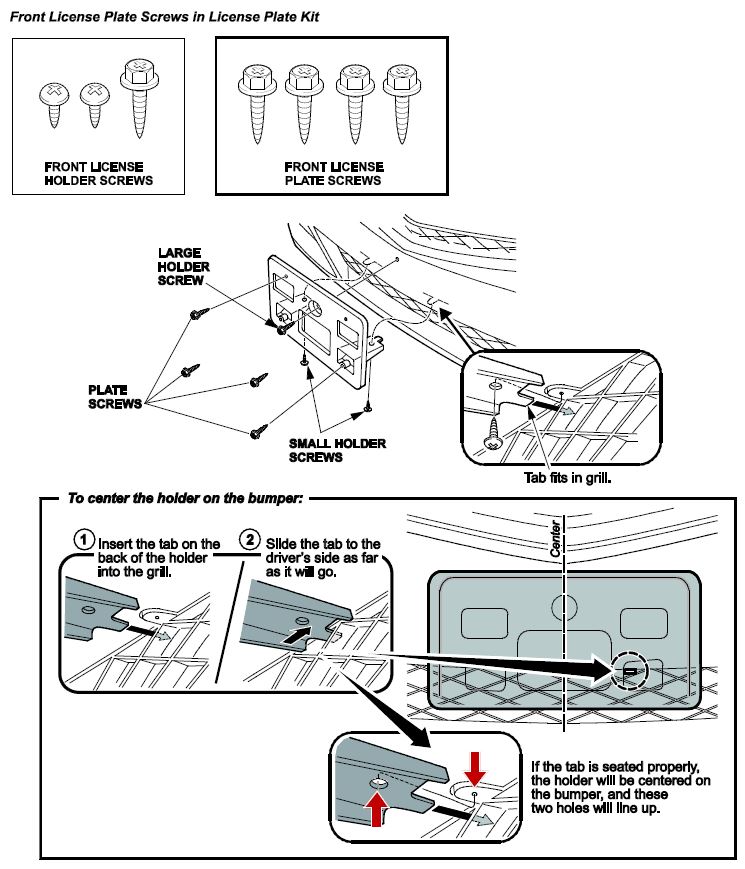
If state regulations require the use of a front license plate, install the front license plate holder using the three selftapping screws. The remaining four self-tapping screws are for attaching the plate.
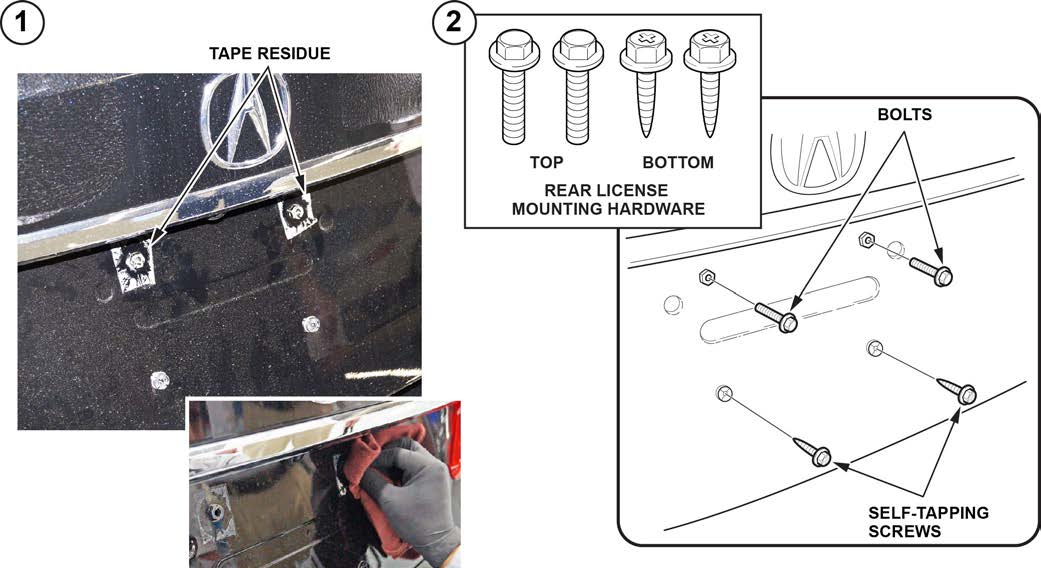
9. Clean the Rear License Plate Area and Install the Mounting Hardware
Remove the masking tape covering the two bolt holes. Using 3M General Purpose Adhesive Cleaner (3M #05113508984) and a clean shop towel, carefully remove any tape residue. Then install the mounting hardware as shown.
10. Install the Front Splash Guards (If Equipped)
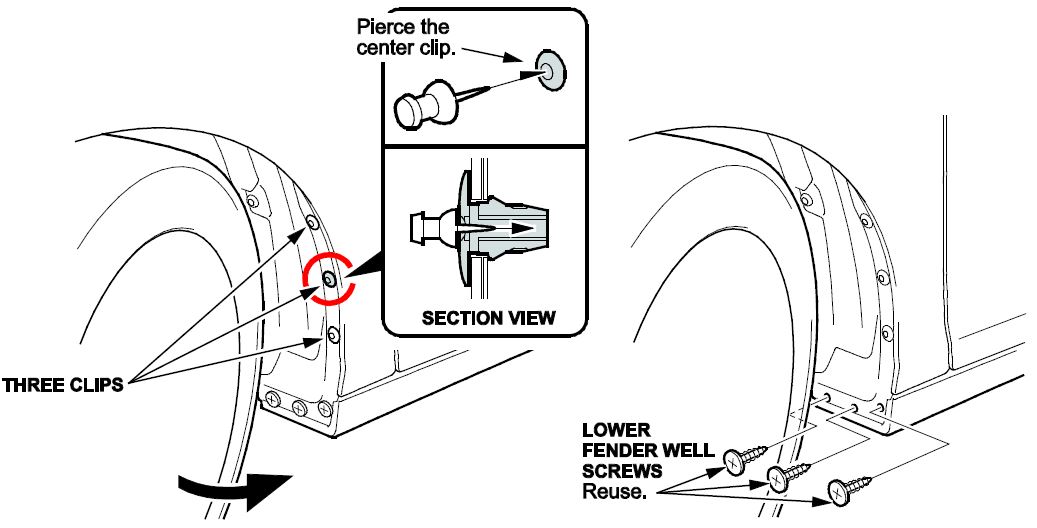
Install the front splash guards as follows:
- Turn the steering wheel all the way to the left. Then, pierce the center clip on the left front inner fender with a push pin.
- Remove the three self-tapping screws from the left front inner fender well.
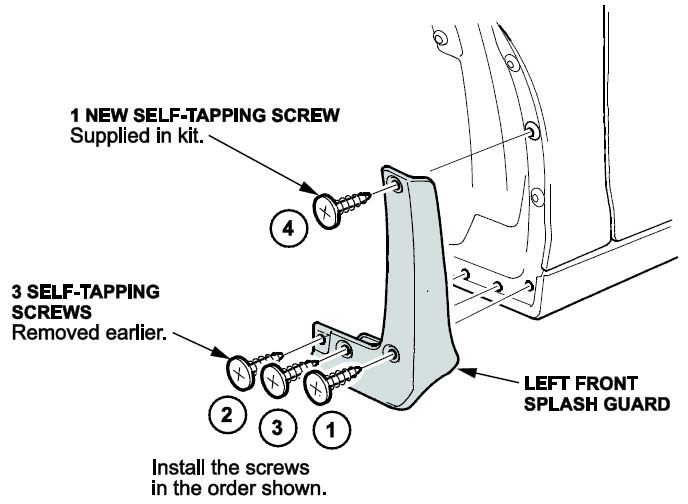
- Install the left front splash guard with one of the supplied self-tapping screws and the three self-tapping screws you removed in step 2 in the order shown.
- Make sure there is no gap between the splash guard and the body. If there is, loosen the four self-tapping screws, hold the splash guard against the body, and tighten the screws.
- Turn the steering wheel all the way to the right, and repeat steps 2 thru 4 for the right front splash guard.
Vehicle Exterior (Vehicle Lowered to Ground)
.
11. Set the Tire Pressures
To prevent flat spots during vehicle shipping and storage, the tires are inflated to over 40 psi. Adjust the tire pressures to the cold inflation values listed on the driver’s doorjamb label. If you are in a cold climate region, make sure the tires are at the outside ambient temperature before adjusting the pressures; otherwise, the Low Tire Pressure/TPMS indicator may come on in cold weather.
NOTE: There is no spare tire. This vehicle comes with a tire repair kit stored under the trunk lining. An optional spare tire can be ordered separately.
12. Initialize the Tire Pressure Monitoring System (TPMS)
If the Low Tire Pressure/TPMS indicator stays on with the ignition turned to ON, do this to initialize the system:
- Start the engine, then turn it off.
- Wait 25 seconds.
- Repeat steps 1 and 2 three times.
- Check the TPMS message in the MID; the tire pressure readings should be normal. If they are abnormally high, check for DTCs with the HDS.
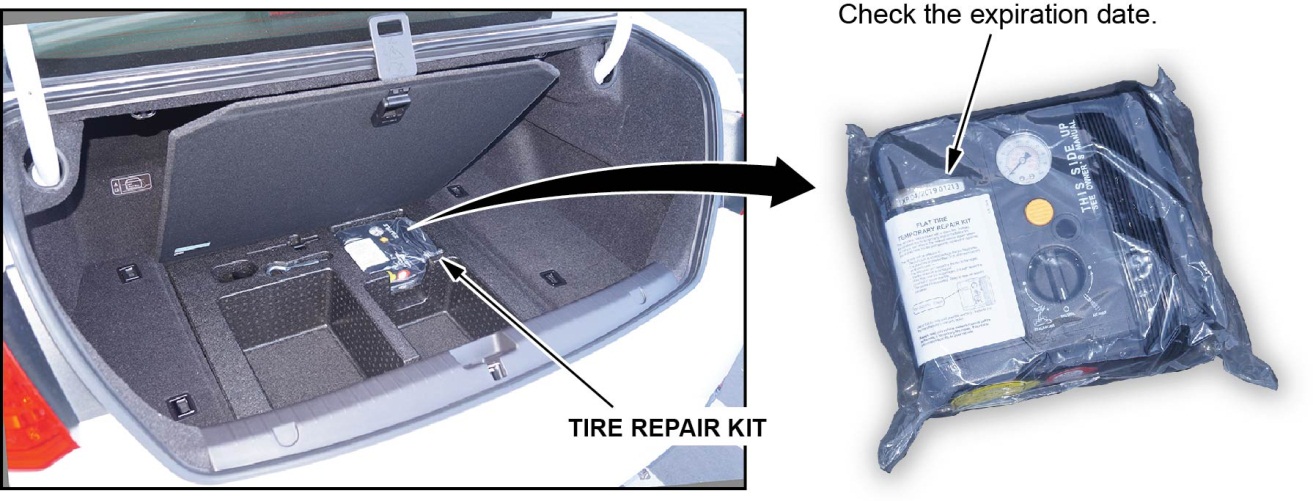
13. Check the Tire Repair Kit
The tire repair kit is stored in the trunk. Check the expiration date in the upper left window. If it is close, replace the sealant.
Under-Hood (Engine Idling)
14. Do the Idle Learn Procedure
To ensure a steady engine idle, do the idle learn procedure as follows after installing the No. 15 BACKUP RADIO (10 A) and No. 16 BACKUP (10 A) fuses:
- Make sure all electrical items (A/C, audio unit, rear window defogger, lights, etc.) are turned off.
- Put the vehicle in Sport Mode by pressing the SPORT button on the electronic gear selector. This will force the engine to run. Let it reach operating temperature (the cooling fans cycle twice.)
- Let the engine idle for 10 minutes with the throttle fully closed.
The idle learn procedure must also be done after updating or replacing the PCM. If does not need to be done after clearing DTCs.
15. Charge the High-Voltage Battery
The gauge on the left side of the instrument panel indicates the high-voltage battery charge level. If it reads less than one third full, you must charge the battery before delivering the vehicle or putting it in storage.
To charge the battery, apply the brake pedal and press the POWER button while in Park. After you see Ready to Drive in the MID, press the accelerator pedal for at least 10 seconds. The engine speed will increase and the battery will charge. Continue the idling charge until the engine stops. At that time, the high-voltage battery will be sufficiently charged.
If the vehicle is left unattended for a long time, the high-voltage battery’s service life will be affected. For those vehicles, carry out idling charges by running the engine once every 12 months for about 30 minutes.
Vehicle Interior
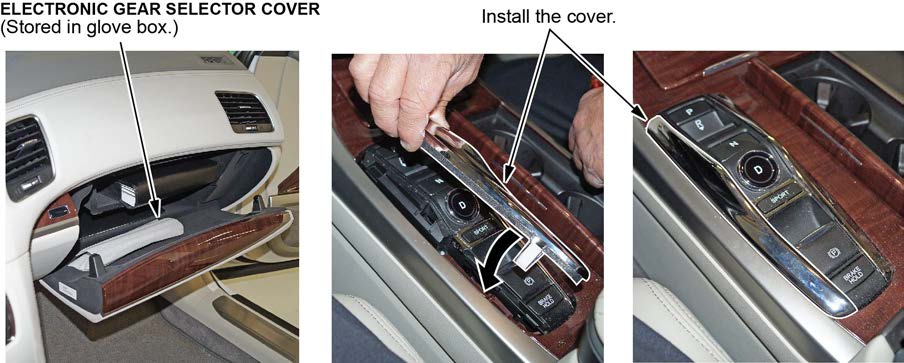
16. Install the Electronic Gear Selector Cover
Install the cover onto the electronic gear selector by gently pressing it into place.
NOTE: The glove box will not open unless the No. 15 BACKUP RADIO (10 A) and No. 16 BACKUP (10A) fuses are installed or it is opened manually (see Electric Glove Box for details).
17. Initialize the Audio-Navigation Unit Anti-Theft Function, and Set the AM/FM Audio Unit Presets
- Do S/B 15-026, 2016 RLX Sport Hybrid: TQI of the Navigation System.
- Enter a local AM or FM station on all of the audio unit presets (AM, FM1 and FM2). To enter a station, tune to it, then press and hold the preset button on the ODMD touch screen until you hear a beep.
18. Check/Refresh the XM Satellite Radio Dealer Demo Service (Except in Alaska and Hawaii)
The audio system comes from the factory activated with the XM Satellite Radio dealer demo service. Once you install the No. 15 BACKUP RADIO (10 A) and No. 16 BACKUP (10 A) fuses, the XM radio should receive the full range of available XM channels. You can see a full list of channels at siriusxm.com.
While watching the audio unit display, tune to several channels within the full XM lineup. If you can tune to all of the XM channels, the dealer demo service is activated.
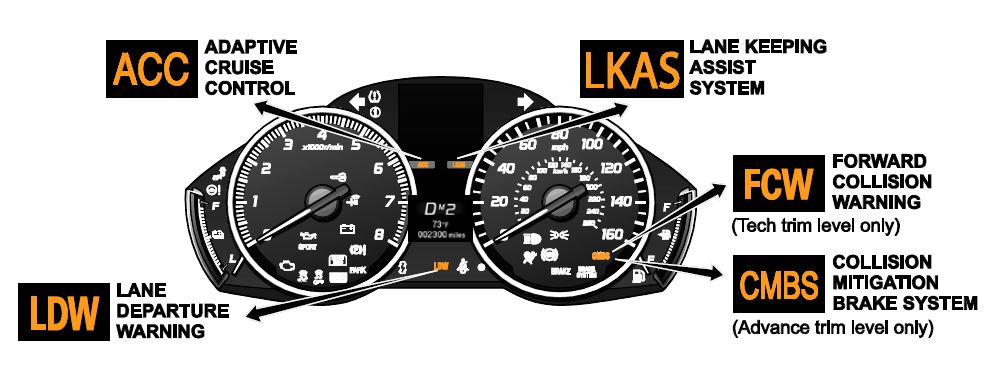
19. Check the ACC, LKAS, LDW, FCW, and CMBS Indicators (If Equipped)
When you first turn the ignition to ON, these indicators should come on for a few seconds and then go off:
- ACC (Adaptive Cruise Control [with low speed follow])
- LKAS (Lane Keeping Assist System)
- LDW (Lane Departure Warning)
- FCW (Forward Collision Warning)
- CMBS (Collision Mitigation Braking System)
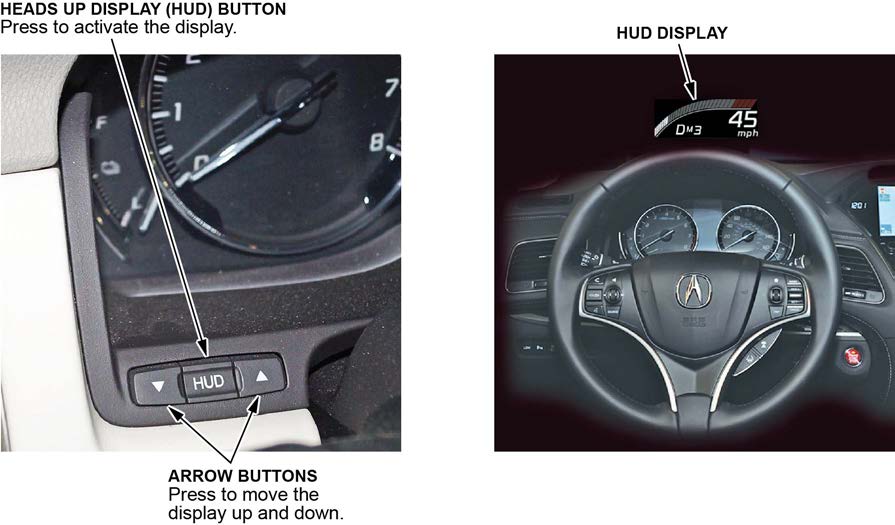
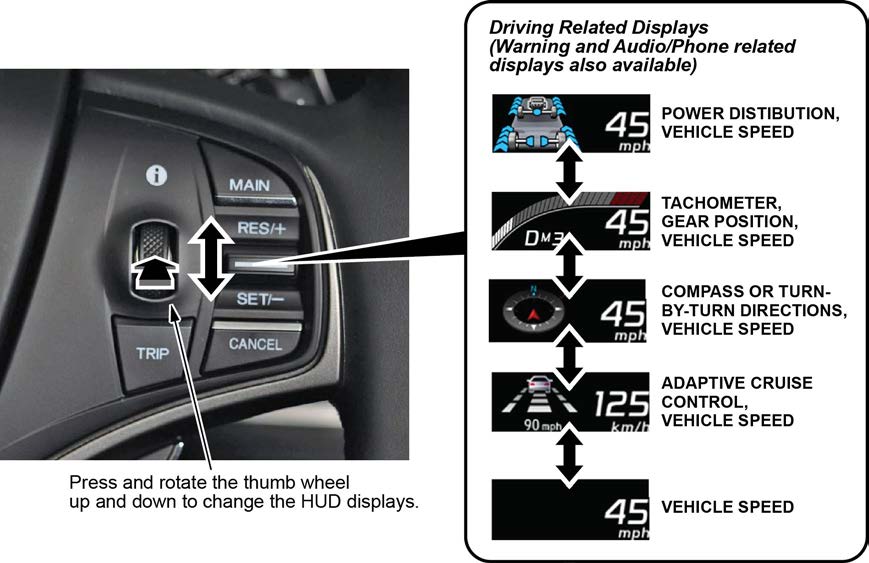
20. Check the Head-Up Display (HUD)
To turn on the HUD, press the HUD button to the left of the steering column. While sitting in the driver’s seat and looking straight out the windshield, check the arrow buttons on either side of the button. They should move the HUD image up and down.
Check the HUD toggle by first pushing in on the thumb wheel on the right side of the steering wheel, then turning it. This will change the image you see in the HUD.
21. Check Voice System Interaction
Audio System and On-Demand Multi-Use Display (ODMD)
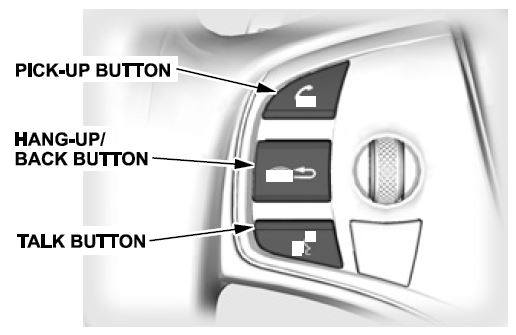
- Press and release the Talk button.
- After the beep, say “XM channel 122.” You should see XM channel 122 on the ODMD.
Climate Control System
- Select AUTO to turn on the climate control system.
- Press and release the Talk button.
- After the beep, say “Driver’s temperature 68 degrees.” The navigation system should repeat the command and you should see 68 degrees on the ODMD.
22. Check Bluetooth® HandsFreeLink® (HFL)
To ensure HFL works and is ready to use, start the engine, turn on the audio unit, then press and hold the HangUp/Back button on the steering wheel for about 5 seconds. You should hear “The TCU is OK.” (TCU is telematic control unit.) If you do not hear this, see the electronic service manual for troubleshooting information. If you want to pair a phone, press the PHONE button below the ODMD.
23. Check the Moonroof One-Touch Feature
Make sure the moonroof one-touch feature works right:
- When you firmly pull the moonroof switch backward and release it, the moonroof should fully open.
- When you firmly push the switch forward and release it, the moonroof should fully close.
- When you push up on the switch and release it, the moonroof should tilt.
If the moonroof does not work right, do this procedure to calibrate it:
NOTE:
- Calibration is not needed after disconnecting the battery.
- Calibrate the moonroof one-touch feature after replacing any moonroof components or after installing the accessory moonroof visor.
- Close the driver’s door and leave it closed until the procedure is done.
- Turn the ignition to OFF.
- Press and hold the tilt switch and turn the ignition to ON 4. Release the tilt switch and turn the ignition to OFF.
- Repeat steps 3 and 4 four more times.
- Check if the auto open and auto close functions still work. If they do, the auto functions have not been cleared. Go back to step 1. If the auto functions have been cleared, go to step 7.
- Press and hold the moonroof open switch for at least 3 more seconds after the moonroof is fully open.
- Press and hold the moonroof close switch for at least 3 more seconds after the moonroof is fully closed (tilted).
- Make sure the moonroof control unit is reset by using the moonroof auto open and auto close function.
NEW MODEL SERVICE INFORMATION
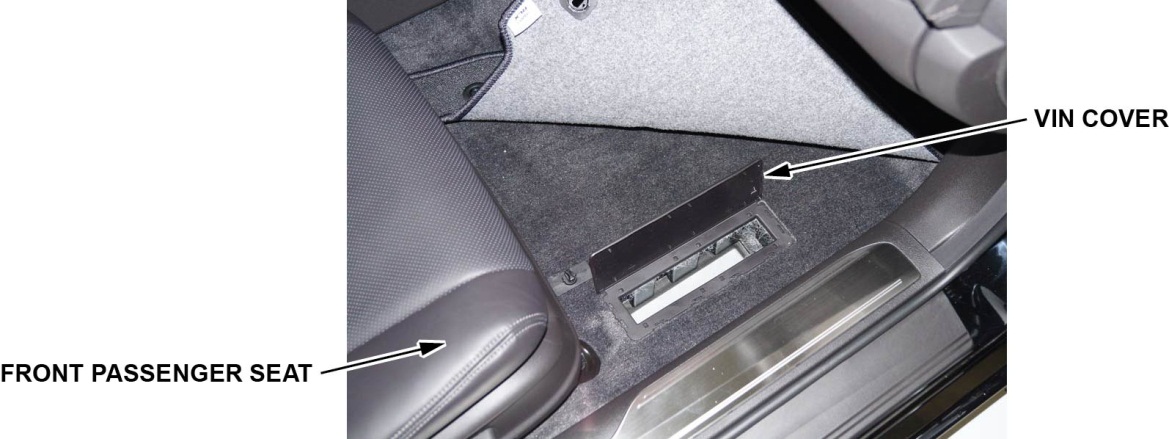
1. VIN Location
The VIN is beneath the front passenger’s floor mat under a cover in the floor panel.
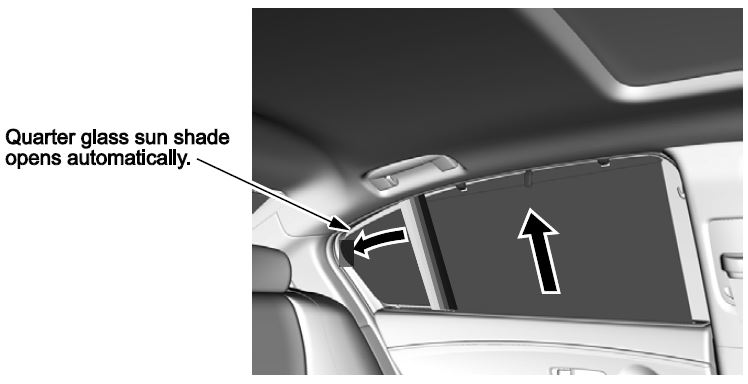
2. Rear Door Sun Shade
When you raise the rear door sun shade, a second part of the shade automatically opens to cover the quarter glass. They cannot be deployed separately.
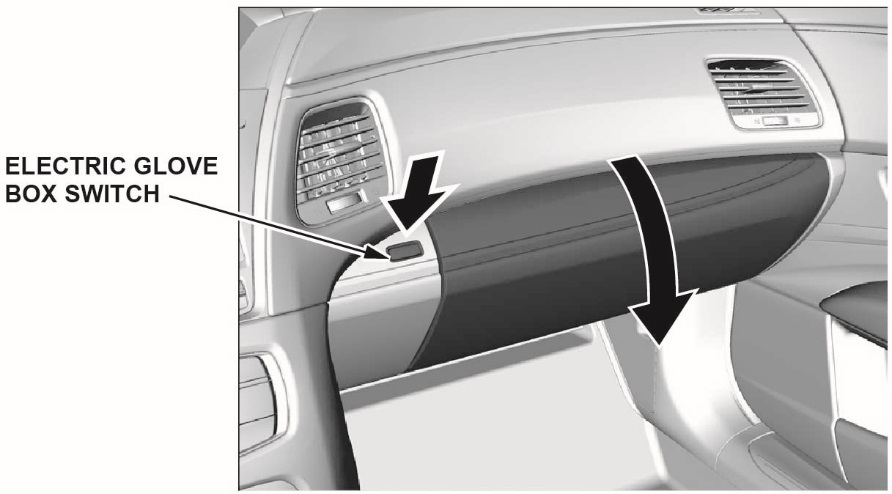
3. Electric Glove Box
To open the glove box, press the electric glove box switch. If the battery is dead or if the backup fuse is removed, the actuator will not work and the glove box will not open.
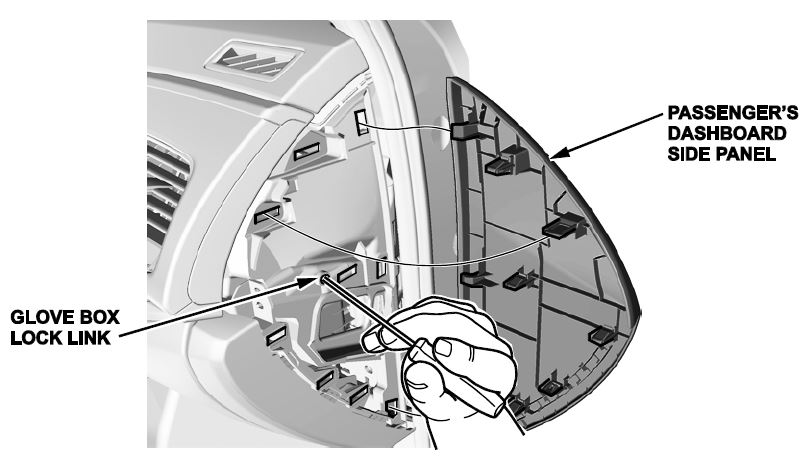
If the battery is dead and you need to open the glove box, remove the passenger’s dashboard side panel and push the lock link area (inside the circle) with a small flat-head screwdriver (included in the tool kit).
4. Capless Fueling System
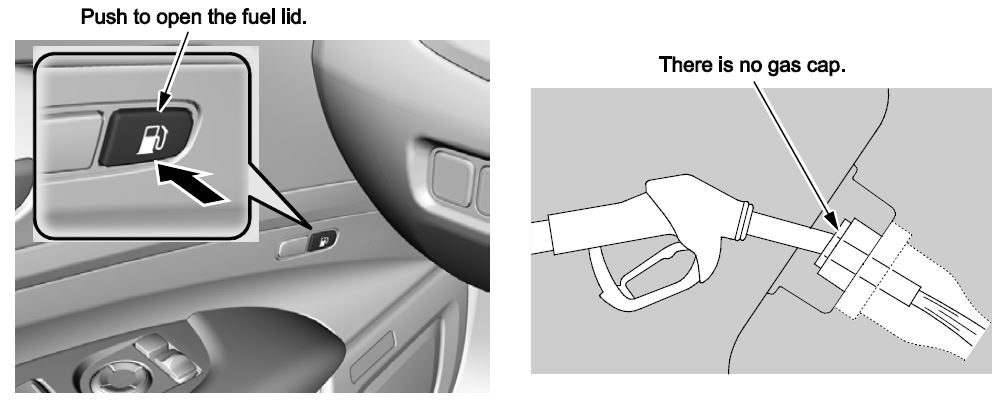
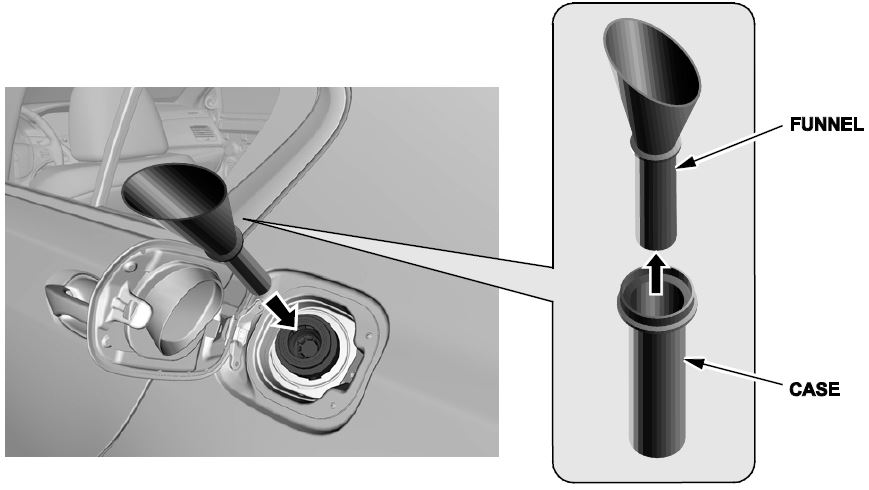
This vehicle does not come with a gas cap.
A funnel is provided to allow manual fueling from a gas container. It is stored in the trunk luggage area. For more information, see the owner’s manual.
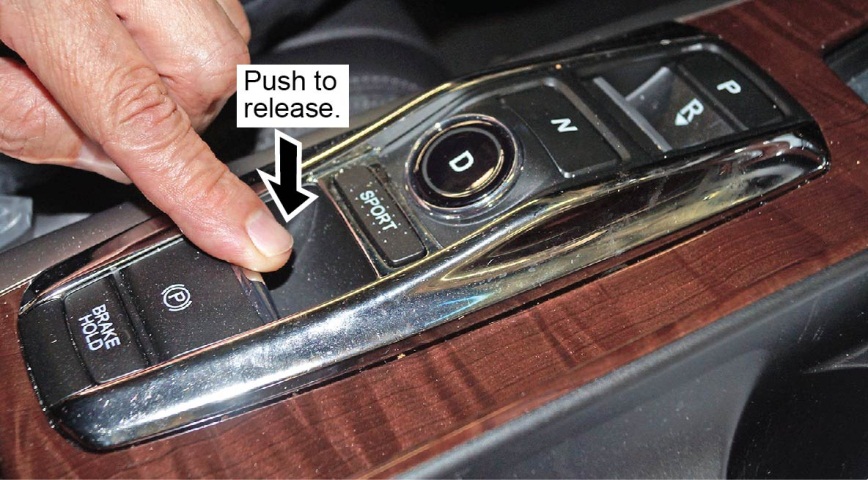
5. Electric Parking Brake Operation
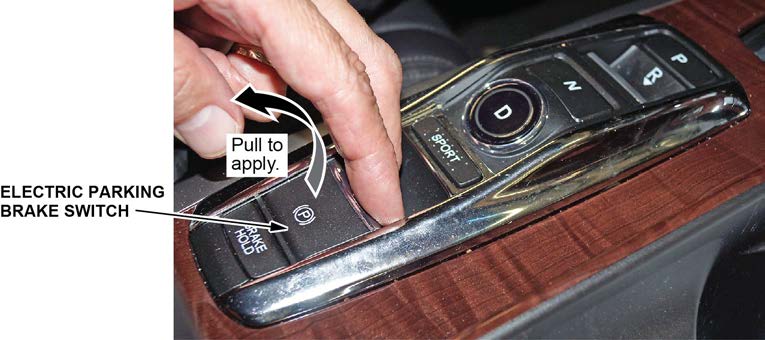
To manually apply:
Gently and securely pull up the electric parking brake switch. The PARK indicator in the instrument panel comes on.
To manually release:
Press down on the brake pedal, then push down on the electric parking brake switch. The PARK indicator goes off.
To automatically release:
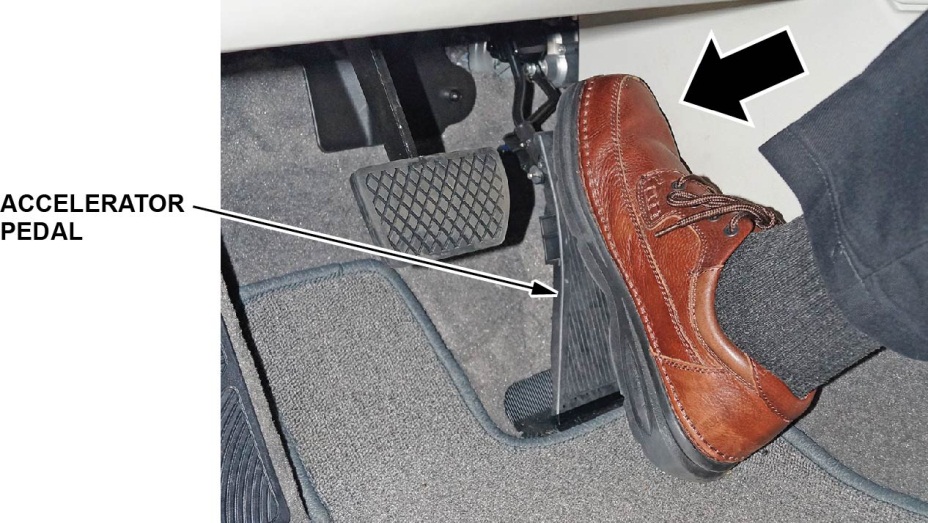
Gently press the accelerator pedal. The PARK indicator in the instrument panel goes off and the parking brake releases.
The parking brake can be automatically released under these conditions:
- The driver’s seat belt is buckled.
- The engine is running.
- The electronic gear selector is not set to Park or Neutral.
6. Electronic Gear Selector Operation
You select gears by either pressing or pulling up on each of the electronic gear selector buttons. Park, Neutral, and Drive are all activated by pressing down on the corresponding letter. Reverse is activated when you pull up on the button. Colored indicators next to each button tell you which gear is selected.
Shifting from Park to Reverse, Park to Drive, Neutral to Reverse, and Neutral to Drive can only be done with the brake pedal applied.
Auto Park Mode
As a convenience feature, the transmission automatically shifts into Park when you turn the ignition to OFF or when all of these conditions are met:
Always apply the brake pedal and shift to Park when idling or when exiting the vehicle. If you select any gear other than Park with the driver’s door open and the driver’s seat belt unbuckled, Park is reengaged when you release the brake pedal.
Car Wash Mode
If you need to run the vehicle through an unattended conveyor-style car wash or load it onto a flatbed, you can bypass Auto Park Mode by setting Car Wash Mode. Here is how to set it:
- With the engine running, apply the brake pedal and select Neutral on the electronic gear selector.
- Within 5 seconds, press the POWER button. The ignition goes to ACCESSORY and the engine shuts off.
- Look for the message Shift to Park in the MID and N in the instrument panel. This tells you that Car Wash Mode is set. You will then have 15 minutes before the transmission automatically shifts into Park and the ignition goes to OFF. You may now exit the vehicle.
7. Fluids
This vehicle uses 0W-20 Full Synthetic engine oil (P/N 08798-9073). For the rear differential and automatic transmission, it uses ATF DW-1 (P/N 08200-9008).
8. Shift Override
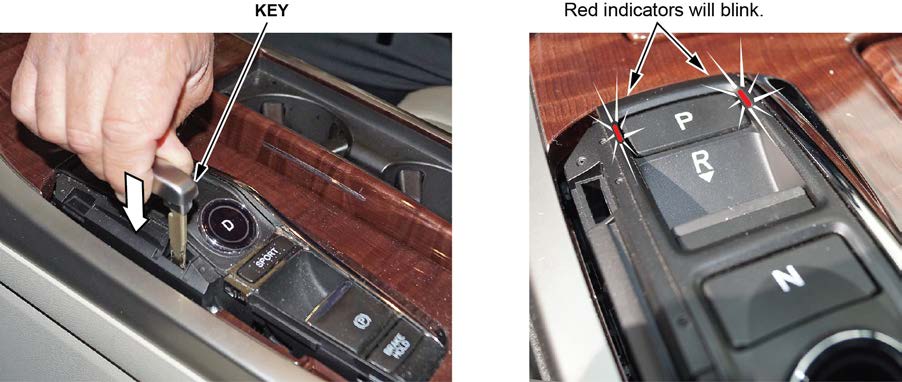
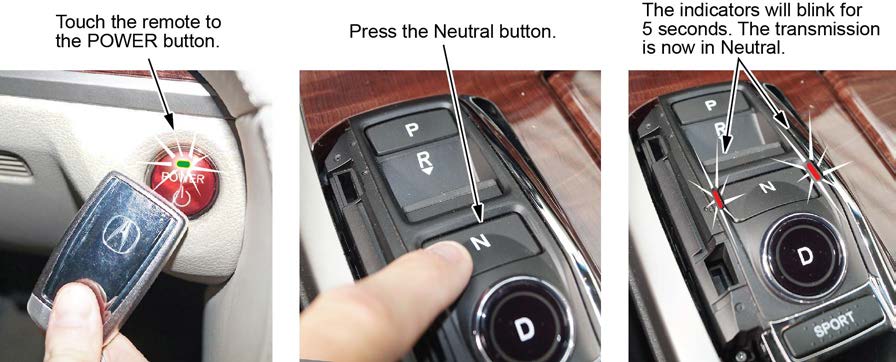
The transmission can be put into Neutral during transport mode (without backup fuses installed) by doing these steps:
- Insert the key into the slot to the left of Drive, and push down. The red indicators on either side of the Park button will start to blink.
- Within 15 seconds (and with your foot off the brake pedal), press the POWER button. The indicator will start to blink.
- Touch the remote to the POWER button, and press the Neutral button with your foot off the brake pedal. The red indicators on either side of the Neutral button will start to blink and will keep blinking for 5 seconds. Even after they go out, the transmission is in Neutral and will stay there indefinitely.
- To return the transmission to Park, repeat steps 1 thru 3, this time pressing the Park button in step 3 instead of the Neutral button.
 Loading...
