A15-023
May 15, 2015
01746 Version 1
Rubbing or Groaning from the Driver’s Front Airbag Area
AFFECTED VEHICLES
| Year | Model | Trim | VIN Range |
| 2013–14 | Accord | ALL | ALL |
| 2015 | Accord | L4 Coupe | 1HGCT1B8…000001 thru 1HGCT1B8…005372 |
| 2015 | Accord | L4 Sedan | 1HGCR2F5…000001 thru 1HGCR2F5…082162 |
| 2015 | Accord Hybrid | ALL | 1HGCR6F5…000001 thru 1HGCR6F5…004895 |
| 2015 | Accord | V6 Coupe | 1HGCT2B8…000001 thru 1HGCT2B8…003790 |
| 2015 | Accord | V6 Sedan | 1HGCR3F8…000001 thru 1HGCR3F8…014358 |
| 2013–14 | Crosstour | ALL | ALL |
| 2015 | Crosstour | L4 | 5J6TF3…FL000001 thru 5J6TF3…FL001082 |
| 2015 | Crosstour | V6 | 5J6TF2…FL000001 thru 5J6TF2…FL002125 |
SYMPTOM
A rubbing or groaning is heard from the driver’s front airbag module while turning the steering wheel.
POSSIBLE CAUSES
Noise is generated from moving parts/friction within the damper assemblies in the horn plate assembly.
CORRECTIVE ACTION
Replace the horn plate assembly.
PART INFORMATION
WARRANTY CLAIM INFORMATION
The normal warranty applies.
| Operation Number | Description | Flat Rate Time | Template ID | Failed Part Number |
| 7111A5 | Replace Horn Plate Assembly | 0.4 hr | 15-023A | 78501-T2A-U51ZA |
Defect Code: 07403
Symptom Code: 04201
Skill Level: Repair Technician
REPAIR PROCEDURE
- Make sure the ignition is turned to OFF.
- Disconnect and isolate the negative cable with the battery sensor from the battery.
NOTE:
- Always disconnect the negative cable first.
- To protect the battery sensor connector from damage, do not hold it when removing the negative terminal.
- Do not disconnect the battery sensor from the negative terminal.
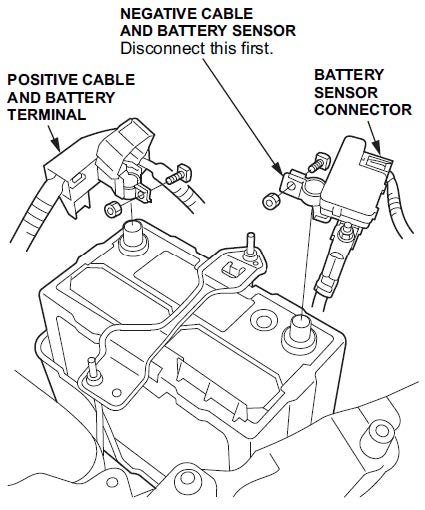
- Disconnect the positive battery cable and the battery terminal from the battery.
- Wait at least 3 minutes before starting work to allow the airbag system to de-energize.
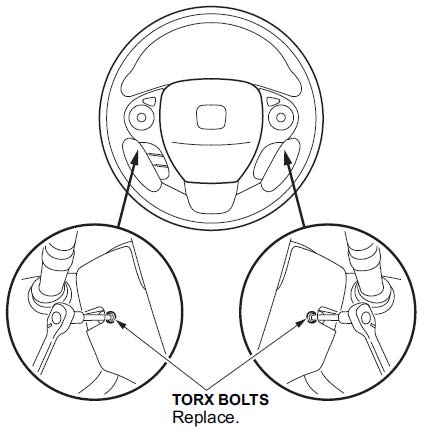
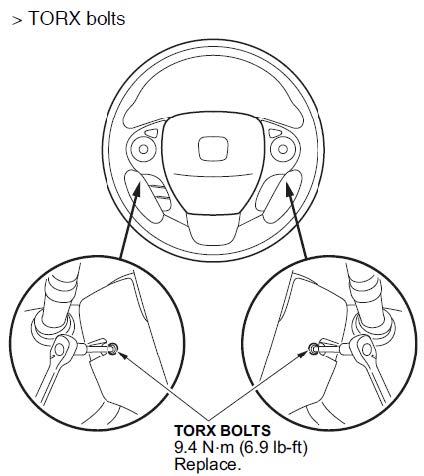
- Remove the Torx bolts using a Torx T-30.
- Pull up on both locking tabs to disconnect the driver’s airbag inflator connectors on the cable reel harness.
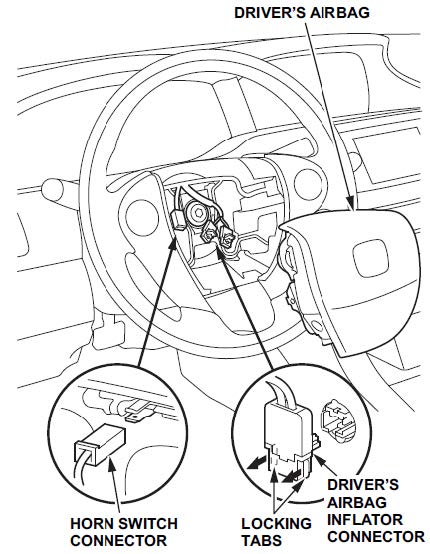
- Disconnect the horn switch connector.
- Remove the driver’s airbag.
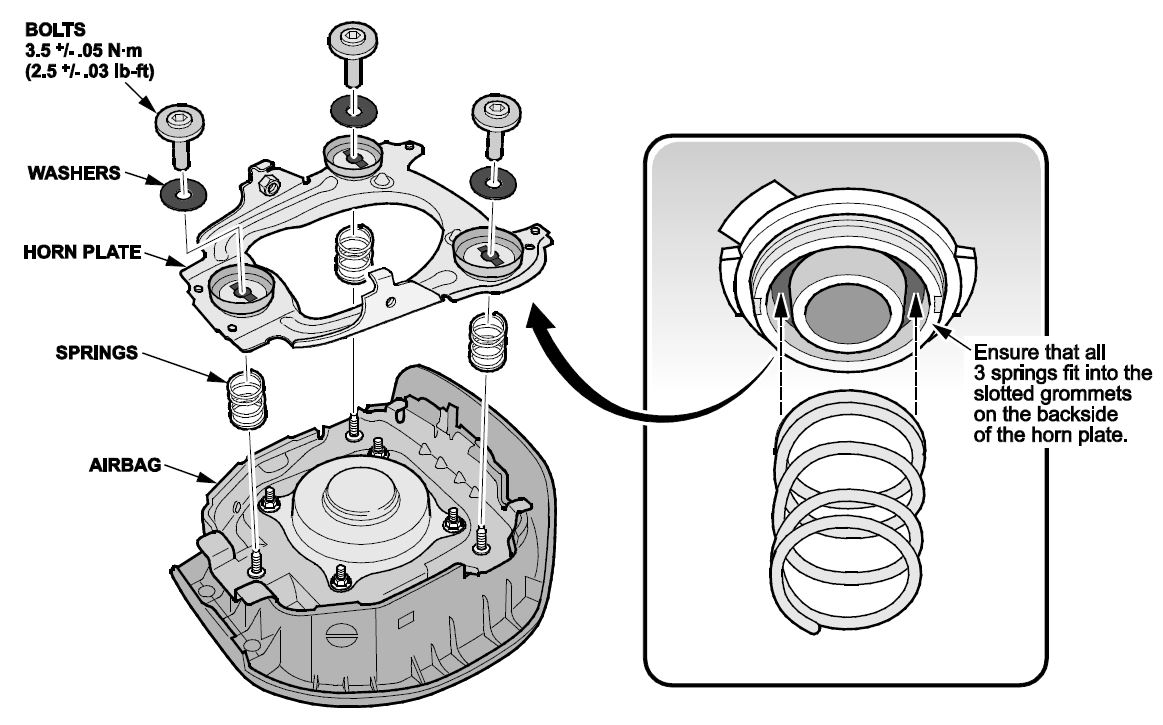
- Remove the three horn plate assembly bolts and washers and discard. Remove the three springs and discard.
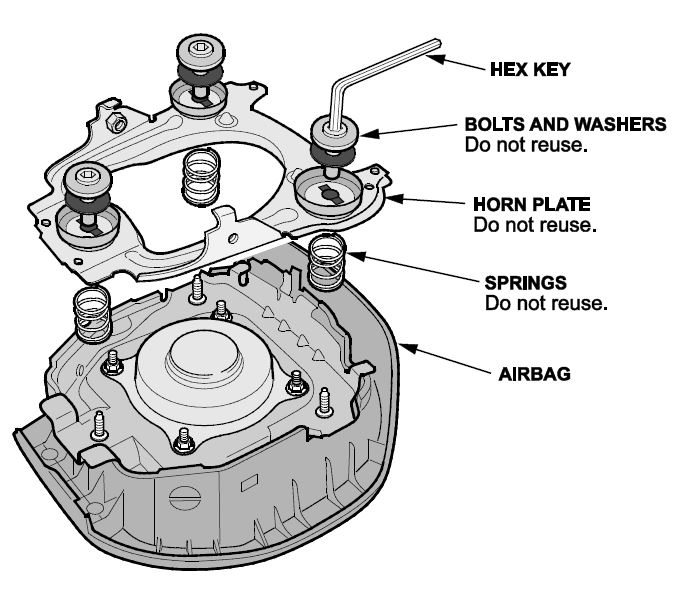
- Install the new Horn Plate Assembly with the new bolts, washers, and springs. Torque the bolts to (3.5 ± .05 N·m), (5 ± .03 lb-ft).
- Connect the driver’s airbag inflator connector to the cable reel subharness to the airbag by aligning the guide tab to the groove on the connectors.
NOTE: Do not pinch the driver’s airbag inflator harness.
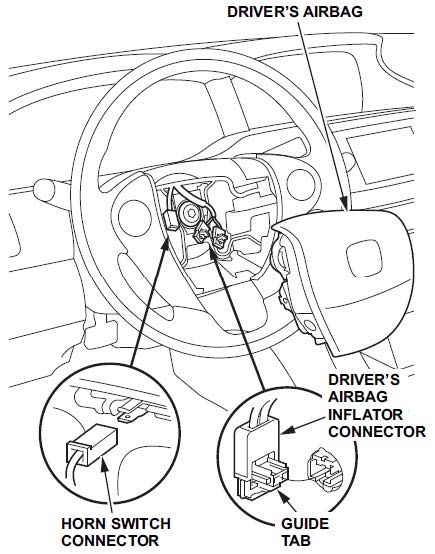
- Connect the horn switch connector.
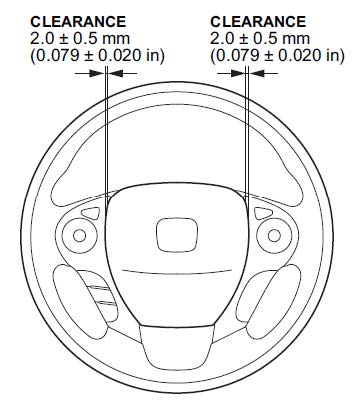
- Place the driver’s airbag in the steering wheel.
- Torque the new Torx bolts to 4 N·m (6.9 lb-ft).
- Reconnect the positive cable to the battery terminal.
NOTE: Always connect the positive side first.
- Reconnect the negative cable to the battery terminal.
NOTE: To protect the battery sensor connector from damage, do not hold it when installing the negative terminal.
- Clear any DTCs with the HDS.
- Turn the ignition to ON, check that the SRS indicator should come on for about 6 seconds and then goes off.
END.
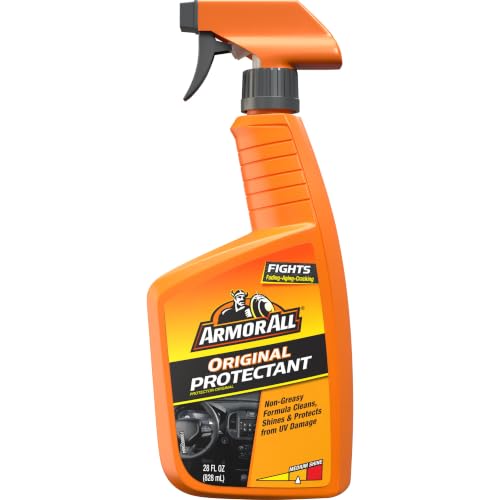
- Car Protectant Spray: One 28 ounce bottle of Armor All Original Protectant car interior cleaning spray that fits in your car detailing kit
- Cleans Surfaces: Easily removes dirt, dust and debris, leaving your vehicle's surfaces and car interior cleaner after using this car cleaner spray
- Safe For Vinyl, Rubber And Plastic: A great addition to your car care products; this surface protectant spray is safe for your vehicle's vinyl, rubber and plastic surfaces
- With Gloss Enhancers: Improved car spray cleaner formula features increased gloss enhancers to restore shine and color, giving surfaces a renewed look with a medium shine
- Apply To Surface And Wipe Clean: To use this Armor All spray, spray this car protectant onto a clean cloth, spread evenly over the surface to be cleaned, and wipe off excess


- Proven Armor All Original Protectant in a convenient disposable wipe
- Fights aging, fading and cracking
- Cleans, shines and protects plastic, vinyl and rubber from UV damage
- Helps keep surfaces looking like new with a medium shine finish
- Disposable wipes are lint-free

- CAR PROTECTANT SPRAY: One 16 fl oz bottle of Armor All Protectant Spray
- FOR VINYL, RUBBER AND PLASTIC: Car protectant and car cleaning spray safe for your vehicle's vinyl, rubber and plastic surfaces
- REMOVES DIRT AND DUST: Easily cleans dirt, dust and debris from vehicle surfaces
- UVA AND UVB SUN PROTECTION: Provides UVA and UVB sun protection and defends against fading and aging to help keep your vehicle's interior surfaces looking like new
- MEDIUM SHINE: Car protectant formula restores color and leaves a medium shine; ideal for commuters and car enthusiasts to add to their car cleaning products
This product presentation was made with AAWP plugin.