| “This site contains affiliate links for which OEMDTC may be compensated” |
A14-083
June 18, 2015
01314-01691 Version 5
Product Update: Driver’s Door Lock Actuator
Supersedes 14-083, dated March 19, 2015, to revise the information highlighted in yellow
AFFECTED VEHICLES
| Year | Model | Trim | VIN Range |
| 2007–09 | CR-V | ALL | Check the iN VIN status for eligibility |
REVISION SUMMARY
- The title of S/B 14-084 changed.
- Step 3 of the INSPECTION AND REPAIR PROCEDURE was changed.
BACKGROUND
The driver’s door lock will not lock or cycles up and down when trying to unlock the door. This product update provides for inspection and replacement of the driver’s door lock actuator if necessary even if it is working properly.
CUSTOMER NOTIFICATION
Owners of affected vehicles will receive a notification of this campaign. An example of the customer notifications is included at the end of this bulletin.
Do an iN VIN status inquiry to make sure the vehicle is shown as eligible.
Some vehicles affected by this campaign may be in your used vehicle inventory. These vehicles must be repaired before they are sold.
There are two bulletins addressing the 2007–09 CR-V door lock actuators:
- S/B 14-083, Product Update: Driver’s Door Lock Actuator
- S/B 14-084, Warranty Extension: Front Passenger and Left and Right Rear Passenger Door Lock Actuator Make sure 14-083 has been done before doing any repairs under 14-084. A faulty driver’s door lock actuator can make the other door lock actuators appear faulty.
CORRECTIVE ACTION
Inspect the door lock actuator and, if necessary, replace it with a new one.
For any subsequent repairs, replace the door lock actuator with a new one.
PARTS INFORMATION
| Part Name | Part Number | Quantity |
| Driver’s Door Lock Actuator Subassembly Kit | 06725-SWA-305 | 1 |
WARRANTY CLAIM INFORMATION
NOTE: Enter the door actuator lot number into the DTC field.
| Operation Number | Description | Flat Rate Time | Defect Code | Symptom Code | Template ID | Failed Part Number |
| 7485A0 | Inspect the door lock actuator. | 0.3 hr | 5NK00 | JE100 | 14-083A | 72150-SWA-A01 |
| 7481B9 | Inspect and replace the door lock actuator subassembly. | 0.8 hr | 5NK00 | JE100 | 14-083B | 72150-SWA-A01 |
Skill Level: Repair Technician
INSPECTION AND REPAIR PROCEDURE
NOTE: Make sure 14-083 has been done before doing any repairs under 14-084. A faulty driver’s door lock actuator can make the other door lock actuators appear faulty.
- Remove the door panel.
- Remove the plastic cover as needed.
- Inspect the lot number on the latch assembly using a mirror and write it down on the RO (repair order).
NOTE: The lot number can appear two different ways. The first six digits are the production date. The first two digits indicate the year, the third and fourth digits indicate the month, the fifth and sixth digits indicate the day. In some cases, there may be a seventh digit, which is the line number. For example, 100804.5 was produced on August 4, 2010, on line 5.
- If the production date is August 3, 2008 (080803) or later and the door lock actuator is functioning properly, the door lock actuator is OK and no repair is needed at this time.
- If the production date is before August 3, 2008 (080803), go to step 4.
- If the production date is before August 3, 2008 (080803), go to step 4.
- Remove the driver’s door latch assembly.
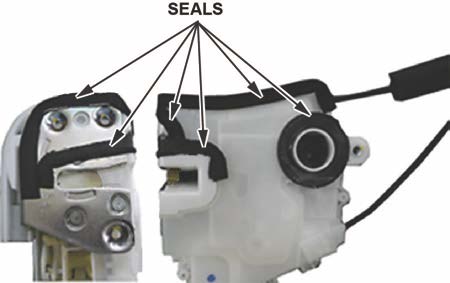
- Remove all the seals from the latch assembly.
- Detach the outer handle rod.
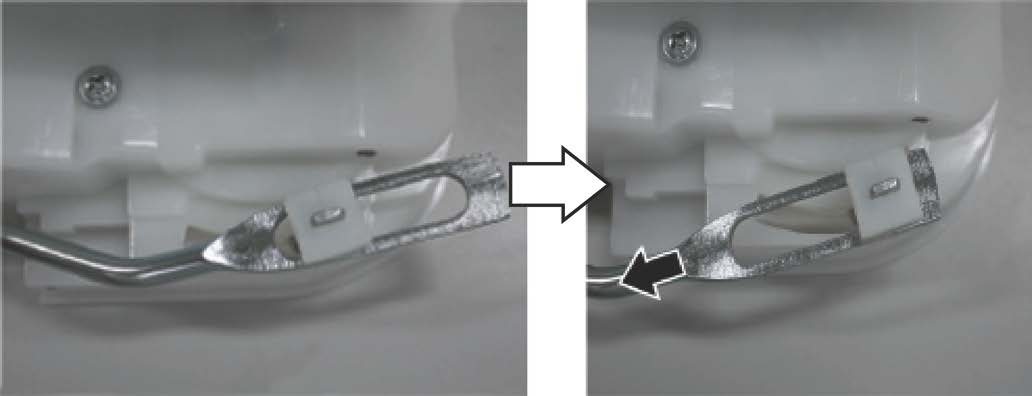
- Invert the outer handle rod.
- Move the outer handle rod to the fully extended position as shown.
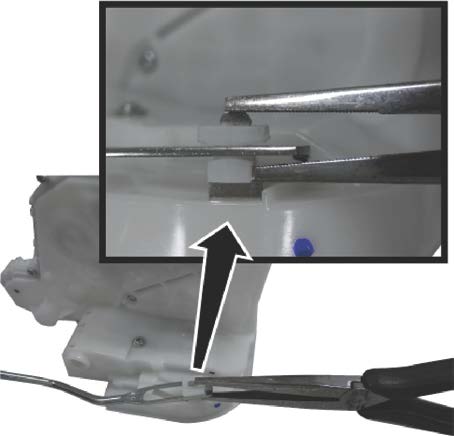
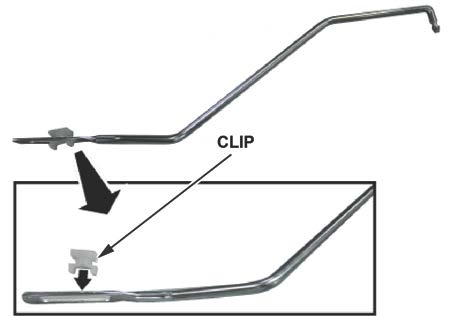
- Using needle-nose pliers, pinch the tip of the lever and the underside of the clip as shown to release it.
- After the clip is released, remove the outer handle rod.
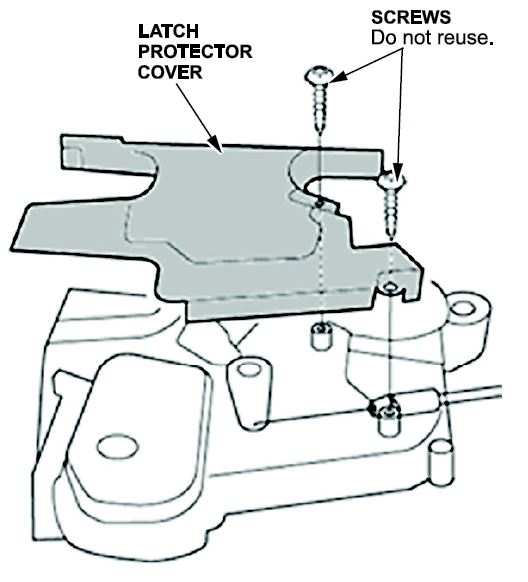
- Remove the two screws on the latch protector cover, then remove the cover.
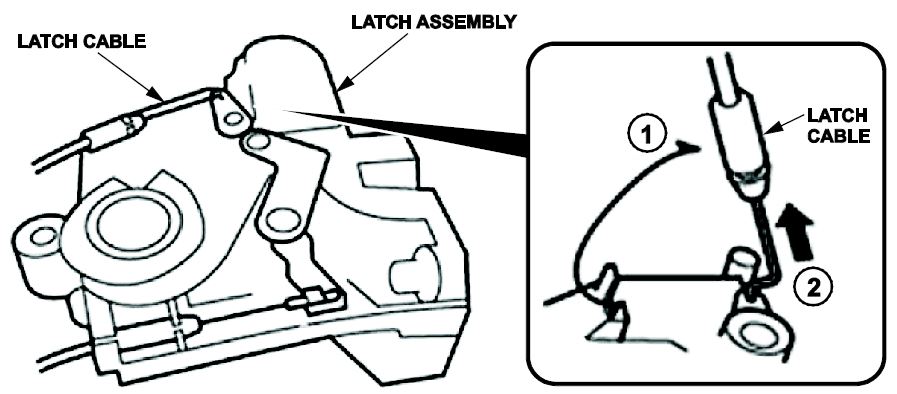
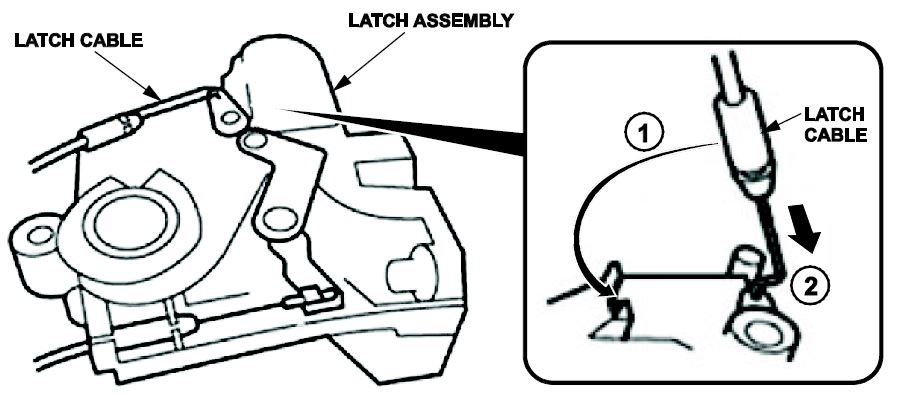
- Detach the latch cable from the assembly.
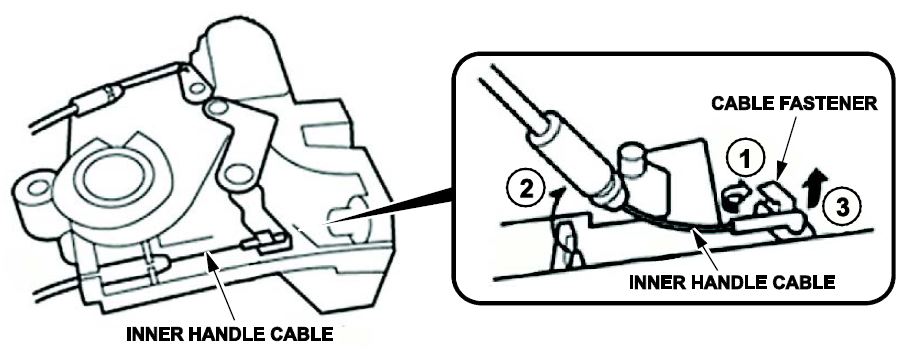
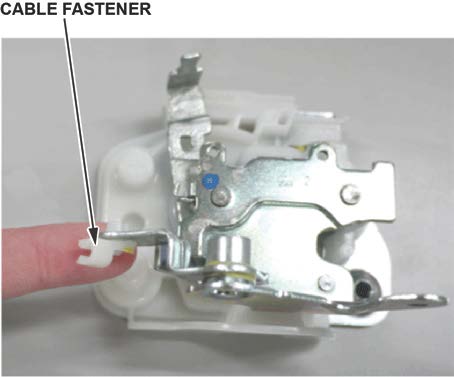
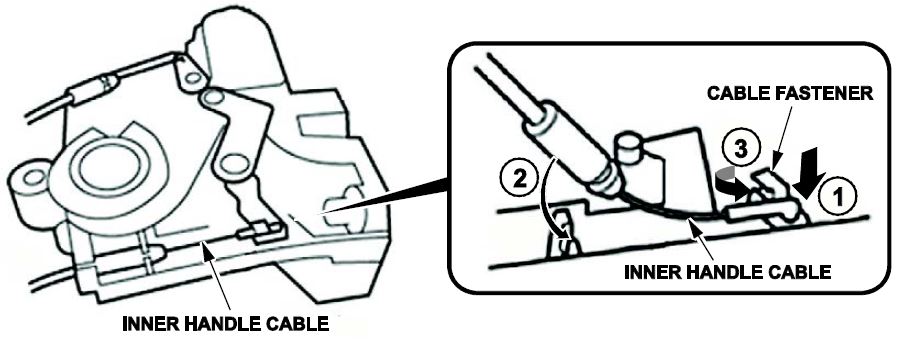
- Detach the cable fastener, then disconnect the inner handle cable from the latch assembly.
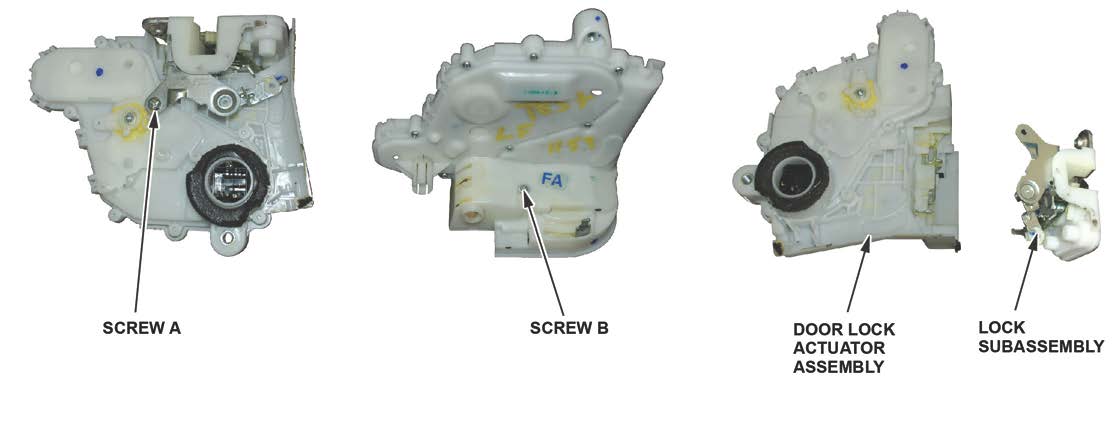
- Separate the lock subassembly from the door lock actuator assembly by removing the two screws.
- Remove the cable fastener and install the new cable fastener from the kit.
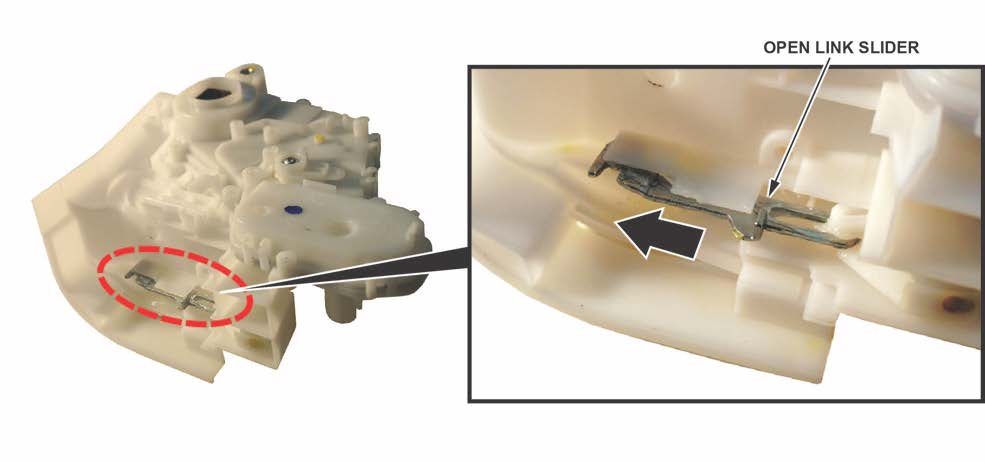
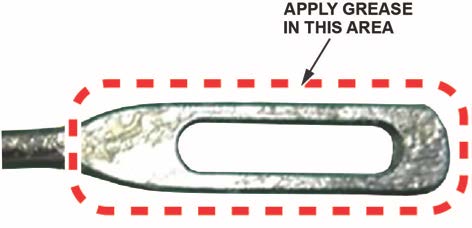
- Apply the grease included in the kit to the channel that holds the open link.
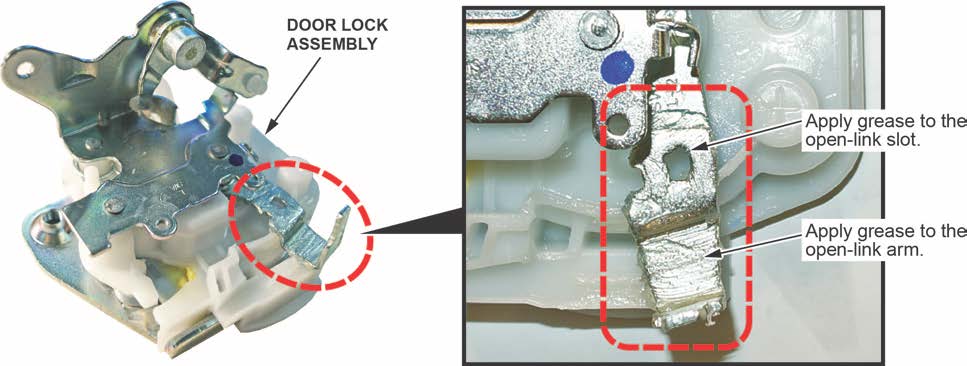
- Apply the grease included in the kit to the open-link arm and the open-link slot of the door lock assembly.
- Set the new door lock actuator’s open link slider to its highest position.
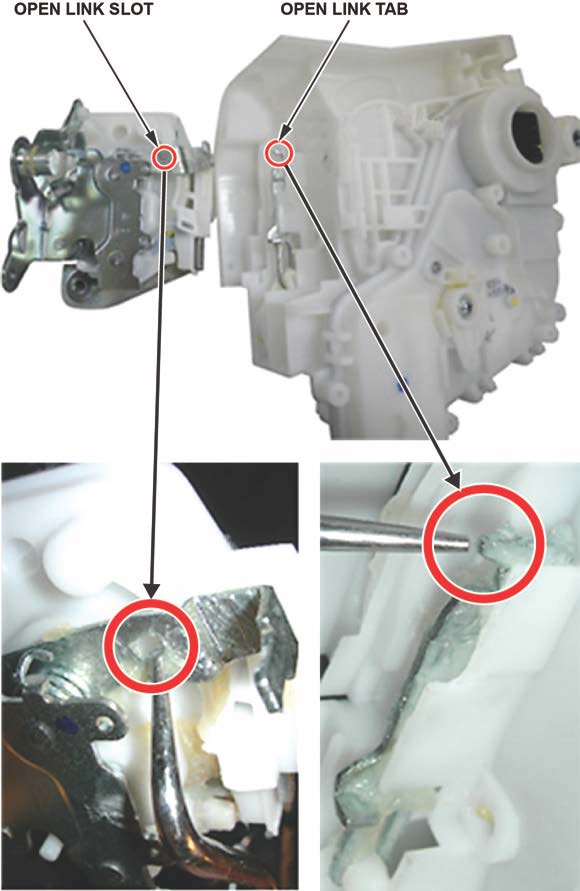
- Install the lock subassembly onto the new door lock actuator using the new screws from the kit (P/N 72116-SWA-A01 and P/N 72116-SWA-003). Make sure the open link tab fits into the open link slot.
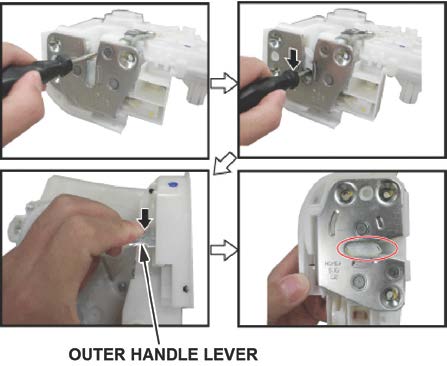
- Using a screwdriver, test that the locking mechanism works by locking the latch, then checking if the door latch releases using the outer handle lever.
- If the door latch releases when you operate the outer handle lever, the latch is working properly. Go to step 13.
- If the door latch does not release when you operate the outer handle, separate the lock subassembly from the door lock actuator and repeat steps 10 through 12.
NOTE Make sure the tab is properly set in the slot. If it is not and you install it on the vehicle, you will not be able to open the door.
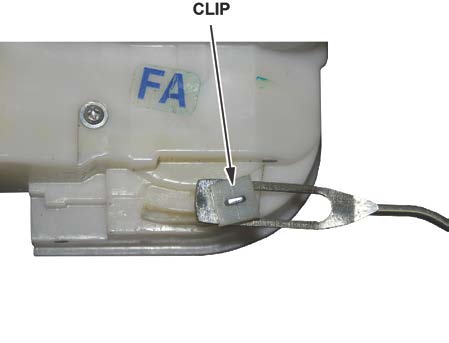
- Remove the clip from the outer handle rod and install the new clip included in the kit.
NOTE:
- Apply the grease from the kit to the clip where it contacts the lock sub assembly tab.
- Make sure to install the clip in the correct direction.
- Install the outer handle rod onto the latch assembly.
NOTE:
- Make sure the outer handle rod is in the correct position as shown.
- Do not use excessive force to install the rod.
- Install the latch cable onto the latch assembly.
- Install the inner handle cable onto the actuator assembly and attach the cable fastener onto the cable.
NOTE:
- Check whether the handle cable can open the door latch.
- Check whether the latch cable can lock and unlock the door latch.
- Install the latch protector cover onto the latch using the two new screws (P/N 90141-SWA-A01) from the kit.
- Attach a new door latch seal (P/N 72114-SWA-A01) from the kit to the new door latch assembly.
- Clean all the seal application areas with brake cleaner and a shop towel. Make sure you let it dry. If there is any grease or dirt on the housing, the weather seals may not stick properly.
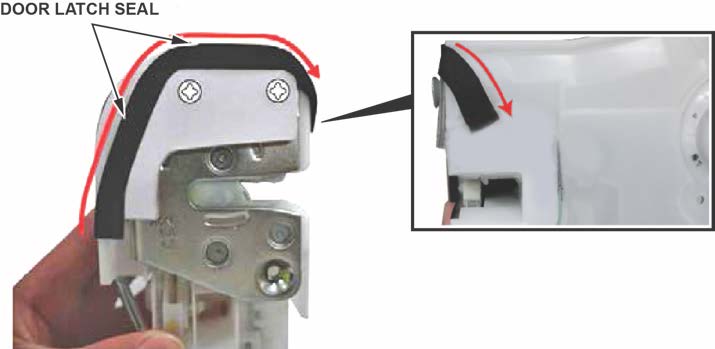
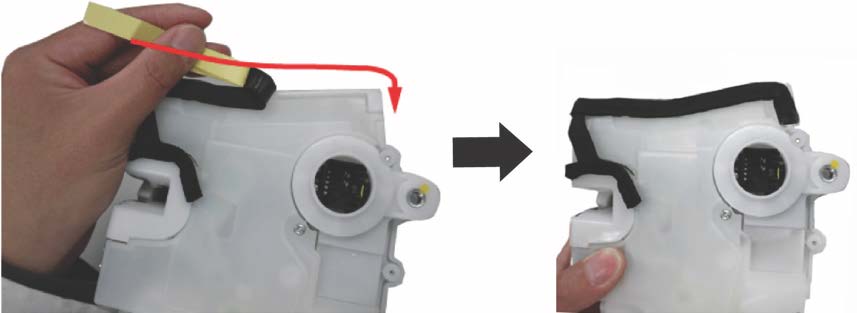
- Apply the door latch seal as shown; make sure the seal covers the three gaps between the latch and the actuator.
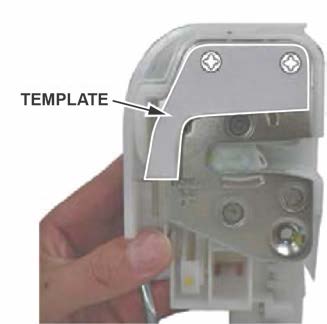
- Attach the template onto the latch using the screws.
- Wrap the seal around the side of the assembly as shown.
- Attach a new door latch seal (P/N 72115-SWA-A01) from the kit.
- Wrap the seal around the side of the assembly as shown.
- Make sure the seals overlap each other as shown so there is no gap.
- Install the door latch seal by following the template as shown, then remove the template.
- Attach a new door latch seal (P/N 72115-SWA-A01) from the kit along the upper gap between the latch and the latch protector cover as shown.
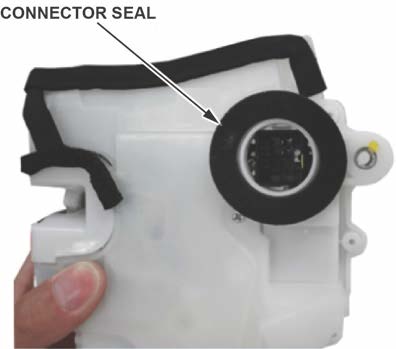
- Apply the connector seal to the door latch assembly as shown.
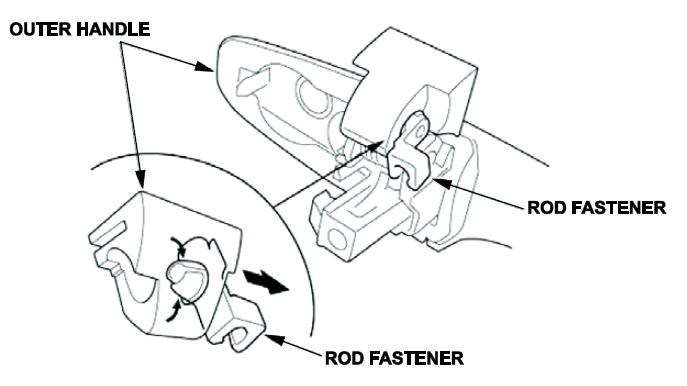
- Remove the outer handle rod fastener and replace it with the new one (P/N 72181-SD4-004) from the kit.
- Reinstall the latch in the reverse order of removal.
- Reinstall the door panel in the reverse order of removal.
- Make sure all of the doors open and close normally by using both the outer and inner handle. Then check that the security system can be armed with all of the doors closed.
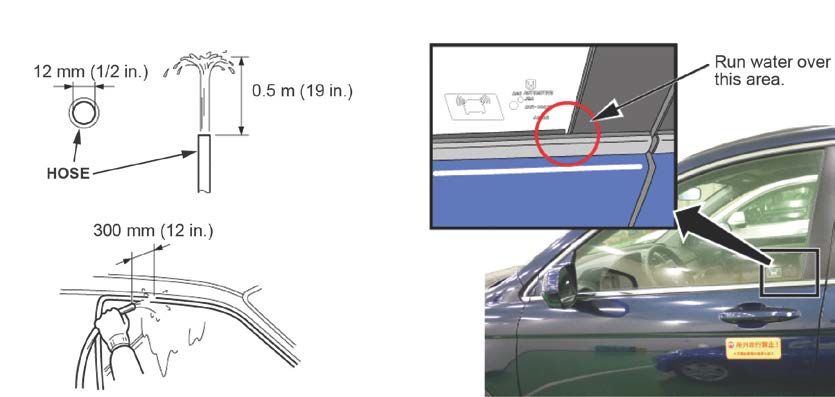
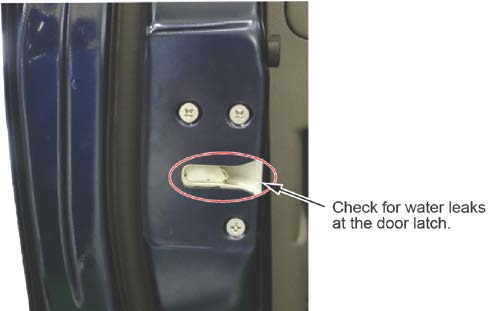
- Check for water leaks by running water over the door glass outer weatherstrip area. After soaking the indicated area, open the door and check for water leaks at the latch. If a water leak is found, check the condition of the latch seal.
NOTE:
- Use a 1/2 in. (12 mm) – diameter hose.
- Adjust the water flow as shown.
- Do not use a nozzle.
- Hold the hose about 12 inches (300 mm) away from the door.
END
 Loading...



 stamp.


I have a 2007 Honda CRV, we have had to replace the automatic door locks twice. Once, maybe – twice, something is really wrong no now, it needs to be done again! We have 4 grandchildren who who may be we me at any given time, not sat e, because the doors lock & unlock all the time. The car slows down, it locks or unlocks. Accelerates, it locks or unlocks. I don’t know what to do!The front doors will lock, but not the back or hatch, so nothing is safe in the car.Have there been any recalls lately, it just not right!
You may have a problem with the Park/Neutral Range Sensor, in the mean time you can disable the Auto Lock Feature. https://www.mattcastruccihonda.com/blog/how-to-program-the-honda-auto-lock-unlock-feature/