| “This site contains affiliate links for which OEMDTC may be compensated” |
Service Bulletin
A18-034
April 16, 2018
Version 1
Clicking from the Driver’s Power Seat While Using the Height or Tilt Adjustment
AFFECTED VEHICLES
| Year | Model | Trim | VIN Range |
| 2016-18 | Pilot | EX, EX-L, Touring, Elite | ALL |
| 2017-19 | Ridgeline | RT-L, RTL-T, RTL-E, Black Edition | ALL |
SYMPTOM
When adjusting the driver’s seat height or tilt, the power seat does not move or moves just a small amount and clicks loudly during operation.
POSSIBLE CAUSES
The vertical transmission assembly (VTA) unit has a stripped internal gear.
CORRECTIVE ACTION
Replace the height adjust VTA unit and/or tilt adjust VTA unit.
TOOL INFORMATION
| Part Name | Tool Number | Quantity |
| Meshing Tool | 07AAF-2GAA100 | 1 |
| U-Joint Removal Tool – See note below before ordering. | OTC7248 | 1 |
| Adapter G – See note below before ordering. | 07XAF-001050B | 1 |
NOTES
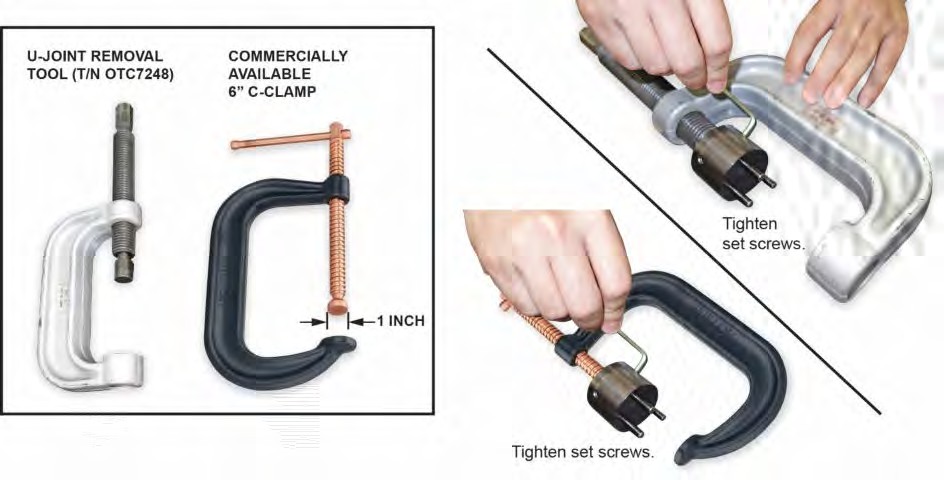
- The U-Joint Removal Tool and Adapter G can be substituted with a commercially available 6-inch C-clamp with a 1-inch foot.
- The U-Joint Removal Tool is a required dealer tool. If you need another one, call the Honda
 Tool and Equipment program at 888-424-6857.
PARTS INFORMATION
NOTE
The VTA unit is universal. The same unit is used for either tilt or height.
| Part Name | Part Number | Quantity |
| VTA Unit (Tilt or Height) for driver’s side with non-memory seat (Includes grease and 3 nuts) | 81603-T2F-A31 | 1 |
| VTA Unit (Tilt or Height) for driver’s side with memory seat (Includes grease and 3 nuts) | 81603-T2F-A51 | 1 |
WARRANTY CLAIM INFORMATION
The normal warranty applies.
| Operation Number | Description | Flat Rate Time | Defect Code | Symptom Code | Template ID | Failed Part Number |
| 7491A5 | Replace the height VTA unit (non-memory seat). | 1.0 hrs | 01801 | 04202 | A18034A | 81603-T2F-A31 |
| 7491A3 | Replace the tilt VTA unit (non-memory seat). | 1.0 hrs | 01801 | 04202 | A18034B | 81603-T2F-A31 |
| 7491D8 | Replace both VTA units (non-memory seat). | 1.1 hrs | 01801 | 04202 | A18034C | 81603-T2F-A31 |
| 7491A5 | Replace the height VTA unit (memory seat). | 1.0 hrs | 01801 | 04202 | A18034D | 81603-T2F-A51 |
| 7491A3 | Replace the tilt VTA unit (memory seat). | 1.0 hrs | 01801 | 04202 | A18034E | 81603-T2F-A51 |
| 7491D8 | Replace both VTA units (memory seat). | 1.1 hrs | 01801 | 04202 | A18034F | 81603-T2F-A51 |
Skill Level: Repair Technician
INSPECTION
NOTES
- Before replacing a VTA unit, check which VTA unit is causing the noise and replace only the affected unit.
- In most cases, only one VTA unit is damaged. It is rare to replace both.
Height Adjust VTA
Adjust the seat height. If you hear a loud clicking or ratcheting from the seat height VTA unit and the height adjustment does not move very much, go to REPAIR PROCEDURE A (HEIGHT ADJUST VTA REPLACEMENT).
Tilt Adjust VTA
Adjust the seat tilt. If you hear a loud clicking or ratcheting from the seat tilt VTA unit and the tilt adjustment does not move very much, go to REPAIR PROCEDURE B (TILT ADJUST VTA REPLACEMENT).
SETTING UP THE MESHING TOOL
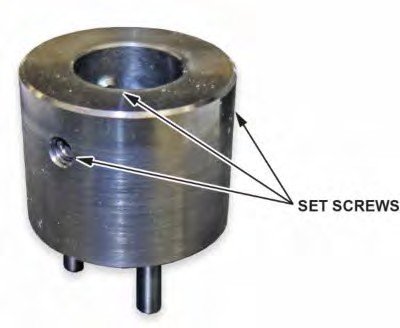
- Make sure the set screws are installed on the meshing tool. If they are not installed, install them without passing through the inner cutout of the tool.
- Install the meshing tool onto the U-Joint Removal Tool (T/N OTC7248) or universal 6-inch C-clamp. Hand tighten the set screws with a hex tool.
NOTE
If you are using a 6-inch C-clamp, the foot of the C-Clamp must be 1-inch in diameter for the meshing tool to fit correctly.
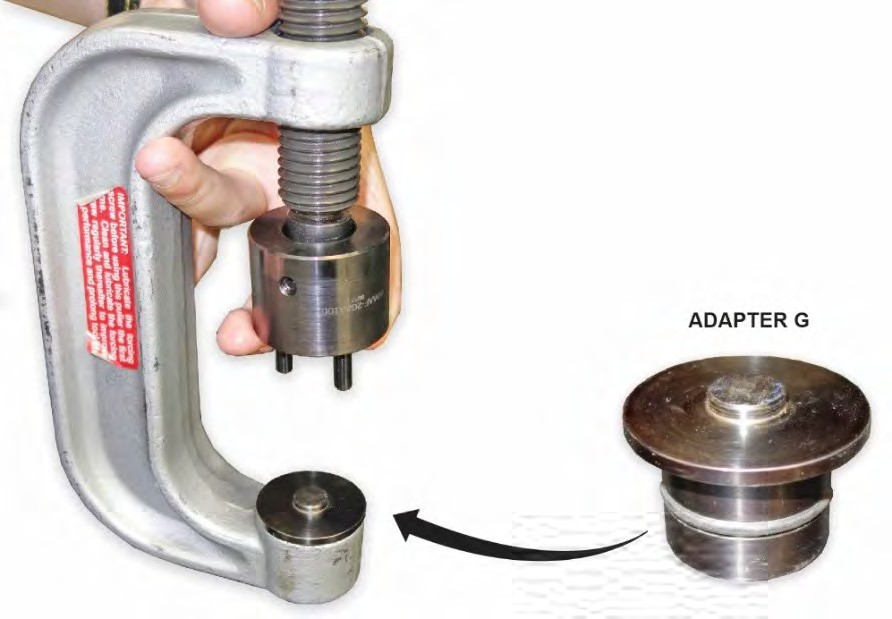
- If you are using the U-Joint Removal Tool (T/N OTC7248), install Adaptor G (T/N 07XAF-001050B).
REPAIR PROCEDURE A (HEIGHT ADJUST VTA UNIT REPLACEMENT)
| CAUTION |
| Be careful; there are many sharp edges. Wear protective gloves. Always wear protective eyewear when using a hammer or impact tools. |
- Turn the ignition switch to the ON position and check if the SRS indicator comes on for about 6 seconds, then turns off.
- If the indicator comes on, then turns off after about 6 seconds, go to step 2.
- If the indicator does not come on, or if it stays on, check the SRS DTC and record it.
- Adjust the seat to the highest position possible, then lower by about 1/2 inch.
- Disconnect the battery negative cable and wait at least 3 minutes before continuing.
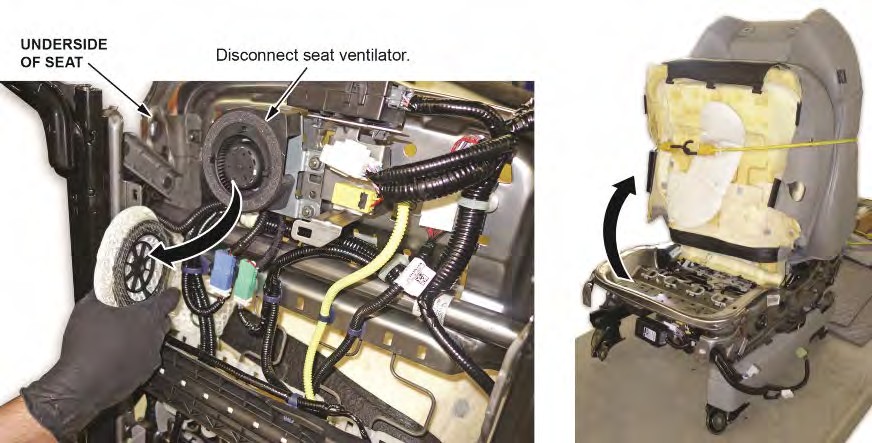
- Remove the affected seat and seat cushion cover/pad. Refer to the service information for the model and model year you are working on.
NOTES
- Do not remove the cushion cover from the foam pad. Remove both parts as an assembly.
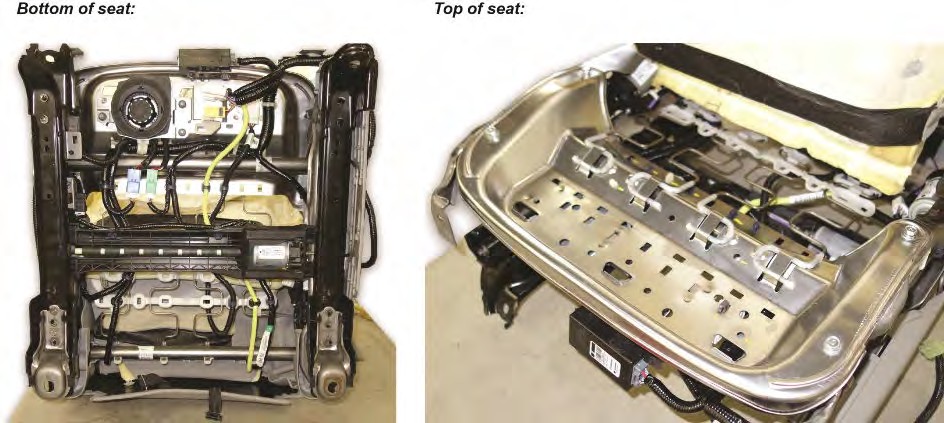
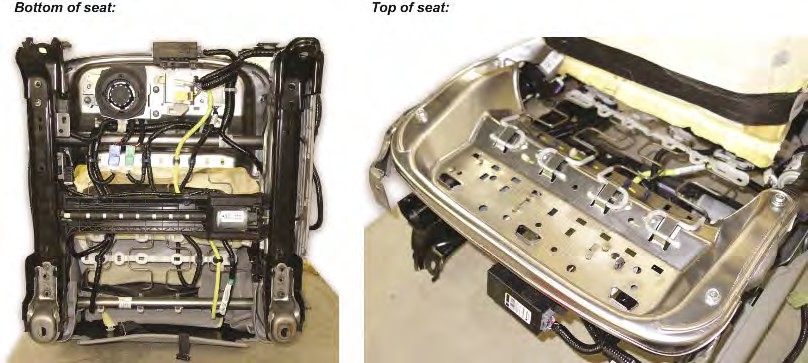
- For reference during assembly, take a photo of the harness routing and clip location layout as shown.
- Ventilated seat is shown. It may differ slightly from the seat you are repairing.
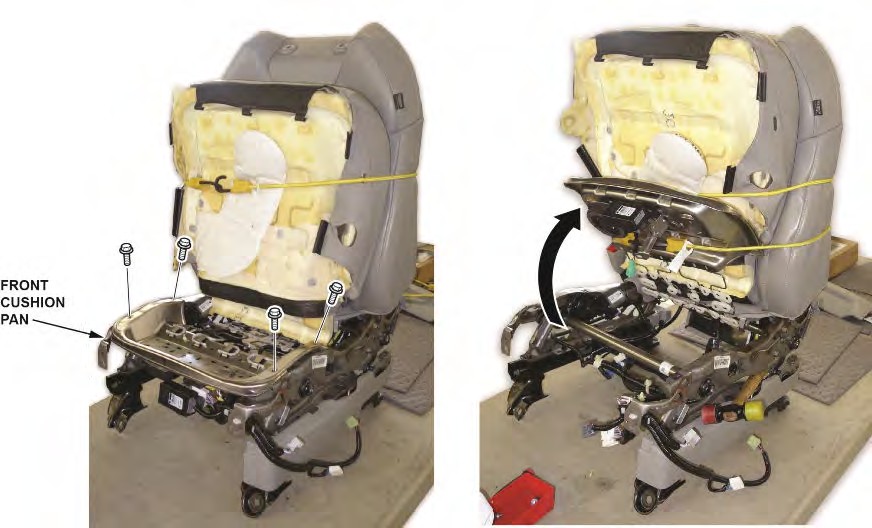
- Remove any harnesses or harness clips that will prevent removal of the cushion pan.
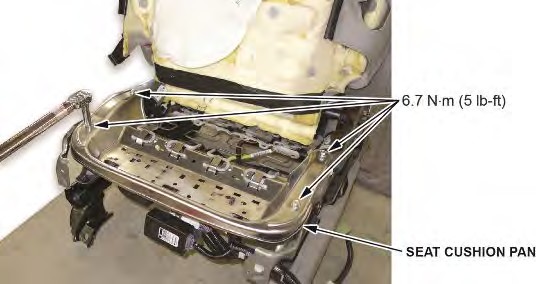
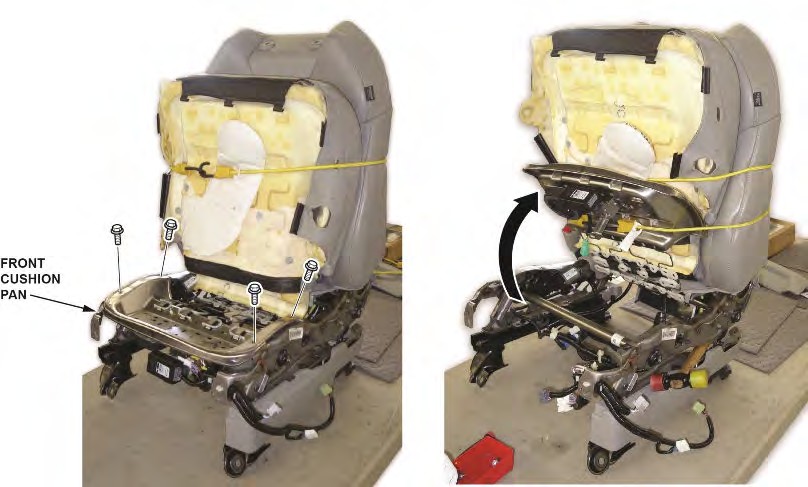
- Remove the four 10 mm bolts from the front cushion pan.
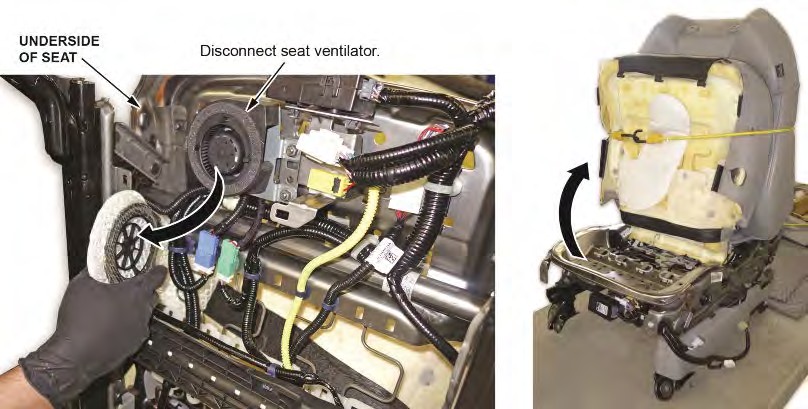
- Lift the cushion pan, and hold it up with a bungee cord or set the seat on its back on a clean surface to keep the cushion pan out of the way.
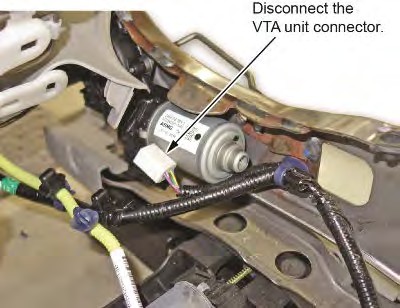
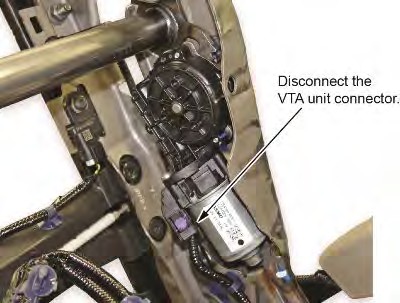
- Disconnect the VTA unit connector.
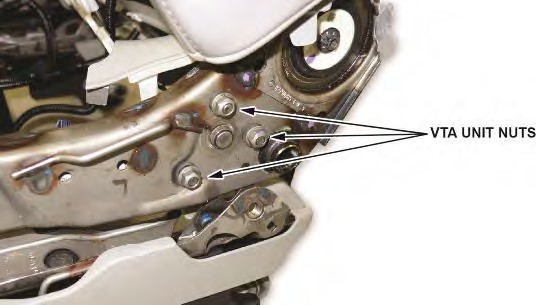
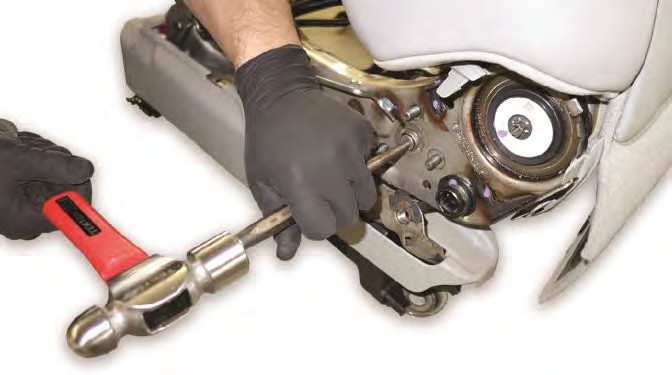
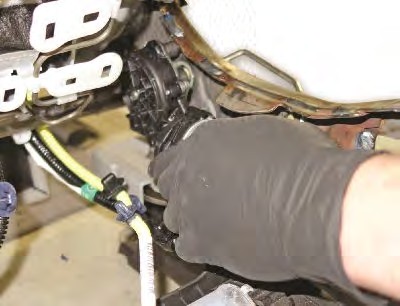
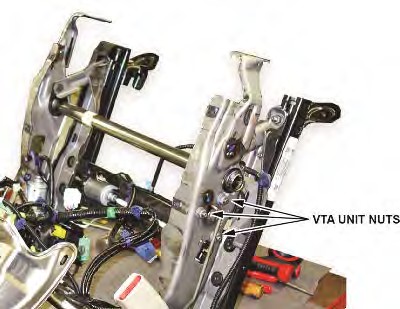
- Remove the VTA unit nuts, then remove the VTA unit.
NOTES
- If the seat frame is too low and you cannot access the VTA unit nut, use an open end wrench.
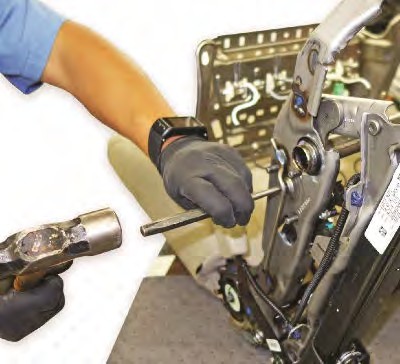
- If it is difficult to remove the VTA unit after removing the nuts, hit the center shaft of the VTA unit with a punch tool and hammer to remove it.
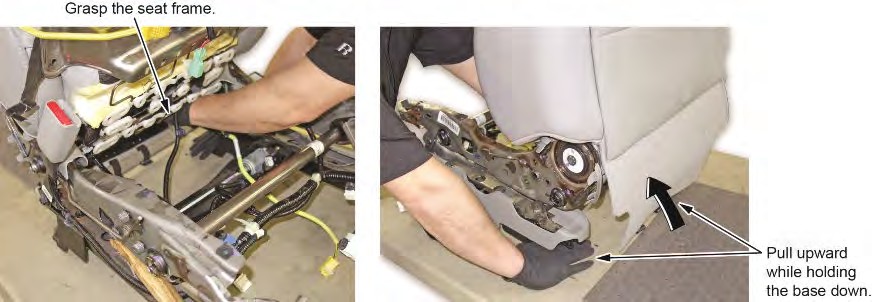
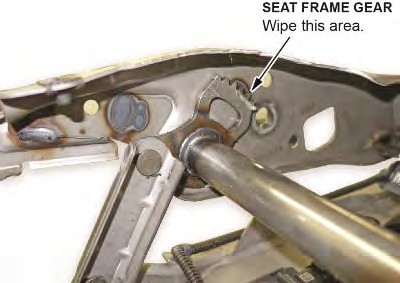
- Raise the seat as much as possible by pulling the seat frame as shown. This allows easier meshing of the gear teeth when installing the new VTA motor.
NOTE
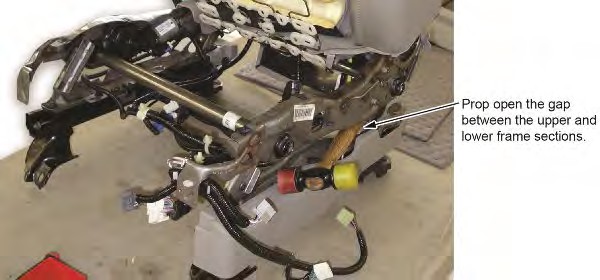
The photo below shows how the seat should look after it is raised.
| CAUTION |
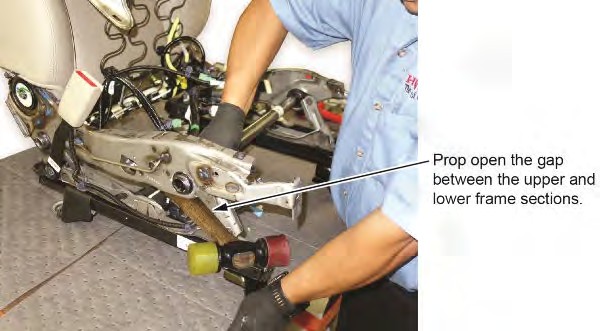
| Place a hammer handle (or similar tool) between the upper and lower sections of the seat frame to prevent the rear of the frame from collapsing and pinching fingers. Remove the blocking hammer ONLY when you have installed and aligned the new VTA motor. |
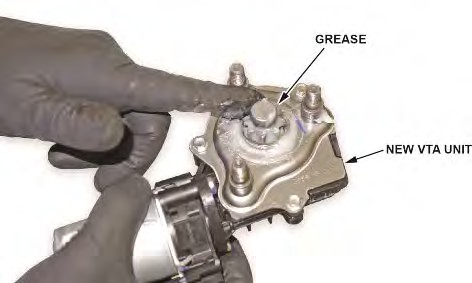
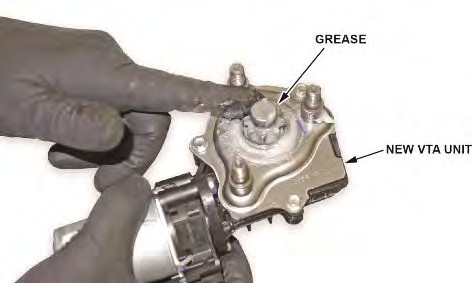
- Apply the provided grease to the new VTA unit motor splines.
NOTE
Only 1/8th of the grease packet is needed. Do not use the whole packet.
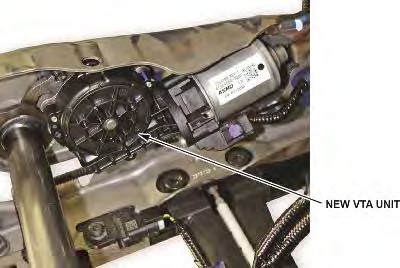
- Mount the new VTA unit onto the seat frame.
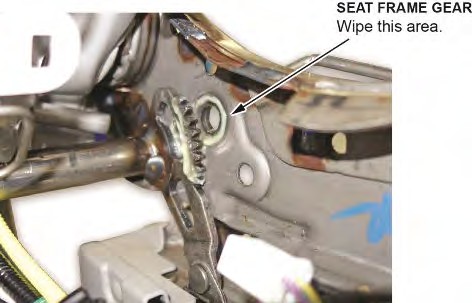
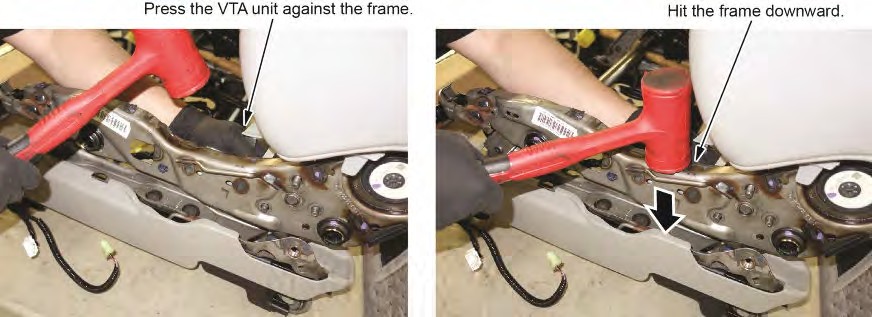
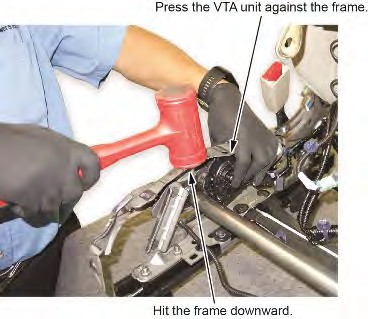
- While applying pressure to keep the VTA unit against the seat frame, use a rubber mallet or plastic hammer to hit the frame downwards. This will allow the VTA unit splines to align and engage with the frame gear.
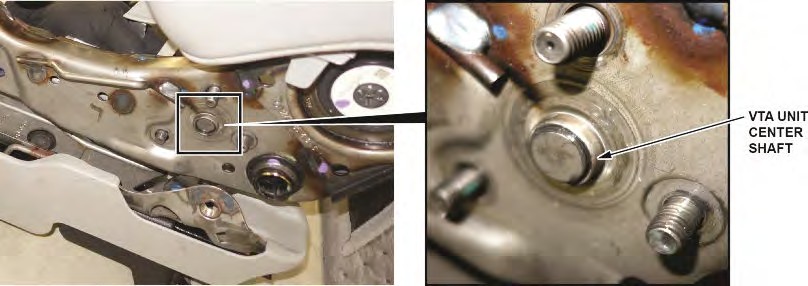
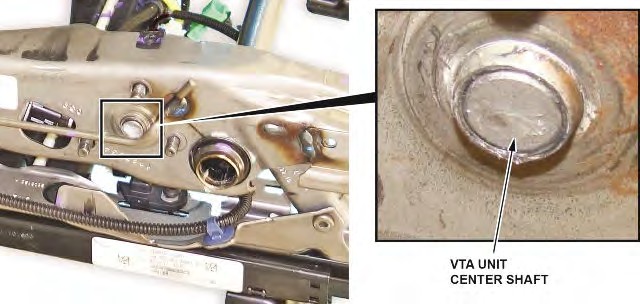
- Make sure the VTA unit splines and seat frame gear are properly engaged. The VTA unit center shaft should be protruding from the frame.
NOTES
- You may need to adjust or remove the blocking hammer handle if it is preventing proper gear engagement.
- Use caution as the seat will NOT be fully supported and may collapse or pinch fingers until the new VTA unit is secured to the seat frame.
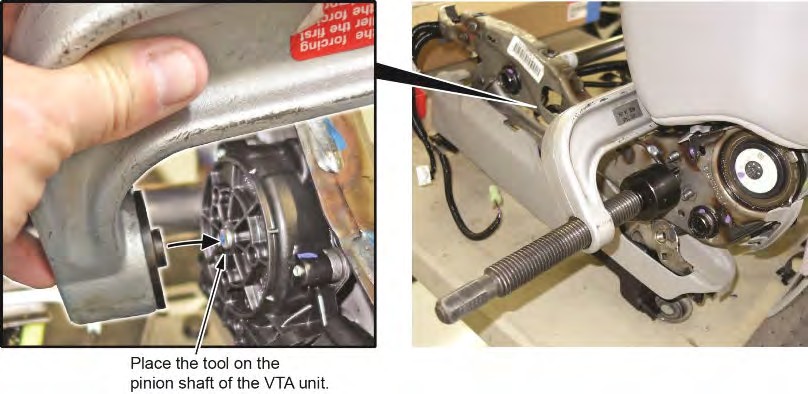
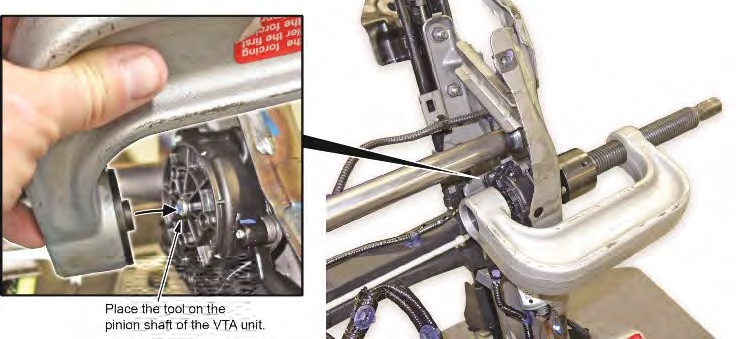
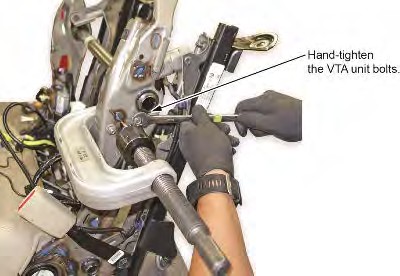
- Place the meshing tool as shown. Center the tool on the pinion shaft protruding from the VTA unit.
NOTICE
- DO NOT over tighten the C-clamp.
- DO NOT attempt to install the VTA unit without using the meshing tool. Seating the VTA unit by tightening the nuts will damage the VTA unit.
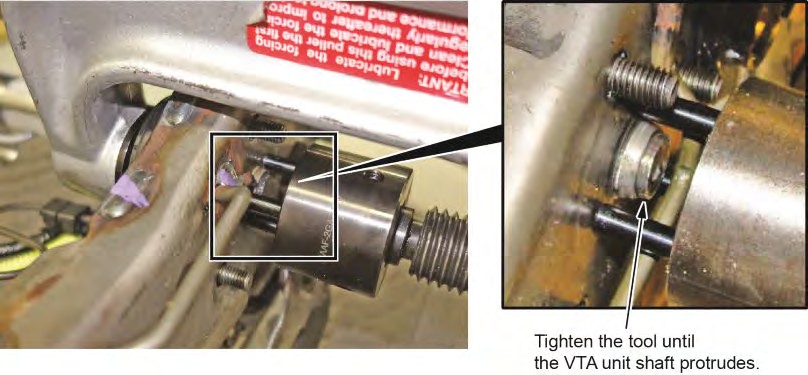
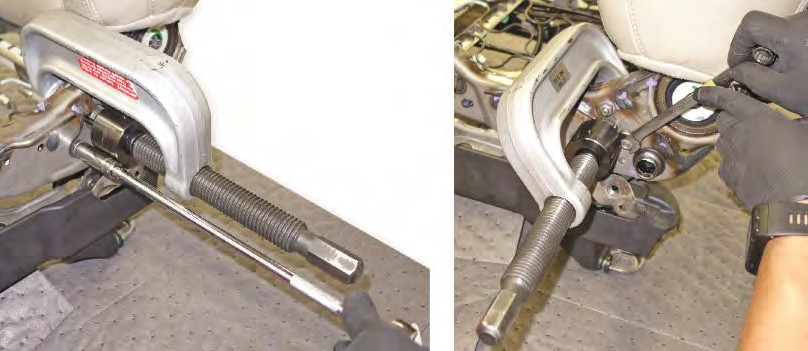
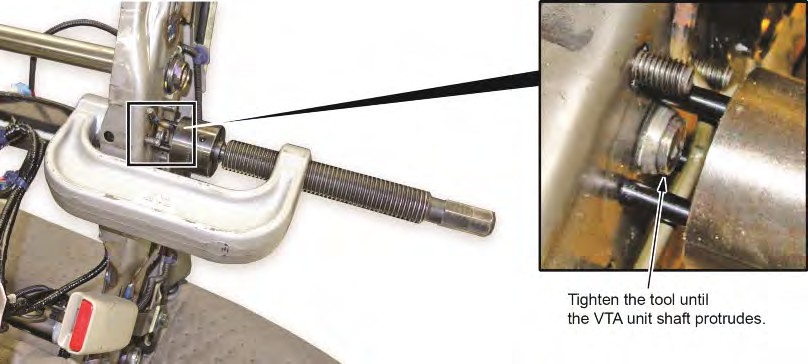
- Gradually tighten the C-clamp until the VTA unit shaft is protruding out of the frame. Once the VTA unit shaft is protruding, go to the next step.
NOTICE
- DO NOT over tighten the C-clamp.
- DO NOT attempt to install the VTA unit without using the meshing tool. Seating the VTA unit by tightening the nuts will damage the VTA unit.
- With the C-clamp still in place, install the new VTA unit nuts and snug them with a wrench.
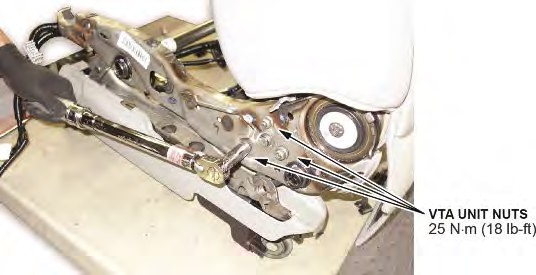
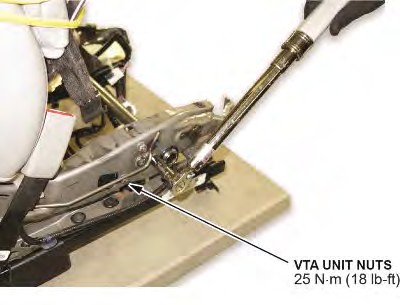
- Remove the C-clamp, and torque the nuts to 25 N•m (18 lb-ft).
- Make sure the VTA unit is supporting the seat’s weight, then remove the blocking hammer or tool.
- Connect the VTA unit connector.
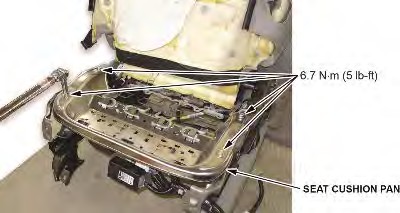
- Lower the seat cushion pan, and install the bolts. Torque the bolts to 7 N•m (5 lb-ft).
- Route and install the harnesses and the harness clips.
NOTE
Make sure the routing is correct by looking at the photo you took before disassembly.
- Install all other removed parts in the reverse order of removal, and install the seat.
- Reconnect the battery.
- If you are repairing a memory seat, clear the driving position memory as outlined in the service information.
- Make sure the height and tilt functions on the seat work properly and the noise is gone.
- Turn the ignition switch to the ON position and check if the SRS indicator comes on for about 6 seconds, then turns off.
- If the indicator comes on, then turns off after about 6 seconds, the procedure is complete.
- If the SRS indicator did not perform correctly at the beginning of the procedure, check to see if the same problem exists. If there are additional problems, make sure all of the reassembly steps were completed.
REPAIR PROCEDURE B (TILT ADJUST VTA UNIT REPLACEMENT)
| CAUTION |
| Be careful; there are many sharp edges. Wear protective gloves. Always wear protective eyewear when using a hammer or impact tools. |
- Turn the ignition switch to the ON position and check if the SRS indicator comes on for about 6 seconds, then turns off.
- If the indicator comes on, then turns off after about 6 seconds, go to step 2.
- If the indicator does not come on, or if it stays on, check the SRS DTC and record it.
- Adjust the seat to the highest position possible.
- Disconnect the battery negative cable and wait at least 3 minutes before continuing.
- Remove the affected seat and seat cushion cover/pad. Refer to the service information for the model and model year you are working on.
NOTES
- Do not remove the cushion cover from the foam pad. Remove both parts as an assembly.
- For reference during assembly, take a photo of the harness routing and clip location layout as shown.
- Ventilated seat is shown. It may differ slightly from the seat you are repairing.
- Remove any harnesses or harness clips that will prevent the removal of the cushion pan.
- Remove the four 10 mm bolts from the front cushion pan.
- Lift the cushion pan, and hold it up with a bungee cord or set the seat on its back on a clean surface to keep the cushion pan out of the way.
- Disconnect the VTA unit connector.
- Remove the VTA unit nuts.
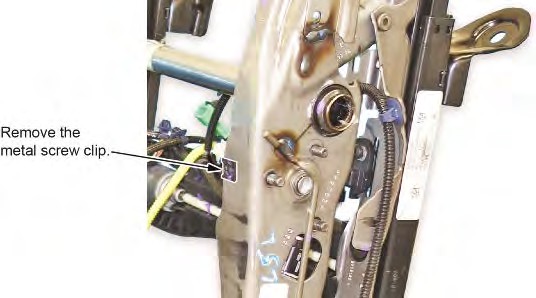
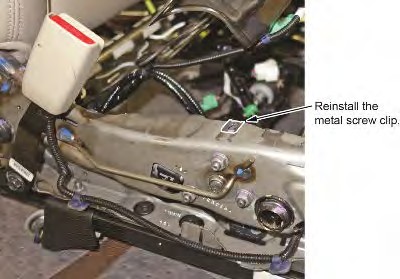
- Remove the metal screw clip on top of the VTA unit with a clip removal tool.
NOTE
Make sure you do not damage or lose the metal screw clip.
- Remove the VTA unit.
NOTE
If it is difficult to remove the VTA unit after removing the nuts, hit the center shaft of the VTA unit with a punch tool and hammer to remove it.
- Raise the seat as much as possible by grabbing the seat frame as shown. This allows easier meshing of the gear teeth when installing the new VTA motor.
| CAUTION |
| Place a hammer handle (or similar tool) between the upper and lower sections of the seat frame to prevent the rear of the frame from collapsing and pinching fingers. Remove the blocking hammer ONLY when you have installed and aligned the new VTA motor. |
- Apply the grease provided in the kit to the new VTA unit splines.
NOTE
Only 1/8th of the grease packet is needed. Do not use the whole packet.
- Mount the new VTA unit to the seat frame.
- While applying pressure to keep the VTA unit against the seat frame, use a rubber mallet or plastic hammer to hit the frame downwards. This will allow the VTA unit splines to align and engage with the frame gear.
- Make sure the VTA unit splines and seat frame gear are properly engaged. The VTA unit center shaft should be protruding from the frame.
NOTES
- You may need to adjust or remove the blocking hammer handle if it is preventing proper gear engagement.
- Use caution as the seat will NOT be fully supported and may collapse or pinch fingers until the new VTA unit is secured to the seat frame.
- Place the meshing tool as shown. Center the tool on the pinion shaft protruding from the VTA unit.
NOTICE
- DO NOT over-tighten the C-clamp.
- DO NOT attempt to install the VTA unit without using the meshing tool. Seating the VTA unit by tightening the nuts will damage the VTA unit.
- Gradually tighten the C-clamp until the VTA unit shaft is protruding from the frame. Once the VTA unit shaft is protruding, go to the next step.
NOTICE
- DO NOT over-tighten the C-clamp.
- DO NOT attempt to install the VTA unit without using the meshing tool. Seating the VTA unit by tightening the nuts will damage the VTA unit.
- With the C-clamp still in place, install the new VTA unit nuts and snug them with a wrench.
- Remove the C-clamp, and torque the nuts to 25 N•m (18 lb-ft).
- Install the metal screw clip.
- Make sure the VTA unit is supporting the seat’s weight, then remove the blocking hammer or tool.
- Connect the VTA unit connector.
- Lower the seat cushion pan, and install the bolts. Torque the bolts to 7 N•m (5 lb-ft).
- Route and install the harnesses and the harness clips.
NOTE
Make sure the routing is correct by looking at the photo you took before disassembly.
- Install all other removed parts in the reverse order of removal, and install the seat.
- Reconnect the battery.
- If you are repairing a memory seat, clear the driving position memory as outlined in the service information.
- Make sure the height and tilt functions on the seat work properly and the noise is gone.
- Turn the ignition switch to the ON position and check if the SRS indicator comes on for about 6 seconds, then turns off.
- If the indicator comes on, then turns off after about 6 seconds, the procedure is complete.
- If the SRS indicator did not perform correctly at the beginning of the procedure, check to see if the same problem exists. If there are additional problems, make sure all of the reassembly steps were completed.
END
A18-034
April 16, 2018
Version 1
 Loading...
- [Pro OBD2 Scanner] - BlueDriver is the easiest way to scan and understand your vehicle like a professional mechanic. Read and clear your car’s trouble codes and check engine light.
- [Read & Clear All The Codes] - BlueDriver's enhanced vehicle diagnostics gives you access to information normally available only to mechanics on their OBD2 scan tools. Now you can read and clear ABS, Airbag, SRS, TPMS codes, and many more.
- [Get The Right Fix & View Live Data] - Much more than a car code reader, BlueDriver is a diagnostic tool. You’ll get unlimited repair reports with possible causes and fixes, plus real-time health monitoring while you drive with the live data feature.
- [Wireless & Bluetooth Enabled] - Say goodbye to wires. BlueDriver connects with Bluetooth via your phone/tablet to a sensor that plugs into your car's OBDII port. Get all of the capabilities of an expensive code reader & scan tool without any annoying wires.
- [User-Friendly App and Repair Videos] - BlueDriver gives you more ways to scan and fix your vehicle. Our iOS & Android app connects you to a large database of repair videos with step-by-step directions of repairs.
- [Easy to Use--Work out of box] + [FOXWELL 2025 New Version] FOXWELL NT604 Elite scan tool is the 2025 new version from FOXWELL, which is designed for those car owners who want to figure out the cause issue before fixing the car problem via scanning the most common systems like abs srs engine and transmission.The NT604 Elite diagnostic tool comes with latest software, which can be used out of box. No need to waste time to download the software first.
- [Affordable] + [Reliable Car Health Monitor] Will you be confused what happen when the warning light of abs/srs/transmission/check engine flashes? Instead of taking your cars to dealership, this foxwell scanner will help you do a thorough scanning and detection for your cars and pinpoint the root cause. It will t-urn off the warning light car after the problem is fixed.👉TIPS: Airbag crash/collision data can NOT be cleared even you replace the new airbag.
- [5 in 1 Diagnostic Scanner] Compared with those auto scanners (50-100), NT604 Elite code scanner not only includes their OBDII diagnosis but also it can be an abs/srs scanner, transmission and check engine code reader. When it’s an odb2 scanner, you can use it to check if your car is ready for annual test through I/M readiness menu. In addition, live data stream, built-in DTC library, data play back and print, all these features are a big plus for it. Note: doesn't support maintenance function.
- [Fantastic AUTOVIN] + [No extra software fee] Through the AUTOVIN menu, this NT604 Elite car scanner allows you to get your V-IN and vehicle info rapidly, no need to take time to find your V-IN and input one by one. What's more, the NT604 Elite abs srs scanner supports 60+ car makes from worldwide (America/Asia/Europe). You don’t need to pay extra software fee.
- [Solid protective case KO plastic carrying bag] + [Lifetime update] Almost all same price-level obd scanner diagnostic tool only offers plastic bag to hold on the scanner.However, NT604 Elite automotive scanner is equipped with solid protective case, preventing your obd2 scanner from damage. Then you don’t need to pay extra money to buy a solid toolbox.
- 【Best Bang For Your Buck!-FOXWELL NT614 Elite】1. 2025 New software-faster than old one. 2. One click lifetime WIFI f-ree update, no need to use the annoying Micro SD card. 3. New Update-No need to register on the FOXWELL website before use, more convenient! 4. More intuitive viewing with new interface, you can find I/M, Battery Test, DTC Lookup directly.
- 【UPGRADE OF NT604-POWERFUL 5 RESETS】Wanna to do maintenance service for your car however the basic 4 system scanner tool can't do it? Then FOXWELL NT614 Elite-the upgraded version of nt604, was born for providing you with 5 special functions-ABS Bleeding/Oil Reset/SAS Calibration/EPB Reset/Throttle Reset. These functions are enough for your daily needs. No need to buy those 300-600 dollors obd2 scanner. Saving your unnecessary repair fee with FOXWELL nt614 car scanner diagnostic tool!
- 【ENGINE/ABS/SRS/TRANSMISSION CODE READER】Don't know what's wrong with your car when the warning light of ABS, transmission, SRS, Engine flashes? NT614 Elite obd2 scanner can pinpoint the problem components. It boasts many functions of engine, abs, srs and transmission such as read & erase fault codes and grapgh live data like engine temp, wheel speed sensor, read transmission temperature, etc. Compared with car repairs, using foxwell nt614 elite is more convenient and a-ffordable.
- 【ABS BLEEDING OBD SCANNER】Do you always feel the brake pedal was slowly sinking to floor or it's loose after doing a complete front & rear brake job? And then you need to take more time than normal to stop your car, which is very dangerous. That's because when you open the brake system to replace components, air gets inside. To get a firm brake pedal, the air need to be removed by bleeding the brakes. NT614 Elite odb2 scanner can do ABS BLEEDING perfectly for your cars.
- 【SMART AUTOVIN & LIFETIME F-REE WIFI UPDATE & PERFECT GIFT CHOICE】With the fantastic AUTOVIN function, this nt614 scan tool can get your VIN and vehicle info rapidly. No need to spend much time in finding your VIN and input it one by one. Also, the lifetime f-ree wifi update is provided for more vehicle coverage, bug fixes, newly added parameters. SAVE AT LEAST 1000+ PER YEAR. And this automotive scanner is a best gift for your Dad, Husband, Boyfriend and Handy Men.
- [Transform Your Car Care Experience] - With BLCKTEC, instantly become your own professional mechanic. Effortlessly read and clear your car’s trouble codes and check engine light, ensuring your vehicle stays in top condition.
- [Empower Yourself with Comprehensive Diagnostics] - Unlock the full potential of your vehicle with the BLCKTEC 430. Access detailed diagnostics previously exclusive to professional mechanics’ OBD2 scan tools, including ABS, Airbag, SRS, TPMS codes, and beyond, right at your fingertips.
- [Drive with Confidence] - The BLCKTEC 430 is more than just a car code reader; it's your personal vehicle health advisor. Receive tailored repair reports with potential causes and verified solutions for your specific make and model, guiding you to the right fix every time.
- [Seamless Connectivity, Ultimate Convenience] - Experience the freedom of wireless diagnostics with this portable car scanner. Easily connect via Bluetooth to our intuitive sensor and enjoy all the functionalities of high-end scan tools without the clutter of wires, directly from your smartphone or tablet. To connect the tool to the App, please DO NOT go to device's Bluetooth settings, instead, open RepairSolutions2 App and follow the instructions on the App to pair the BLCKTEC 430.
- [DIY Repairs Made Easy] - Navigate car maintenance with ease using our premium app. Access a vast library of easy-to-follow repair videos, guiding you through each step of the repair process, compatible with both iOS & Android devices.
- Updated New Version AD600S: Discover the improved version of TOPDON AD600S OBD2 scanner. Now immerse yourself in a seamlessly diagnostic experience with Android 11.0 OS. With an upgraded 32G ROM, this scan tool offers ample storage and faster performance. The 5-inch display with 1280x720 resolution offers high-definition clarity, ensuring easy readability for every diagnostic detail
- Professional 4 Systems Diagnostics: For car owners dealing with common issues such as engine, transmission, ABS, and SRS, the TOPDON AD600S code scanner delivers professional diagnostic services. It easily reads and clears fault codes, analyzes data streams and more, ensuring a quick identification of problems. Additionally, the DTC Lookup function provides corresponding fault code analysis
- 9 Hot Reset Functions: Say goodbye to costly trips to the repair shop for resetting after routine maintenance such as changing oil, replacing tires, or installing new brake pads. The AD600S diagnostic tool effortlessly tackles common automotive challenges with just one click. Cut costs and cut the hassle with its 9 reset functions: Oil/BMS/ABS/SAS/EPB/DPF/TPMS/Throttle/injector coding
- Support for 10,000+ Car Models: The upgraded AD600S car scanner now supports 67+ global brands and 10,000+ models, ensuring compatibility with a diverse range of vehicles. Whether American, German, French, or Japanese, the AD600S diagnostic scanner has you covered. (Note: Contact TOPDON customer service for vehicle compatibility inquiries before purchase)
- Life time Free Updates: The AD600S diagnostic tool offers free upgrades with convenient one-click updates via Wi-Fi. Our dedicated TOPDON technical team continuously enhances our product's software, providing users with expanded vehicle support and an improved user experience through regular updates
- 【Great Ideal For Every Car Owner】Prefect choice for your father, husband, brother or boyfriend. EVERY CAR OWNER WILL NEED IT! Also, the lifetime update is provided for more vehicle coverage, bug fixes. SAVE AT LEAST $1000+ PER YEAR!Get LAUNCH CRP123 V2.0 Elite car diagnostic scanner and give your lover a surprise!*R each us to Get the Extra Gifts :Protective Case Storage Bag.
- 【2025 Newly Added 3 Reset Functions】CRP123 V2.0 obd2 scanner with upgrades it offers Throttle Adaptation,Oil Reset and SAS Reset functions for FREE now!! Optimize your engine performance with Throttle Adaptation, reset your oil life system with ease to save time and money on maintenance, and enhance your vehicle's handling and safety with SAS Reset.Covering more daily repairs,become the most cost-effective product in its price range,save your time and money!
- 【 Read & Clear/Reset Engine/ABS/SRS/Transmission Diagnostic Scan Tool 】LAUNCH CRP123 V2.0 OBD2 Scanner can test Engine, Transmission, ABS and Airbag four systems, also reads and resets code, displays data stream graphic, stores and playbacks dynamic data stream,helps to quick analysis and diagnosis.
- 【 Error Fault Code Reader】Except the full 10 modes OBD2 diagnostic functions like, retrieving I/M readiness, Freeze Frame Data, Read Dynamic Data stream and V-ehicle Information, O2 Sensor Test, EVAP Test of F-uel Tank System (Mode 8) and Advanced On-board Monitoring (Mode 6), launch crp123 v2.0 obd2 scanner can not only reveal what error codes your car is producing, but also erase your v-ehicle’s check engine light after problem fixed, the DTC help and explanation also tell you the exact problem.
- 【 Live Data Graphing + Read/Record/Playback Data stream + Print diagnostic data 】Live Data Graphing,more intuitive to know your vehicle’s problem.Large size Color Screen ;Print Function:Print the diagnose result easily; with user manual and register & update tutorial video uploaded in the link by us,you can Look up it anytime by ONE-CLICK.
- 【2025 UPGRADED VERSION, NEW CHIPS, ADD MORE FUNCTIONS, No Extra Software Fee】Faster! The 2025 CRP123I V2.0 car diagnostic scanner has a new processor, Android 8.1, 32GB of memory, 5-inch touchscreen (720P), 6000mAh rechargeable battery, One-touch Wi-Fi Lifetime Free update for more vehicle coverage, bug fixes,newly added parameters, and functionality to help you access, diagnose and fix more vehicles faster,upgrade of CRP123I.
- 【Newly Added 7 RESET FUNCTIONS】+ 【BATTERY VOLTAGE TEST】2025 New Ver. scan tool CRP123I V2.0 ADDS NEW SPECIAL FUNCTIONS-Throttle Adaptation,Oil Reset,SAS Reset,ABS Bleeding,BMS Reset,EPB Reset, D.P.F Regeneration,to maintain your vehicle system safely and efficiently.Graphing the battery voltage easier and more intuitive for the real-time monitors to check.It does not only reveal what error codes your car is producing,but also erase your vehicle's check engine light after the problem is fixed.
- 【Multi System Diagnostic Tool】LAUNCH CRP123I V2.0 obd2 scanner check ABS/SRS/AT/ENG systems &10 OBD2 modes, read/clear fault codes,Online Google Search, 4 IN 1 Graphing.Store and playback of dynamic data stream help to quick analysis and diagnosis. Generate vehicle health reports with one click and share them with your email via W-ifi which helps avoid blind maintenance. CRP123I costs less, in the long run, saving you up to $2000 each year.
- 【Fre-e Lifetime Update + AutoAuth for FCA SGW+ Auto Vin】This scan tool features One-click w-ifi update and fre-e for fixing more bugs; Realtime battery voltage graphing helps to Judge the state of the battery; Auto Vin,facilitate accurate diagnosis and provide useful information.Besides,CRP123I V2.0 support AutoAuth for FCA SGW,For 2017 and later FCA Vehicles with Secure Gateway Module (SGW),with no limitation.
- 【Cover 10000+ Models & 90+ Car Brands】CRP123I V2.0 Elite launch scanner is capable of diagnosing fault codes on more than 10000+ vehicles from 1996 to 2025 and 90+ car makes worldwide. Support almost all OBDII cars such as SUVs, minivans, light-duty trucks, etc. It's an excellent tool for all types of mechanics from novice to pros. NOTICE: Compatibility will vary on vehicles' model and year, pls c-ontact us via Q&A/message before purchase.
- 【Professional 4 Systems Diagnostics】For DIYers addressing typical concerns like engine, transmission, ABS, and SRS, the TOPDON AD500 vehicle scanner provides specialized diagnostic solutions. It effortlessly interprets and eliminates fault codes and scrutinizes data streams, ensuring the prompt detection of issues.
- 【6 Reset Functions】The AD500 car diagnostic tool offers essential features like Oil Reset, Throttle Adaptation, SAS/TPMS/BMS/EPB Reset. Easily reset oil change indicators, fine-tune throttle response, and recalibrate steering angle sensors for optimal vehicle performance and maintenance convenience.
- 【Works Easier with AD500】The AD500 scanner combines a 5” touchscreen with buttons for easier and seamless operation. Elevate your diagnostic experience with DTC Lookup, Diagnostic data record, and printing diagnostic reports via email. Stay up to date with lifetime free upgrades via Wi-Fi, ensuring your tool is always equipped with the latest features.
- 【Fast Diagnostics, Instant Support】With AutoVIN, instantly obtain crucial vehicle details for expedited diagnostic processes. The AD500 code reader not only facilitates data stream recording for later review but also acts as a battery voltage monitor, providing valuable insights into your vehicle's battery health. If you encounter any diagnostic hurdles, share feedback with TOPDON for prompt professional support.
- 【Unlock FCA Secure Gateway】Supports cutting-edge CAN FD protocol, making it compatible with modern vehicles including 2020+ GM & Chrysler. It bypasses the FCA Secure Gateway to stay up to date with newer models from Chrysler, Jeep, Fiat, and others.
- 【Designed for Volkswagen
 (VAG) Cars Diagnostics】The VD500 OBD2 scanner is specifically designed to diagnose Volkswagen
 Group (Fits for VW
 /Audi
/Audi /Skoda/ SEAT) 12-volt 16-pin vehicles, but can also be used with other 12-volt (non-Volkswagen
 ) and light trucks (non-electric) vehicles manufactured in 1996 or later that are OBD II -compliant with standard 16-pin OBD II protocols (J1850 VPM, J1850PWM, ISO9141, KWP 2000 and CAN)
 - 【Basic + Special Advanced Functions for VAG Vehicle】The ANCEL VD500 scan tool for vw
 can not only read and clear codes on engine, ABS, transmission, SAS (not all cars), ESP, TPMS and other systems, but also reset the oil, brake pad(epb service) and throttle position adaption. If you don't know how to do it, please con-tact us in time. Include your car model, year and the function you want to do
 - 【Plug and Play, No Complex Connection】The ANCEL VD500 is truly plug-and-play—no complicated networking or batteries required. Simply connect it and use it anywhere in your car, anytime. Fast, easy, and convenient
- 【Full Access, No Hidden Costs】Unlike other detectors that charge extra for features, the ANCEL VD500 is 100% no extra additional charges, with no hidden costs. The full functionality is accessible, and the system upgrade is included, a favorite choice among customers
- 【Wide Compatibility for Volkswagen
 Cars】The VD500 diagnostic scanner for audi
 offering for Volkswagen
 vehicles covers the following vehicles: fits for VW
 (CC, EOS, Golf, GTI, Jetta, Passat, Phaeton, Polo, Rabbit, Sharan, Tiguan, Touran, Touareg); fits for Audi
 (A3, A4, A6, A7, A8, A5, Q3, Q5, Q7, R8, RS3, TT, RS, RS5, S4, S6); fits for Skoda (Octavia, Rapid, Yeti, Kodiaq, Fabio, Superb); fits for SEAT (Leon, Ateca, Ibiza, Altea, Cushion, Cord, Alhambra) Diagnostics
- Comprehensive OBD2 Scanner with 15 Resets: The XTOOL D5S car code reader and vehicle reset tool provides an advanced diagnostic solution with 15 high demand reset functions, including Electronic Parking Brake Reset (EPB), SAS, BMS Reset, Throttle Body Relearn, TPMS Reset, ABS Bleeding, Injector Coding, Gearbox Match, Suspension Adjustment, Headlight, Window Initialization, Crank Sensor Relearn and more. Equipped with CAN FD Protocol and FAC AutoAuth, the D5S obdii scanner diagnostic tool ensures compatibility with a broad range of modern vehicles, allowing users to address common maintenance needs quickly.
- 4 Main System Car Diagnostic Scanner & Full OBD2 Diagnostics: The XTOOL D5S vehicle code reader is ideal for home mechanics, DIYers, and professionals, providing access to Transmission/Engine/ABS/SRS to read dtcs, and live data can be displayed in text or up to 4 pid data graphs, along with full OBD2 diagnostics to check the engine light on, other obd2 issues and routine maintenance. This scan tool ensures you can keep your vehicles in top condition, avoiding costly repairs or unexpected breakdowns. NOTE: Some vehicles display three systems after connection because the transmission and engine of some vehicles are integrated into one
- One-Tap W!Fi Updates + No Software Fees: Enjoy a 5.45” high-resolution touchscreen (1440x720) that’s easy to read, even in low light. Free lifetime software updates over Wi-Fi keep your D5S OBD2 Scanner Diagnostic Tool updated with the latest features—no hidden fees. Ample 32GB storage plus expandable memory ensures room for all your diagnostic data, while durable silicone grips provide comfortable, secure handling. This makes D5S a cost-effective, long-term investment for continuous diagnostic support, a reli~able automotive scanner diagnostic tool for your family
- Wide Compatibility Across 90+ Vehicle Brands: The XTOOL D5S Scanner for cars and trucks works with OBDII-equipped vehicles built after 1996, covering over 90 vehicle brands, including 12V diesel and SUVs, minivans, and light-duty trucks. It supports most of protocols include CAN FD for broad compatibility. For vehicle-specific compatibility, send us your vehicle information to check the compatibility before purchase
- Super Clear Navigation Display: The XTOOL D5S car scanner enhances your diagnostic workflow with a super clear navigation display, designed for convenience and speed. TOP Capability include a Voltage Display for real-time monitoring of your vehicle’s electrical system, a “My Vehicle” Menu for adding and managing vehicle information, and Quick Button Interfaces for both Auto Scan and OBD2 Diagnostics, ensuring you can quickly access the menu you need. These features streamline the diagnostic process, allowing you to focus on what matters most—Efficient vehicle maintenance
Last update on 2025-05-08 / Affiliate links / Images from Amazon Product Advertising API
This product presentation was made with AAWP plugin.

