| “This site contains affiliate links for which OEMDTC may be compensated” |
Service Bulletin
A16-013
July 20, 2018
Version 6
High Pressure Fuel Pump Chirps
Supersedes 16-013, dated April 26, 2018, see REVISION SUMMARY.
AFFECTED VEHICLES
| Year | Model | Trim | VIN Range |
| 2016-18 | Pilot | ALL | ALL |
| 2017-19 | Ridgeline | ALL | ALL |
| 2018-19 | Odyssey | ALL | ALL |
REVISION SUMMARY
Under REPAIR PROCEDURE, a torque specification was revised.
SYMPTOM
There is a chirping coming from the engine area with the engine warmed up.
POSSIBLE CAUSES
The high pressure fuel pump is making a chirp.
NOTE
This noise does not impact pump, engine function, or reliability.
CORRECTIVE ACTION
Replace the high pressure fuel pump.
PARTS INFORMATION
| Part Name | Part Number | Quantity |
| Fuel Joint Pipe Set | 16012-R9P-315 | 1 |
| High Pressure Fuel Pump | 16790-RLV-305 | 1 |
| Retainer | 17711-S0X-931 | 1 |
| EGR Pipe Seal | 17103-RLV-A01 | 2 |
| Intake Manifold Gasket | 17101-RLV-A01 | 6 |
| Throttle Body Gasket | 17102-RLV-A01 | 1 |
| Intake Manifold Gasket | 17065-R9P-A01 | 1 |
| Intake Manifold Gasket | 17055-R9P-A01 | 1 |
| EGR Pipe Gasket | 18716-RB0-G01 | 1 |
WARRANTY CLAIM INFORMATION
The normal warranty applies.
| Operation Number | Description | Flat Rate Time | Defect Code | Symptom Code | Template ID | Failed Part Number |
| 1211U6 | Pilot and Ridgeline
Replace the high pressure fuel pump. | 1.6 hrs | 03214 | 04201 | 16-013A | 16790-5J6-305 |
| 1211U6 | Odyssey
Replace the high pressure fuel pump. | 1.1 hrs | 03214 | 04301 | 16-013B | 16790-5J6-305 |
Skill Level: Repair Technician
DIAGNOSIS
- If the noise is coming from the high pressure fuel pump, go to REPAIR PROCEDURE.
- If the noise is not coming from the high pressure fuel pump, continue with normal troubleshooting.
REPAIR PROCEDURES
- Relieve the fuel pressure. See service information.
- Set the No. 1 piston at top dead center (TDC). See service information.
- Remove the intake manifold and intake manifold base. See service information.
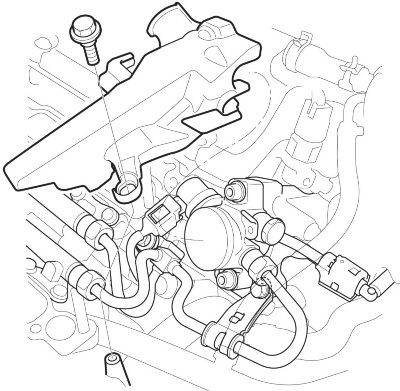
- Remove the high pressure fuel pump cover.
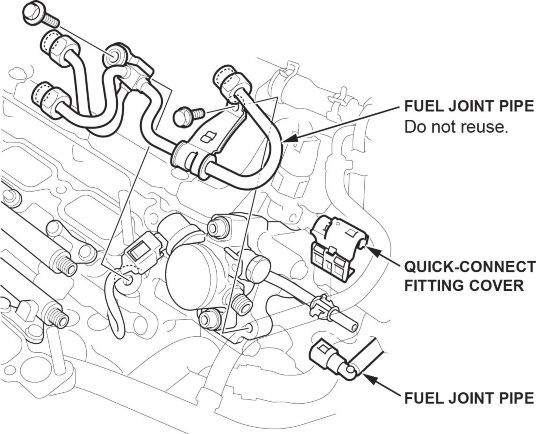
- Remove the quick-connect fitting cover.
- Disconnect the quick connect fitting.
- Remove the fuel joint pipe.
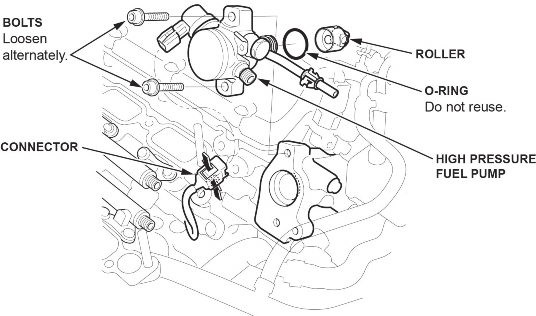
- Disconnect the high pressure fuel pump connector.
- Remove the bolts by loosening them alternately, then remove the high pressure fuel pump and the roller.
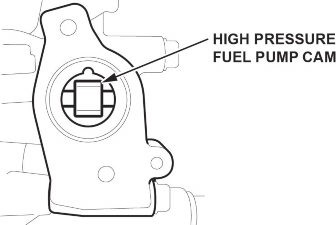
- Rotate the crankshaft and check the high pressure fuel pump cam for pits, scores, and excessive wear. If needed, replace the rear camshaft.
- Set the No. 1 piston at top dead center (TDC).
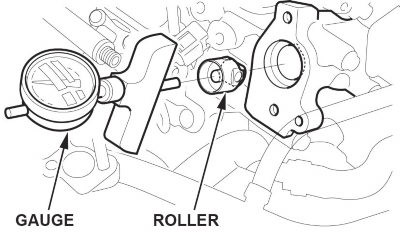
- Install the roller onto the high pressure fuel pump cam.
- Set the gauge on the roller and hold it, then set the dial to zero.
- Rotate the crankshaft 720° and measure the three cam lobes height. If the cam lobes are excessively worn, replace the rear camshaft.
NOTE
The high pressure fuel pump cam has three cam lobes. Cam Lobe Height Standard (New): 0.236 in (6.0 mm)
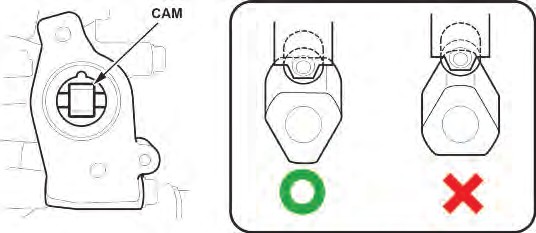
- Set the No. 1 piston at top dead center (TDC).
- Check the position of the cam that drives the high pressure fuel pump as shown.
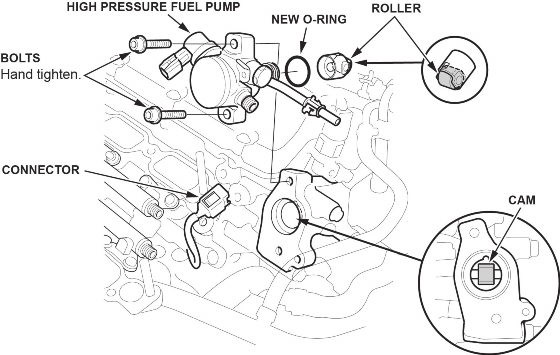
- Coat the roller, O-ring, cam and around the bore of the lifter with clean engine oil.
- Install the roller and the high pressure fuel pump. Install the bolts loosely by hand in an alternate pattern. Connect the connector.
NOTE
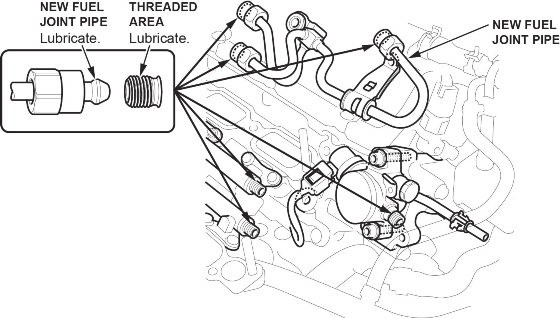
Failure to install a new fuel joint pipe will cause fuel leaks.
- Lubricate the top of the new fuel joint pipe and the threaded area of the fuel rails and the high pressure fuel pump with polyethylene glycol included in the new fuel joint pipe kit.
NOTE
Do not reuse the fuel joint pipe.
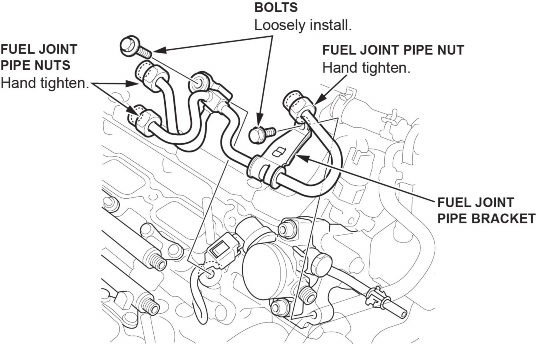
- Tighten the fuel joint pipe nuts by hand until the end of the joint pipe is seated on the fuel rails and high pressure fuel pump.
- Set the fuel joint pipe bracket on the cylinder head and loosely install the bolts.
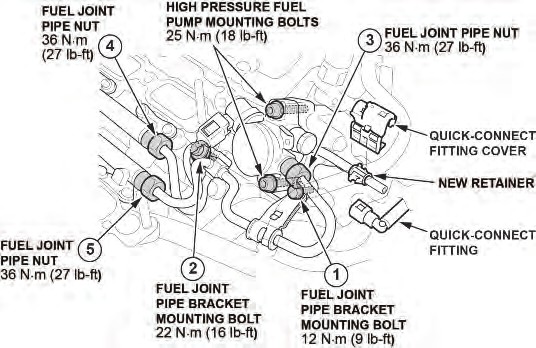
- Tighten the high pressure fuel pump mounting bolts to the specified torque.
- Tighten the fuel joint pipe bracket mounting bolts and the fuel joint pipe nuts to the specified torque in the numbered sequence shown.
NOTES
- A crowfoot-type special tool increases the torque applied by the torque wrench. Search Torque Specifications on the iN for details on how to recalculate the torque wrench setting.
- Failure to tighten the fuel joint pipe nuts to the proper torque will cause a fuel leak.
- Connect the quick-connect fitting and install the quick-connect fitting cover.
- Set the power mode to ON, but do not start the engine. After the fuel pump runs for about two seconds, the fuel line will be pressurized. Repeat this two or three times, then check for fuel leakage.
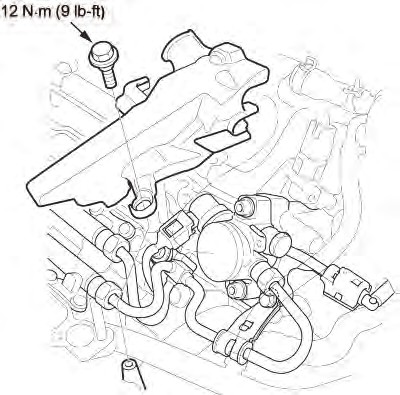
- Install the high pressure fuel pump cover and torque it to 12 N·m (9 lb-ft).
- Install the intake base and intake manifold.
END
A16-013
July 20, 2018
Version 6
 Loading...
A16-013
July 20, 2018
Version 6
 Loading...
- Deep Cleans GDI (Gasoline Direct Injection) / PFI (Port Fuel Injection) Intake Valves, As Well As, The Throttle Body, Intake Ports, Fuel Injectors and Combustion Chambers
- Helps Restore Fuel Economy and Maximize Horse Power
- Removing Carbon and Fuel Deposits From Gasoline Engines Intake Valves, Intake Ports and Turbos Is Essential to Ensuring Optimal Vehicle Performance.
- Made with Carbon Clear and Trade, the Most Advanced P.E.A. Cleaning Agent Available
- Strong Enough to Cut Through Thick Carbon Deposits, Even at Extreme Engine Temperatures
- Formulated for Use In All Fuel-Injected Gasoline Engines, Including GDI
- Contains Polyetheramine (“PEA”) to Dissolve Carbon Buildup in Combustion Chambers
- Cleans ALL Types of Intake Valves, Including Those Found in PFI, TBI, and GDI Engines
- Safe On Catalytic Converters and Oxygen Sensors
- Not For Use In Diesel Engines
- Increases power output
- Restores fuel efficiency
- Restores performance
- BG Platinum Air Intake, Valve & Combustion Chamber Cleaner is a diverse blend of cleaning ingredients that break through the nearly impenetrable deposit exterior and deliver potent detergents to the vulnerable center
- Restores MPG
- Restores engine performance
- Restores power
- Reduces harmful emissions
- Requires pressurized tool
- One New Aftermarket Replacement Turbo Ii Pre-Cleaner For Model 46 (With 4.5" Inlet) That Features Ev
- OEM Numbers Are Provided for Reference Only. Please Verify Fit Prior To Ordering.
- Please Note: Some Listings Use Stock Images for Reference and May Differ from the Actual Product.
- This Aftermarket Part Is Made to Meet or Exceed Manufacturer (OEM) Specifications.
- Air Filter Cold Air Intake Filter Breather 12mm
Last update on 2025-05-08 / Affiliate links / Images from Amazon Product Advertising API
This product presentation was made with AAWP plugin.
