B15-036
July 20, 2017
06957 Version 3
HVAC Display Flashes or Flickers
Supersedes 15-036, dated September 24, 2015 to revise the information highlighted in yellow
AFFECTED VEHICLES
| Year | Model | Trim | VIN Range |
| 2014–15 | MDX | ALL with navigation | ALL |
REVISION SUMMARY
- Updated information under REPAIR PROCEDURE.
- Additional WARRANTY CLAIM INFORMATION added.
SYMPTOM
The HVAC information flashes or flickers.
POSSIBLE CAUSE
There is a software error.
CORRECTIVE ACTION
Update the audio-navigation unit with the DVD update.
TOOL INFORMATION
| Tool Name | Tool Number | Quantity |
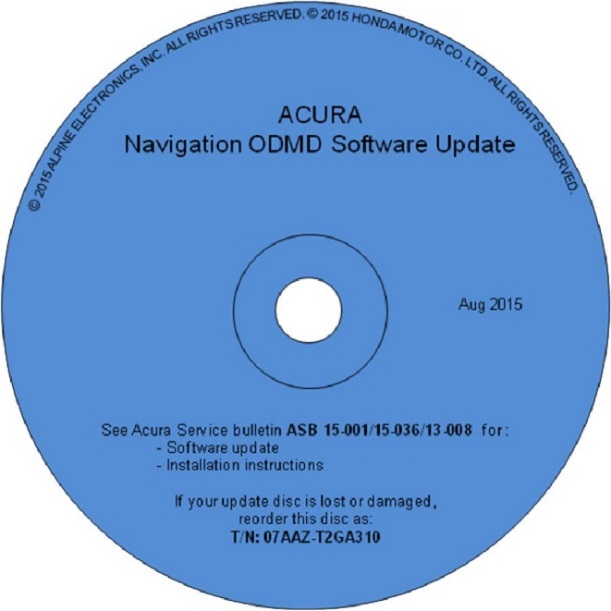
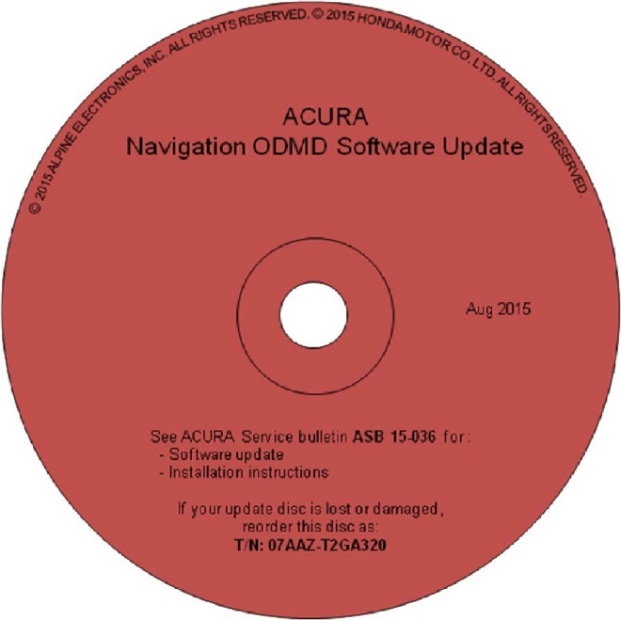
| 2014 MDX Audio-Navigation System DVD Update (with navigation) (Blue) | 07AAZ-T2GA310 | 1 |
| 2015 MDX Audio-Navigation System DVD Update (with navigation) (Red) | 07AAZ-T2GA320 | 1 |
The DVD updates have recently shipped to all dealers. Additional DVDs are available for purchase through the parts system.
WARRANTY CLAIM INFORMATION
The normal warranty applies.
| Model | Operation Number | DescriptionFlat Rate TimeTemplate ID | Failed Part Number | |||||
|---|---|---|---|---|---|---|---|---|
| MDX | 0100A1 | Update the navigation system software. | 0.3 hr | B15036A | 39542-TY2-A01 | |||
Use the warranty information below only if the vehicle required a 2017 map update (2015 MDX only). Use the template below only in the rare case of when the client did not take advantage of the now expired Client Satisfaction Improvement Campaign.
| MDX | 0100A1 | Update the navigation system software. | 0.3 hr | B15036B | 39542-TY2-A01 |
| B | Installing the 2017 map update. | 0.1 hr |
Defect Code: 03214
Symptom Code: 03217
Skill Level: Repair Technician
REPAIR PROCEDURE 2015 MDX
NOTE:
- If the vehicle does not have navigation, do not use this software update. If you do, you may permanently damage the audio unit.
- Apply this software update only to the vehicles listed under AFFECTED VEHICLES; otherwise this software update can permanently damage the unit.
- If you accidentally update the wrong vehicle, contact Tech Line; if the unit must be replaced, your dealership may be debited for the replacement cost.
- Connect a battery charger or a fully charged jumper battery to the vehicle and leave it connected during the entire update procedure to maintain a steady voltage.
- Set the power mode to ON.
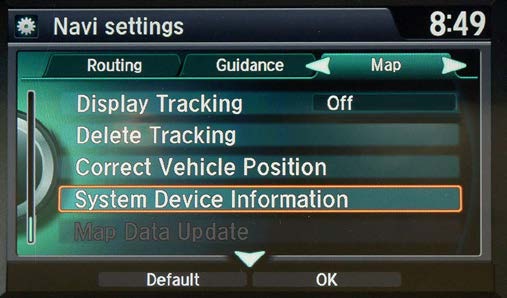
- Press the Settings button.
- Select Navi Settings, then press the interface dial (jog knob).
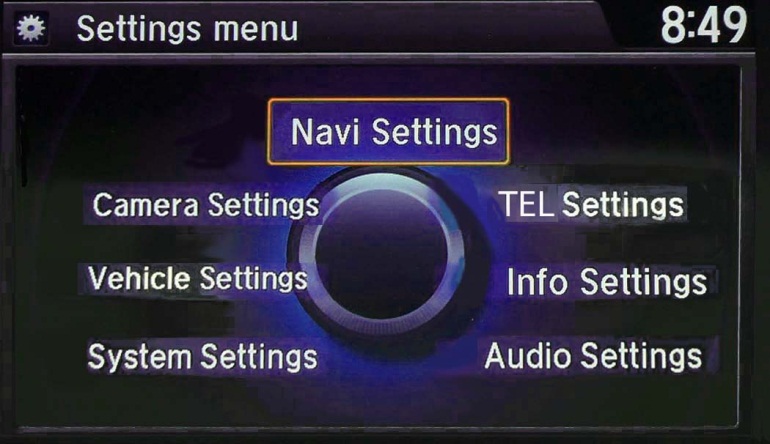
- Scroll down and select System Device Information.
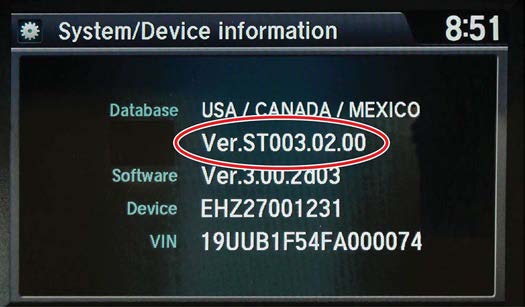
- Check the Database version is VER.ST003.02.00.
- If the version matches, continue to step 4.
- If the version is different, a 2017 or above Navi map update must be performed (this should only be in the rare case when the client did not take advantage of the now expired Client Satisfaction Improvement Campaign). The map database must be completely installed, including the background update, before continuing with this bulletin. If you try to update the ODMD without the correct software version, the ODMD will not work properly.
NOTE: If you are doing the 2017 or later navigation map update, make sure to use the correct WARRANTY CLAIM INFORMATION.
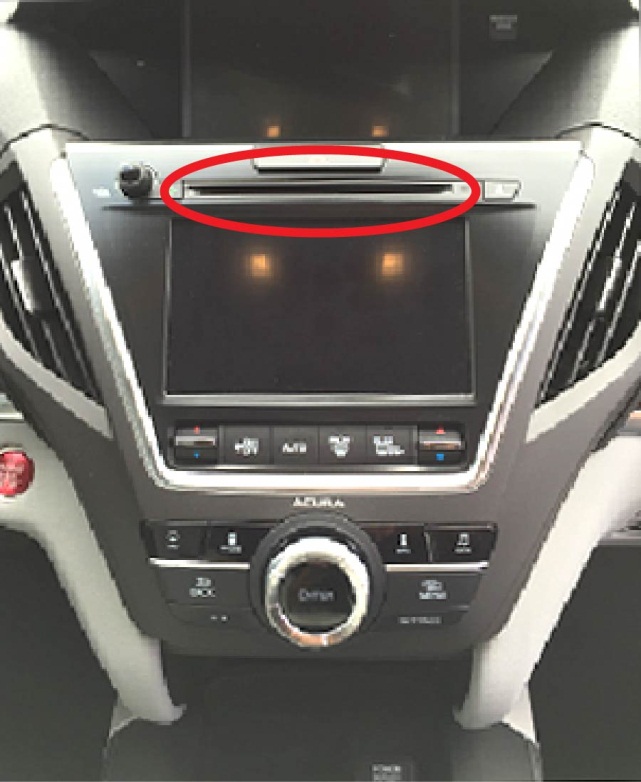
- Set the power mode to OFF, then to ON and wait for the navigation system to boot up. Insert the RED DVD into the CD slot as shown. See TOOL INFORMATION.
NOTE: The power mode must remain ON during the entire update procedure. If the power mode is set to OFF, the engine is started, or the DVD is removed at any time during the update process, the audio-navigation unit will be locked up and you will need to use the RECOVERY PROCEDURE.
- The software update will begin. The screen will show a Reading the Disc message, then both screens will shut off for about 10 seconds and reboot. The message No Data will appear on the screen. Do not eject the disc. The unit is uploading the update and may take up to 1 minute before beginning. The displays should change to a Notification screen loading bar.
NOTE:
- The engine does not need to be running to do this update, even if it says so on the screen.
- If the No Data screen does not change after about a minute, the software may already be updated. Go to step 11 to confirm the software versions.
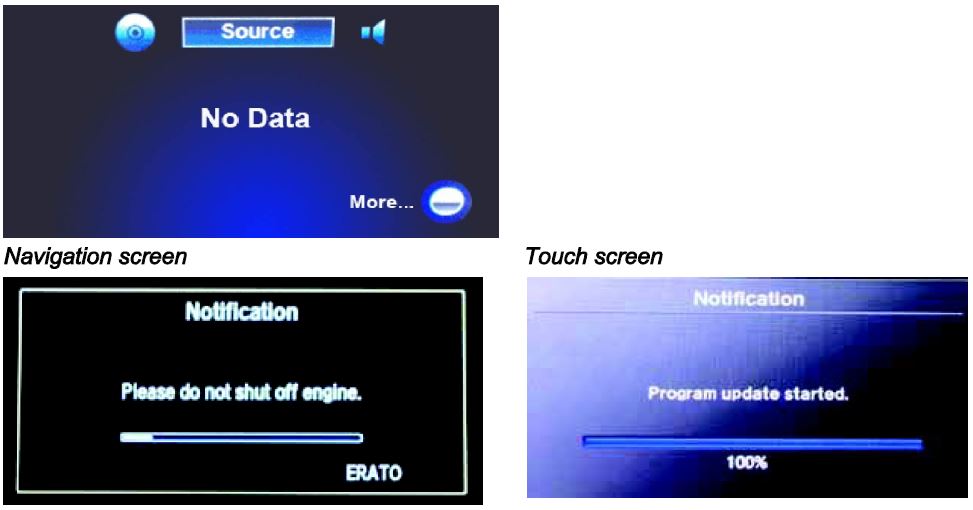
NOTE: The software update takes about 30 minutes to complete; you do not have to oversee the update during this time as no action is needed until the update is loaded. Update Order:
- ERATO
- SH-BOOT
- SH-IPL
- SH-NK
- Utility
- BUuCOM
On the touch screen, the progress bar will stop at 100% after ERATO is updated and remain at 100% throughout all SH and Utility updates. The progress bar will go back to 0% and resume when the BUuCOM update starts.
- When the update is complete, the system will reboot to the AcuraLink screen. The Enter code message and keypad will appear on the screens, although they may not appear at the same time. Wait for both screens to appear, then press the engine start/stop button to set the power mode to OFF.
NOTE:
- You must wait for both screens to appear before setting the power mode to OFF, or you will lock up the unit.
- Do not remove the DVD until you set the power mode to OFF because if you do so, the audio-navigation unit will lock up. If it locks up, go to RECOVERY PROCEDURE.
- The audio-navigation unit may lock up if any of the following occurs during the update process. If the unit locks up, refer to the RECOVERY PROCEDURE to unlock it.
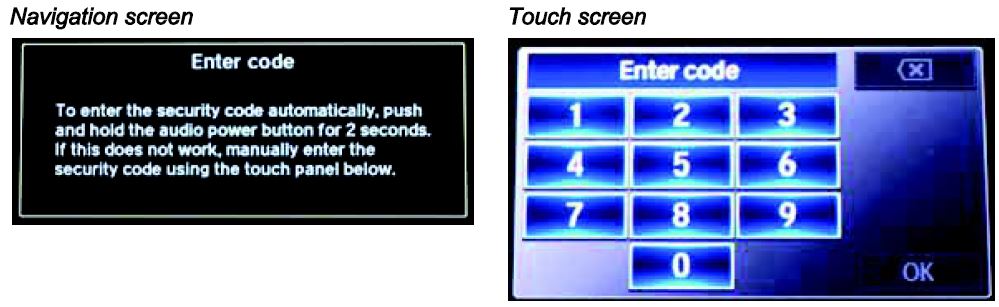
- Eject the DVD and wait at least 1 minute.
- Set the power mode to ON. Once both Enter code screens appear, press and hold the power button for 2 seconds until you hear the beep.
- The navigation screen will show the GPS initialization message.
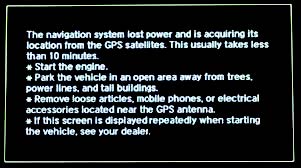
- Press and hold the NAVI, BACK, and MENU buttons until the Select Diagnosis Items screen appears.
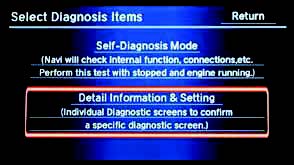
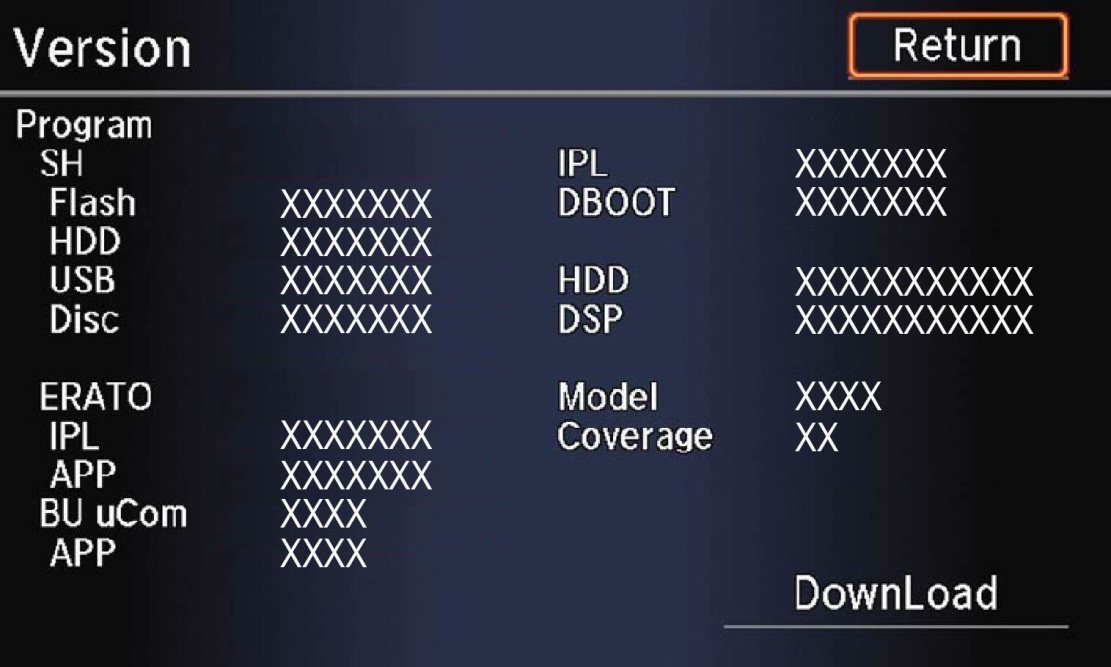
- Select Detail Information & Setting, then select Version.
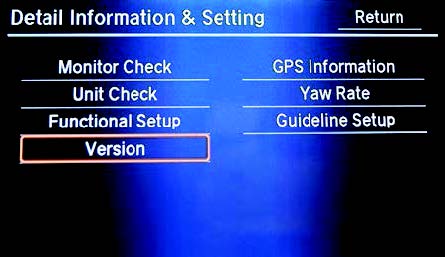
- Verify that the software versions were updated to the new version as shown:
| Software | 2015 MDX with RES | 2015 MDX without RES |
| SH Flash | 4.00.2309 | 4.00.2309 |
| ERATO IPL | 4.00.5004 | 4.00.5004 |
| BU uCom APP | 4.003.604 | 4.003.804 |
| Model | TZ5A | TZ5A |
NOTE: If the Version information does not match the table above after doing the update, or the update won’t auto start, select Download and press the interface dial.
- Make sure the rear camera is working properly. If not, reset the rear camera.
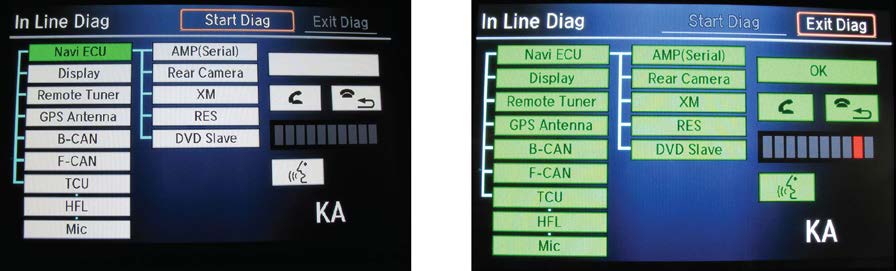
- When the In-Line Diag screen appears, select Start Diag.
- Make sure all the icons turn green.
NOTE: To get all the icons to turn green, make sure that you do the following:
- Press the Pick-up button.
- Press the Hang-up button.
- Press the Talk button.
- Snap your fingers in front of the microphone to complete the test.
- Delete all paired phones from the vehicle. Make sure the service consultant informs the client that he or she needs to re-pair his or her phone to the vehicle.
If the audio-navigation unit fails during the update, refer to RECOVERY PROCEDURE at the end of this S/B.
REPAIR PROCEDURE 2014 MDX
NOTE:
- If the vehicle does not have navigation, do not use this software update. If you do, you may permanently damage the audio unit.
- Apply this software update only to the vehicles listed under AFFECTED VEHICLES; otherwise this software update can permanently damage the unit.
- If you accidentally update the wrong vehicle, contact Tech Line; if the unit must be replaced, your dealership may be debited for the replacement cost.
- Connect a battery charger or a fully charged jumper battery to the vehicle and leave it connected during the entire update procedure to maintain a steady voltage.
- Set the power mode to ON.
- Wait for the navigation system to boot up. Insert the BLUE DVD into the CD slot as shown. See TOOL INFORMATION.
NOTE: The power mode must remain ON during the entire update procedure. If the power mode is set to OFF, the engine is started, or the DVD is removed at any time during the update process, the audio-navigation unit will be locked up and you will need to use the RECOVERY PROCEDURE.
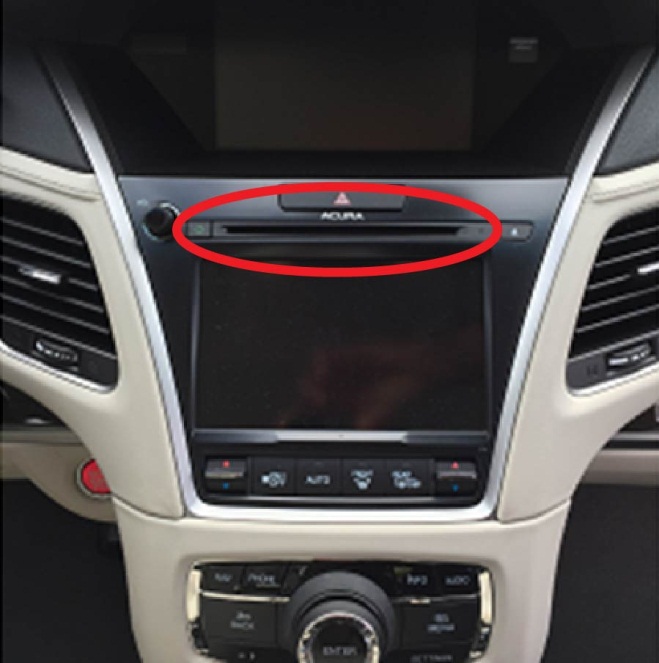
- The software update will begin. The screen will show a Reading the Disc message, then both screens will shut off for about 10 seconds and reboot. The message No Data will appear on the screen. Do not eject the disc. The unit is uploading the update and may take up to 1 minute before beginning. The displays should change to a Notification screen loading bar.
NOTE:
- The engine does not need to be running to do this update, even if it says so on the screen.
- If the No Data screen does not change after about a minute, the software may already be updated. Go to step 11 to confirm the software versions.
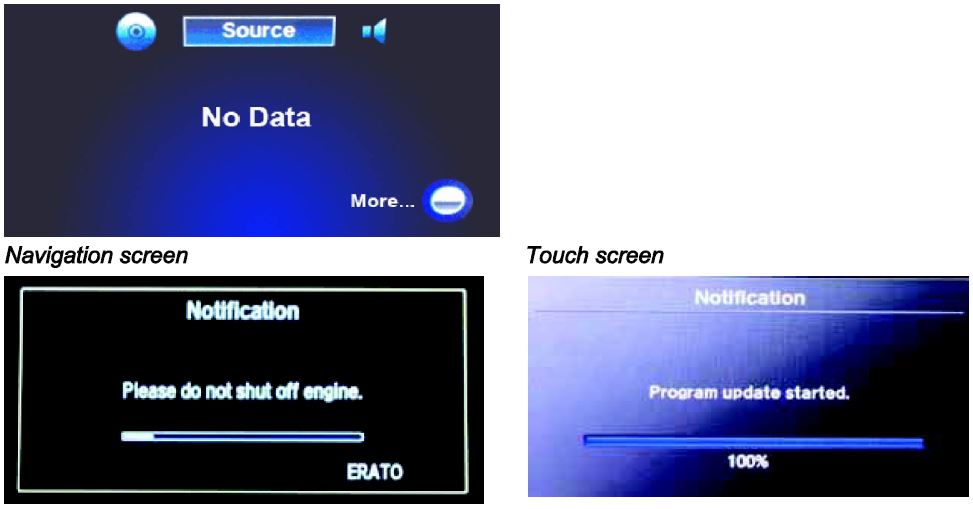
NOTE: The software update takes about 30 minutes to complete; you do not have to oversee the update during this time as no action is needed until the update is loaded. Update Order:
- ERATO
- SH-BOOT
- SH-IPL
- SH-NK
- Utility
- BUuCOM
On the touch screen, the progress bar will stop at 100% after ERATO is updated and remain at 100% throughout all SH and Utility updates. The progress bar will go back to 0% and resume when the BUuCOM update starts.
- When the update is complete, the system will reboot to the AcuraLink screen. The Enter code message and keypad will appear on the screens, although they may not appear at the same time. Wait for both screens to appear, then set the power mode to OFF.
NOTE:
- You must wait for both screens to appear before setting the power mode to OFF, or you will lock up the unit.
- Do not remove the DVD until you set the power mode to OFF because if you do so, the audio-navigation unit will lock up. If it locks up, go to RECOVERY PROCEDURE.
- The audio-navigation unit may lock up if any of the following occurs during the update process. If the unit locks up, refer to the RECOVERY PROCEDURE to unlock it.
- Loss of battery power/low voltage
- Engine cranks or starts
- The power mode is set to OFF
- A rewrite failure occurs
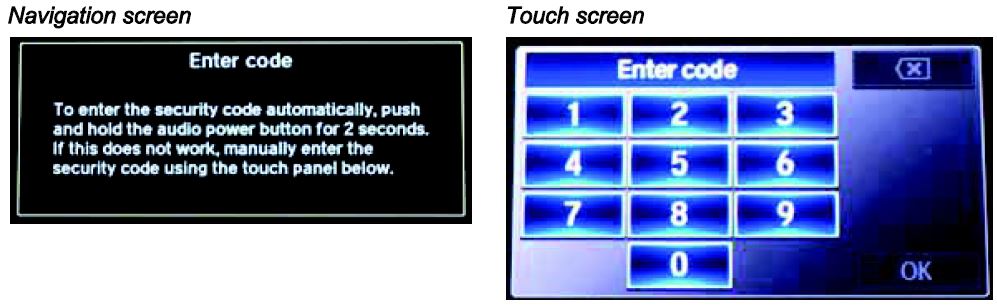
- Eject the DVD and wait at least 1 minute.
- Set the power mode to ON. Once both Enter code screens appear, press and hold the power button for 2 seconds until you hear the beep.
- The navigation screen will show the GPS initialization message.
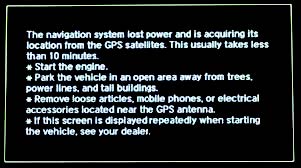
- Press and hold the NAVI, BACK, and MENU buttons until the Select Diagnosis Items screen appears.
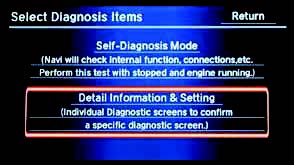
- Select Detail Information & Setting, then select Version.
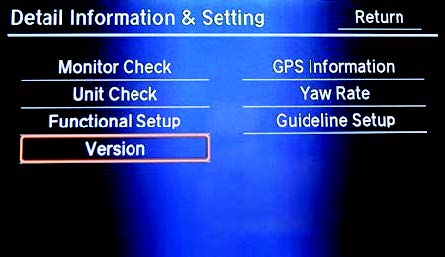
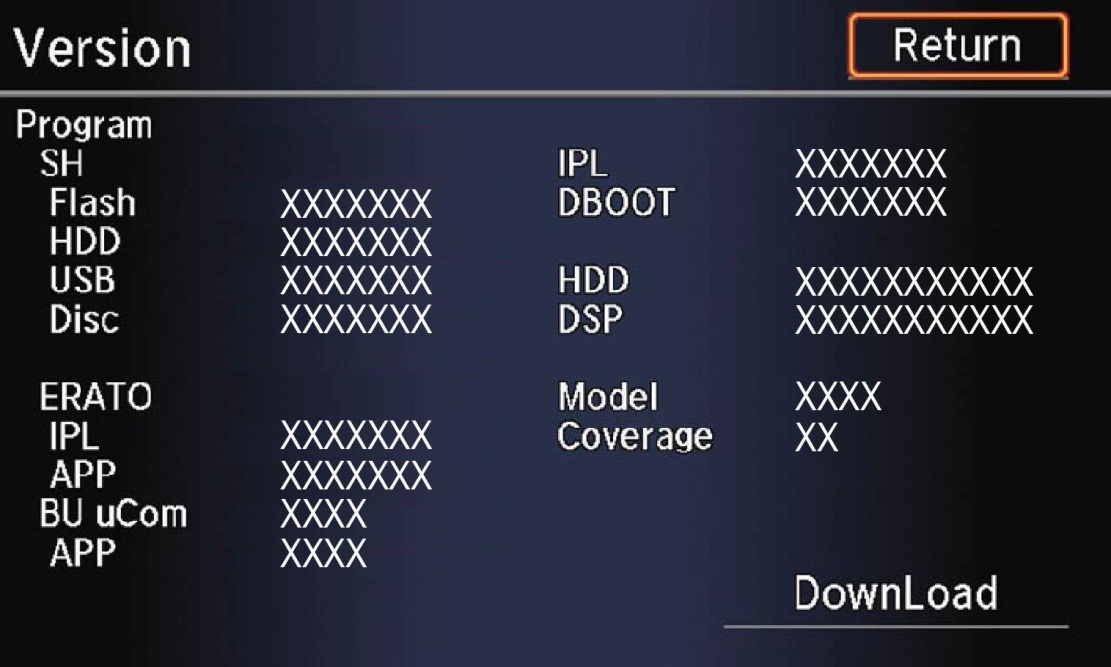
- Verify that the software versions were updated to the new version as shown.
| Software | 2014 MDX with RES | 2014 MDX without RES |
| SH Flash | 3.00.2304 | 3.00.2304 |
| ERATO IPL | 3.00.2004 | 3.00.2004 |
| BU uCom APP | 3.002.604 | 3.002.804 |
| Model | TZ5A | TZ5A |
NOTE: If the software is not updated, set the power mode to OFF, and go back to step 2 and repeat the update procedure.
- Make sure the rear camera is working properly. If not, reset the rear camera.
- Move the vehicle to an open area. Start the engine if not already done.
- Press and hold the NAVI, BACK, and MENU buttons until the Select Diagnosis Items screen appears.
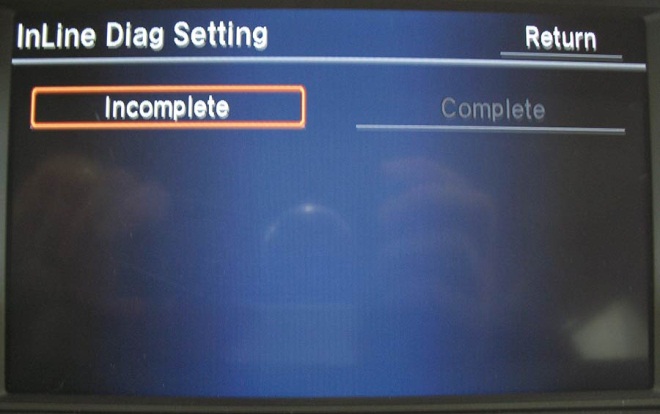
- Press and hold the NAVI button.
- Select Incomplete. The system restarts.
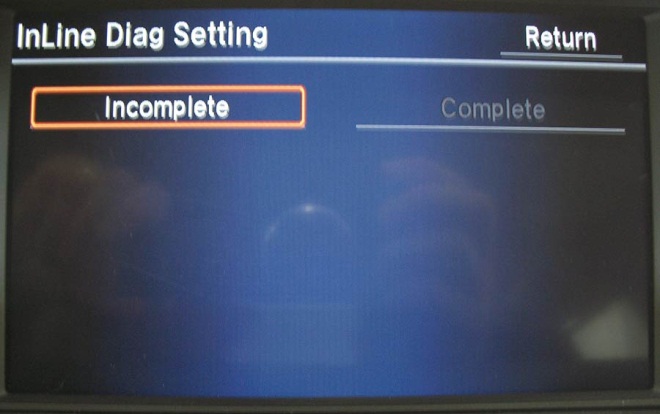
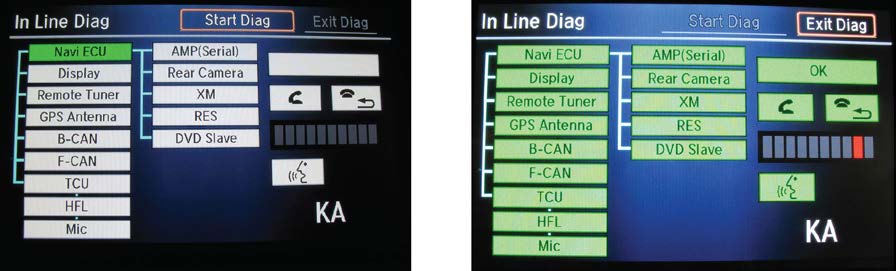
- When the In-Line Diag screen appears, select Start Diag.
- Make sure all the icons turn green.
NOTE: To get all the icons to turn green, make sure that you do the following:
- Press the Pick-up button.
- Press the Hang-up button.
- Press the Talk button.
- Snap your fingers in front of the microphone to complete the test.
- Delete all paired phones from the vehicle. Make sure the service consultant informs the client that he or she needs to re-pair his or her phone to the vehicle.
If the audio-navigation unit fails during the update, refer to RECOVERY PROCEDURE at the end of this S/B.
RECOVERY PROCEDURE
- Set the power mode to OFF.
- Make sure the DVD is inserted into the CD slot, then do a battery cable reset for 2 minutes.
NOTE: Make sure the DVD is inserted when you set the power mode back to ON because when the unit powers up, it will immediately look for the DVD to start the recovery process.
- Disconnect the negative battery cable first, then the positive battery cable.
- Short the battery cables together with a jumper wire for 2 minutes.
- Remove the jumper wire, and reconnect the battery cables – positive cable first, then negative.
- Reattach the battery charger or fully charged jumper battery.
- Set the power mode to ON (do not start the engine).
NOTE: Do not start the engine because starting it interrupts the steady battery power needed to update the audionavigation unit.
- Make sure the green LEDs on each side of the CD slot are blinking. This indicates the recovery process is working. NOTE:
- The recovery procedure and software update reload takes 15–30 minutes depending on when the update procedure was interrupted.
- The displays may stay blank during this time.
- When the recovery procedure and software update is complete, the Enter code message and keypad screens (with navigation) appear. Set the power mode to OFF.
- Eject the DVD and wait at least 1 minute.
- Go to REPAIR PROCEDURE to complete the update procedure.
END
NHTSA ID Number: 10115159
Manufacturer Communication Number: B15-036
Summary
Service bulletin – The HVAC information flashes or flickers. There is a software error.
1 Associated Document
Manufacturer Communications
B15-036
September 24, 2015
02210 Version 2
MC-10115159-9999.pdf 1123.637KB

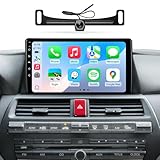
- 【Applicable Car Models】This radio is compatible with the original factory-style car radio for Honda Accord 2008-2013. Before purchasing, please verify the year, dimensions, and shape of your vehicle's center console. If you are unsure about compatibility, feel free to contact us with a message or picture for further assistance.
- 【Powerful Functions】This infotainment system for Honda Accord features a 10.2-inch IPS touchscreen with a Linux operating system, delivering a smooth and responsive user experience. The unit is designed for plug-and-play installation with no extra accessories required, ensuring a straightforward upgrade to your vehicle’s infotainment system.
- 【Wired/Wireless CarPlay & Android Auto】This radio for Honda Accord supports both wired and wireless CarPlay & Android Auto, enabling seamless integration with your smartphone. You can easily use voice control to operate apps, make calls, send messages, cast navigation from your phone via CarPlay or Android Auto, and control music playback—all for a safer, hands-free driving experience.
- 【1280*720 HD Display】This car stereo for Honda Accord features a high-definition display with 1280*720 resolution. Compared with standard screens, it delivers sharper, smoother visuals and more vibrant colors, providing an exceptional viewing experience.
- 【AHD 1080P Backup Camera】This car stereo for Honda Accord comes with an IP69 waterproof AHD 1080P rear camera. It features a 170° wide-angle optical glass lens for crystal-clear rear vision. The large aperture and wide-angle design enhance image clarity, while the AHD signal ensures sharp 1080P display for safer reversing and parking.
- 【Applicable Car Models】This radio is compatible with factory-style head units for Honda Accord 2008 to 2012 models. Before purchasing, please verify the year, dimensions, and shape of your vehicle’s center console. If you are unsure, contact us with a message or photo for assistance.
- 【Powerful Functions】This Android infotainment system features a 10.2-inch IPS touchscreen with 2GB RAM and 32GB ROM, providing smooth, responsive performance for Honda Accord vehicles. The unit supports plug-and-play installation with no additional parts required, making it simple to upgrade your car’s infotainment system.
- 【Wired/Wireless CarPlay & Android Auto】This car radio supports both wired and wireless CarPlay & Android Auto for seamless smartphone connectivity. You can use voice control to access GPS navigation, phone calls, messages, and music, helping you stay focused on the road. FCC and CE certified for safe and reliable use.
- 【1280*720 QLED HD Display】This car stereo for Honda Accord is equipped with a 1280x720 high-resolution QLED screen, which presents clearer images, more natural transitions and richer colors for an improved in-car viewing experience.
- 【AHD 1080P Rear Camera】The IP69 waterproof AHD1080P rear camera features a 170° wide-angle optical glass lens for high-definition viewing. Its large aperture and fisheye design enhance image clarity and technology aesthetic. This aftermarket camera supports AHD signal output for 1080P display.
![[2G+64G] for Honda Civic 2006-2011 Wireless Carplay Android 15.0 Car Stereo](https://m.media-amazon.com/images/I/41uEvl6hnfL._SL160_.jpg "HVAC Display Flashes or Flickers - 2014-2015 Acura MDX 27")
- Car Radio for Honda Civic Upgrade: 10.1 inch touchscreen car stereo fits for Honda Civic 2006 2007 2008 2009 2010 2011. No need additional frame, it includes a Plug and Play wiring harness for a effortless installation experience. PLEASE NOTE: For vehicles equipped with a factory passenger airbag switch, the installation frame may cause obstruction. Minor trimming of the frame is required to ensure the switch remains fully accessible.
- Wireless Carplay / Android Auto: This car audio for Honda Civic supports Wireless CarPlay and Android Auto which allows you to access map navigation, phone contacts, email, music and more. Meanwhile, the intelligent voice control assistant helps you focus on the road and have fun along the way
- GPS Navigation / 5GHz-WiFi: The latest Android 15.0 system with 4 Core 2GB RAM and 64GB storage this head unit, equipped with GPS for direct use of offline and online maps. It also supports WiFi/hotspot for app installation, video streaming, and online navigation from the Play Store
- HiFi Audio: The car play radio for Honda Civic equipped with high fidelity HiFi technology and EQ options, which aims to capturing the nuances and details of the original recording with exceptional clarity and accuracy, providing an immersive and authentic listening experience
- More Functions: Full HD rear view camera; Bluetooth hands-free call and music; Steering Wheel Control; Mirroring link; FM RDS radio; EQ Settings; GPS; WiFi; Subwoofer output; Dual USB ports; Customize UI interface; 1280*720P high resolution IPS Touchscreen; Split screen
![[2G+64G] Android 15 Car Stereo for Honda CRV 2007-2011](https://m.media-amazon.com/images/I/41H7ZVccrhL._SL160_.jpg "HVAC Display Flashes or Flickers - 2014-2015 Acura MDX 28")
- Applicable Car Models: This car head unit is compatible with Honda CRV 2007 2008 2009 2010
- Android 15.0 Car Stereo: The latest Android System, Quad-core CPU, 2G Ram and 64G Rom for more APPs installed, ensures smooth operation and faster response
- GPS Navigation & WiFi: Built-in offline map app, allowing free download of worldwide offline map data. Online maps are also supported, once connected to Wi-Fi or hotspot, you can use GPS navigation anywhere. This android car radio allows you to install or delete Android apps from the Application Store, just like a smartphone
- Wireless Carplay / Android Auto: The car play radio for Honda CRV supports wireless Carplay and Android Auto, allowing easy access to your phone's apps, such as real-time online map, music, call, and enabling voice control, enhancing your driving safety and comfort
- HiFi Audio: The car audio receiver equipped with high fidelity HiFi technology and EQ options, which aims to capturing the nuances and details of the original recording with exceptional clarity and accuracy, providing an immersive and authentic listening experience

- ✅ 【Compatible Vehicle Models & Years】 Car radio suitable for Honda Civic radio:2016 2017 2018 2019 2020 2021 providing Used Car Owners with a practical replacement choice when upgrading outdated factory stereos. Designed for drivers looking to refresh their vehicle interior, this upgrade offers a simpler way to replace older audio systems with a more suitable solution for daily driving needs.
- ✅ 【Wireless CarPlay & Android Auto】 Daily commutes can be frustrating for No CarPlay Drivers who still need to plug in their phones before accessing maps, music, or calls. The wireless honda civic apple carplay offers easier phone integration during morning traffic and busy drives, while compatible honda civic accessories help maintain a cleaner and more convenient cabin setup.
- ✅ 【Upgrade Android 15 & Quad-Core CPU 64GB ROM System】 Slow loading and delayed responses are common frustrations for Slow System Users relying on older factory screens during everyday driving. The upgraded honda civic stereo improves performance when switching between navigation, entertainment, and apps, while honda civic car accessories help bring a more updated and practical dashboard experience.
- ✅ 【Faster 5GWiFi & Bluetooth Connectivity】 Staying connected throughout multiple stops is important for Delivery Drivers who depend on hands-free calls, navigation, and online features during work routes. The faster connection of the honda civic radio helps maintain reliable Bluetooth and wireless functions, while compatible pantalla para honda civic support a more organized in-car technology setup.
- ✅ 【Online/Offline GPS Navigation & HD Rearview Camera】 Family outings and weekend drives can be challenging for Parents with Kids when they need quick directions and better visibility in busy parking areas. The civic android car radio combines online and offline GPS navigation with HD rear camera support, while compatible touch screen radio for civic help create a more practical setup for daily family driving.
This product presentation was made with AAWP plugin.