| “This site contains affiliate links for which OEMDTC may be compensated” |
A15-042
July 21, 2015
02077 Version 1
2016 Odyssey: PDI Information
AFFECTED VEHICLES
| Year | Model | Trim Level |
| 2016 | Odyssey | LX |
| EX | ||
| SE | ||
| EX-L | ||
| EX-L with Rear Entertainment System | ||
| EX-L with Navigation | ||
| Touring | ||
| Touring Elite |
INTRODUCTION
This bulletin covers the pre-delivery inspection (PDI) of the 2016 Odyssey. It includes these procedures:
To do a PDI on a model with a navigation system, be sure to complete S/B 15-043, 2016 Odyssey: PDI of the Navigation System.
CLAIM INFORMATION
Flat Rate Time: 1.4 hours
NOTE: This flat rate time includes the PDI of the navigation system, if equipped.
PDI PROCEDURES
Before Starting
Review these items:
- Perfect Delivery documents, especially the information on battery maintenance and tire pressures
- Checklist in the PDI and Final Delivery Checklist booklet
Make sure you record the PDI on the appropriate pages of the checklist. The PDI is not done until this bulletin and the checklist are both complete. Note on the repair order any repairs or problems that cannot be fixed within a few minutes. Remove all PDI items from the cargo area and glove box.
Models with One-Push Start
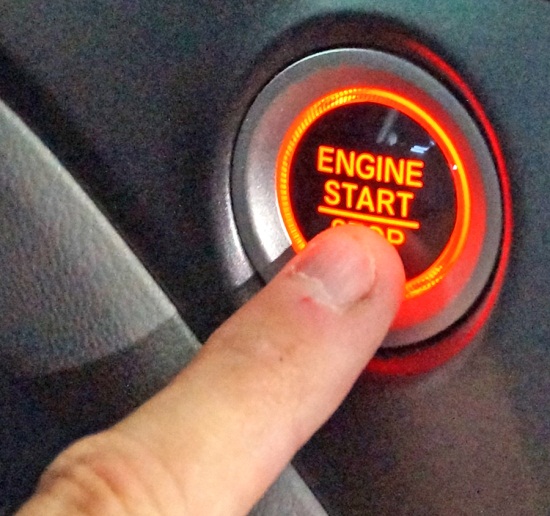
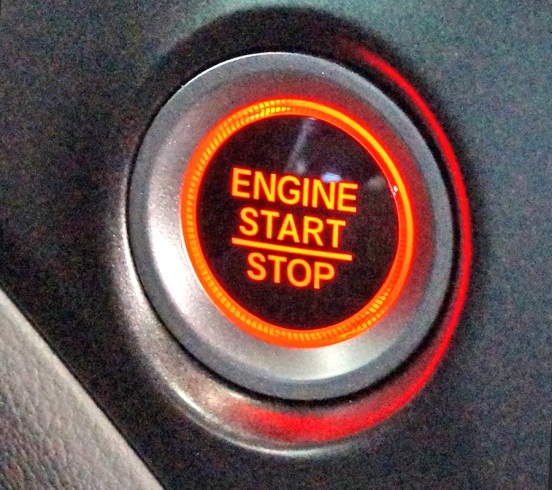
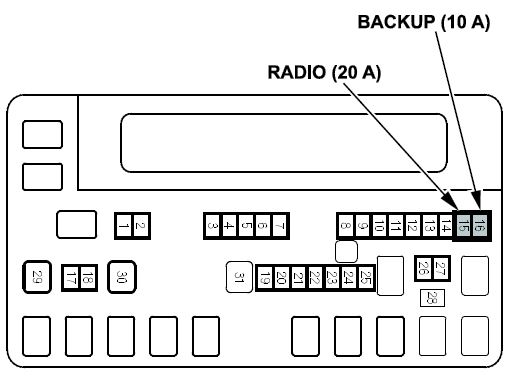
To prevent parasitic draw, the vehicle comes from the factory with the No. 16 BACKUP (10 A) fuse removed from the main under-hood fuse box. With it removed, the engine will not start when you apply the brake pedal and press the ENGINE START/STOP button.
To start the engine with the No. 16 fuse removed, you must do this:
- Press the ENGINE START/STOP button once.
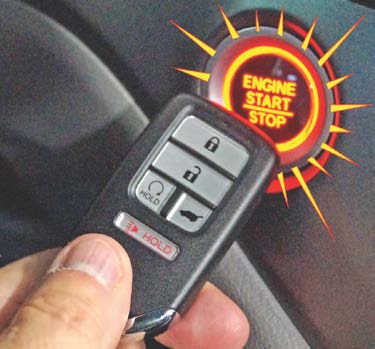
- When the indicator blinks, touch the keyless remote to the ENGINE START button.
NOTE: The indicator will switch from blinking to steady when communication is complete.
- Start the engine by pressing the ENGINE START/STOP button while pressing the brake pedal. You must start the engine within 10 seconds of touching the remote to the button.
1. Remove the Exterior Protective Coatings
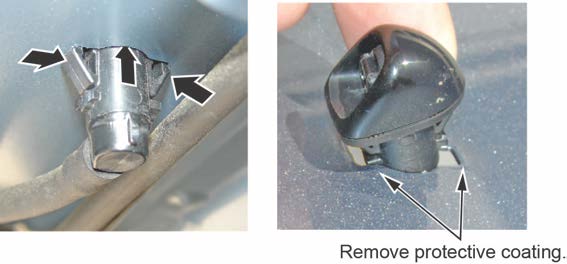
Carefully remove the exterior protective coatings. See S/B 03-080, Removal of Protective Coatings During PDI. Be sure to remove the protective coating from under the windshield washer nozzle. Lift the hood, and release the clips holding each nozzle in place. Remove the coating, then snap the nozzles back into place.
2. Install the Fuses
To prevent battery drain during vehicle shipping, the No. 15 RADIO (20 A) and the No. 16 BACKUP (10 A) fuses are removed from the under-hood fuse box and stored in the glove box. Make sure you install these fuses with the ignition turned to OFF.
Vehicle Interior
3. Remove the Interior Protective Coverings
There are several protective coverings on the interior trim pieces and some areas of the carpet. Carefully remove all of them with clean hands to avoid soiling any surfaces. If any of the interior is dirty, clean it with mild soap or a Honda cleaning product such as Leather & Vinyl Cleaner (P/N 08700-9214) or Carpet Spot Remover (P/N 08700-9215).
4. Install the Floor Mats
First and second row floor mats are standard on all models. Install them in the appropriate positions. The driver’s side of the first row floor mat has a plastic tab that goes between the carpet and the door sill molding.
Under-Hood (Engine Cold)
5. Check the Battery
To ensure long battery life and that the customer gets a fully charged battery, it must be checked at these times:
- When the vehicle first arrives at the dealership
- During the PDI, if done at a later date
- At regular intervals (see S/B 89-003, Battery Maintenance at Dealers)
- Just before vehicle delivery
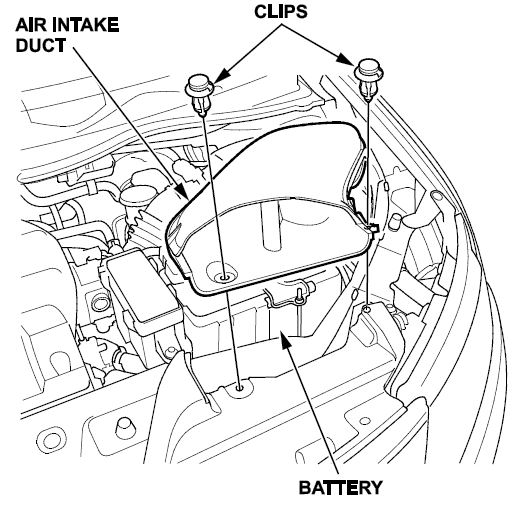
To access the battery for testing, remove the air intake duct (two clips).
Test the battery with the ED-18 battery tester using S/B 88-023, Battery Testing and Replacement. Make sure you connect both tester leads directly to the battery. If the ED-18 does not show GOOD BATTERY, charge the battery with the GR8 battery diagnostic station.
Write down the GOOD BATTERY 10-digit code in the PDI and Final Delivery Checklist booklet. During the PDI, write down the code in the “Under Hood – Engine Cold” section. Then, at vehicle delivery, write it down in the “Final Inspection (At Delivery)” section.
NOTE: Make sure the ED-18 has the latest software installed before using it. See S/B 09-045, ED-18 Battery Tester Update Information.
Vehicle Exterior (Vehicle Raised to Full Height)
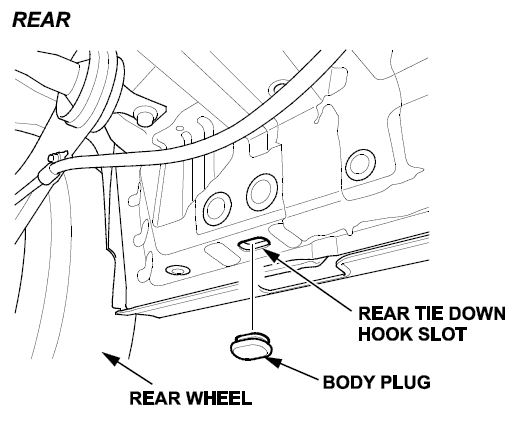
6. Install the Body Plugs
Install the body plugs as shown.
NOTE: The left side is shown; the right side is similar.
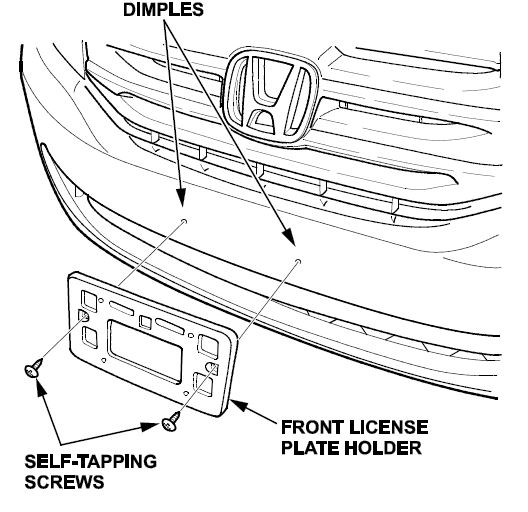
7. Install the Front License Plate Holder
If state regulations require using a front license plate, install the front license plate holder as follows:
- Find the two dimples near the middle of the front bumper.
- Center the holes in the front license plate holder over the dimples, then attach the holder with the two selftapping screws. The remaining screws in the kit are for attaching the license plate to the holder.
Vehicle Exterior (Vehicle Lowered to Ground)
8. Make Sure the Tire Pressure Sensors Are Operational and Set the Tire Pressures
NOTE: If this procedure is not done during the PDI, the TPMS indicator will come on after driving about 20 miles. When it comes on, the TPMS control unit also sets one or more of these TPMS DTCs: 32, 34, 36, 38 and/or 41. The repair of any of these DTCs, at PDI or shortly after, is not covered by warranty.
To make sure the tire pressure sensors are operational and the tire pressures are set, do this:
- Turn the ignition to OFF.
- Use a tire pressure gauge with a bleeder valve to quickly lower the pressure in one tire to 18 psi or less.
NOTE:
- The tire pressure must be lowered by at least 3 psi within 15 seconds, or the tire pressure sensor will not be activated.
- To ensure accuracy, periodically check your tire pressure gauge with the calibration tool (P/N 07AAJ-000A100).
- Adjust the tire pressure to the cold inflation value listed on the driver’s doorjamb label. If you are in a cold climate region, make sure the tire is at the same temperature as the outside air before adjusting the pressure; otherwise, the TPMS low tire pressure indicator may come on in cold weather.
- Repeat steps 2 and 3 for the other three tires.
NOTE: The spare tire does not have a tire pressure sensor. Make sure the spare tire is inflated to the pressure listed on the doorjamb label.
9. Check the Spare Tire Pressure
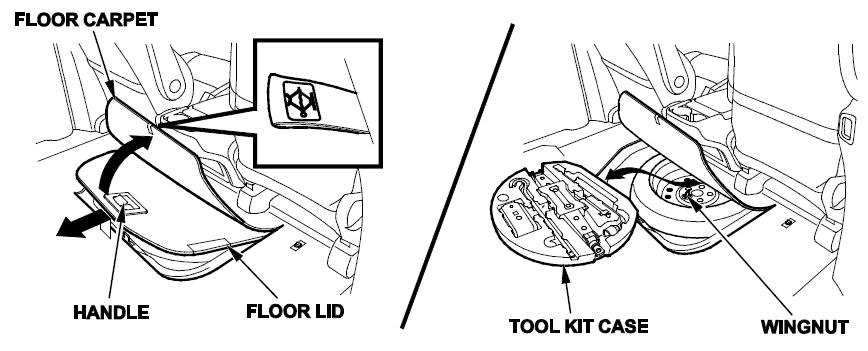
To check the spare tire pressure, follow these steps:
- Slide the second row seats backward.
- Raise the floor carpet and pull the handle to open the floor lid.
- Tilt up the floor lid about 4 inches, then remove it.
- Remove the tool kit case from the center of the spare tire, then loosen the wing nut and remove the tire to access the valve stem.
- Set the tire pressure to the value listed on the driver’s doorjamb label.
- Reinstall the spare tire and all removed parts in the reverse order of removal.
10. Check the Remote Transmitters
Check each remote transmitter to ensure it is working right. The remote transmitter is in the key on LX models.
The remotes are factory set to open the power tailgate or a power sliding door with a single, 1-second button push.
Under-Hood (Engine Idling)
11. Do the Idle Learn Procedure
To ensure a steady engine idle, do the idle learn procedure after installing the No. 16 BACKUP (10 A) fuse.
- Make sure all electrical items (A/C, audio unit, rear defogger, lights, etc.) are turned off.
- Start the engine and let it reach operating temperature (the cooling fans cycle twice).
- Let the engine idle for 10 minutes with the throttle fully closed.
The idle learn procedure must also be done after updating or replacing the PCM. If does not need to be done after clearing DTCs.
12. Do the CKP-Pattern Learn Procedure
To ensure proper engine operation, do the CKP-pattern learn procedure after doing the idle learn procedure. Do it on a level road during your PDI test-drive.
The procedure consists of a low- and high-rpm pattern learn. Make sure you do the low-rpm pattern learn first.
- Low-rpm Pattern Learn: Shift to D3 or D4 and decelerate from 2,500 rpm to 1,000 rpm with the throttle fully closed.
- High-rpm Pattern Learn: Shift to 1st and decelerate from 5,000 rpm to 3,000 rpm with the throttle fully closed.
Vehicle Interior
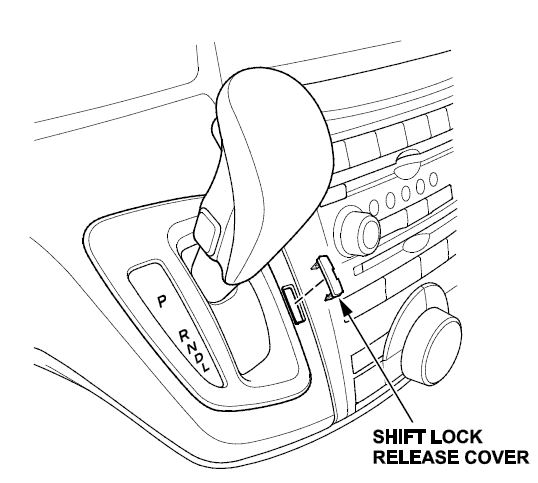
13. Install the Shift Lock Release Cover
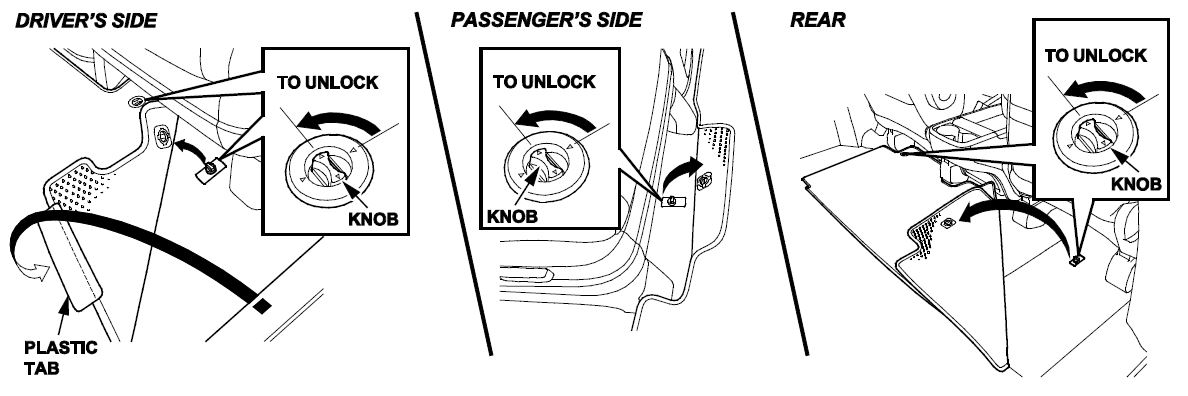
Install the shift lock release cover as shown.
14. Unlock the Audio Unit
After installing the No. 15 RADIO (20 A) and No. 16 BACKUP (10 A) fuses, turn the ignition to ON. Press the volume/power knob once to turn on the audio unit. When the Enter Code screen appears, press and hold the volume/power knob for about 2 seconds. Release the knob when you hear the long beep.
15. Set the Clock (Models Without Navigation)
Do this after installing the No. 15 RADIO (20 A) and No. 16 BACKUP (10 A) fuses:
- Turn the ignition to ON and turn on the audio unit.
- Press the SETTINGS button.
Models with One Display
- Turn the interface dial to select System Settings, then press ENTER.
- Repeat this procedure to select Clock, then Clock Adjustment.
Models with Two Displays
- Turn the interface dial right or left to select Clock, then turn it to select Clock Adjustment and press ENTER.
All Models
- Turn the interface dial to change the hours, then press ENTER.
- Turn the interface dial to change the minutes, then press ENTER.
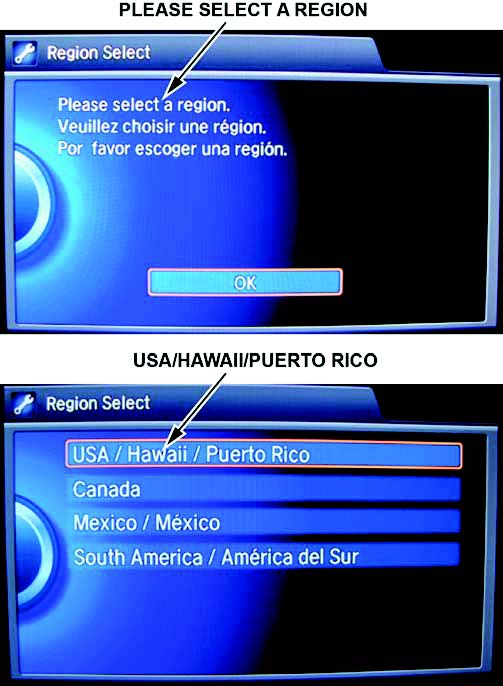
16. Set the Radio Region (Models Without Navigation)
If you see the Region Select screen on the i-MID, select the region where you are located. If not, continue with the PDI.
17. Set the Compass Zone (Models Without Navigation, Except LX)
In most areas, there is a variation between magnetic north and true north. At the PDI, the compass zone needs to be set to your geographic zone to compensate for this variation.
To set the compass zone, do this:
- Turn the ignition to ON.
- Press and hold the SETUP button on the audio panel for about 5 seconds, until the display shows you the compass.
- Turn the selector knob to highlight Zone Adjust, then press SELECT. The display shows the current zone number.
- Find your zone number on this map.
- If the current zone number is not your zone, turn the selector knob to select your zone, then press SELECT.
- To exit the zone selection, press the Cancel button.
18. Set the Compass Calibration (Models Without Navigation, Except LX)
Although the compass is self-calibrating, it may need to be manually calibrated after exposure to a strong magnetic field. If the compass is blinking and you see CAL in the display, do this to manually calibrate the compass:
- Turn the ignition to ON.
- Press and hold the SETUP button for about 5 seconds. The display changes to the compass.
- Turn the selector knob to highlight Calibration, then press SELECT.
- When you see Calibration Start, press SELECT.
- Drive the vehicle slowly in two complete circles. The compass starts to show a direction after the calibration. The CAL indicator goes off.
19. Check/Refresh the XM Satellite Radio Dealer Demo Service (48-State, EX-L, and Touring)
The audio system comes from the factory activated with the XM Satellite Radio dealer demo service. Once you install the No. 15 RADIO (20 A) fuse, the XM radio receives the full range of available XM channels. To ensure this service is activated, follow these steps:
- Turn the ignition to ON.
- Turn on the audio unit. If not already done, push and hold the VOL knob for 2 seconds to unlock the audio unit, then select the XM audio source.
- Make sure the XM radio is in channel mode, not category mode. To change modes, select the XM mode, then follow the appropriate procedure:
Interface Dial
- Press the MENU button.
- Turn the interface dial to select XM Tune Mode, then press ENTER.
- Turn the interface dial to select Channel Mode, then press ENTER.
Audio with Touch Screen
- Select More.
- Select XM Tune Mode.
- Select Channel Mode.
- Tune to channel 001 (the XM preview channel) to make sure you are receiving the XM signal. If you do not get a clear signal, park the vehicle outside where there is a clear view of the southern sky.
- While watching the audio unit display, tune to several channels within the full XM lineup. To see the full list of channels, go to siriusxm.com.
- If you can tune to all of the XM channels, the dealer demo service is activated. Tune to channel 001, and leave the audio unit on for 7 minutes to refresh the dealer demo service. No further action is needed.
- If you can tune to just a few channels like 000, 001, and 247, the dealer demo service is not yet activated, and you need to do an activation refresh. Go to step 6.
- Tune to 000, then write down the eight-character radio ID you see in the audio unit display. You need this ID, your dealer number, and the VIN to do an activation refresh of the dealer demo service. Go to step 7. NOTE:
- If you cannot tune to channel 000, you are in category mode. See step 3 to switch from category mode to channel mode.
- Check the ID carefully. The letters I, O, S, and F are not used.
- Go to an iN workstation.
NOTE: If you do not have access to the iN, call SiriusXM Satellite Radio at 800-852-9696, and follow the automated menu instructions. When the agent answers, ask for a rapid dealer activation refresh, then go to step 10.
- From the iN main menu, click on SERVICE and HCUC XM Radio Demo Activation. This brings up the HCUC XM Radio Activation screen.
NOTE: If you cannot bring up this screen, call the iN Support Center at 800-245-4343.
- Enter the eight-character radio ID that you wrote down in step 6, then click on Submit. You will see the ACTIVATION REFRESH screen once the ID is recognized.
NOTE: If you enter the ID incorrectly, or if it is not recognized, you will see an error screen. If this happens, follow the screen instructions.
- Tune to 001 to make sure you are receiving the XM signal. If you do not get a clear signal, park the vehicle outside where there is a clear view of the southern sky, then go to step 11.
- Leave the audio unit on for at least 10 minutes, then go to step 12.
- While watching the audio unit display, tune to several channels within the full XM lineup.
- If you can tune to all of the XM channels, the dealer demo service is activated. No further action is needed.
- If you can tune to only a few channels like 000, 001, and 247, repeat steps 7 through 12.
- If, after 2 hours, you can only tune to channels 000, 001, and 247, call SiriusXM Satellite Radio at 800-8529696. When you hear the automated menu, enter option 2 to route your call to an XM agent. When the agent answers, ask him or her to review the account status and make any needed corrections. If the account status is correct for the vehicle, replace the XM receiver.
NOTE:
- The dealer demo service lasts for 7 months or until the vehicle’s retail delivery registration (RDR) is submitted, whichever comes first.
- After the vehicle is registered, the dealer demo service converts to a customer account. The customer gets a 90-day trial service of all available non-premium XM channels. If the customer decides to end the service after that time, the XM radio goes back to preview mode. Normal AM/FM radio reception is not affected by ending the service.
- The XM radio receives digital programming broadcasts from two fixed-orbit satellites near the equator along with a network of ground antennas (repeaters). You will get the strongest signal where there is a clear view of the southern sky.
- The XM radio may lose reception when driving through a tunnel, under an overpass, inside a parking garage, or near the northern face of a canyon or mountain.
- To cut down on reception loss, XM radio uses a buffer. If the reception loss lasts longer than the buffering period, the signal goes silent.
- Because the signal is digital, any reception loss makes it go silent. The signal does not fade like it does with an AM/FM radio.
- If you ever need to replace the XM receiver, call SiriusXM Satellite Radio at 800-852-9696. Be prepared to give your dealer number, the VIN, and the radio ID from the printed label on the side of the old and new receiver units.
- Your customer’s XM radio presets will be lost if you disconnect the battery or if it goes dead. Always write down the XM radio presets before disconnecting the battery.
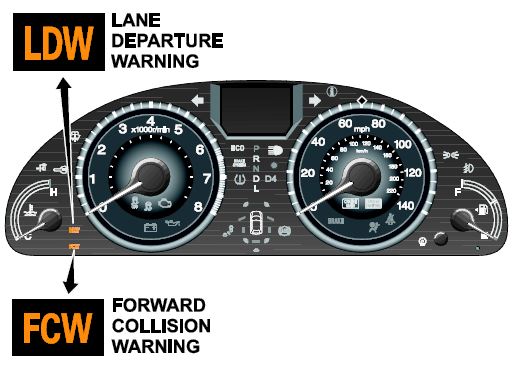
20. Check Operation of the FCW and LDW Indicators (If Equipped)
When you first turn the ignition to ON, these indicators should come on for a few seconds and then go off:
- FCW (Forward Collision Warning)
- LDW (Lane Departure Warning)
21. Check the Blind Spot Information System (Touring Elite)
There is a BSI indicator near each side mirror and on the instrument panel. When you turn the ignition to ON, make sure these indicators come on for about 1 second and then go off. If the instrument panel BSI indicator stays on, make sure the system has not been turned off by checking the settings in the i-MID, under Customize Settings/Driver Assist System Setup/Blind Spot Info.
22. Make Sure LaneWatch Works (If Equipped)
Turn the ignition to ON, then press the button on the end of the combination switch to make sure LaneWatch works. Press the button again and the LaneWatch image should turn off. Activate the right turn signal, and the LaneWatch image should come on.
23. Check Bluetooth® HandsFreeLink® (HFL)
To ensure HFL works and is ready to use, start the engine, then press and hold the Hang-up/Back button on the steering wheel for 10 seconds. You should hear “The HFL is OK.” If you do not hear this message, see the electronic service manual for troubleshooting information.
24. Check the Driver’s and Front Passenger’s Window Auto-Up/Down Feature
Make sure the driver’s and front passenger’s window auto-up/down feature works right. When you firmly press the window switch and then release it, the window should fully open; when you firmly pull back the switch and then release it, the window should fully close.
If it does not work right, initialize the auto-up/down feature by following these steps:
- Make sure the window is fully closed, then press and hold the window switch until the window opens all the way.
- Pull back the window switch, and hold it until the window is fully closed. Keep holding the switch for another 2 seconds.
- Check the auto-up/down feature: When you firmly press the window switch and release it, the window should fully open; when you firmly pull back the switch and then release it, the window should fully close. If the window does not work this way, repeat the initialization.
- If the auto-up/down feature does not initialize, do the power window control unit reset in the electronic service manual.
25. Check the Moonroof One-Touch Feature
Make sure the moonroof one-touch feature works right:
- When you firmly slide the moonroof switch backward and release it, the moonroof should fully open.
- When you firmly slide the switch forward and release it, the moonroof should fully close.
- When you push up on the switch and release it, the moonroof should tilt.
If the moonroof does not work right, do this procedure to reset the control unit:
- Make sure the battery is fully charged, then close the driver’s door and leave it closed until the procedure is done.
- Turn the ignition to OFF.
- Press and hold the tilt switch, and turn the ignition to ON 4. Release the tilt switch, and turn the ignition to OFF.
- Repeat steps 3 and 4 four more times.
- Check if the auto open and auto close functions still work. If they do, the auto functions have not been cleared. Go back to step 1. If the auto functions have been cleared, go to step 7.
- Press and hold the moonroof open switch for at least 3 more seconds after the moonroof is fully closed.
- Press and hold the moonroof close switch for at least 3 more seconds after the moonroof is fully closed.
- Make sure the moonroof control unit is reset by using the moonroof auto open and auto close function.
NOTE: The moonroof auto-reverse feature does not need initialization, and disconnecting the battery does not require initialization of the auto function. The moonroof can also be opened with the remote transmitter.
26. Check the Rear Entertainment System (If Equipped)
For detailed information on RES operation, see the owner’s manual. Before checking the RES, install the batteries in the wireless headphones.
There are various types of DVDs available. Some of them are not compatible with the system. The DVDs should have the region designation of 1 or ALL.
If a DVD is available, turn the ignition to ACCESSORY or ON, then insert the DVD into the DVD player. Release the screen by pressing the release button, then lower the screen to the detent. On the Touring Elite model, release the ultra-wide screen by pressing the release button.
Turn on the headphones by pivoting the ear pieces outward, and adjust the volume with the dial on the ear piece.
NOTE:
- The headphones will not turn on if the batteries are not correctly installed.
- While the DVD is playing, test the functions with the remote control and make sure both headphones work right. They work in the rear seats only, not in the front seats, nor outside the vehicle.
When you are done, remove the DVD from the DVD player, and store the remote control in the ceiling unit. Store both headphones in the front seat-back pockets.
27. Check the Honda VAC (SE and Touring Elite)
To check operation of the Honda VAC, do this:
- Set the parking brake.
- Start the engine.
- Press the VAC POWER button to turn on the system.
Final Inspection
28. Remove the Window Sticker
When the vehicle is being readied for delivery to the customer, the window sticker (Monroney label) should be removed from the rear side glass. To avoid damaging the antenna wire element on the inside of the glass, do not use a razor blade or any type of scraping tool. Instead, pull the sticker from the window by hand, then use glass cleaner on a clean shop towel to wipe off any residual adhesive.
 Loading...

