| “This site contains affiliate links for which OEMDTC may be compensated” |
A15-011
March 28, 2015
01438 Version 2
Wind Noise from the Driver’s or Front Passengers Side Window
AFFECTED VEHICLES
| Year | Model | Trim | VIN Range |
| 2014 | Accord | ALL 4-door | ALL |
| 2015 | Accord | 4-door, L4 | 1HGCR2…FA000001 to 1HGCR2…FA086310 |
| 4-door, V6 | 1HGCR3…FA000001 to 1HGCR3…FA015025 |
SYMPTOM
There is a noticeable wind noise at ear level from either the driver’s door or the front passenger’s window.
POSSIBLE CAUSE
The wind noise is caused by either a gap between the run channel and sash trim or a gap between the run channel and inner sash.
CORRECTIVE ACTION
Test-drive the vehicle to determine the location(s) of the wind noise. If the wind noise is heard at ear level from either the driver’s or passenger’s side window or along the pillar, tape it off and see if the noise goes away. If the wind noise goes away, this bulletin applies. If the wind noise is still heard, the bulletin does not apply, troubleshoot and repair as needed. Based on your results, replace the affected run channel(s) and sash trim(s) (see REPAIR PROCEDURE A) or replace the affected sash trim(s) and apply EPT sealer to the run channel groove (see REPAIR PROCEDURE B.)
REQUIRED MATERIALS
| Part Name | Part Number | Quantity |
| 3M Adhesion Promoter (Use if 08F20-S9A-10003 is not available. One box fixes 10 vehicles.) | 06396 | 1 |
| EPT Sealer (One roll repairs about 165 vehicles.) | 06990-SA5-000 | 1 |
| Adhesion Promoter Kit (One packet repairs one vehicle.) | 08F20-S9A-10003 | 1 |
| Rubbing Alcohol (degreaser) | Commercially available | 1 |
PARTS INFORMATION
| Part Name | Part Number | Quantity |
| Channel, Right Front | 72235-T2F-A02 | 1 |
| Channel, Left Front | 72275-T2F-A02 | 1 |
| Garnish, Right Front (L4) | 72430-T2F-A01 | 1 |
| Garnish, Right Front (V6) | 72430-T2G-A01 | 1 |
| Garnish, Left Front (L4) | 72470-T2F-A01 | 1 |
| Garnish, Left Front (V6) | 72470-T2G-A01 | 1 |
TOOL INFORMATION
| Part Name | Part Number | Quantity |
| Trim Tool (or equivalent) | SILTRIMTL10 | 1 |
This tool is available through the Honda Tool and Equipment Program at 888-424-6857.
WARRANTY CLAIM INFORMATION
The normal warranty applies.
NOTE: There is a Repair Procedure A and B for both L4 and V6 models. Make sure you are doing the correct repair procedure for the correct vehicle.
Repair Procedure A (L4)
| Operation Number | Description | Flat Rate Time | Template ID | Failed Part Number |
| 8271B5 | Replace right front run channel and right front trim (L4). Includes test drive | 1.9 hrs | 15-011A | 72235-T2F-A02 |
| 8261C0 | Replace left front run channel and left front trim (L4).
Includes test drive | 1.9 hrs | 15-011B | 72275-T2F-A02 |
| 8271B6 | Replace Both right and left side run channels and front trims (L4). Includes test drive | 3.8 hrs | 15-011C | 72235-T2F-A02 |
Repair Procedure B (L4)
| Operation Number | Description | Flat Rate Time | Template ID | Failed Part Number |
| 8271B7 | Replace right front trim (L4).
Clean and apply EPT Sealer. Includes test drive. | 0.9 hr | 15-011G | 72430-T2F-A01 |
| 8261C1 | Replace left front trim (L4).
Clean and apply EPT Sealer. Includes test drive. | 0.9 hr | 15-011H |
Repair Procedure A (V6)
| Operation Number | Description | Flat Rate Time | Template ID | Failed Part Number |
| 8271B8 | Replace right front run channel and right front trim (V6). Includes test drive | 1.9 hrs | 15-011D | 72235-T2F-A02 |
| 8261C2 | Replace left front run channel and left front trim (V6).
Includes test drive | 1.9 hrs | 15-011E | 72275-T2F-A02 |
| 8271B9 | Replace Both right and left side run channels and front trims (V6). Includes test drive | 3.8 hrs | 15-011F | 72235-T2F-A02 |
Repair Procedure B (V6)
| Operation Number | Description | Flat Rate Time | Template ID | Failed Part Number |
| 8271C0 | Replace right front trim (V6).
Clean and apply EPT Sealer. Includes test drive. | 0.9 hr | 15-011J | 72430-T2G-A01 |
| 8261C3 | Replace left front trim (V6).
Clean and apply EPT Sealer. Includes test drive. | 0.9 hr | 15-011K |
Defect Code: 06201
Symptom Code: 07302
Skill Level: Repair Technician
INSPECTION
Check the vehicle to determine the location(s) of the wind noise.
- If the wind noise is heard at ear level from either the driver’s or passenger’s side windows or along the pillar, tape it off and see if the wind noise goes away, If the wind noise goes away, go to REPAIR PROCEDURE.
- If the wind noise is heard elsewhere, this service bulletin does not apply. Continue normal troubleshooting procedures.
REPAIR PROCEDURE
NOTE:Repair only the affected side.
- For all 2014 and 2015 models within the affected vehicles VIN range, do REPAIR PROCEDURE A.
- For 2015 models outside the affected vehicles VIN range, do REPAIR PROCEDURE B.
REPAIR PROCEDURE A
NOTE: Repair only the affected side.
Replace both the run channel and the sash trim.
Sash Trim Replacement
- Remove the tweeter cover.
- Remove the front door panel. Remove the front door plastic cover if needed.
- Remove the door mirror.
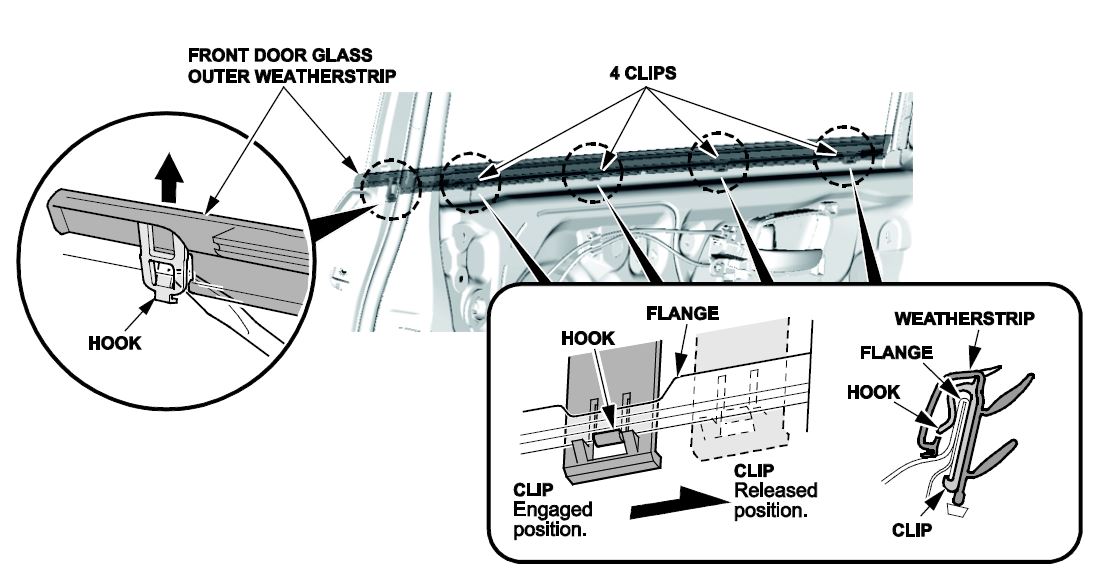
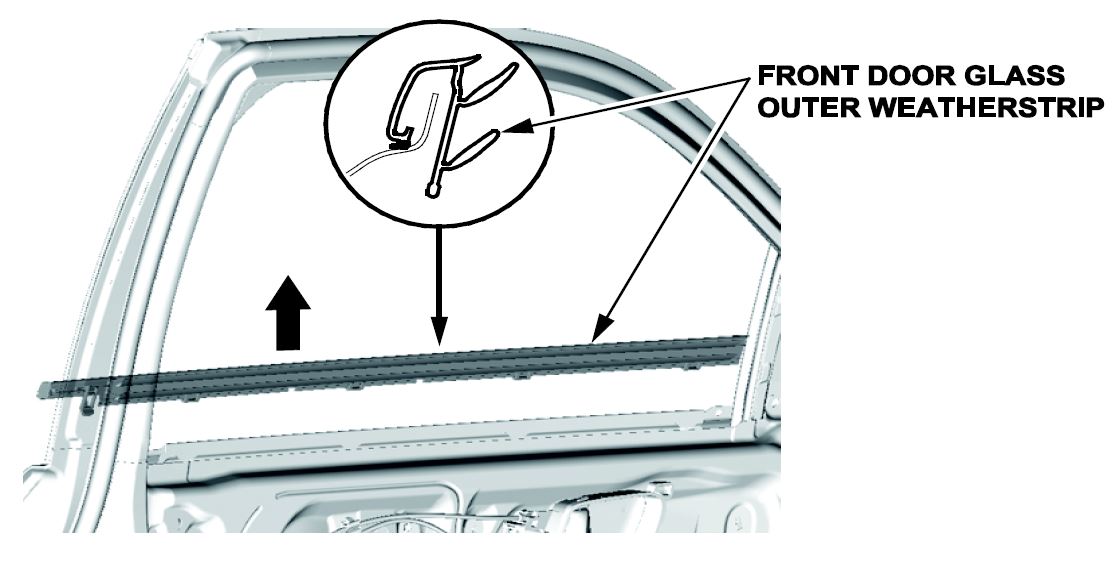
- From the inside of the door, slide the clips on the front door glass outer weatherstrip to release the hooks from the flanges on the door. Release the hook with a flat-tip screwdriver from inside of the door.
- Remove the front door glass outer weatherstrip.
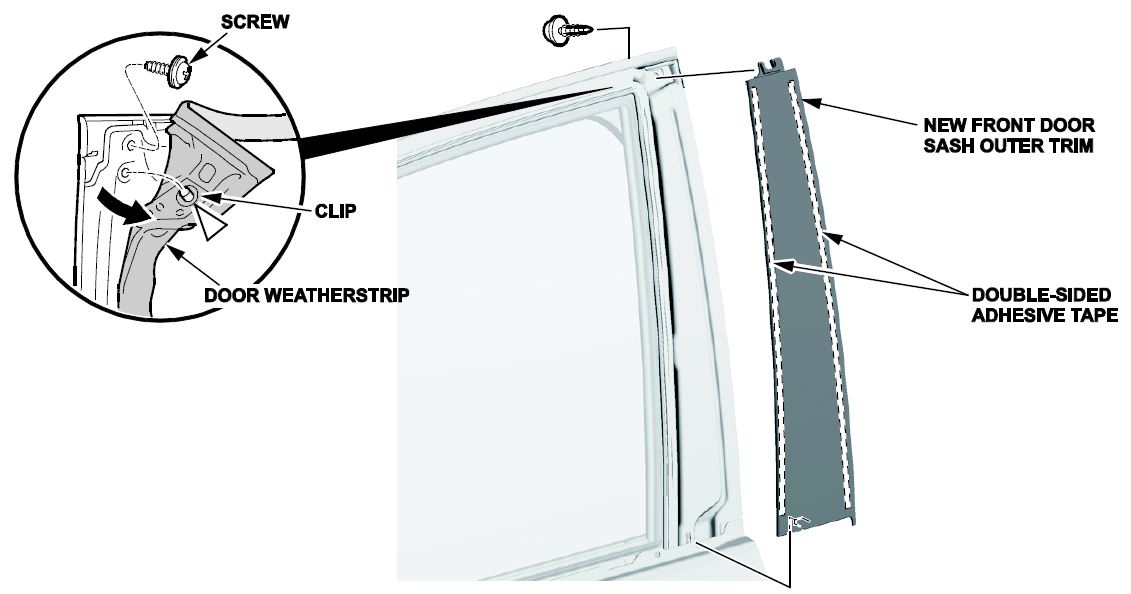
- Lightly pull away the door weatherstrip from the top corner just enough to remove the screw on the end of the chrome molding. Lightly pull away the top end of the chrome molding, detach the clip, then remove the door sash trim.
- Clean the door sash trim area with alcohol/degreaser, then install the new door sash trim.
- Reinstall the screw holding the door sash trim.
Run Channel Replacement
- Remove the run channel from the window frame.
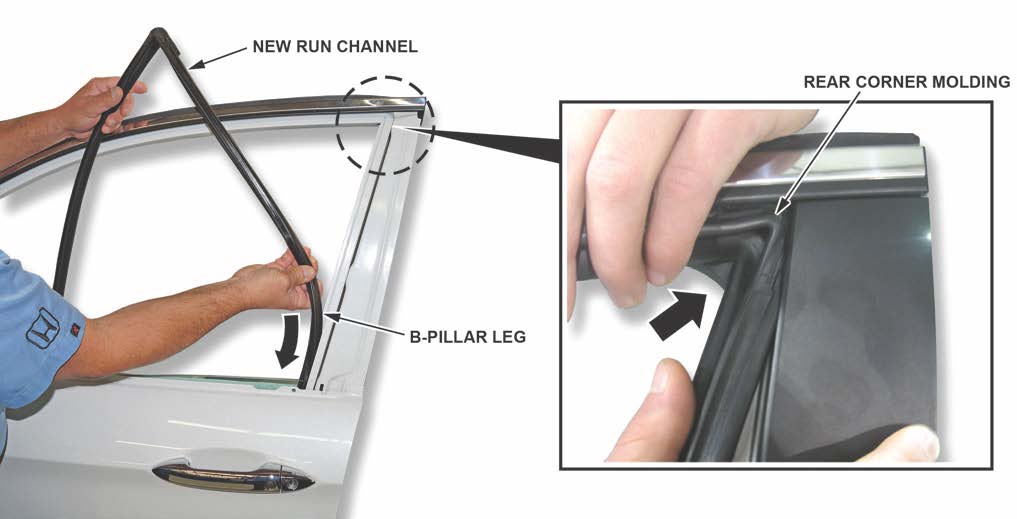
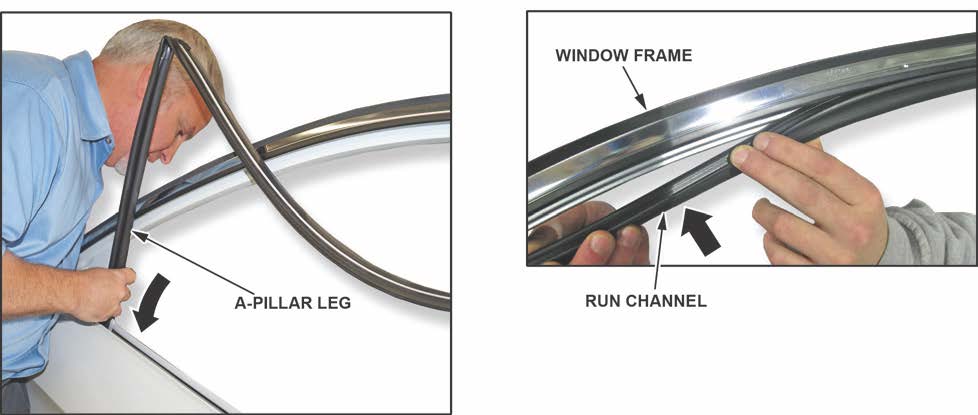
- Install the new run channel by sliding the B-pillar leg all the way down between the glass and the vertical steel channel first, then install the rear corner molding of the run channel.
- After setting the rear corner molding, begin setting the run channel in the window frame toward the front sash. Now slide the A-pillar leg of the run channel down between the glass and the front steel channel.
- Set the front corner molding.
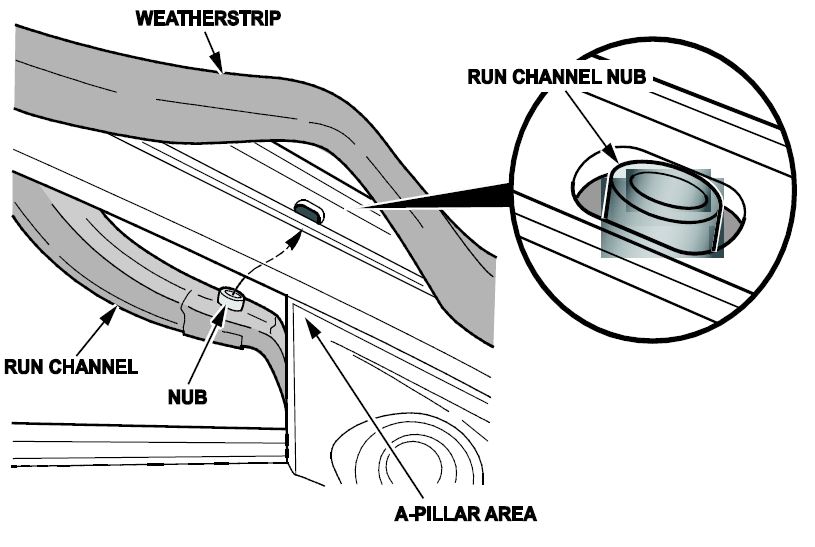
- Gently pull up on the weatherstrip on top of the door frame near the door mirror.
- Check that the run channel is set by making sure the run channel nub is seated in the oval hole.
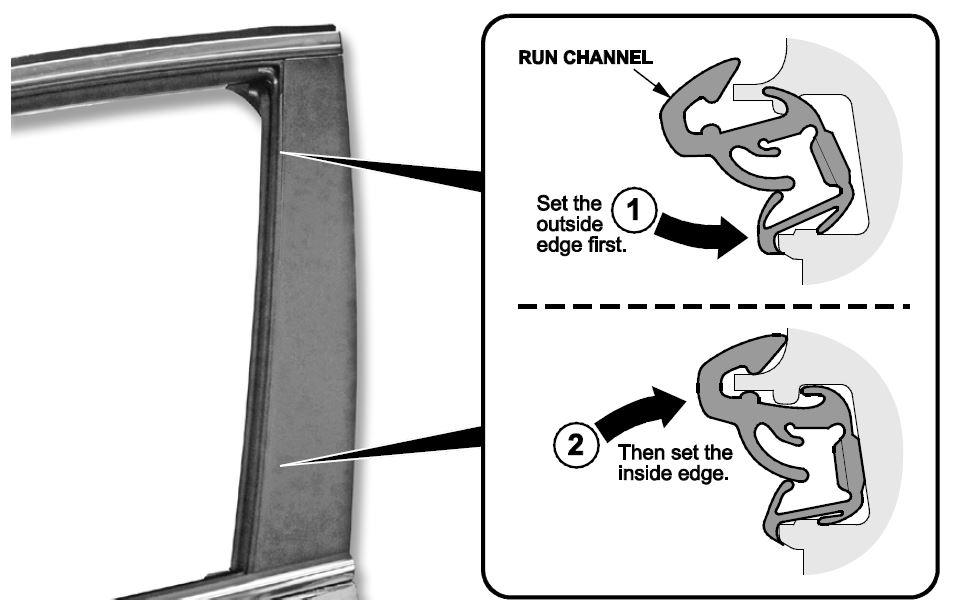
- Set the A-pillar leg of the run channel down into the door. Set the outside attachment first, then set the inside attachment of the run channel.
- Set the B-pillar leg of the run channel all the way down the bottom of the sash. Set the outside attachment first, then set the inside attachment.
- Reinstall the door mirror.
- Reinstall the front door panel.
- Reinstall the tweeter cover.
- Check that the wind noise is gone.
REPAIR PROCEDURE B
NOTE: Repair only the affected side.
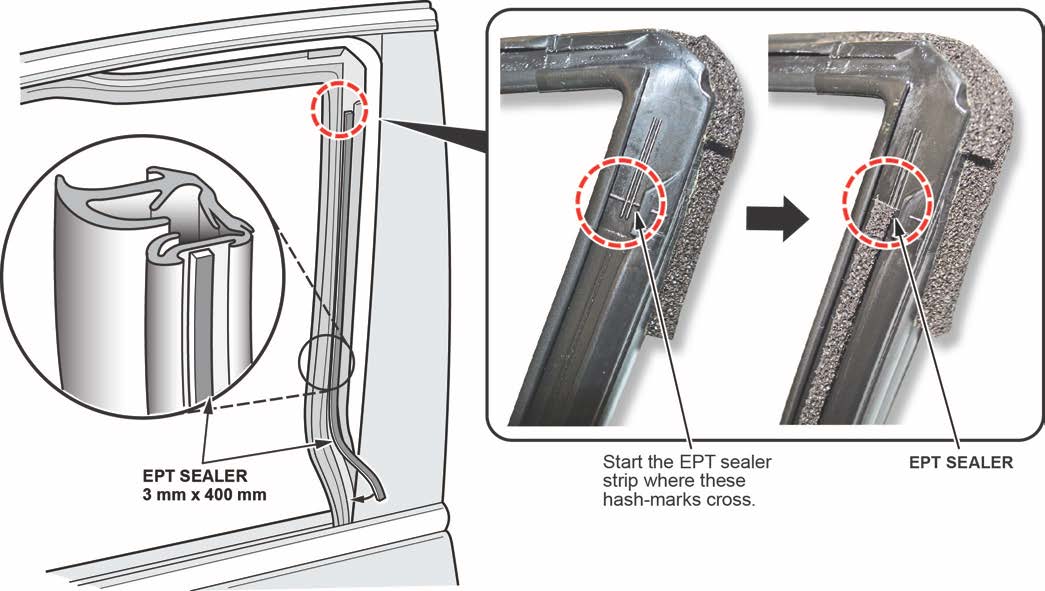
Replace the sash trim and apply EPT sealer to the run channel groove.
- Replace the sash trim (see Sash Trim Replacement under REPAIR PROCEDURE A).
- Open the window.
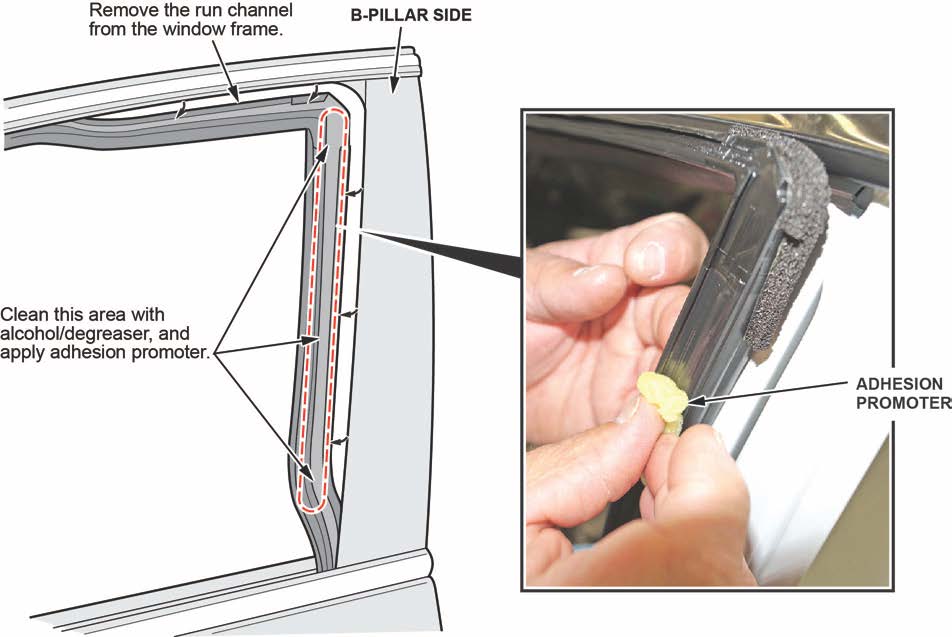
- Remove the run channel from the upper part of the door frame.
- Remove the run channel from the top corner of the B-pillar to B Line.
- Clean the run channel groove along the B-pillar with rubbing alcohol.
- Apply primer (3M Adhesion Promoter 4298UV) to the run channel groove along the B-pillar.
- Cut a strip of EPT sealer that measures 3 mm x 400 mm x 3 mm and attach it to the groove of the run channel. Start at the top corner and install the strip down the run channel. Center the strip around the hash marks on the run channel.
- Install the run channel by attaching at the Y-corner.
- Install the run channel down the B-pillar by attaching from the outside lip, then outside.
- Install the run channel along the top of the door frame.
NOTE: The corner may require some force to be properly installed
- Push the run channel up against the sash trim to set the EPT sealer, then check for any gaps or visible sealer.
- Reinstall the door mirror.
- Reinstall the front door panel.
- Reinstall the tweeter cover.
- Check that the wind noise is gone.
END
 Loading...
