| “This site contains affiliate links for which OEMDTC may be compensated” |
A14-059
February 4, 2015
52566-01391 Version 2
2015 CR-V: PDI and New Model Service Information
Supersedes 14-059, dated September 24, 2014, to revise the information highlighted in yellow.
AFFECTED VEHICLES
| Year | Model | Trim Level | |
|---|---|---|---|
| 2WD | AWD | ||
| 2015 | CR-V | LX | LX |
| EX | EX | ||
| EX-L | EX-L | ||
| EX-L with Navigation | EX-L with Navigation | ||
| Touring | Touring | ||
REVISION SUMMARY
Under PDI PROCEDURES, 13. Set the Clock, Models with Display Audio (Without Navigation), added a note on how toclear the In Line Diag screen.
INTRODUCTION
This bulletin covers the pre-delivery inspection (PDI) of the 2015 CR-V. It includes these procedures:
| 1. | Fuel the Vehicle | 10. | Install the Antenna Mast |
| 2. | Remove the Exterior Protective Coatings | 11. | Do the Idle Learn Procedure |
| 3. | Install the Fuses | 12. | Install the Shift Lock Release Cover |
| 4. | Remove the Interior Protective Coverings | 13. | Set the Clock |
| 5. | Install the Floor Mats | 14. | Check/Refresh the XM Satellite Radio Dealer Demo Service (If Equipped) |
| 6. | Check the Battery | 15. | Check the LDW, ACC, LKAS, and CMBS Indicators (Touring Only) |
| 7. | Install the Front License Plate Holder | 16. | Make Sure LaneWatch Works (All Except LX) |
| 8. | Set the Tire Pressures | 17. | Check Bluetooth® HandsFreeLink® (HFL) |
| 18. | Start the TPMS Calibration Process |
To do a PDI on a model with a navigation system, be sure to complete S/B 14-060, 2015 CR-V: PDI of the Navigation System.
This bulletin also includes this new model service information:
| 1. | PDI and Final Delivery Checklist | 4. | LaneWatch (All Except LX) |
| 2. | VIN Location | 5. | Touring Model |
| 3. | New Engine and Transmission |
CLAIM INFORMATION
Flat Rate Time: 1.4 hours
NOTE: This flat rate time includes the PDI of the navigation system, if equipped.
PDI PROCEDURES
Before Starting Review these items:
- Perfect Delivery documents, especially the information on battery maintenance and tire pressures
- Checklist in the PDI and Final Delivery Checklist
Make sure you record the PDI on the appropriate pages of the checklist. The PDI is not done until this bulletin and the checklist are both complete. Note on the repair order any repairs or problems that cannot be fixed within a few minutes. Remove all PDI items from the cargo area and glove box.
1. Fuel the Vehicle
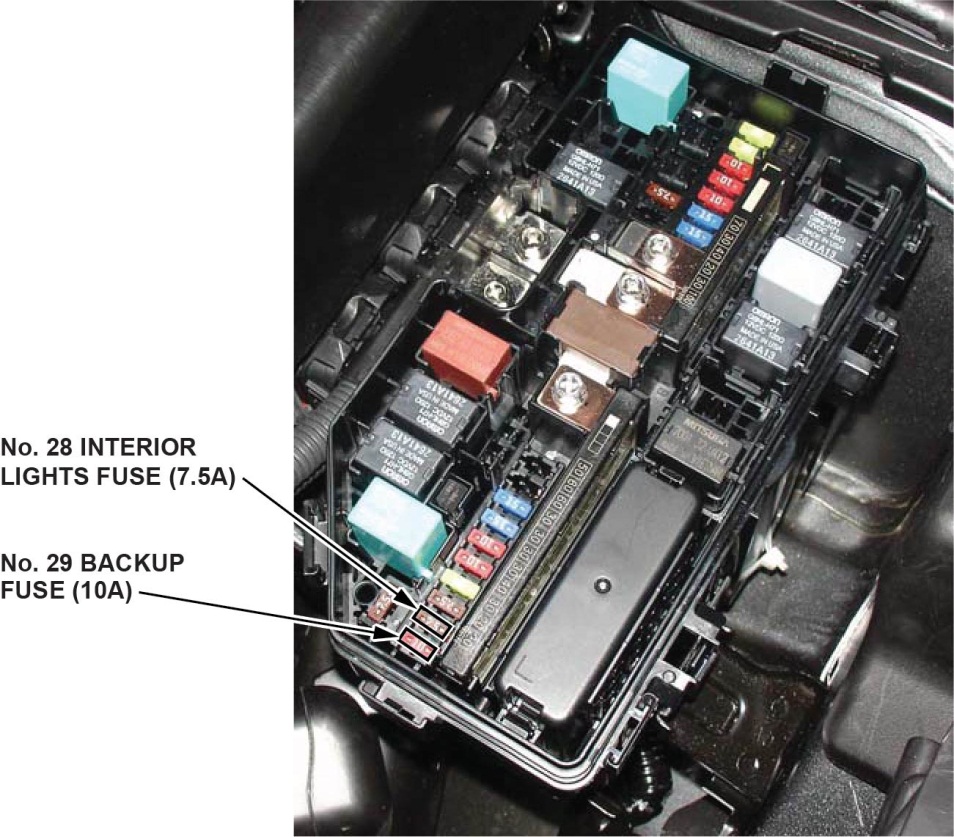
Make sure the No. 28 INTERIOR LIGHTS (7.5 A) fuse and No. 29 BACKUP (10 A) fuse are installed before filling up the fuel tank (see “Install the Fuses”). If you do it without them installed, the fuel gauge will take much longer than normal to show an accurate reading.
If this happens, and you do not want to wait for the fuel gauge to show the correct level, turn the ignition to OFF and let the vehicle sit for 10 minutes. Install the fuses, then turn the ignition to ON. The fuel gauge will show the correct level.
2. Remove the Exterior Protective Coatings
Carefully remove the exterior protective coatings. See S/B 03-080, Removal of Protective Coatings During PDI.
3. Install the Fuses
To prevent battery drain during vehicle shipping, the No. 28 INTERIOR LIGHTS (7.5 A) fuse and No. 29 BACKUP (10 A) fuse are removed from the under-hood fuse/relay box and stored in the glove box. Make sure you turn the ignition to OFF and wait for at least 1 minute before reinstalling these fuses.
Vehicle Interior
4. Remove the Interior Protective Coverings
Carefully remove all interior protective coverings. Remove them with clean hands to avoid soiling any surfaces.
5. Install the Floor Mats
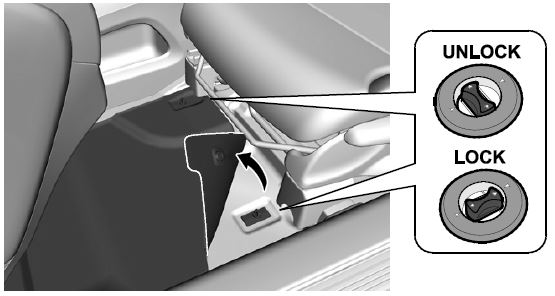
Install the floor mats in the appropriate positions. Be sure to place the driver’s floor mat eyelets over the hooks in the floor and turn the knobs clockwise to the lock position.
Under-Hood (Engine Cold)
6. Check the Battery
To ensure long battery life and that the customer gets a fully charged battery, it must be checked at these times:
- When the vehicle first arrives at the dealership
- During the PDI (if done at a later date)
- At regular intervals (if stored)
- Just before vehicle delivery
Test the battery with the ED-18 battery tester using S/B 88-023, Battery Testing and Replacement. Do not use the battery’s test indicator window to check its state of charge. If the ED-18 does not show GOOD BATTERY, charge the battery with the GR8 battery diagnostic station.
Write down the GOOD BATTERY 10-digit code in the PDI and Final Delivery Checklist. During the PDI, write down the code in the “Under Hood – Engine Cold” section. Then, at vehicle delivery, write it down in the “Final Inspection (At Delivery)” section.
NOTE: Make sure the ED-18 has the latest software installed before using it. See S/B 09-045, ED-18 Battery Tester Update Information.
Vehicle Exterior (Vehicle Lowered to Half-Height)
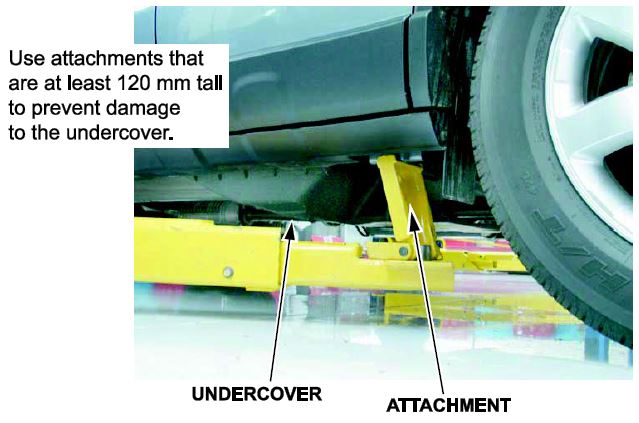
NOTE: The undercover is 90 mm (3.5 in.) lower than the side sill. A flat lift may interfere with the undercover, so use attachments that are at least 120 mm (4.7 in.) tall when putting the vehicle on a lift.
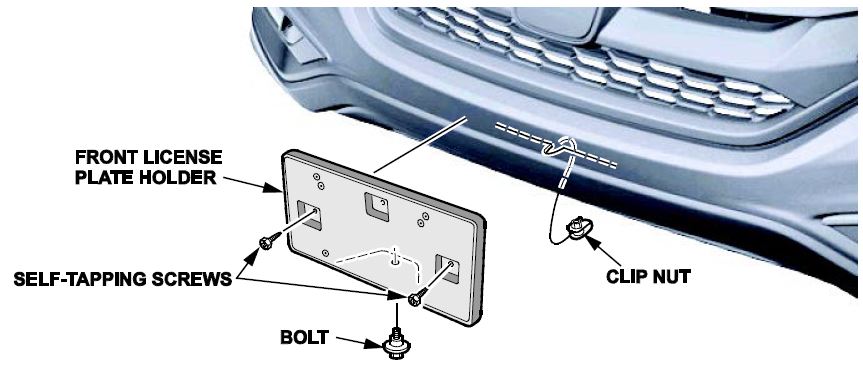
7. Install the Front License Plate Holder
If state regulations require the use of a front license plate, install the front license plate holder as shown:
Vehicle Exterior (Vehicle Lowered to Ground)
8. Set the Tire Pressures
Set the tire pressures according to the driver’s doorjamb label. Make sure the tires are normalized (at ambient temperature) when checking and setting the pressures.
9. Start the TPMS Calibration Process
This vehicle has an indirect TPMS. Unlike other systems that directly measure air pressure, an indirect TPMS uses the wheel speed sensors to monitor and compare tire characteristics while driving and determine when one or more tires are significantly underinflated.
To ensure the Low Tire Pressure/TPMS indicator does not come on when the tire pressures are OK, you must inflate all four tires to the cold inflation values listed on the driver’s doorjamb label and start the TPMS calibration process during the PDI.
All Models Except Touring
With the shift lever in Park, turn the ignition to ON. Press and hold the TPMS button until the Low Tire Pressure/TPMS indicator blinks twice, telling you the calibration process has begun. The calibration will complete on its own.
Touring Only
- With the shift lever in Park, turn the ignition to ON.
- Using the MID and the steering wheel buttons, go to VEHICLE SETTINGS.
- Select TPMS Calibration.
- Select Calibrate. The calibration starts and will complete on its own.
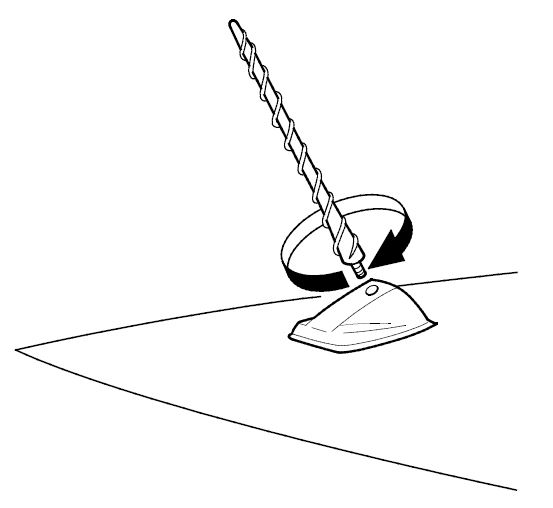
10. Install the Antenna Mast
If not already installed, the antenna mast is included in the glove box. Install the mast on the roof mount by hand. Be careful not to over tighten the mast.
Under-Hood (Engine Idling)
11. Do the Idle Learn Procedure
To ensure a steady engine idle, do the idle learn procedure after installing the No. 28 INTERIOR LIGHTS (7.5 A) fuse and No. 29 BACKUP (10 A) fuse.
- Make sure all electrical items (A/C, audio unit, defogger, lights, etc.) are turned off.
- Start the engine with the shift lever in Park, and hold the engine speed at 3,000 rpm until the radiator fan comes on.
- Let the engine idle for 10 minutes with the throttle fully closed.
The idle learn procedure must also be done after updating or replacing the ECM/PCM. If does not need to be done after clearing DTCs.
Vehicle Interior
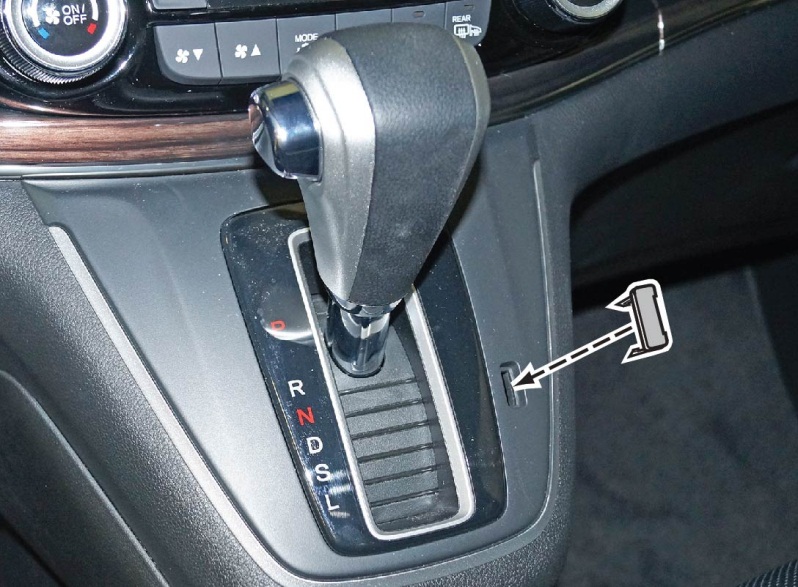
12. Install the Shift Lock Release Cover
Install the shift lock release cover as shown.
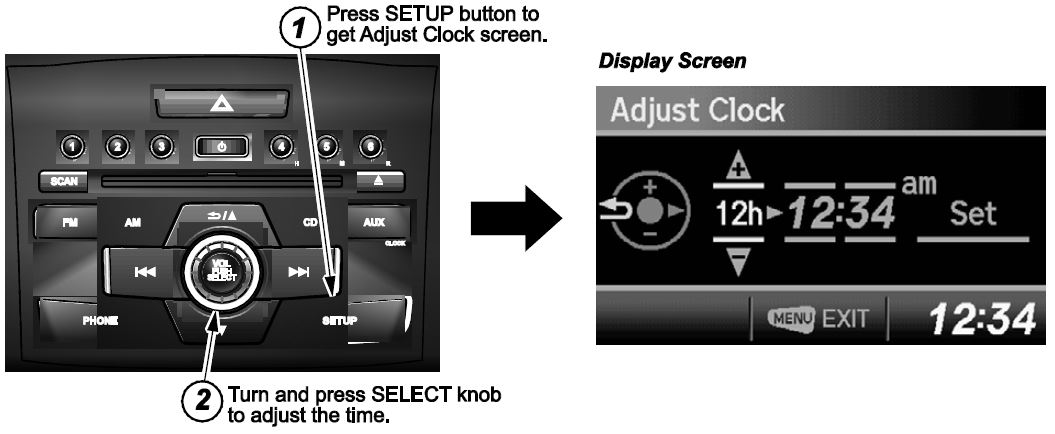
13. Set the Clock
Models Without Display Audio
- Turn the ignition to ON.
- Press the SETUP button.
- Turn the selector knob to select Adjust Clock, then press the knob.
- Turn the selector knob to the item you want to change (12/24 hour mode, hours, minutes), then press the knob to make the selection.
- Turn the selector knob to make the adjustment.
- Press the selector knob to make your selection. The display returns to Adjust Clock.
- Repeat steps 4 through 6 to adjust other items.
- To enter the selection, turn the selector knob to select Set, and then press the knob.
- Press the SETUP button to go back to the normal display.
Models with Display Audio (Without Navigation)
- Turn the ignition to ON.
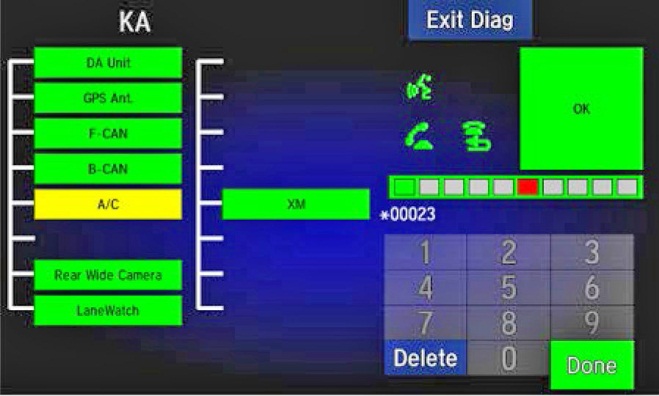
NOTE: You may see the In Line Diag screen below. If so, do the following. If not, go to step 2.
- Press and release the Talk, Pick-Up, and Hang-Up/Back buttons, then wait for all of the boxes to turn green. If any of them are red, troubleshoot the applicable system. See the electronic service manual for more information.
- Press and release the Talk button and, in a normal voice, say “Testing.” The mic level indicator must reach at least six bars.
- Select Exit Diag to exit the screen.
- Turn the ignition to OFF, then back to ON to make sure the In Line Diag screen does not reappear.
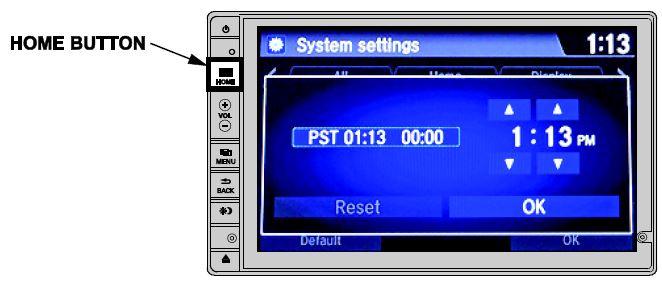
- Select Home, Settings, and System.
- Select Clock, and move the vehicle outside so the GPS receiver can acquire a signal. Once the signal is acquired, the time will default to PST.
- Select Clock Adjustment, press the up/down arrow keys to adjust the hours and minutes, then select OK.
Models with Display Audio (With Navigation)
These models do not need to have the clock set. The system gets the time from the GPS satellites.
14. Check/Refresh the XM Satellite Radio Dealer Demo Service (If Equipped)
The audio system comes from the factory activated with the XM Satellite Radio dealer demo service. Once you install the fuses, the XM radio receives the full range of available XM channels. To ensure this service is activated, follow these steps:
- Turn the ignition to ON.
- Turn on the audio unit, enter the five-digit navigation anti-theft code (if not already done), and press the XM button.
- Make sure the XM radio is in channel mode, not category mode. On models without navigation, press and hold the DISP MODE button until the mode changes. On models with navigation, go to the Audio menu and select CH to switch between modes.
- Tune to channel 001 (the XM preview channel) to make sure you are receiving the XM signal. If you do not get a clear signal, park the vehicle outside where there is a clear view of the southern sky.
- While watching the audio display, tune to several channels within the full XM lineup. To see the full list of channels, go to siriusxm.com.
- If you can tune to all of the XM channels, the dealer demo service is activated. Tune to channel 001, and leave the audio unit on for 7 minutes to refresh the dealer demo service. No further action is needed.
- If you can tune to just a few channels like 000, 001, and 174, the dealer demo service is not yet activated, and you need to do an activation refresh. Go to step 6.
Tune to 000, then write down the eight-character radio ID you see in the audio unit display. You need this ID, your dealer number, and the VIN to do an activation refresh of the dealer demo service. Go to step 7.
NOTE:
- If you cannot tune to channel 000, you are in category mode. See step 3 to switch from category mode to channel mode.
- Check the ID carefully. The letters I, O, S, and F are not used.
- Go to an iN workstation.
NOTE: If you do not have access to the iN, call SiriusXM Satellite Radio at 800-852-9696, and follow the automated menu instructions. When the agent answers, ask for a rapid dealer activation refresh, then go to step 10.
- From the iN main menu, click on SERVICE and HCUC XM Radio Demo Activation. This brings up the HCUC XM Radio Activation
NOTE: If you cannot bring up this screen, call the iN Support Center at 800-245-4343.
- Enter the eight-character radio ID that you wrote down in step 6, then click on Submit. You will see the ACTIVATION REFRESH screen once the ID is recognized.
NOTE: If you enter the ID incorrectly, or if it is not recognized, you will see an error screen. If this happens, follow the screen instructions.
- Tune to 001 to make sure you are receiving the XM signal. If you do not get a clear signal, park the vehicle outside where there is a clear view of the southern sky, then go to step 11.
- Leave the audio unit on for at least 10 minutes, then go to step 12.
- While watching the audio unit display, tune to several channels within the full XM lineup.
- If you can tune to all of the XM channels, the dealer demo service is activated. No further action is needed.
- If you can tune to only a few channels like 000, 001, and 174, repeat steps 7 through 12.
- If, after 2 hours, you can only tune to channels 000, 001, and 174, call SiriusXM Satellite Radio at 800-8529696. When you hear the automated menu, enter priority code 9466 to route your call to an XM agent. When the agent answers, ask him or her to review the account status and make any needed corrections. If the account status is correct for the vehicle, replace the XM receiver.
NOTE:
- The dealer demo service lasts for 7 months or until the vehicle’s RDR (retail delivery registration) is submitted, whichever comes first.
- After the vehicle is registered, the dealer demo service converts to a customer account. The customer gets a 90-day trial service of all available non-premium XM channels. If the customer decides to end the service after that time, the XM radio goes back to preview mode. Normal AM/FM radio reception is not affected by ending the service.
- The XM radio receives digital programming broadcasts from two fixed-orbit satellites near the equator along with a network of ground antennas (repeaters). You will get the strongest signal where there is a clear view of the southern sky.
- The XM radio may lose reception when driving through a tunnel, under an overpass, inside a parking garage, or near the northern face of a canyon or mountain.
- To cut down on reception loss, XM radio uses a buffer. If the reception loss lasts longer than the buffering period, the signal goes silent.
- Because the signal is digital, any reception loss makes it go silent. The signal does not fade like it does with an AM/FM radio.
- If you ever need to replace the XM receiver, call SiriusXM Satellite Radio at 800-852-9696. Be prepared to give your dealer number, the VIN, and the radio ID from the printed label on the side of the old and new receiver units.
- Your customer’s XM radio presets will be lost if you disconnect the battery or if it goes dead. Always write down the XM radio presets before disconnecting the battery.
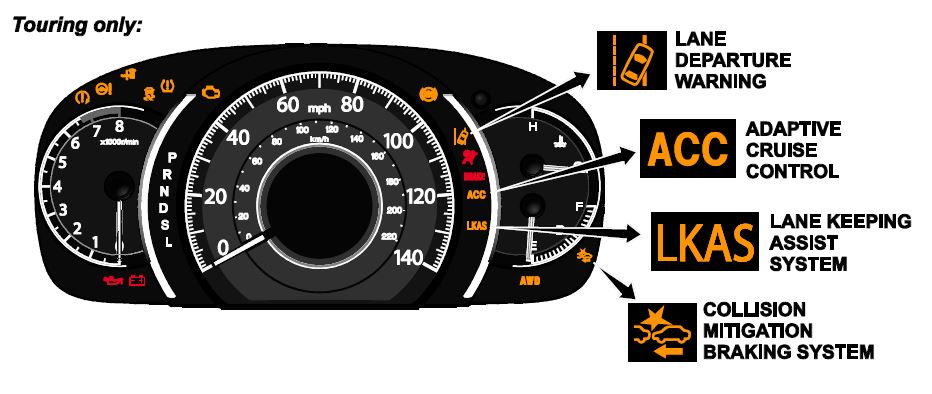
15. Check Operation of the LDW, ACC, LKAS, and CMBS Indicators (Touring Only)
When you first turn the ignition to ON, these indicators should come on for a few seconds and then go off:
- LDW (Lane Departure Warning)
- ACC (Adaptive Cruise Control)
- LKAS (Lane Keeping Assist System)
- CMBS (Collision Mitigation Braking System)
16. Make Sure LaneWatch Works (All Except LX))
Turn the ignition to ON. Push the button on the end of the combination switch to make sure LaneWatch works. Push the button again and the LaneWatch image should turn off. Activate the right turn signal, and the LaneWatch image should come on.
17. Check Bluetooth® HandsFreeLink® (HFL)
To ensure HFL works and is ready to use, start the engine, then press and hold the Hang-Up/Back button on the steering wheel for 10 seconds. You should hear “The HandsFreeLink system is OK.” If you do not hear this message, see the electronic service manual for troubleshooting information.
NEW MODEL SERVICE INFORMATION
1. PDI and Final Delivery Checklist
The service history booklet has been replaced with the PDI and Final Delivery Checklist. This booklet includes all of the PDI and final delivery sheets, but not the maintenance record section. That section will be posted on ISIS and ServiceExpress. Be sure to fill out the PDI sheets during the PDI and the final inspection sheet at vehicle delivery.
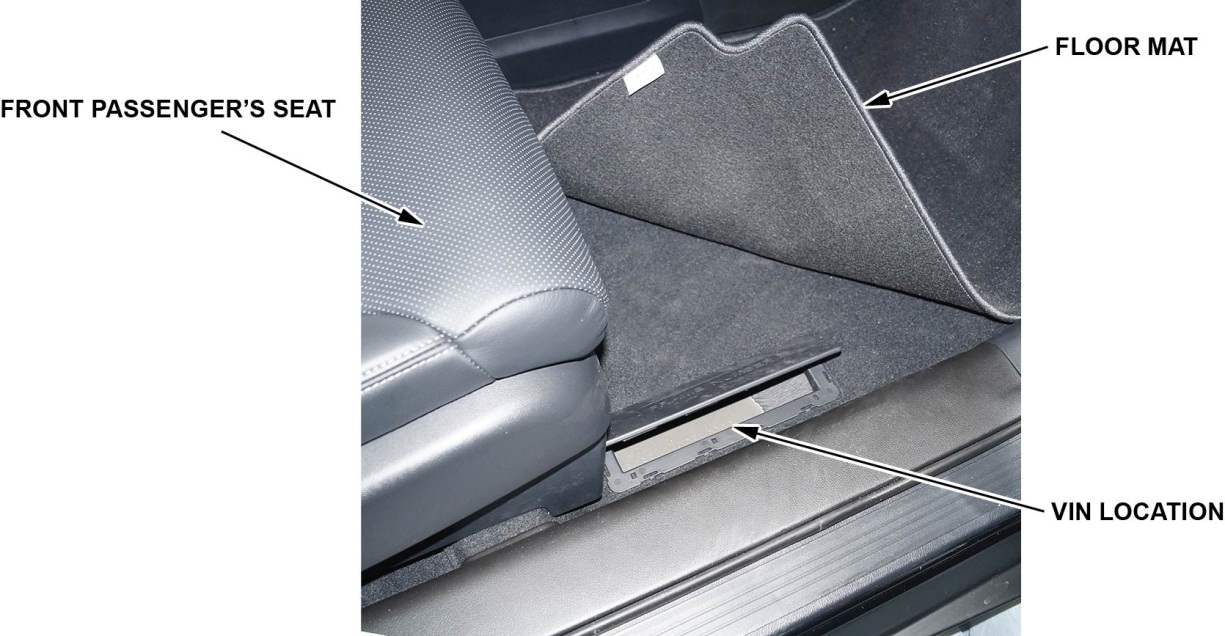
2. VIN Location
The VIN is stamped on the chassis. You will find it under a lid on the floor on the right side of the front passenger’s seat.
3. New Engine and Transmission
This vehicle comes with a new engine and transmission, which are the same as the engine and transmission in the 2015 Accord L4. The engine has direct-injection. The transmission is the second-generation CVT.
4. LaneWatch (All Except LX)
All 2015 CR-Vs (except LX) come with LaneWatch. This feature can help drivers see traffic as well as pedestrians and other objects in their blind spot. It uses real-time video from a camera mounted below the passenger’s power mirror to give a wide angle rear view on the MID or navigation screen, depending on the trim level. The video comes up when you put on the right turn signal or press the LaneWatch button on the end of the turn signal lever.
5. Touring Model
A Touring model is now available. It adds these features:
- Power Tailgate
- Driver’s Position Memory System (DPMS)
- HID Headlights
- Lane Departure Warning (LDW)
- Adaptive Cruise Control (ACC)
- Lane Keeping Assist System (LKAS)
- Collision Mitigation Braking System (CMBS)
- HomeLink
- Turn Signal Mirrors
- 18-Inch Aluminum-Alloy Wheels
 Loading...
