| “This site contains affiliate links for which OEMDTC may be compensated” |
NHTSA Campaign Number: 15V045
Manufacturer Honda (American Honda
 Motor Co.)
Components AIR BAGS
Potential Number of Units Affected 374,177
Inadvertent Air Bag Deployment
Inadvertent deployment of the air bags may increase the risk of injury and the possibility of a vehicle crash.
Summary
Honda is recalling certain model year 2003-2004 Honda
 Odyssey vehicles manufactured February 13, 2002, to August 13, 2004, and 2003 Acura
 MDX vehicles manufactured February 21, 2002, to September 23, 2003.
Due to electrical noise, a component in the air bag control module may fail, causing the front air bags, side air bags, and/or seatbelt pretensioners to deploy inadvertently while the vehicle is being operated.
Remedy
Honda dealers will replace the supplemental restraint system electronic control unit (SRS ECU). The recall began on February 22, 2016.
Owners may contact Honda customer service at 1-800-999-1009.
Honda ’s number for this recall is JN6 (Odyssey), and JN7 (MDX).
Note: This recall supersedes recall 13V-412.
Vehicles that had a noise filter installed as the remedy for that campaign need to have the SRS ECU replaced under this campaign.
Notes
Owners may also contact the National Highway Traffic Safety Administration Vehicle Safety Hotline at 1-888-327-4236 (TTY 1-800-424-9153), or go to www.safercar.gov.
Check if your Honda has a Recall
B15-011
December 11, 2015
01466 Version 4
Safety Recall: SRS Unit
Supersedes S/B 15-011, dated October 31, 2015, to revise the information highlighted in yellow
AFFECTED VEHICLES
| Year | Model | VIN Range |
| 2003 | MDX | Check the iN VIN status for eligibility |
REVISION SUMMARY
- The INSPECTION PROCEDURE was changed.
- An add code was included under WARRANTY CLAIM INFORMATION.
- The REPAIR PROCEDURE was changed. Make sure your read these steps as they are different from previous versions.
BACKGROUND
Electrical noise (interference) generated by the vehicle may inadvertently cause some or all of the vehicle’s airbags to deploy. Many vehicles had an electrical noise suppressor installed under S/B 13-038, Safety Recall: Electrical Noise May Cause Inadvertent Front Airbag Deployment. In rare cases, even with the noise suppressor installed, some front airbags inadvertently deployed.
NOTE: If the VIN status inquiry indicates that the vehicle is subject to any open safety recalls, including an airbag inflator campaign/recall, make sure to also complete those recall repairs before returning the vehicle to the client. If you are unable to complete any open recall, advise the client of the recall status and when the recall may be completed.
CLIENT NOTIFICATION
Owners of affected vehicles will be sent a notification of this campaign.
Do an iN VIN status inquiry to make sure the vehicle is shown as eligible.
Some vehicles affected by this campaign may be in your new or used vehicle inventory. These vehicles must be repaired before they are sold.
Should your dealership sell an unrepaired vehicle that subsequently causes injury or damage because of the recalled item, the dealership will be solely responsible to the damaged party, and will be required to defend and indemnify American Honda for any resulting claims. To see if a vehicle in inventory is affected by this recall, do a VIN status inquiry before selling it.
CORRECTIVE ACTION
Inspect the vehicle and based on your results, do one of the following:
- Do nothing, the vehicle is up to date.
- Replace the SRS unit.
- Remove the noise suppressor and replace the SRS unit.
NOTE: When you install a new SRS unit, do not initialize the OPDS unit.
PARTS INFORMATION
| Part Name | Part Number | Quantity |
| SRS Unit Kit (contains SRS Unit [1], Torx bolts [4], wire tie [1], foam piece [1], clip [1]) | 06772-S3V-306 | 1 |
WARRANTY CLAIM INFORMATION
NOTE: Do not use this warranty information for vehicles where the SRS unit is being replaced because of a collision.
| Operation Number | Description | Flat Rate Time | Defect Code | Symptom Code | Template ID | Failed Part Number |
| 7515A1 | Inspect the SRS unit – the vehicle is OK. | 0.3 hr | 5YT00 | JN700 | 15-011N | 77960-S3V-A81 |
| 7511B9 | Repair Procedure A – Inspect the vehicle, replace the SRS unit, and remove the noise suppressor. (includes resetting power window and idle learn) | 1.0 hr | 5YT00 | JN700 | 15-011P | 77960-S3V-A81 |
| A | Add if you need to use the HDS to initialize the OPDS. | 0.2 hr | 5YT00 | JN700 | 15-01P1 | 77960-S3V-A81 |
| 7511C0 | Repair Procedure B – Inspect the vehicle and replace the SRS unit. (includes resetting power window and idle learn) | 0.6 hr | 5YT00 | JN700 | 15-011Q | 77960-S3V-A81 |
| A | Add if you need to use the HDS to initialize the OPDS. | 0.2 hr | 5YT00 | JN700 | 15-01Q1 | 77960-S3V-A81 |
Skill Level: Repair Technician
INSPECTION PROCEDURE
- Turn the ignition to ON and check if the SRS indicator comes on for about 6 seconds, then goes out.
- If the indicator comes on, then goes out after about 6 seconds, go to step 2.
- If the indicator does not come on, or if it stays on, connect the HDS and write the DTCs on the RO.
- Contact the client and inform them that there is a problem with the SRS system and explain that replacing the SRS unit may not fix the problems causing the indicator light to illuminate as the SRS unit replacement was only intended address the specific problem that led to the recall.
- If the client declines the client pay repairs, make sure you write down the description of the problem and any DTCs on the RO. Also, state that the SRS system is not operating properly and may pose a risk to the front occupants in the event of a collision; either because the airbags did not deploy, or the airbags deploy in a manner that does not account for all factors involved in the collision.
- After the SRS unit is replaced, additional client pay repairs will likely be needed to return the SRS system to proper operation.
- Turn the ignition to OFF and wait for 30 seconds. Turn the ignition to ON and check if the SIDE AIRBAG OFF indicator comes on for about 6 seconds, then goes out.
NOTE: Do not confuse the SIDE AIRBAG OFF indicator and the PASSENGER AIRBAG OFF indicator.
- If the indicator comes on, then goes out after about 6 seconds, go to step 3.
- If the indicator does not come on at all, or comes on and stays on, connect the HDS and write the DTCs on the RO.
- Have the service consultant contact the client and inform them that there is a problem with the side airbag and explain that replacing the SRS unit may not fix the problems, causing the indicator to illuminate. The SRS unit replacement was only intended to address the specific problem that led to the recall.
- If the client declines the client pay repairs, make sure you write down the description of the problem and any DTCs on the RO. Also, state that the SRS system is not operating properly and may pose a risk to the front occupants in the event of a collision; either because the airbags may not deploy, or the airbags may deploy in a manner that does not account for all factors involved in the collision.
- After the SRS unit is replaced, additional client pay repairs will likely be needed to return the SRS system to proper operation.
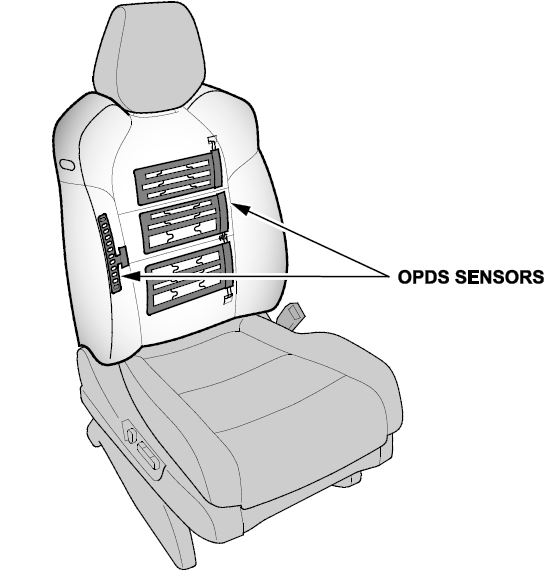
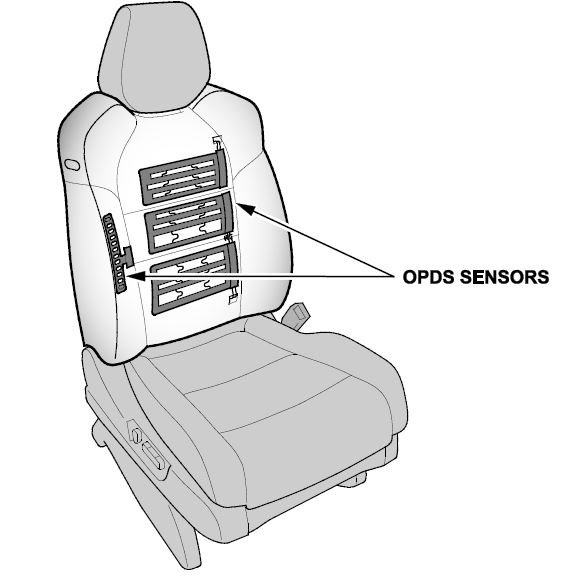
- Make sure the OPDS is working properly by leaving the ignition turned to ON, then grabbing and holding the passenger seat back outside bolster with both hands for about 30 seconds. The SIDE AIRBAG OFF indicator should come on.
- If the SIDE AIRBAG OFF indicator comes on, go to step 4.
- If the indicator does not come on, connect the HDS and write any SRS DTCs on the RO.
- Have the service advisor contact the client and inform them that there is a problem with the OPDS and explain that replacing the SRS unit may not fix the problems. The SRS unit replacement was only intended to address the specific problem that led to the recall.
- If the client declines the client pay repairs, make sure you write down the description of the problem and any DTCs on the RO. Also, state that the SRS system is not operating properly and may pose a risk to the front occupants in the event of a collision; either because the airbags may not deploy, or the airbags may deploy in a manner that does not account for all factors involved in the collision.
- After the SRS unit is replaced, additional client pay repairs will likely be needed to return the SRS system to proper operation.
- Make sure you have the anti-theft codes for the audio and navigation system (if applicable) and write down the frequencies for the audio unit presets.
- Disconnect the negative battery cable and wait at least 3 minutes before beginning work.
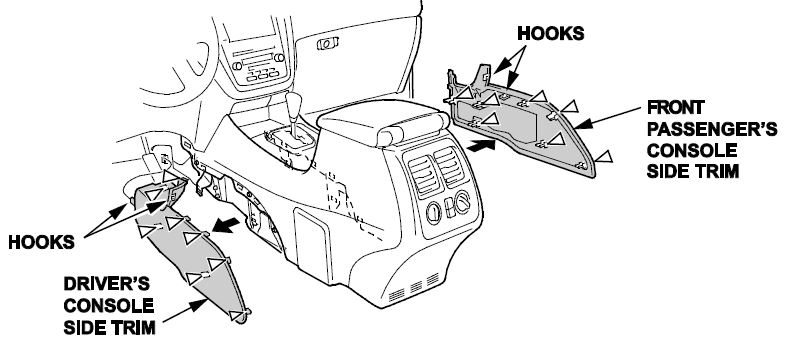
- Detach the clips and release the hooks, then remove the driver’s and front passenger’s console side trim.
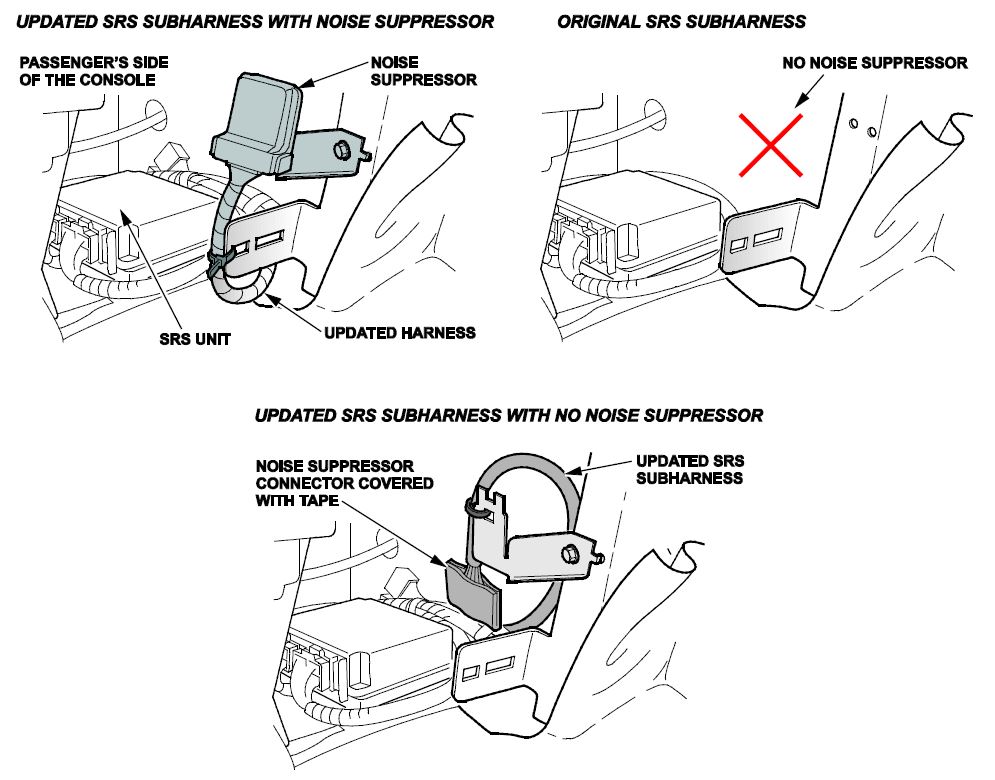
- Inspect the subharness and note its arrangement:
- The original subharness is installed in the vehicle.
- There is an updated subharness connected to the noise suppressor.
- There is an updated subharness that has been taped up as shown and the noise suppressor has been removed.
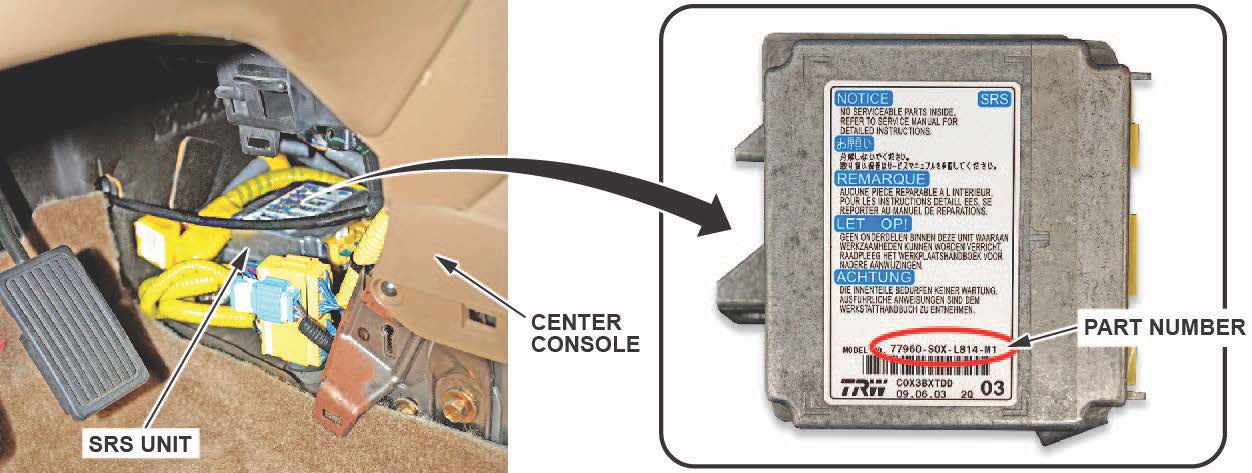
- Write down the SRS unit P/N on the RO.
- Check the SRS unit P/N and arrangement of the subharness against the table below and follow the correct repair action.
NOTE: When you install a new SRS unit, do not initialize the OPDS unit.
| SRS Unit P/N | Subharness Arrangement | Repair Action |
| 77960-S3V-A81X-XX | Original subhaness is installed. | REPAIR PROCEDURE B |
| 77960-S3V-A81X-XX | Updated subharness with a noise suppressor installed. | REPAIR PROCEDURE A |
| 77960-S3V-307X | Original subharness is installed. | The vehicle is OK; no further action needed. |
| 77960-S3V-307X | Updated subharness with a noise suppressor is installed. | REPAIR PROCEDURE A |
| 77960-S3V-307X | Updated subharness with the connector taped up and the noise suppressor was removed. | The vehicle is OK; no further action needed. |
REPAIR PROCEDURE A
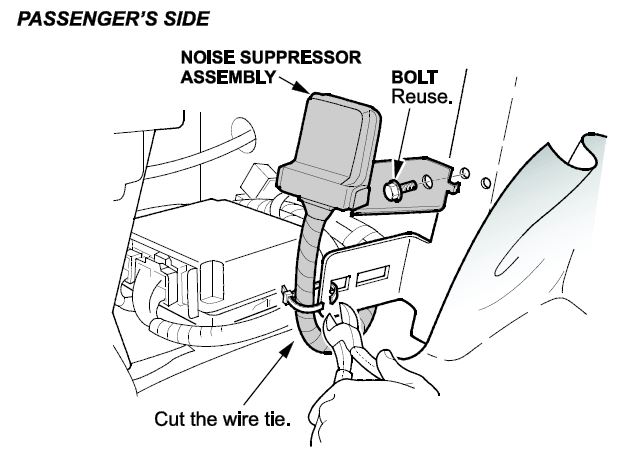
- Cut the wire tie and unbolt the suppressor bracket.
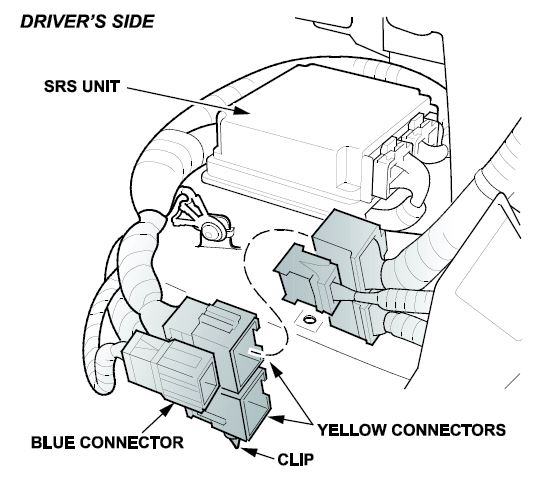
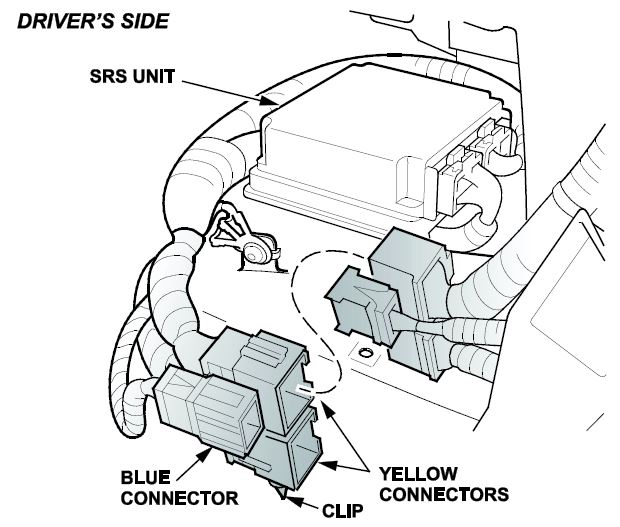
- On the driver’s side, disconnect the clip, then disconnect the two yellow connectors and the blue connector.
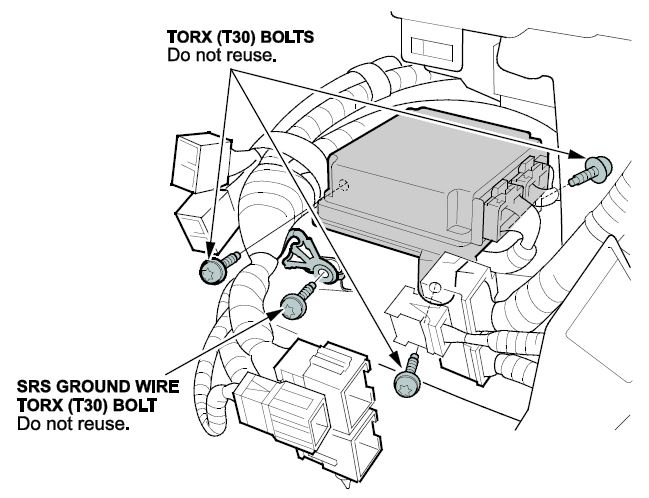
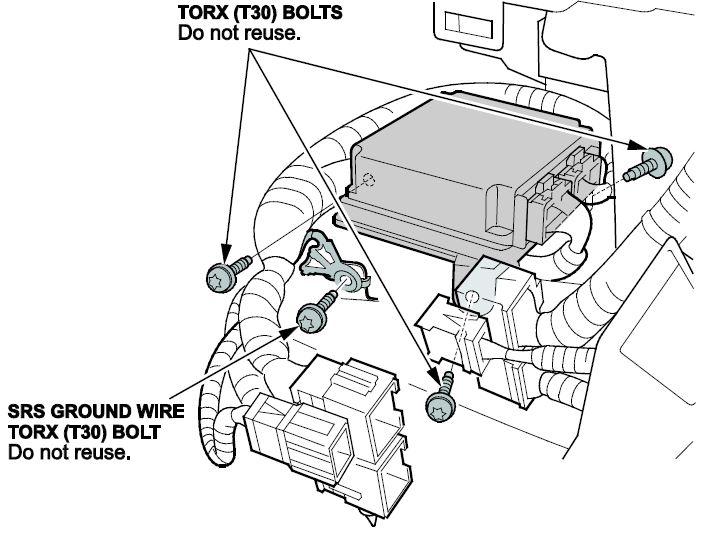
- Remove the SRS ground wire Torx (T30) bolt.
NOTE: Two of the bolts are accessible from the driver’s side, and one is accessible from the front passenger’s side.
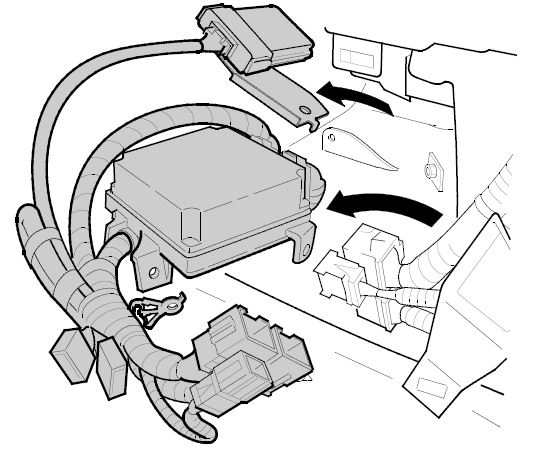
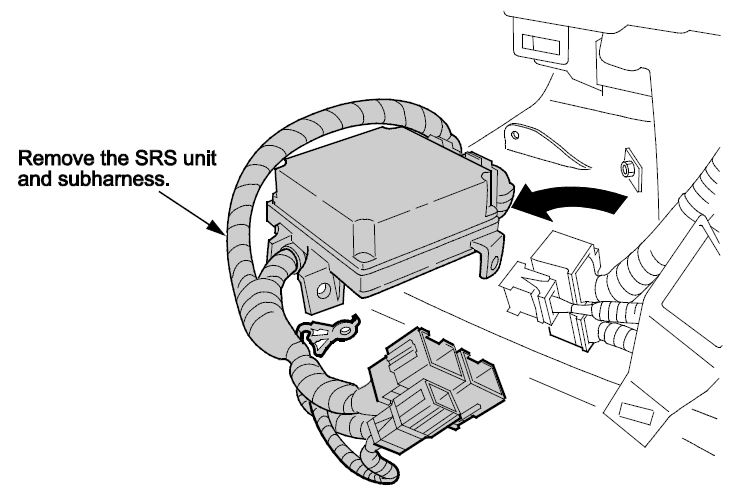
- Remove the SRS unit and the subharness from the vehicle.
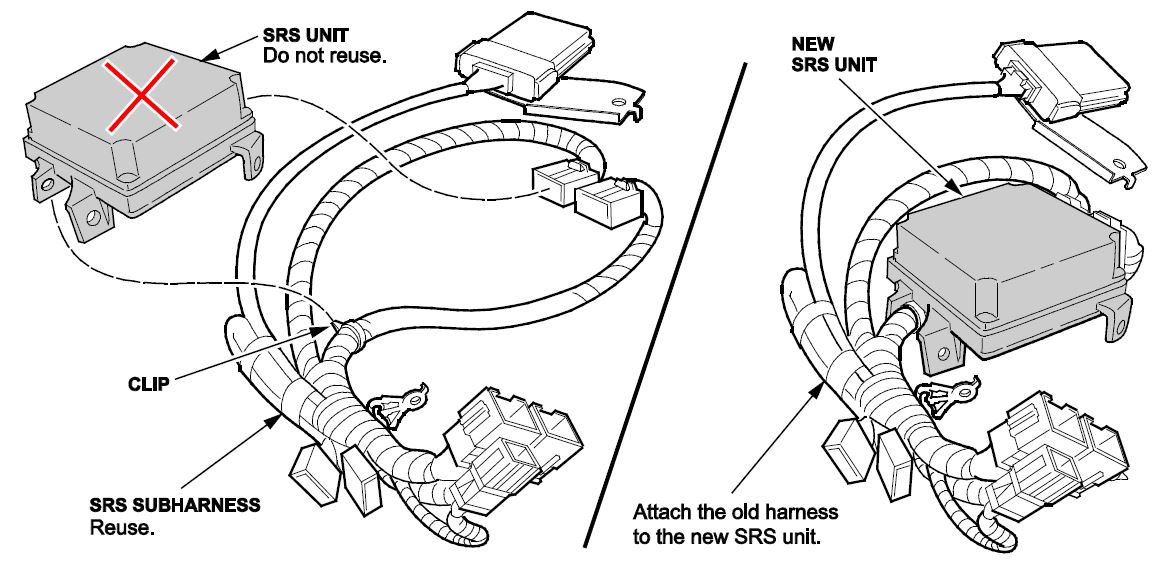
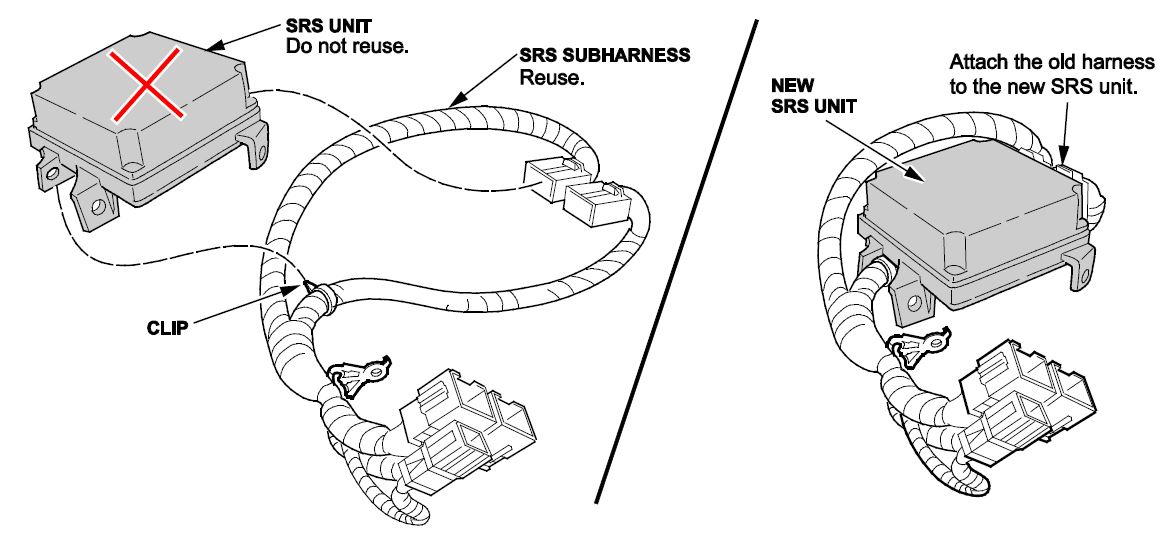
- Remove the subharness clip from the underside of the SRS unit, then disconnect the subharness from the old SRS unit.
- Connect the subharness to the new SRS unit P/N 77960-S3V-307.
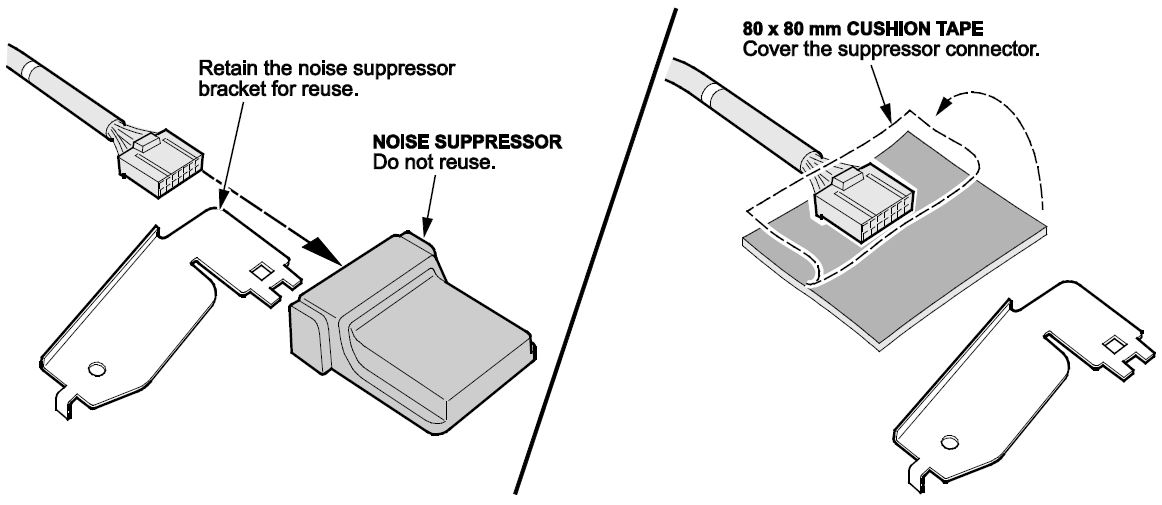
- Remove the bracket from the suppressor because you will reuse the bracket. Do not reuse the noise suppressor.
- Apply a piece of 80 mm x 80 mm cushion tape over the noise suppressor connector as shown.
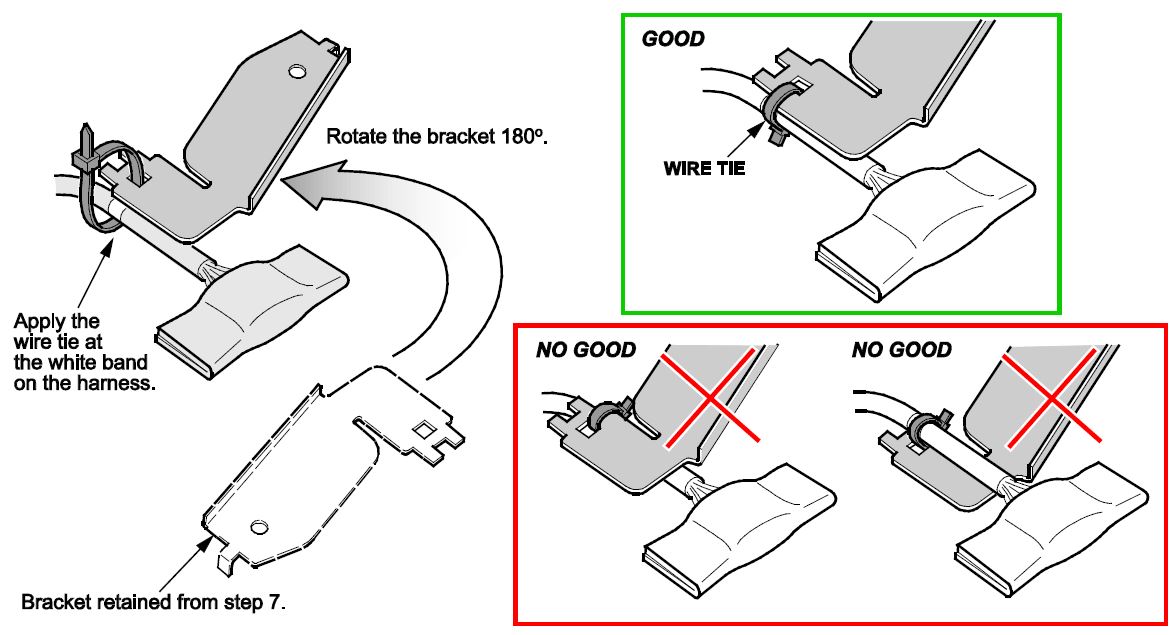
- Using a wire tie, secure the old bracket to the harness as shown. In a later step this will hold the harness with the connector pointing down.
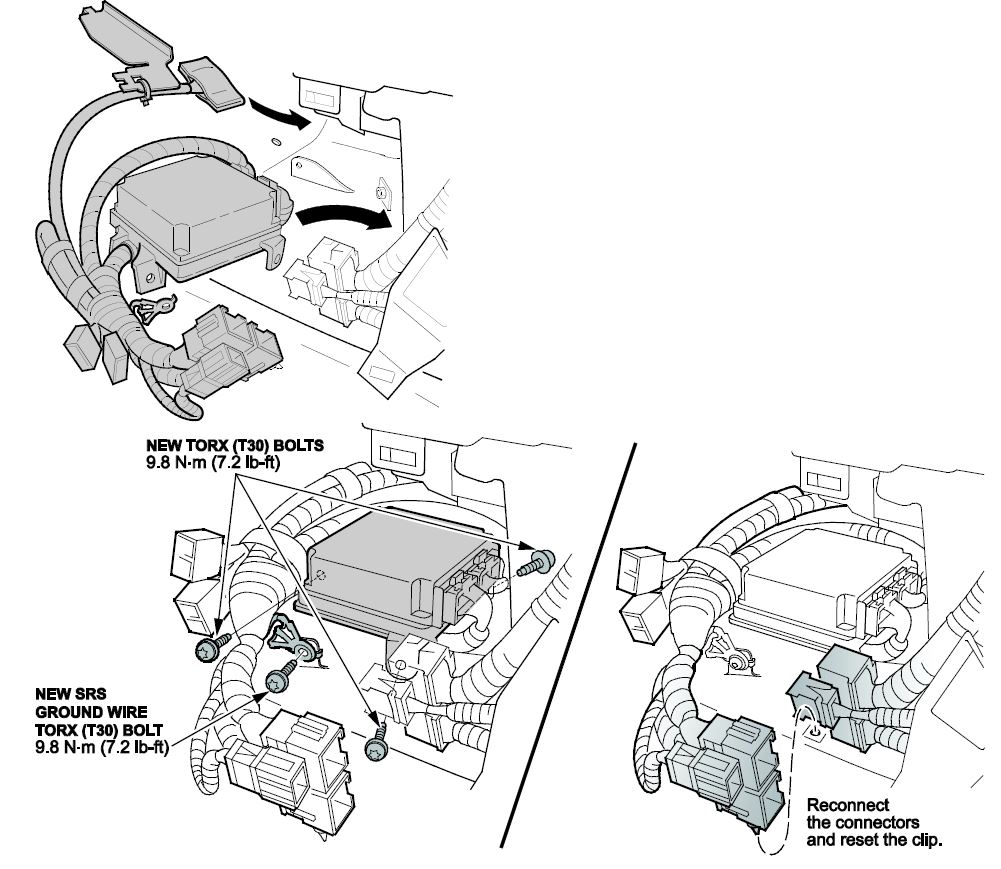
- Reinstall the new SRS unit and subharness into the vehicle.
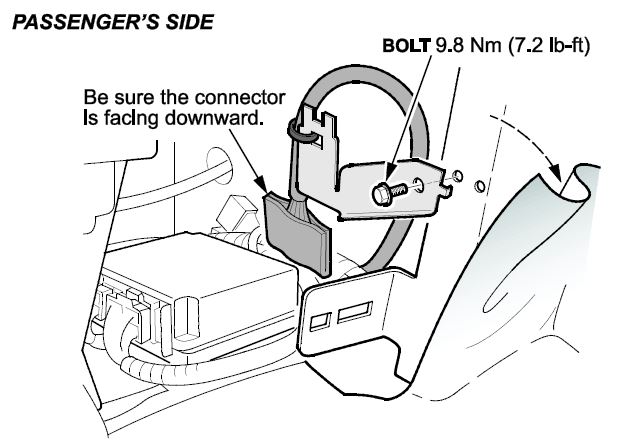
- Reinstall the bracket using the original bolt as shown. Make sure the connector is pointing downward.
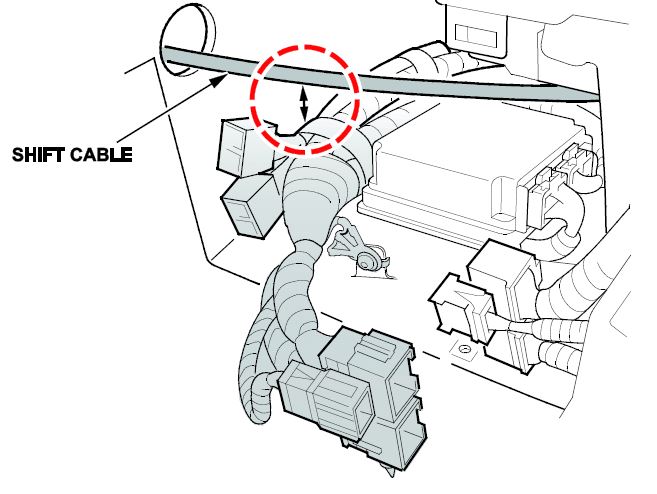
- Make sure the SRS subharness does not interfere with or rub against the shift cable.
- Reconnect the two yellow connectors and the blue connector, then reconnect the clip.
- Reinstall the center console side trim.
- Reconnect the negative battery cable.
NOTE: Do not initialize the OPDS unit with the HDS.
- To ready the vehicle for OPDS initialization, do this:
- Move the front passenger’s seat back to the most upright position.
- Slide the front passenger’s seat all the way back.
- Make sure there is nothing in the front passenger’s seat back pocket.
- Make sure there is nothing under the front passenger’s seat.
- Make sure the vehicle is parked out of direct sunlight.
- Make sure the vehicle’s temperature has stabilized to the shop temperature (do not initialize the vehicle in extreme cold or hot temperatures).
- To complete SRS unit initialization, turn the ignition to ON for 1 full minute, turn the ignition off for another minute, then repeat two more times, making sure to wait 1 full minute between turning the ignition key ON or OFF. After cycling the ignition 3 times, turn the ignition to ON and if the SRS indicator comes on for about 6 seconds then goes off, the SRS unit initialization is complete.
- If the OPDS is initialized (the indicator light is off) and it passed all the inspection items (INSPECTION PROCEDURE steps 1-3), go to step 19.
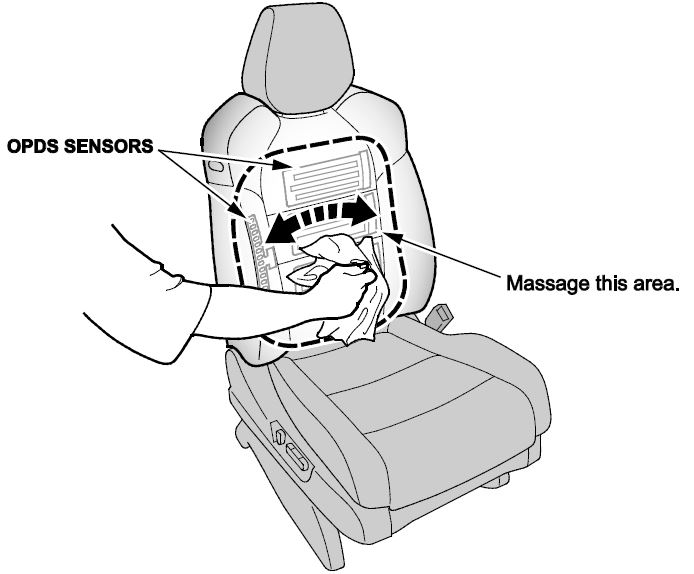
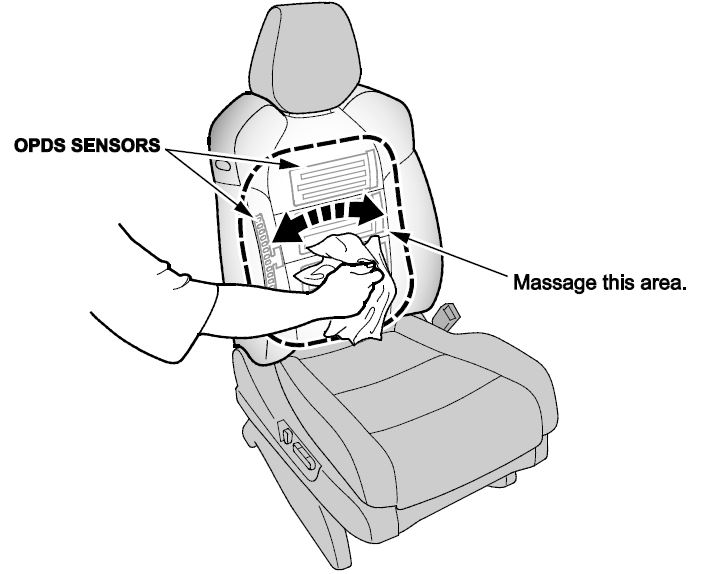
- If the SRS indicator remains on and the SIDE AIRBAG OFF indicator is flashing, the leather passenger seat back material around the OPDS may be causing an issue. Massage the leather to make sure there are no tight areas where the leather is stretched across the seat for about 1 minute and then repeat step 17-18.
- If the SRS indicator remains on after the doing the OPDS initialization it is most likely because the interior of the front seat around the OPDS isn’t completely dry. After drying the seat, repeat steps 17-18. To dry the seat, do this:
- Close the vehicle windows and sunroof.
- Start the engine and run the HVAC at its lowest temperature setting and make sure the A/C is on.
- Aim the vents at the OPDS sensor area.
- If you can’t safely run the vehicle to dry the seat, use a shop fan aimed directly at the OPDS sensor.
- Try to initialize the OPDS every 30 minutes. If it doesn’t initialize, continue drying the seat and try again in 30 minutes. Most seats will dry within 1.5 hours.
- If the SRS indicator remains on and the SIDE AIRBAG OFF indicator is flashing, use the HDS to initialize the OPDS from the SRS menu.
NOTE: If the SRS indicator is on and the SIDE AIRBAG OFF indicator is flashing, do not initialize the SWS (seat weight sensor).
- Enter the anti-theft codes for the audio and navigation system (if applicable), then enter the client’s audio unit presets.
- Reset the power window control unit:
- Turn the ignition to OFF, then back to ON.
- Press the driver’s window switch firmly to the second detent to lower the window all the way down.
- When the window reaches the bottom, continue holding the driver’s window switch in the down position for 2 seconds.
- Pull the driver’s window switch up and hold it to the second detent to raise the window without stopping.
- When the window reaches the top, continue holding the driver’s window switch in the up position for 2 seconds.
- Vehicles without navigation: Set the clock.
- Do the idle learn procedure.
- Make sure all electrical items (A/C, audio unit, defogger, lights, etc.) are off.
- Start the engine and let it warm up to its normal operating temperature (the cooling fans cycle twice).
- Let the engine idle (throttle closed and all electrical items off) for 10 minutes.
NOTE: Do not initialize the OPDS unit.
REPAIR PROCEDURE B
NOTE: The foam piece and wire tie in the kit are not needed for this repair procedure.
- Disconnect the two yellow connectors and remove the clip from the floor.
NOTE: Two of the bolts are accessible from the driver’s side and one is accessible from the front passenger’s side.
- Remove the ground wire by removing the Torx bolt.
- Remove the SRS unit and the subharness from the vehicle.
- Remove the subharness clip from the underside of the SRS unit, then disconnect the subharness from the unit.
- Install a new subharness clip onto the original subharness, then connect the subharness to the new SRS unit P/N 77960-S3V-307.
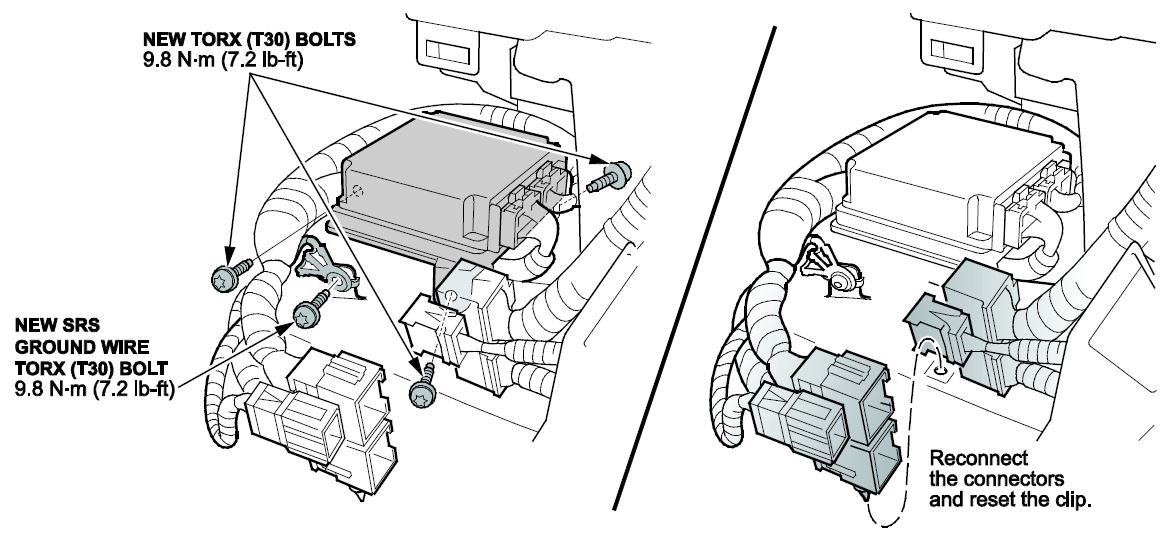
- Reinstall the new SRS unit and existing SRS subharness into the vehicle with three new Torx bolts and torque them to 8 N·m (7.2 lb-ft).
- Reinstall the ground wire with a new Torx bolt and torque it to 8 N·m (7.2 lb-ft).
- Reconnect the connectors and the clip.
- Reinstall the center console side trim.
- Reconnect the negative battery cable.
NOTE: Do not initialize the OPDS unit with the HDS.
- To ready the vehicle for OPDS initialization, do this:
- Move the front passenger’s seat back to the most upright position.
- Slide the front passenger’s seat all the way back.
- Make sure there is nothing in the front passenger’s seat back pocket.
- Make sure there is nothing under the front passenger’s seat.
- Make sure the vehicle is parked out of direct sunlight.
- Make sure the vehicle’s temperature has stabilized to the shop temperature (do not initialize the vehicle in extreme cold or hot temperatures).
- To complete SRS unit initialization, turn the ignition to ON for 1 full minute, turn the ignition off for another minute, then repeat two more times, making sure to wait 1 full minute between turning the ignition key ON or OFF. After cycling the ignition 3 times, turn the ignition to ON and if the SRS indicator comes on for about 6 seconds then goes off, the SRS unit initialization is complete.
- If the OPDS is initialized (the indicator light is off) and it passed all the inspection items (INSPECTION PROCEDURE steps 1-3), go to step 14.
- If the SRS indicator remains on and the SIDE AIRBAG OFF indicator is flashing, the leather passenger seat back material around the OPDS may be causing an issue. Massage the leather to make sure there are no tight areas where the leather is stretched across the seat for about 1 minute and then repeat step 12-13.
- If the SRS indicator remains on after the doing the OPDS initialization it is most likely because the interior of the front seat around the OPDS isn’t completely dry. After drying the seat, repeat steps 12-13. To dry the seat, do this:
- Close the vehicle windows and sunroof.
- Start the engine and run the HVAC at its lowest temperature setting and make sure the A/C is on.
- Aim the vents at the OPDS sensor area.
- If you can’t safely run the vehicle to dry the seat, use a shop fan aimed directly at the OPDS sensor.
- Try to initialize the OPDS every 30 minutes. If it doesn’t initialize, continue drying the seat and try again in 30 minutes. Most seats will dry within 1.5 hours.
- If the SRS indicator remains on and the SIDE AIRBAG OFF indicator is flashing, use the HDS to initialize the OPDS from the SRS menu.
NOTE: If the SRS indicator is on and the SIDE AIRBAG OFF indicator is flashing, do not initialize the SWS (seat weight sensor).
- Turn the ignition to ON for 1 full minute. The SRS indicator should come on for 6 seconds and go out, but continue to leave the key on the one full minute before turning the ignition OFF.
- Enter the anti-theft codes for the audio and navigation system (if applicable), then enter the client’s audio unit presets.
- Reset the power window control unit:
- Turn the ignition to OFF, then back to ON.
- Press the driver’s window switch firmly to the second detent to lower the window all the way down.
- When the window reaches the bottom, continue holding the driver’s window switch in the down position for 2 seconds.
- Pull the driver’s window switch up and hold it to the second detent to raise the window without stopping.
- When the window reaches the top, continue holding the driver’s window switch in the up position for 2 seconds.
- Vehicles without navigation: Set the clock.
- Do the idle learn procedure.
- Make sure all electrical items (A/C, audio unit, defogger, lights, etc.) are off.
- Start the engine and let it warm up to its normal operating temperature (the cooling fans cycle twice).
- Let the engine idle (throttle closed and all electrical items off) for 10 minutes.
END
 Loading...
 Loading...
 Loading...
 Loading...
 Loading...
 Loading...
 Loading...
 Loading...
 Loading...
