| “This site contains affiliate links for which OEMDTC may be compensated” |
A14-066
October 21, 2014
ATB 00283 (1410)
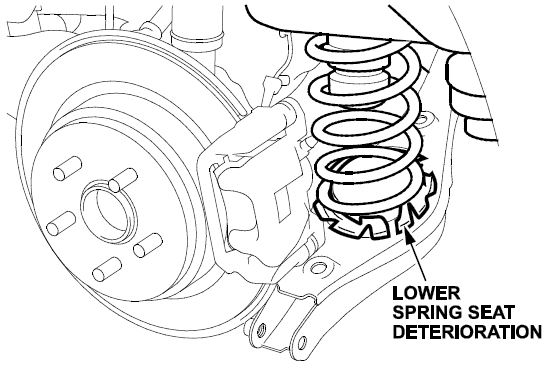
Clunk or Squeak From the Rear Suspension/Rear Lower Spring Seat Deterioration
AFFECTED VEHICLES
| Year | Model | Trim | VIN Range |
| 2011-14 | Odyssey | ALL | ALL |
SYMPTOM
There is a clunk or squeak from the rear suspension.
POSSIBLE CAUSES
Uneven pressure from the rear spring damages the rear spring seat.
CORRECTIVE ACTION
Replace the lower arm and the lower spring seat.
PARTS INFORMATION
| Part Name (Left Side) | Part Number | Quantity |
| Left Lower Arm | 52360-TK8-A02 | 1 |
| Flange Bolt | 90170-SHJ-A00 | 1 |
| Adjusting Bolt | 52387-SHJ-A02 | 1 |
| Nut (14 mm) | 90362-SHJ-A01 | 1 |
| Left Lower Spring Seat | 52748-S0X-A00 | 1 |
| Part Name (Right Side) | Part Number | Quantity |
| Right Lower Arm | 52350-TK8-A02 | 1 |
| Flange Bolt | 90170-SHJ-A00 | 1 |
| Adjusting Bolt | 52387-SHJ-A02 | 1 |
| Nut (14 mm) | 90362-SHJ-A01 | 1 |
| Right Lower Spring Seat | 52744-TK8-A00 | 1 |
WARRANTY CLAIM INFORMATION
The normal warranty applies.
| Operation Number | Description | Flat Rate Time | Template ID | Failed Part Number |
| 4171D6 | Replace the left lower spring seat and lower arm (includes alignment). | 1.5 hrs | 14-066A | 52748-S0X-A00 |
| 4171D7 | Replace the right lower spring seat and lower arm (includes alignment). | 1.5 hrs | 14-066B | 52744-TK8-A00 |
| 4171D8 | Replace both lower spring seats and lower arms (includes alignment). | 2.0 hrs | 14-066C | 52748-S0X-A00 |
Defect Code: 02101
Symptom Code: 00101
Skill Level: Repair Technician
DIAGNOSIS
- Raise and support the vehicle.
- Inspect both lower spring seats for deterioration.
REPAIR PROCEDURE
- If not already done, raise and support the vehicle.
- Remove the rear wheel.
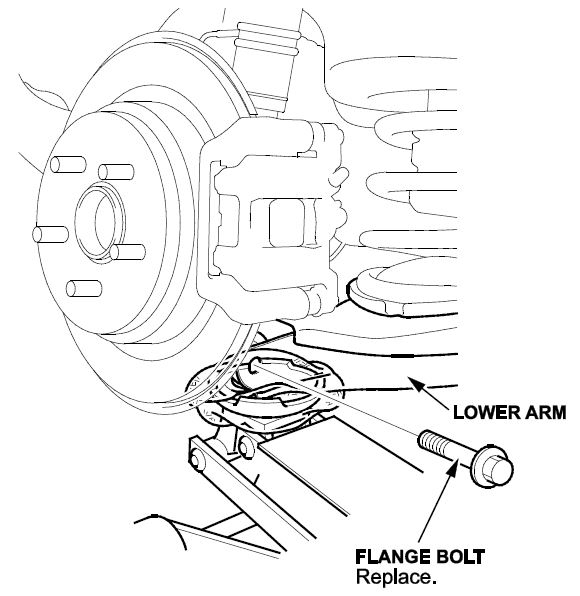
- Position a floor jack under the lower arm. Raise the floor jack until the suspension begins to compress.
- Remove the flange bolt from the knuckle.
- Lower the floor jack gradually.
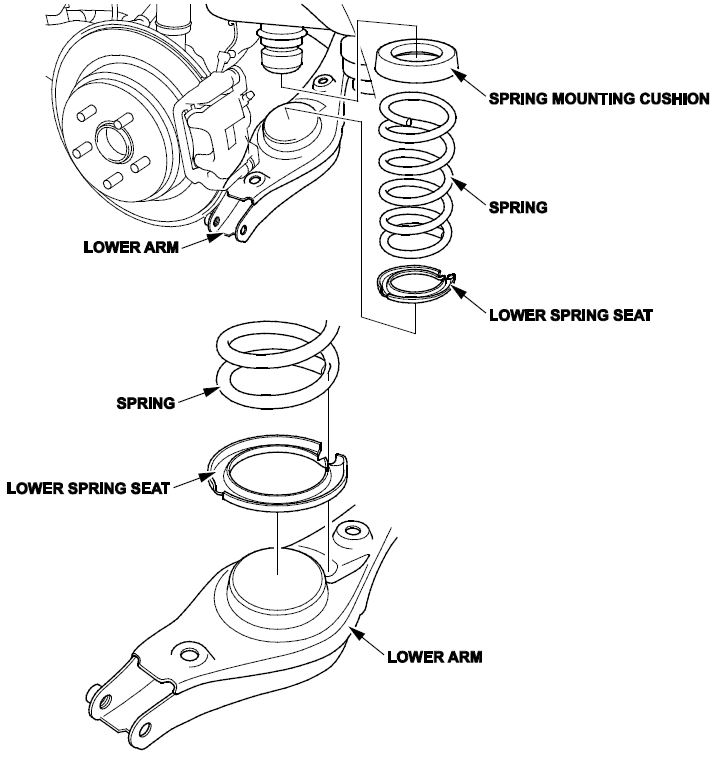
- Remove the spring, the spring cushion, and the lower spring seat.
NOTE: During installation, align the bottom of the spring with the stepped part of the lower spring seat and the lower arm as shown.
- Mark the cam positions of the adjusting bolt and the adjusting cam plate with the frame.
- Remove the self-locking nut while holding the adjusting bolt, then remove the adjusting cam plate, the adjusting bolt, and the lower arm.
- Using the new adjusting bolt and self-locking nut, loosely install the new lower arm, the spring mounting cushion, the spring and the new lower spring seat.
- Lightly tighten the bolts and nuts, then raise the suspension to load it with the vehicle’s weight.
- Align the cam positions of the adjusting bolt and adjusting cam plate with the marked positions. Then torque the nut to 99 N∙m (73 lb-ft).
- Torque the flange bolt to 93 N∙m (69 lb-ft).
- Clean the mating surfaces between the brake disc/drum and inside the wheel.
- Reinstall the wheel.
- Repeat steps 2 through 14 on the opposite side if needed.
- Check the wheel alignment, and adjust it if necessary.
END
 Loading...
Price Disclaimer


