| “This site contains affiliate links for which OEMDTC may be compensated” |
NHTSA ID Number: 10108045
Manufacturer Communication Number: A09-010
Summary
SERVICE BULLETIN – AT COLD START-UP, THE ENGINE RATTLES LOUDLY FOR ABOUT 2 SECONDS. THE VARIABLE VALVE TIMING CONTROL (VTC) ACTUATOR IS DEFECTIVE.
9 Affected Products
Vehicles
A09-010
February 25, 2017
05909 Version 5
Engine Rattles at Cold Start-Up
Supersedes 09-010, dated March 3, 2015, to revise the information highlighted in yellow.
REVISION SUMMARY
Under DIAGNOSIS, the audio/movie file was added.
AFFECTED VEHICLES
| Year | Model | Trim | VIN Range |
| 2008–12 | Accord | ALL | ALL |
| 2012 | CR-V | ALL | ALL |
| 2013 | CR-V | 2WD | 5J6RM3H…000001 thru 5J6RM3H…033075
2HKRM3H…000001 thru 2HKRM3H…513144 3CZRM3H…000001 thru 3CZRM3H…707736 |
| 2013 | CR-V | 4WD | 5J6RM4H…000001 thru 5J6RM4H…067486
2HKRM4H…000001 thru 2HKRM4H…658914 |
| 2012 | Crosstour | 2WD | ALL |
| 2013 | Crosstour | 2WD | 5J6TF3H…000001 thru 5J6TF3H…004260 |
SYMPTOM
At cold start-up, the engine rattles loudly for about 2 seconds.
POSSIBLE CAUSES
The variable valve timing control (VTC) actuator is defective.
CORRECTIVE ACTION
Replace the VTC actuator. This procedure does not require the complete removal of the cam chain and associated parts, so repair time is much shorter.
TOOL INFORMATION
| Tool Name | Tool Number | Quantity |
| Stopper (lock pin) | 14511-PNA-003 | 1 |
| Tappet Adjuster | 07MAA-PR70110 | 1 |
| Tappet Lockout Wrench | 07MAA-PR70120 | 1 |
REQUIRED MATERIALS
| Part Name | Part Number | Quantity |
| Honda Bond HT | 08718-0004 | 1/10th of a tube (One tube repairs 10 vehicles.) |
NOTE: Material costs = 1/10th of the current net part price (must be entered under the “Materials” section of the claim form)
PARTS INFORMATION
| Part Name | Part Number | Quantity |
| VTC Actuator | 14310-R5A-305 | 1 |
WARRANTY CLAIM INFORMATION
The normal warranty applies. NOTE: Different states have different warranty coverages 5/60K powertrain, 7/70k California emissions, and PZEV 15-150k. Use powertrain and emissions inquiry to confirm coverage.
| Operation Number | Description | Flat Rate Time | Defect Code | Symptom Code | Template ID | Failed Part Number |
| 1101Z9 | Replace the VTC actuator. | 2.0 hrs | 03214 | 04216 | 09-010C | 14310-R44-A01 |
Skill Level: Repair Technician
DIAGNOSIS
If viewing this service bulletin on SIS and your computer has sound, click on the picture below to hear a sample of the engine’s rattle.
- Allow the engine oil to drain from the VTC system by not starting the engine for at least 6 hours.
- Start the engine and immediately listen for a loud rattle.
On start-up, do you hear a loud engine rattle that lasts about 2 seconds?
Yes – Go to REPAIR PROCEDURE
NO ̶ If you hear a different noise, continue with normal troubleshooting.
If you do not hear an abnormal noise, get more information from the customer and, if needed, continue with normal troubleshooting.
REPAIR PROCEDURE
This procedure is in an outline form that you can also use as a checklist for the repair. If you need more details, refer to the service information for the following procedures:
- Cylinder Head Cover Removal
- Cylinder Head Cover Installation
- Valve Clearance Adjustment
- Remove the frame (strut) brace (if equipped).
- Remove the engine cover.
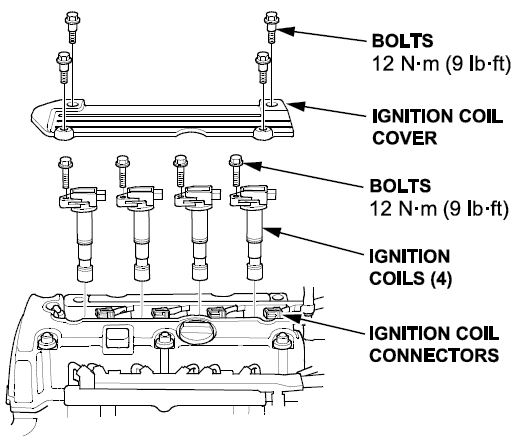
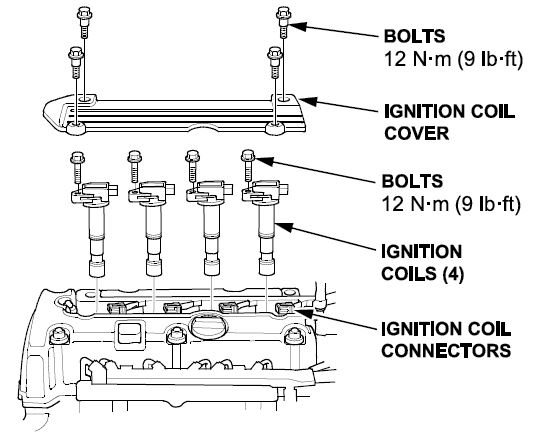
- Remove the ignition coil cover and the ignition coils.
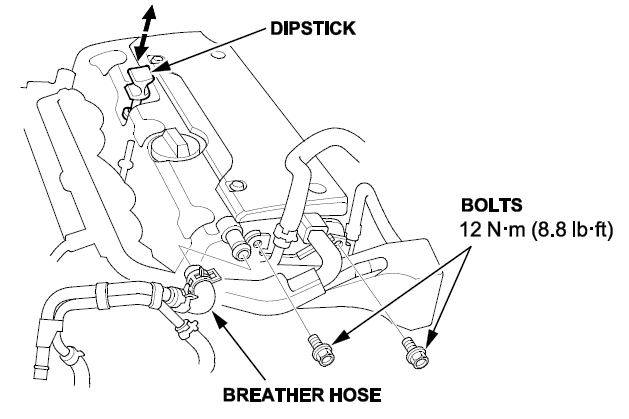
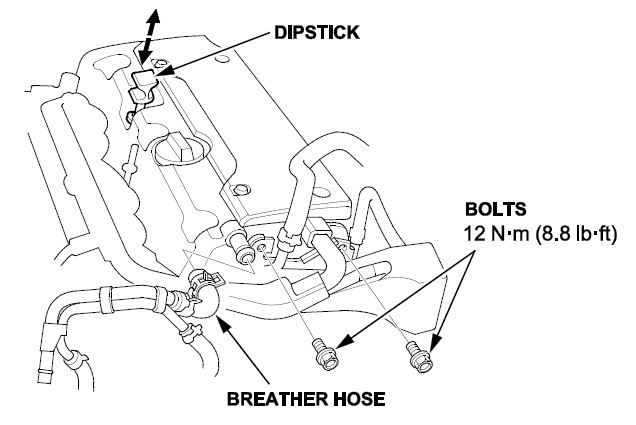
- Remove the engine oil dipstick, then disconnect the breather hose and the brake booster vacuum hose from the cylinder head cover.
- Remove the two bolts holding the EVAP canister purge valve bracket to the cylinder head.
- Remove the cylinder head cover.
- Raise the vehicle on a lift.
- Turn the front wheels or remove the right front wheel.
- Remove the splash shield to provide access to the crankshaft pulley.
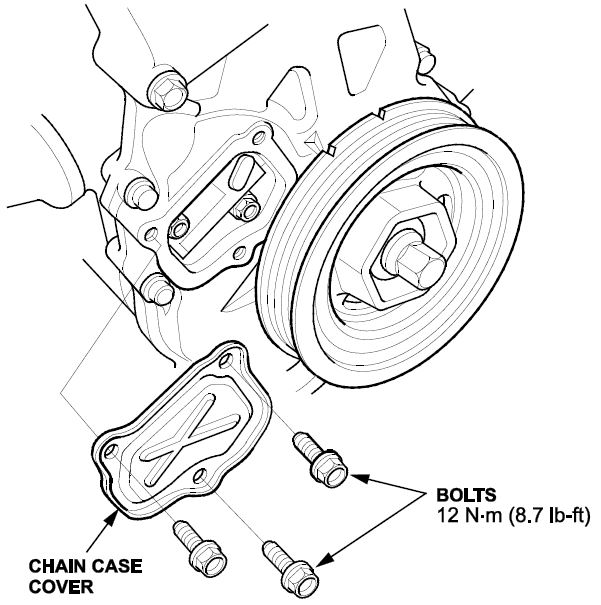
- Remove the camshaft auto-tensioner (chain case) cover.
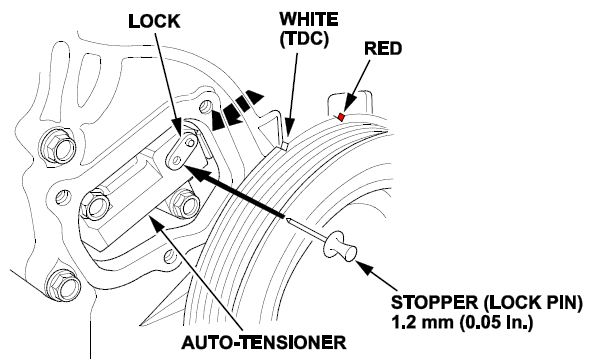
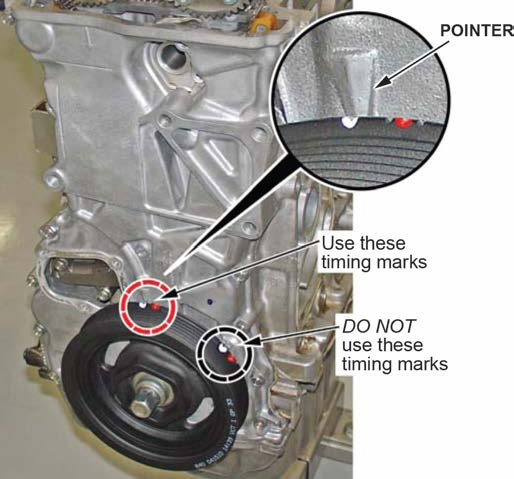
- Rotate the crankshaft clockwise to top dead center (TDC) No. 1 cylinder.
- Rotate the crankshaft counterclockwise to compress the auto-tensioner. Align the hole in the lock and auto-tensioner, then insert a 1.2 mm (0.05 in)-diameter stopper (lock pin).
- Rotate the crankshaft clockwise to TDC No. 1 cylinder.
- Lower the vehicle.
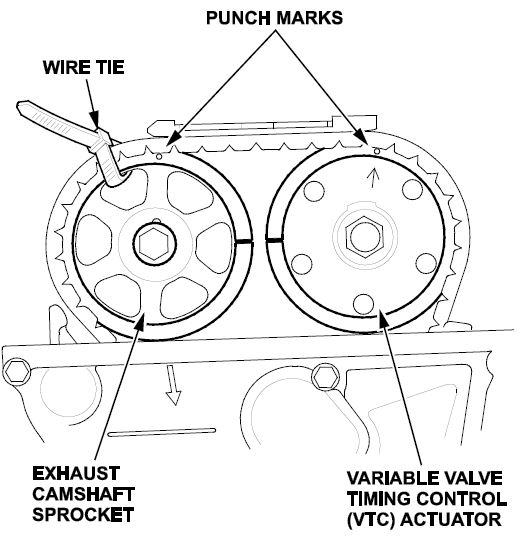
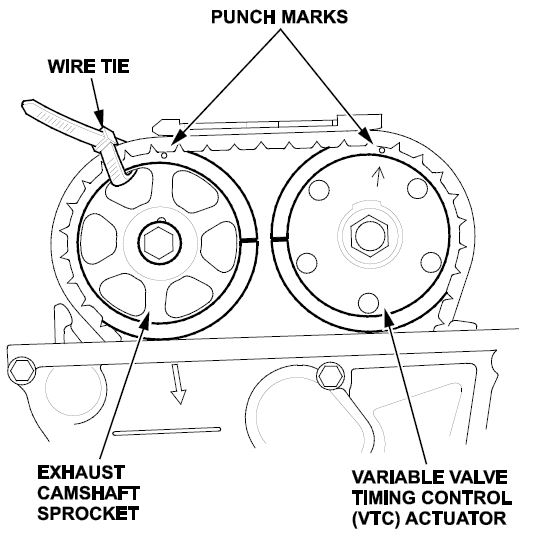
- Mark the timing chain at the punch marks on the exhaust camshaft sprocket and VTC actuator. Secure the chain to the sprocket with a wire tie.
- Loosen the camshaft holder bolts, in sequence, two turns at a time.
- Remove the five camshaft holders. Set them aside on a clean surface in the exact order and position that they were removed from the cylinder head.
- Carefully tip up the end of the intake camshaft until there is enough slack for an assistant to lift the chain off the VTC actuator teeth.
- Remove the intake camshaft/VTC actuator assembly while the assistant keeps light tension on the chain. Place the camshaft/VTC actuator assembly on a clean, padded workbench.
- Secure the timing chain to the A/C compressor hose using a wire or zip tie to keep it from falling into the front cover.
- On the workbench, as an assistant holds the camshaft steady with an open-end wrench, remove the VTC actuator mounting bolt, then separate the VTC actuator from the camshaft. Discard the VTC actuator.
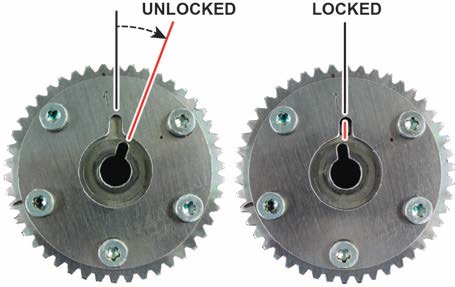
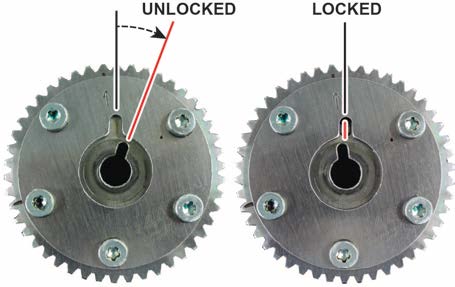
- Before installing the new VTC actuator, make sure it is in the unlocked position.
- Install the new, unlocked VTC actuator onto the camshaft; do not force it on.
- Once fitted, with the VTC actuator facing you, carefully rotate it counterclockwise until it engages the camshaft’s locator pin. When installed and rotated this way, the VTC actuator will not lock. Apply clean engine oil to the mounting bolt threads, then install the mounting bolt, finger tight.
NOTE:
- If the new VTC actuator is unlocked after installation on the camshaft, go to step 28.
- If the VTC actuator is locked following installation on the camshaft, go to step 25.
- To unlock a locked VTC actuator, apply clean engine oil to the mounting bolt thread, then install the mounting bolt on the actuator, finger tight.
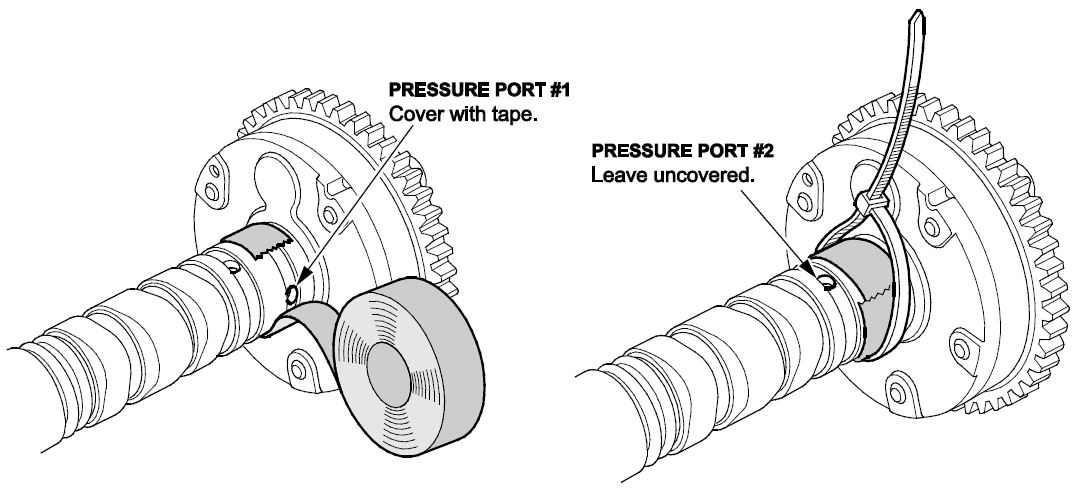
- Cover pressure port #1 on the camshaft with several layers of electrical tape. Secure the tape with a wire tie as shown.
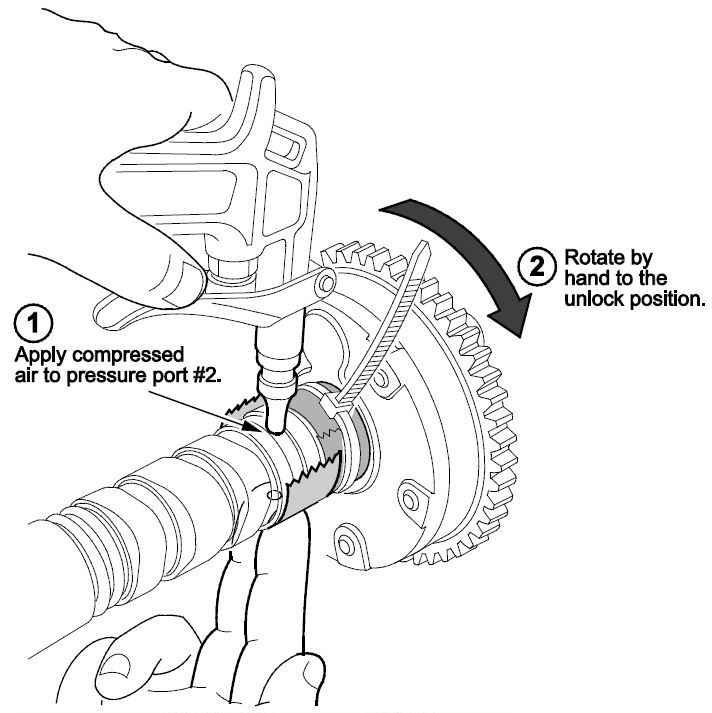
- Apply compressed air to pressure port #2. While compressed air is being applied to pressure port #2, rotate the VTC actuator by hand to the unlock position.
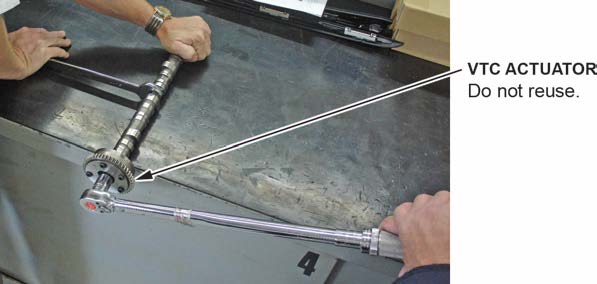
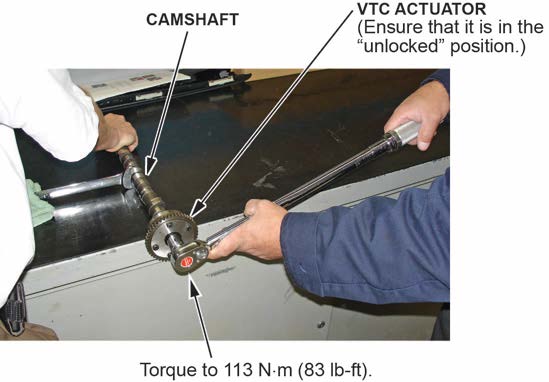
- Have an assistant hold the camshaft/VTC actuator assembly steady on the padded workbench with an open-end wrench. Use a torque wrench to torque the mounting bolt to 113 N·m (83 lb-ft).
NOTE: Be careful not to scratch or damage the camshaft. Also, do not use an impact wrench to tighten the mounting bolt; it will cause internal damage to the VTC actuator housing, vanes, or lockpin.
- After the mounting bolt is torqued, rotate the VTC actuator to the locked position.
- Remove the wire ties as an assistant keeps light tension on the chain.
- Slide the camshaft/VTC actuator in at an angle so that the chain can slip over the actuator’s teeth.
- Line up the marks you made on the chain with the punch marks on the exhaust camshaft sprocket and VTC actuator.
- Apply engine oil to the journals and caps for both camshafts. Lower the camshaft/VTC actuator assembly onto its journals.
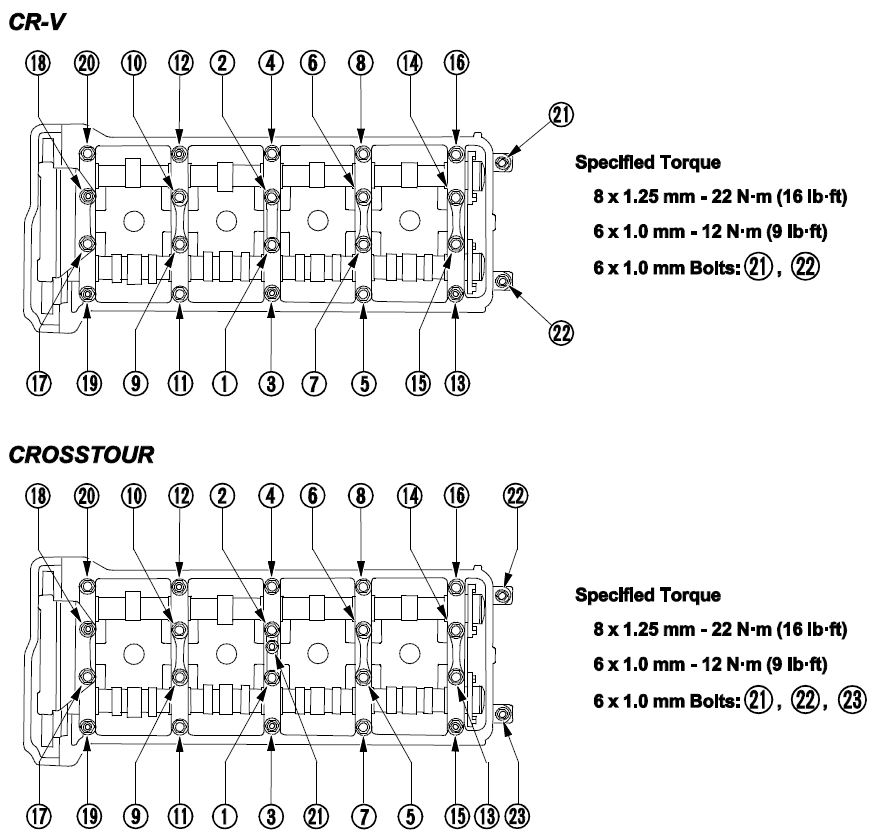
- Install the camshaft holders. Tighten them two turns at a time, starting in the middle and working your way outward, following the numbered sequence.
- Remove the lock pin from the auto-tensioner.
- Rotate the crankshaft in the direction of engine rotation (clockwise) two full turns, then stop at the TDC mark. Make sure both camshafts line up as shown in step 15.
- Inside the cylinder block, visually confirm that the timing chain is properly riding on its guide, and has not slipped behind the guide in the block. If so, realign the chain as needed.
- Remove the old sealant, dry, reseal, then reinstall the auto-tensioner (chain case) cover.
NOTE: Wait 30 minutes before adding oil, (if needed), then wait 3 hours before starting the engine.
- Check the valve clearance using a tappet adjuster. Adjust if needed.
Intake: 0.21 – 0.25 mm (0.008 – 0.010 in)
Exhaust: 0.25 – 0.29 mm (0.010 – 0.011 in)
- Following adjustments, use a tappet locknut wrench to torque the locknuts.
Intake and Exhaust: 14 N·m (10 lb-ft)
- Raise the vehicle.
- Reinstall the splash shield.
- Straighten the wheels or reinstall the right front wheel (if removed).
- Lower the vehicle.
- Check the sparkplug seals for damage. If any seals are damaged, replace them. NOTE: Check the head cover gasket. Replace if needed.
- Install the head cover gasket in the groove.
- Remove the entire liquid gasket from the chain case and the No. 5 rocker shaft holder.
- Clean the head cover contacting surfaces with a clean shop towel.
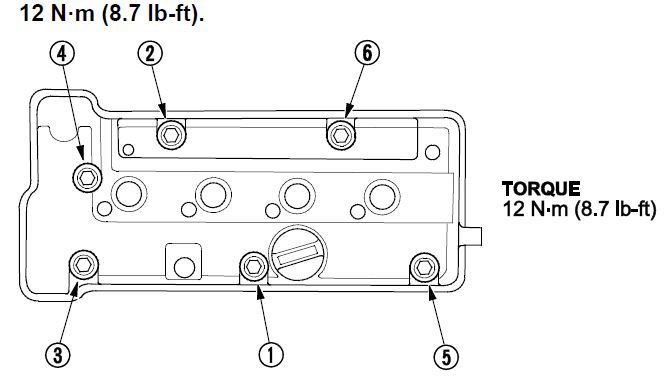
- Reinstall the cylinder head cover, tightening the bolts in three steps. In the final step, torque all bolts in sequence to 12 N·m (8.7 lb-ft).
- Reinstall the EVAP canister purge valve bracket.
- Reinstall the engine oil dipstick and reconnect the breather hose and the brake booster vacuum hose.
- Reinstall the ignition coils and the ignition coil cover.
- Reinstall the engine cover.
- Reinstall the frame (strut) brace (if equipped). Torque the bolts to 22 N·m (16 lb-ft).
END
1 Associated Document
Service Bulletin Document
A09-010
February 25, 2017
05909 Version 5
SB-10108045-9340.pdf 1092.451KB
 Loading...
NHTSA ID Number: 10087883
Manufacturer Communication Number: A09-010.V4
Summary
SERVICE BULLETIN – REPLACE THE VTC ACTUATOR IF THE ENGINE RATTLES LOUDLY FOR 2 SECONDS DURING COLD START-UP.
1 Associated Document
Service Bulletin Document
A09-010
March 17, 2016
01607 Version 4
SB-10087883-2280.pdf 797.667KB
 Loading...
NHTSA ID Number: 10087866
Manufacturer Communication Number: A09-010.V3
Summary
SERVICE BULLETIN – REPLACE THE VTC ACTUATOR IF THE ENGINE RATTLES LOUDLY FOR 2 SECONDS DURING COLD START-UP.
1 Associated Document
Service Bulletin Document
A09-010
March 15, 2016
01607 Version 3
SB-10087866-2280.pdf 803.023KB
 Loading...
NHTSA ID Number: 10056875
Manufacturer Communication Number: 09-010
Summary
HONDA : THERE IS A LOUD RATTLING NOISE COMING FROM ENGINE WHICH LAST FOR 2 SECONDS WHEN TEMPERATURE IS COLD. *LJ
1 Associated Document
Service Bulletin Document
A09-010
September 24, 2014
SB-10056875-8211.pdf 1103.302KB
 Loading...
- Mobil 1 Extended Performance full-synthetic motor oil 0W-20 helps protect critical engine parts for up to 20,000 miles between oil changes,* controlling oxidation to prevent oil breakdown and maintaining excellent viscosity
- Utilizes Mobil 1’s Triple Action+ Formula to combine outstanding engine performance, protection, and cleanliness with the added benefit of power
- Meets ILSAC GF-6 standards to help provide low-speed pre-ignition (LSPI) and timing chain wear protection while keeping your engine clean and helping to improve your fuel economy
- Helps extend engine life by working to prevent damaging deposits and sludge buildup
- Provides excellent internal engine heat protection (up to 500 degrees F) and low temperature protection (to -40 degrees F)
- 3X Stronger than the leading full synthetic*
- 10X Better high stress performance**
- 20,000 miles between oil changes***
- Approved and Licensed Specifications: Exceeds API SP/SN PLUS/SN/SM |ILSAC GF-6 | GM dexos1 Gen 3 | Meets engine test requirements of Chrysler MS 6395 | Meets Ford WSS-M2C947-B1 | Meets Ford WSS-M2C962-A1 |
- Viscosity breakdown as measured in Kurt Orbahn test on 5W-30 grade |**As measured in Seq IX test under high load/torque conditions vs. API SP test limits | ***Or one year, whichever comes first
- 6X better wear protection on critical engine parts than industry standards**
- 1.3X better sludge protection than industry standards*
- 3X Stronger against viscosity breakdown than leading full synthetic^
- Protection for 10,000 miles between oil changes
- Meets or exceeds the following specifications: API SP/SN PLUS/SN | ILSAC GF-6 | GM dexos1 Gen 3 | Meets Ford WSS-M2C947-B1 | Meets Ford WSS-M2C962-A1 |
- Full synthetic 0W-20 motor oil that is made with natural gas and designed to maximize engine protection
- Backed by a 15,000-mile protection guarantee* to protect your pursuit of every mile
- Provides better fuel economy (based on the latest industry standards)
- Keeps pistons cleaner than the toughest industry standard (based on Sequence IIIH results)
- Provides unsurpassed wear protection (based on Sequence IVA wear test using SAE 5W-30)
- Mobil 1 High Mileage full-synthetic motor oil 0W-20 is designed for engines with over 75,000 miles to go up to 10,000 miles between oil changes.*
- Utilizes Mobil 1’s signature Triple Action Formula to deliver outstanding engine performance, protection, and cleanliness
- Meets ILSAC GF-6 standards to help provide low-speed pre-ignition (LSPI) and timing chain wear protection while keeping your engine clean and helping to improve your fuel economy
- Provides excellent internal engine heat protection (up to 500 degrees F) and low temperature protection (to -30 degrees F)
- Mobil 1 is specially formulated to help remove sludge and lower engine temperatures
- Advanced protection against the four main causes of engine breakdown: wear friction heat and deposits
- Full synthetic 0W-20 formula offers 24X stronger protection against engine-killing contaminants than the leading full synthetic motor oil
- 40% better wear protection vs. industry standards as tested in the Sequence IVB engine test
- 25% better deposit protection with superior engine cleaning detergents as tested in the GMOD engine test
- Meets or exceeds all requirements of ILSAC GF-6A, API SP, API SN with SN Plus, API SN, GM dexos 1 Gen 3
- Our most advanced full synthetic 0W-20 engine oil, designed for unbeatable engine protection*
- Pennzoil Ultra Platinum comes with a 20-year, 750,000 mile warranty** to protect your engine and give you peace of mind to drive every mile as hard as you can
- Made with natural gas
- Outstanding performance in extreme temperatures
- Designed for high-performance engines, it helps protect engines from loss of power
- The information below is per-pack only
- Mobil 1 Extended Performance High Mileage full-synthetic motor oil 0W-20 is designed for engines with over 75,000 miles to go up to 20,000 miles between oil changes.*
- Utilizes Mobil 1’s Triple Action+ Formula to combine outstanding engine performance, protection, and cleanliness with the added benefit of power
- Meets ILSAC GF-6 standards to help provide low-speed pre-ignition (LSPI) and timing chain wear protection while keeping your engine clean and helping to improve your fuel economy
- Provides excellent internal engine heat protection (up to 500 degrees F) and low temperature protection (to -40 degrees F)
- Phosphorus Replacement Technology to help extend the life of the emission system
- Reduces leaks, oil burnoff and power robbing deposits
- 15,000 miles between oil changes*
- Meets or exceeds the following specifications: API SP/SN PLUS/SN/SM | ILSAC GF-6 | Meets engine test requirements of Chrysler MS 6395 | Meets Ford WSS-M2C947-B1 | Meets Ford WSS-M2C962-A2
- Or one year, whichever comes first
- Full synthetic formula is engineered with Enhanced MaxLife Technology to prevent engine breakdown in vehicles with over 75,000 miles
- Formulated with seal conditioners to prevent and treat oil leaks, Valvoline Full Synthetic High Mileage minimizes oil consumption and maximizes engine life
- 50% better wear protection than the industry standard and 25% extra defense against deposits, sludge, corrosion and rust
- Meets or exceeds all requirements of ILSAC GF-6A, API SP, API SN with SN Plus, API SN
- American made and formulated, from the Original Motor Oil brand trusted for more than 150 years
Last update on 2025-05-08 / Affiliate links / Images from Amazon Product Advertising API
This product presentation was made with AAWP plugin.



I’m having the same issue with my 2010 Honda Accord. A service rep told me a few years back that I didn’t have to replace the actuator, Honda was aware of the issue and it wouldn’t cause any long term issues. Does that sound right?
Is it really over a $1,000 to replace the Actuator?
I am The Honda Specialist in Fort Worth Texas. I would like to know if this satisfactorily repaired your Honda and how many miles have you driven since. I have gotten a lot of these and would like to help future customers.
If your Honda is out of warranty, and has less than 100k miles on it, and you’re having this issue with it, 1.) Take it to your dealer and have them document the issue, 2.) Bring it to the attention of the Service Manager and ask he/she if they’d be willing to ask their Honda Rep. for warranty help in this matter, 3.) If not, then call American Honda and politely ask to speak with “Goodwill warranty department”. Every auto manufacturer has one, but they don’t tell you that. 4.) Tell Honda Goodwill Dept. everything you did to try and get help to resolve the issue (they may ask for receipts), and tell them your vehicle has less than 100k miles on it, and that you are seeking any type of goodwill help that they can offer you.
My 1st CR-V, a 2001 that I bought new, developed the dreaded receding exhaust valve seats issue that the ’99 to ’01’s had. The car had 55k miles on it when the issues began…Long story long, I paid out-of-pocket for 2 valve adjustments over time, because they wouldn’t pay for that, even though American Honda did keep the case open during that time period. At 93k, it was showing signs once again that it needed yet another valve adjustment, but I was told by the dealer that no further adjustments could be made, and the cylinder head would need to be replaced…at a cost of over $3,000!! Luckily, the service manager knew me for several years, since I always used their services with my previous Honda whenever I couldn’t handle doing repairs myself. (It didn’t hurt that I almost went into that field as well, so I’m pretty knowledgeable, and he knew that.) He called in their regional Honda Rep/Manager who met with me, and they called American Honda for approval, and they offered me some goodwill help. They paid for all labor, and I had to just pay for parts.
At 93k miles, it was almost ready for a timing belt/water pump replacement, so they included that in the labor, since the front timing cover had to come off anyway. All-in-all, I paid only $837! Verses $3800 I would’ve had to shell out had I not gotten the goodwill help!
One last thing… If your service manager refuses to help you acquire goodwill help from American Honda, (1st be sure to call them anyway to open a claim case…they’ll give you a case #), then go to another dealership. Try to find one that has won the “Honda President’s Award”. They are usually a better quality dealership, and want to win your patronage.
If this is a common issue for this range of hondas, why not just cover the replacement? I was just given a dealership quote for this issue of $2400.00. I feel like this is twice as much as it should cost, if anything at all. I love my 2009 Honda Accord with 102,000 miles and was hoping to pass it on to my kids as a first car. But that cost is extremely high for a fix that Ibam reading shouldn’t be more than 700 to 800 at most. The dealer said the parts were 1500 alone. I am just floored, especially since this is an issue for a large number of Hondas.
May have to look at a different brand.
I fixed this problem by switching to High Mileage 5W-20 oil, and using Lucas High Mileage Oil Additive with each oil change. Check oil level monthly. This is not the manufacturer’s recommended OEM repair, but it’s $1,200 cheaper than replacing the actuator.
From what I am reading this is a known issue of these engines with Honda. If the VTC actuator has been replaced and it happens a second time within 15,000 miles, what is Honda’s stance? I have a 2014 Crosstour, original owner, less than 50,000 miles, VCT replaces once and problem is back. Local Honda store is not wanting to cover repair costs. Thanks for any advice or recommendations.
You can make an complaint with NHTSA https://www-odi.nhtsa.dot.gov/VehicleComplaint/ Usually they will replace it once for free.