| “This site contains affiliate links for which OEMDTC may be compensated” |
A12-015
February 28, 2012
Applies To:
2012 Accord L4 – Check the iN VIN status for eligibility
Product Update: Damaged Right Inboard Driveshaft Boot
BACKGROUND
During driveshaft assembly, the assembly equipment damaged the right inboard driveshaft boot.
CUSTOMER NOTIFICATION
All owners of affected vehicles will be sent a notification of this product update.
Do an iN VIN status inquiry to make sure the vehicle is shown as eligible.
In addition, check for a punch mark above the fifth character of the engine compartment VIN. A punch mark in that location means this campaign has already been completed.
Some vehicles affected by this campaign may be in your new or used vehicle inventory. These vehicles must be repaired before they are sold.
To see if a vehicle in inventory is affected by this campaign, do a vehicle status inquiry.
PARTS INFORMATION
| P/N | |
| Inboard Boot Set (includes: boot, two boot bands, circlip, set ring, grease, and spindle nut): | 44017-TA0-A00 |
| Shock Absorber Fork Bolt: | 90121-SM4-010 |
| Self-Locking Nut: | 90215-SB0-003 |
| Cotter Pin: | 94201-30220 |
| Flange Nut: | 90002-S10-000 |
TOOL INFORMATION
| Boot Band Tool: | KD-3191 or equivalent (commercially available) |
| Boot Band Clamp Tool: | Kent-Moore J-35910 or equivalent (commercially available) |
REQUIRED MATERIALS
| P/N | |
| Moly 60 Paste: | 08734-0001 |
| Super High Temp Urea Grease: | 08798-9002 |
WARRANTY CLAIM INFORMATION
Operation Number: 2191T4
| Flat Rate Time: | 1.2 hours |
| Failed Part: | P/N 44017-TA0-A00 |
| Defect Code: | 5KD00 |
| Symptom Code: | S1400 |
| Skill Level: | Repair Technician |
REPAIR PROCEDURE
- Raise and support the vehicle.
- Remove the right front wheel.
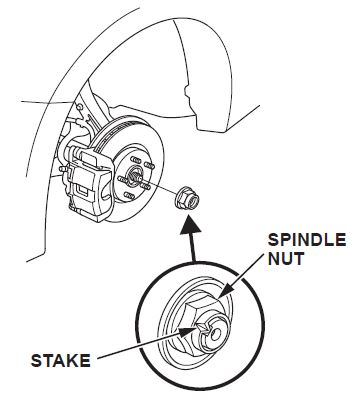
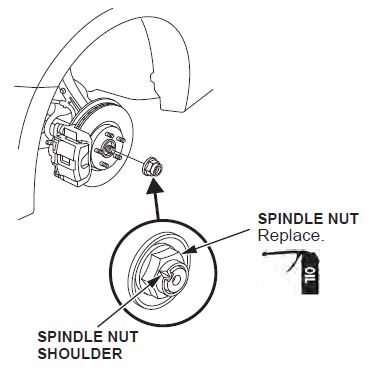
- Pry up the stake on the spindle nut, then remove the nut.
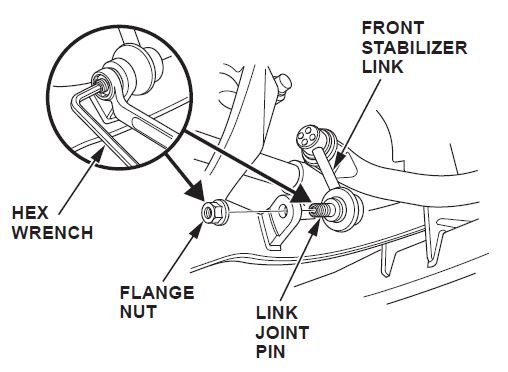
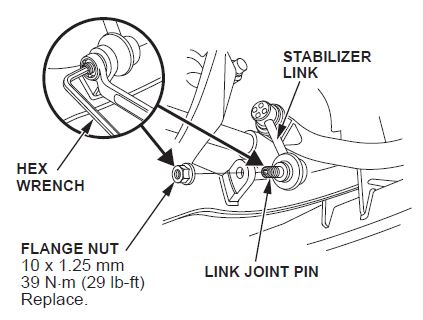
- Hold the stabilizer link joint pin using a hex wrench, and remove the flange nut. Separate the front stabilizer link from the lower arm.
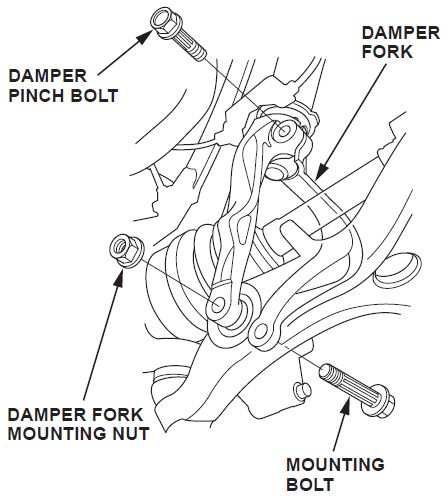
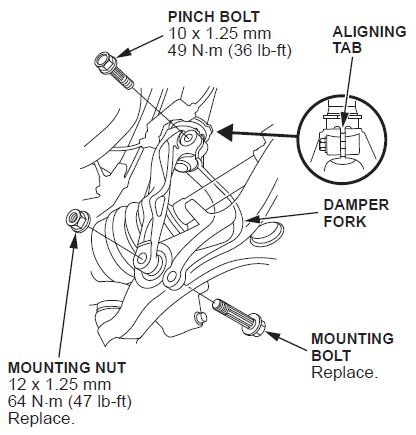
- Remove the pinch bolt and the damper fork mounting nut while holding the mounting bolt, then remove the damper fork from the damper and the lower arm.
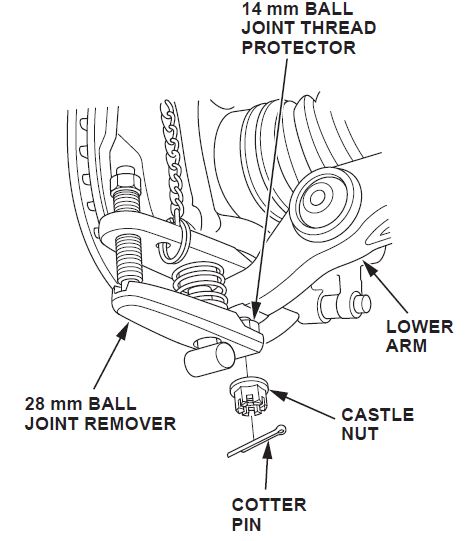
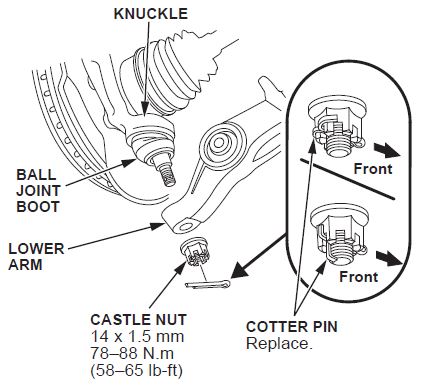
- Remove the cotter pin from the knuckle ball joint, then remove the castle nut. Separate the ball joint from the lower arm using a 28 mm ball joint remover and the 14 mm ball joint thread protector.
NOTE: Make sure not to damage the ball joint boot when installing the remover. Do not force or hammer on the lower arm, or pry between the lower arm and the knuckle. You could damage the ball joint.
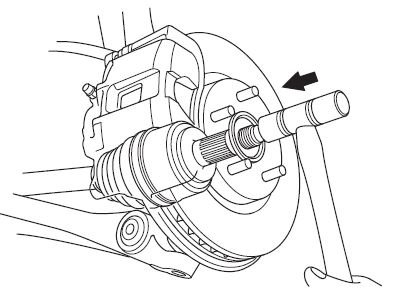
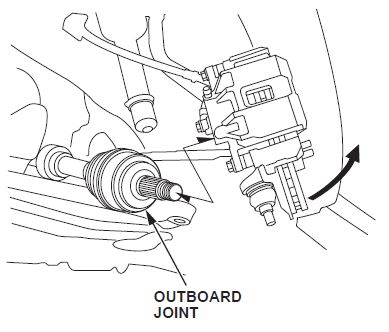
- Pull the knuckle outward, and separate the outboard joint from the front hub using a soft face hammer.
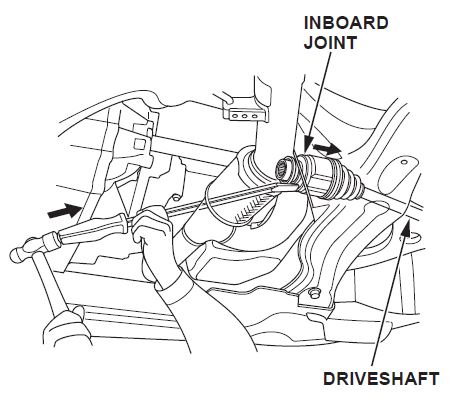
- Drive the inboard joint off of the intermediate shaft using a drift punch and a hammer. Remove the driveshaft as an assembly.
NOTE: Do not pull on the driveshaft, or the inboard joint may come apart.
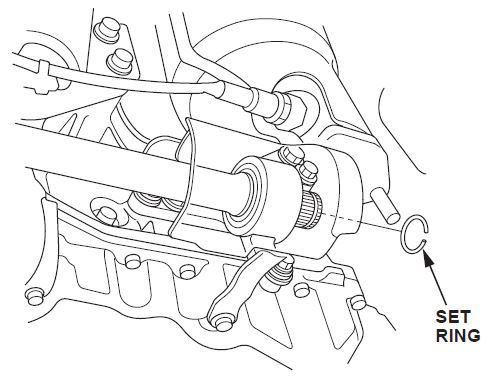
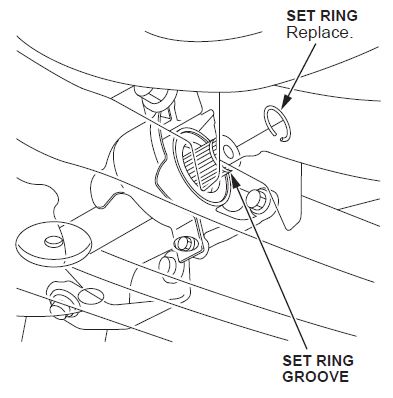
- Remove the set ring from the intermediate shaft.
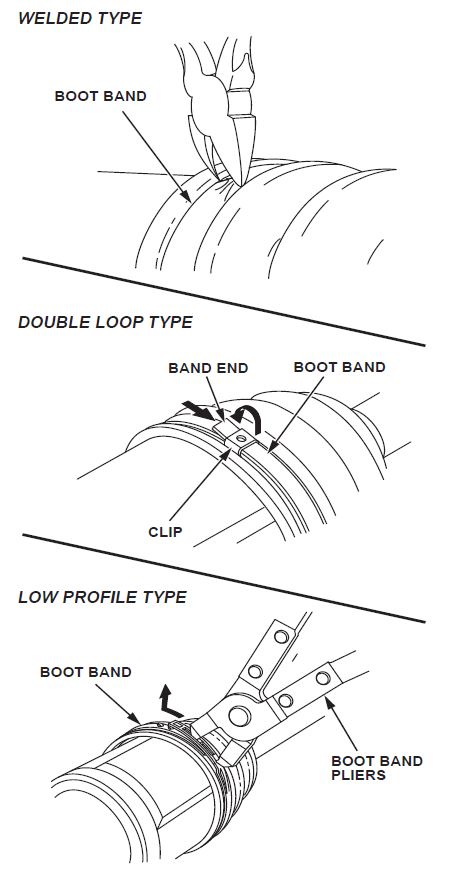
- Remove the boot bands.
- If the boot band is a welded type, cut the boot band.
- If the boot band is a double loop type, lift up the band end and push it into the clip.
- If the boot band is a low profile type, pinch the boot band using commercially available boot band pliers.
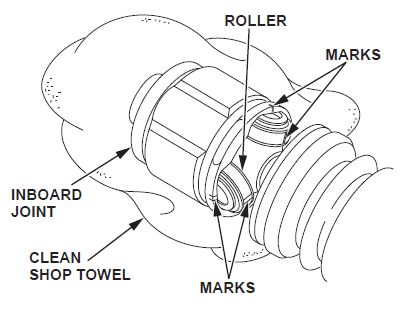
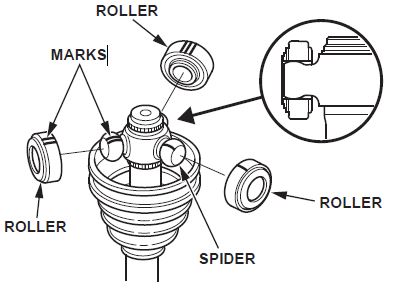
- Make marks on each roller and inboard joint to identify the locations of the rollers to the grooves in the inboard joint.
NOTE: Do not engrave or scribe any marks on the rolling surface.
- Remove the inboard joint and place it on a clean shop towel. Be careful not to drop the rollers when separating them from the inboard joint.
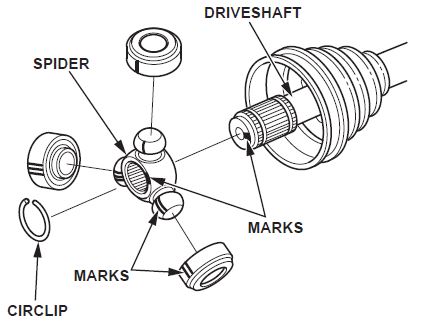
- Make marks on the spider that match the marks on the rollers, then remove the rollers.
NOTE: Do not engrave or scribe any marks on the rolling surface.
- Remove the circlip.
- Make marks on the spider and the driveshaft to identify the position of the spider on the shaft.
- Remove the spider.
NOTE: If necessary, use a commercially available bearing puller while being careful not to damage the spider.
- Remove the inboard boot.
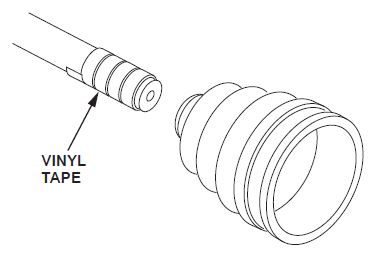
- Wrap the splines on the driveshaft with vinyl tape to prevent damaging the inboard boot.
- Install the new inboard boot onto the driveshaft, then remove the vinyl tape. Be careful not to damage the inboard boot.
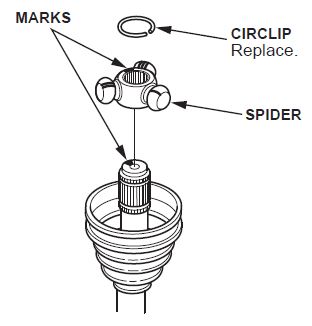
- Install the spider onto the driveshaft by aligning the marks you made on the spider and the end of the driveshaft.
- Install a new circlip into the driveshaft groove. Always rotate the circlip in its groove to make sure it is fully seated.
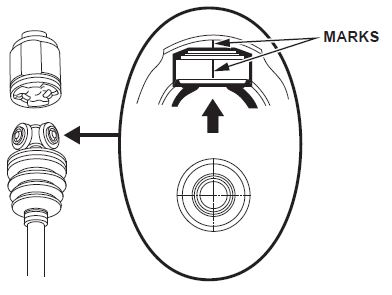
- Fit the inboard joint onto the driveshaft, and note these items.
- Reinstall the inboard joint onto the driveshaft by aligning the marks you made on the inboard joint and the rollers.
- Hold the driveshaft so the inboard joint is pointing inboard joint.
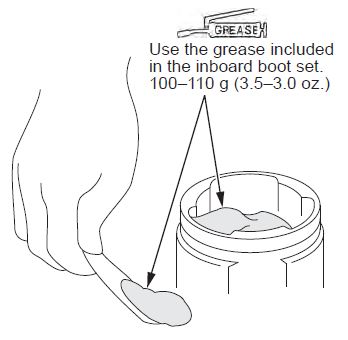
- Pack the inboard joint with joint grease included in the new inboard boot set.
- Fit the inboard joint onto the driveshaft, and note these items.
- Reinstall the inboard joint onto the driveshaft by aligning the marks you made on the inboard joint and the rollers.
- Hold the driveshaft so the inboard joint is pointing up to prevent it from falling off.
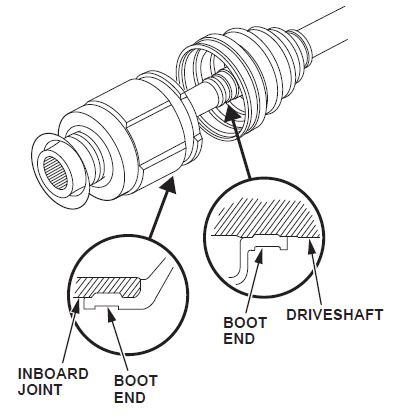
- Fit the boot ends onto the driveshaft and the inboard joint.
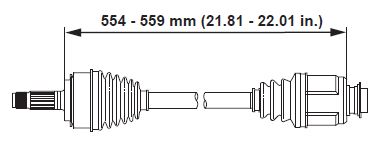
- Adjust the length of the driveshaft to the specifications shown, then adjust the boots to halfway between full compression and full extension. Bleed excess air from the boots by inserting a flat-tipped screwdriver between the boot and the joint.
- Install the new boot bands.
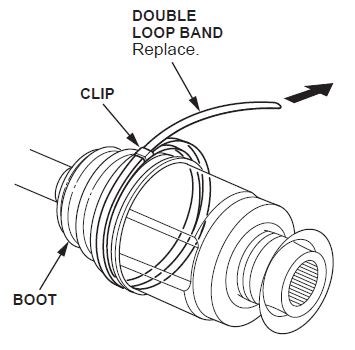
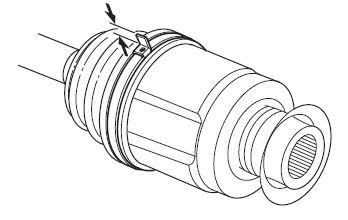
- Fit the boot ends onto the driveshaft and the inboard joint, then install a new double loop band onto the boot.
NOTE: Pass the end of the double loop band through the clip twice in the direction of the forward rotation of the driveshaft.
- Pull up the slack in the band by hand.
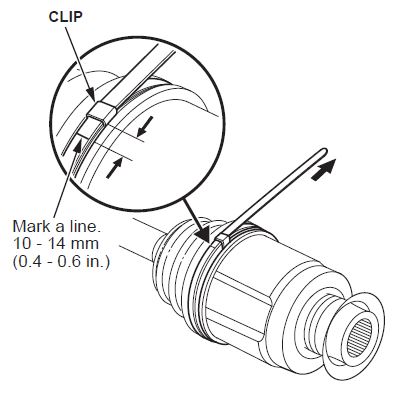
- Mark a line on the band 10–14 mm (0.4–0.6 in) from the clip.
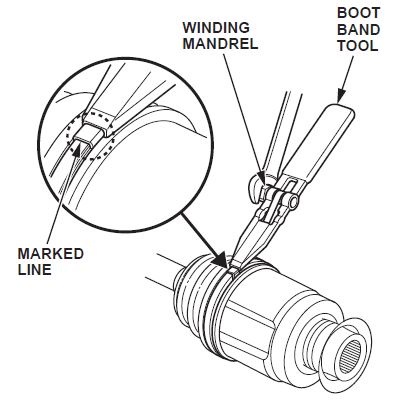
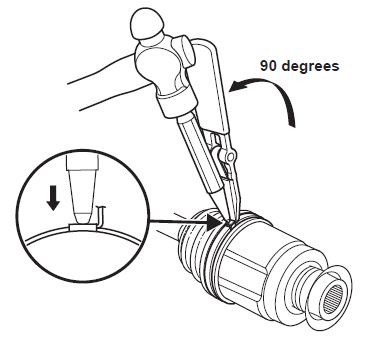
- Thread the free end of the band through the nose section of the commercially available boot band tool (KD-3191 or equivalent), and into the slot on the winding mandrel.
- Using a wrench on the winding mandrel of the boot band tool, tighten the band until the marked line on the band meets the edge of the clip.
- Lift up the boot band tool to bend the free end of the band 90 degrees to the clip. Center-punch the clip, then fold over the remaining tail onto the clip.
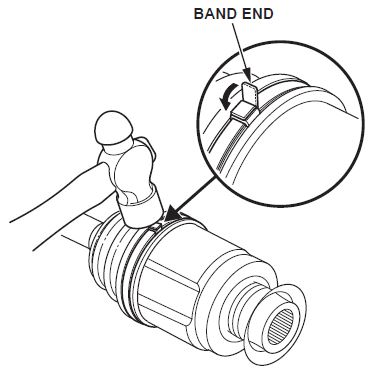
- Unwind the boot band tool, and cut off the excess free end of the band to leave a 5–10 mm (0.2–0.4 in) tail protruding from the clip.
- Bend the band end by tapping it down using a hammer.
NOTE: Make sure the band and the clip do not interfere with anything on the vehicle, and the band does not move. Clean any grease remaining on the surrounding surfaces.
- Repeat steps 28 through 35 for the band on the other end of the boot.
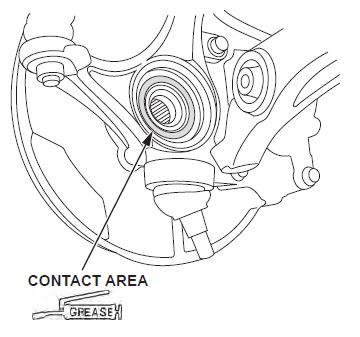
- Apply about 5 g (0.18 oz) of Moly 60 Paste to the contact area of the outboard joint and the front wheel bearing.
NOTE: The paste helps prevent noise and vibration.
- Install a new set ring into the set ring groove of the intermediate shaft.
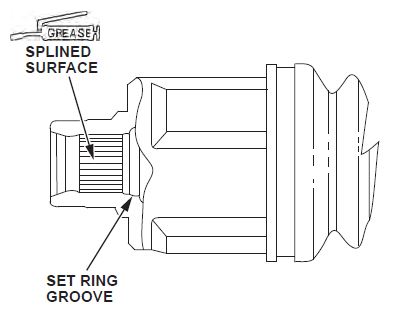
- Apply 0.5–1.0 g (0.02–0.04 oz) of Super High Temp Urea Grease to the whole splined surface of the right driveshaft. After applying grease, remove the grease from the splined grooves at intervals of 2–3 splines and from the set ring groove so that air can bleed from the intermediate shaft.
- Clean the areas where the driveshaft contacts the intermediate shaft oil seal thoroughly with solvent, and dry them with compressed air.
NOTE: Do not wash the rubber parts with solvent.
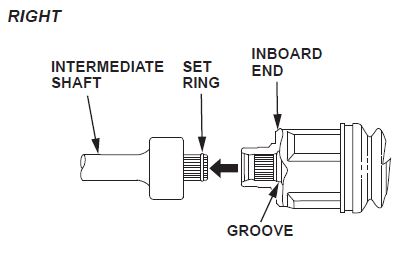
- Insert the inboard end of the driveshaft onto the intermediate shaft until the set ring locks in the groove.
NOTE: Insert the driveshaft horizontally to prevent damaging the oil seal.
- Install the outboard joint into the front hub on the knuckle.
- Wipe off any grease contamination from the ball joint tapered section and threads, then install the knuckle onto the lower arm. Make sure not to damage the ball joint boot. Wipe off the grease before tightening the nut at the ball joint.
- Torque the castle nut to the lower torque specification 78–88 N.m (58–65 lb-ft), then tighten it only far enough to align the slot with the ball joint pin hole.
NOTE: Make sure the ball joint boot is not damaged or cracked. Do not align the nut by loosening it.
- Install a new cotter pin into the ball joint hole, and bend the cotter pin as shown.
- Install the damper fork over the driveshaft and onto the lower arm. Install the damper in the damper fork so the aligning tab is aligned with the slot in the damper fork. Loosely install the damper pinch bolt.
- Loosely install a new damper fork mounting bolt and a new damper fork mounting nut.
- Connect the front stabilizer link to the lower arm, and loosely install a new flange nut. Hold the stabilizer link joint pin using a hex wrench, and tighten the flange nut to 39 N.m (29 lb-ft).
- Place a floor jack under the lower arm, and raise the suspension to load it with the vehicle’s weight.
NOTE: Do not put the floor jack under the ball joint.
- Tighten the damper pinch bolt to 49 N.m (36 lb-ft) and the damper fork mounting nut to 64 N.m (47 lb-ft) while holding the damper fork mounting bolt, then remove the floor jack.
- Apply a small amount of engine oil to the seating surface of the new spindle nut.
- Install the spindle nut, the tighten it to 329 N.m (242 lb-ft). After tightening, use a drift to stake the spindle nut shoulder against the driveshaft.
- Clean the mating surfaces between the brake disc and the inside of the wheel, then install the front wheel. Torque the wheel nuts to 108 N.m (80 lb-ft).
- Turn the wheel by hand, and make sure there is no interference between the driveshaft and surrounding parts.
- Lower the vehicle.
- Center-punch a completion mark above the fifth character of the engine compartment VIN:
Example of Customer Letter
February 2012
Product Update: Damaged Right Inboard Driveshaft Boot
Dear Honda Accord Owner:
This letter is to notify you of a potential problem with your vehicle and what you should do to resolve it.
What is the problem?
The right front inboard driveshaft boot may have been damaged during assembly. This may lead to the boot leaking grease which would cause premature axle joint wear.
What should you do?
Contact any authorized Honda dealer for an appointment to have your vehicle’s right inboard driveshaft boot replaced. This work will be done free of charge. Please plan to leave your vehicle at the dealer for a half a day to allow them flexibility in scheduling.
Lessor Information
If you are the vehicle lessor receiving this product update notice, please forward a copy of this notice to the lessee.
If you have questions
If you have questions about this notice, or need assistance with locating a Honda dealer, please call Honda
 Automobile Customer Service at 1-800-9991009, and select option 4. You can also locate a dealer online at Hondacars.com.
We apologize for any inconvenience this product update may cause you. Our goal is to ensure that your vehicle continues to be as reliable and enjoyable as possible.
Sincerely,
American Honda Motor Co., Inc.
Honda Automobile Division
 Loading...
 Loading...
 Loading...
- ESSENTIAL TOOL FOR BALL JOINT SERVICE - Use the ORION MOTOR TECH Ball Joint Press Set Ball Joint Tool / Bushing Removal Tool with 4WD Adapter to effortlessly remove press fit parts including ball joints, U-joints, brake anchor pins, and more on most 2-wheel drive (2WD) and 4-wheel drive (4WD) vehicles without removing the control arm from the vehicle.
- PROFESSIONAL GRADE QUALITY AND DURABILITY - Off road weekend warriors, novices, and professional mechanics trust the ORION kit because ORION MOTOR TECH sources the highest quality components from around the world. Constructed from heavy-duty forged steel with black-oxide finish on adapters for maximum strength and longevity that resists rust and corrosion.
- UNIVERSALLY COMPATIBLE WITH A WIDE RANGE OF VEHICLES - Fit most American domestic and imported 2-wheel drive (2WD) and 4-wheel drive (4WD) cars and light pickup trucks that have press-fit type ball joints, include 4-wheel drive (4WD) adapter that allows service for 1967 thru current 1/2 and 3/4 ton 4WD vehicles having the Dana 30 or 44 front axle (found on Ford, GM, Dodge, IHC and Jeep vehicles).
- CONVENIENTLY ORGANIZED IN CUSTOM MOLDED CASE - Ball joint press / bushing/ removal tool kit is enclosed inside a heavy-duty 11” x 3” x 15” inch (27.9cm x 7.6cm x 38.1cm) plastic blow-molded carrying case with handle for easy storage, safe storage, and quick organization. Package include: 3x Receiving Tube, 1x Removal Adapter, 1x Installation Adapter, 1x Screw, 1x Install Cup Adapter, 1x Forcing-screw Press, 1x Receiving Cup, 1x Installing Cup.
- ORION MOTOR TECH - We pursue outstanding quality and professional technical support. If you are not satisfied with this product or if you have any question, please feel free to let us know.
- ALL IN ONE FRONT END SERVICE KIT: Containing 5 adjustable tools for a wide range of domestic and import vehicles. Comes with 1x Ball Joint Separator, 1x Tie Rod and Ball Joint Remover, 1x Conical Pitman Arm Puller, 1x Pitman Arm and Tie Rod End Puller, 1x Pitman Arm Puller, 1x well-organized ABS case
- HARDENED ALLOY CONSTRUCTION: Extraordinarily tough and durable alloy means these tools can stand up to the toughest jobs. This front end service tool kit can remove the most stubborn ball joints, tie rod ends, and pitman arms
- UNIVERSALLY COMPATIBLE WITH A WIDE RANGE OF VEHICLES: The versatile design allows this tool to be used as a pitman arm remover, ball joint separator, or tie rod end puller for many small, domestic rear-wheel-drive vehicles, import vehicles, and light trucks
- PROFESSIONAL PORTABLE ABS CASE: The custom-molded case is crafted from high-quality ABS hard plastic for the amateur or professional mechanic on the go. Conveniently keeps all your tools in one organized and secure place. Never miss out on a job or project from a misplaced tool
- WIDELY APPLICATION: Professional ball joint & u-joint service kit, works for ball joint removal/installation, U joint removal/installation and brake anchor pins assemble/disassemble. Even remove rusted and corroded parts.
- UNIVERSAL COMPATIBLE: Fits most American domestic and imported 2-wheel drive (2WD) and 4-wheel drive (4WD) cars, vehicles and light pickup trucks that have press-fit type ball joints.
- EASY OPERATION: Includes heavy-duty C frame press, receiver tubes, and installation and removing adapters. Ideal for removal and installation of press-fit parts such as ball joints, universal joint and truck brake anchor pins without removing the control arm from the vehicle, effectively avoid the deformation of the front axle and the ball joint.
- PREMIUM MATERIAL: Heavy duty C-clamp with forcing screw constructed from heavy-duty forged 20# steel, ensure maximum strength and toughness; Black-oxide finished adapters for anti-rust and anti-corrosion, extend service life.
- HEAVY DUTY CARRYING CASE: Come with a 15.35 x 12 x 3.34inch heavy-duty plastic blow molded carrying case with handle for simple organization, dry storage and safe transport.
- Heavy-Duty Applications: It is a heavy-duty press tool for Ball Joint that can withstand the most challenging tasks, ensuring durability and long-lasting performance. perfect for frequent users who need a sturdy and durable tool, It's an ideal tool for various vehicles, excellent for removal and installation of press-fit parts such as ball joints, U joint, Control arm bushing and brake anchor pins for Most 2WD and 4WD Cars and Light Trucks. Hardend C Clamp Puller can excellent press rusted parts effortlessly.
- Complete with Adapters: Our hd ball joint installation tool with 4 wheel drive adapters, making it compatible with a broad range of four wheeler vehicle models. It gives you the flexibility and convenience needed to get the job done right. Fit most American domestic and imported car SUV ATV UTV pickup and light truck and Fit on Ford, GM, Dodge Ram, IHC and Jeep vehicles.
- Robust Construction: Crafted with high-grade materials, this ball joint press kit promises heavy-duty performance, enabling you to tackle even the most stubborn ball joints and bushings. Upper and Lower Control Arm Ball Joint Removal Tool be able to: Remove Upper/Lower Ball Joints, Install Upper/Lower Ball Joints, Remove/Install Brake Anchor Pin, Disassemble/Assemble Universal U Joints.
- Package include: 3x Receiving Tube, 1x Removal Adapter, 1x Installation Adapter, 1x Screw, 1x Install Cup Adapter, 1x Forcing-screw Press, 1x Receiving Cup, 1x Installing Cup.
- 4 in 1 ball joint service kit tool set Four Wheel Drive Is Made of Strong Carbon Steel, Instruction In English Included ,Plastic Carrying Red Case Package.
- Gearwrench's Ball Joint Separator is made for separating the ball joint from the spindle support arm on domestic and import front wheel drive vehicles
- Adjustable for different size ball joints
- Suitable for most cars and light trucks (not intended for use on 3/4 ton or 1 ton trucks)
- Works on ball joints from 1-1/8” to 2-1/8” and 30 to 56mm in size
- Slot is 7/8" wide by 1-1/4" Deep
- Pickle Fork Separator Tool: The tapered fork wedge design of this ball joint separator tool focuses on the fundamentals of machine technology for an easy and uncomplicated process
- Precision Performance: Striking the handle with a hammer separates the ball joint cleanly; Designed with a 15/16 inch opening for a firm hold and secure removal
- Hardened Steel: The heat treated steel alloy construction of this ball joint separator stands up to tough jobs; Zinc plating resists rust and extends service life
- Thoughtful Design: Ball joint separator handle features a nonslip knurled texture; Used as designed, this front end service tool will stand up to years of use
- Versatile Uses: This universal ball joint separator can be used for a variety of repairs; For example, the ball joint tool can also be used on CV drive shafts
- ESSENTIAL TOOL FOR BALL JOINT SERVICE - Use the ORION MOTOR TECH 21PCS Ball Joint Press Set Ball Joint Tool / Bushing Removal Tool with multi-size adapter to effortlessly remove press fit parts including ball joints, U-joints, brake anchor pins, and more on most 2-wheel drive (2WD) and 4-wheel drive (4WD) vehicles without removing the control arm from the vehicle.
- UNIVERSALLY COMPATIBLE WITH A WIDE RANGE OF VEHICLES - Use the ORION MOTOR TECH Ball Joint Press Set Ball Joint Tool / Bushing Removal Tool with all the receiver tubes and removing/installing adapters needed to effortlessly remove press fit parts including ball joints, U-joints, brake anchor pins, and more on most GM, Chevy, Ford, and Dodge 2 and 4 wheel drive pickups, vans and sport utility vehicles, will service perfect for vehicles having the Dana 28, 30, 35, 44, 60 axle
- PROFESSIONAL GRADE QUALITY AND DURABILITY - Off road weekend warriors, novices, and professional mechanics trust the ORION kit because ORION MOTOR TECH sources the highest quality components from around the world. Constructed from heavy-duty forged solid carbon steel with anti-rust black-oxide finish on adapters for maximum strength and longevity that resists rust and corrosion.
- CONVENIENTLY ORGANIZED IN CUSTOM MOLDED CASE - Ball joint press / bushing/ removal tool kit is enclosed inside a heavy-duty ABS plastic blow-molded carrying case with handle for easy storage, safe storage, and quick organization. Package include: 9x Adapters, 1x Center Rod, 1x C-Frame, 1x Install Adapter, 1x Install Cup, 1x Install Cup Adapter, 1x Receiving Cup, 3x Receiving Tube, 1x Removal Adapter, 1x Screw, 1x Sleeve.
- ORION MOTOR TECH - We pursue outstanding quality and professional technical support. If you are not satisfied with this product or if you have any question, please feel free to let us know.
- Handle Ball Joints with Ease: Orion Motor Tech's 23pc ball joint removal tool kit lets you quickly and easily remove and install stubborn press-fit parts, including ball joints, U joints, and brake anchor pins.
- Easily Repair Your Chryslers: Our specially designed 4-point sockets (1-59/64 in. & 2-9/64 in.) are tailored to fit numerous Chrysler vehicles, ensuring a secure and accurate fit when removing and installing their uniquely threaded upper ball joints.
- Gentle on Your Vehicle: Our 9 inch C-frame press with a 6 inch opening and an extra-long jackscrew provides even and straight force to let you smoothly press out joints without damaging other components.
- Universal Compatibility: Our ball joint tool kit works with most 2WD and FWD vehicles, including GM, Chrysler, Ford, Jeep, Dodge, and more, thanks to its versatile receiving tubes and adapters.
- Engineered for Durability: Our ball joint press kit is crafted from premium AISI 1045 carbon steel, carefully forged and blackened to ensure superior strength and excellent corrosion resistance.
- Universal Compatibility: The ball joint removal tool is designed for domestic and imported 2WD/4WD cars and light trucks with press-fit ball joints. Includes a 4WD adapter for 1/2 and 3/4 ton 4WD vehicles with the Dana 30 or 44 front axle on Ford, GM, Dodge, IHC, and Jeep vehicles.
- Easy Operation: The PUNMEW ball joint press simplifies vehicle part removal and installation. Easily remove lock ring retainers from brake anchor pins, then apply the C-frame press to the brake spider. Tighten the forcing screws to effortlessly remove mounting pins, making your repair tasks a breeze.
- Package Includes: 3x Receiving Tubes, 1x Removal Adapter, 1x Installation Adapter, 1x Screw, 1x Install Cup Adapter, 1x Forcing-screw Press, 1x Receiving Cup, 1x Installing Cup.
- Robust and Functional: PUNMEW' ball joint removal tool kit features heavy forged steel with black-oxide finish, ensuring durability. Four-wheel drive adapters simplify press-fit part removal, enhancing work efficiency for enthusiasts and professionals alike.
- Organized and Portable: This ball joint press is conveniently stored in a custom case with handle, featuring essential components for efficient repairs.
- EASY TO USE: This tie rod removal tool separates ball joints without damaging other components, designed specifically for quick and easy separation of a vehicle’s ball joint from the spindle support arm.
- ADJUSTABLE: 2-Stage height adjustment feature uses a heat-treated steel pin thrust bolt and steel ball insert, allowing quick and easy height adjustment changes.
- WIDE APPLICATION: This ball joint separator tool is adjustable for different size ball joints, it can be used on most press-fit ball joint applications. Max. opening range is 1/2 inch & 1-7/8 inch.
- PREMIUM MATERIAL: This ball joint press kit is made of high hardness carbon steel, heat-treated, sturdy and steady, corrosion resistant, wear resistant, with reliable use and long service life.
- AFTER-SALES DESCRIPTION:If you have any questions about the purchased tool, please contact us in time, and your problems will be solved in time.
Last update on 2025-05-08 / Affiliate links / Images from Amazon Product Advertising API
This product presentation was made with AAWP plugin.
