| “This site contains affiliate links for which OEMDTC may be compensated” |
NHTSA Campaign Number: 16V932
Manufacturer Honda (American Honda
 Motor Co.)
Components SEATS
Potential Number of Units Affected 7,549
Seat Adjuster may Stick Unlocked/FMVSS 207
An unlocked second row center seat may increase the risk of injury to the seat occupant in the event of a crash.
Summary
Honda (American Honda
 Motor Co.) is recalling certain model year 2016 Odyssey vehicles manufactured September 23, 2016, to October 24, 2016.
The affected vehicles have a second row center seat with a horizontal adjuster bar that may stick in the unlocked position, allowing the seat to unexpectedly slide.
As such, these vehicles fail to comply with the requirements of Federal Motor Vehicle Safety Standard (FMVSS) number 207, “Seat Systems.”
Remedy
Honda will notify owners, and dealers will inspect the slide function and replace the horizontal position adjustment bar, as necessary, free of charge.
The recall is expected to begin January 23, 2017.
Owners may contact Honda customer service at 1-888-234-2138.
Honda ’s number for this recall is KD4.
Notes
Owners may also contact the National Highway Traffic Safety Administration Vehicle Safety Hotline at 1-888-327-4236 (TTY 1-800-424-9153), or go to www.safercar.gov.
Check if your Honda has a Recall
A16-107
December 21, 2016
05504 Version 1
Non-Compliance Recall: Second Row Center Seat
AFFECTED VEHICLES
| Year | Model | Trim | VIN Range |
| 2016 | Odyssey | ALL except LX | Check the iN VIN status for eligibility |
BACKGROUND
The second row center seat slide lever may get stuck in the open position after moving the seat. If the seat slide lever does get stuck in the open (up) position, the seat will not properly lock into position, allowing it to slide while the vehicle is in motion. As a result, affected vehicles do not comply with applicable Federal Motor Vehicle Safety Standards 207.
CUSTOMER NOTIFICATION
Owners of affected vehicles will be sent a notification of this campaign.
Do an iN VIN status inquiry to make sure the vehicle is shown as eligible.
Some vehicles affected by this campaign may be in your new or used vehicle inventory.
Federal law requires that all affected new vehicles be repaired before sale. In addition, failure to repair a vehicle subject to a recall or campaign may subject your dealership to claims or lawsuits from the customer or anyone else harmed as a result of such failure. Furthermore, state law may provide American Honda with the right to seek indemnification in any such claim or lawsuit. To see if a vehicle in inventory is affected by this recall, do a VIN status inquiry before selling it.
CORRECTIVE ACTION
Inspect the vehicle and, if necessary, adjust the second row center seat slide lever.
NOTE: In rare cases the slide lever cannot be adjusted because it is out of specification and will need to be replaced. Order parts only when you find the slide lever is out of specification.
TOOL INFORMATION
| Part Name | Part Number | Quantity |
| Seat Slide Lever Adjuster | 07AAG-TK8A100 | 1 |
PARTS INFORMATION
| Part Name | Part Number | Quantity |
| Second Row Center Seat Slide Lever | 81998-TK8-A21 | 1 |
| 6 mm Push Nuts | 82183-TK8-A01 | 2 |
NOTE: Most vehicles do not need a slide lever and push nuts – replace the lever only if after adjusting the clearance, the lever does not overlap the locking tabs properly. See REPAIR PROCEDURE A.
REQUIRED MATERIAL
| Part Name | Part Number | Quantity |
| Hondalock 2 Threadlock | 08713-0002 | 1 bottle repairs 100 vehicles |
WARRANTY CLAIM INFORMATION
| Operation Number | Description | Flat Rate Time | Defect Code | Symptom Code | Template ID | Failed Part Number |
| 8515A0 | Inspect the second row center seat and, if needed,
do REPAIR PROCEDURE A to adjust the seat. | 0.3 hr | 6SC00 | KD400 | 16-107A | 81998-TK8-A21 |
| 8515A0 | Inspect the second row center seat and, if necessary, do REPAIR PROCEDURE A. | 0.3 hr | 6SC00 | KD400 | 16-107B | 81998-TK8-A21 |
| A | Do REPAIR PROCEDURE
B to replace the slide lever. | 0.3 hr |
Skill Level: Repair Technician
INSPECTION PROCEDURE
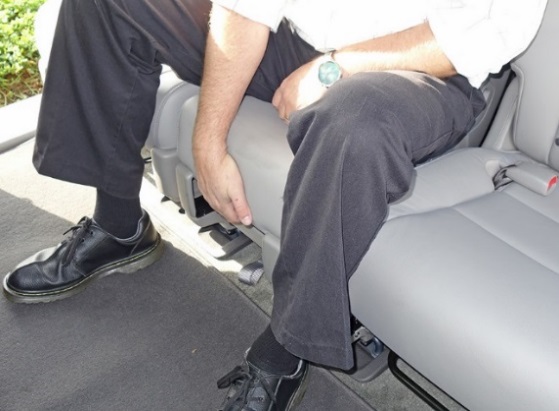
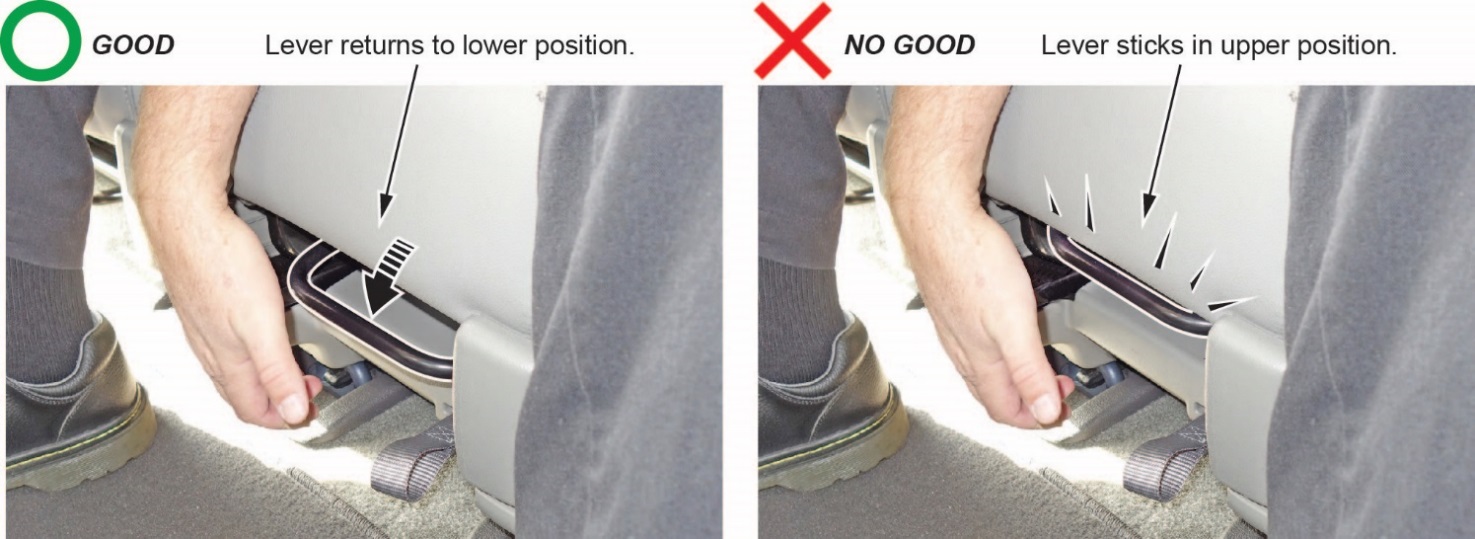
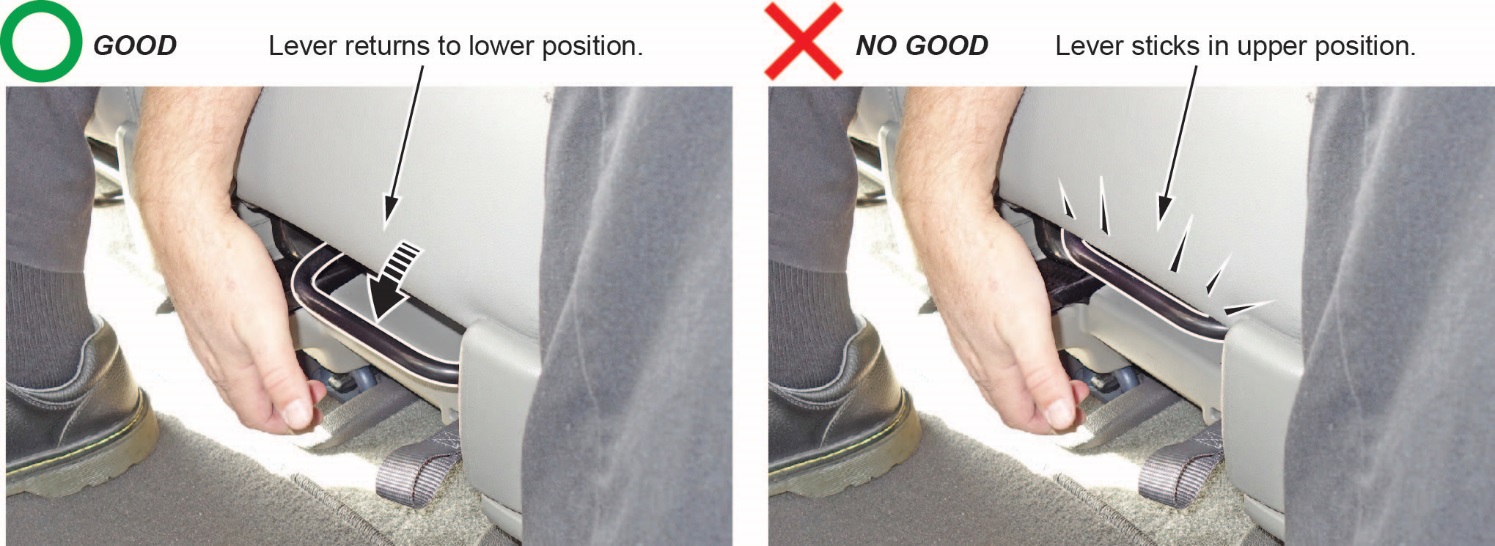
- Sit in the second row center seat, lift the slide lever and slide the seat all the way back toward the rear of the vehicle.
- Slowly lower your hand to release the slide lever, then slide the seat forward to the first latching point.
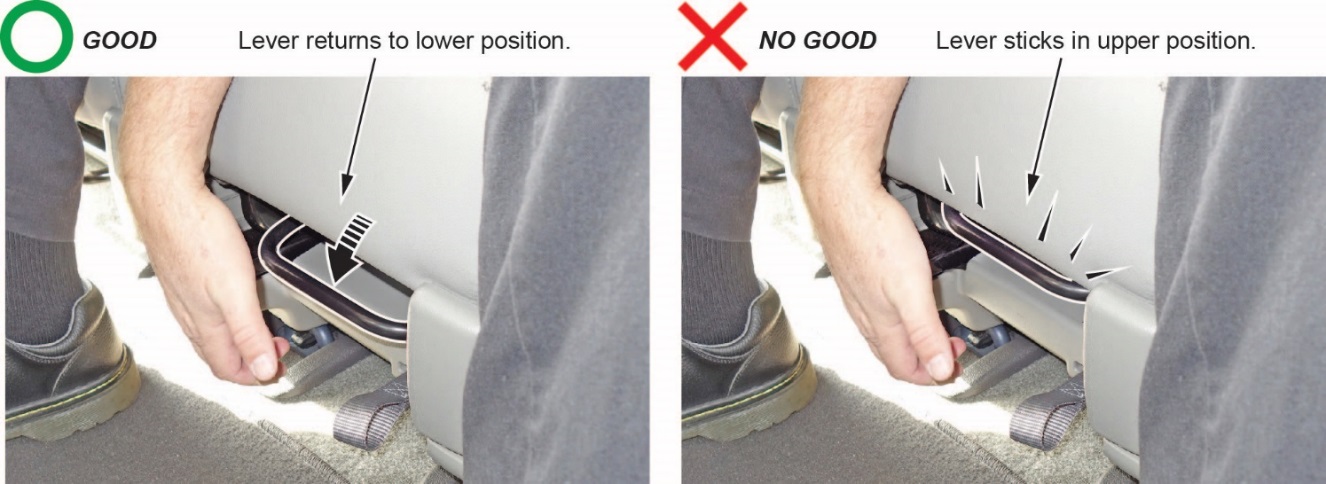
- If the slide lever returns to the original (lowest) position under its own force and the seat locks into place, the vehicle is OK.
- If the slide lever is stuck in the up position, does not return to its original position under its own force, or doesn’t lock, go to REPAIR PROCEDURE A.
REPAIR PROCEDURE A
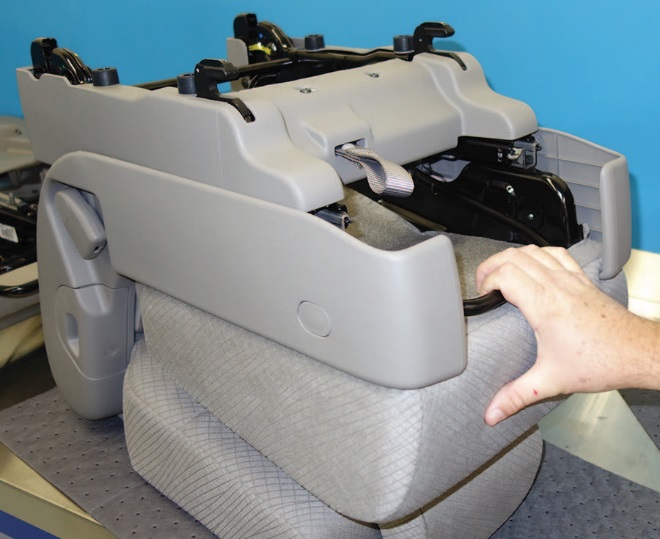
- Fold the second row center seat and unlatch it from the floor.
- Place the center seat upside down on a clean surface.
NOTE: You can either work on the bench or in the vehicle. Make sure you protect the seat from getting dirty by using clean shop towels, plastic sheet, etc.
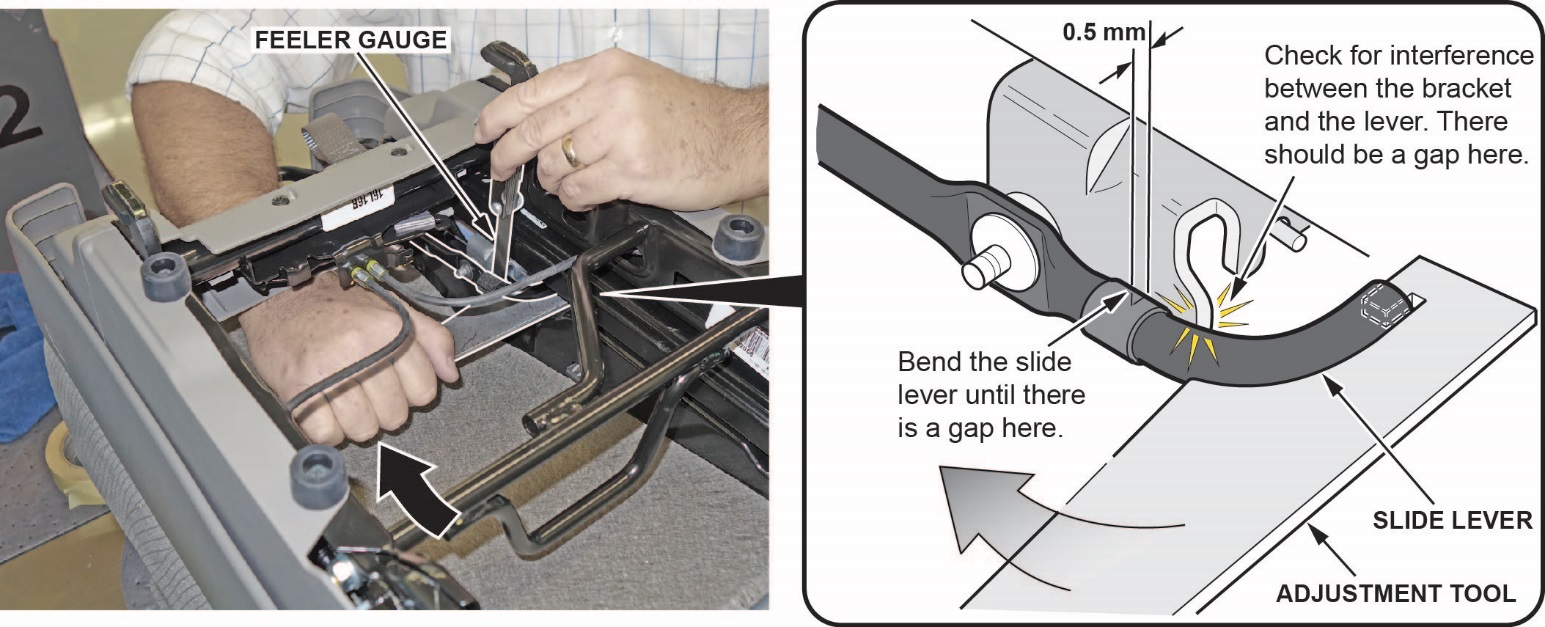
- Using the seat slide lever adjuster and a feeler gauge, bend the slide lever to create 0.5 mm of space between the lever and the bracket as shown.
NOTE: Do not use too much force and do not bend the slide lever to more than 0.5 mm of clearance.
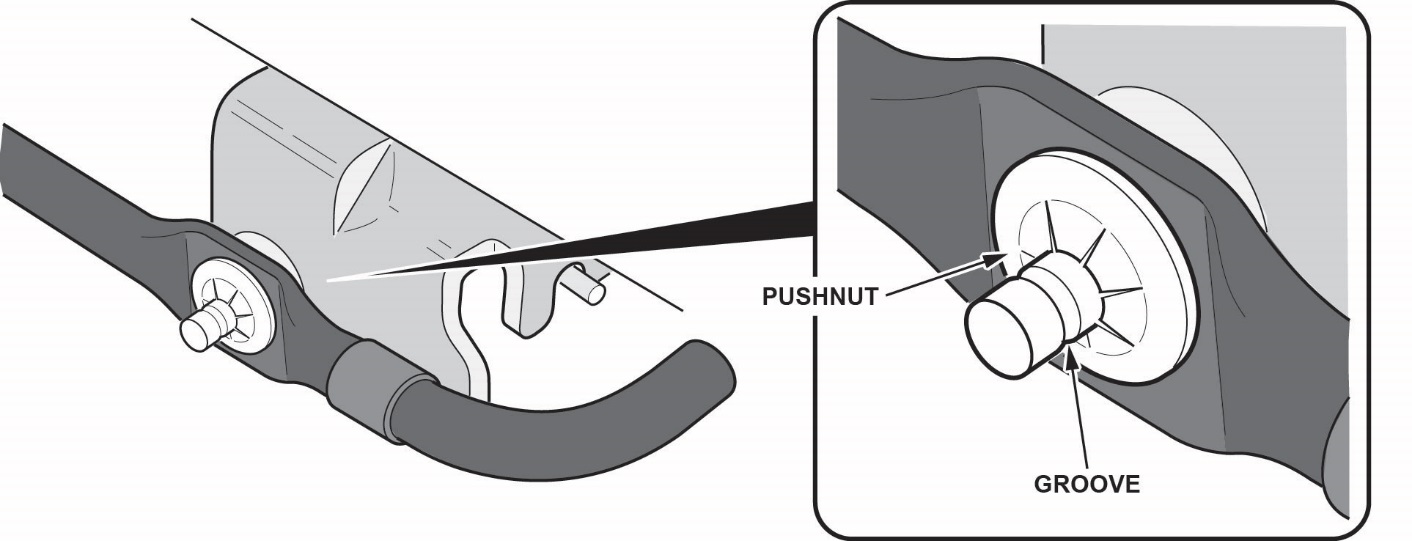
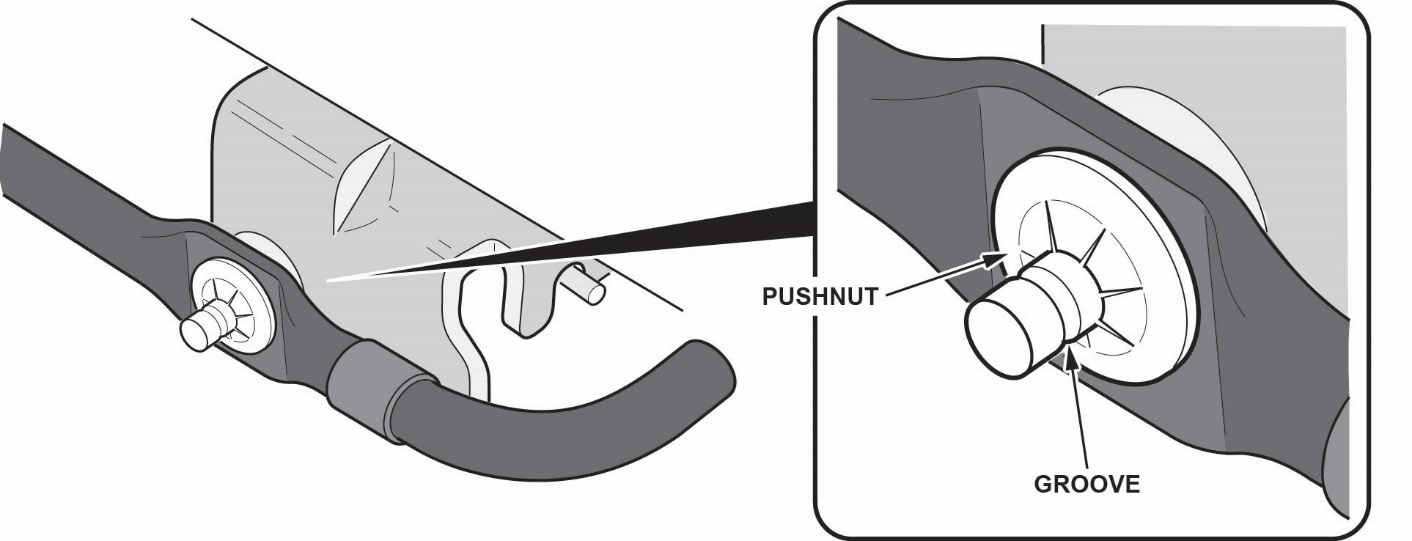
- Once there is 0.5 mm of clearance, check that the 6 mm push nuts are secure and they are pushed past the groove on the stud as shown.
- If the push nuts are secure and pushed past the groove, go to step 5.
- If the push nuts are not secure or not pushed past the groove, use a 10 mm socket and small hammer to gently tap the push nut past the groove.
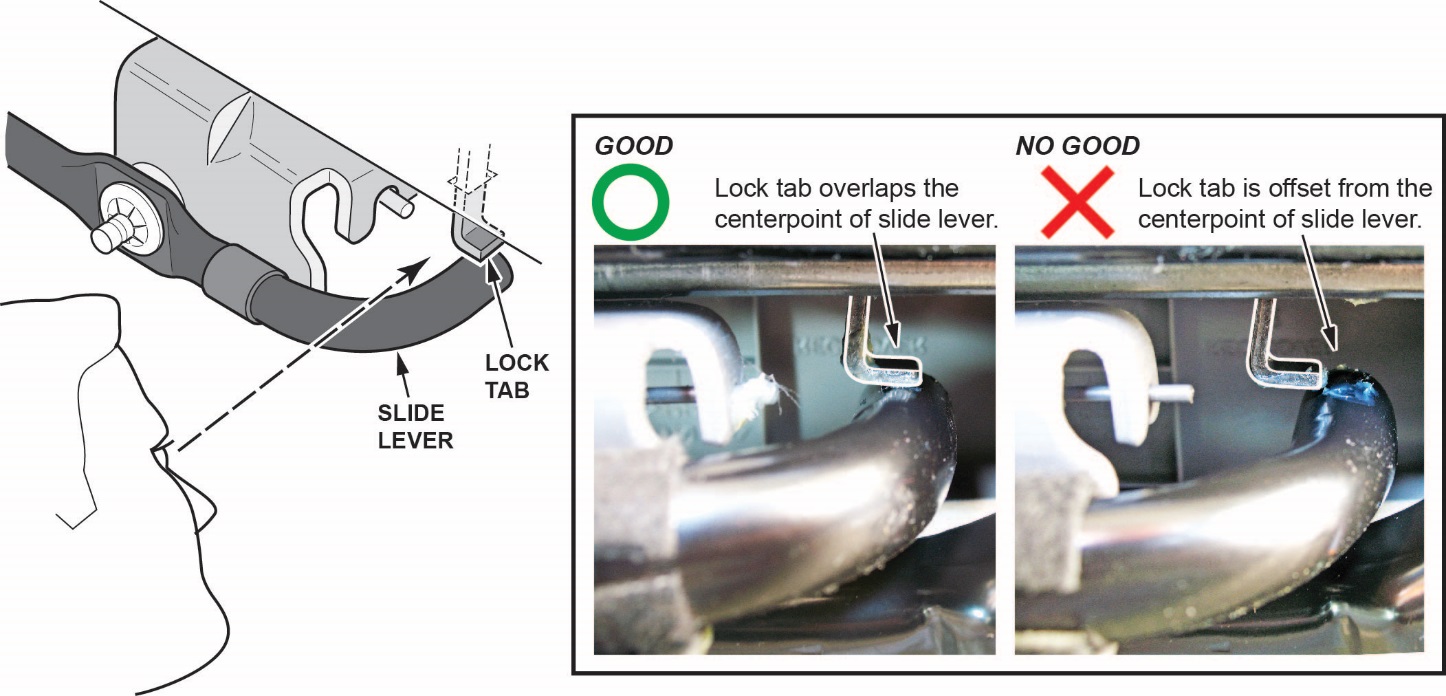
- Check that the ends of the slide lever properly overlap the lock tabs as shown.
- If the slide lever position is OK, go to step 6.
- If the slide lever position is no good, replace the slide lever. Go to REPAIR PROCEDURE B – SLIDE LEVER REPLACEMENT.
- Install the center seat in the vehicle.
- Sit in the second row center seat, lift the slide lever and slide the seat all the way back toward the rear of the vehicle.
- Confirm the slide lever works properly by slowly lowering your hand to release the slide lever, then slide the seat forward to the first latching point. Verify that the seat locks into place and the slide lever returns to the original down position under its own force.
REPAIR PROCEDURE B – SLIDE LEVER REPLACEMENT
NOTE: Use this procedure only if you found the slide lever and lock tab overlap no good in REPAIR PROCEDURE A.
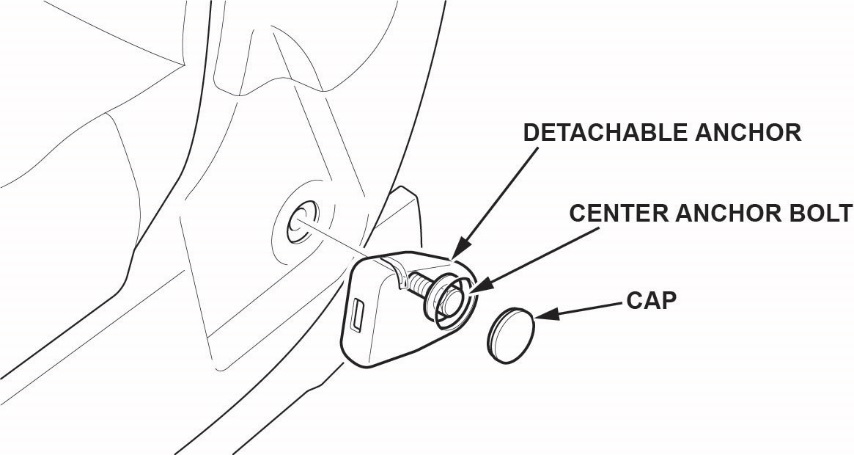
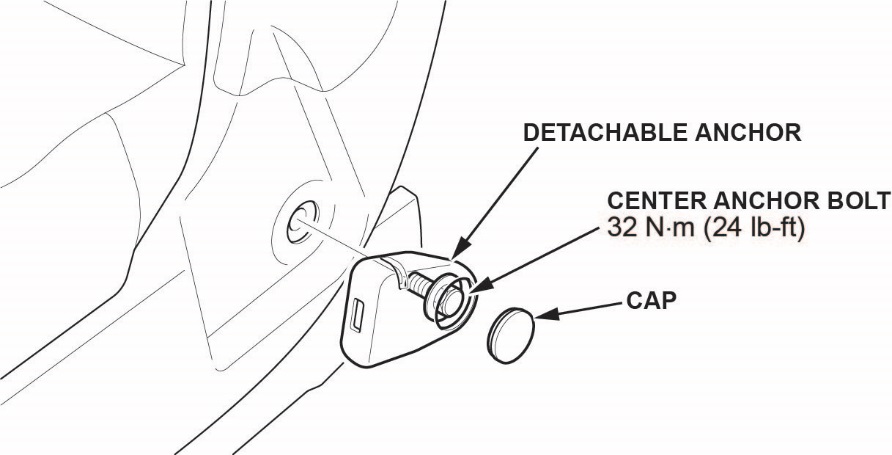
- Remove the seatbelt detachable anchor.
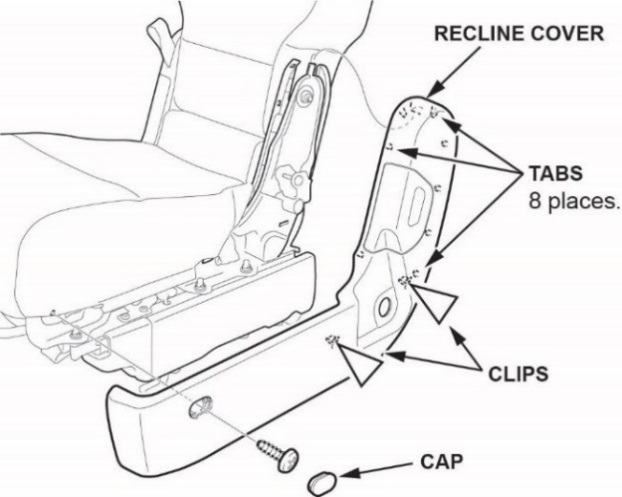
- Remove the recliner cover.
- Remove the cap, then remove the screw.
- Pull up on the cover, then detach the clips and release the tabs.
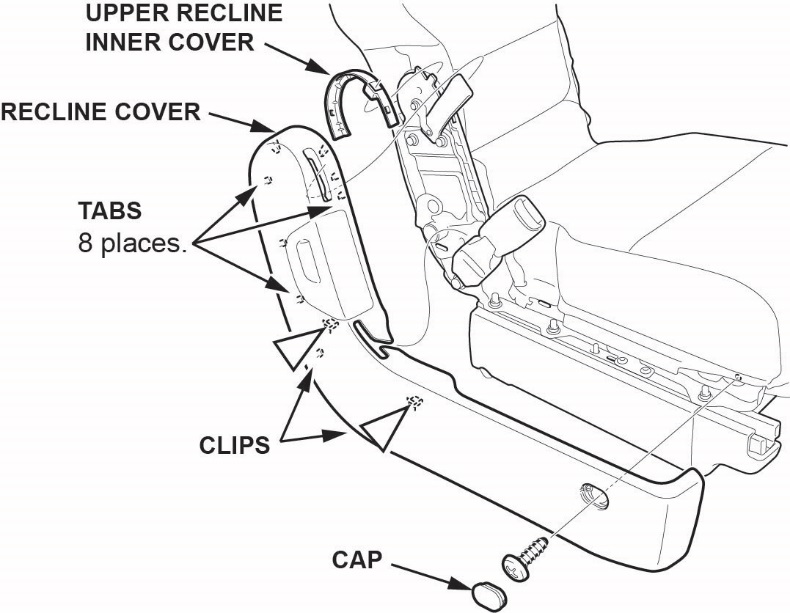
- Remove the center cover.
- Remove the cap, then remove the screw.
- Pull up the cover, then detach the clips and release the tabs.
- If necessary, remove the upper recline inner cover.
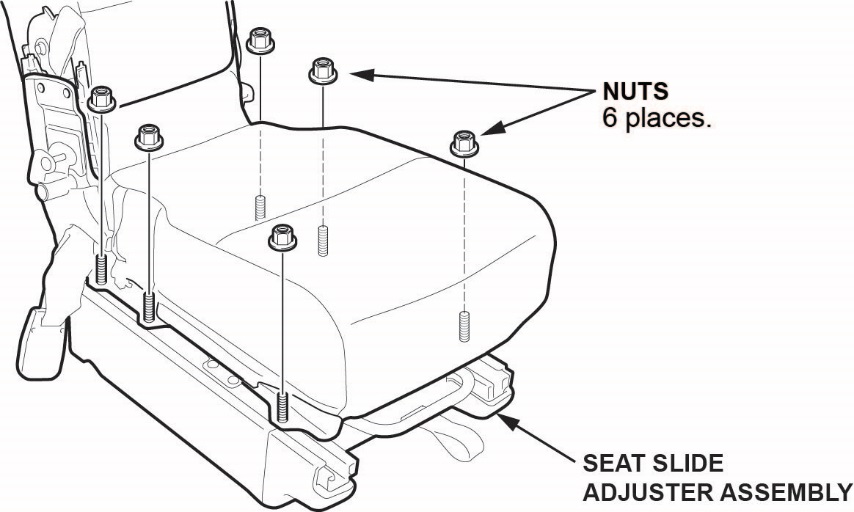
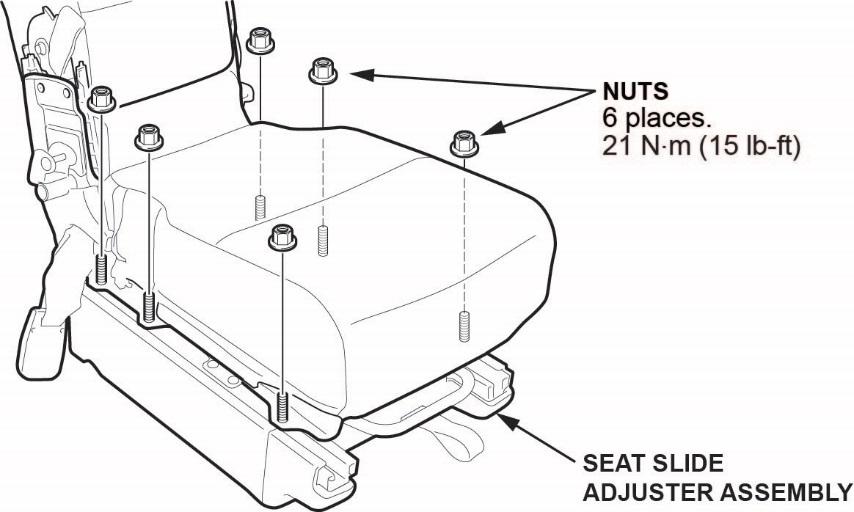
- Remove the seat slide adjuster assembly by removing the 6 nuts.
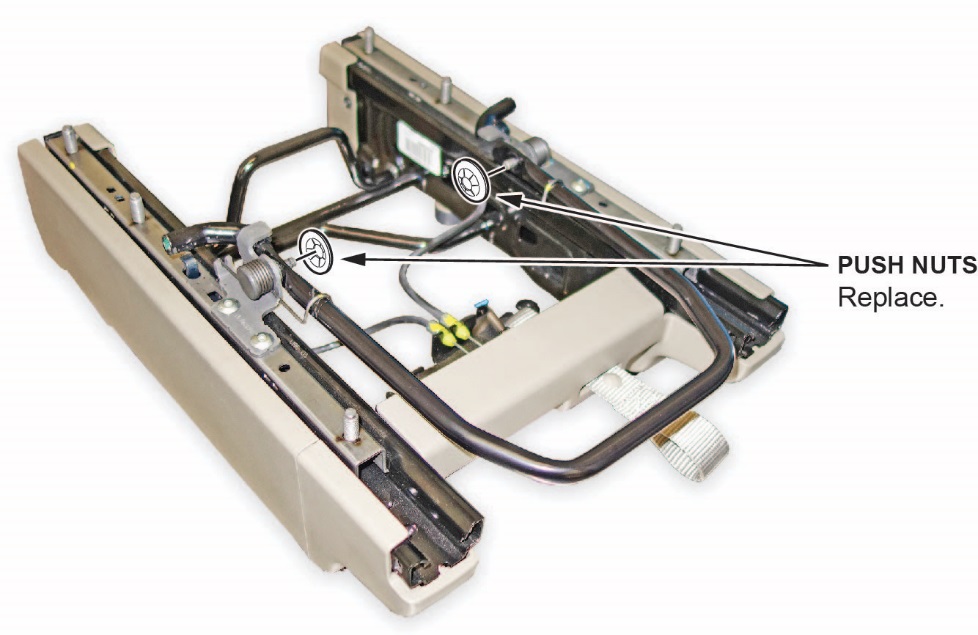
- Remove the 6 mm push nuts using a grommet puller or a small screwdriver.
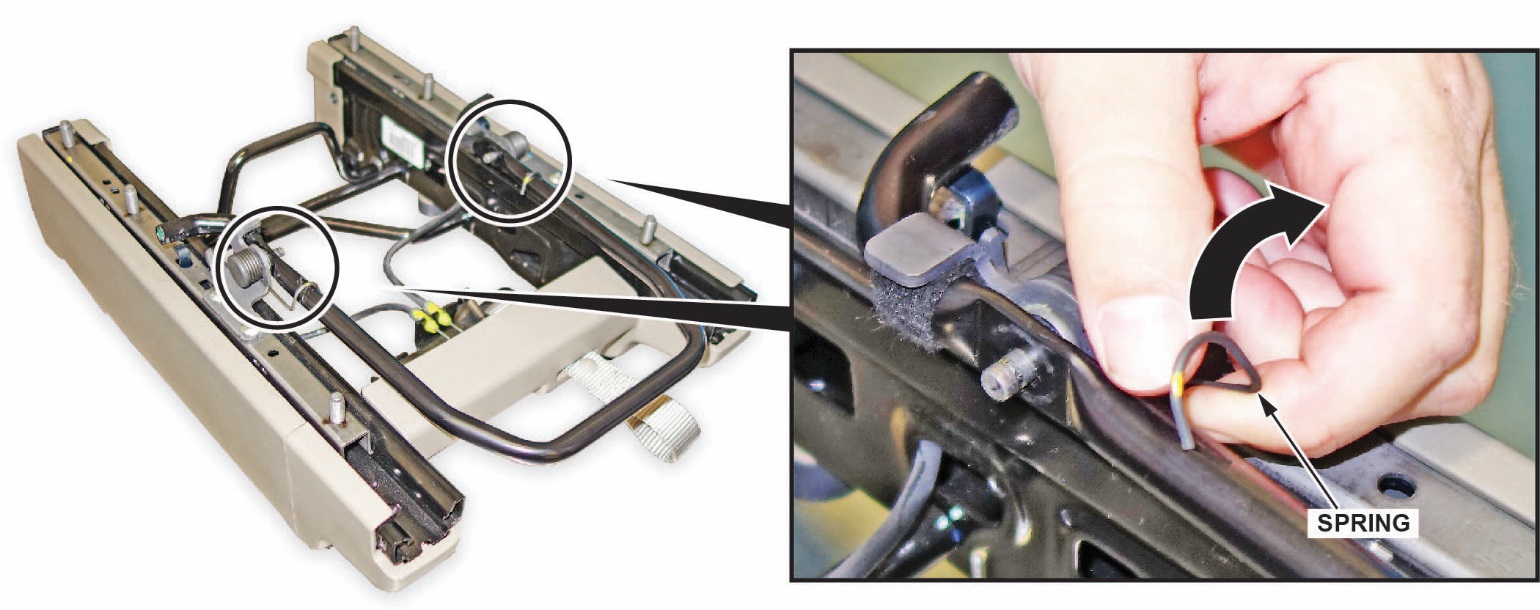
- Release the springs from the slide lever.
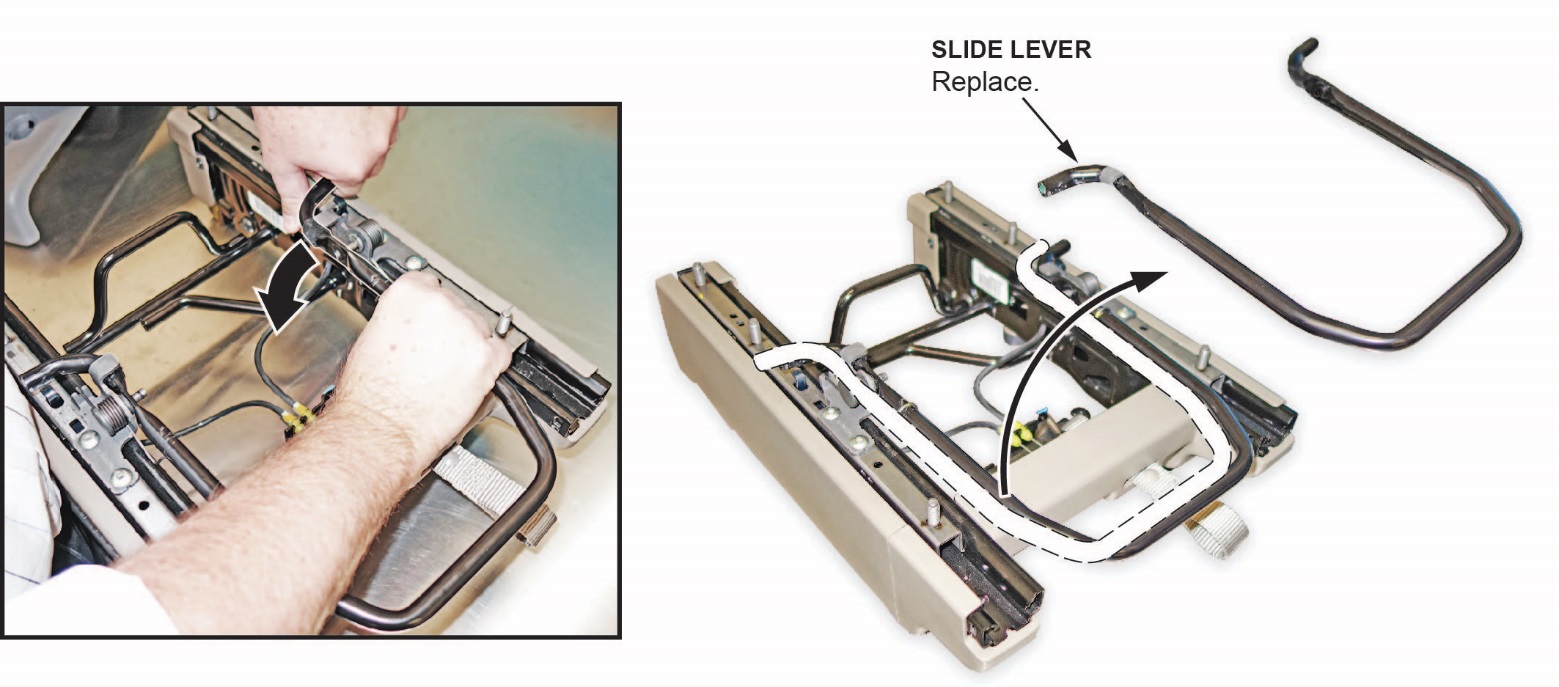
- Pull or flex the slide bar to remove it.
- Install the new slide lever using new 6 mm push nuts and re-engage both springs.
NOTE: Make sure you install the push nuts past the groove.
- Reassemble the seat in the reverse order of removal and note the following.
- Install the slide adjuster assembly using the 6 nuts and torque them to 21 N·m (15 lb-ft).
- Apply thread-lock to the seat belt anchor bolt and torque it to 32 N·m (24 lb-ft).
- Install the center seat in the vehicle.
- Sit in the second row center seat, lift the slide lever and slide the seat all the way back toward the rear of the vehicle.
- Confirm the slide lever works properly by slowly lowering your hand to release the slide lever, then slide the seat forward to the first latching point. Verify that the seat locks into place and the slide lever returns to the original down position under its own force.
END
 Loading...
