| “This site contains affiliate links for which OEMDTC may be compensated” |
B14-031
October 5, 2016
04964 Version 5
Steering Column Screeches When Moving
Supersedes 14-031, dated June 18, 2016, to revise the information highlighted in yellow
AFFECTED VEHICLES
| Year | Model | Trim | VIN Range |
| 2014–15 | MDX | ALL | ALL |
| 2016 | MDX | AWD | 5FRYD4H..GB000001 thru 5FRYD4H..GB060678 |
| 2016 | MDX | 2WD | 5FRYD3H..GB000000 thru 5FRYD3H..GB020816 |
| 2014–16 | RLX | ALL | ALL |
REVISION SUMMARY
Under AFFECTED VEHICLES, additional information was added.
SYMPTOM
In high ambient temperatures, the steering column screeches or squeals when it moves in or out.
POSSIBLE CAUSES
Premature wear of the steering column gearbox components.
CORRECTIVE ACTION
Replace the steering column assembly.
PARTS INFORMATION
| Part Name | Part Number | Quantity |
| Steering Column (2014–15 MDX) | 53200-TZ5-A52 | 1 |
| Steering Column (2016 MDX) | 53200-TZ5-A62 | 1 |
| Steering Column (RLX) | 53200-TY2-A03 | 1 |
| Driver’s Knee Airbag Bolts (MDX) | 90178-TZ5-003 | 4 |
| Driver’s Knee Airbag Bolts (RLX) | 90178-SNA-003 | 4 |
| Steering Lock Kit (bracket and two left-hand thread bolts) | 06352-TX4-A11 | 1 |
| Steering Wheel Bolt | 90161-TX4-000 | 1 |
| Driver’s Airbag Bolts | 90134-S6A-A80 | 2 |
WARRANTY CLAIM INFORMATION
The normal warranty applies.
| Operation Number | Description | Flat Rate Time | Template ID | Defect Code | Symptom Code | Failed Part Number |
| 510100 | Remove and replace the steering column.
(2014–16 RLX) | 1.1 hrs | 14-031N | 07409 | 04201 |
53200-TY2-A02 |
| D | Add for alignment. | 0.4 hr | 14-031P | |||
| 510100 | Remove and replace the steering column.
(2014–15 MDX) | 1.8 hrs | 14-031Q | 07409 | 04201 | 53200-TZ5-A51 |
| D | Add for alignment. | 0.4 hr | 14-031R | |||
| 510100 | Remove and replace the steering column.
(2016 MDX) | 1.8 hrs | 14-031S | 07409 | 04201 | 53200-TZ5-A61 |
| D | Add for alignment. | 0.4 hr | 14-031T |
Skill Level: Repair Technician
REPAIR PROCEDURE
- Do the battery terminal disconnection procedure.
- Remove the driver’s airbag.
- Remove the steering wheel.
- Remove the driver’s dashboard lower cover.
- Remove the steering column cover.
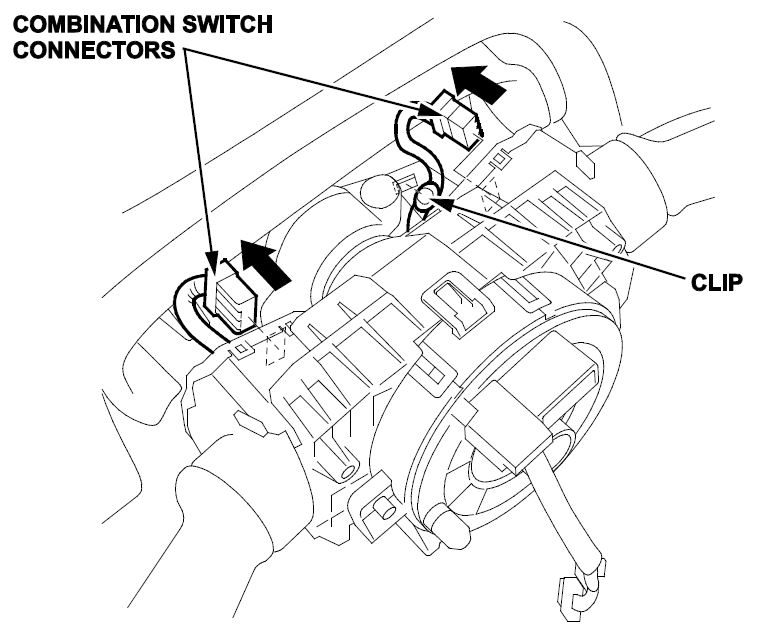
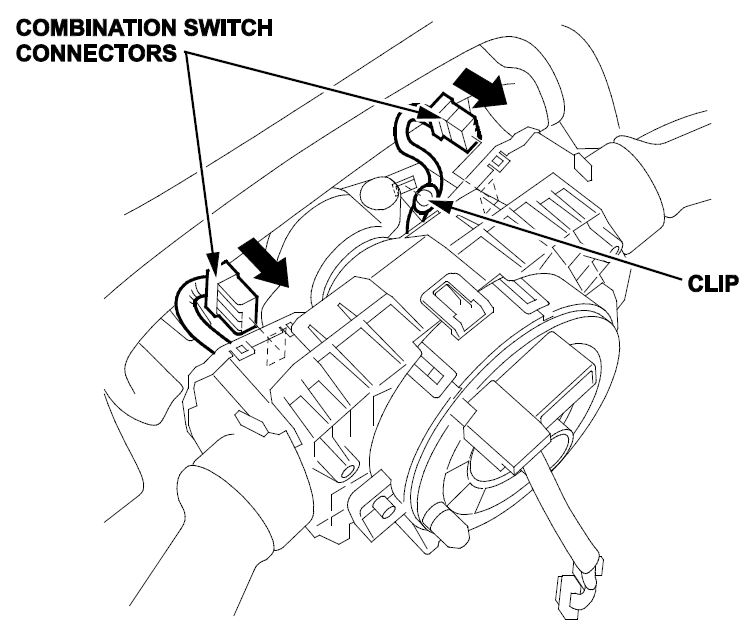
- Disconnect the combination switch connectors and remove the clip.
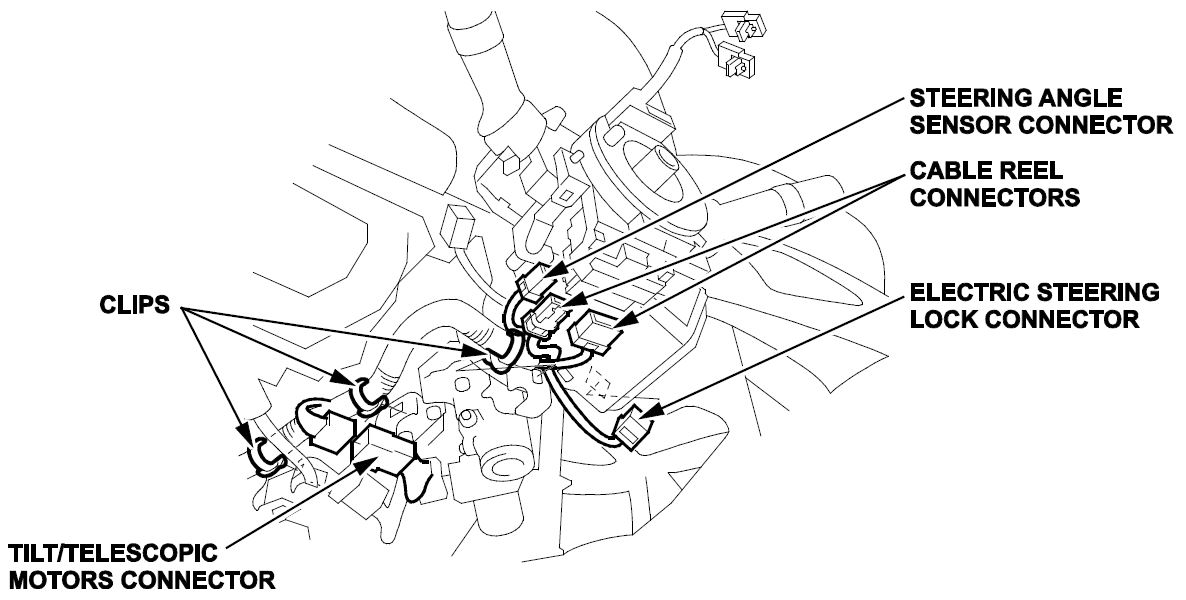
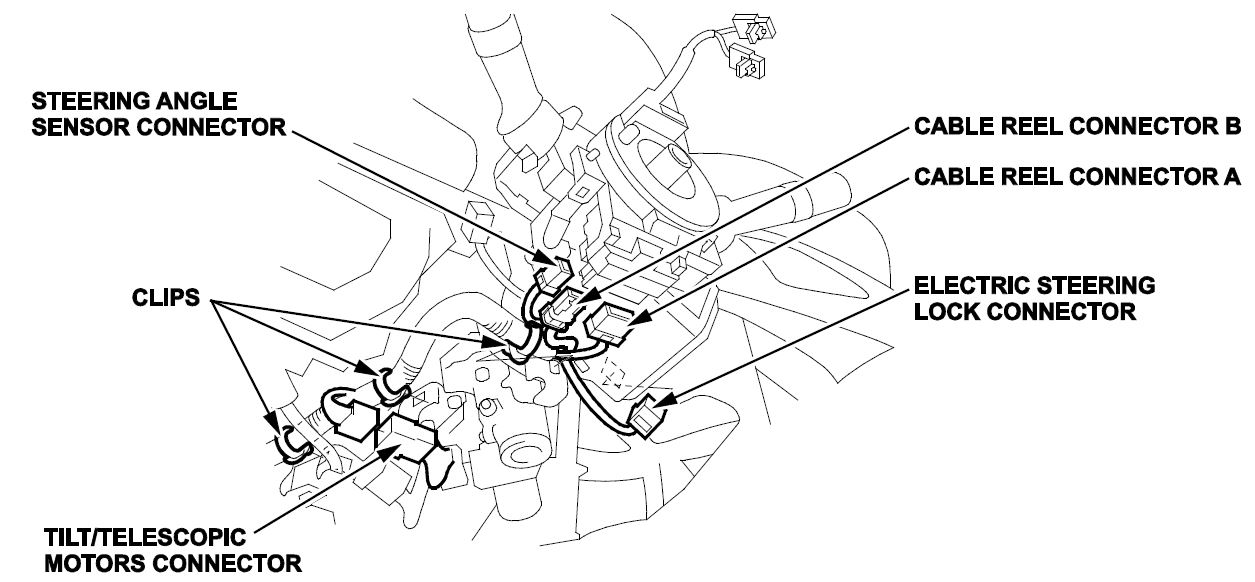
- Remove the clips and disconnect the following connectors:
- Cable reel connectors
- Steering angle sensor connector
- (2014–15 models only): Electric steering lock connector
- Tilt/telescopic motors connector
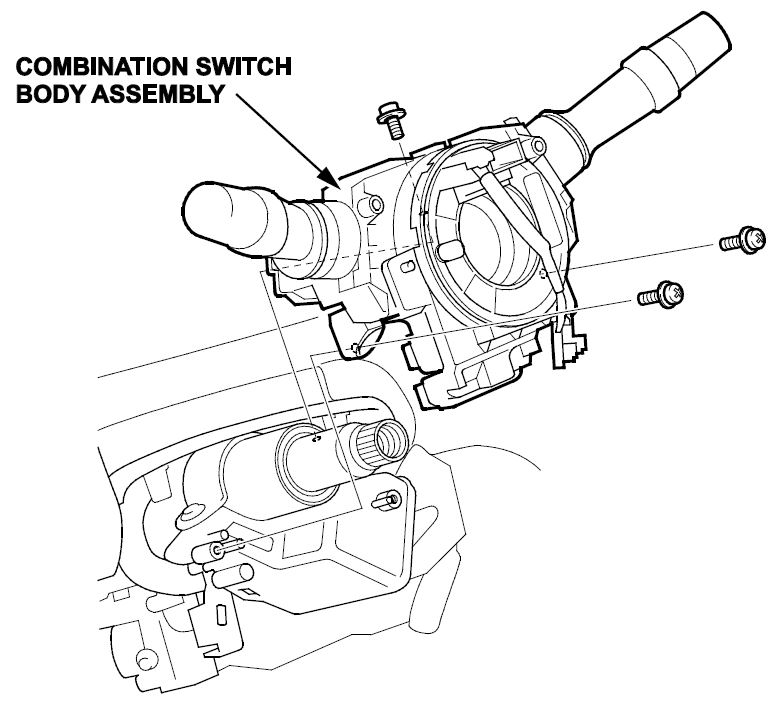
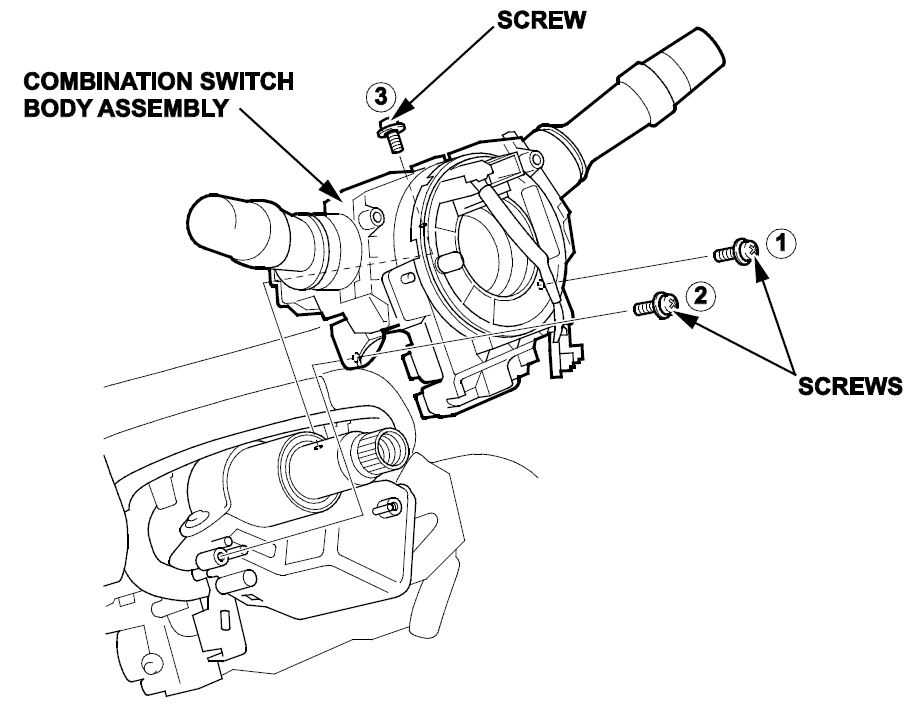
- Remove the combination switch body assembly from the steering column shaft.
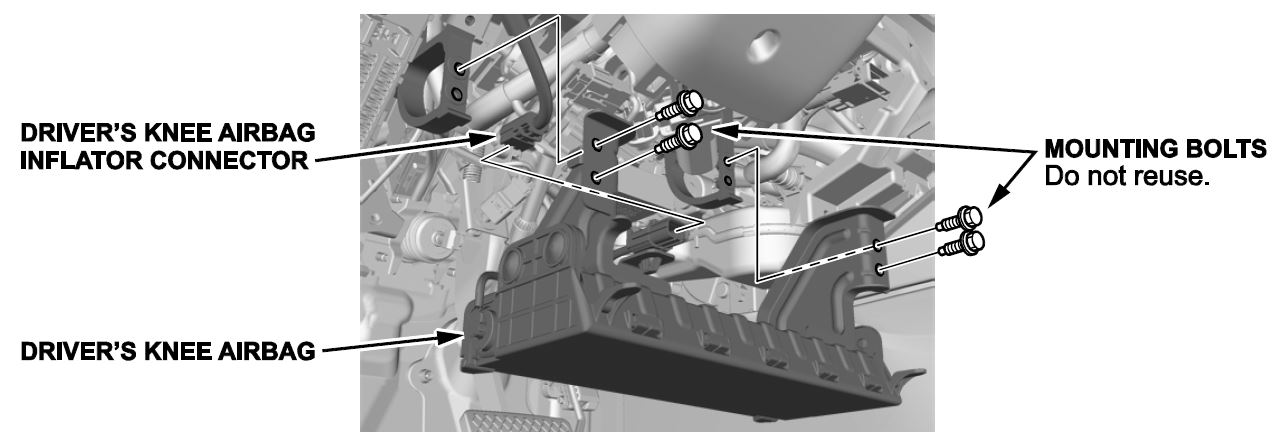
- Disconnect the driver’s knee airbag inflator connector, then remove the mounting bolts.
- MDX Only: Remove the driver’s side kick panel.
- MDX Only: Remove the driver’s side center console cover.
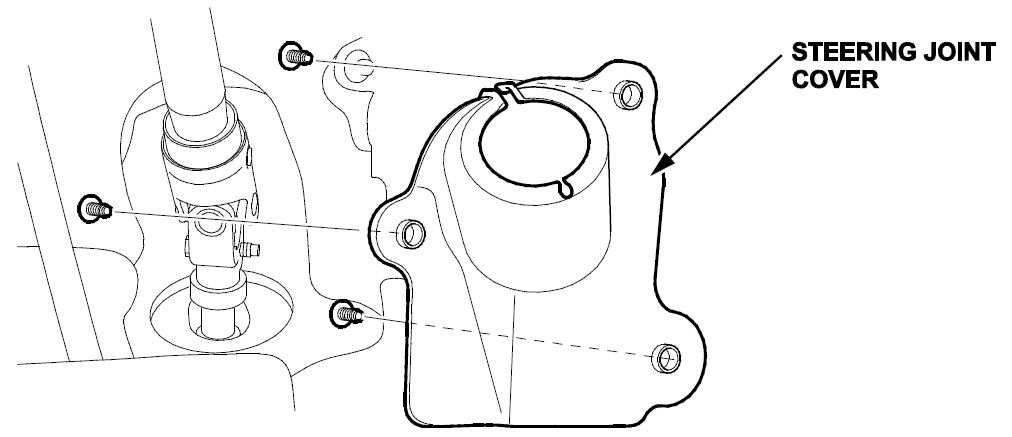
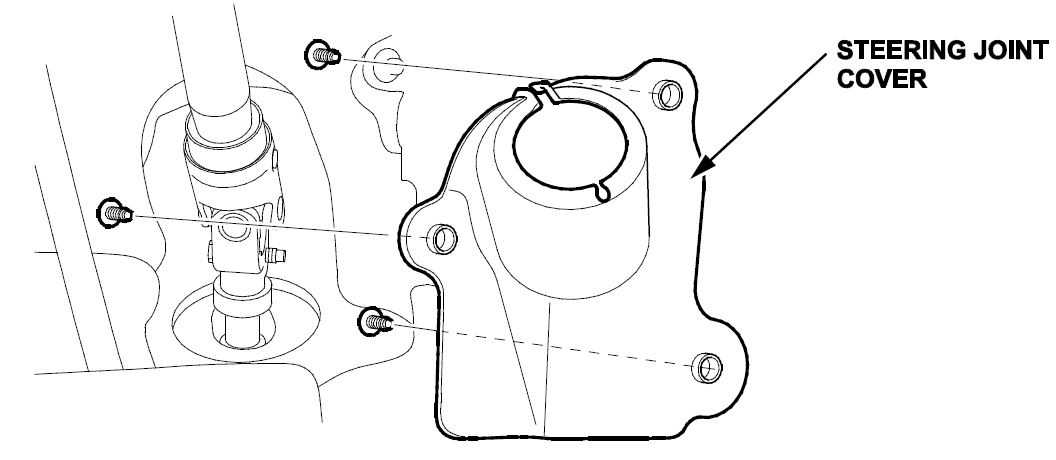
- Remove the steering joint cover.
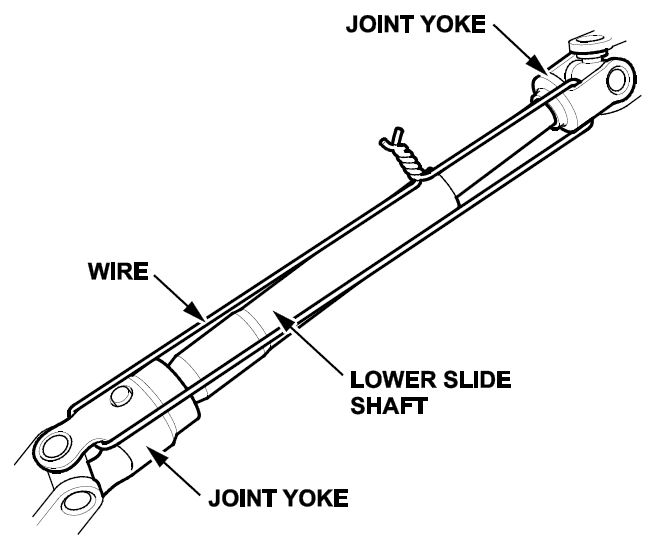
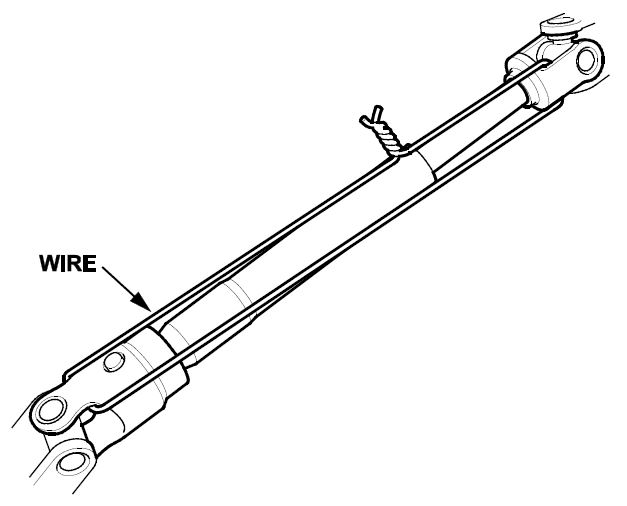
- Hold the lower side shaft on the column with a piece of wire between the joint yoke of the lower side shaft and the joint yoke of the upper shaft to prevent the lower slide shaft from pulling out.
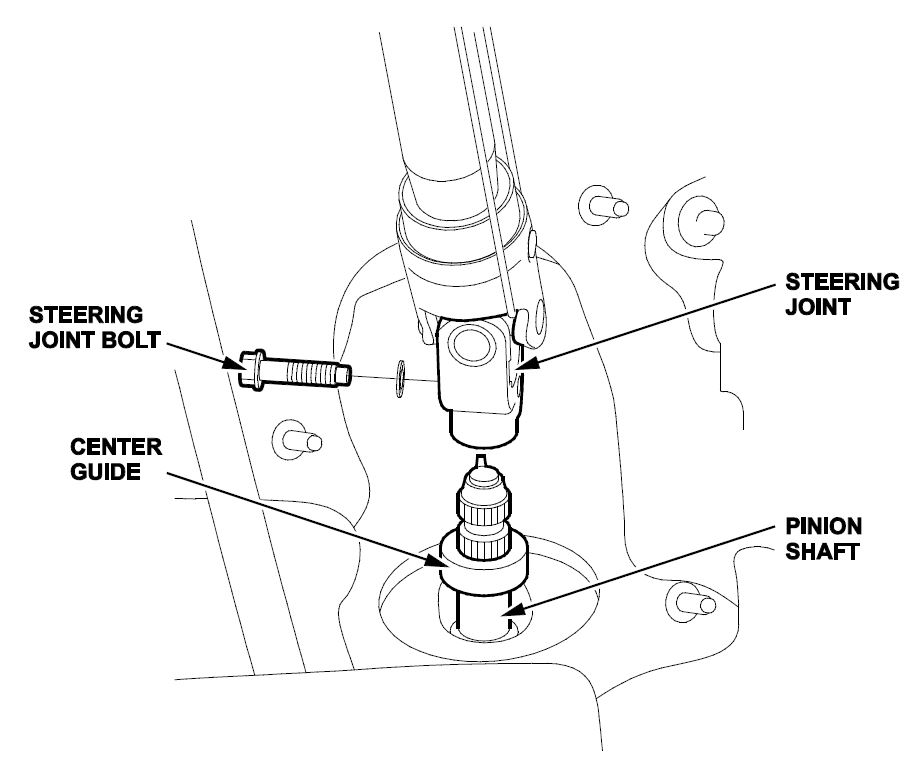
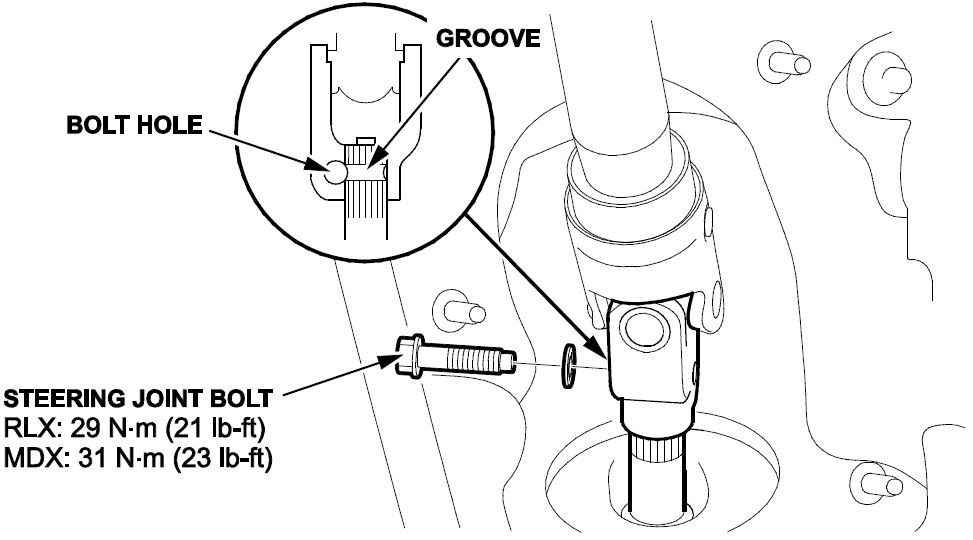
- Remove the steering joint bolt, then disconnect the steering joint from the pinion shaft.
NOTE: If the center guide is in place and has not moved, leave it in place. If the center guide has come off, discard it.
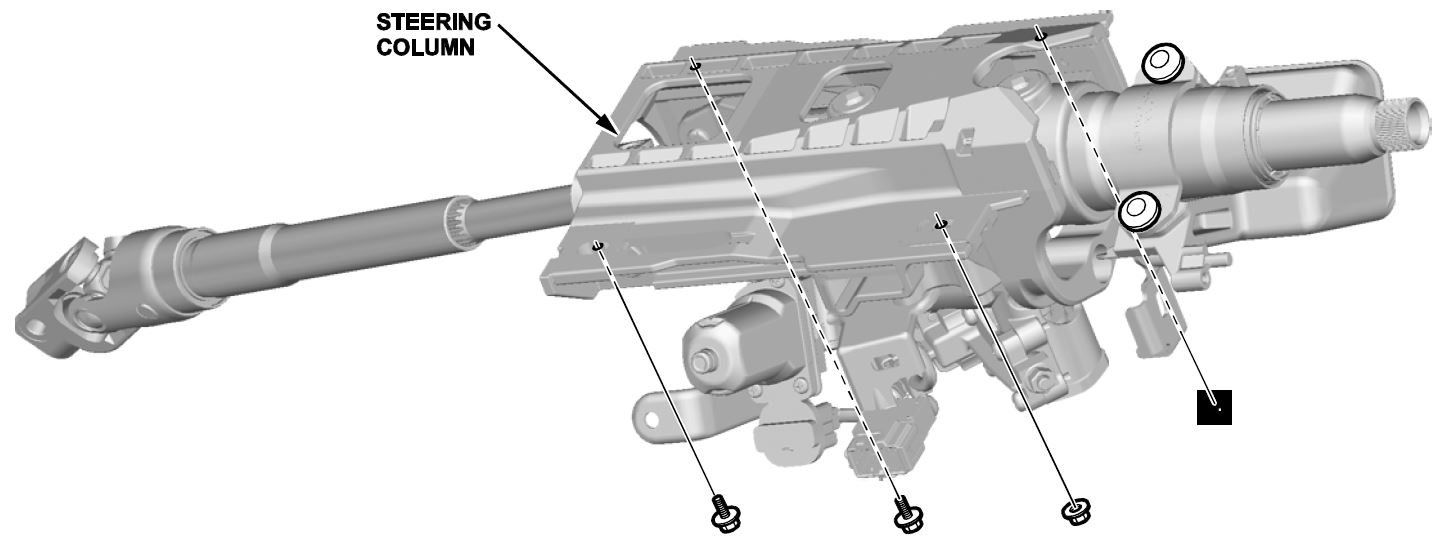
- Remove the steering column.
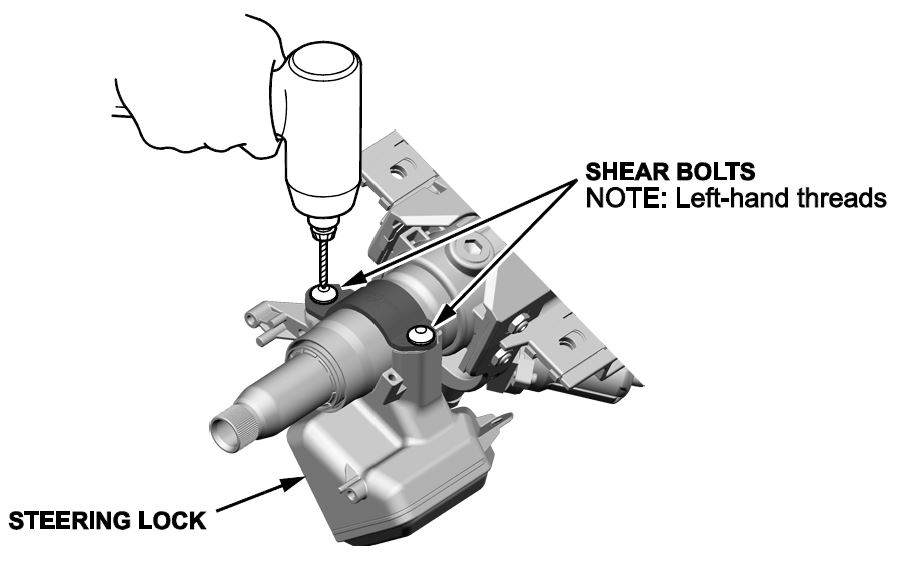
- 2014–15 RLX/MDX Only: Center punch both of the two shear bolts and drill out the heads with a 5 mm (0.20 in) drill bit.
NOTE: The shear bolts have left-hand threads.
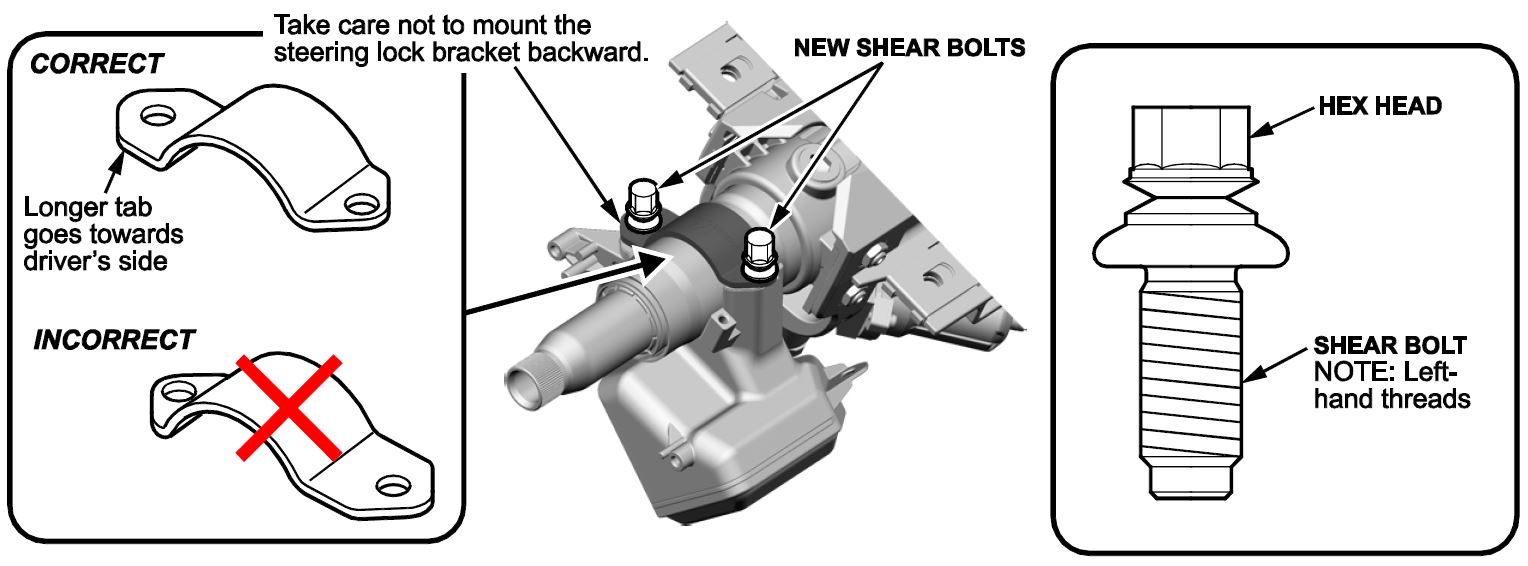
- Install the steering lock onto the new steering column with the new bracket and new left- hand thread bolts.
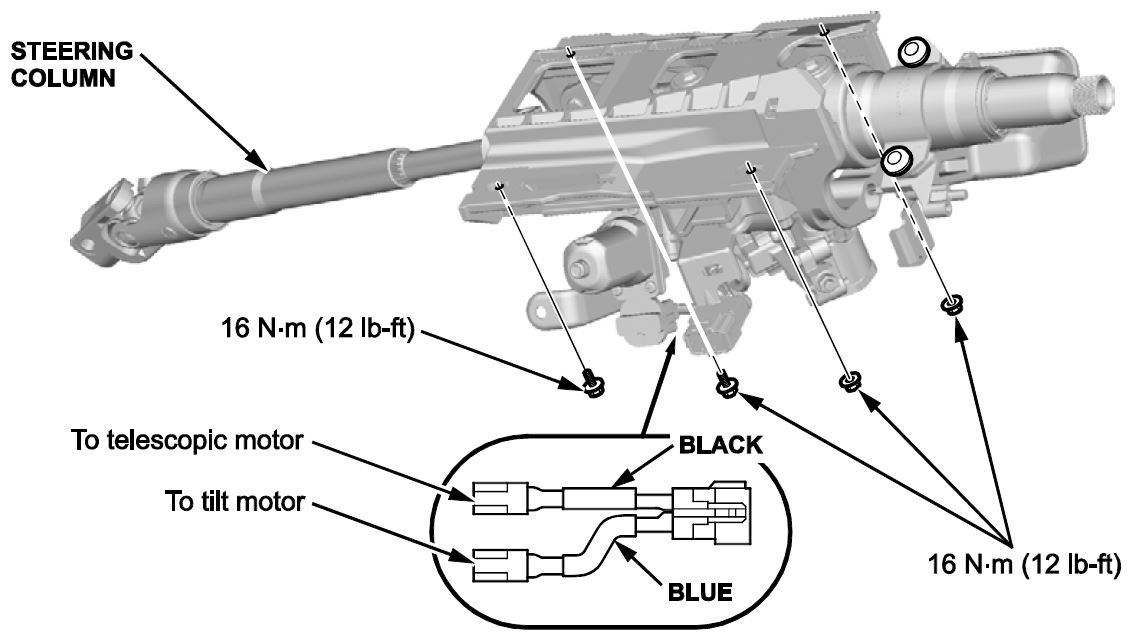
- Install the steering column.
NOTE: Make sure the connectors are securely connected and the wires are not caught or pinched by any parts.
- Remove the wire.
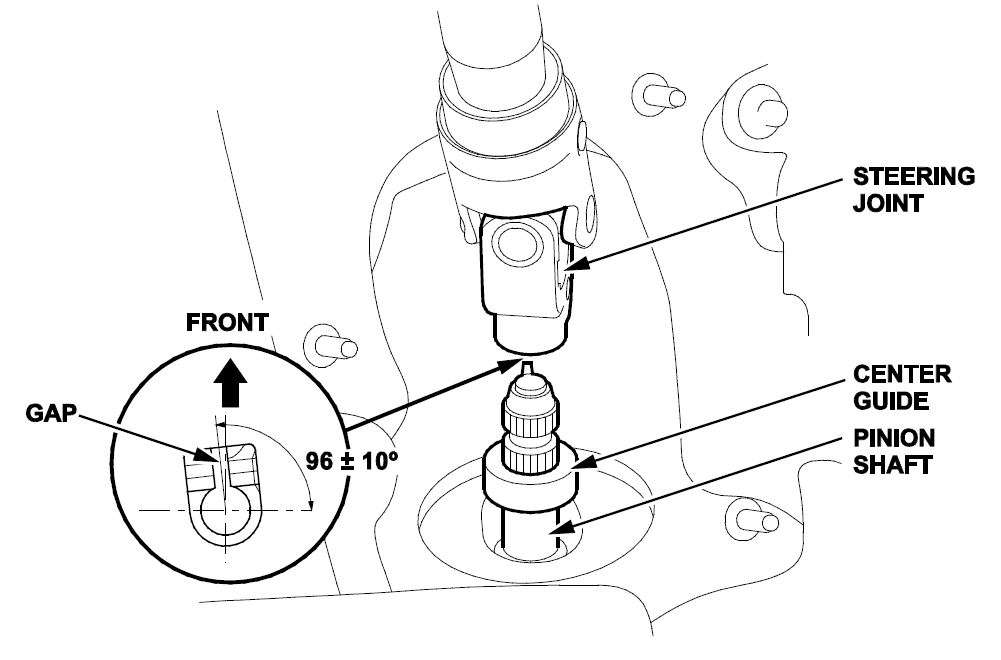
- Set the rack in the straight-ahead position and slip the steering joint onto the pinion shaft.
NOTE: If the pinion shaft has a guide, install the steering joint by aligning the center guide. If the pinion shaft does not have a guide, position the steering column by aligning the gap within the angle.
- Align the bolt hole on the steering joint with the groove around the pinion shaft and loosely install the steering joint bolt. Be sure the joint bolt is securely in the groove. Pull on the steering joint to make sure the bolt is fully seated, then tighten it to RLX 29 N∙m (21 lb-ft), MDX 31 N.m (23 lb-ft).
- Install the steering joint cover.
- Install the driver’s knee airbag and torque the new mounting bolts to 4 N∙m (6.9 lb-ft). Then, connect the driver’s knee airbag inflator connector.
- Install the combination switch body assembly and tighten the three screws in the numbered sequence as shown.
- Install the clips and connect the following connectors:
- Tilt/telescopic motors connector
- Cable reel connector A
- Cable reel connector B
- Steering angle sensor connector
- (2014–15 models only): Electric steering lock connector
- Install the clip and connect the combination switch connectors.
- Install the column cover.
- Install the driver’s dashboard lower cover.
- Install the steering wheel and tighten the new steering wheel bolt.
NOTE: The steering wheel bolt is coated with either a green or blue thread lock. The specified torque value varies depending on the type of steering wheel bolt used.
Green-Coated Bolts: 49 N∙m (36 lb-ft)
Blue-Coated Bolts: 60 N∙m (44 lb-ft).
- Install the driver’s airbag and torque the new Torx bolts to 4 N∙m (6.9 lb-ft).
- Do the battery terminal connection procedure.
- Check the wheel alignment and adjust it if necessary.
- Do the VSA sensor neutral position memorization procedure.
- MDX Only: Do the steering angle sensor neutral position clear procedure.
- RLX Only: Do the steering rack end stop position learning procedure.
- Do the driving position memory clear procedure.
NOTE: If the driving position memory is not cleared, the column will not have its full range of travel.
END
 Loading...
