| “This site contains affiliate links for which OEMDTC may be compensated” |
Service Bulletin
A20-043
June 19, 2020
Version 2
Safety Recall: 2018-19 Accord Fuel Pump Motor
Supersedes A20-043, dated May 29,2020, to revise the information highlighted in yellow
AFFECTED VEHICLES
| Year | Model | Trim Level | VIN Range |
| 2018-19 | Accord | 2.0L | Check the iN VIN status for eligibility. |
REVISION SUMMARY
- Under PARTS INFORMATION, additional text was added.
- Under REPAIR PROCEDURE step 9, the NOTES and substep 9.2 were revised.
BACKGROUND
Due to swelling of the fuel pump motor impeller, the fuel pump may seize and stop working. If this occurs, the engine may not start, or the engine could stall while driving, possibly increasing the risk of a crash.
CUSTOMER NOTIFICATION
Owners of affected vehicles will be sent a notification of this campaign.
Do an iN VIN status inquiry to make sure the vehicle is shown as eligible.
Some vehicles affected by this campaign may be in your new or used vehicle inventory.
Failure to repair a vehicle subject to a recall or campaign may subject your dealership to claims or lawsuits from the customer or anyone else harmed as a result of such failure. To see if a vehicle in inventory is affected by this safety recall, do a VIN status inquiry before selling it.
CORRECTIVE ACTION
Replace the fuel pump motor.
PARTS INFORMATION
NOTE
Due to limited supply, this will be a controlled part and will require a valid VIN when ordering.
| Part Name | Part Number | Quantity |
| Fuel Pump Motor Kit | 06170-TVC-306 | 1 |
For dealers experiencing a strong fuel smell from storing a fuel pump motor replaced under this service bulletin, the fuel pump motor may be disposed of immediately in accordance with local regulations. This only applies to the fuel pump motor replaced under this service bulletin. The published retention policy remains in effect for all other parts. If you have any questions about this exception or other parts retention issues, contact the WPI Administrative Office at 937-642-2737.
TOOL INFORMATION
| Part Name | Part Number | Quantity |
| Fuel Sender Wrench | 070AA-TLA0100 | 1 |
WARRANTY CLAIM INFORMATION
| Operation Number | Description | Flat Rate Time | Defect Code | Symptom Code | Template ID | Failed Part Number |
| 3101HK | Replace the fuel pump motor. | 1.2 hr | 6FE00 | F7I00 | A20043A | 17045-TVC-A03 |
REPAIR PROCEDURE
| WARNING |
| Fuel pump motor removal exposes fuel, which can ignite, causing a fire or explosion.
This can cause serious injury or death. Always work in a well-ventilated area and keep sparks or open flames away. |
- Relieve the fuel pressure.
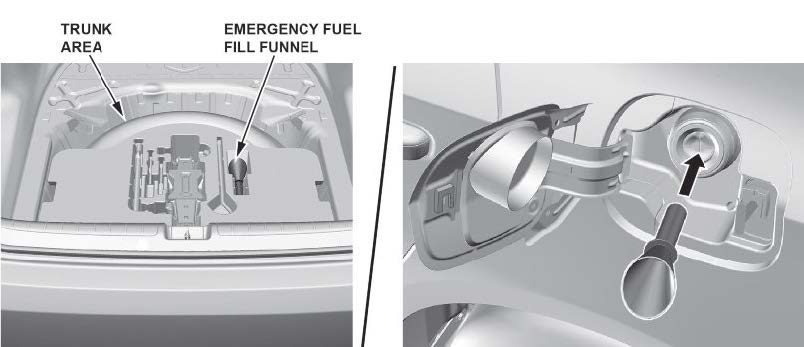
1.1 Insert the emergency fuel fill funnel into the fuel filler neck to relieve the pressure in the fuel tank.
NOTE
The emergency fuel fill funnel is in the trunk tool box.
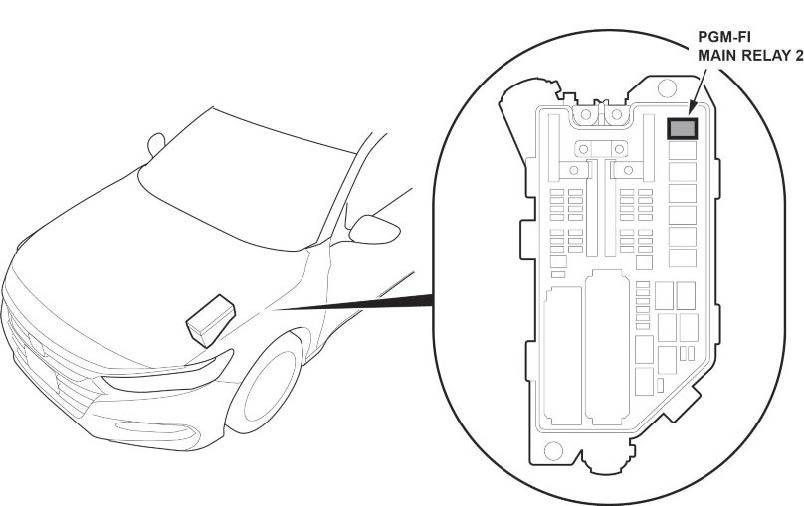
1.2 Remove PGM-FI main relay 2.
1.3 Start the engine, and let it idle until it stalls.
1.4 Turn the ignition to OFF.
1.5 Install PGM-FI main relay 2.
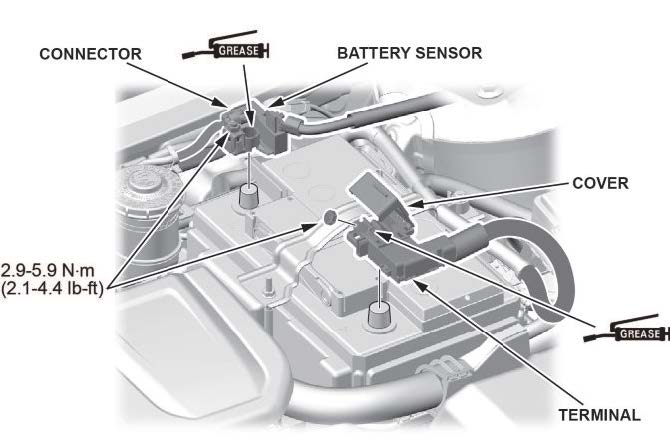
- Disconnect both 12-volt battery terminals.
NOTES
- Always disconnect the negative terminal first.
- To protect the terminal connector from damage, do not hold it when removing the terminal.
- Do not disconnect the 12-volt battery sensor from the cable.
- Remove the rear seat cushion.
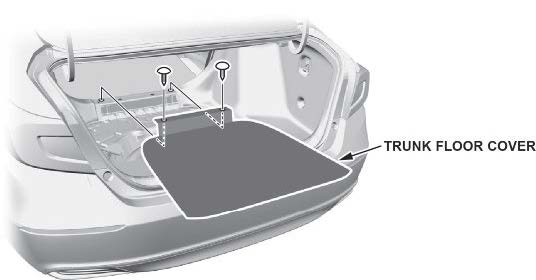
3.1 Remove the trunk floor cover.
3.2 Fold down the left and right-rear seat-backs.
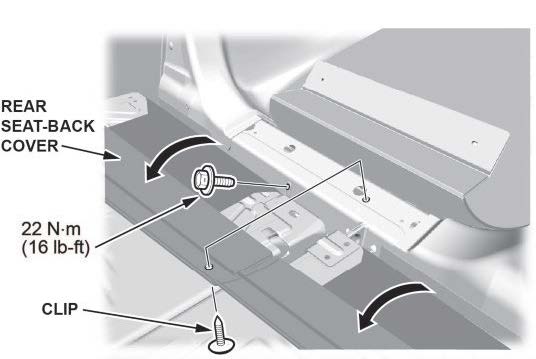
3.3 Remove the clip, then turn over the rear seat-back cover.
3.4 Remove the bolt.
3.5 Fold up the left and right-rear seat-backs.
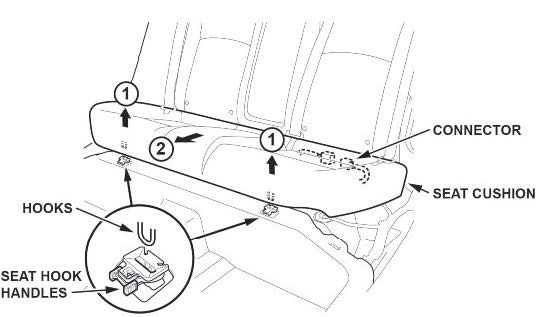
3.6 While pushing down on the seat cushion, pull the seat hook handles to release the hooks.
3.7 With rear seat heaters: Disconnect the connector.
3.8 Remove the rear seat cushion.
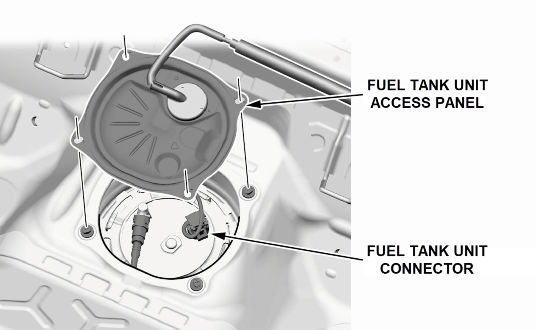
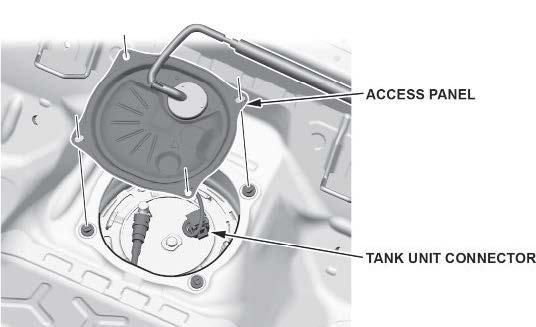
- Remove the fuel tank unit access panel and connector.
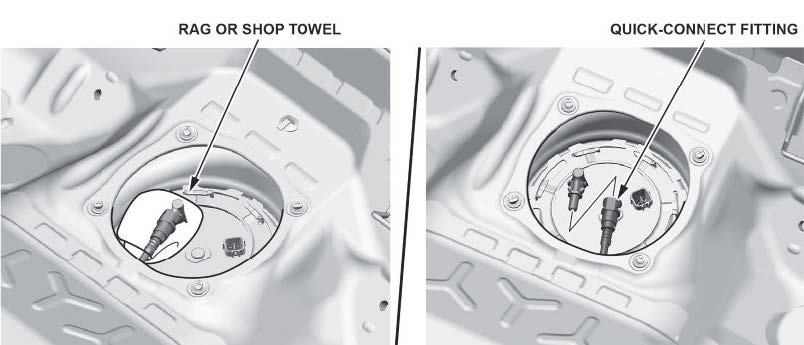
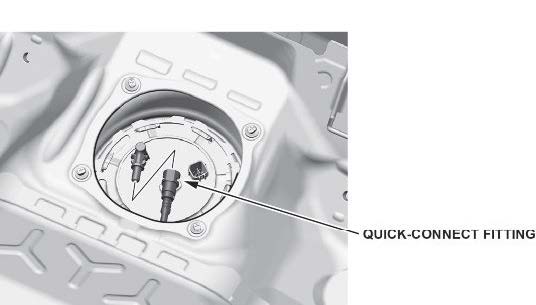
- Place a rag or shop towel over the quick-connect fitting, and disconnect it.
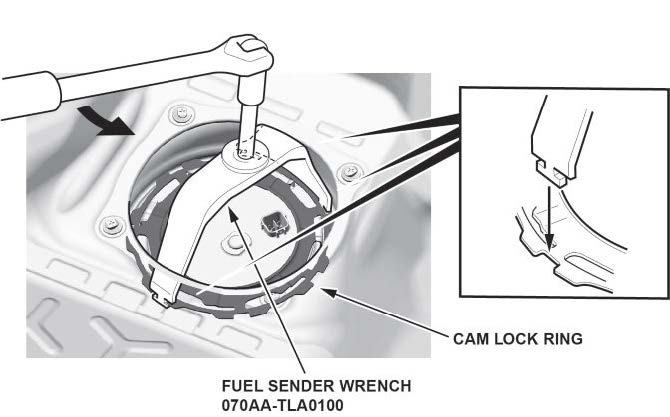
- Unlock the fuel tank unit cam lock ring using the fuel sender wrench (070AA-TLA0100
 ).
).
6.1 Set the fuel sender wrench as shown.
6.2 Turn the fuel tank unit cam lock ring counterclockwise.
NOTE
Keep the fuel sender wrench from floating.
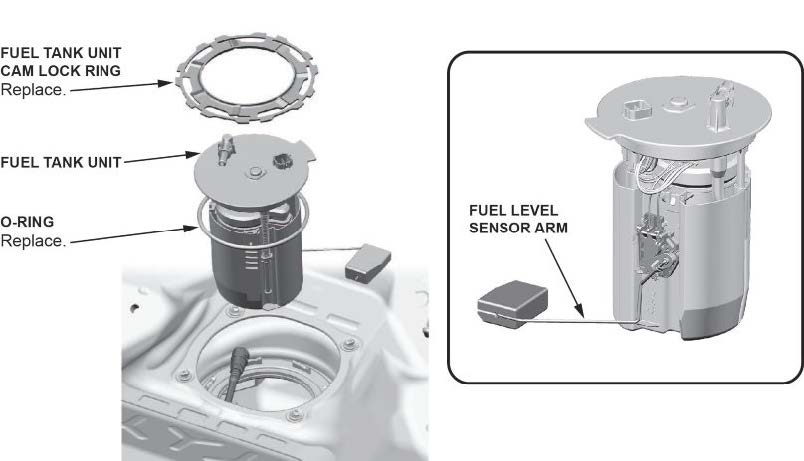
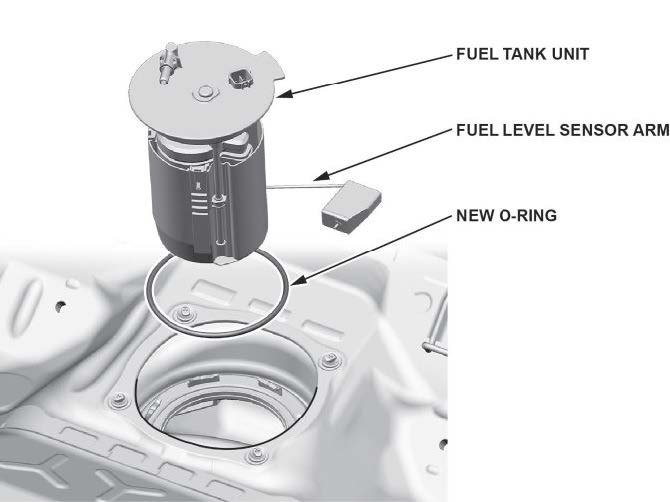
- Remove the fuel tank unit.
NOTE
Make sure not to bend or twist the fuel level sensor arm excessively.
- Disassemble the fuel tank unit.
8.1 Prepare the fuel pump and parts to be replaced.
NOTE
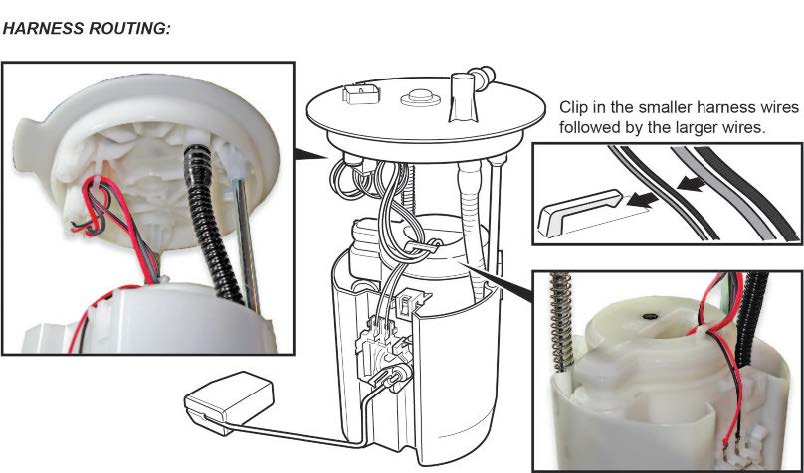
Take a photo of the fuel tube and wire harness, and note their routing for assembly. There are various types of routing.
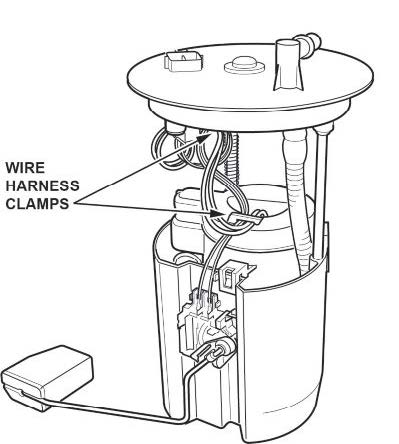
8.2 Spread the wire harness clamps, and remove the wire harness.
NOTES
- Make sure not to damage the wire harness.
- Do not spread the clamps too wide. Spreading the clamps too wide may damage them.
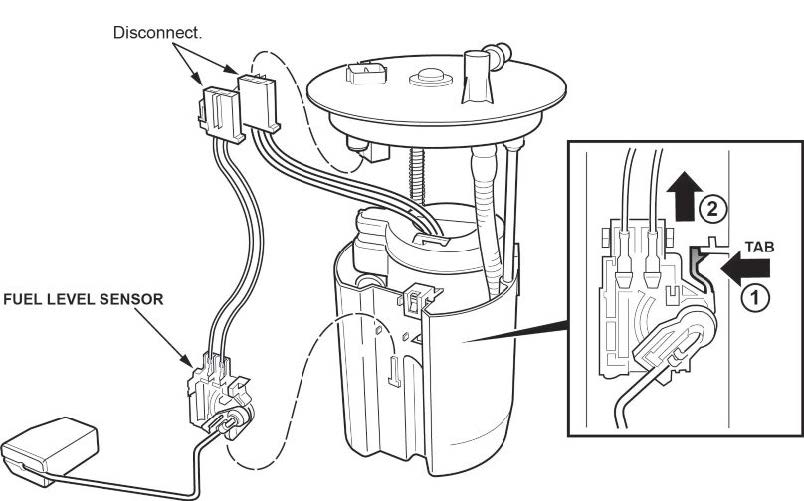
8.3 Remove the fuel level sensor.
-
-
- Disconnect the harnesses.
-
-
-
- Press the tab to release the lock (1). Then, push up on the fuel gauge sending unit (2).
- Remove the fuel level sensor from the fuel tank unit.
-
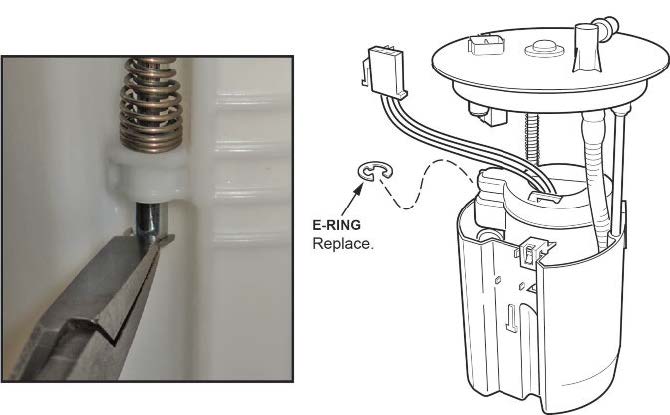
8.4 Remove the E-ring, and throw it away. Do not use it again.
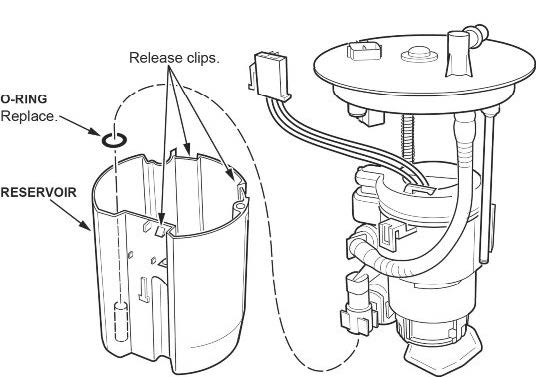
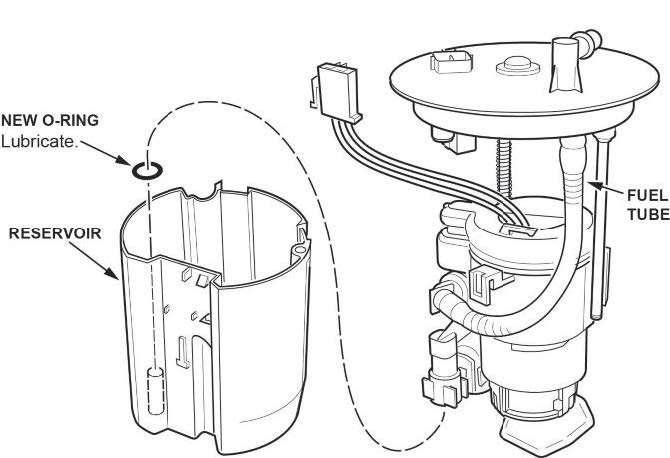
8.5 Remove the fuel filter assembly from the reservoir by releasing the three clips.
NOTES
- Do not spread the clips too wide. Spreading them too wide may damage them.
- If the O-ring remains on the fuel filter, use a flat-tip screwdriver wrapped in protective tape to remove it. Take care not to damage the O-ring seat section.
- The spring may slide off the sliding shaft. Retain this spring. It will be used during assembly.
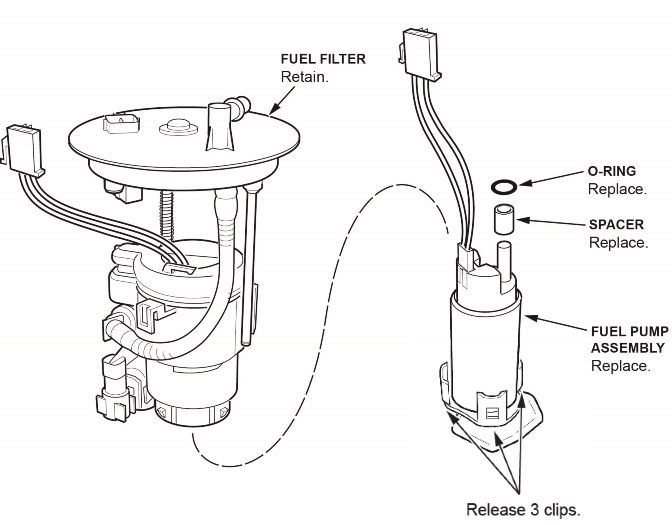
8.6 Remove the fuel pump assembly from the fuel filter.
-
-
- Release the three clips at the base of the fuel pump assembly.
- Pull the fuel pump assembly out of the fuel filter.
- If the O-ring remains on the fuel filter, use a flat-tip screwdriver wrapped in protective tape to remove it. Make sure not to damage the O-ring seat section.
-
- Assemble the fuel tank unit.
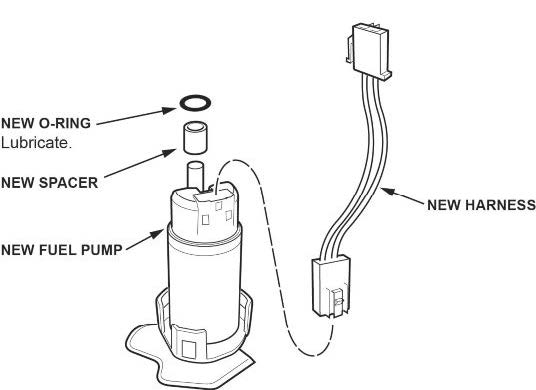
9.1 Install the new spacer, O-ring, and wire harness to the new fuel pump.
NOTES
- The O-ring must be installed on the pump as shown, not on the fuel filter side.
- Coat the O-ring with clean engine oil; do not use any other oil or fluid.
- Do not pinch the O-ring during installation.
- When connecting the wire harness, make sure the connection is secure and the connectors are firmly locked into place.
- Use all the new parts supplied in each replacement kit.
9.2 Place the fuel pump on a bench, then install the filter to the fuel pump.
9.3 Install the fuel filter assembly to the reservoir.
-
-
- Coat the O-ring with clean engine oil; do not use any other oil or fluid.
- Do not pinch the O-ring during installation.
- Insert the spring to the sliding shaft and make sure it is aligned when installing the fuel filter.
-
NOTES
- Make sure the fuel tube is routed exactly as shown in the photo taken before disassembly.
- Make sure the three release clips are fully engaged.
9.4 Install the new E-ring.
NOTE
After installation, make sure the E-ring can be rotated with your finger. If it cannot be rotated, the E-ring may not be fully seated or may be incorrectly installed.
9.5 Install the fuel level sensor to the reservoir. Make sure the lock is engaged.
NOTE
When installing the fuel level sensor, make sure the connection is secure and the connector is firmly locked into place. Be careful not to bend or twist it excessively.
9.6 Install the wiring harness to the clamps.
NOTES
- Clip in the smaller harness wires followed by the larger wires.
- Make sure not to damage the wire harness.
- Make sure the wire harness is routed exactly as shown in the photo taken before disassembly.
- Do not spread the clamps too wide. Spreading them too wide may damage them.
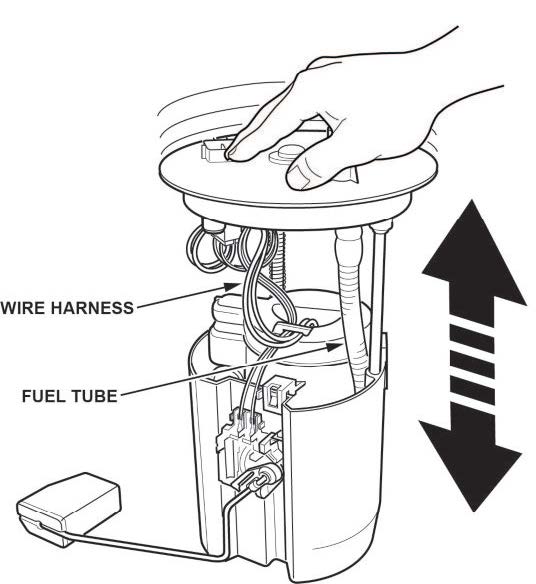
9.7 While compressing the fuel tank unit, make sure the movement is smooth and the fuel tube and wiring harness do not pinch or bind.
-
-
- Make sure the wire harness is not stretched.
- Make sure the fuel tube is not pinched.
-
- Install the fuel tank unit.
10.1 Partially insert the fuel tank unit into the fuel tank with a new O-ring.
NOTES
- Be careful not to damage the new O-ring.
- Do not coat the O-ring with any oil.
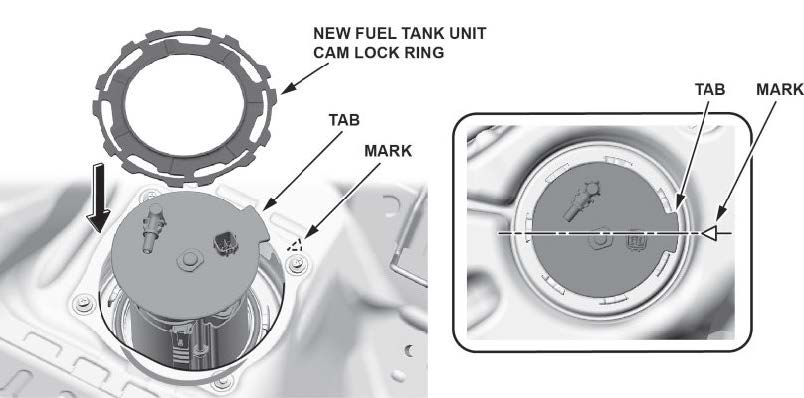
10.2 Line up the tab of the fuel tank unit as shown, and temporarily insert the new fuel tank unit cam lock ring.
- Lock the fuel tank unit cam lock ring.
NOTICE
If the cam lock ring is not properly installed, the fuel tank can be damaged and will require replacement.
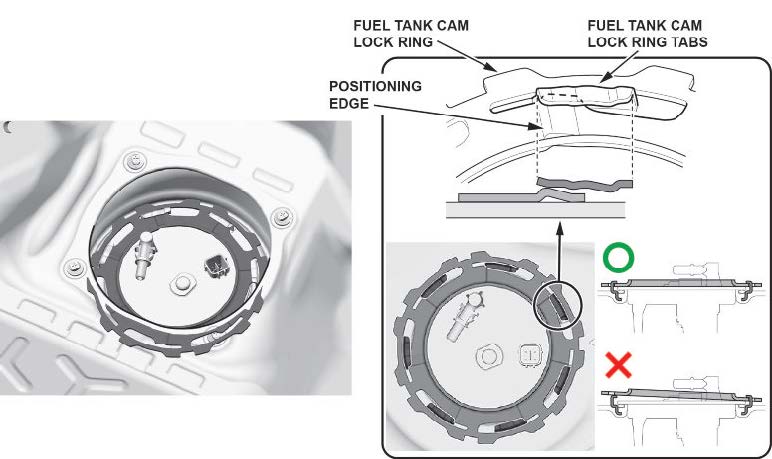
11.1 Rotate the fuel tank unit cam lock ring, and slide the fuel tank unit cam lock tabs to the positioning edge as shown, by hand.
NOTE
Make sure the fuel tank unit cam lock ring is not floating.
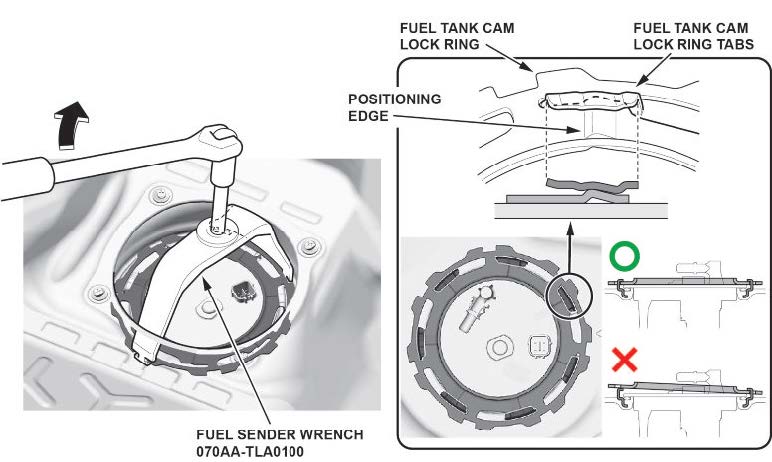
11.2 Turn the fuel tank unit cam lock ring clockwise using the fuel sender wrench.
NOTES
- Keep the fuel sender wrench from floating.
- Securely set the positioning edge of the fuel tank at the fuel tank unit cam lock ring tabs on the fuel tank unit cam lock ring as shown.
- Install the new retainer to the quick-connect fitting.
- Connect the fuel line quick-connect fitting.
- Connect the fuel tank unit connector.
- Check for fuel leaks.
15.1 Turn the ignition to ON, but do not start the engine. After the fuel pump runs for about 2 seconds, the fuel line will be pressurized. Repeat this two or three times, then make sure there is no fuel leakage.
- Install the fuel tank unit access panel.
- Install the remaining parts in the reverse order of removal.
- Clear all DTCs using an i-HDS.
- Do the VSA Sensor Neutral Position Memorization procedure.
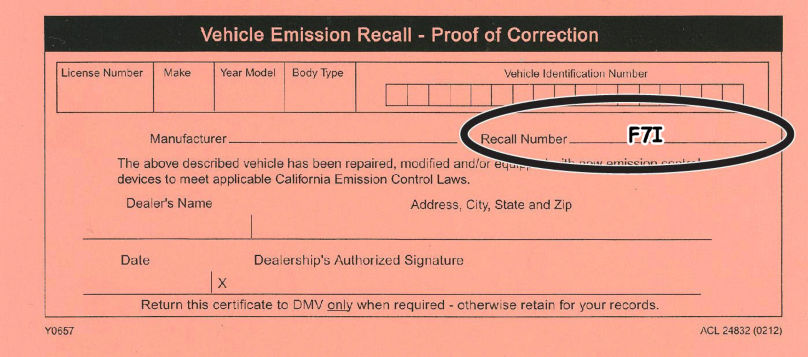
- California residents only: Fill out a Vehicle Emissions Recall – Proof of Correction certificate, and use F7I as the recall number. Have the service advisor give the certificate to your customer, and advise him or her to keep it as proof that the recall was completed. Your customer will need to submit this certificate to the DMV only if the DMV requests it. If you need more certificates, use reorder number Y0657.
END
July 2020
NHTSA Recall 20V-314
IMPORTANT SAFETY RECALL
This notice applies to your vehicle: XXXXXXXXXXXXXXXXX
Dear FIRSTNAME LASTNAME,
This notice is sent to you in accordance with the National Traffic and Motor Vehicle Safety Act.
WHAT IS THE REASON FOR THIS NOTICE?
Honda has decided that a defect which relates to motor vehicle safety exists in certain 2018 – 2019 model year Accord vehicles that may have a fuel pump module with out of specification impellers. Over time, these impellers may absorb an excessive amount of fuel and deform. A deformed impeller may cause the fuel pump to stop working.
SAFETY CONSEQUENCE
An inoperative fuel pump could prevent an engine from starting or cause a vehicle to stall while being driven, increasing the risk of a crash.
EMISSION CONSEQUENCE
The check engine light may illuminate as a result of this defect. Your vehicle may fail a state or local emissions inspection when such tests are required under state law if you do not have the repair done.
WHAT WILL HONDA DO?
DO?
The dealer will replace the fuel pump assembly for free.
WHAT SHOULD YOU DO?
Please call any authorized Honda dealer and make an appointment to have your vehicle’s fuel pump assembly replaced for free. Once you make an appointment for your vehicle, be advised that the replacement process may take approximately 1 hour and 15 minutes. However, your dealer can provide you with a better estimate of the overall time for this service visit, as it may be necessary to make your vehicle available for a longer period of time. If you are not the only driver of this vehicle, please advise all other drivers and passengers of this important information.
CHECK YOUR VEHICLE FOR OPEN RECALLS
You can check your vehicle’s eligibility for repair under this or any other recall. Please access the Honda Recall Lookup tool at www.recalls.honda.com and enter your Vehicle Identification Number (VIN).
CALIFORNIA OWNERS ONLY
The DMV will not renew your vehicle’s registration until this emissions recall has been completed. After completing the repair procedure, your dealer will give you a Vehicle Emission Recall – Proof of Correction certificate. Please make sure the dealer completes and provides you the certificate. Keep the certificate for your records as proof that the emissions recall was completed. Submit the certificate to the DMV only if the DMV requests it.
EMISSION WARRANTY
In order to ensure your full protection under the emission warranty provisions, it is recommended that you have your vehicle repaired as soon as possible. Failure to do so could be determined as lack of proper maintenance.
OWNER INFORMATION
You received this notice because government regulations require that notification be sent to the last known owner of record. Our records are based primarily on state registration and title information, which indicate that you are the current owner of this vehicle. If this is not the case, or if any of the information is not correct, please complete, sign and return the Information Change Card and we will then update our records. If you are a lessor of this vehicle, federal regulations require you to forward this notice to your lessee within ten days.
DO YOU STILL HAVE MORE QUESTIONS?
If you have questions or concerns, we encourage you to:
- contact your local Honda
 automobile dealer; or
 - call American Honda
 ’s Customer Support & Campaign Center at 1-888-234-2138 Monday through Friday, 6:00 a.m. to 5:00 p.m., Pacific Time; or
 - email or chat by going to https://owners.honda.com/help/customer-relations; or
- visit Twitter @HondaCustSvc; or
- visit recalls.honda.com to use “Ask Dave”, our 24/7 virtual agent.
If you believe that American Honda or the dealer has failed or is unable to remedy the defect in your vehicle, without charge and within a reasonable period of time (60 days from the date you first contact the dealer for a repair appointment), you may submit a complaint to the Administrator, National Highway Traffic Safety Administration (NHTSA), 1200 New Jersey Ave., SE, Washington, DC 20590.
Alternatively, you may call the NHTSA toll-free Safety Hotline at 888-327-4236 (TTY 800-424-9153), or go to https://www.safercar.gov. We apologize for any inconvenience this recall may cause you.
Sincerely,
American Honda Motor Co., Inc.
Campaign #F7I / Service Bulletin #20-043
Julio del 2020
Campaña de seguridad NHTSA 20V-314
CAMPANA DE SEGURIDAD IMPORTANTE
Esta notificación aplica a su vehículo: XXXXXXXXXXXXXXXXX
Estimado FIRSTNAME LASTNAME,
Esta notificación ha sido enviada a usted de acuerdo con el decreto de la oficina de Administración Nacional de Seguridad del Tráfico en las Carreteras (National Highway Traffic Safety Administration o NHTSA por sus siglas en inglés).
¿CUÁL ES EL MOTIVO DE ESTA NOTIFICACIÓN?
Honda ha determinado que existe un defecto el cual está relacionado con la seguridad del vehículo en algunos vehículos modelo Accord año modelo 2018 – 2019 que pueden tener un módulo de la bomba de combustible con impulsores fuera de especificación. Con el paso del tiempo, estos impulsores pueden absorber una cantidad excesiva de combustible y deformarse. Un impulsor deformado puede ocasionar que la bomba de combustible deje de funcionar.
CONSECUENCIA DE SEGURIDAD
Una bomba de combustible inoperativa puede prevenir que un motor no arranque u ocasionar que un vehículo se detenga cuando es conducido, aumentando el riesgo de un choque.
CONSECUENCIA DE EMISIÓN
La luz indicadora de fallas (verificar el motor) puede iluminarse como resultado de este defecto. Su vehículo puede fallar una inspección de emisiones local o estatal cuando tales pruebas sean requeridas bajo la ley estatal si usted no completa la reparación.
¿QUÉ HARÁ HONDA ?
?
El concesionario reemplazará el conjunto de la bomba de combustible de forma gratuita.
¿QUÉ DEBE HACER USTED?
Por favor llame a cualquier concesionario autorizado Honda y haga una cita para el reemplazo del conjunto de la bomba de combustible del vehículo de forma gratuita. Una vez que programe una cita para su vehículo, le avisamos que el proceso de reemplazo puede tardar aproximadamente 1 hora y 15 minutos. No obstante, su concesionario le puede ofrecer un mejor estimado del tiempo total de esta visita de servicio, ya que pudiera ser necesario que su vehículo esté disponible por un periodo más largo. Si usted no es el único conductor de este vehículo, por favor informe a todos los conductores y pasajeros sobre esta información importante.
VERIFIQUE SI SU VEHÍCULO TIENE UNA CAMPAÑA DE SEGURIDAD PENDIENTE
Puede verificar la elegibilidad de su vehículo para que sea reparado bajo esta campaña de seguridad o bajo cualquier otra. Por favor acceda la herramienta “Honda Recall Lookup” en www.recalls.honda.com e ingrese su número de identificación del vehículo (VIN).
SOLAMENTE PROPIETARIOS EN CALIFORNIA
El DMV no renovará su registro del vehículo hasta que esta campaña de seguridad de emisiones haya sido completada. Después de completar este procedimiento de reparación, su concesionario le entregará un certificado de Prueba de Corrección – Campaña de seguridad de emisiones del vehículo (Vehicle Emissions Recall – Proof of Correction). Por favor asegúrese que el concesionario complete y le otorgue el certificado. Mantenga el certificado para sus registros como prueba que la campaña de emisiones fue completada. Envíe el certificado para el DMV solamente si el DMV lo solicita.
GARANTÍA DE EMISIONES
A fin de garantizar su protección completa bajo las disposiciones con respecto a la garantía de emisiones, se recomienda que haga que su vehículo sea reparado tan pronto sea posible. De no hacerlo podría determinarse como una falta de mantenimiento adecuado.
INFORMACIÓN DEL PROPIETARIO
Usted recibió esta notificación porque las regulaciones gubernamentales requieren que esta notificación sea enviada al último propietario registrado. Nuestros registros están basados principalmente en la información del título y registro en el estado, el cual indica que usted es el propietario actual de este vehículo. Si no es el caso o si la información no está correcta, por favor complete, firme y devuelva la tarjeta de Cambio de información anexa y nosotros actualizaremos nuestros registros. Si usted es el arrendador de este vehículo, las regulaciones federales requieren que usted envié una copia de esta notificación a su arrendatario en un lapso de diez días.
¿USTED TODAVÍA TIENE MÁS PREGUNTAS?
Si usted tiene preguntas o inquietudes, le recomendamos que:
- se comuníquese con su concesionario de automóviles Honda
 local; o
 - llame al Centro de Apoyo al Cliente y Campañas de American Honda
 al 1-888-234-2138 de lunes a viernes, 6:00 a.m. a 5:00 p.m., hora del Pacífico; o
 - por correo electrónico o chat en https://owners.honda.com/help/customer-relations; o
- visite Twitter @HondaCustSvc; o
- visite recalls.honda.com
Si usted cree que American Honda o el concesionario ha fallado o no le es posible reparar el defecto en su vehículo, sin cobro alguno y dentro de un período de tiempo razonable (60 días desde la fecha en que usted contactó por primera vez el concesionario para la cita de la reparación), usted puede enviar una queja a: Administrator, National Highway Traffic Safety Administration (NHTSA), 1200 New Jersey Ave., SE, Washington, DC 20590. Alternativamente, usted también puede comunicarse con el número de llamada sin costo (Toll-free) Safety Hotline de NHTSA al 888-327-4236 (TTY 800-424-9153), o visitar la página web https://www.safercar.gov.
Le pedimos disculpas por cualquier inconveniente que esta campaña de seguridad pudiera causarle. Atentamente,
American Honda Motor Co., Inc.
Campaña #F7I / Boletín de servicio #20-043
Remedy Instructions and TSB
RCRIT-20V314-3572.pdf 1985.283KB
 Loading...
Remedy Instructions and TSB
RCRIT-20V314-3291.pdf 1982.264KB
 Loading...
ISSUED Owner Notification Letter(Part 577)- F7I – 2018-2019 Accord
RCONL-20V314-9457.pdf 196.432KB
 Loading...
Latest Recalls Documents
- Deep Cleans GDI (Gasoline Direct Injection) / PFI (Port Fuel Injection) Intake Valves, As Well As, The Throttle Body, Intake Ports, Fuel Injectors and Combustion Chambers
- Helps Restore Fuel Economy and Maximize Horse Power
- Removing Carbon and Fuel Deposits From Gasoline Engines Intake Valves, Intake Ports and Turbos Is Essential to Ensuring Optimal Vehicle Performance.
- Made with Carbon Clear and Trade, the Most Advanced P.E.A. Cleaning Agent Available
- Strong Enough to Cut Through Thick Carbon Deposits, Even at Extreme Engine Temperatures
- Formulated for Use In All Fuel-Injected Gasoline Engines, Including GDI
- Contains Polyetheramine (“PEA”) to Dissolve Carbon Buildup in Combustion Chambers
- Cleans ALL Types of Intake Valves, Including Those Found in PFI, TBI, and GDI Engines
- Safe On Catalytic Converters and Oxygen Sensors
- Not For Use In Diesel Engines
- Increases power output
- Restores fuel efficiency
- Restores performance
- BG Platinum Air Intake, Valve & Combustion Chamber Cleaner is a diverse blend of cleaning ingredients that break through the nearly impenetrable deposit exterior and deliver potent detergents to the vulnerable center
- Restores MPG
- Restores engine performance
- Restores power
- Reduces harmful emissions
- Requires pressurized tool
- One New Aftermarket Replacement Turbo Ii Pre-Cleaner For Model 46 (With 4.5" Inlet) That Features Ev
- OEM Numbers Are Provided for Reference Only. Please Verify Fit Prior To Ordering.
- Please Note: Some Listings Use Stock Images for Reference and May Differ from the Actual Product.
- This Aftermarket Part Is Made to Meet or Exceed Manufacturer (OEM) Specifications.
- Air Filter Cold Air Intake Filter Breather 12mm
Last update on 2025-05-08 / Affiliate links / Images from Amazon Product Advertising API
This product presentation was made with AAWP plugin.
