| “This site contains affiliate links for which OEMDTC may be compensated” |
A00-006
March 31, 2006
Applies To:
1988–00 Civic – ALL
1997–01 CR-V – ALL
1993–97 Del Sol – ALL
Clunk or Squeak From Rear Suspension
(Supersedes 00-006, dated December 11, 2001, to update the information marked by the black bars)
SYMPTOM
A clunk or squeak from the rear suspension when going over rough or bumpy roads.
PROBABLE CAUSE
Broken rear trailing arm bushing(s).
CORRECTIVE ACTION
Replace the rear trailing arm bushing(s).
PARTS INFORMATION
| Rear Trailing Arm Bushing: | P/N | H/C |
| 1988–00 Civic and 1993–97 Del Sol | 52385-SR3-000 | 4098299 |
| 1997–01 CR-V | 52385-SR3-003 | 7424773 |
TOOL INFORMATION
| T/N | H/C | |
| Trailing Arm Bushing Installation Set | 07AAF-SK7A130 | 8283822 |
WARRANTY CLAIM INFORMATION
In warranty: The normal warranty applies.
| OP# | Description | FRT |
| 419104 | Replace right bushing | 0.9 |
| 419103 | Replace left bushing | 0.9 |
| 419102 | Replace both bushings | 1.8 |
| 431311 | Check two-wheel alignment | 0.6 |
| Failed Part: | 1988–00 Civic and 1993–97 Del Sol: P/N 52385-SR3-000 H/C 40982991997–01 CR-V: P/N 52385-SR3-003 H/C 7424773 |
| Defect Code: | 01801 Symptom Code: 04205 |
| Skill Level: | Repair Technician |
Out of warranty: Any repair performed after warranty expiration may be eligible for goodwill consideration by the District Parts and Service Manager or your Zone Office. You must request consideration, and get a decision, before starting work.
REPAIR PROCEDURE
NOTE: ISIS online service manual information is only available for vehicles 1990 and newer.
- Remove the rear trailing arm:
- Refer to the suspension section of the appropriate service manual, or
- Online, enter keyword REAR SUSPENSION, then select Suspension Arms Replacement from the list.
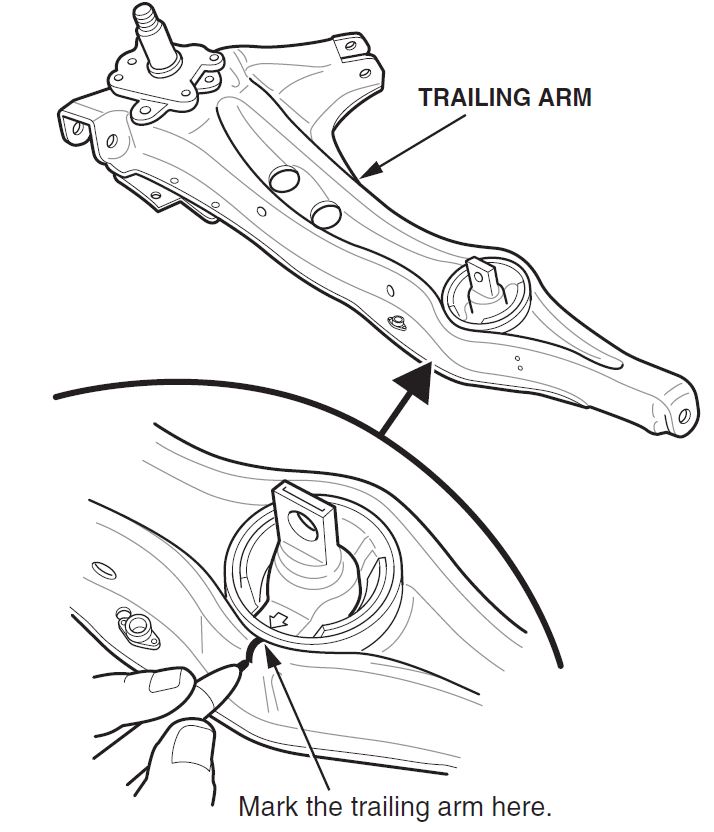
- Mark the trailing arm at the arrow on the bottom of the bushing.
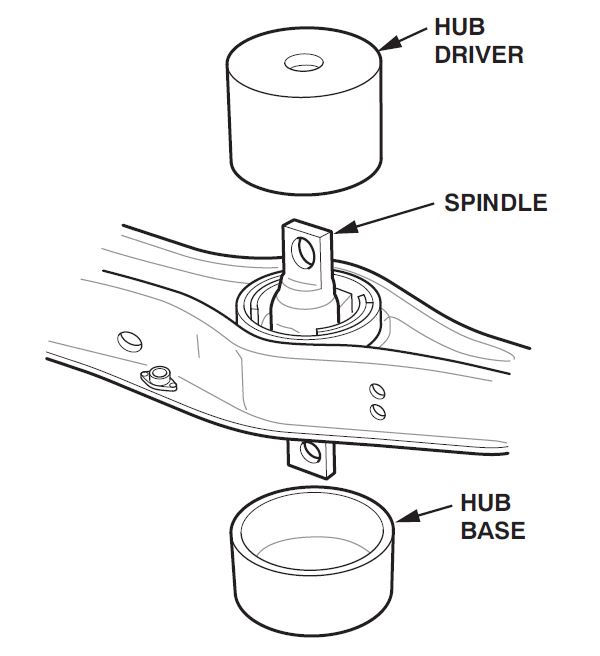
- Place the arm on a hydraulic press, supported by the hub base, with the spindle facing up.
- With the hub driver, press the old bushing out of the trailing arm.
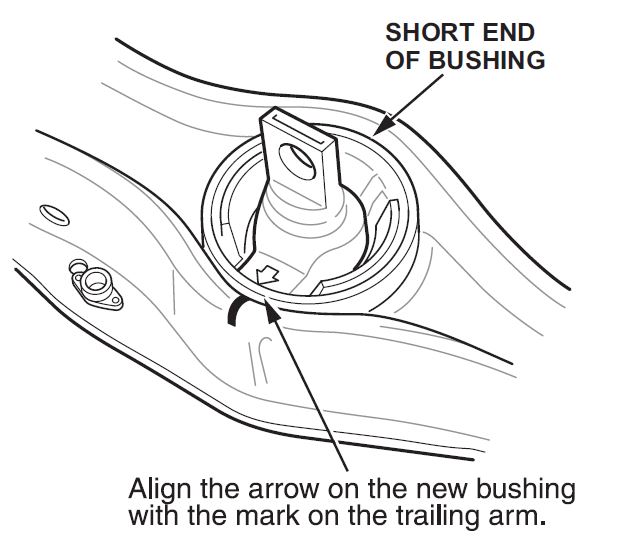
- Install the new bushing with the short end toward the outside of the vehicle. Align the arrow with the mark you made on the trailing arm.
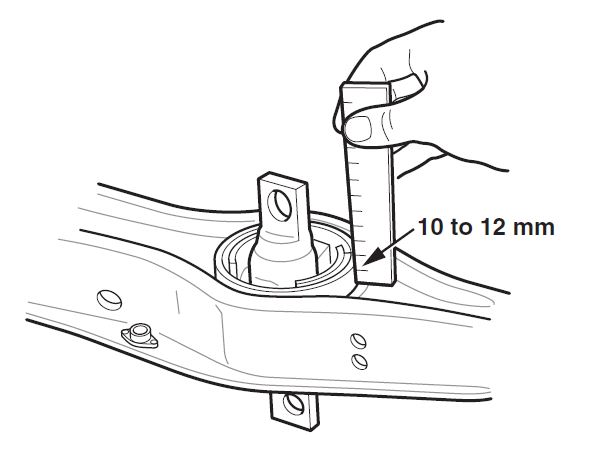
- Press the new bushing into the trailing arm until its edge is 10 to 12 mm above the surface of the arm.
- Reinstall the trailing arm.
- If necessary, repeat steps 1 thru 7 to install a new bushing in the other rear trailing arm.
- Bleed the brake system:
- Refer to the brakes section of the appropriate service manual, or
- Online, enter keyword BLEED, then select Brake System Bleeding from the list.
- Check the wheel alignment, and adjust it if needed:
- Refer to the suspension section of the appropriate service manual, or
- Online, enter keyword WHEEL ALIGNMENT, then select Wheel Alignment – Rear Toe Inspection/Adjustment from the list.
 Loading...


