
Service Bulletin
A18-034
April 16, 2018
Version 1
Clicking from the Driver’s Power Seat While Using the Height or Tilt Adjustment
AFFECTED VEHICLES
| Year | Model | Trim | VIN Range |
| 2016-18 | Pilot | EX, EX-L, Touring, Elite | ALL |
| 2017-19 | Ridgeline | RT-L, RTL-T, RTL-E, Black Edition | ALL |
SYMPTOM
When adjusting the driver’s seat height or tilt, the power seat does not move or moves just a small amount and clicks loudly during operation.
POSSIBLE CAUSES
The vertical transmission assembly (VTA) unit has a stripped internal gear.
CORRECTIVE ACTION
Replace the height adjust VTA unit and/or tilt adjust VTA unit.
TOOL INFORMATION
| Part Name | Tool Number | Quantity |
| Meshing Tool | 07AAF-2GAA100 | 1 |
| U-Joint Removal Tool – See note below before ordering. | OTC7248
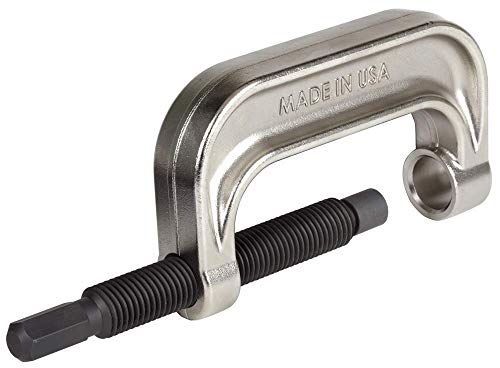
OTC 7248 U-Joint Removal/Installing Tool
| 1 |
| Adapter G – See note below before ordering. | 07XAF-001050B | 1 |

NOTES
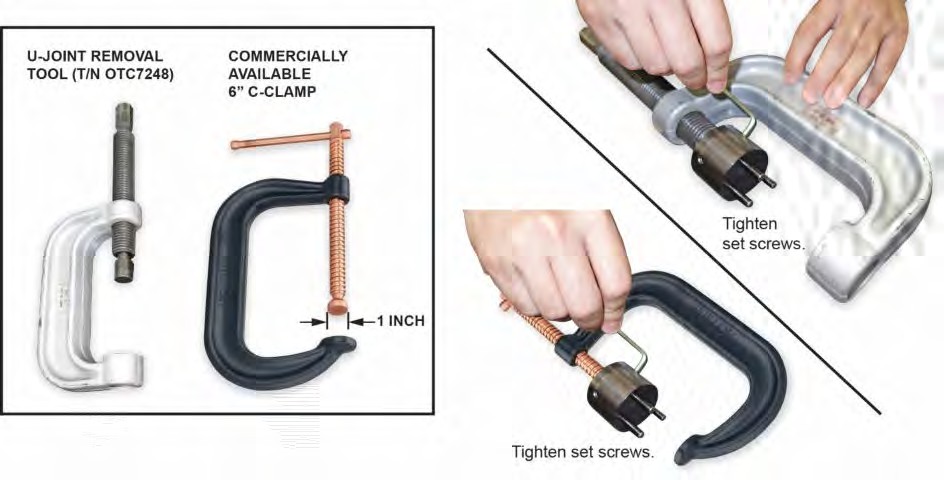
- The U-Joint Removal Tool and Adapter G can be substituted with a commercially available 6-inch C-clamp with a 1-inch foot.
- The U-Joint Removal Tool is a required dealer tool. If you need another one, call the Honda Tool and Equipment program at 888-424-6857.
PARTS INFORMATION
NOTE
The VTA unit is universal. The same unit is used for either tilt or height.
| Part Name | Part Number | Quantity |
| VTA Unit (Tilt or Height) for driver’s side with non-memory seat (Includes grease and 3 nuts) | 81603-T2F-A31 | 1 |
| VTA Unit (Tilt or Height) for driver’s side with memory seat (Includes grease and 3 nuts) | 81603-T2F-A51 | 1 |
WARRANTY CLAIM INFORMATION
The normal warranty applies.
| Operation Number | Description | Flat Rate Time | Defect Code | Symptom Code | Template ID | Failed Part Number |
| 7491A5 | Replace the height VTA unit (non-memory seat). | 1.0 hrs | 01801 | 04202 | A18034A | 81603-T2F-A31 |
| 7491A3 | Replace the tilt VTA unit (non-memory seat). | 1.0 hrs | 01801 | 04202 | A18034B | 81603-T2F-A31 |
| 7491D8 | Replace both VTA units (non-memory seat). | 1.1 hrs | 01801 | 04202 | A18034C | 81603-T2F-A31 |
| 7491A5 | Replace the height VTA unit (memory seat). | 1.0 hrs | 01801 | 04202 | A18034D | 81603-T2F-A51 |
| 7491A3 | Replace the tilt VTA unit (memory seat). | 1.0 hrs | 01801 | 04202 | A18034E | 81603-T2F-A51 |
| 7491D8 | Replace both VTA units (memory seat). | 1.1 hrs | 01801 | 04202 | A18034F | 81603-T2F-A51 |
Skill Level: Repair Technician
INSPECTION
NOTES
- Before replacing a VTA unit, check which VTA unit is causing the noise and replace only the affected unit.
- In most cases, only one VTA unit is damaged. It is rare to replace both.
Height Adjust VTA
Adjust the seat height. If you hear a loud clicking or ratcheting from the seat height VTA unit and the height adjustment does not move very much, go to REPAIR PROCEDURE A (HEIGHT ADJUST VTA REPLACEMENT).
Tilt Adjust VTA
Adjust the seat tilt. If you hear a loud clicking or ratcheting from the seat tilt VTA unit and the tilt adjustment does not move very much, go to REPAIR PROCEDURE B (TILT ADJUST VTA REPLACEMENT).
SETTING UP THE MESHING TOOL
- Make sure the set screws are installed on the meshing tool. If they are not installed, install them without passing through the inner cutout of the tool.
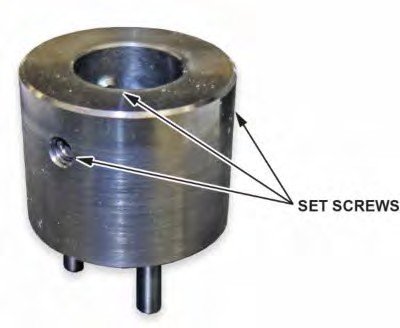
- Install the meshing tool onto the U-Joint Removal Tool (T/N OTC7248) or universal 6-inch C-clamp. Hand tighten the set screws with a hex tool.
NOTE
If you are using a 6-inch C-clamp, the foot of the C-Clamp must be 1-inch in diameter for the meshing tool to fit correctly.
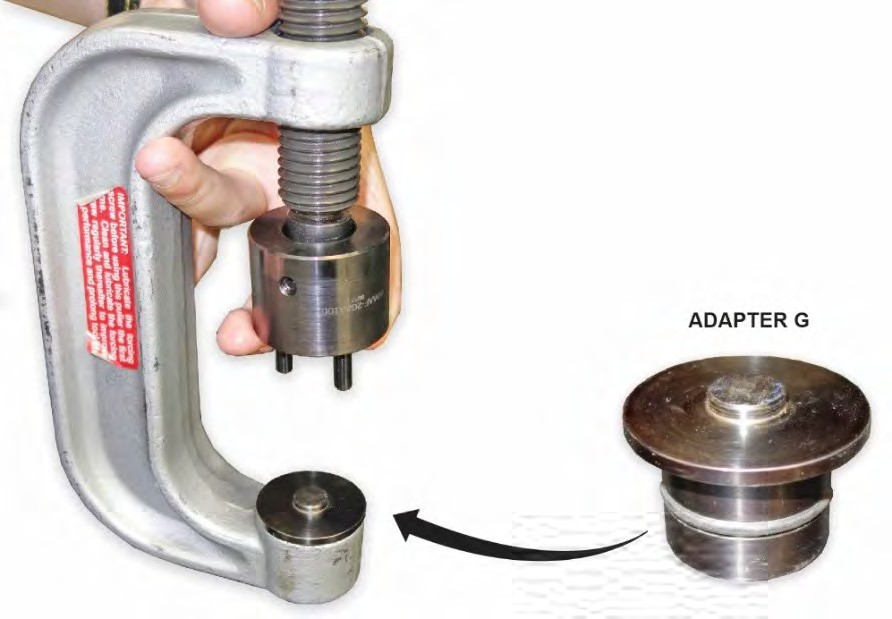
- If you are using the U-Joint Removal Tool (T/N OTC7248), install Adaptor G (T/N 07XAF-001050B).
REPAIR PROCEDURE A (HEIGHT ADJUST VTA UNIT REPLACEMENT)
| CAUTION |
| Be careful; there are many sharp edges. Wear protective gloves. Always wear protective eyewear when using a hammer or impact tools. |
- Turn the ignition switch to the ON position and check if the SRS indicator comes on for about 6 seconds, then turns off.
- If the indicator comes on, then turns off after about 6 seconds, go to step 2.
- If the indicator does not come on, or if it stays on, check the SRS DTC and record it.
- Adjust the seat to the highest position possible, then lower by about 1/2 inch.
- Disconnect the battery negative cable and wait at least 3 minutes before continuing.
- Remove the affected seat and seat cushion cover/pad. Refer to the service information for the model and model year you are working on.
NOTES
- Do not remove the cushion cover from the foam pad. Remove both parts as an assembly.
- For reference during assembly, take a photo of the harness routing and clip location layout as shown.
- Ventilated seat is shown. It may differ slightly from the seat you are repairing.
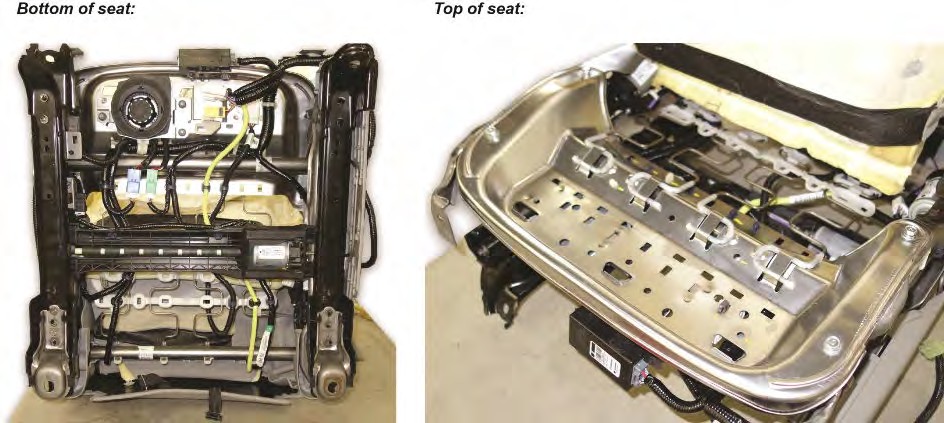
- Remove the seat ventilator from seat bottom (if equipped).
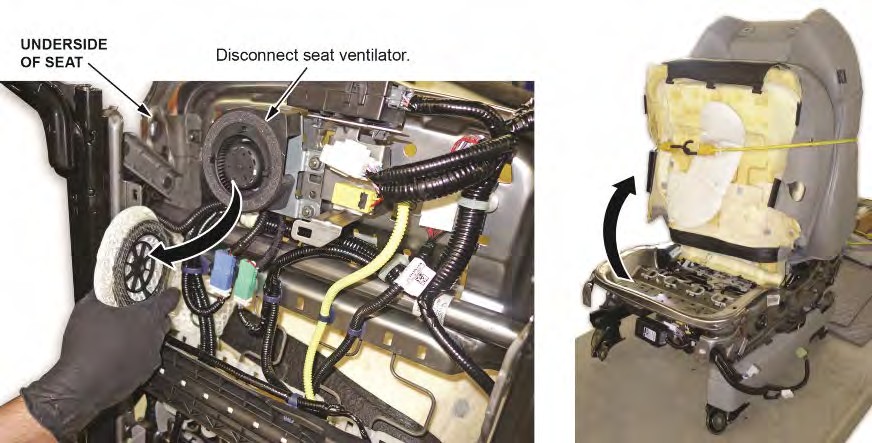
- Remove any harnesses or harness clips that will prevent removal of the cushion pan.
- Remove the four 10 mm bolts from the front cushion pan.
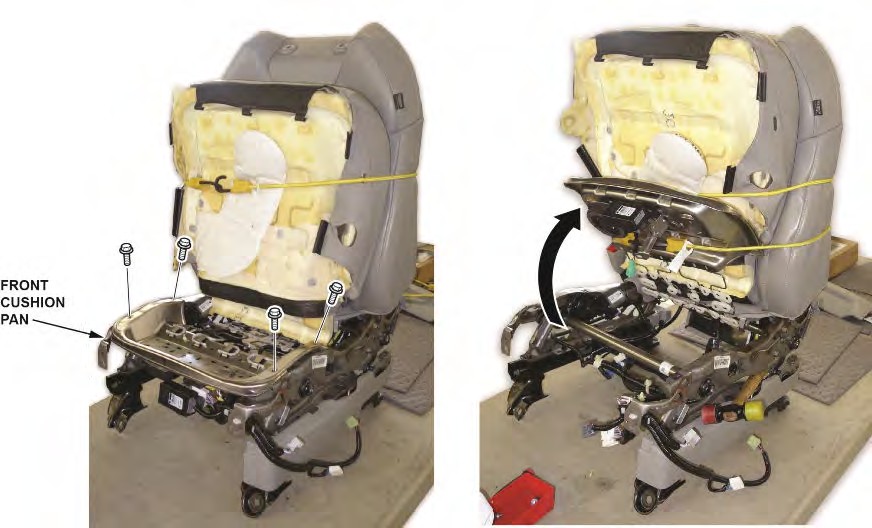
- Lift the cushion pan, and hold it up with a bungee cord or set the seat on its back on a clean surface to keep the cushion pan out of the way.
- Disconnect the VTA unit connector.
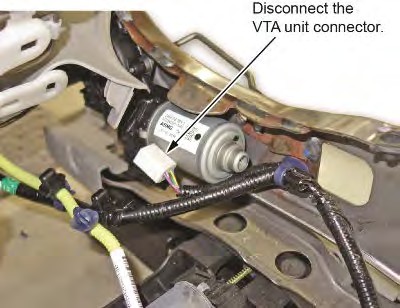
- Remove the VTA unit nuts, then remove the VTA unit.
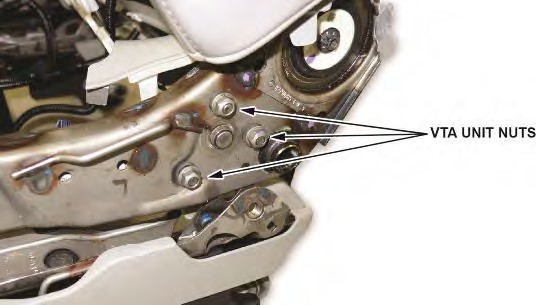
NOTES
- If the seat frame is too low and you cannot access the VTA unit nut, use an open end wrench.
- If it is difficult to remove the VTA unit after removing the nuts, hit the center shaft of the VTA unit with a punch tool and hammer to remove it.
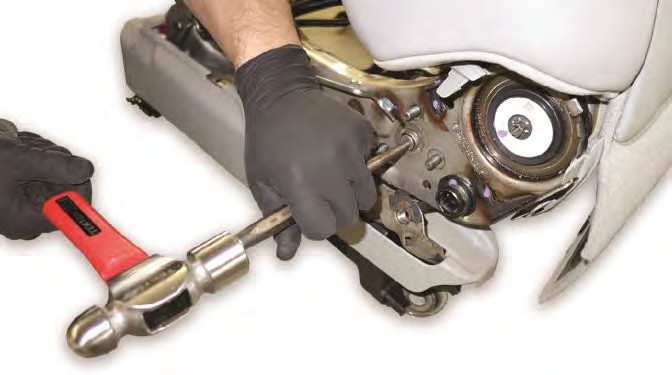
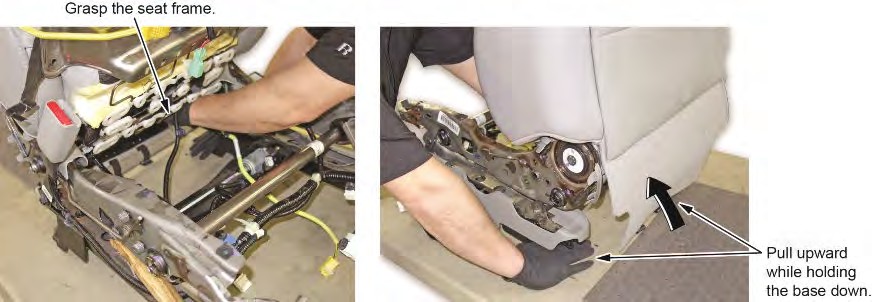
- Raise the seat as much as possible by pulling the seat frame as shown. This allows easier meshing of the gear teeth when installing the new VTA motor.
NOTE
The photo below shows how the seat should look after it is raised.
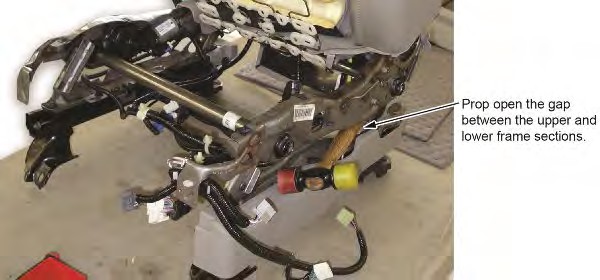
| CAUTION |
| Place a hammer handle (or similar tool) between the upper and lower sections of the seat frame to prevent the rear of the frame from collapsing and pinching fingers. Remove the blocking hammer ONLY when you have installed and aligned the new VTA motor. |
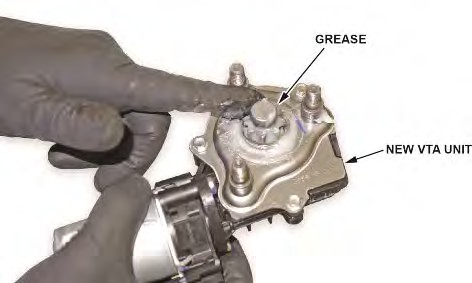
- Apply the provided grease to the new VTA unit motor splines.
NOTE
Only 1/8th of the grease packet is needed. Do not use the whole packet.
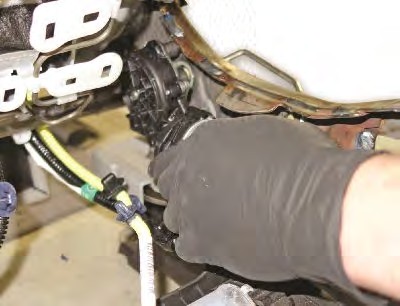
- Mount the new VTA unit onto the seat frame.
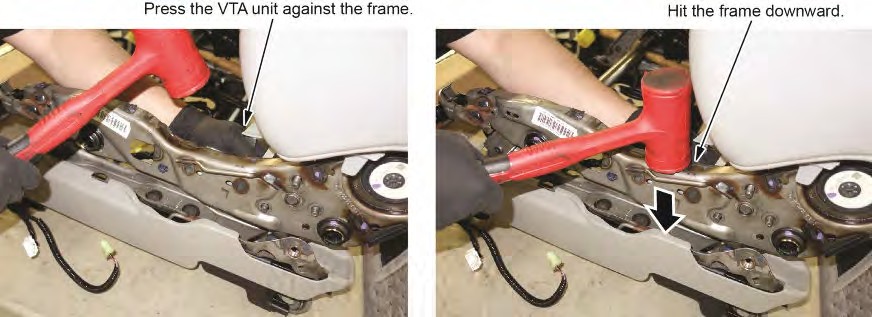
- While applying pressure to keep the VTA unit against the seat frame, use a rubber mallet or plastic hammer to hit the frame downwards. This will allow the VTA unit splines to align and engage with the frame gear.
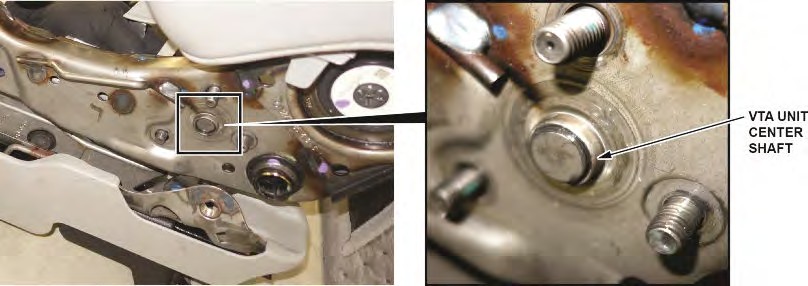
- Make sure the VTA unit splines and seat frame gear are properly engaged. The VTA unit center shaft should be protruding from the frame.
NOTES
- You may need to adjust or remove the blocking hammer handle if it is preventing proper gear engagement.
- Use caution as the seat will NOT be fully supported and may collapse or pinch fingers until the new VTA unit is secured to the seat frame.
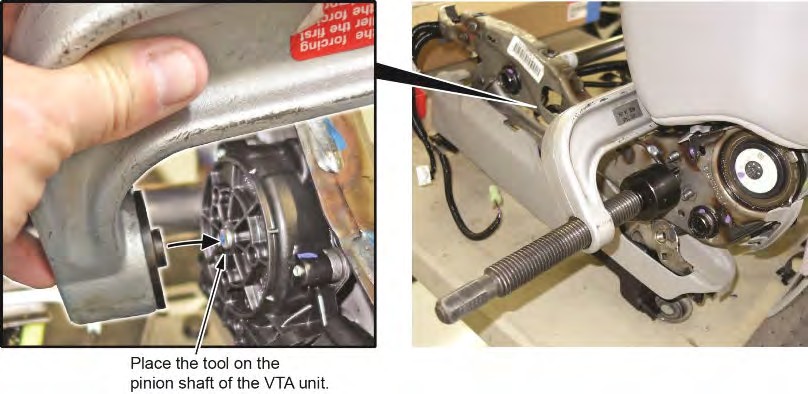
- Place the meshing tool as shown. Center the tool on the pinion shaft protruding from the VTA unit.
NOTICE
- DO NOT over tighten the C-clamp.
- DO NOT attempt to install the VTA unit without using the meshing tool. Seating the VTA unit by tightening the nuts will damage the VTA unit.
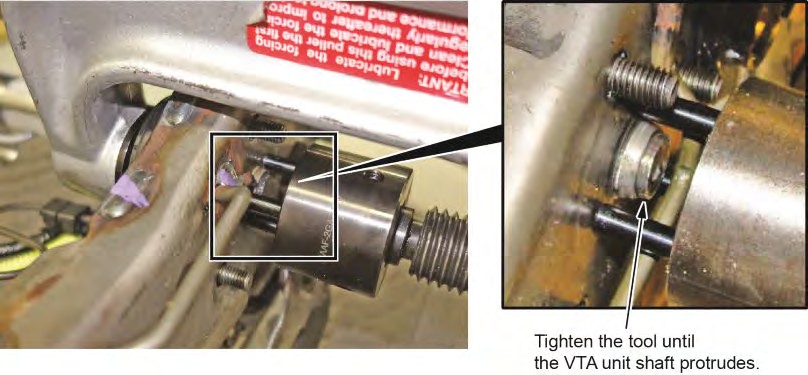
- Gradually tighten the C-clamp until the VTA unit shaft is protruding out of the frame. Once the VTA unit shaft is protruding, go to the next step.
NOTICE
- DO NOT over tighten the C-clamp.
- DO NOT attempt to install the VTA unit without using the meshing tool. Seating the VTA unit by tightening the nuts will damage the VTA unit.
- With the C-clamp still in place, install the new VTA unit nuts and snug them with a wrench.
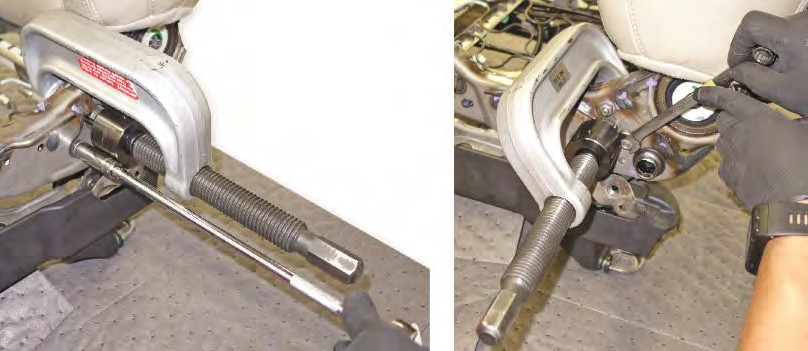
- Remove the C-clamp, and torque the nuts to 25 N•m (18 lb-ft).
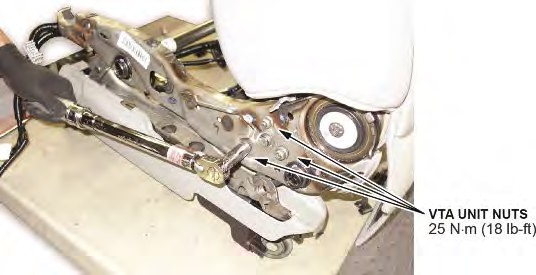
- Make sure the VTA unit is supporting the seat’s weight, then remove the blocking hammer or tool.
- Connect the VTA unit connector.
- Lower the seat cushion pan, and install the bolts. Torque the bolts to 7 N•m (5 lb-ft).
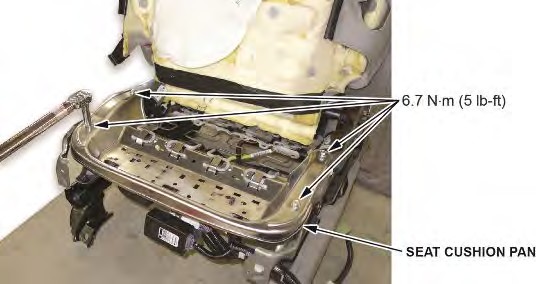
- Route and install the harnesses and the harness clips.
NOTE
Make sure the routing is correct by looking at the photo you took before disassembly.
- Install all other removed parts in the reverse order of removal, and install the seat.
- Reconnect the battery.
- If you are repairing a memory seat, clear the driving position memory as outlined in the service information.
- Make sure the height and tilt functions on the seat work properly and the noise is gone.
- Turn the ignition switch to the ON position and check if the SRS indicator comes on for about 6 seconds, then turns off.
- If the indicator comes on, then turns off after about 6 seconds, the procedure is complete.
- If the SRS indicator did not perform correctly at the beginning of the procedure, check to see if the same problem exists. If there are additional problems, make sure all of the reassembly steps were completed.
REPAIR PROCEDURE B (TILT ADJUST VTA UNIT REPLACEMENT)
| CAUTION |
| Be careful; there are many sharp edges. Wear protective gloves. Always wear protective eyewear when using a hammer or impact tools. |
- Turn the ignition switch to the ON position and check if the SRS indicator comes on for about 6 seconds, then turns off.
- If the indicator comes on, then turns off after about 6 seconds, go to step 2.
- If the indicator does not come on, or if it stays on, check the SRS DTC and record it.
- Adjust the seat to the highest position possible.
- Disconnect the battery negative cable and wait at least 3 minutes before continuing.
- Remove the affected seat and seat cushion cover/pad. Refer to the service information for the model and model year you are working on.
NOTES
- Do not remove the cushion cover from the foam pad. Remove both parts as an assembly.
- For reference during assembly, take a photo of the harness routing and clip location layout as shown.
- Ventilated seat is shown. It may differ slightly from the seat you are repairing.
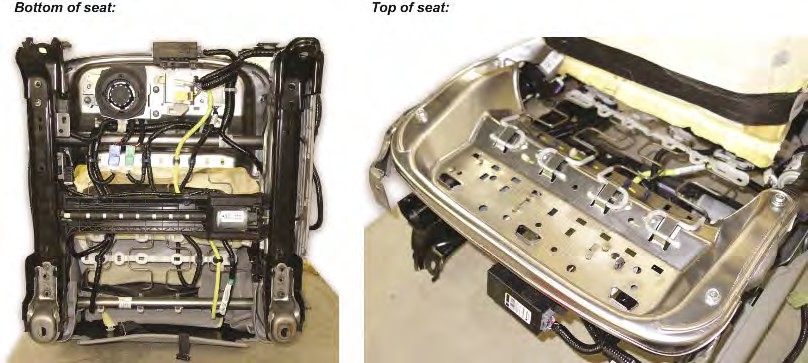
- Remove the seat ventilator from the seat bottom (if equipped).
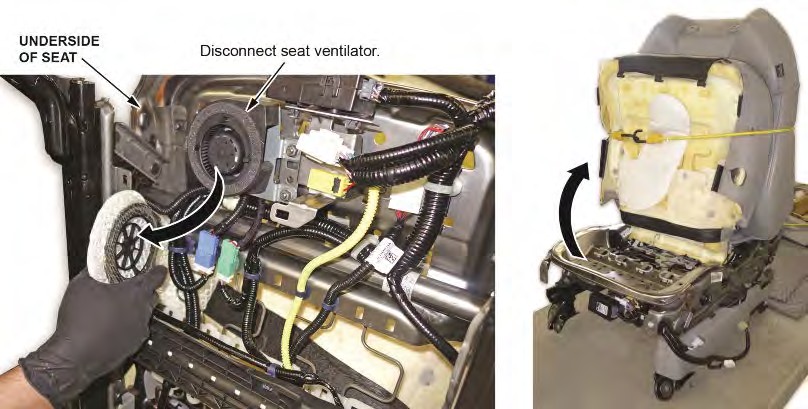
- Remove any harnesses or harness clips that will prevent the removal of the cushion pan.
- Remove the four 10 mm bolts from the front cushion pan.
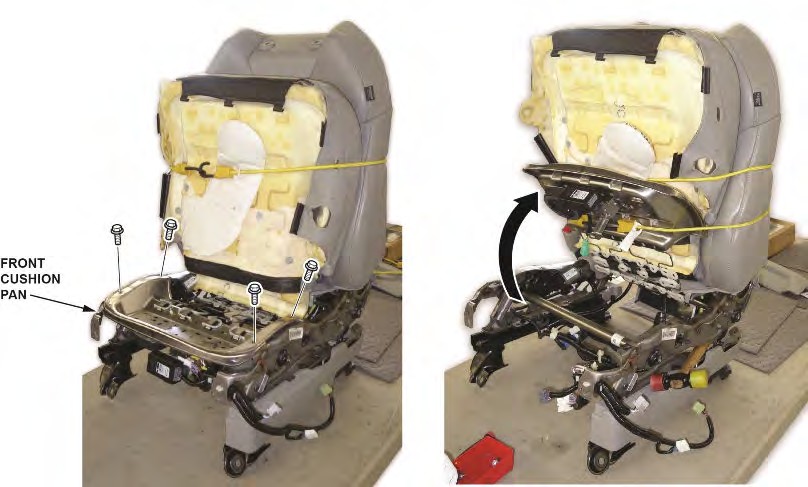
- Lift the cushion pan, and hold it up with a bungee cord or set the seat on its back on a clean surface to keep the cushion pan out of the way.
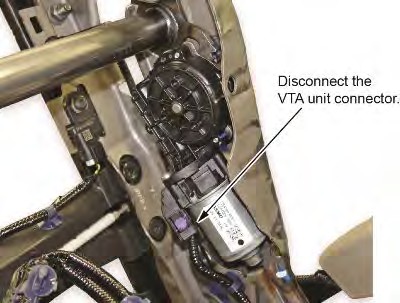
- Disconnect the VTA unit connector.
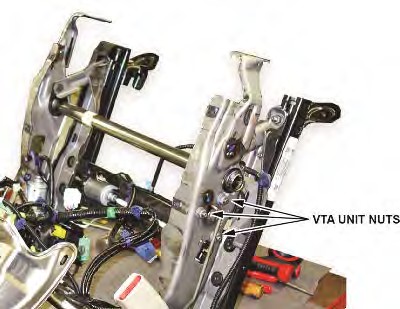
- Remove the VTA unit nuts.
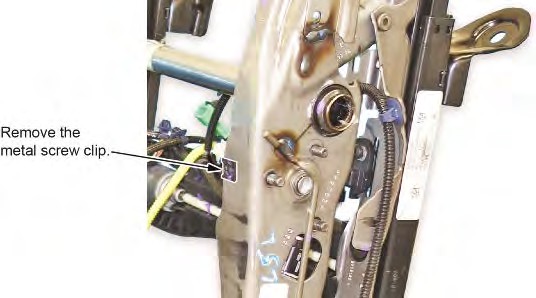
- Remove the metal screw clip on top of the VTA unit with a clip removal tool.
NOTE
Make sure you do not damage or lose the metal screw clip.
- Remove the VTA unit.
NOTE
If it is difficult to remove the VTA unit after removing the nuts, hit the center shaft of the VTA unit with a punch tool and hammer to remove it.
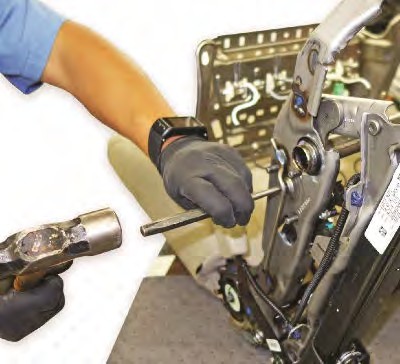
- Raise the seat as much as possible by grabbing the seat frame as shown. This allows easier meshing of the gear teeth when installing the new VTA motor.
| CAUTION |
| Place a hammer handle (or similar tool) between the upper and lower sections of the seat frame to prevent the rear of the frame from collapsing and pinching fingers. Remove the blocking hammer ONLY when you have installed and aligned the new VTA motor. |
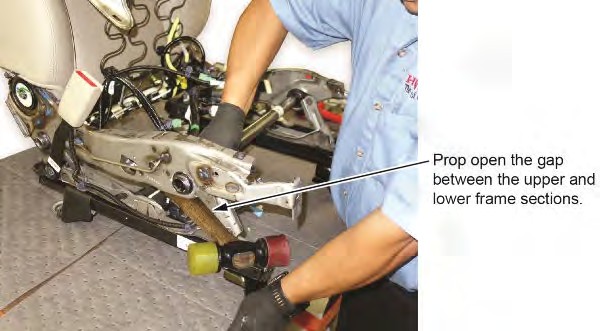
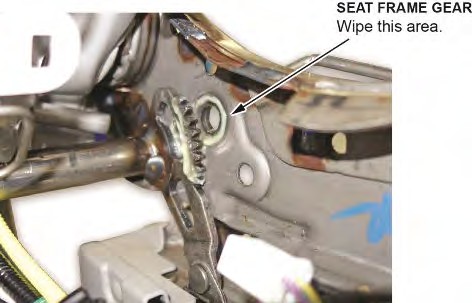
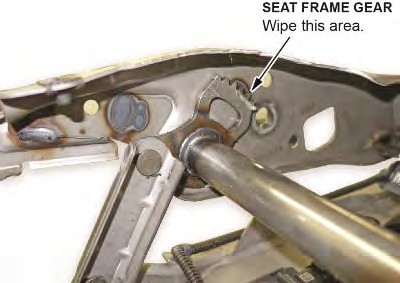
- Wipe off any excess grease from the seat frame gear teeth with a paper towel or clean rag.
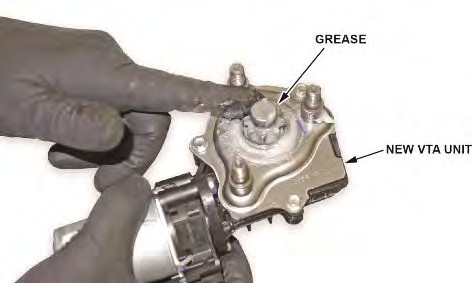
- Apply the grease provided in the kit to the new VTA unit splines.
NOTE
Only 1/8th of the grease packet is needed. Do not use the whole packet.
- Mount the new VTA unit to the seat frame.
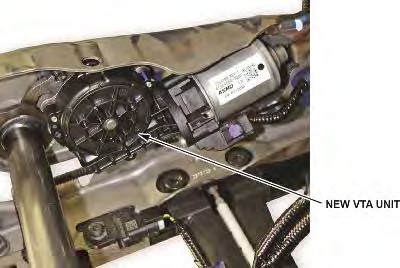
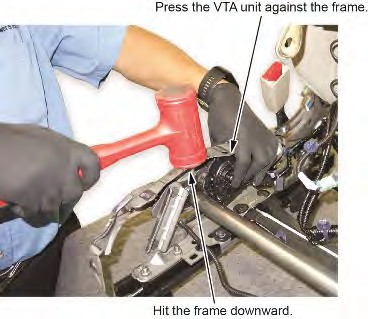
- While applying pressure to keep the VTA unit against the seat frame, use a rubber mallet or plastic hammer to hit the frame downwards. This will allow the VTA unit splines to align and engage with the frame gear.
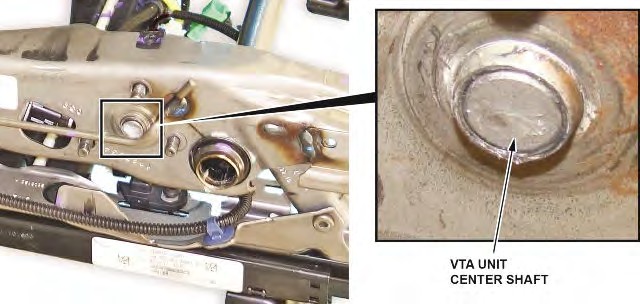
- Make sure the VTA unit splines and seat frame gear are properly engaged. The VTA unit center shaft should be protruding from the frame.
NOTES
- You may need to adjust or remove the blocking hammer handle if it is preventing proper gear engagement.
- Use caution as the seat will NOT be fully supported and may collapse or pinch fingers until the new VTA unit is secured to the seat frame.
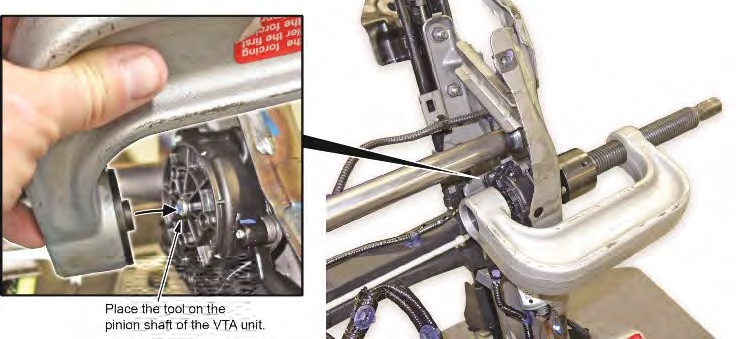
- Place the meshing tool as shown. Center the tool on the pinion shaft protruding from the VTA unit.
NOTICE
- DO NOT over-tighten the C-clamp.
- DO NOT attempt to install the VTA unit without using the meshing tool. Seating the VTA unit by tightening the nuts will damage the VTA unit.
- Gradually tighten the C-clamp until the VTA unit shaft is protruding from the frame. Once the VTA unit shaft is protruding, go to the next step.
NOTICE
- DO NOT over-tighten the C-clamp.
- DO NOT attempt to install the VTA unit without using the meshing tool. Seating the VTA unit by tightening the nuts will damage the VTA unit.
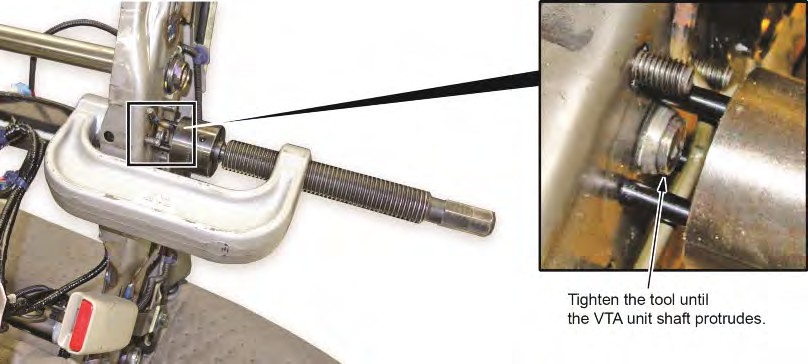
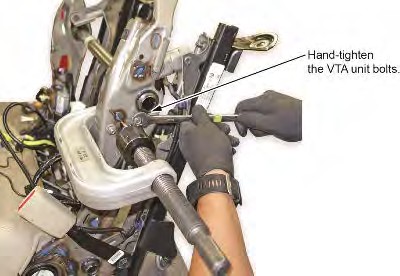
- With the C-clamp still in place, install the new VTA unit nuts and snug them with a wrench.
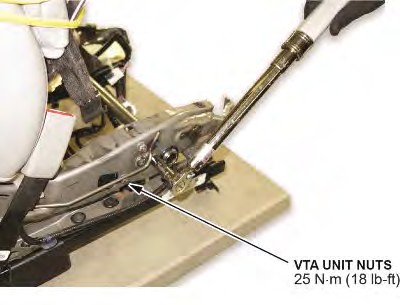
- Remove the C-clamp, and torque the nuts to 25 N•m (18 lb-ft).
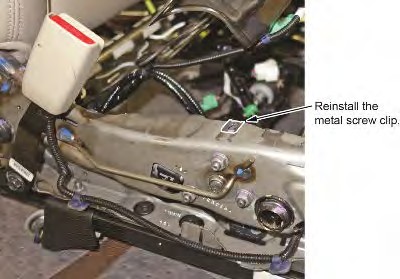
- Install the metal screw clip.
- Make sure the VTA unit is supporting the seat’s weight, then remove the blocking hammer or tool.
- Connect the VTA unit connector.
- Lower the seat cushion pan, and install the bolts. Torque the bolts to 7 N•m (5 lb-ft).
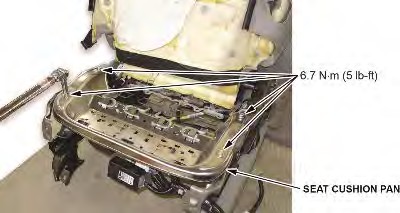
- Route and install the harnesses and the harness clips.
NOTE
Make sure the routing is correct by looking at the photo you took before disassembly.
- Install all other removed parts in the reverse order of removal, and install the seat.
- Reconnect the battery.
- If you are repairing a memory seat, clear the driving position memory as outlined in the service information.
- Make sure the height and tilt functions on the seat work properly and the noise is gone.
- Turn the ignition switch to the ON position and check if the SRS indicator comes on for about 6 seconds, then turns off.
- If the indicator comes on, then turns off after about 6 seconds, the procedure is complete.
- If the SRS indicator did not perform correctly at the beginning of the procedure, check to see if the same problem exists. If there are additional problems, make sure all of the reassembly steps were completed.
END
A18-034
April 16, 2018
Version 1
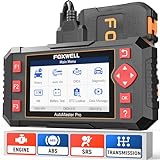
- [Easy to Use—Work Out of the Box] + [FOXWELL 2026 New Version] FOXWELL NT604 Elite scan tool is the 2026 new version from FOXWELL, designed for car owners who want to figure out the cause of issues before fixing car problems by scanning common systems like ABS, SRS, engine, and transmission. The NT604 Elite obd2 scanner diagnostic tool comes with the latest software—no need to waste time downloading software first. Plug the scanner into the OBDII port with OBDII cable to start the diagnosis.
- [Affordable] + [Reliable Car Health Monitor] Will you be confused what happens when the warning light of ABS/SRS/transmission/check engine flashes? Instead of taking your cars to dealership, this FOXWELL scanner will help you do a thorough scanning and detection for your cars and pinpoint the root cause. Note:The device is a diagnostic tool, not a repair tool. To turn off a warning light, you must first physically repair the issue causing it. Only then can the scanner be used to clear the corresponding fault code.
- [5 in 1 Car Diagnostic Scanner] Compared with obd scanners (50-100), NT604 Elite code scanner not only includes their OBDII diagnosis but also serves as ABS/SRS scanner, transmission and check engine code reader. When it’s an odb2 scanner, you can use it to check if your car is ready for annual test through I/M readiness menu. In addition, live data stream, built-in DTC library, data play back and print, all these features are a big plus for it. Note: doesn't support maintenance functions like reset or relearn. For the SRS system, NT604 Elite can read and clear common fault codes not caused by a crash, but crash/collision data cannot be cleared.
- [Fantastic AUTOVIN] + [No extra software fee] Through the AUTOVIN menu, this NT604 Elite car scanner allows you to get your V-IN and vehicle info rapidly, no need to take time to find your V-IN and input one by one. What's more, the NT604 Elite ABS SRS scanner supports 60+ car brands from worldwide (America/Asia/Europe). You don’t need to pay extra software fee. AUTOVIN may not work on some older vehicles or certain vehicle brands. If AUTOVIN fails, please input the vin code manually or go to the Diagnostic Menu to select your vehicle model.
- [Solid protective case KO plastic carrying bag] + [Lifetime update] Almost all same price-level car scanner diagnostic tool only offers plastic bag to hold the scanner.However, NT604 Elite automotive scanner is equipped with solid protective case, preventing your obd2 scanner from damage. Then you don’t need to pay extra money to buy a solid toolbox.
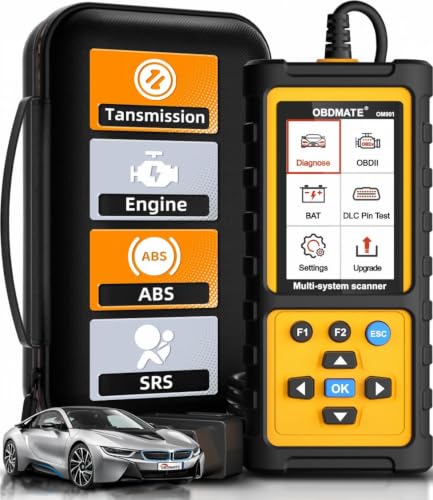
- 【Reset ABS/SRS/Transmission/Engine Lights】 More than an check engine code reader, OBDMATE OM901 obd2 scanner performs comprehensive diagnostics for the 4 most-used systems (ABS/SRS/Engine/Transmission). It quickly clears fault codes, turns off warning lights, read data stream and auto VIN.
- 【3.5" Handheld Scanner with 4 System Diagnose】 3.5" Super large TFT screen equipped displays an intuitive menu and clear readings of various sensors from ABS, SRS, ECM and TCM systems. It arrived with a silicone protective case and hard-shell carrying case, ensuring long-lived durability and drop resistance. The car diagnostic tool is plug-to-play designed, plug it and get diagnosis started without any batteries or updates required.
- 【One-Click I/M Readines&Full OBD2 Functions】 Press F1 to get an intuitive corloured form about whether various emissions-related systems on the vehicle are operating properly. Help you get smog-check ready quickly. OM901 car scanner supports all essential OBD2 functions you need: read & clear codes, view freeze frame, read I/M readiness, retrieve VIN, live data stream (with graphing display), O2 sensor test, onboard monitoring mode, and EVAP leak test.
- 【Battery Voltage Check&DLC Pin Test】 It allows you to monitor battery health by testing current battery voltage. Plus, this obd2 diagnostic tool features DLC 16-PIN test to check current voltage of every pin.
- 【Automotive Scanner Diagnostic Kit】 The package comes with 1 car scanner, 1 USB-type c cable, 1 hard storage bag and 1 user manual(en). Free to update without any hidden fees. 5 languanges available in setting including English, French, Italian, German and Espanish. Valuable and Portable, making it a great tool kit for car owners, DIY enthusiasts, and professional mechanics.
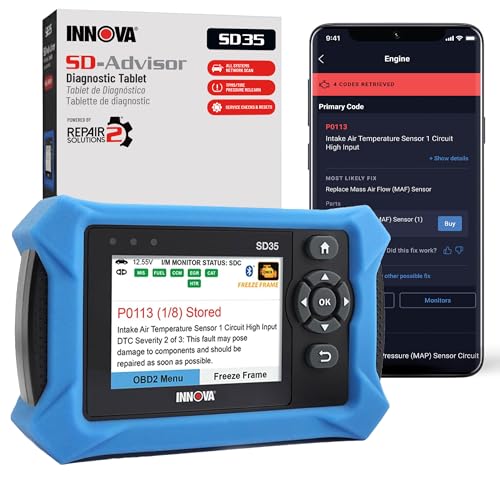
- OBD2 SCANNER FOR ALL SYSTEMS – The INNOVA SD35 is a tablet-based OBD2 scanner designed for advanced diagnostics. Read and clear check engine light, ABS, SRS, and TPMS codes, plus test your car battery and alternator to prevent unexpected failures. Vehicle coverage may vary. Please use Innova’s Coverage Checker to verify compatibility.
- ALL-SYSTEM DIAGNOSTICS & LIVE DATA – Unlike basic code readers, this OBD2 scanner for all vehicles scans engine, transmission, ABS, SRS, and more. Get real-time live data, including RPM, fuel trims, temperature readings, and oxygen sensor performance.
- OBD2 TABLET WITH USER-FRIENDLY INTERFACE – This automotive scan tool features a high-resolution display, making vehicle diagnostics faster and easier.
- ADVANCED TPMS, OIL RESET & SERVICE FUNCTIONS – Perform TPMS sensor checks, oil light reset, and other service resets with ease This professional diagnostic tool provides comprehensive vehicle maintenance capabilities in one device.
- WIDE VEHICLE COVERAGE (1996 & NEWER CARS & TRUCKS) – This OBD2 scanner Bluetooth tablet is compatible with Toyota, Ford, Honda, Chevrolet, Nissan, Dodge, and more. However, feature coverage may vary. Please use Innova's Coverage Checker to verify coverage.
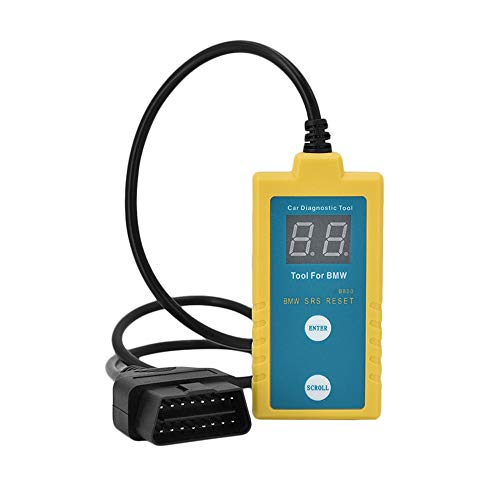
- ✔️【Professional SRS Reset for 1994-2003 BMW】 Designed specifically for classic BMW models (1994-2003). This B800 scanner reads & clears SRS airbag fault codes, turns off the warning light, and saves you a costly dealer visit. Confirmed compatible with: E36, E46 (EXCEPT 2001 330i), E34, E38, E39, Z3, and X5 (E53). NOT compatible with any BMW built before 1994 or after 2003.
- ✔️【Important: Two Different Connection Ports – Read Before Use】 To avoid “not working” issues, please note: For 1994–2000 BMWs (most E36, E34, Z3, early E39), the SRS diagnostic port is a round 20-pin connector under the hood. You MUST use the included 16-pin to 20-pin adapter cable. For 2000–2003 models (late E46, E39, X5), use the standard OBD-II port inside the cabin. Incorrect connection is the #1 reason for “incompatibility” reports.
- ✔️【Read & Clear Fault Codes in Minutes】 Quickly diagnose why your SRS light is on. The scanner accurately reads fault codes from airbag and seatbelt pretensioner systems. With one button press, clear the codes and reset the SRS warning light in seconds. No expensive dealer tools needed.
- ✔️【User-Friendly for DIYers – No Mechanic Required】 Easy operation with an intuitive button layout: ‘Enter’ to confirm, ‘Scroll’ to navigate. The clear LCD screen shows results instantly. Includes a step-by-step manual (revised for clarity) to guide you through the entire reset process.
- ✔️【Reliable Support with 1-Year Warranty】 We stand behind the quality of our B800 scanner. It comes with a 1-Year Hassle-Free Warranty. If you have any questions or need support, please contact us with your Order ID, and our dedicated team will assist you promptly.
- [All System Diagnostics, Professional-Level Scanner] - BLCKTEC 460T is the ultimate OBD2 diagnostic tool for home mechanics and professionals. It supports all 10 OBD2 modes, reads and clears Engine/Transmission/ABS/SRS codes, performs All-System Diagnostics, offers workshop reset tools, and provides real-time live data. It helps you pinpoint issues, assess your car's condition, and prepare for SMOG checks with ease. NOTE: Function availability depends on your vehicle. Before you buy, be sure to use the Compatibility Checker on BLCKTEC website or contact our customer support to verify that the features you need are supported for your vehicle’s specific year, make, and model.
- [12+ Most Popular Reset Functions] - BLCKTEC 460T OBD2 scanner offers 12+ dealer-level service functions, including Oil Maintenance Reset, ABS Bleeding, EPB Reset, SAS(Steering Angle Sensor) Recalibration, DPF(Diesel Particulate Filter) Reset, Throttle Body Relearn, Battery Reset/Initialization, TPMS Relearn, Transmission Reset, Fluid Change Reset, Maintenance Reset and more, enabling you to perform workshop services like a pro. NOTE: Function availability depends on your vehicle. Be sure to use the Compatibility Checker on BLCKTEC website to verify that the features you need are supported for your vehicle.
- [Real-Time OBD2 and OEM Live Data, Freeze Frame Data] - BLCKTEC 460T helps diagnose vehicle issues when warning lights like Check Engine Light or ABS/SRS Light appear. It offers detailed DTC info, ECU Freeze Frame Data, and real-time OBD2 and advanced OEM live data, including Engine, Transmission, ABS, SRS, and more, making it easy to diagnose and resolve vehicle problems. You can view, graph, record, replay, and overlay up to four live data streams in a single graph for better analysis.
- [AutoVIN, AutoReLink, AutoScan, 3X Faster] - Equipped with AutoVIN technology, 460T automatically retrieves the VIN to save you time. Its AutoScan and AutoReLink features scan all of the vehicle's ECUs and detect any fault codes immediately after you plug the scanner into the vehicle's OBD2 port - no button presses required. Additionally, it regathers DTC and I/M readiness information every 30 seconds, simplifying monitor tests. 460T's advanced technology makes it 3X faster than other products.
- [Get RepairSolutions2, the #1 Auto Repair App for Free] - When paired with RepairSolutions2(RS2) App, 460T becomes even more powerful. RS2's Verified Fix Database built by master technicians, provides the parts needed for the repair. Additionally, RS2 gives you access to OEM warranty info, maintenance schedules, TSB, and dealership recall info, making car care easier than ever. RS2 is free with no subscription fees and it stores your car scan reports in the cloud, allowing you to access, share, or print them anytime and anywhere.
This product presentation was made with AAWP plugin.