
NHTSA Campaign Number: 18V777
Manufacturer Honda (American Honda Motor Co.)
Components SERVICE BRAKES, HYDRAULIC
Potential Number of Units Affected 64,785
Coating on Rear Brake Caliper Pistons/FMVSS 135
A reduction of braking performance increases the risk of a crash.
Summary
Honda (American Honda Motor Co.) is recalling certain 2017-2019 Acura MDX, 2017-2018 Acura MDX Sport Hybrid, 2018-2019 Honda HR-V and Honda Odyssey, and 2016 Honda HR-V vehicles. The rear brake caliper pistons may have an insufficient coating, causing gas pockets to form, reducing brake performance. As such, these vehicles fail to comply with the requirements of Federal Motor Vehicle Safety Standard (FMVSS) number 135, “Light Vehicle Brake Systems.”
Remedy
Owners will be notified, and Honda or Acura dealers will bleed the brakes, free of charge. The recall is expected to begin December 17, 2018. Owners may contact Honda customer service at 1-888-234-2138. Honda’s numbers for this recall are C31 and L30.
Notes
Owners may also contact the National Highway Traffic Safety Administration Vehicle Safety Hotline at 1-888-327-4236 (TTY 1-800-424-9153), or go to www.safercar.gov.
Check if your Honda has a Recall
B18-061
November 2, 2018
Version 1
Safety Recall: Soft or Low Brake Pedal
AFFECTED VEHICLES
| Year | Model | Trim | VIN Range |
| 2017-19 | MDX | ALL | Check the iN VIN status for eligibility. |
| 2017-18 | MDX Sport Hybrid | ALL | Check the iN VIN status for eligibility. |
BACKGROUND
The brake pedal may have a soft feeling or travel to the floor with low effort because of air bubbles in the brake fluid. Air may be trapped in the system due to the temporary release of air bubbles from improperly plated rear brake caliper pistons. This may cause low braking performance or increased pedal stroke, increasing the risk of a crash.
CLIENT NOTIFICATION
Owners of affected vehicles will be sent a notification of this campaign.
Do an iN VIN status inquiry to make sure the vehicle is shown as eligible.
Some vehicles affected by this campaign may be in your new or used vehicle inventory.
Failure to repair a vehicle subject to a recall or campaign may subject your dealership to claims or lawsuits from the client or anyone else harmed as a result of such failure. To see if a vehicle in inventory is affected by this safety recall, do a VIN status inquiry before selling it.
CORRECTIVE ACTION
Bleed the brake system.
NOTE
The MDX and MDX Sport Hybrid require different repair procedures.
MDX Sport Hybrid REPAIR PROCEDURE – Page 7
REQUIRED MATERIALS
| Part Name | Part Number | Quantity |
| Brake Fluid (DOT 3) | 08798-9008A | 2 |
WARRANTY CLAIM INFORMATION
| Operation Number | Description | Flat Rate Time | Defect Code | Symptom Code | Template ID | Failed Part Number |
| 4130A9 | MDX (Non-Sport
Hybrid) – Bleed the brake system. (Includes rear caliper bleed procedure.) | 1.6 hrs | 6RB00 | L3000 | B18061A | 43018-TZ5-A11 |
| 4130A2 | MDX Sport Hybrid Bleed the brake system. (Includes rear caliper bleed procedure.) | 1.8 hrs | 6RB00 | L3000 | B18061B | 43018-TZ5-A11 |
Skill Level: Repair Technician
REPAIR PROCEDURE – MDX (NON SPORT HYBRID)
NORMAL BLEED
NOTICE
Do not spill brake fluid on the vehicle, it may damage the paint. If brake fluid does contact the paint, wash it off immediately with water.
NOTES
- Review the Service Precautions before doing repairs or service.
- Before beginning the bleeding procedure, remove the reservoir cap and strainer, and remove any dirt and debris then reinstall the strainer only.
- Use only new Acura DOT 3 Brake Fluid from an unopened container. Using a non-Acura brake fluid can cause corrosion and shorten the life of the system. Do not reuse the drained brake fluid.
- The brake fluid in the reservoir connected to the master cylinder must be at the MAX (upper) level mark at the start of the bleeding procedure and checked after bleeding each wheel. Add fluid as required.
- Unless indicated, the illustrations shown are examples only and may not match your vehicle.
Bleed the brake system in this order:
- Front Driver’s Side Brake Caliper
- Front Passenger’s Side Brake Caliper
- Rear Passenger’s Side Brake Caliper
- Rear Driver’s Side Brake Caliper
- Raise the vehicle on a lift.
- Attach a clear tube to the bleed screw.
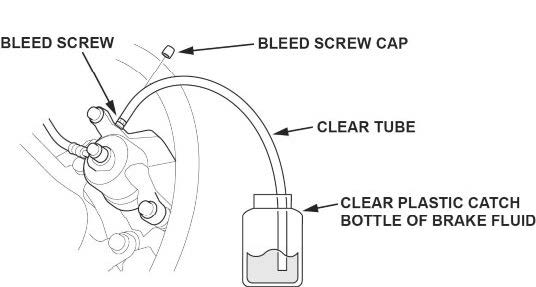
- Submerge the other end of the clear tube into a clear plastic catch bottle of brake fluid.
- Have an assistant slowly pump the brake pedal several times then apply steady continuous pressure.
- Loosen the bleed screw slowly to bleed the fluid into the plastic catch bottle. The brake pedal will travel toward the floor as the fluid is bled from the system.
- When the brake pedal reaches the floor, have the assistant hold the pedal in that position, then tighten the bleed screw to the specified torque. The brake pedal can now be released.
NOTE
Inspect the brake lines and fittings for damage, leaks, deterioration, or twisting.
| Component | Specified Torque Value |
| Front Brake Caliper Bleed Screw | 8.3 N·m (6.1 lbf-ft ) |
| Rear Brake Caliper Bleed Screw | 11 N·m (8 lbf-ft) |
- Repeat steps 3 thru 6 until the brake fluid in the clear tube appears fresh and there are no air bubbles in the fluid.
- Repeat this procedure for each caliper in the bleeding sequence.
- Go to REAR CALIPER BLEED.
REAR CALIPER BLEED
NOTE
Do the following procedure only after doing the NORMAL BLEED procedure.
Bleed the rear brakes in this order:
- Passenger’s Side Rear Brake Caliper
- Driver’s Side Rear Brake Caliper
- Remove the passenger’s side rear caliper body and remove the outer pad.
- Place a small piece of cardboard in place of the outer pad and reinstall the brake caliper.
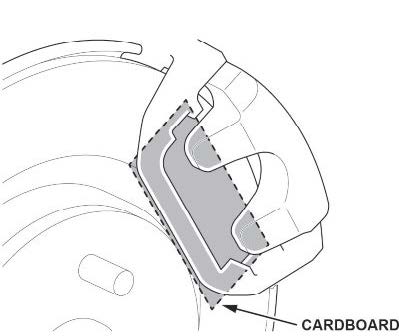
- Slowly press the brake pedal until the caliper body contacts the cardboard.
- Turn the ignition to ON.
- Apply and release the parking brake.
NOTE
The air in the threaded portion between the spindle and the locknut is discharged by operating the parking brake.
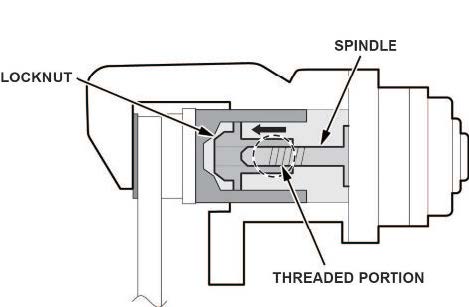
- Connect the HDS to the data link connector (DLC).
- Select ELECTRIC PARKING BRAKE from the BRAKE SYSTEM menu with the HDS, then select BRAKE PAD MAINTENANCE MODE from ADJUSTMENT, and follow the screen prompts.
NOTE
The spindle returns to the initial position by entering the brake pad maintenance mode.
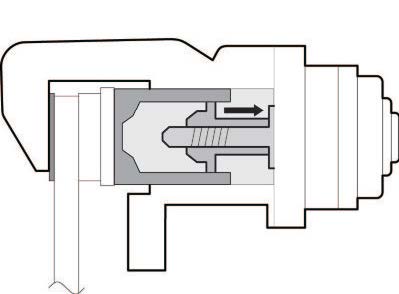
- Turn the ignition to OFF.
- Disconnect the negative cable from the 12 volt battery.
- Press the brake pedal several times.
- Disconnect the electric parking brake actuator connector, and remove the caliper body without disconnecting the brake hose from the caliper body.
- Hold the caliper body so that the bleed screw is upright.
- Direct any air trapped in the caliper by doing the following.
13.1 Shake the caliper side to side.
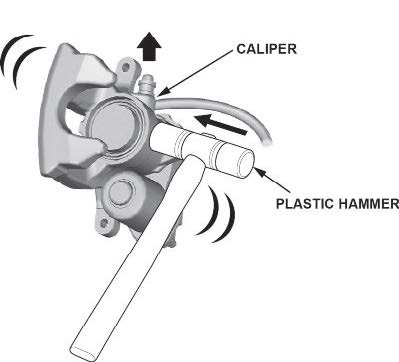
13.2Strike the caliper several times using a plastic hammer.
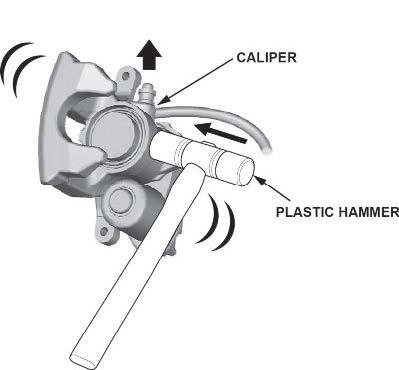
- Attach a clear tube to the bleed screw.
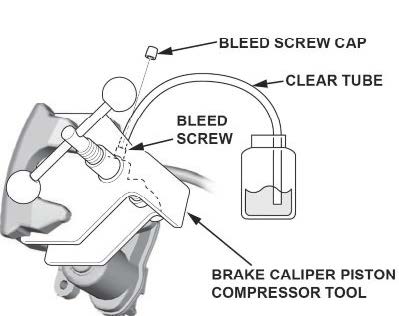
- Install a commercially available brake caliper piston compressor tool between the caliper body and piston.
- Loosen the bleed screw slowly and press in the piston with the brake caliper piston compressor tool.
- If there are air bubbles in the fluid, tighten the bleed screw to the specified torque, install the rear brake caliper and repeat steps 2 thru 16.
- If there are no air bubbles in the fluid, tighten the bleed screw to the specified torque, remove the cardboard and reinstall the outer pad and caliper.
| Component | Specified Torque Value |
| Rear Brake Caliper Bleed Screw | 11 N·m (8 lbf-ft) |
- Connect the electric parking brake actuator connector.
- Press the brake pedal several times.
- Reconnect the negative cable to the 12 volt battery.
- Turn the ignition to ON.
- Select ELECTRIC PARKING BRAKE from the BRAKE SYSTEM menu with the HDS, then select BRAKE PAD MAINTENANCE MODE from ADJUSTMENT, and follow the screen prompts.
- Apply and release the parking brake.
- Turn the ignition to OFF.
- Repeat this procedure for the rear caliper body on the opposite side.
REPAIR PROCEDURE MDX SPORT HYBRID
BRAKE SYSTEM – BLEED 1 (Between Pedal Feel Simulator and Brake Caliper)
NOTICE
Do not spill brake fluid on the vehicle, it may damage the paint. If brake fluid does contact the paint, wash it off immediately with water.
NOTES
- Review the Service Precautions before doing repairs or service.
- Before beginning the bleeding procedure, remove the reservoir cap and strainer, and remove any dirt and debris then reinstall the strainer only.
- Use only new Acura DOT 3 Brake Fluid from an unopened container. Using a non-Honda brake fluid can cause corrosion and shorten the life of the system. Do not reuse the drained brake fluid.
- The brake fluid in the reservoir connected to the master cylinder must be at the MAX (upper) level mark at the start of the bleeding procedure and checked after bleeding each wheel. Add fluid as required.
- Unless indicated, the illustrations shown are examples only and may not match your vehicle.
Bleed the brake system in this order:
- Front Driver’s Side Brake Caliper
- Front Passenger’s Side Brake Caliper
- Rear Passenger’s Side Brake Caliper
- Rear Driver’s Side Brake Caliper
- Raise the vehicle on a lift.
- Open the driver’s door and wait 3 minutes or more.
NOTE
Do not turn the ignition ON.
- Do the 12 volt battery terminal disconnection procedure.
- Remove the air cleaner.
- Attach a clear tube to the bleed screw.
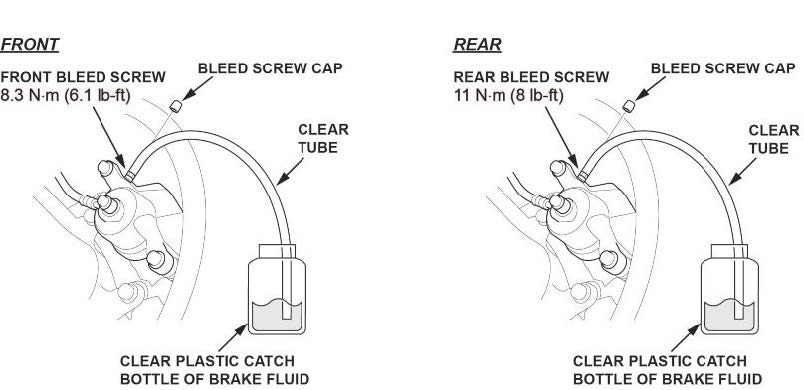
- Submerge the other end of the clear tube into a clear plastic catch bottle of brake fluid.
- Have an assistant slowly pump the brake pedal several times then apply steady continuous pressure.
- Loosen the bleed screw slowly to bleed the fluid into the plastic catch bottle. The brake pedal will travel toward the floor as the fluid is bled from the system.
- When the brake pedal reaches the floor, have the assistant hold the pedal in that position, then tighten the bleed screw to the specified torque. The brake pedal can now be released.
NOTE
Inspect the brake lines and fittings for damage, leaks, deterioration, or twisting.
| Component | Specified Torque Value |
| Front Brake Caliper Bleed Screw | 8.3 N·m (6.1 lbf-ft) |
| Rear Brake Caliper Bleed Screw | 11 N·m (8 lbf-ft) |
- Repeat steps 7 thru 9 until the brake fluid in the clear tube appears fresh and there are no air bubbles in the fluid.
- Repeat this procedure for each caliper in the bleeding sequence.
- Go to BRAKE SYSTEM – BLEED 2.
BRAKE SYSTEM – BLEED 2 (Between Pedal Feel Simulator and Tandem Motor Cylinder)
- Attach a clear tube to the front or rear tandem motor bleed screw.
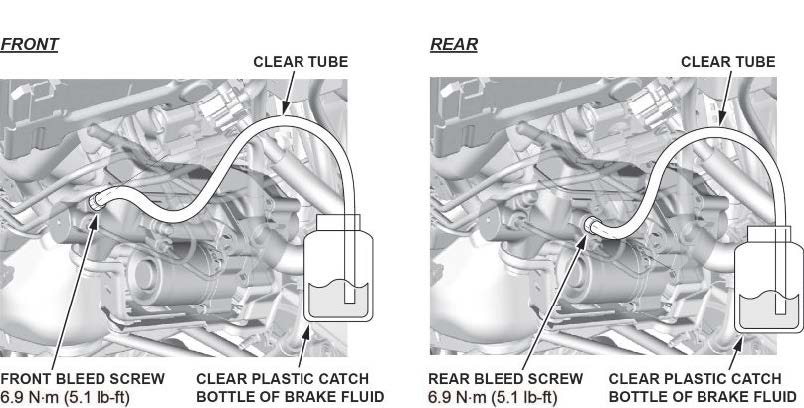
- Submerge the other end of the clear tube into a clear plastic catch bottle of brake fluid.
- Have an assistant slowly pump the brake pedal several times then apply steady continuous pressure.
- Loosen the bleed screw slowly to bleed the fluid into the plastic catch bottle. The brake pedal will travel toward the floor as the fluid is bled from the system.
- When the brake pedal reaches the floor, have the assistant hold the pedal in that position, then tighten the bleed screw to the specified torque. The brake pedal can now be released.
| Component | Specified Torque Value |
| Front and Rear Bleed Screw | 6.9 N·m (5.1 lbf-ft) |
- Repeat steps 3 thru 5 until the brake fluid in the clear tube appears fresh and there are no air bubbles in the fluid.
- Repeat this procedure for the remaining tandem motor bleed screw.
- Reconnect the 12 volt battery.
- Install the air cleaner.
- Go to BRAKE SYSTEM – BLEED 3.
BRAKE SYSTEM – BLEED 3 (Between Pedal Feel Simulator and Brake Caliper)
Bleed the brake system in this order:
- Front Driver’s Side Brake Caliper
- Front Passenger’s Side Brake Caliper
- Rear Passenger’s Side Brake Caliper
- Rear Driver’s Side Brake Caliper
- Attach a clear tube to the bleed screw.
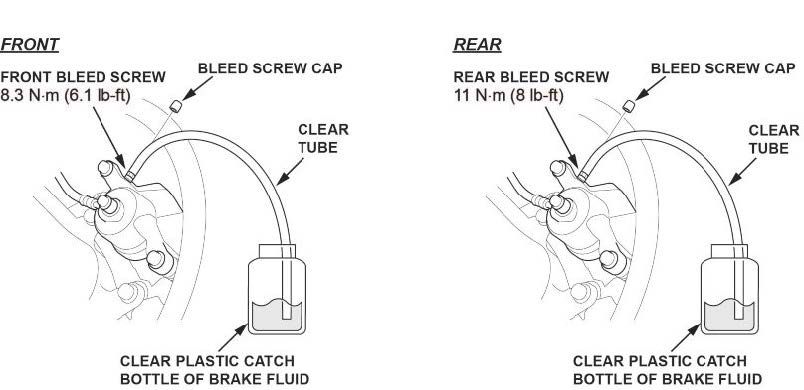
- Submerge the other end of the clear tube into a clear plastic catch bottle of brake fluid.
- Have an assistant slowly pump the brake pedal several times then apply steady continuous pressure.
- Loosen the bleed screw slowly to bleed the fluid into the plastic catch bottle. The brake pedal will travel toward the floor as the fluid is bled from the system.
- When the brake pedal reaches the floor, have the assistant hold the pedal in that position, then tighten the bleed screw to the specified torque. The brake pedal can now be released.
| Component | Specified Torque Value |
| Front Brake Caliper Bleed Screw | 8.3 N·m (6.1 lbf-ft) |
| Rear Brake Caliper Bleed Screw | 11 N·m (8 lbf-ft) |
- Repeat steps 3 thru 5 until the brake fluid in the clear tube appears fresh and there are no air bubbles in the fluid.
- Repeat this procedure for each bleed screw of the brake caliper in the bleeding sequence.
- Go to REAR CALIPER BLEED.
REAR CALIPER BLEED
NOTE
Do the following procedure only after doing the previously listed BLEED procedures.
Bleed the rear brakes in this order:
- Passenger’s Side Rear Brake Caliper
- Driver’s Side Rear Brake Caliper
- Remove the passenger’s side rear caliper body and remove the outer pad.
- Place a small piece of cardboard in place of the outer pad and reinstall the brake caliper.
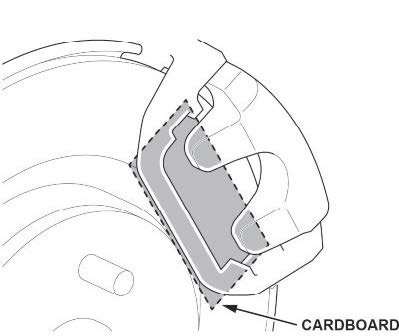
- Slowly press the brake pedal until the caliper body contacts the cardboard.
- Turn the ignition to ON.
- Apply and release the parking brake.
NOTE
The air in the threaded portion between the spindle and the locknut is discharged by operating the parking brake.
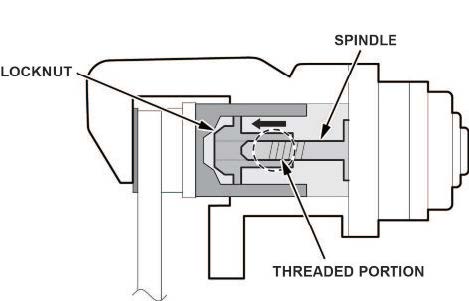
- Connect the HDS to the data link connector (DLC).
- Select ELECTRIC PARKING BRAKE from the BRAKE SYSTEM menu with the HDS, then select BRAKE PAD MAINTENANCE MODE from ADJUSTMENT, and follow the screen prompts.
NOTE
The spindle returns to the initial position by entering the brake pad maintenance mode.
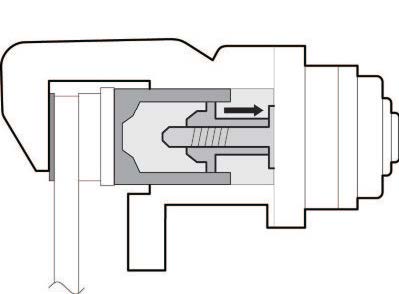
- Turn the ignition to OFF.
- Disconnect the negative cable from the 12 volt battery.
- Press the brake pedal several times.
- Disconnect the electric parking brake actuator connector and remove the caliper body without disconnecting the brake hose from the caliper body.
- Hold the caliper body so that the bleed screw is upright.
- Direct any air trapped in the caliper by doing the following.
13.1 Shake the caliper side to side.
13.2 Strike the caliper several times using a plastic hammer.
- Attach a clear tube to the bleed screw.
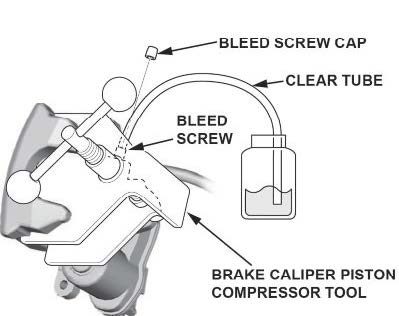
- Install a commercially available brake caliper piston compressor tool on the caliper body.
- Loosen the bleed screw slowly and press in the piston with the brake caliper piston compressor tool.
- If there are air bubbles in the fluid, tighten the bleed screw to the specified torque, install the rear brake caliper and repeat steps 2 thru 16.
- If there are no air bubbles in the fluid, tighten the bleed screw to the specified torque, remove the cardboard and reinstall the outer pad and caliper.
| Component | Specified Torque Value |
| Rear Brake Caliper Bleed Screw | 11 N·m (8 lbf-ft) |
- Connect the electric parking brake actuator connector.
- Press the brake pedal several times.
- Reconnect the negative cable to the 12 volt battery.
- Turn the ignition to ON.
- Select ELECTRIC PARKING BRAKE from the BRAKE SYSTEM menu with the HDS, then select BRAKE PAD MAINTENANCE MODE from ADJUSTMENT, and follow the screen prompts.
- Apply and release the parking brake.
- Turn the ignition to OFF.
- Repeat this procedure for the rear caliper body on the opposite side.
END
B18-061
November 2, 2018
Version 1
Manufacturer Notice
November 2, 2018
DEFECT INFORMATION REPORT
Recall Acknowledgement
November 15, 2018
Recalls Documents

- Mixes well with conventional fluids
- Low-moisture formula provides excellent vapor lock protection
- Ideal for hydraulic and disc brakes


- Provides an extra margin of safety in extreme braking conditions (packaging may vary)
- Mix of polyglycol ethers ensures hot brake-system operation will not create dangerous vapor
- Excellent for ABS, disc and drum brake systems
- Delivers braking power when needed by avoiding a spongy pedal
- Both wet and dry boiling points exceed the minimum government standards

- Ideal for hydraulic and disc brakes
- Mixes well with conventional fluids
- Low-moisture formula provides excellent vapor lock protection
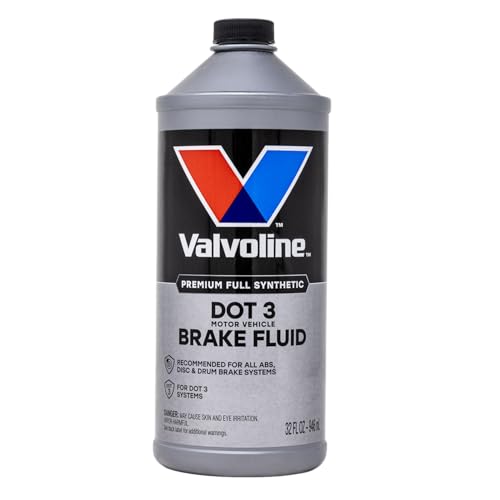
- Exceeds DOT 3 regulations: Formulated to meet or surpass DOT 3 requirements, ensuring consistent braking performance and dependable stopping power in all conditions
- Premium high boiling point: Helps prevent vapor lock and brake fade under extreme heat, maintaining safe and reliable braking even in demanding situations
- Full synthetic formula: Provides superior resistance to moisture absorption and corrosion, helping protect vital brake system components for long-lasting performance
- Superior protection and performance: Designed to deliver reliable braking under extreme temperatures while supporting the safety and efficiency of the braking system
- Recommended applications: Suitable for ABS, disc, and drum brake systems; surpasses SAE J1703, FMVSS 116, and ISO 4925 DOT 3 specifications
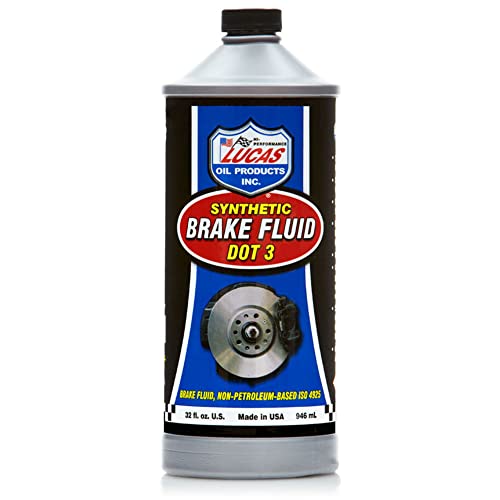
- High quality blend of polyethylene glycol ethers and additives
- Compatible with all brake system rubber components and other brake fluids
- Prevents seal hardening or softening
- Protects against rust and corrosion
- Provides excellent lubricity
This product presentation was made with AAWP plugin.