| “This site contains affiliate links for which OEMDTC may be compensated” |
NHTSA Campaign Number: 14V779
Manufacturer Honda (American Honda Motor Co.)
Components POWER TRAIN
Potential Number of Units Affected 9,392
Automatic Transmission Not Shifting Into Park
If the shift indicator displays “Park” but the park lock does not engage, the vehicle may roll away increasing the risk of a crash.
Summary
American Honda Motor Co. (Honda) is recalling certain model year 2015 Acura TLX V6 2WD vehicles manufactured July 14, 2014, to November 12, 2014, and certain 2015 TLX V6 SH-AWD vehicles manufactured August 26, 2014, to November 10, 2014.
The automatic transmission parking pawl may become contaminated or the park rod may become dislodged or broken.
This may prevent the transmission from shifting into the Park position.
Remedy
Honda will notify owners, and dealers will inspect and replace the transmission if necessary, free of charge.
The recall began January 30, 2015.
Owners may contact Honda customer service at 1-310-783-2000.
Honda’s number for this recall is JM8.
Notes
Owners may also contact the National Highway Traffic Safety Administration Vehicle Safety Hotline at 1-888-327-4236 (TTY 1-800-424-9153), or go to www.safercar.gov.
Check if your Acura has a Recall
B14-050
April 24, 2015
01229-01601 Version 5
Safety Recall: Transmission Does Not Engage Park
Supersedes 14-050, dated April 14, 2015; see REVISION SUMMARY.
AFFECTED VEHICLES
| Year | Model | VIN Range |
| 2015 | TLX V6 with 9-speed A/T | Check the iN VIN status for eligibility |
REVISION SUMMARY
There is a link to a short survey at the end of this bulletin. We would like your feedback about how useful you found the included videos and animations.
- PARTS INFORMATION was added.
- The information under TOOL INFORMATION was changed.
- Several videos and animations were updated in REPAIR PROCEDURE.
- Step 43 was added under INSPECTION AND REPAIR PROCEDURE.
BACKGROUND
Acura has decided that a defect relating to motor vehicle safety exists in certain 2015 model year TLX vehicles. During installation of the park rod and the EPR (electric park release) shaft, there are two issues that may have occurred:
- The lock tab of the park rod may have been broken during assembly and the rod can pop out of the park disc; if the rod pops out, the park lock will not engage.
- When the EPR shaft was installed, the roll pin may have created some metal chips or debris that could have fallen into the park pawl bushing. These chips may jam the park pawl and prevent it from engaging.
If either of these conditions occurs, the transmission may not shift into Park when the driver selects the Park position on the electronic gear selector. Although the gear position indicator will display P, the park lock may not engage allowing the vehicle to roll away and increasing the risk of a crash.

CLIENT NOTIFICATION
Owners of affected vehicles will be sent a notification of this campaign.
Do an iN VIN status inquiry to make sure the vehicle is shown as eligible.
Some vehicles affected by this campaign may be in your new or used vehicle inventory. These vehicles must be repaired before they are sold.
Should your dealership sell an unrepaired vehicle or fails to do the inspection or flush according to this bulletin that subsequently causes injury or damage because of the recalled item, the dealership will be solely responsible to the damaged party, and will be required to defend and indemnify American Honda for any resulting claims. To see if a vehicle in inventory is affected by this recall, do a iN VIN status inquiry before selling it.
CORRECTIVE ACTION
Inspect the park rod in the transmission and, based on the results, either flush the A/T or replace it.
PARTS INFORMATION
| Part Name | Part Number | Quantity |
| TRANSMISSION 2WD, BASE AND TECH | 06200-5J4-A56RM | 1 |
| TRANSMISSION 2WD, ACC AND ADVANCE | 06200-5J4-A66RM | 1 |
| TRANSMISSION AWD, BASE AND TECH | 06200-5L9-A56RM | 1 |
| TRANSMISSION AWD, ACC AND ADVANCED | 06200-5L9-A66RM | 1 |
Needed for both 2WD and AWD
| Part Name | Part Number | Quantity |
| Flange Bolt (12 x 120 mm) | 90051-5J4-000 | 1 |
| Flange Bolt (12 x 70 mm) | 90051-R97-000 | 1 |
| Flange Nut (12 mm) | 90371-SEF-000 | 4 |
| Flange Bolt (10 x 35 mm) | 90163-SDA-A01 | 1 |
| Flange Bolt (10 x 45 mm) | 90163-TZ3-A00 | 1 |
| Flange Bolt (10 x 30 mm) | 90161-T2F-A01 | 3 |
| Flange Bolt (12 x 45 mm) | 90165-SDA-A00 | 2 |
| Flange Bolt (12 x 45 mm) | 90164-T2G-A01 | 1 |
| Flange Bolt (14 x 135 mm) | 90176-SDA-A00 | 4 |
| Split Pin (3.0 x 22 mm) | 94201-30220 | 2 |
| Castle Nut (14 mm) | 90363-S3V-A01 | 2 |
| Flange Bolt (10 x 45 mm) | 90163-SZ3-000 | 3 |
| Flange Bolt (12 x 33 mm) | 90186-SDA-A00 | 2 |
| Flange Bolt (10 x 30 mm) | 90163-SDB-A00 | 3 |
| Flange Bolt (10 x 34 mm) | 90162-T2A-A00 | 4 |
| Self-Lock Nut (10 mm) | 90212-SA5-003 | 9 |
| Pre-Chamber Gasket | 18393-SDB-A00 | 1 |
| Ex. Pipe Gasket (ISHINO) | 18212-SA7-003 | 2 |
| Spindle Nut | 90305-S3V-A11 | 2 |
| Snap Ring (32 x 2.2 mm) | 44319-STX-A01 | 1 |
| Set Ring (32 x 2.2 mm) | 44319-STX-A60 | 1 |
| Washer Bolt (8 x 16 mm) | 90101-SWA-A00 | 2 |
Additional parts for AWD
| Part Name | Part Number | Quantity |
| Bolt (12 point 8 x 21 mm) | 90113-S10-000 | 8 |
| Bolt-Washer (10 x 30 mm) | 90382-SZA-003 | 2 |
| Shaft Ring Seal Kit | 06235-5L9-000 | 1 |
NOTE: The ATF fill plug, the drain plug, and the level plug are reused for this service bulletin.
RECOMMENDED MATERIALS
TOOL INFORMATION
| Part Name | Part Number | Quantity |
| Transmission Flush Kit (Includes inlet and outlet hoses, bucket, pump and filter, park rod inspection tool, EPR lever, flush bracket, nozzle, nut, and Acura Genuine ATF Type 3.0 [or later] [6 quarts]) | 07AAZ-TZ3A100 | 1 |
NOTE: Each dealer was sent one Transmission Flush Kit. Additional kits are available through the Acura Tool and Equipment Program at 888-424-6857.
WARRANTY CLAIM INFORMATION
| Operation Number | Description | Flat Rate Time | Defect Code | Symptom Code | Template ID | Failed Part Number |
| 2185A5 | Inspect and flush the transmission. | 0.9 hr | 5YG00 | JM800 | 14-050N | 06200-5J4-A56 |
| 2181AS | For 2WD – Inspect and replace the transmission. | 5.8 hrs | 5YG00 | JM800 | NOTE: Template IDs cannot be used because the quantity of part numbers exceeds the system limitations (10). | 06200-5J4-A56 |
| 2181AR | For AWD – Inspect and replace the transmission | 6.4 hrs | 5YG00 | JM800 | 06200-5J4-A56 |
Skill Level: Repair Technician.
INSPECTION AND REPAIR PROCEDURE
Park Rod Inspection
- Make sure the vehicle is parked on level ground in Park. Make sure the electric parking brake is off and try to roll the vehicle.
- If you cannot roll the vehicle, go to step 2.
- If you can roll the vehicle, the transmission is no good. Replace the transmission. Refer to the electronic service manual.
- Place the vehicle in car-wash mode.
- Start the engine.
- Press the brake pedal, then press the Neutral button on the electronic gear selector. NOTE: The vehicle will not enter carwash mode without the engine running.
- Press the ENGINE START/STOP button within 5 seconds. The power mode goes to accessory and the engine shuts off.
- When the message Shift to Park appears in the MID and the letter N appears in the instrument panel, the vehicle is in car-wash mode.
NOTE: The vehicle remains in carwash mode for about 15 minutes, then it shifts into Park.
- Make sure the transmission is in Neutral by rolling the vehicle about 1 foot. NOTE: If the vehicle is not in Neutral, the inspection procedure will give you an incorrect result. As a result, you may think the vehicle only needs a transmission flush when it actually may need to have the transmission replaced.
- Remove the ATF fill plug.

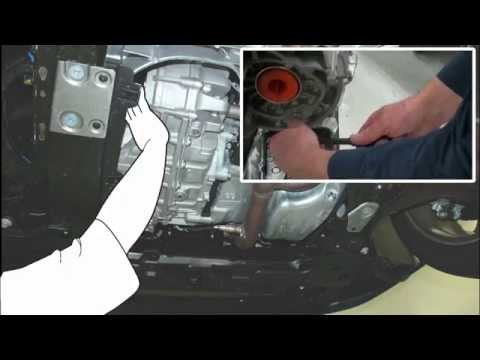
- Insert the park rod inspection tool into the ATF fill hole as shown.

Click on the image below to watch a short video about this procedure.

- Press the lever all the way down until it touches the stop; repeat this three times.


- Remove the park rod inspection tool.
- Use the electronic gear selector to shift the transmission into Park. NOTE: Do not apply the electric parking brake.
- Try to push the vehicle several feet.
- If you cannot move the vehicle, the park rod is OK. Go to step 10 to flush the transmission.
- If you can roll the vehicle, the transmission is no good. Replace the transmission (do not do the following flush procedure). Refer to the electronic service manual.
Transmission Flush Procedure
- Press the ENGINE START/STOP button to set the power mode to OFF.
- Do the 12-volt battery disconnection procedure.
- Remove the 12-volt battery and the battery box.

- Insert the flush nozzle into the ATF fill hole as shown.


Click on the image below to watch a short video about this procedure.

- Install the flush bracket as shown.
NOTE: The tab on the flush nozzle should align with the slot in the bracket. If the tab is not aligned with the bracket, it will not flush the correct area.

- Install the EPR lever and finger-tighten the nut.

Note: If you cannot thread the nut on because there is not enough room on the threaded shaft, the flush nozzle and flush bracket are not properly aligned. Remove the tools and repeat steps 13 thru 15.

- Raise the vehicle. Remove the engine undercover by removing the seven screws.

- Drain the ATF.

- Reinstall the drain plug and torque it to 35 N•m (26 lb-ft).
- If this is the first time using the flush kit, go to HOW TO PRIME THE PUMP on page 16.
- Make sure the flush pump is primed. A primed pump should have ATF in the hoses and about 2 quarts of ATF in the bucket. If you need information about priming the pump, go to HOW TO PRIME THE PUMP on page 16.
- Add 6 quarts of ATF to the bucket. There should be a total of 8 quarts of ATF.
- Attach the flush hose to the flush nozzle.

Click on the image below to watch a short video about this procedure.

- Open the valve on the flush hose.

- Turn on the pump by plugging it in.
- Wait a few seconds for the ATF to start entering the transmission. Once ATF is flowing into the transmission, move the EPR lever slowly back and forth 5 times, as shown in the video. NOTE:
- Make sure the ATF is flowing through the hose when moving the lever. If you move the shaft without any ATF flowing, the flush will not effectively remove any debris.
- If there is no ATF flowing, turn off the pump, remove the priming plug and make sure there is ATF inside. If there is no ATF present, go to HOW TO PRIME THE PUMP on page 16.

- After you cycle the lever 5 times, continue to run the pump until there are only 2 quarts of ATF left in the bucket, then turn off the pump. NOTE: Do not let the ATF in the bucket drop below 2 quarts because you will damage the pump if you run the pump dry.
- Close the valve, and remove the flush hose by prying up on the green quick release tab using a panel removal tool while gently pulling up on the hose.

- Remove the nut, handle, bracket, and nozzle from the vehicle.

- Raise the vehicle and drain the ATF that was used to flush the transmission, then reinstall the drain plug.

- Lower the vehicle and refill the transmission with 3.5 quarts of new ATF Type 3.0 (or later) and install the fill plug.
- Reinstall and reconnect the 12-volt battery.

Check the ATF Level
Click on the image below to watch a short video about this procedure.
- Connect the HDS
- Press the ENGINE START/STOP button to set the power mode to ON. Do not start the engine.
- Press the VSA OFF switch.


- Select transmission D mode, then press the IDS (Integrated Dynamics System) switch until you select Sport+ mode.
- Press the accelerator pedal and run the vehicle in 1st, 2nd, 3rd, and 4th gear for about 10 seconds each to warm up the ATF fluid. Gently apply the brakes to stop the wheels. NOTE: Do not shift the transmission past 4th gear while on the lift because you will damage the transmission.
- Select P mode, then raise the engine speed to 2,000 rpm for a few seconds to make sure the torque converter is full of ATF.
- Let the engine idle and use the HDS AT Mode Data List to read the ATF temperature. Once the ATF reaches 104º F, leave the engine idling and raise the vehicle.

- Remove the level plug located by the left side drive shaft.
- If ATF is flowing out of the hole, wait until the ATF slows to a drip, then reinstall the level plug.
- If no ATF comes out of the hole, lower the vehicle, and add more ATF as necessary. Raise the vehicle and recheck.

- Install the engine undercover.

- Clear any VSA DTCs that may have set from driving the vehicle on a lift.
HOW TO PRIME THE PUMP
Click on the image below to watch a short video about this procedure.

If you are using the transmission flush kit (T/N 07AAZ-TZ3A100) for the first time, you will need 6 quarts of ATF to prime the pump. This is separate from the 6 quarts of ATF used for each flush. Use the following procedures to prime the pump.
Once the pump is primed, you do not have to repeat this procedure unless you drain the pump. NOTE: If you run the pump without fluid, you will damage it.
- Assemble the flush kit as shown.

- Remove the priming plug.

- Add about 1 quart of ATF Type 3.0 (or later) to the pump.

- Apply Teflon tape to the priming plug, then reinstall it.

- Fill the bucket with 5 quarts of ATF Type 3.0 (or later).
NOTE: Make sure you use only ATF Type 3.0 (or later) fluid because if you mix in other types of ATF, you may damage the transmission.

- When the flush nozzle is installed on a vehicle, attach the flush hose to it. Open the valve and run the pump. Confirm ATF fills the filter housing and several inches of the outlet hose. This is confirmed when there is ATF in both hoses and about two quarts of ATF left in the bucket. NOTE: Make sure you drain the ATF from the vehicle before you do the transmission flush.

- After the pump is primed, you are ready to flush the transmission. Add 6 quarts of ATF Type 3.0 (or later) for a total of 8 quarts in the bucket, then go to step 24 and start the flush procedure.
END
Take the Survey:
 Loading...
Loading...
Loading...
Loading...

