| “This site contains affiliate links for which OEMDTC may be compensated” |
| Model | Applicable To | File Under | Bulletin No. | Issue Date |
| 1990 – 93 ACCORD | ALL | ENGINE | A96-005 | JAN 22, 1996 |
Excessive Idle Vibration or “Click” Sound
SYMPTOMS
- Engine vibration at idle.
or
- A single “click” or “pop” sound is heard when coming to a stop (automatic transmission only).
PROBABLE CAUSES
Idle Vibration:
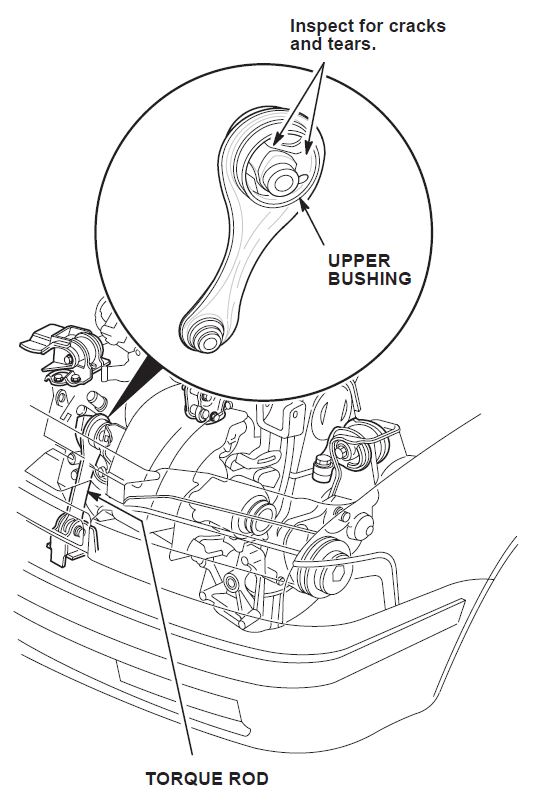
- The upper bushing in the torque rod is cracked or torn (manual or automatic transmission).
- The vacuum-controlled rear engine mount is defective (automatic transmission only).
“Click” Sound (automatic transmission only): - The vacuum-controlled rear engine mount is defective.
PARTS INFORMATION
| Torque rod: | ||
| For manual transmission P/N | 50830-SM4-020 | H/C 3594991 |
| For automatic transmission P/N | 50830-SM4-A81 | H/C 3594983 |
| Vacuum-actuated rear engine mount: P/N | 50810-SV4-J82 | H/C 4710133 |
CORRECTIVE ACTION
- Idle Vibration: Begin with Torque Rod Inspection.
- “Click” Sound: Begin with Diagnosis B.
Torque Rod Inspection
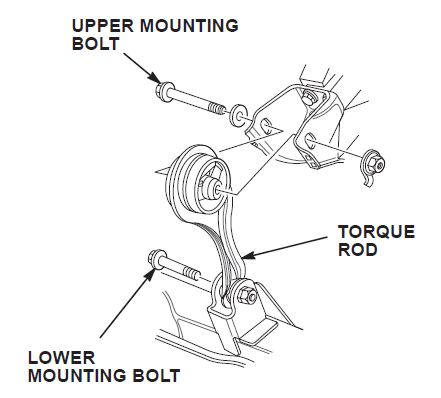
- Inspect the torque rod upper bushing for cracks or tears. On A/T-equipped models, remove the upper mounting bolt and rotate the torque rod away from the engine.
- If the bushing is bad, continue to step 2 to replace the torque rod.
- If the bushing is OK, and the vehicle has an automatic transmission, go to Diagnosis A.
- If the bushing is OK, and the vehicle has a manual transmission, investigate other causes.
- Remove the upper mounting bolt (if not done instep 1). Remove the lower mounting bolt. Remove the torque rod.
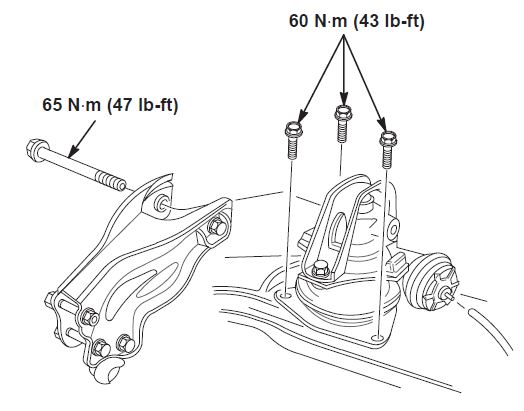
- Install the new torque rod (see PARTS INFORMATION). Torque both mounting bolts to 65 N⋅m (47 lb-ft).
NOTE: The upper mounting bolt should easily slide into the torque rod. If it does not, the front beam may be bent.
- Start the engine and check for idle vibration.
- Manual Transmission: If idle vibration is still excessive, investigate other causes.
- Automatic Transmission: If idle vibration is still excessive, go to Diagnosis A.
Diagnosis A (Excessive Idle Vibration)
- Warm the engine to normal operating temperature (cooling fan comes on at least twice).
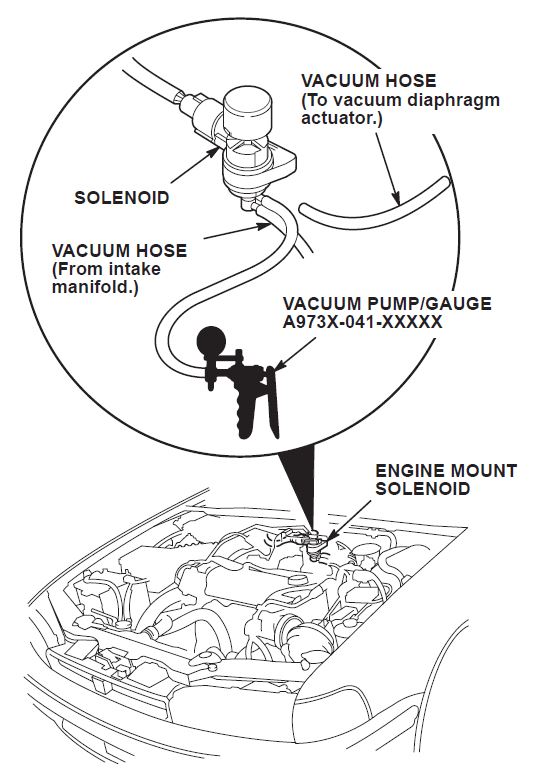
- Disconnect the upper hose from the engine mount solenoid. Attach a vacuum gauge to the solenoid.
- With engine speed at 770 rpm or less, check for manifold vacuum.
- If there is no vacuum, troubleshoot the engine mount control system (see section 23 of the appropriate service manual).
- If there is vacuum, continue to step 4.
- Disconnect the vacuum gauge from the engine mount solenoid and plug the hose port.
- Connect a vacuum pump to the upper hoseyou disconnected in step 2. Apply 15 inches of vacuum for several seconds.
- If there is a vacuum leak, inspect the hose and engine mount diaphragm.
- If there is no vacuum leak, continue to step 6.
- Turn on the air conditioning and put the transmission in Drive.
- Have an assistant apply 15 inches of vacuum for approximately 10 seconds, then release the vacuum for 10 seconds. Repeat this several times.
- If the level of idle vibration changes with the vacuum application, investigate other causes for the idle vibration.
- If the level of idle vibration does not change, go to Engine Mount Replacement.
Diagnosis B (“Click” Sound)
- Test drive the vehicle and verify that a single“click” or “pop” sound is heard when coming to a stop.
- Disconnect the upper hose from the enginemount solenoid. Plug the hose and the port on the solenoid.
- Drive the vehicle again and listen for the same sound.
- If the sound is still there, investigate other causes.
- If the sound has disappeared, go to Engine Mount Replacement.
Engine Mount Replacement
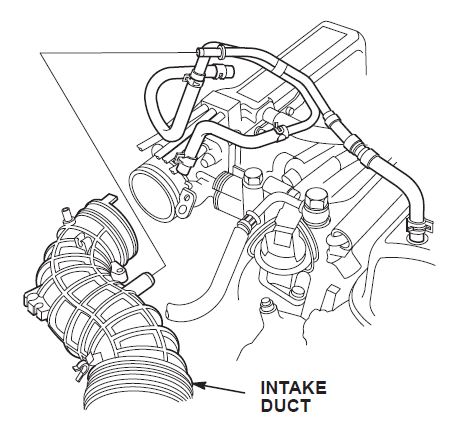
- Remove the air intake duct.
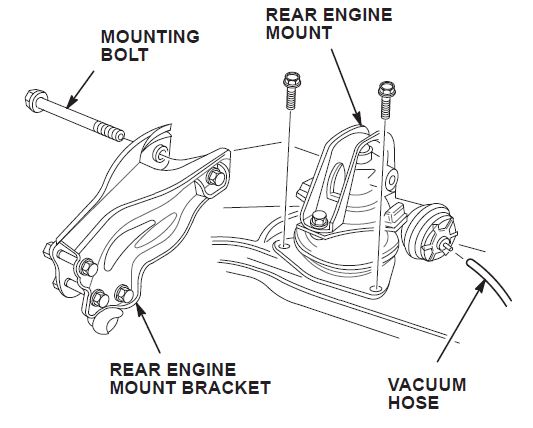
- Disconnect the vacuum hose from the rear engine mount diaphragm. Remove the mounting bolt.
- Remove two of the three rear engine mount mounting bolts.
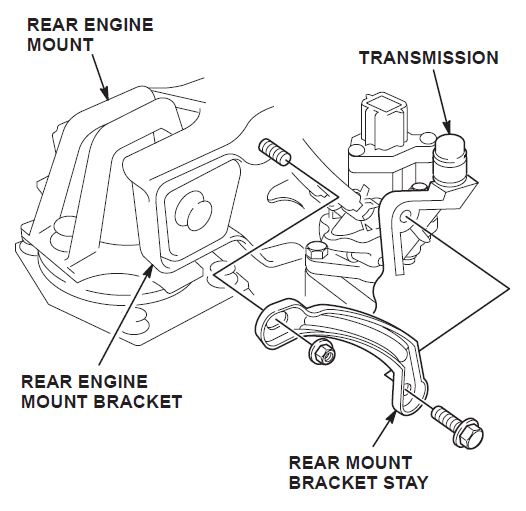
- Remove the bracket between the engine and transmission.
- Raise the vehicle on a hoist.
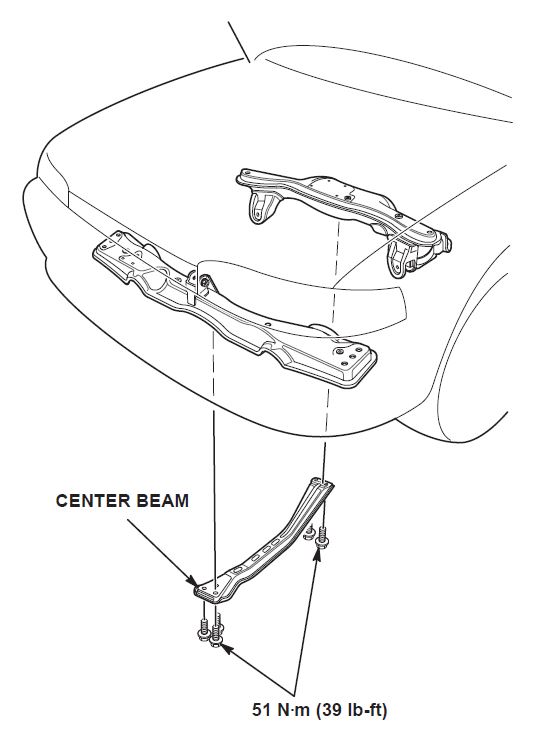
- Remove the center beam (five bolts).
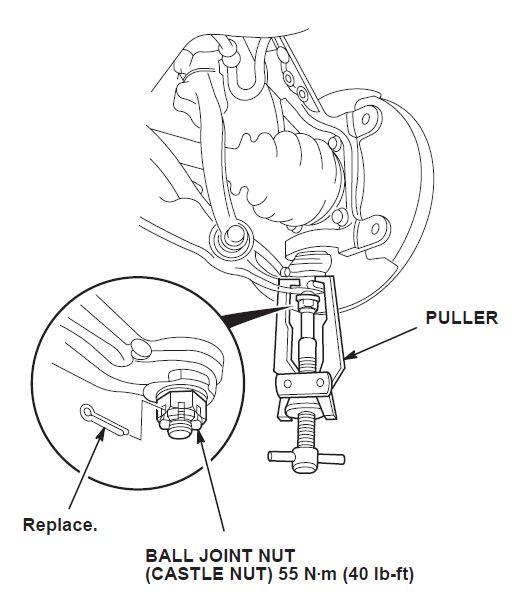
- Remove the cotter pin and castle nut from the left lower control arm. Use the special tool to separate the lower control arm from the steering knuckle.
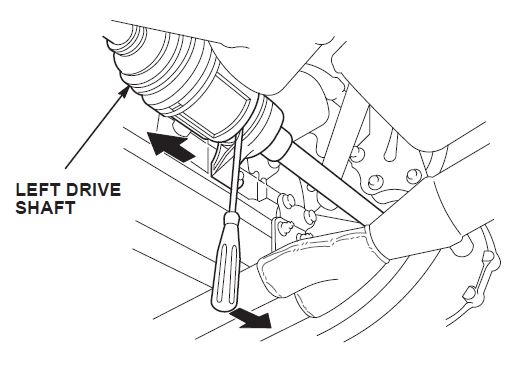
- Disconnect the left drive shaft from the intermediate shaft.
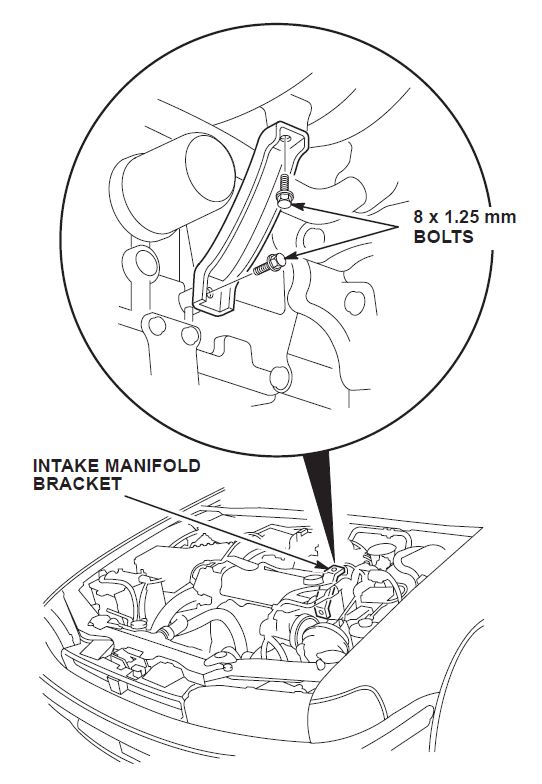
- Remove the intake manifold bracket.
- Remove the remaining rear engine mount mounting bolt.
- Remove the oil filter.
- EX model only: Remove the oxygen sensor.
- Remove the rear engine mount by sliding it to the left side of the vehicle.
- Install the new rear engine mount. Torque the bolts as shown.
- Reinstall all removed parts.
WARRANTY CLAIM INFORMATION
In warranty: The normal warranty applies.
Out of warranty: Any repair performed after warranty expiration may be eligible for goodwill consideration by the District Service Manager or your Zone Office. You must request consideration, and get a decision, before starting work.
| OPERATION NUMBER | DESCRIPTION | FLAT RATE TIME | TEMPLATE ID |
| 112113 | Inspect and replace torque rod, manual transmission | 0.5 hour | 96-005A |
| 112113 | Inspect and replace torque rod, automatic transmission | 0.5 hour | 96-005B |
| 112114 | Diagnose and replace rear engine mount | 1.9 hours | 96-005C |
Failed part: P/N 50830-SM4-A81 H/C 3594983
Defect code: 042
Contention code: B07
 Loading...
