| “This site contains affiliate links for which OEMDTC may be compensated” |
A14-016
September 28, 2016
04967 Version 3
Pop or Clunk from Front End When Driving over Bumps in Cold Weather
Supersedes 14-016, dated October 8, 2014; to revise the information highlighted in yellow
REVISION SUMMARY
Under PARTS INFORMATION, a part number was updated.
AFFECTED VEHICLES
| Year | Model | Trim | VIN Range |
| 2012 | Odyssey | ALL | 5FNRL5H..CB088500 thru 5FNRL5H..CB999999 |
| 2013 | Odyssey | ALL | ALL |
| 2014 | Odyssey | ALL | 5FNRL5H..EB000001 thru 5FNRL5H..EB060508 |
SYMPTOM
In below-freezing weather, there is a pop or clunk from the front of the vehicle while going over a bump.
POSSIBLE CAUSES
The front bump stops have loosened and are moving inside the top mounting cap.
CORRECTIVE ACTION
Replace both front bump stops.
PARTS INFORMATION
| Part Name | Part Number | Quantity |
| Front Bump Stop | 51722-TK8-A21 | 2 |
| Flange Bolt (16 X 68 mm) | 90120-SHJ-A00 | 4 |
| Nut (12 mm) | 90213-SHJ-L01 | 2 |
| Flange Nut (10 mm) | 90304-S10-024 | 6 |
| Flange Nut (16 mm) | 90382-SP0-003 | 4 |
WARRANTY CLAIM INFORMATION
The normal warranty applies.
| Operation Number | Description | Flat Rate Time | Template ID | Failed Part Number |
| 4141E1 | Install new bump stops on both sides (includes test drive and alignment). | 2.1 hours | 14-016A | 51722-SHJ-A02 |
Defect Code: 06201
Symptom Code: 04201
Skill Level: Repair Technician
DIAGNOSIS
- With the vehicle cold-soaked and the ambient temperature at 23º F or below, drive the vehicle over a road with small bumps.
- If a pop or clunk (similar to a mallet hitting a solid metal piece) is heard from the front struts, park the vehicle inside the shop and wait about 30 minutes to warm it up, then continue with step 2.
- If no noise is heard, this bulletin does not apply. Continue with normal troubleshooting.
- After the suspension components have warmed up for 30 minutes, drive the vehicle on the same portion of the road where you heard the pop or clunk.
- If there is no noise from the front suspension, continue to REPAIR PROCEDURE.
- If the same noise is heard, this bulletin does not apply. Continue with normal troubleshooting.
REPAIR PROCEDURE
- Raise and support the vehicle.
- Remove the front wheel.
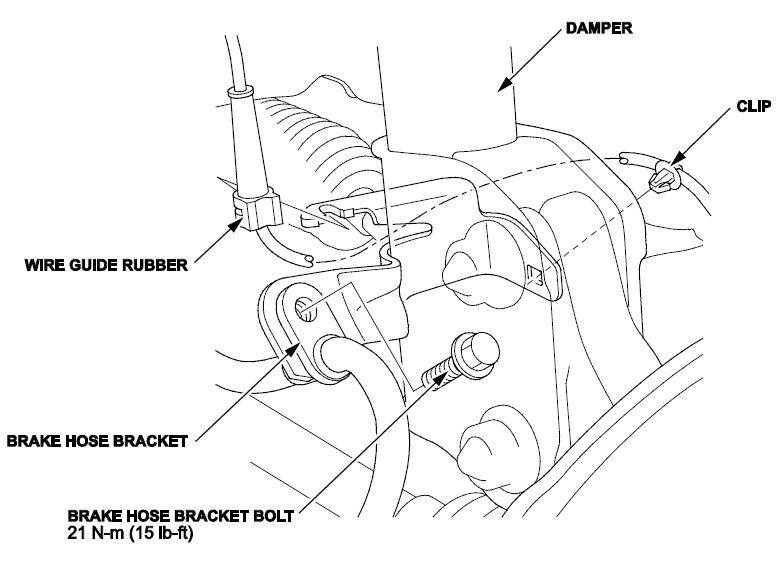
- Remove the wire guide rubber and the clip from the damper. Do not disconnect the wheel speed sensor connector.
- Remove the brake hose bracket from the damper.
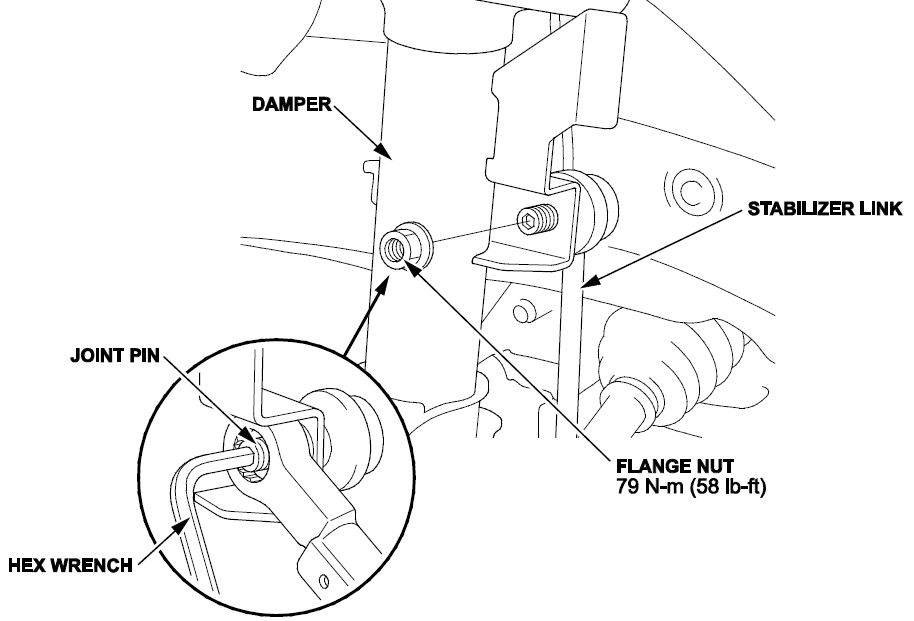
- Remove the flange nut while holding the joint pin with a hex wrench, and disconnect the stabilizer link from the damper.
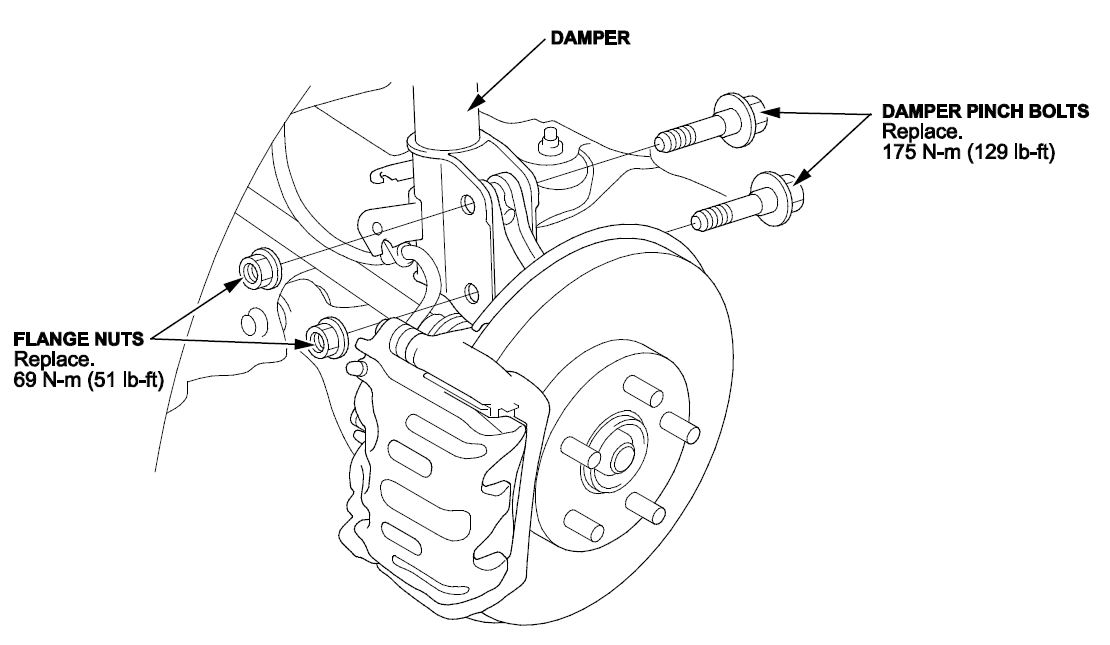
- Remove the damper pinch bolts and flange nuts from the damper.
NOTE: Do not allow the knuckle to rotate too far outward, or the driveshaft inboard joint may come apart.
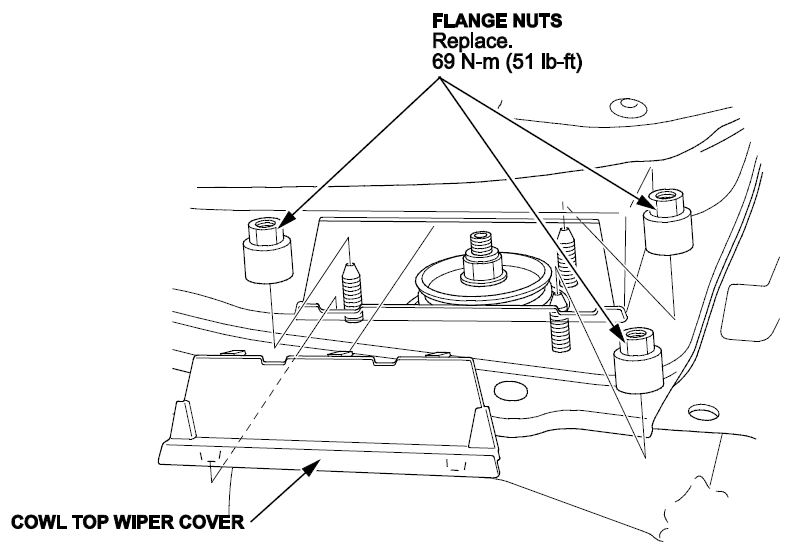
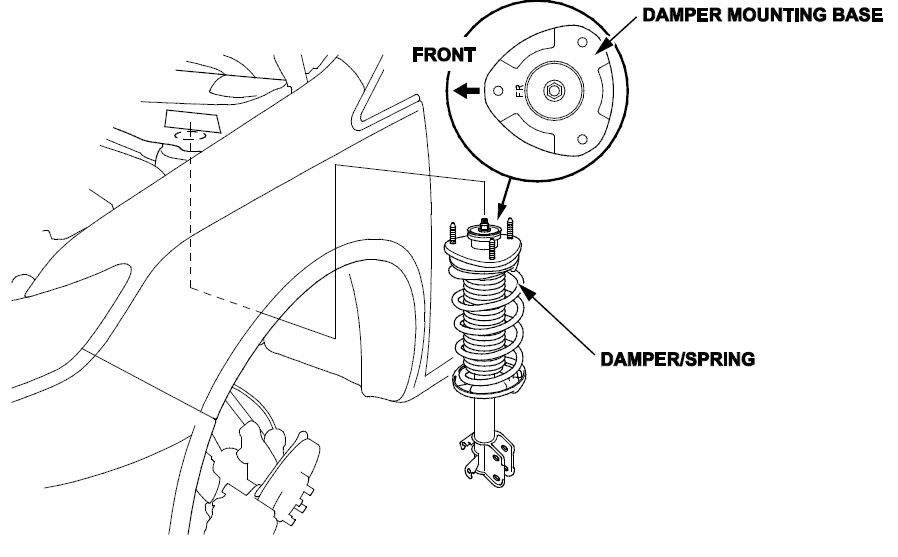
- Remove the cowl top wiper cover, then remove the flange nuts from the top of the damper. Do not let the damper/spring drop down under its own weight.
- Remove the damper/spring.
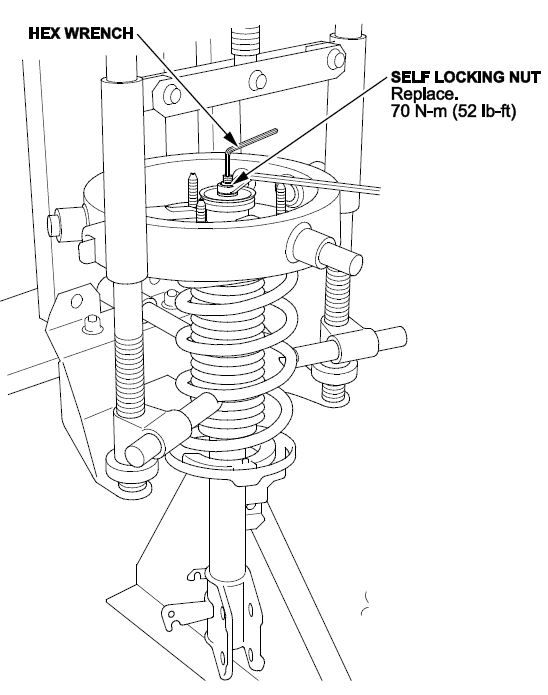
- Compress the damper spring, then remove the self-locking nut while holding the damper shaft with a hex wrench. Do not compress the damper spring more than necessary to remove the self-locking nut.
- Release the pressure from the strut spring compressor, then disassemble the damper.
- Install the new bump stop.
- Reassemble the damper using a new self-locking nut. Torque the nut to 70 N∙m (52 lb-ft).
- Reinstall the damper assembly onto the vehicle using the new flange nuts and pinch bolts. Torque the flange nuts to 69 N∙m (51 lb-ft) and the pinch bolts to 175 N∙m (129 lb-ft).
- Reconnect the stabilizer link to the damper. Torque the bolt to 79 N∙m (58 lb-ft).
- Install the brake hose bracket to the damper. Torque the bolt to 21 N∙m (15 lb-ft).
- Repeat steps 2 through 15 on the other damper assembly.
- Do the front wheel alignment.
END
 Loading...
