
NHTSA ID Number: 10084521
Manufacturer Communication Number: A16-035
Summary
SERVICE BULLETIN – A CREAK IS HEARD FROM THE BASE OF THE B-PILLAR WHEN DRIVING ON UNEVEN SURFACES OR DURING ACCELERATION AND BRAKING. THE SHEET METAL HAS A TOUCH POINT DEEP WITHIN THE BASE OF THE B-PILLAR. TO REMEDY THIS CONDITION, SEPARATE THE SHEET METAL AT THE TOUCH POINT AT THE B-PILLAR ON AFFECTED SIDE ONLY.
A16-035
November 3, 2016
05097 Version 2
03969 Version 1
Creak From the B-pillar
(Supersedes 16-035, Dated July 23, 2016, to revise the information highlighted in yellow)
AFFECTED VEHICLES
| Year | Model | Trim | VIN Range |
| 2014–15 | Odyssey | ALL | ALL |
| 2016 | Odyssey | ALL | 5FNRL….GB000001 thru 5FNRL….GB044289 |
REVISION SUMMARY
REPAIR PROCEDURE A has been added.
SYMPTOM
A creak is heard from the base of the B-pillar when driving on uneven surfaces or during acceleration and braking.
POSSIBLE CAUSES
The sheet metal has a touch point deep within the base of the B-pillar.
CORRECTIVE ACTION
Separate the sheet metal at the touch point at the B-pillar on affected side only.
TOOL INFORMATION
| Tool Name | Tool Number | Quantity |
Snap-on Borescope Borescope | BK5600 | 1 |
| Chisel (5.5” X 3/8”) | Snap-on PPC812B or similar | 1 |
| Acid Brush | Commercially Available | 1 |
REQUIRED MATERIALS
| Part Name | Part Number | Quantity |
| Expanding Foam | Commercially Available | 1 |
| Undercoat | Commercially Available | 1 |
DIAGNOSIS
- Test drive the vehicle on an uneven surface (driveway) to determine if the noise is coming from the B-pillar area.
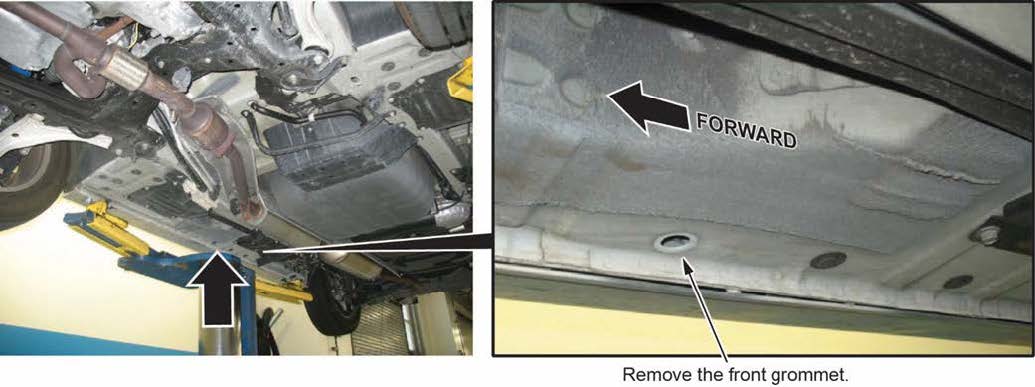
- If the noise is coming from the B-pillar area, raise the vehicle on a lift and, remove the front 20 mm grommet on the side that is making the noise.
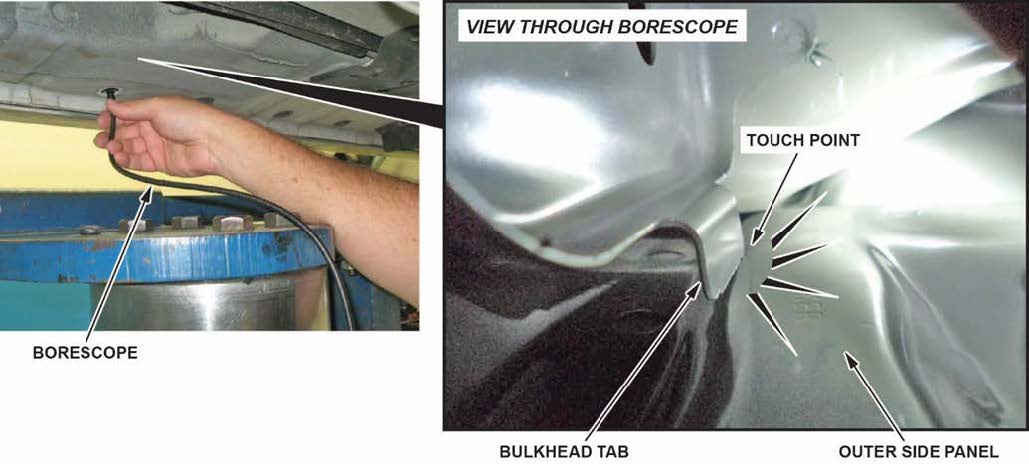
- Use a borescope to look straight up into the hole.
- If the bulkhead tab is touching the outer side panel, go to REAPIR PROCEDURE A.
- If the bulkhead tab is not touching the outer side panel, go to REAPAIR PROCEDURE B.
REPAIR PROCEDURE A
- Use a screwdriver to bend the tab away from the outer side panel.
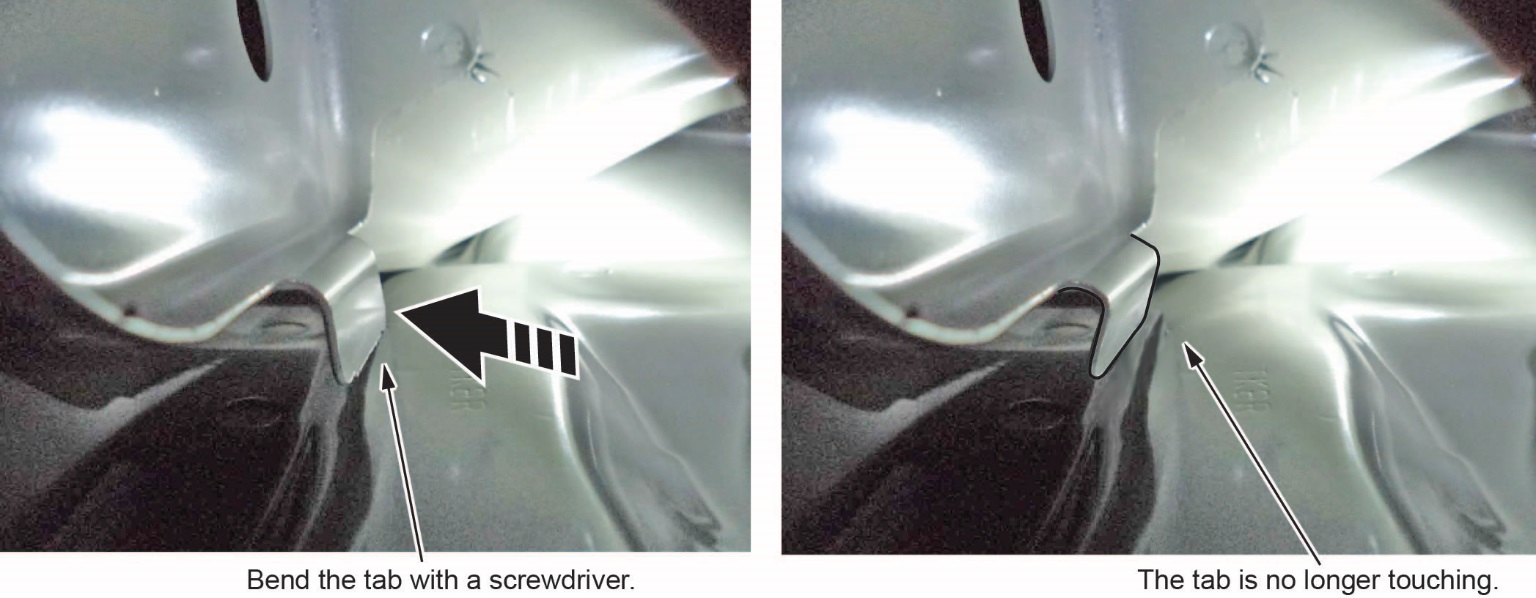
- After bending the bulkhead tab, test-drive the vehicle to confirm the noise has been eliminated.
- If the noise is gone, no further action is needed.
- If the noise is still present, go to REPAIR PROCEDURE B.
REPAIR PROCEDURE B
NOTE: This procedure is in an outline form. For more information on how to remove these items, refer to the service information.
- Move the seat position and the recliner as far forward as possible.
- Disconnect the battery and wait 3 minutes.
- Remove the middle row seat.
- Remove the front door sill trim.
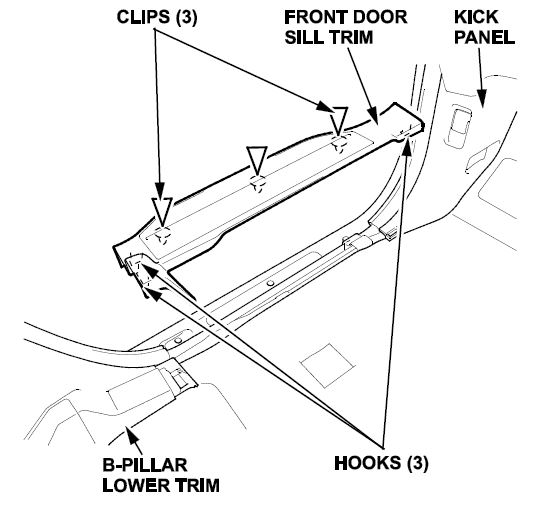
- Remove the sliding door sill trim.
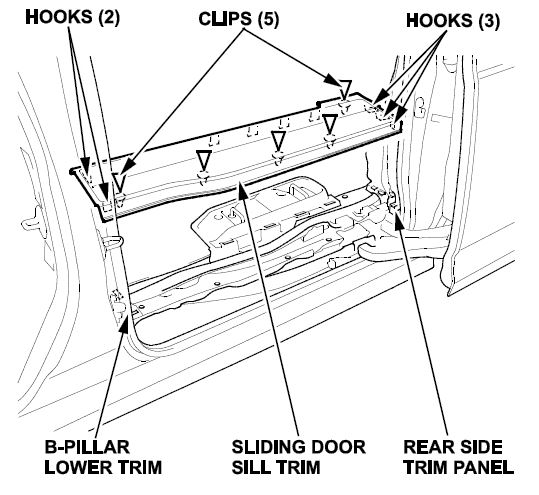
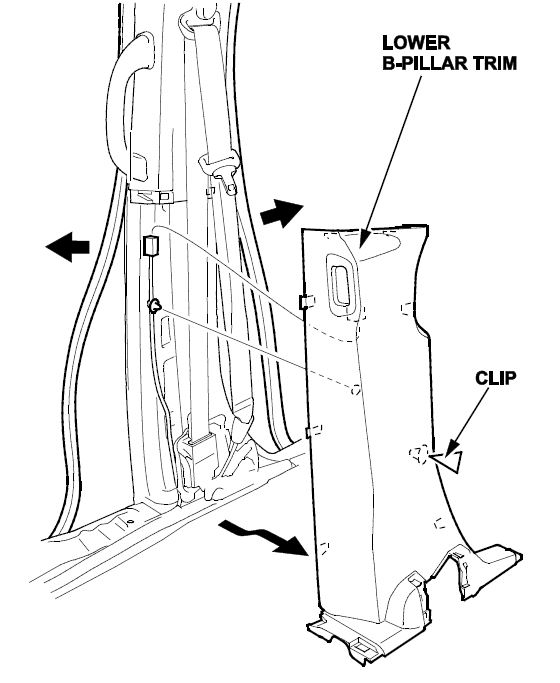
- Remove the lower B-pillar trim.
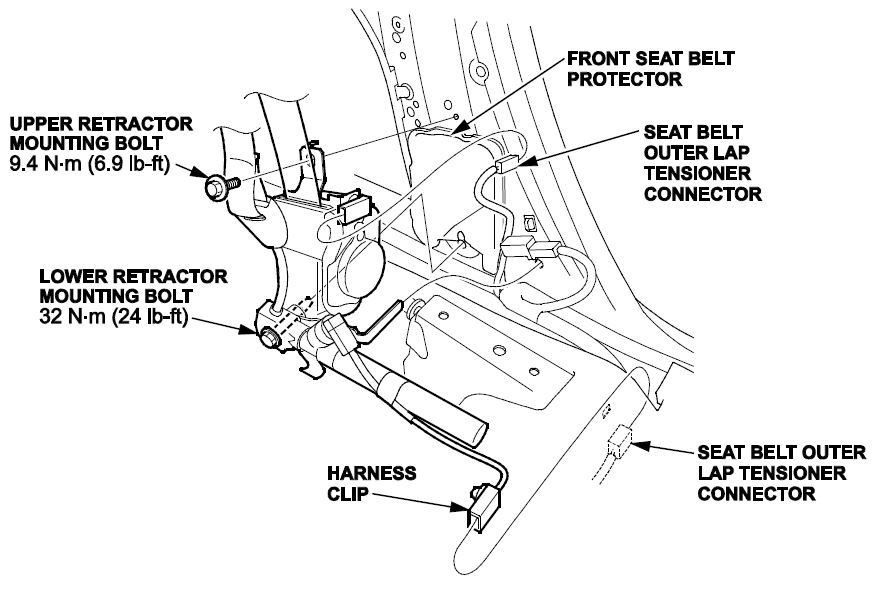
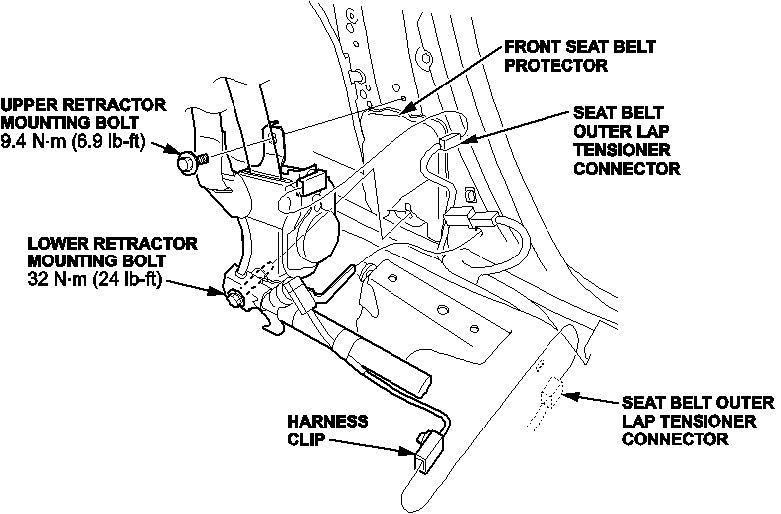
- From under the carpet, disconnect the seat belt tensioner connectors and detach the harness clip. Disconnect the seat belt outer lap tensioner connector, then place the retractor on the front seat.
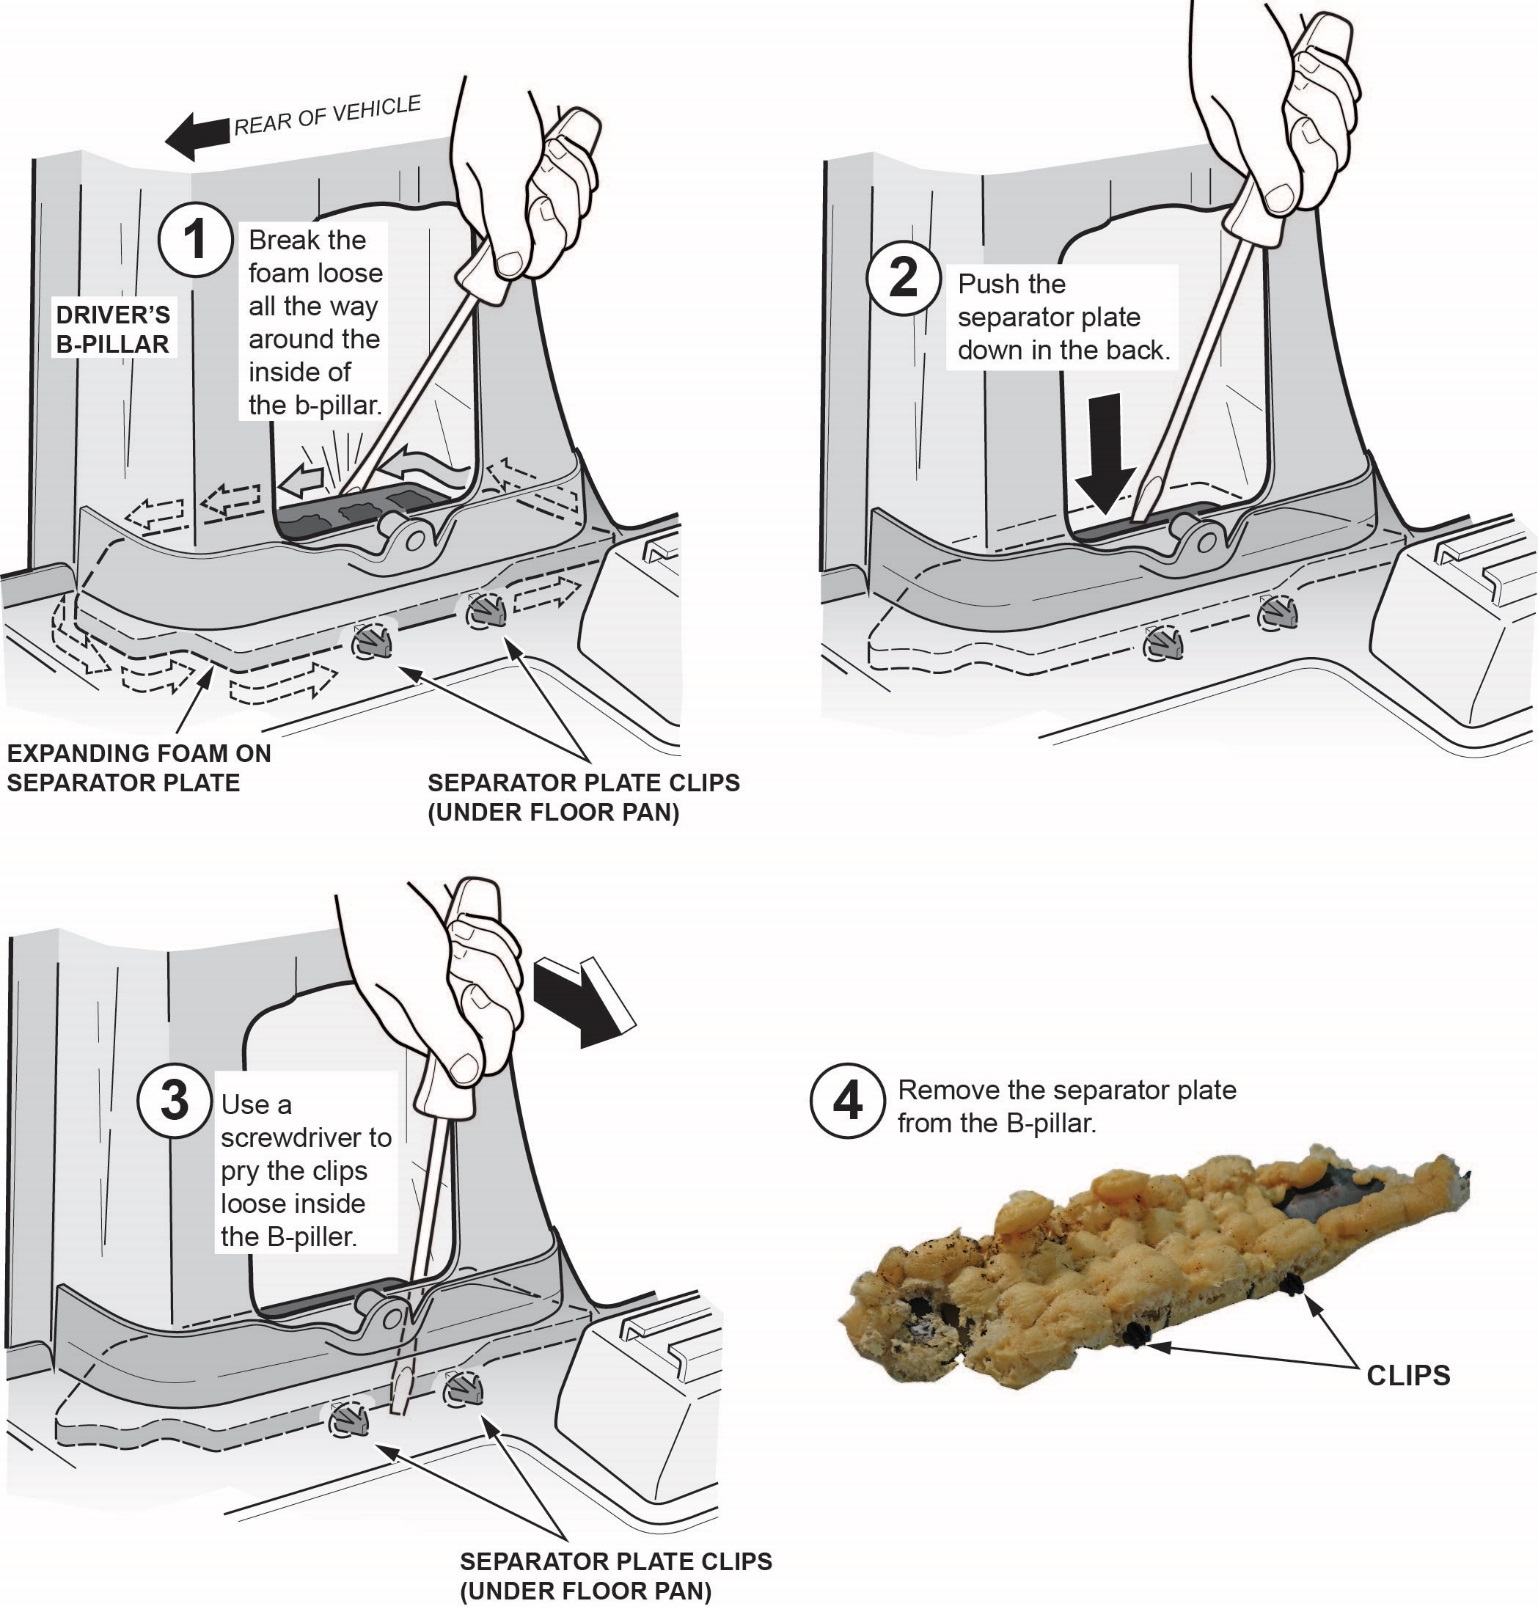
- Use a large flat-blade screwdriver or pry bar to separate the expanding foam that is applied to the plastic separator plate from the inner walls of the B-pillar as shown. Push the back edge of the separator plate down into the B-pillar, then remove the separator plate.
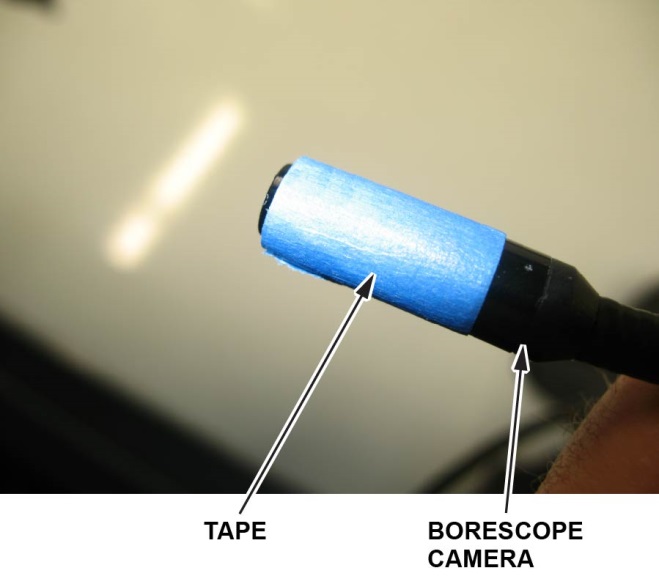
- Wrap some masking tape around the front edge of the borescope camera.
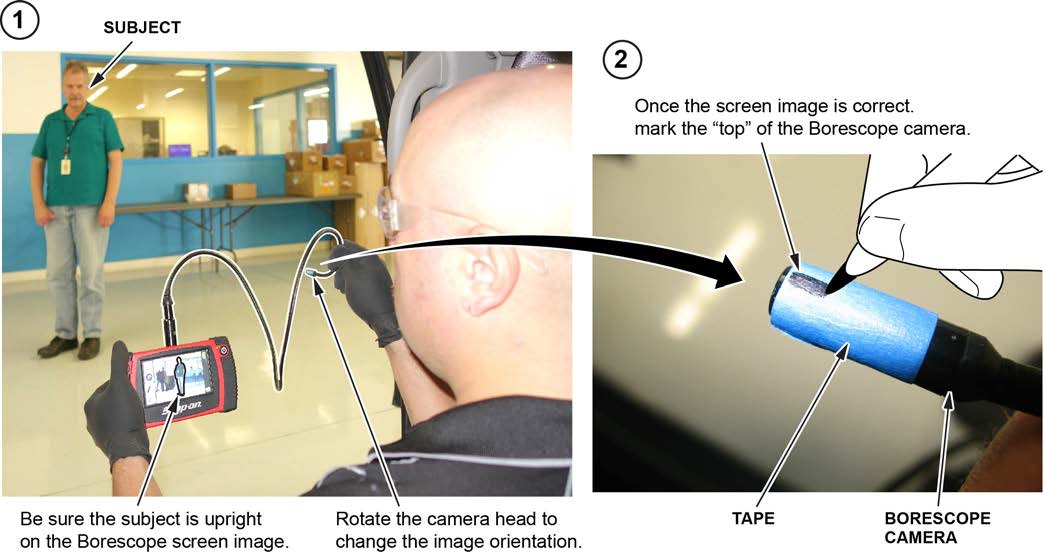
- Turn on the borescope and adjust the camera until you get the display level as shown. Then, put a mark on top of the tape to show the correct orientation for the display.
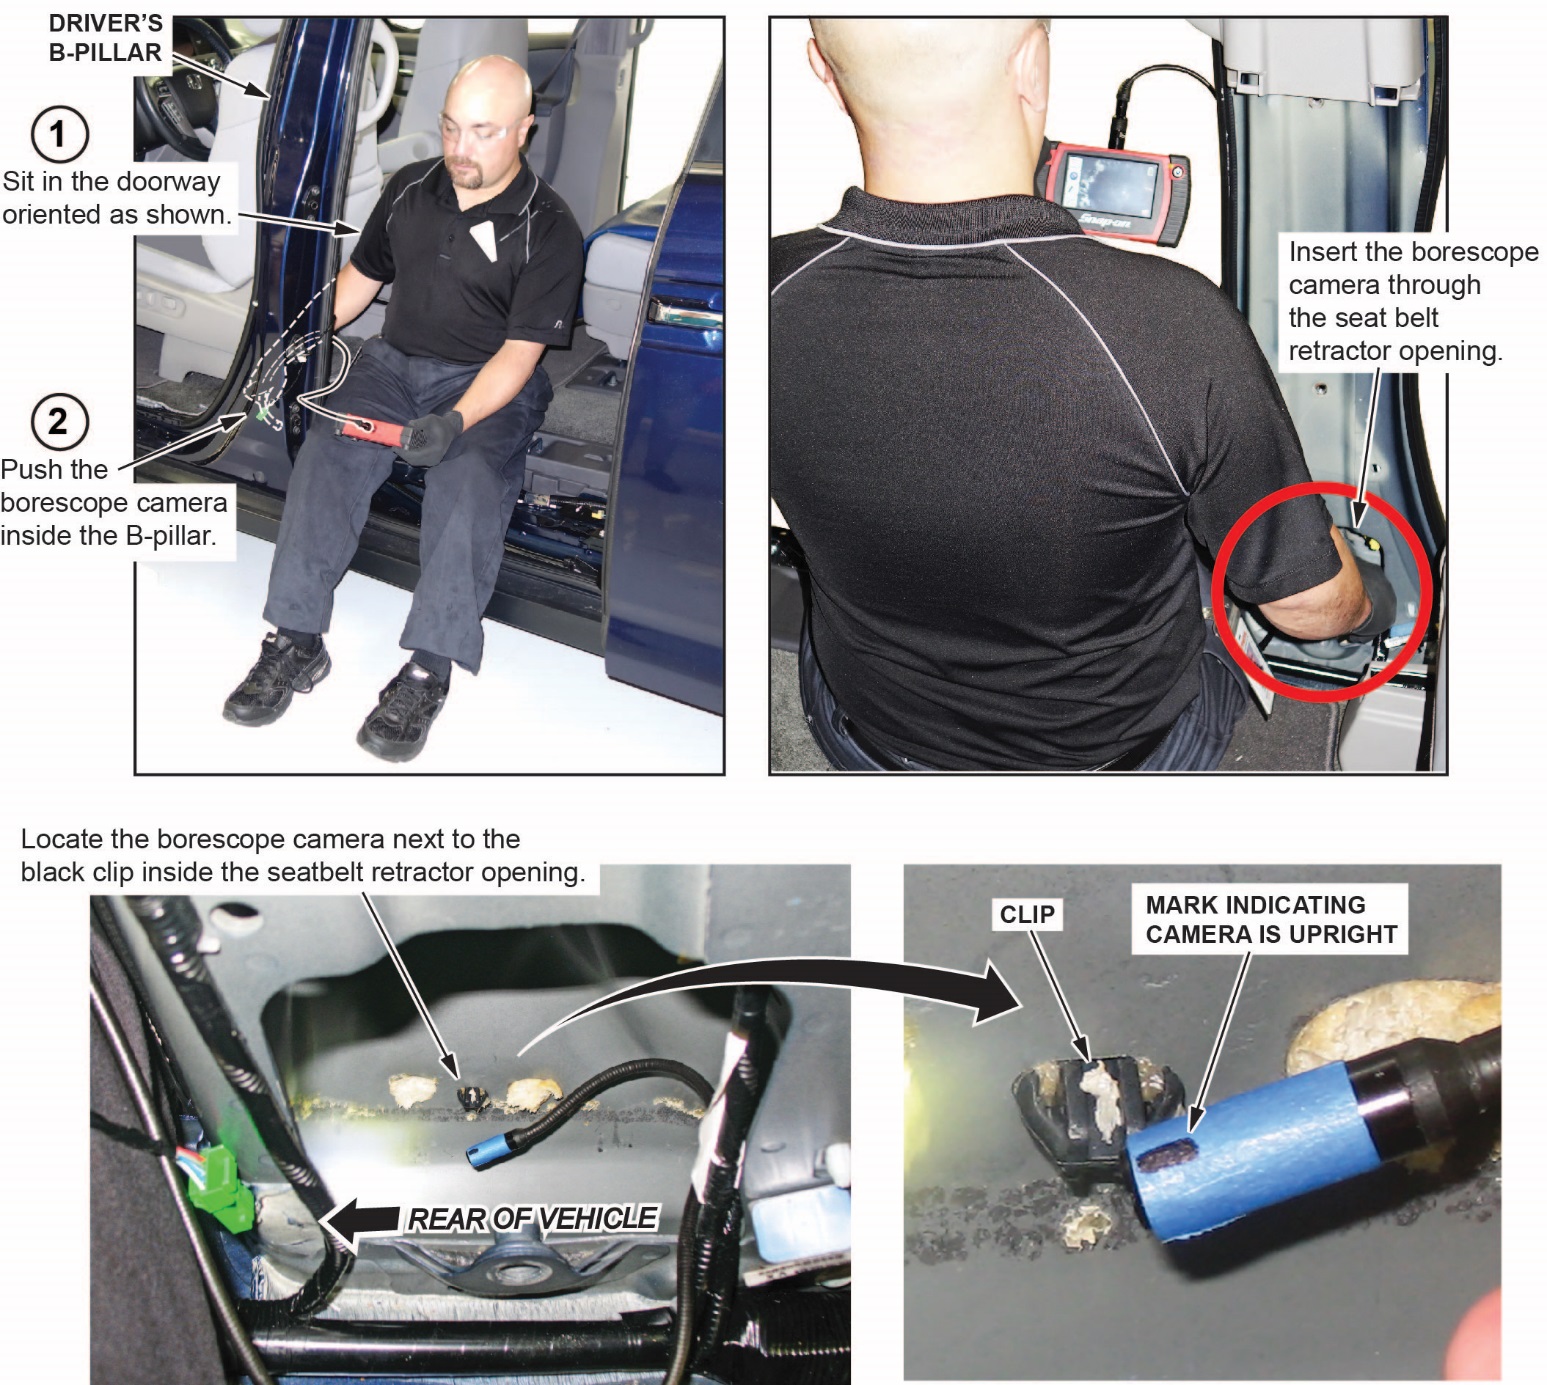
- From a sitting position in the door opening, insert the borescope camera down into the seat belt retractor opening. Place the camera near the black plastic clip and aim toward the rear of the vehicle as shown.
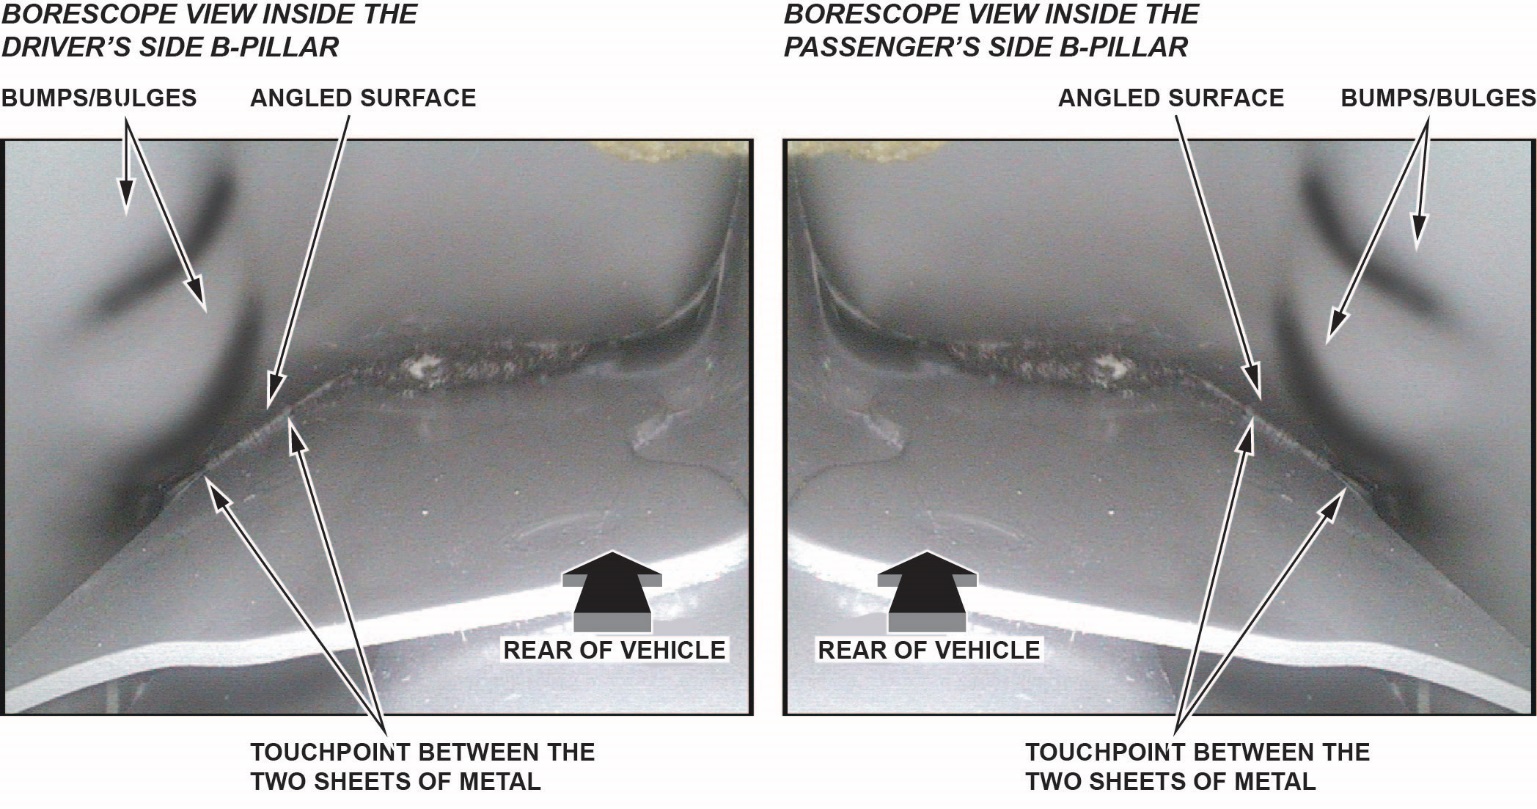
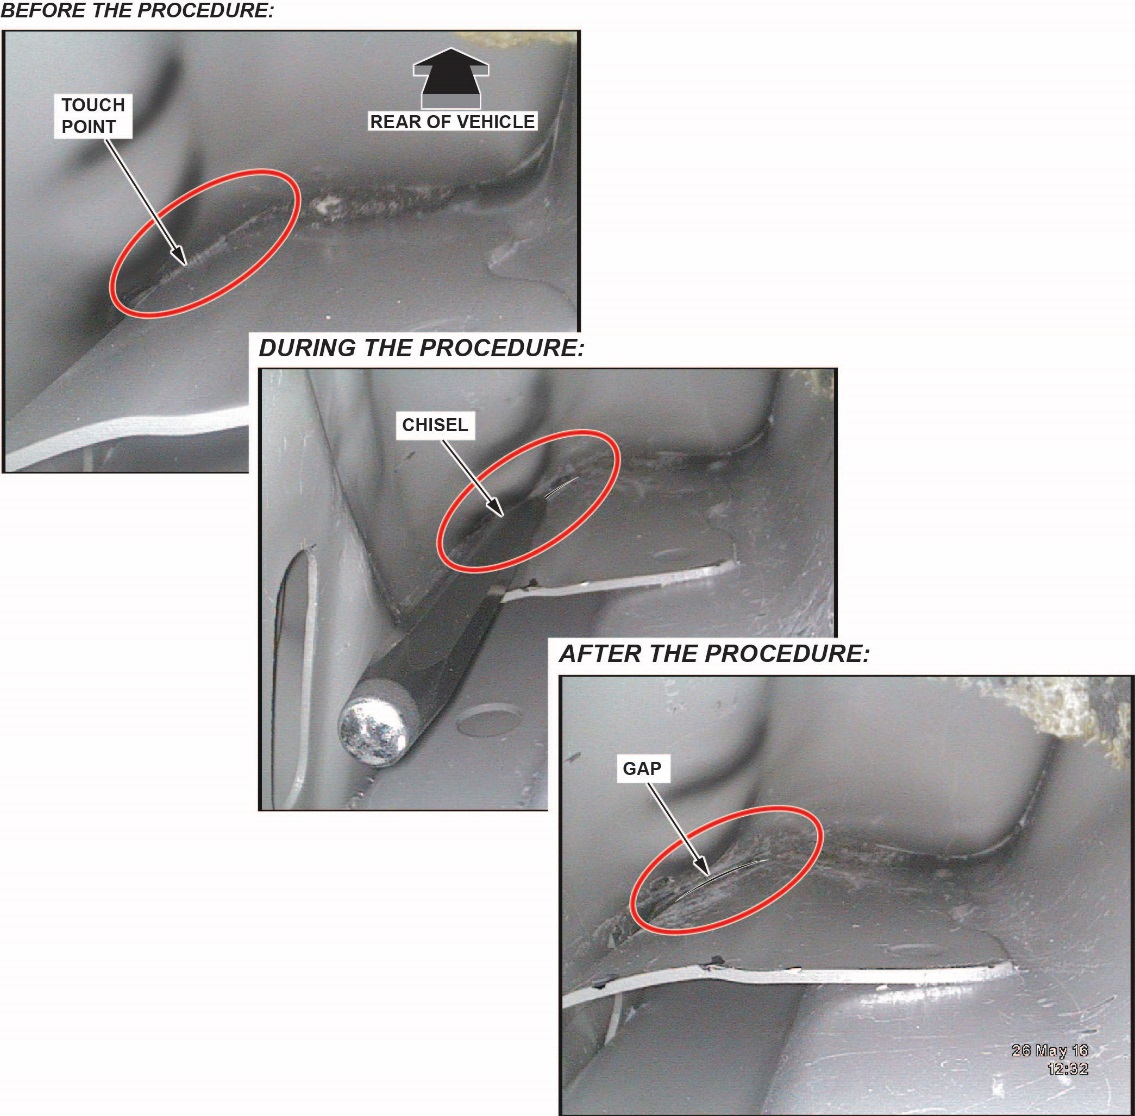
- Position the camera to inspect the specified location to confirm the touch point area.
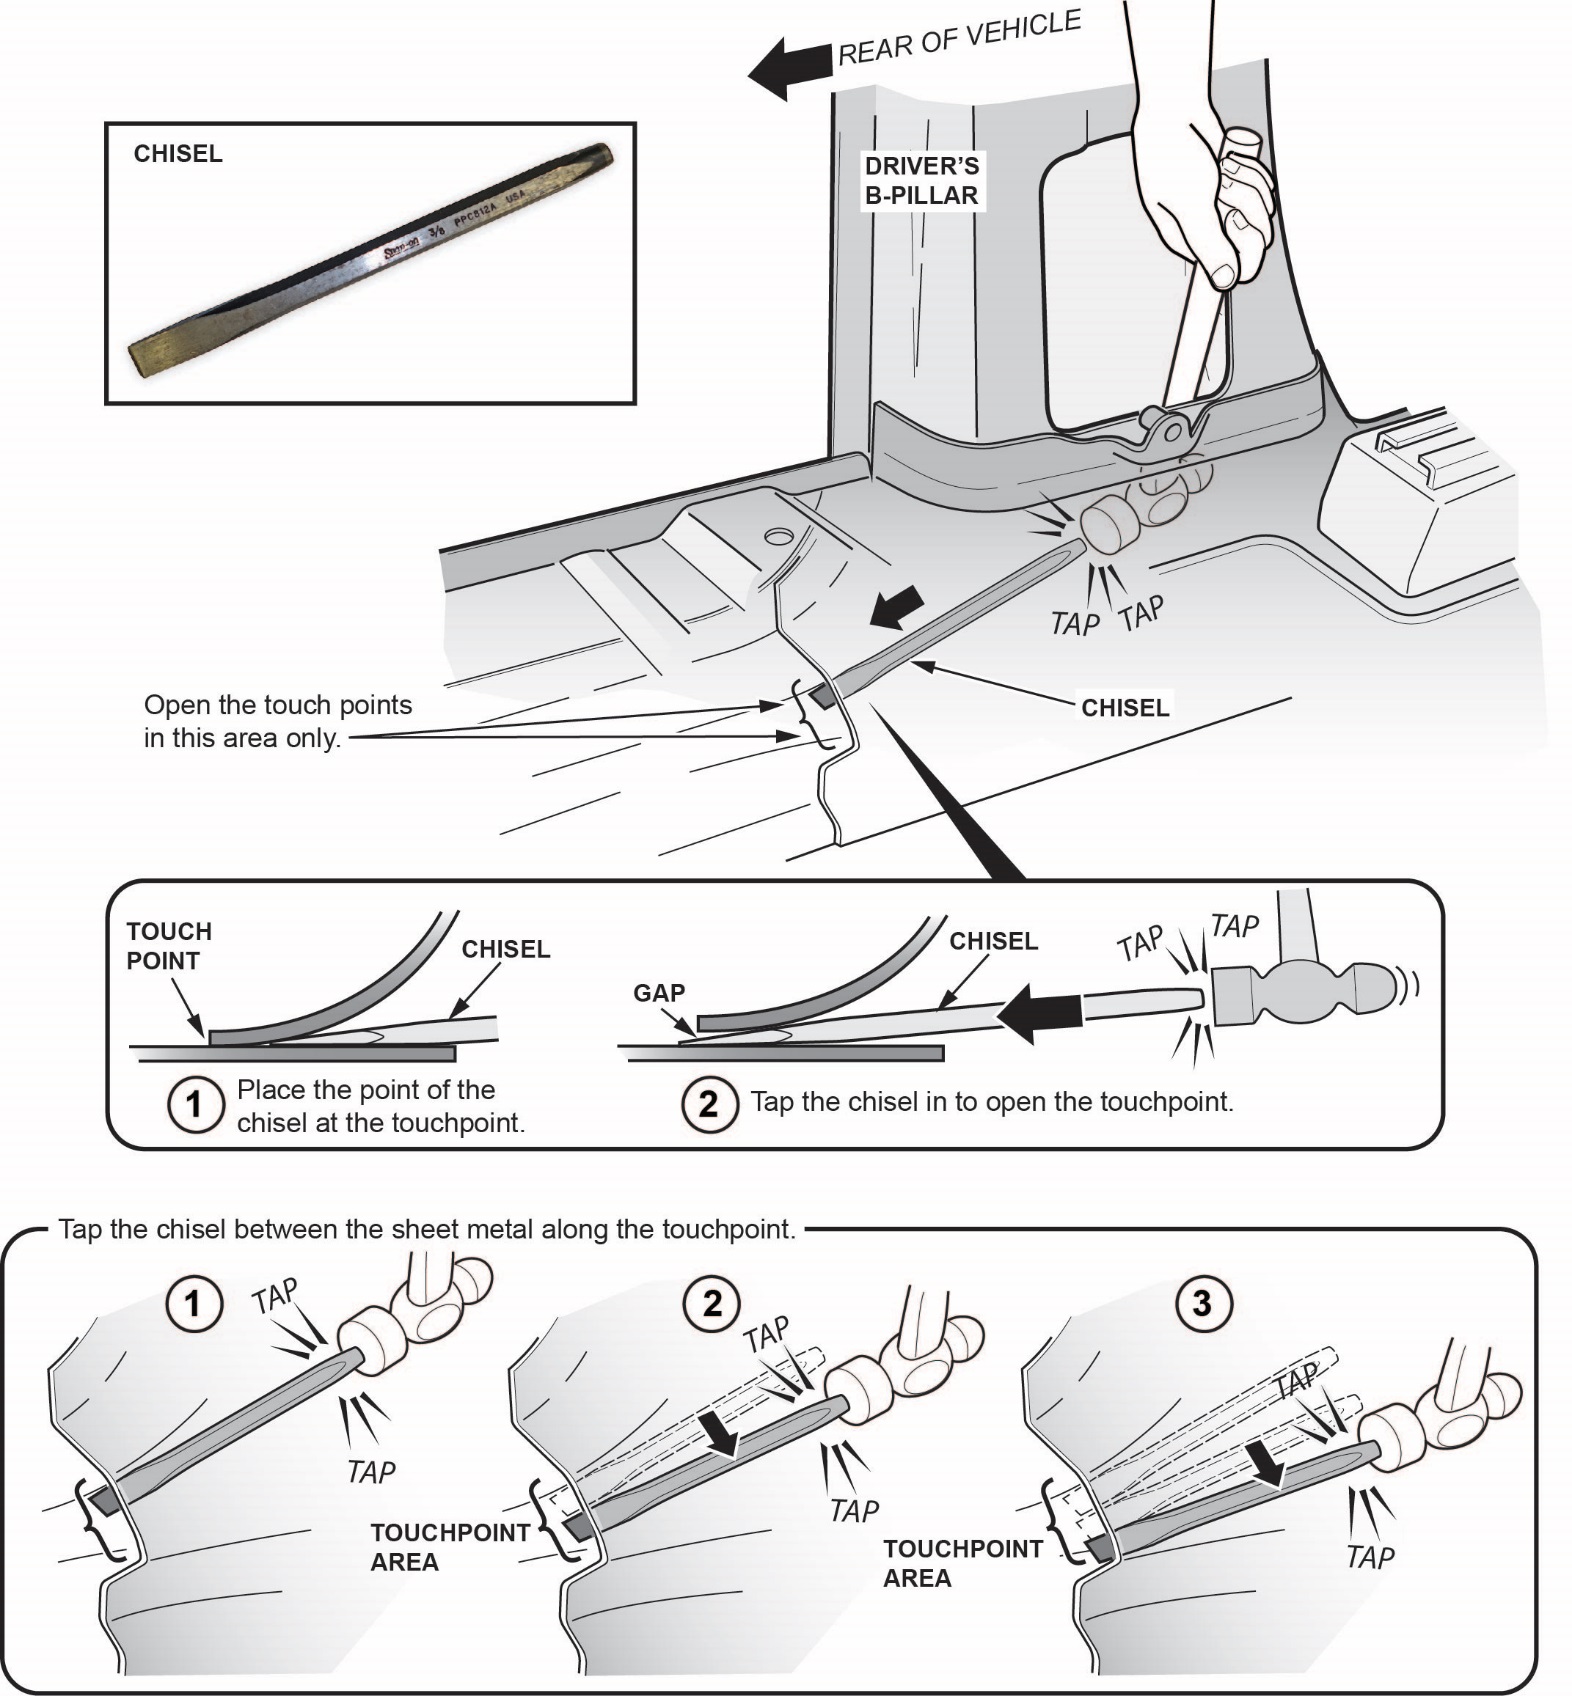
- Using a hammer and a small chisel, separate the sheet metal all along the touch points. Tap the chisel several times to obtain separation. NOTE:
- Drive the chisel in between the sheet metal in several locations to get the proper separation along the touch point area.
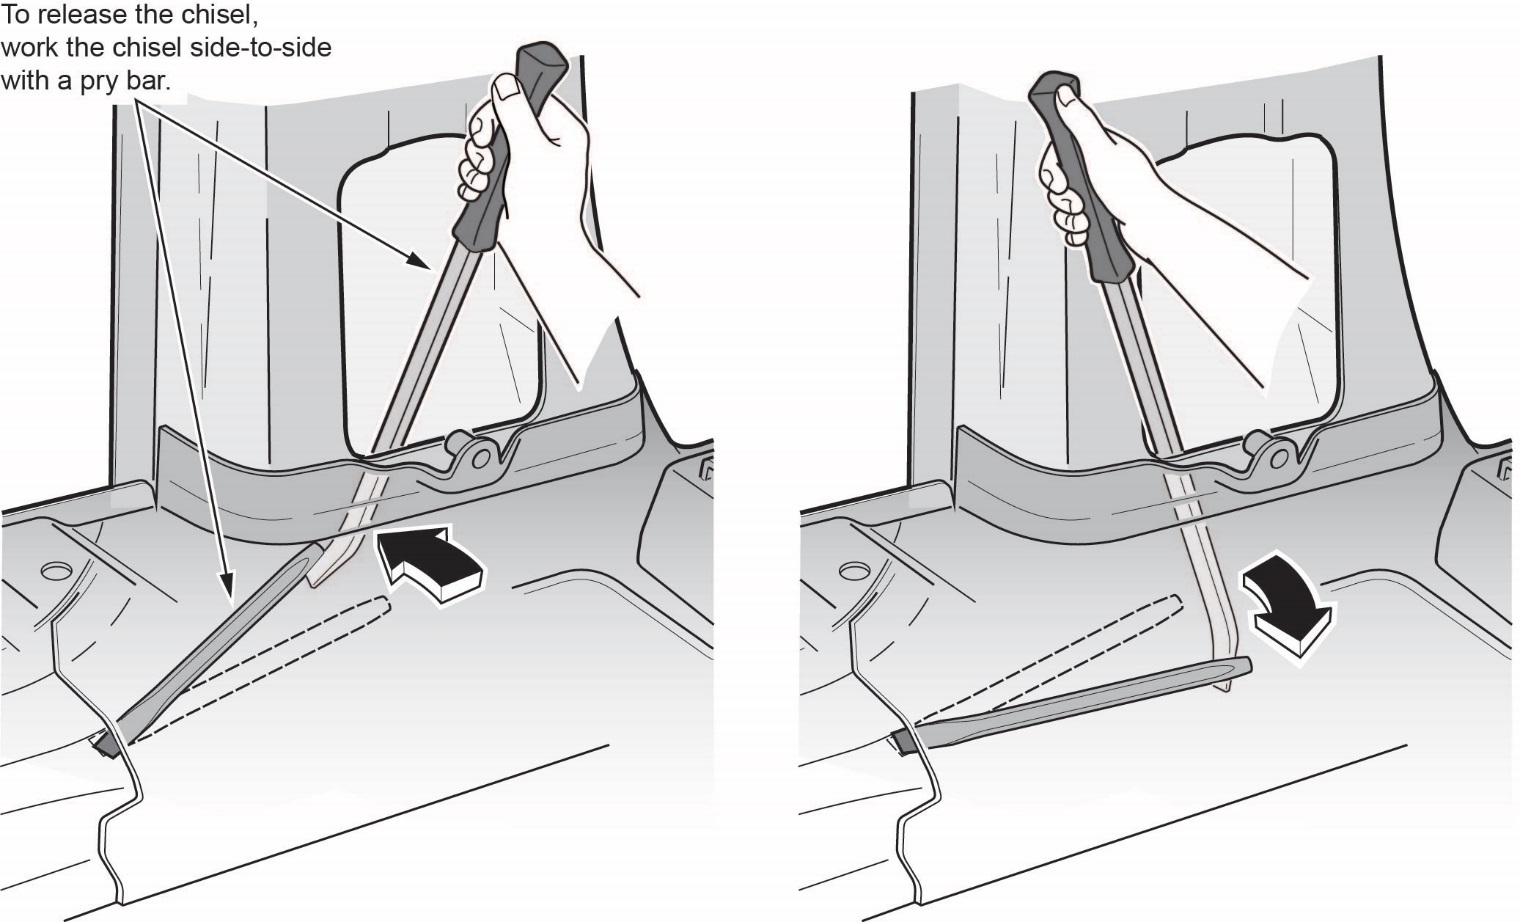
- You will need to use a pry bar to remove the chisel from the B-pillar. Work it side to side to remove it.
- DO NOT pry up or down on the chisel; it could break off in the B-pillar.
- After separating the sheet metal, temporarily install the seatbelt retractor and reconnect the battery.
- Test-drive the vehicle to confirm the noise has been eliminated.
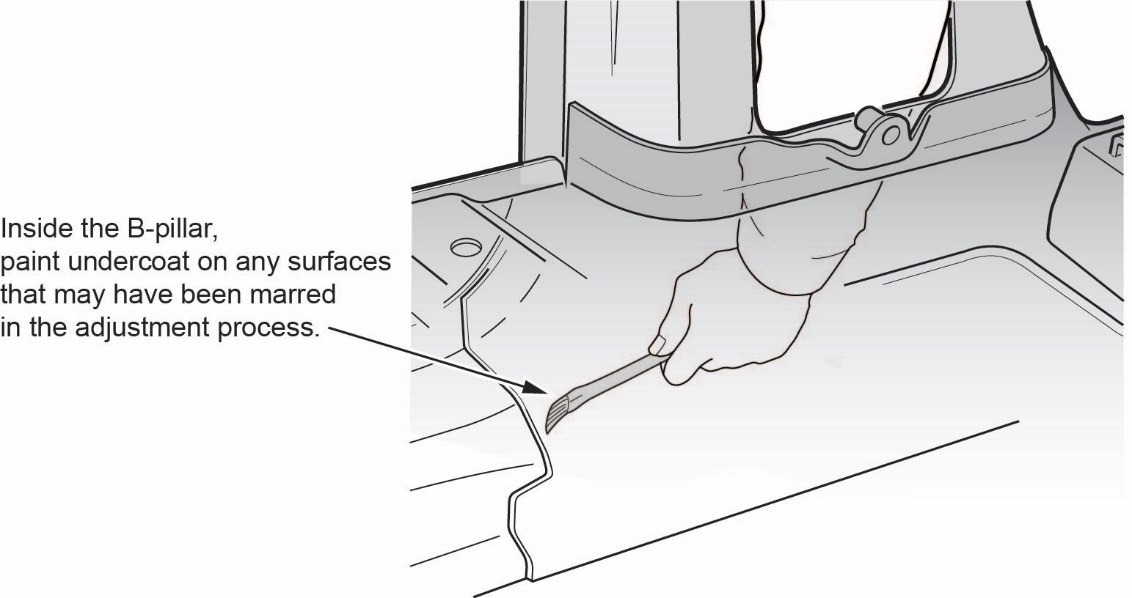
- Apply undercoat to the separation area to prevent rust.
- Install the plastic separator plate.
NOTE: The clips on the plastic separator may have been deformed during removal. Bend or trim the clips as needed to help inserting them back into the holes.
- Seal the plastic separator by applying commercially available expanding foam around the perimeter.
- Install all removed parts and torque the retractor upper mounting bolts to 4 N·m (6.9 lb-ft) and the lower retractor mounting bolts to 32 N·m (24 lb-ft).
- Repeat on the opposite side if necessary.
END
3 Affected Products
Vehicle
| MAKE | MODEL | YEAR |
| HONDA | ODYSSEY | 2014-2016 |
1 Associated Document
Service Bulletin Document
A16-035
July 23, 2016
03969 Version 1
SB-10084521-2280.pdf 1929.683KB
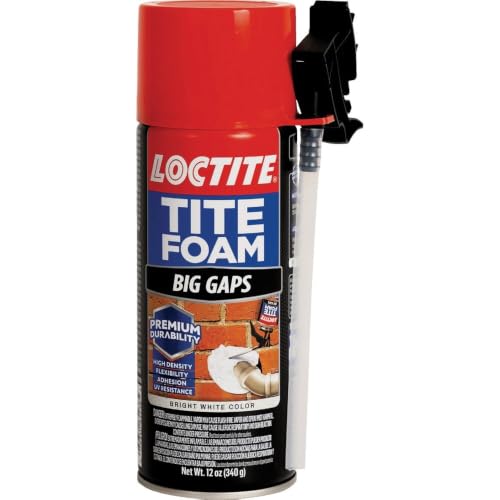
- Expands To Fill: Loctite Tite Foam Big Gaps fills, seals, and insulates effectively around gaps and cracks up to 3 inches in size
- High Density Foam: Offers high density with a uniform cell structure for durability and overall insulation for your remodeling needs
- Superior Flexibility: Withstands building and material movement without compromising its seal
- Strong Adhesion: Sealant bonds to most building materials like wood, concrete, brick, stone, metal, pvc, and more
- UV Resistance: Withstands harsh UV rays for long lasting results

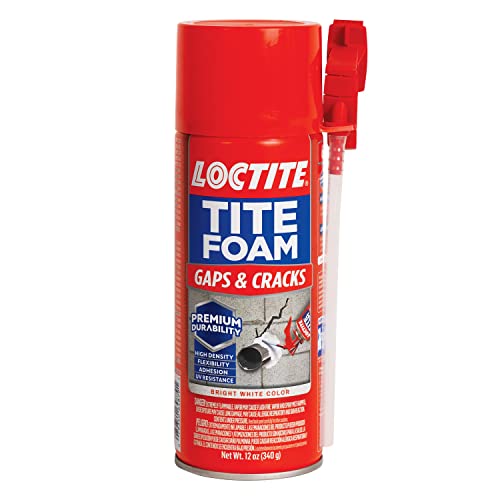
- Expands To Fill: Loctite Tite Foam Gaps & Cracks fills, seals, and insulates effectively around gaps and cracks up to 1 inch in size
- Premium Durability: Polymer foam based on purified and concentrated ingredients withstands harsh UV rays for long-lasting results
- High Density Foam: Offers high density with a uniform cell structure for durability and overall insulation for your remodeling needs
- Superior Flexibility: Withstands building and material movement without compromising its seal
- Strong Adhesion: Sealant bonds to most building materials like wood, concrete, brick, stone, metal, pvc, and more
- The information below is per-pack only
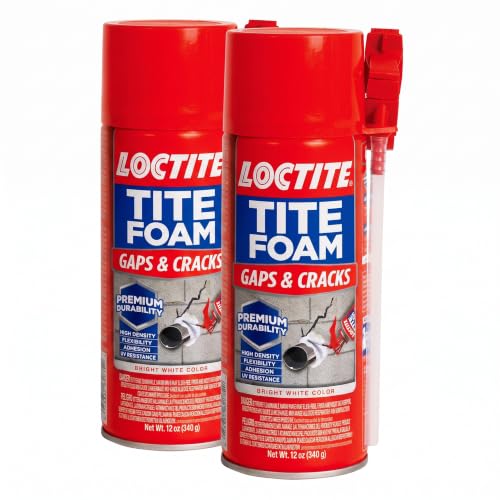
- Expands To Fill: Loctite Tite Foam Gaps & Cracks fills, seals, and insulates effectively around gaps and cracks up to 1 inch in size
- Premium Durability: Polymer foam based on purified and concentrated ingredients withstands harsh UV rays for long-lasting results
- High Density Foam: Offers high density with a uniform cell structure for durability and overall insulation for your remodeling needs
- Superior Flexibility: Withstands building and material movement without compromising its seal

- WEATHER-TIGHT SEAL: Forms a permanent, water-resistant barrier to minimize drafts and block insect infestation. Ideal for sealing gaps and cracks in various building materials.
- STRONG ADHESION: Exceptional bond to wood, metal, masonry, glass, and most plastics. This foam sealer gap filler ensures long-lasting results for both small and large projects.
- VERSATILE APPLICATION: Suitable for interior or exterior use. Expanding foam sealant fills and insulates gaps, making it perfect for windows, doors, and other structural openings.
- FAST CURING TIME: Tack free in six minutes and trims in thirty minutes. This spray foam fill cracks quickly, allowing for efficient project completion and minimal downtime.
- FLEXIBLE FOAM ELASTICITY: Foam elasticity allows for movement and shifting within a structure. Acts as a reliable crack foam filler, maintaining a secure seal as buildings settle.
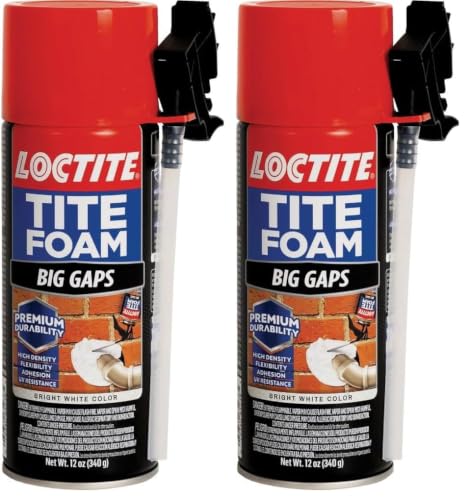
- The information below is per-pack only
- Expands To Fill: Loctite Tite Foam Big Gaps fills, seals, and insulates effectively around gaps and cracks up to 3 inches in size
- High Density Foam: Offers high density with a uniform cell structure for durability and overall insulation for your remodeling needs
- Superior Flexibility: Withstands building and material movement without compromising its seal
- Strong Adhesion: Sealant bonds to most building materials like wood, concrete, brick, stone, metal, pvc, and more
SEOCONTENT-START
CUSTOMER INFORMATION: The information in this bulletin is intended for use only by skilled technicians who have the proper tools, equipment, and training to correctly and safely maintain your vehicle. These procedures should not be attempted by “do-it-yourselfers,” and you should not assume this bulletin applies to your vehicle, or that your vehicle has the condition described. To determine whether this information applies, contact an authorized Honda automobile dealer. © 2016 American Honda Motor Co., Inc. – All Rights Reserved Page 1 of 13
Service Bulletin 16-035
July 23, 2016 03969 Version 1 Creak From the B-pillar AFFECTED VEHICLES
Year Model Trim VIN Range
2014–15 Odyssey ALL ALL
2016 Odyssey ALL 5FNRL….GB000001 thru 5FNRL….GB044289 SYMPTOM
A creak is heard from the base of the B-pillar when driving on uneven surfaces or during acceleration and braking.
POSSIBLE CAUSES
The sheet metal has a touch point deep within the base of the B-pillar. CORRECTIVE ACTION
Separate the sheet metal at the touch point at the B-pillar on affected side only. TOOL INFORMATION
Tool Name Tool Number Quantity
Snap-on Borescope BK5600 1
Chisel (5.5” X 3/8”) Snap-on PPC812B or similar 1
Acid Brush Commercially Available 1 REQUIRED MATERIALS
Part Name Part Number Quantity
Expanding Foam Commercially Available 1
Undercoat Commercially Available 1 WARRANTY CLAIM INFORMATION
The normal warranty applies. Operation Number
8570A8 Description
Separate the sheet metal at the touch point at the B-pillar on affected side only (left or right side). Flat Rate Time
1.9 hrs Defect Code
07406 Symptom Code
04201 Template ID
16-035A Failed Part Number
63610-TK8-306ZZ 8570A8
A Separate the sheet metal at the touch point at the B-pillar on affected side only (left or right side).
For additional side (if necessary) – add 1.9 hrs
1.9 hrs 07406 04201 16-035B 63610-TK8-306ZZ Skill Level: Repair Technician DIAGNOSIS
1. Test drive the vehicle on an uneven surface (driveway) to determine if the noise is coming from the B-pillar area.
• If the noise is coming from the B-pillar. Go to REPAIR PROCEDURE.
• If the noise is not coming from the B-pillar, continue with normal troubleshooting. REPAIR PROCEDURE
NOTE: This procedure is in an outline form. For more information on how to remove these items, refer to the service information.
1. Move the seat position and the recliner as far forward as possible.
2. Disconnect the battery and wait 3 minutes.
3. Remove the middle row seat.
4. Remove the front door sill trim. Page 2 of 13 5. Remove the sliding door sill trim.
HOOKS (2) CLIPS (3) \
l c:: J B-PILLAR LOWER TRIM SLIDING DOOR REAR SIDE SILL TRIM TRIM PANEL 6. Remove the lower B-pillar trim. LOWER
B-PILLAR TRIM p Page 3 of 13 7. From under the carpet, disconnect the seat belt tensioner connectors and detach the harness clip. Disconnect the seat belt outer lap tensioner connector, then place the retractor on the front seat. Page 4 of 13 8. Use a large flat-blade screwdriver or pry bar to separate the expanding foam that is applied to the plastic separator plate from the inner walls of the B-pillar as shown. Push the back edge of the separator plate down into the B-pillar, then remove the separator plate. Page 5 of 13 9. Wrap some masking tape around the front edge of the borescope camera. 10. Turn on the borescope and adjust the camera until you get the display level as shown. Then, put a mark on top of the tape to show the correct orientation for the display. Page 6 of 13 11. From a sitting position in the door opening, insert the borescope camera down into the seat belt retractor opening. Place the camera near the black plastic clip and aim toward the rear of the vehicle as shown. Page 7 of 13 12. Position the camera to inspect the specified location to confirm the touch point area. Page 8 of 13 13. Using a hammer and a small chisel, separate the sheet metal all along the touch points. Tap the chisel several times to obtain separation.
NOTE:
• Drive the chisel in between the sheet metal in several locations to get the proper separation along the touch point area.
• You will need to use a pry bar to remove the chisel from the B-pillar. Work it side to side to remove it.
• DO NOT pry up or down on the chisel; it could break off in the B-pillar. . Page 9 of 13 Page 10 of 13 Page 11 of 13 14. After separating the sheet metal, temporarily install the seatbelt retractor and reconnect the battery.
15. Test-drive the vehicle to confirm the noise has been eliminated.
16. Apply undercoat to the separation area to prevent rust. 17. Install the plastic separator plate.
NOTE: The clips on the plastic separator may have been deformed during removal. Bend or trim the clips as needed to help inserting them back into the holes.
18. Seal the plastic separator by applying commercially available expanding foam around the perimeter. Page 12 of 13 Page 13 of 13
19. Install all removed parts and torque the retractor upper mounting bolts to 9.4 N·m (6.9 lb-ft) and the lower retractor mounting bolts to 32 N·m (24 lb-ft).
20. Repeat on the opposite side if necessary.
END
**************************************************************************************************************
**************************************************************************************************************
SEOCONTENT-END
This product presentation was made with AAWP plugin.