Service Bulletin
A20-027
June 30, 2020
Version 2
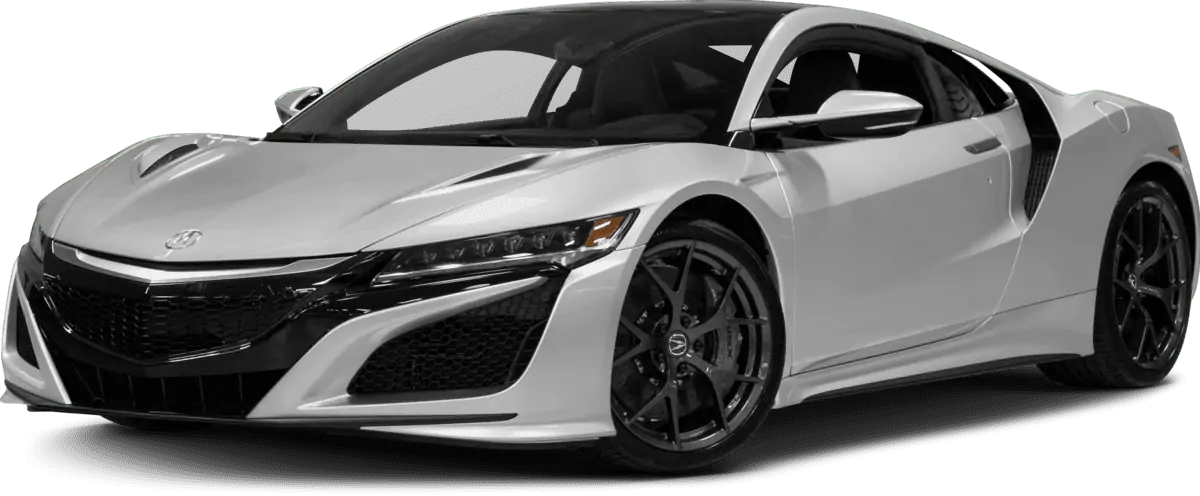
Safety Recall: 2018-19 NSX Fuel Pump Motor
AFFECTED VEHICLES
| Year | Model | Trim Level | VIN Range |
| 2018-19 | NSX | ALL | Check the iN VIN status for eligibility. |
BACKGROUND
Due to swelling of the fuel pump motor impeller, the fuel pump may seize and stop working. If this occurs, the engine may not start, or the engine could stall while driving, increasing the risk of a crash.
CLIENT NOTIFICATION
Owners of affected vehicles will be sent a notification of this campaign.
Do an iN VIN status inquiry to make sure the vehicle is shown as eligible.
Some vehicles affected by this campaign may be in your new or used vehicle inventory.
Failure to repair a vehicle subject to a recall or campaign may subject your dealership to claims or lawsuits from the client or anyone else harmed as a result of such failure. To see if a vehicle in inventory is affected by this safety recall, do a VIN status inquiry before selling it.
CORRECTIVE ACTION
Replace the fuel tank unit (fuel pump module).
NOTE
This repair is for the fuel tank unit only (driver’s side), not the secondary fuel gauge sending unit (passenger’s side).
PARTS INFORMATION
NOTE
Due to limited supply, this will be a controlled part and will require a valid VIN when ordering.
| Part Name | Part Number | Quantity |
| Fuel Tank Unit Kit | 06177-T6N-316 | 1 |
For dealers experiencing a strong fuel smell from storing a fuel tank unit replaced under this service bulletin, the fuel tank unit may be disposed of immediately in accordance with local regulations. This only applies to the fuel tank unit replaced under this service bulletin. The published retention policy remains in effect for all other parts. If you have any questions about this exception or other parts retention issues, contact the WPI Administrative Office at 937-642-2737.
REQUIRED MATERIALS
| Part Name | Part Number | Quantity |
Acura Long-Life Antifreeze/Coolant Type 2 Long-Life Antifreeze/Coolant Type 2 | OL999-9011A | 4 |
| Acura Gear Oil GO-Type | 08200-9018A | 2 |
TOOL INFORMATION
| Part Name | Tool Number | Quantity |
| Fuel Pump Module Locknut Wrench | 07AAA-SNAA100 or
07AAA-SNAA101 | 1 |
| Tank Removal Adapter | 07AAK-T6NA300 | 1 |
| Powertrain Lift Table
*OTCHON52200 and OTCHON52200A requires Lift Table Spacer Set. | OTC1595 or
OTCHON52200* or OTCHON52200A* | 1 |
| Lift Table Spacer Set
(Only required if using Powertrain Lift table OTCHON52200A or OTCHON52200) | 07AAK-T6NA210 | 1 |
| Arm Holder | 07AAB-T6NA400 | 1 |
| Brake Disc Covers (set of 4) | 07AAZ-T6NA800 | 1 |
| Hose Plug Set | 07AAZ-T6NA600 | 1 |
| Fender Covers | 07AAZ-T6NA200 | 1 |
| Lug Nut Cap Removal Tool | 07AAC-T6NA100 | 1 |
| Wheel Stud Guide Pins (set of 2) | 07AAB-T6NA200 | 1 |
WARRANTY CLAIM INFORMATION
| Operation Number | Description | Flat Rate Time | Defect Code | Symptom Code | Template ID | Failed Part Number |
| 3101HK | Replace the fuel tank module (Includes alignment). | 9.5 hr | 6FE00 | K7E00 | B20027A | 17045-T6N-A01 |
REPAIR PROCEDURE
| ⚠ WARNING |
| Fuel tank unit removal exposes fuel, which can ignite, causing a fire or explosion.
This can cause serious injury or death. Always work in a well-ventilated area and keep sparks or open flames away. |
- Set the vehicle on the lift. Refer to the service information.
- Move the driver’s seat all the way forward.
- Protect and cover the body panels surrounding the engine compartment.
- Relieve the fuel pressure. Refer to the service information.
NOTE
Go to the procedure under Direct Injection Fuel Line and Port Injection Fuel Line.
- Disconnect the 12-volt battery. Refer to the service information.
- Remove the engine compartment covers. Refer to the service information.
- Remove the driver’s side air cleaner assembly. Refer to the service information.
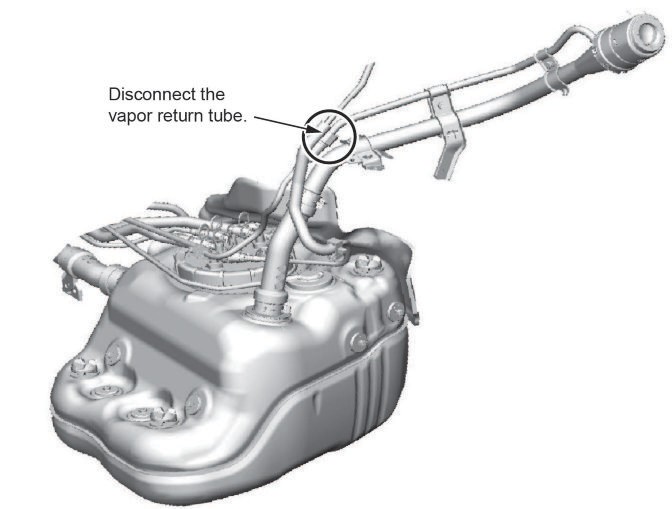
- Disconnect the fuel vapor return tube (located below the removed driver’s air cleaner assembly).
- Turn off the service plug.
9.1 Remove the lower portion of the driver’s door seal. Refer to the service information.
NOTE
Do not completely remove the driver’s door seal.
9.2 Remove the driver’s C-pillar trim.
NOTE
To avoid damage when removing the C-pillar trim, make sure you detach it from the outer edge near the rear glass and not at the seat belt webbing pocket.
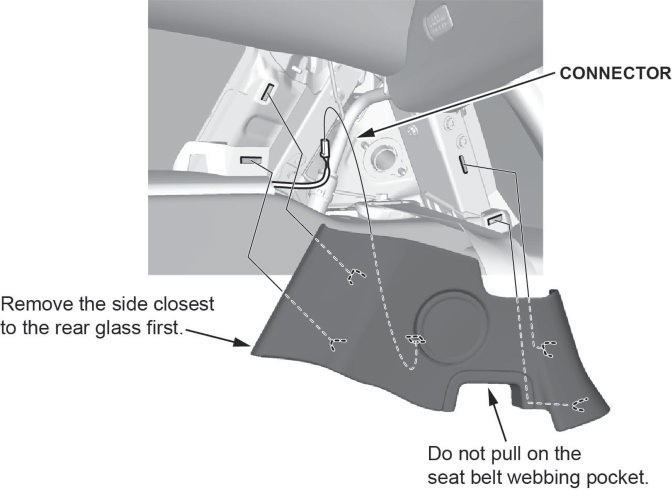
9.3 Remove the driver’s rear side trim panel. Refer to the service information.
9.4 Pull the rear bulkhead carpet up to access and remove the service plug cover.
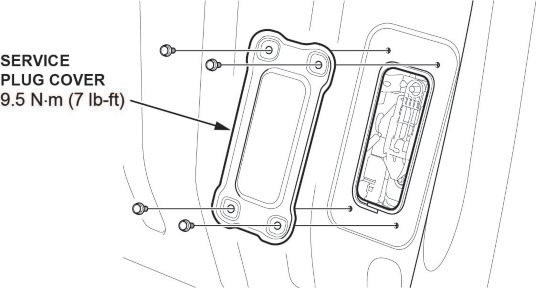
9.5 Remove the service plug. Refer to the service information.
- Raise the vehicle.
- Remove the rear wheels, and install the brake disk cover.
NOTE
Make sure the brake discs do not get damaged.
- Remove the left and right inner fender liners. Refer to the service information.
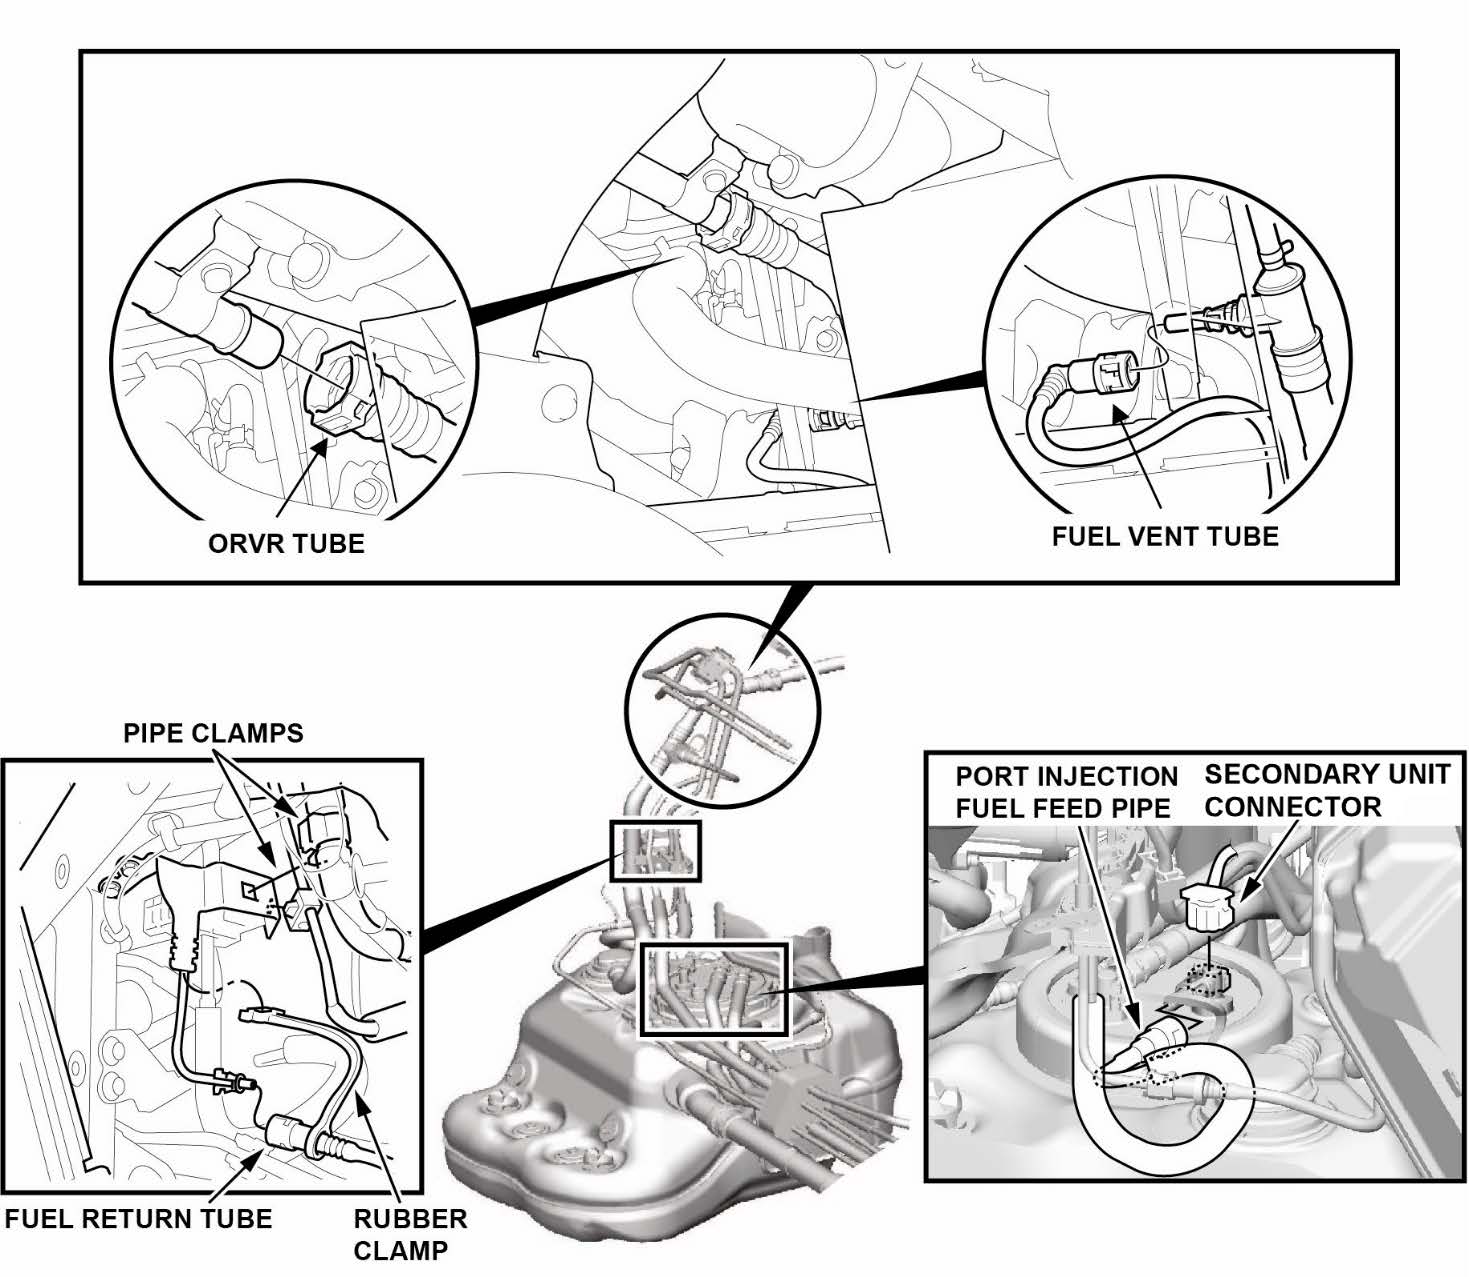
- On the passenger side rear wheel well, disconnect the following:
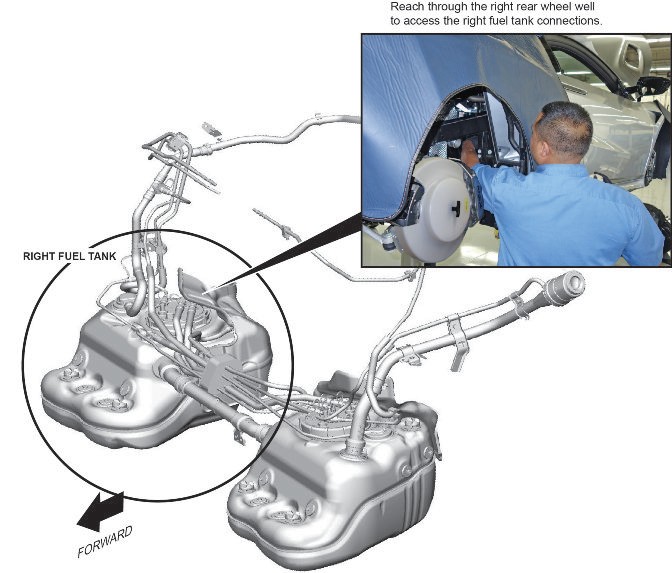
- ORVR tube
- Fuel vent tube
- Port injection fuel feed pipe
- Secondary unit connector
- Fuel return tube with rubber clamp
- Pipe clamps
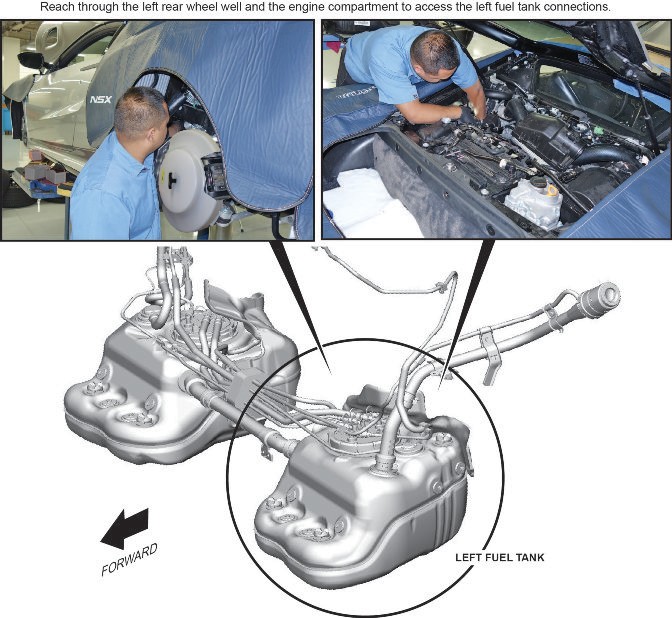
- On the driver’s side rear wheel well, do the following:
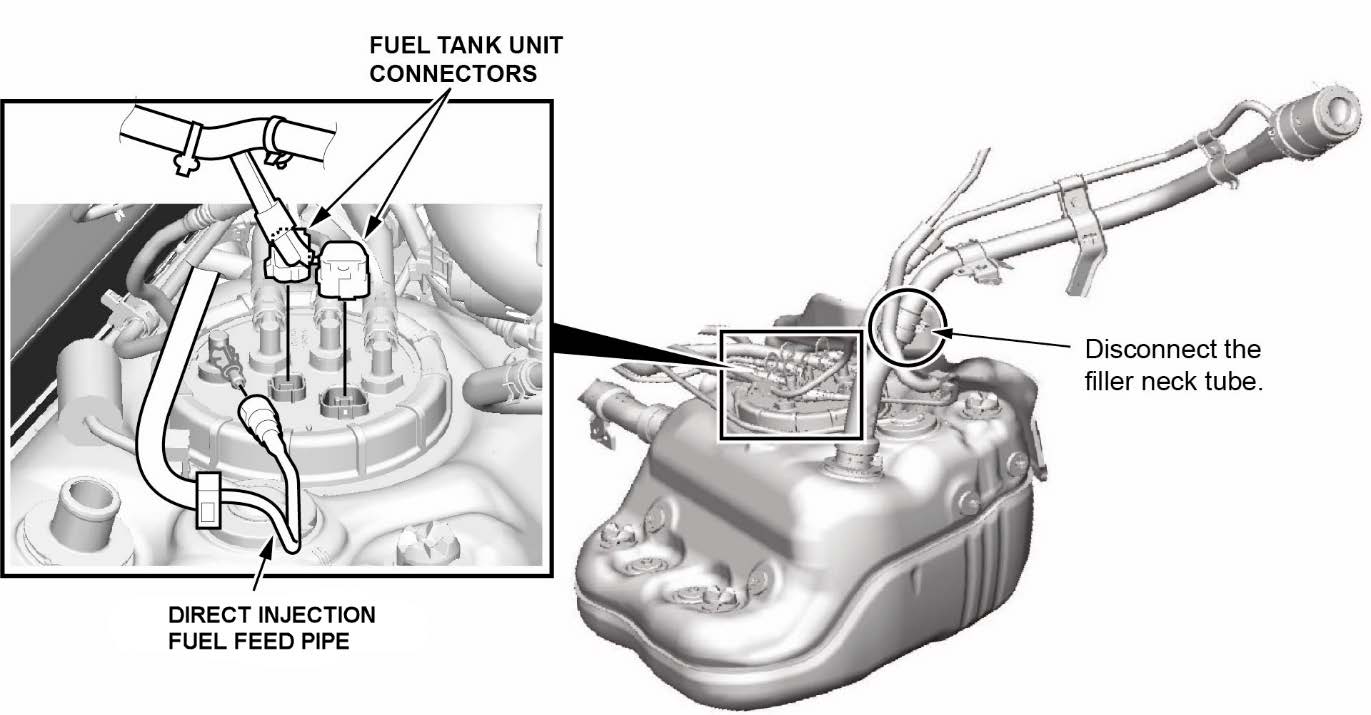
- Disconnect the fuel tank unit connectors.
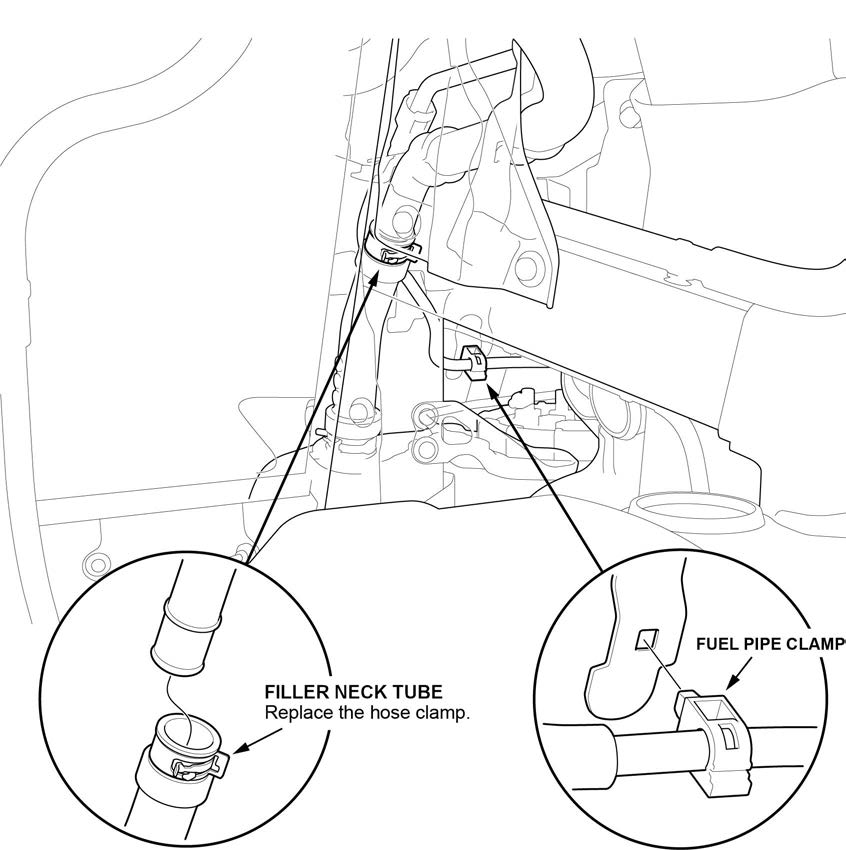
- Disconnect the filler neck tube. Replace the hose clamp during installation.
- Remove the fuel pipe clamp.
- Disconnect the direct injection fuel feed pipe to the fuel tank unit.
- Remove the engine undercover. Refer to the service information.
- Remove the (rear) center tunnel reinforcement. Refer to the service information.
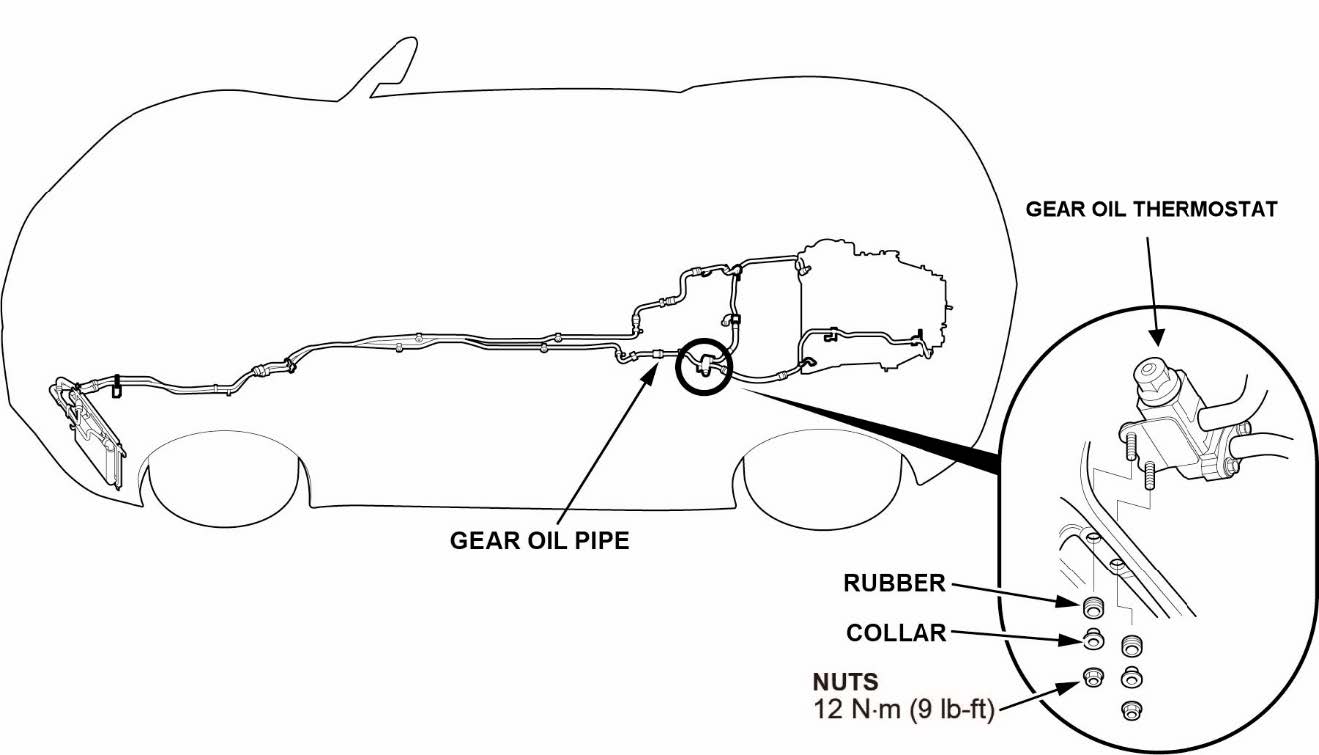
- Remove the two gear oil thermostat housing fasteners.
- Remove the (front) rear subframe. Refer to the service information.
NOTE
Pay attention to the bolt length and locations.
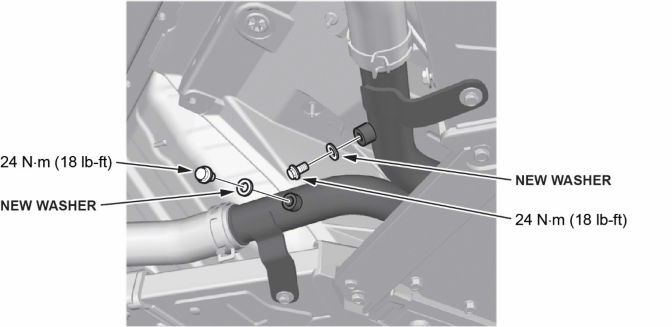
- Drain the engine coolant only from the water pipe underneath the vehicle.
NOTE
After the coolant has drained, install the drain bolts with new washers included in the kit.
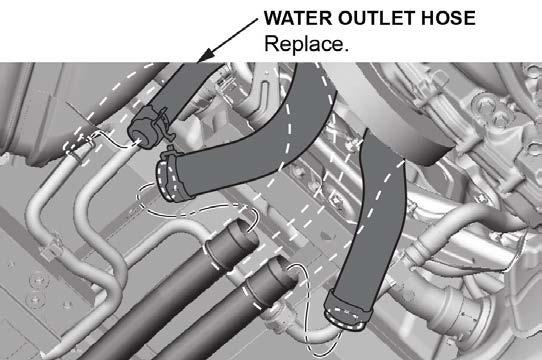
- Disconnect the water hoses from the center pipes, and cap off the ends. Replace the water outlet hose during installation.
- Disconnect the two gear oil lines in the center tunnel. Refer to the service information.
- Disconnect the coolant heater hose, and cap it off.
- Disconnect the rear motor power cable. Replace the terminal cover seals during installation. Refer to the service information.
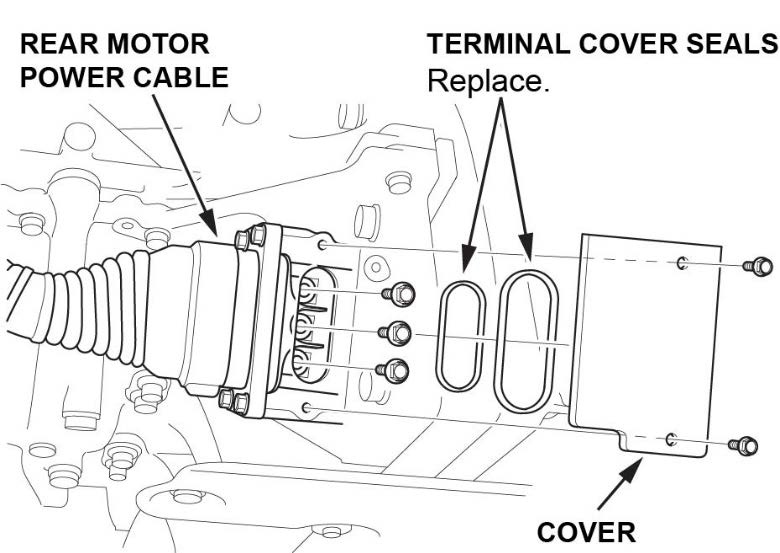
- Remove the rear bulkhead upper brace, rear bulkhead lower brace, and fuel pipe separator bracket. Refer to the service information.
- Remove the crossover pipe bracket bolts. Refer to the service information.
- Remove the fuel tank separator braces. Refer to the service information.
- Place the tank removal adapter and the powertrain lift table under the fuel tank assembly. Refer to the service information.
- Remove the fuel tank strap bolts.
- Slightly lower the fuel tank assembly. On the passenger side tank, reach over and disconnect the fuel return tube.
- Completely lower the fuel tank assembly, making sure none of the remaining hardlines and hoses get snagged.
- Place a rag or shop towel over the quick-connect fittings, and disconnect them.
NOTE
This repair is for the fuel pump on the fuel tank unit (driver’s side), not the secondary fuel gauge sending unit (passenger’s side).
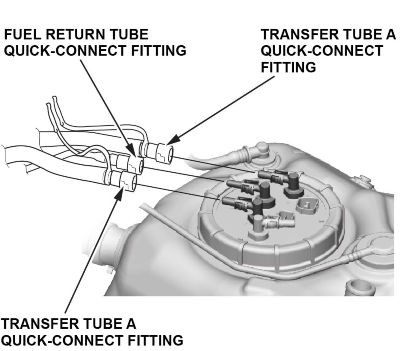
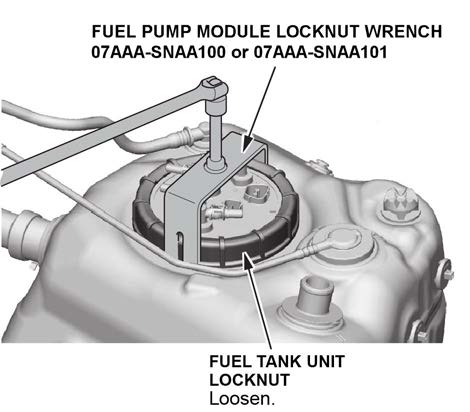
- Loosen the fuel tank unit locknut using the Fuel Pump Module Locknut Wrench (T/N 07AAA-SNAA100 or 07AAA- SNAA101), then remove it.
NOTE
Have an assistant help if needed.
- Remove the fuel tank unit.
NOTE
Make sure not to bend or twist the fuel level sensor arm excessively.
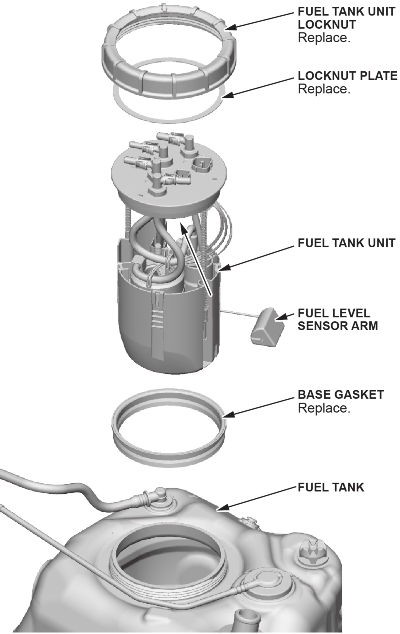
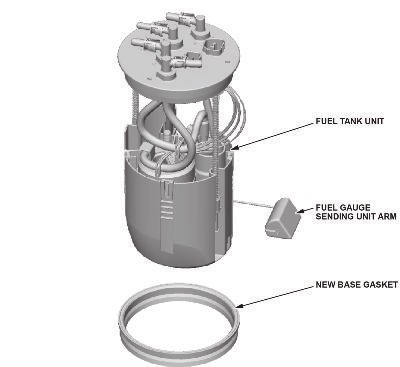
- Partially insert the new fuel tank unit into the fuel tank with a new base gasket.
NOTE
- Be careful not to damage the new base gasket.
- Do not coat the base gasket with any oil.
- Make sure not to bend or twist the fuel level sensor arm excessively.
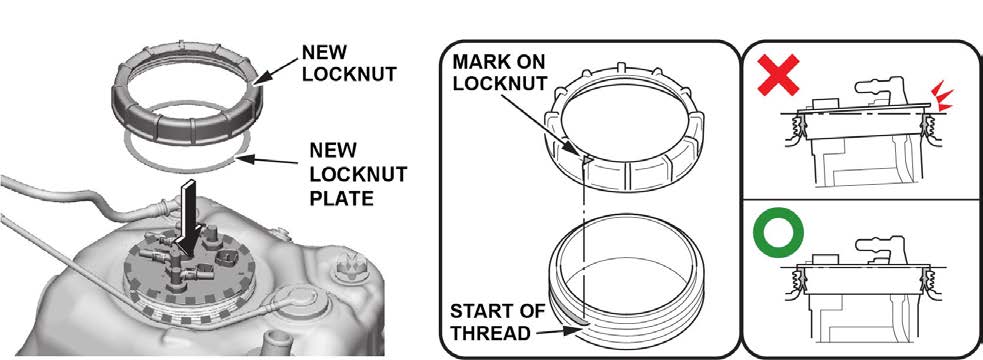
- Line up the mark on the fuel tank locknut to the start of the thread as shown. Then, partially install the fuel tank unit locknut with a new locknut plate by hand.
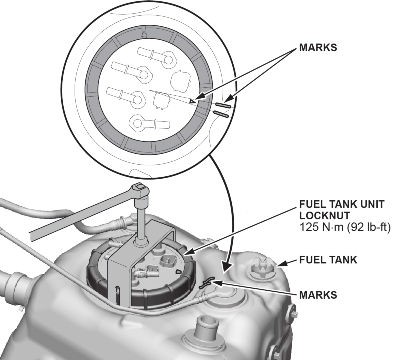
- Tighten the fuel tank unit locknut to the specified torque.
NOTICE
If the locknut is not properly installed, the fuel tank can be damaged and will require replacement.
NOTE
- Have an assistant help if needed.
- After tightening, make sure the marks are still lined up.
- To avoid a fuel leak, make sure the base gasket is not pinched.
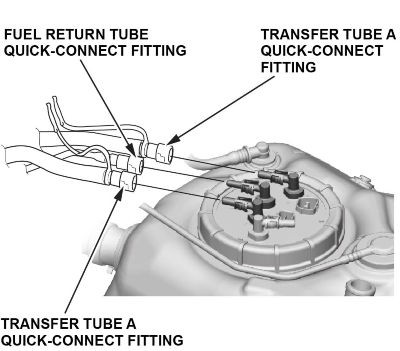
- Install new retainers to the fuel line quick-connect fittings.
- Connect the fuel line quick-connect fittings.
- Install the fuel tank assembly to the vehicle, and install the parts in the reverse order of removal.
- Top off the transmission fluid, and make sure to use a new washer on the filler plug. Refer to the service information.
- Fill the coolant, and air bleed the system. Refer to the service information.
- Do the Forced PI Idling Mode procedure to bleed the PI fuel line. Refer to the service information procedure How to Enter PGM-FI System Maintenance Mode.
- 2019 Models Only: Do the A/F Sensor Learn procedure. Refer to the service information.
- Do an alignment check, and make adjustments as needed.
NOTE
The fuel tanks must be fully fueled when doing an alignment. Also, be sure to follow the pre-alignment checks. Refer to the service information.
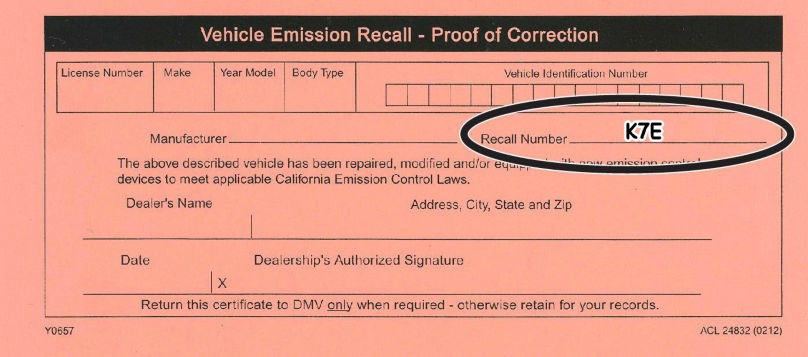
- California residents only: Fill out a Vehicle Emissions Recall – Proof of Correction certificate, and use K7E as the recall number. Have the service consultant give the certificate to your client, and advise him or her to keep it as proof that the recall was completed. Your client will need to submit this certificate to the DMV only if the DMV requests it. If you need more certificates, use reorder number Y0657.
END
July 2020
NHTSA Recall 20V-314
IMPORTANT SAFETY RECALL
This notice applies to your vehicle: XXXXXXXXXXXXXXXXX
Dear FIRSTNAME LASTNAME,
This notice is sent to you in accordance with the National Traffic and Motor Vehicle Safety Act.
WHAT IS THE REASON FOR THIS NOTICE?
Acura has decided that a defect which relates to motor vehicle safety exists in certain 2018 – 2019 model year NSX vehicles that may have a fuel pump module with out of specification impellers. Over time, these impellers may absorb an excessive amount of fuel and deform. A deformed impeller may cause the fuel pump to stop working.
SAFETY CONSEQUENCE
An inoperative fuel pump could prevent an engine from starting or cause a vehicle to stall while being driven, increasing the risk of a crash.
EMISSION CONSEQUENCE
The check engine light may illuminate as a result of this defect. Your vehicle may fail a state or local emissions inspection when such tests are required under state law if you do not have the repair done.
WHAT WILL ACURA DO?
The dealer will replace the fuel pump assembly for free.
WHAT SHOULD YOU DO?
Please call any authorized Acura dealer and make an appointment to have your vehicle’s fuel pump assembly replaced for free. Once you make an appointment for your vehicle, be advised that the replacement process may take approximately 9 hours and 30 minutes. However, your dealer can provide you with a better estimate of the overall time for this service visit, as it may be necessary to make your vehicle available for a longer period of time. If you are not the only driver of this vehicle, please advise all other drivers and passengers of this important information.
CHECK YOUR VEHICLE FOR OPEN RECALLS
You can check your vehicle’s eligibility for repair under this or any other recall. Please access the Acura Recall Lookup tool at www.recalls.acura.com and enter your Vehicle Identification Number (VIN).
CALIFORNIA OWNERS ONLY
The DMV will not renew your vehicle’s registration until this emissions recall has been completed. After completing the repair procedure, your dealer will give you a Vehicle Emission Recall – Proof of Correction certificate. Please make sure the dealer completes and provides you the certificate. Keep the certificate for your records as proof that the emissions recall was completed. Submit the certificate to the DMV only if the DMV requests it.
EMISSION WARRANTY
In order to ensure your full protection under the emission warranty provisions, it is recommended that you have your vehicle repaired as soon as possible. Failure to do so could be determined as lack of proper maintenance.
OWNER INFORMATION
You received this notice because government regulations require that notification be sent to the last known owner of record. Our records are based primarily on state registration and title information, which indicate that you are the current owner of this vehicle. If this is not the case, or if any of the information is not correct, please complete, sign and return the Information Change Card and we will then update our records. If you are a lessor of this vehicle, federal regulations require you to forward this notice to your lessee within ten days.
DO YOU STILL HAVE MORE QUESTIONS?
If you have questions or concerns, we encourage you to:
- contact your local Acura dealer; or
- call American Honda’s Customer Support & Campaign Center at 1-888-234-2138 Monday through Friday, 6:00 a.m. to 5:00 p.m., Pacific Time; or
- visit Twitter @AcuraClientCare; or
- visit recalls.acura.com to use “Ask Us”, our 24/7 virtual agent.
If you believe that American Honda or the dealer has failed or is unable to remedy the defect in your vehicle, without charge and within a reasonable period of time (60 days from the date you first contact the dealer for a repair appointment), you may submit a complaint to the Administrator, National Highway Traffic Safety Administration (NHTSA), 1200 New Jersey Ave., SE, Washington, DC 20590.
Alternatively, you may call the NHTSA toll-free Safety Hotline at 888-327-4236 (TTY 800-424-9153), or go to https://www.safercar.gov. We apologize for any inconvenience this recall may cause you.
Sincerely,
American Honda Motor Co., Inc.
Campaign #K7E / Service Bulletin #20-027
Julio del 2020
Campaña de seguridad NHTSA 20V-314
CAMPANA DE SEGURIDAD IMPORTANTE
Esta notificación aplica a su vehículo: XXXXXXXXXXXXXXXXX
Estimado FIRSTNAME LASTNAME,
Esta notificación ha sido enviada a usted de acuerdo con el decreto de la oficina de Administración Nacional de Seguridad del Tráfico en
las Carreteras (National Highway Traffic Safety Administration o NHTSA por sus siglas en inglés).
¿CUÁL ES EL MOTIVO DE ESTA NOTIFICACIÓN?
Acura ha determinado que existe un defecto el cual está relacionado con la seguridad del vehículo en algunos vehículos modelo NSX año modelo 2018 – 2019 que pueden tener un módulo de la bomba de combustible con impulsores fuera de especificación. Con el paso del tiempo, estos impulsores pueden absorber una cantidad excesiva de combustible y deformarse. Un impulsor deformado puede ocasionar que la bomba de combustible deje de funcionar.
CONSECUENCIA DE SEGURIDAD
Una bomba de combustible inoperativa puede prevenir que un motor no arranque u ocasionar que un vehículo se detenga cuando es conducido, aumentando el riesgo de un choque.
CONSECUENCIA DE EMISIÓN
La luz indicadora de fallas (verificar el motor) puede iluminarse como resultado de este defecto. Su vehículo puede fallar una inspección de emisiones local o estatal cuando tales pruebas sean requeridas bajo la ley estatal si usted no completa la reparación.
¿QUÉ HARÁ ACURA?
El concesionario reemplazará el conjunto de la bomba de combustible de forma gratuita.
¿QUÉ DEBE HACER USTED?
Por favor llame a cualquier concesionario autorizado Acura y haga una cita para el reemplazo del conjunto de la bomba de combustible del vehículo de forma gratuita. Una vez que programe una cita para su vehículo, le avisamos que el proceso de reemplazo podría tardar aproximadamente 9 horas y 30 minutos. No obstante, su concesionario le puede ofrecer un mejor estimado del tiempo total de esta visita de servicio, ya que pudiera ser necesario que su vehículo esté disponible por un periodo más largo. Si usted no es el único conductor de este vehículo, por favor informe a todos los conductores y pasajeros sobre esta información importante.
VERIFIQUE SI SU VEHÍCULO TIENE UNA CAMPAÑA DE SEGURIDAD PENDIENTE
Puede verificar la elegibilidad de su vehículo para que sea reparado bajo esta campaña de seguridad o bajo cualquier otra. Por favor acceda la herramienta “Acura Recall Lookup” en www.recalls.acura.com e ingrese su número de identificación del vehículo (VIN).
SOLAMENTE PROPIETARIOS EN CALIFORNIA
El DMV no renovará su registro del vehículo hasta que esta campaña de seguridad de emisiones haya sido completada. Después de completar este procedimiento de reparación, su concesionario le entregará un certificado de Prueba de Corrección – Campaña de seguridad de emisiones del vehículo (Vehicle Emissions Recall – Proof of Correction). Por favor asegúrese que el concesionario complete y le otorgue el certificado. Mantenga el certificado para sus registros como prueba que la campaña de emisiones fue completada. Envíe el certificado para el DMV solamente si el DMV lo solicita.
GARANTÍA DE EMISIONES
A fin de garantizar su protección completa bajo las disposiciones con respecto a la garantía de emisiones, se recomienda que haga que su vehículo sea reparado tan pronto sea posible. De no hacerlo podría determinarse como una falta de mantenimiento adecuado.
INFORMACIÓN DEL PROPIETARIO
Usted recibió esta notificación porque las regulaciones gubernamentales requieren que esta notificación sea enviada al último propietario registrado. Nuestros registros están basados principalmente en la información del título y registro en el estado, el cual indica que usted es el propietario actual de este vehículo. Si no es el caso o si la información no está correcta, por favor complete, firme y devuelva la tarjeta de Cambio de información anexa y nosotros actualizaremos nuestros registros. Si usted es el arrendador de este vehículo, las regulaciones federales requieren que usted envié una copia de esta notificación a su arrendatario en un lapso de diez días.
¿USTED TODAVÍA TIENE MÁS PREGUNTAS?
Si usted tiene preguntas o inquietudes, le recomendamos que:
- se comuníquese con su concesionario Acura local; o
- llame al Centro de Apoyo al Cliente y Campañas de American Honda al 1-888-234-2138 de lunes a viernes, 6:00 a.m. a 5:00 p.m., hora del Pacífico; o
- visite Twitter @AcuraClientCare; o
- visite recalls.acura.com
Si usted cree que American Honda o el concesionario ha fallado o no le es posible reparar el defecto en su vehículo, sin cobro alguno y dentro de un período de tiempo razonable (60 días desde la fecha en que usted contactó por primera vez el concesionario para la cita de la reparación), usted puede enviar una queja a: Administrator, National Highway Traffic Safety Administration (NHTSA), 1200 New Jersey Ave., SE, Washington, DC 20590. Alternativamente, usted también puede comunicarse con el número de llamada sin costo (Toll-free) Safety Hotline de NHTSA al 888-327-4236 (TTY 800-424-9153), o visitar la página web https://www.safercar.gov.
Le pedimos disculpas por cualquier inconveniente que esta campaña de seguridad pudiera causarle. Atentamente,
American Honda Motor Co., Inc.
Campaña #K7E / Boletín de servicio #20-027
Remedy Instructions and TSB
RCRIT-20V314-0840.pdf 1697.877KB
Remedy Instructions and TSB
RCRIT-20V314-8895.pdf 158.236KB
ISSUED Owner Notification Letter(Part 577)- K7E) – 2018-2019 Acura NSX
RCONL-20V314-1416.pdf 193.764KB
Latest Recalls Documents

- Proven to clean intake valves on GDI engines and turbo systems
- Easily installed through the air intake system
- Highest concentration PEA (Polyether Amine) detergency available
- Proven to remove up to 46% of GDI Intake Valve deposits in 1 hour
- 150X more concentrated than fuel additives


- Removes Carbon Buildup Fast: Breaks down stubborn, baked‑on carbon deposits on intake valves and turbo components, restoring airflow and improving engine performance.
- Boosts Power & Efficiency: Regular use increases power and torque, improves MPG, and reduces rough idle, hesitation, and hard starts.
- Proven High‑Strength Formula: Delivers concentrated cleaning agents directly to intake valves—up to 150× stronger than premium fuel additives—and removes up to 46% of deposits within the first hour.
- No Engine Teardown Required: Safe for GDI and PFI engines; simply spray through the air intake system for professional‑grade cleaning without disassembly.
- Reduces Emissions & Improves Drivability: Helps restore proper combustion, reduce harmful emissions, and smooth out idle and acceleration for a cleaner‑running engine.

- Proven to clean intake valves on GDI engines and turbo systems with advanced Cozol technology
- Increases horsepower and improves air/fuel ratio and MPG by cleaning mass air flow sensors
- Easily installed CRC cleaner through the air intake system to remove deposits
- CRC GDI cleaner dissolves baked-on carbon deposits for smoother idle
- Mass air flow sensor cleaner dries in seconds and is plastic safe

- Formulated for Use In All Fuel-Injected Gasoline Engines, Including GDI
- Contains Polyetheramine (“PEA”) to Dissolve Carbon Buildup in Combustion Chambers
- Cleans ALL Types of Intake Valves, Including Those Found in PFI, TBI, and GDI Engines
- Safe On Catalytic Converters and Oxygen Sensors
- Not For Use In Diesel Engines

- One New Aftermarket Replacement Turbo Ii Pre-Cleaner For Model 46 (With 4.5" Inlet) That Features Ev
- OEM Numbers Are Provided for Reference Only. Please Verify Fit Prior To Ordering.
- Please Note: Some Listings Use Stock Images for Reference and May Differ from the Actual Product.
- This Aftermarket Part Is Made to Meet or Exceed Manufacturer (OEM) Specifications.
- All OEM part numbers and logos are to be used for identification purposes only.
This product presentation was made with AAWP plugin.