
| “This site contains affiliate links for which OEMDTC may be compensated” |
June 6, 2019 NHTSA CAMPAIGN NUMBER: 19V424000
Half Shaft May Disengage and Allow Rollaway
A separated driveshaft can cause the vehicle to have a loss of drive or allow the vehicle to move even while in Park, increasing the risk of a crash or injury.
NHTSA Campaign Number: 19V424
Manufacturer Honda (American Honda Motor Co.)
Components POWER TRAIN
Potential Number of Units Affected 49,898
Summary
Acura (American Honda Motor Co.) is recalling certain 2016-2019 Acura ILX vehicles. Excessive grease may prevent the set-ring on the half shaft from fully engaging, allowing the driveshaft to separate from the half shaft.
Remedy
Acura will notify owners, and dealers will inspect, and, as necessary, replace the driveshaft and half shaft, free of charge. The recall began August 1, 2019. Owners may contact Acura customer service at 1-888-234-2138. Acura’s number for this recall is G54.
Notes
Owners may also contact the National Highway Traffic Safety Administration Vehicle Safety Hotline at 1-888-327-4236 (TTY 1-800-424-9153), or go to www.safercar.gov.
Check if your Acura has a Recall
August 30, 2019
B19-035
Version 2
Safety Recall: 2016-19 ILX Driveshaft Inspection
Supersedes 19-035, dated June 7, 2019. See REVISION SUMMARY.
AFFECTED VEHICLES
| Year | Model | Trim | VIN Range |
| 2016-19 | ILX | ALL | Check the iN VIN status for eligibility. |
REVISION SUMMARY
Under INSPECTION PROCEDURE, several images were updated.
BACKGROUND
The right driveshaft may not have been properly assembled and installed, and may separate from the intermediate shaft. If this happens, it will cause a loss of power transfer to the wheels, leading to the vehicle coming to a stop. On a parked vehicle without the parking brake applied, this will allow the vehicle to move.
CLIENT NOTIFICATION
Owners of affected vehicles will be sent a notification of this campaign.
Do an iN VIN status inquiry to make sure the vehicle is shown as eligible.
Some vehicles affected by this campaign may be in your new or used vehicle inventory.
Failure to repair a vehicle subject to a recall or campaign may subject your dealership to claims or lawsuits from the client or anyone else harmed as a result of such failure. To see if a vehicle in inventory is affected by this safety recall, do a VIN status inquiry before selling it.
CORRECTIVE ACTION
Inspect the right driveshaft installation on the intermediate shaft. If the installation is incomplete, or the driveshaft is not fully set to the intermediate shaft, replace both shafts.
PARTS INFORMATION
| Part Name | Part Number | Quantity |
| Right Driveshaft Assembly | 44305-TV9-A01 | 1 |
| Halfshaft Assembly (Intermediate Shaft) | 44500-TZ4-A01 | 1 |
| Spindle Nut | 90305-SD4-003 |
1 |
| Flange Bolt | 90182-SZ3-000 | 1 |
| Self-Locking Nut | 90215-SB0-003 |
2 |
| Drain Washer (18 mm) | 90471-PX4-000 |
1 |
| Drain Washer (20 mm) | 94109-20000 |
1 |
REQUIRED MATERIALS
| Part Name | Part Number | Quantity |
| Acura ATF Type 2 | 08200-9015A | 5 |
| Moly Paste M77 (One tube repairs about 24 vehicles) | 08798-9010 | 1 |
TOOL INFORMATION
| Tool Name | Tool Number | Quantity |
| Halfshaft Inspection Tool | 07AAJ-TV9A100 | 1 per dealer |
WARRANTY CLAIM INFORMATION
| Operation Number |
Description | Flat Rate Time |
Defect Code |
Symptom Code |
Template ID |
Failed Part Number |
| 2195B2 | Inspect the right driveshaft. | 0.4 hr | 6HS00 | G5400 | B19035A | 44305-TV9-A01 |
| Operation Number |
Description | Flat Rate Time |
Defect Code |
Symptom Code |
Template ID |
Failed Part Number |
| 2195B2 | Inspect the right driveshaft. | 0.4 hr | 6HS00 | G5400 | B19035B | 44305-TV9-A01 |
| A | Add to do the following:
|
1.0 hr |
Skill Level: Repair Technician
INSPECTION PROCEDURE
- Raise the vehicle on a lift.
- Remove the engine undercover.

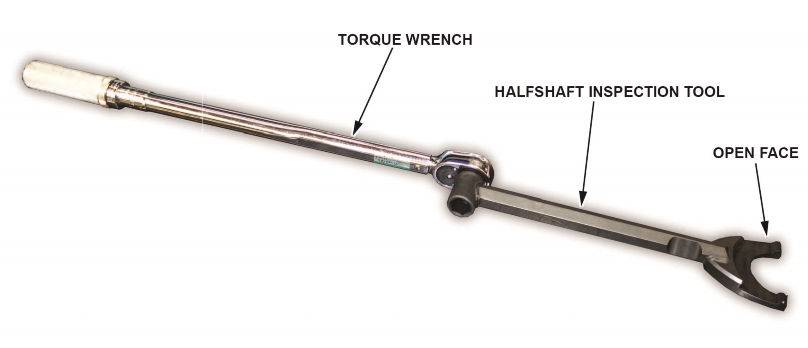
- Set a calibrated torque wrench (commercially available) to tighten to 136 N·m (100 lb-ft).
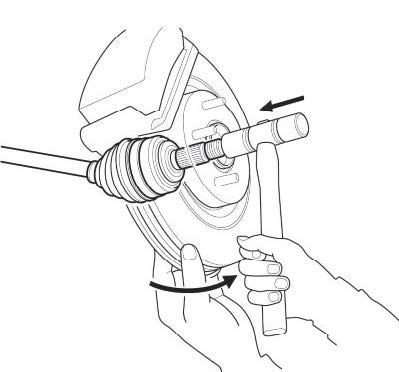
- Attach the halfshaft inspection tool to the torque wrench as shown.
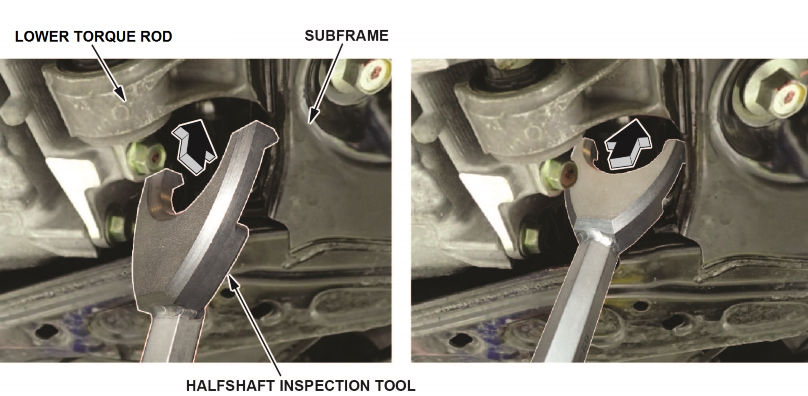
- Keep the tool lined up with the torque wrench. Insert the tool through the gap between the lower torque rod bracket and the subframe. Turn the tool until the open face is toward the right of the vehicle.
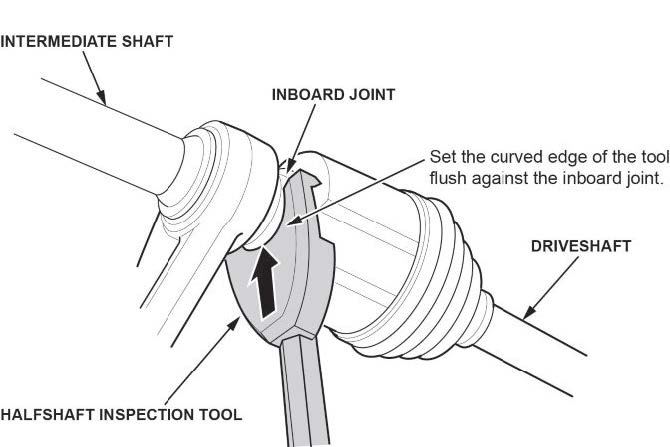
- Place the open face against the inboard joint of the driveshaft. Make sure the curved edge of the tool is flush with the inboard joint as shown.
Revised Image
- Line up the edge of the hexagonal section of the tool between the lower torque rod bracket and lower torque rod as shown.
Revised Image
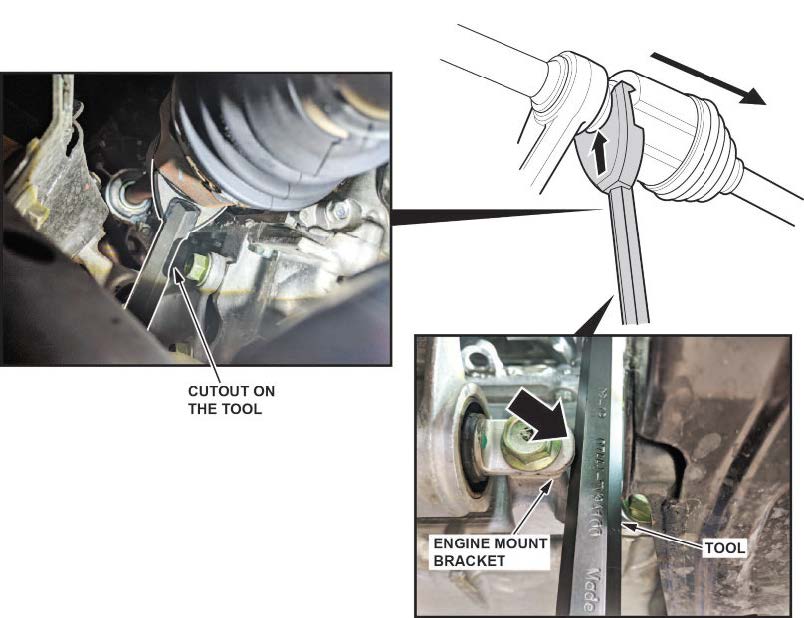
- Slowly apply pressure on the torque wrench until it clicks.
NOTE
Do not apply an impact load to the torque wrench.
- If the driveshaft pops out before the torque wrench clicks, go to REPAIR PROCEDURE.
- If the driveshaft did not pop out, remove the tool and the torque wrench and go to the next step.
- Manually push the right driveshaft inboard joint towards the intermediate shaft to relieve any pressure on the set ring.
- Install the engine undercover and lower the vehicle.
- Make sure the vehicle functions correctly in each gear.
REPAIR PROCEDURE
- Remove the right front wheel.
- Remove the filler plug with the sealing washer.
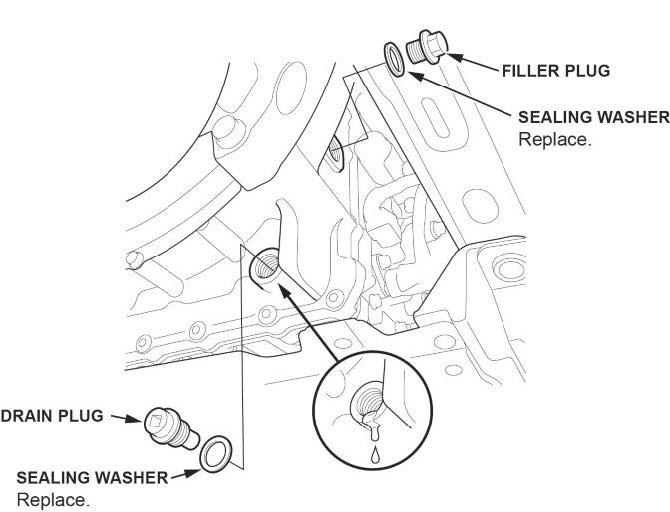
- Remove the drain plug with the sealing washer, and drain the ATF until it slows to a slight drip.
NOTE
Remove any metal particles from the magnetic surface of the drain plug.
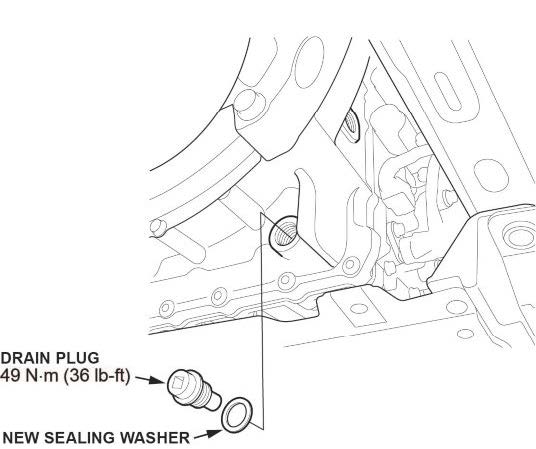
- Install the drain plug with a new sealing washer and torque it to 49 N·m (36 lb-ft)
- Pry up the stake on the spindle nut.
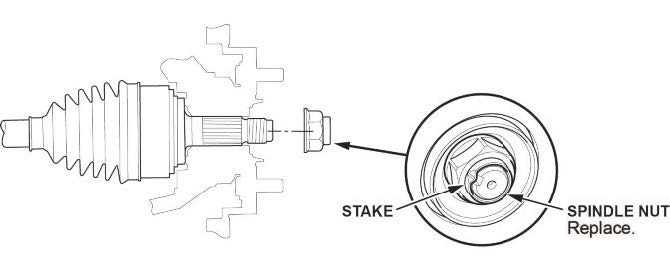
- Remove the spindle nut.
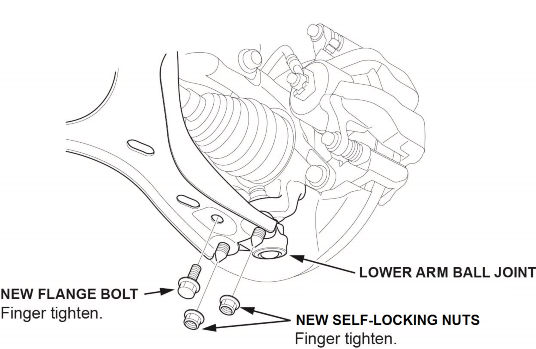
- Remove the lower ball joint flange bolt and self-locking nuts.
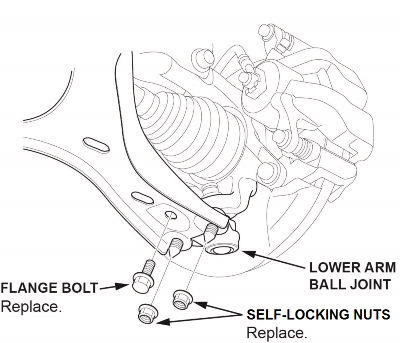
- Disconnect the lower arm ball joint from the lower arm.
- Using a dead-blow soft-face hammer, disconnect the outboard joint from the wheel hub.
- Remove the right driveshaft.
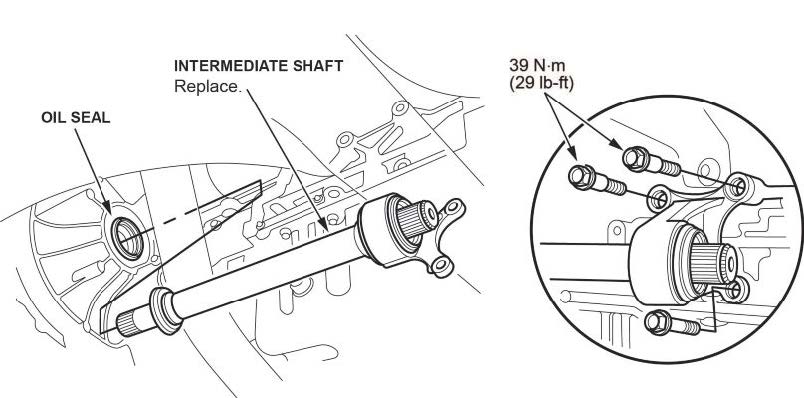
- Remove the intermediate shaft.
NOTE
Hold the intermediate shaft horizontal until it is clear of the differential to prevent damaging the oil seal. 12.
- Install the new intermediate shaft and torque the bolts to 39 N·m (29 lb-ft)
- Install the new right driveshaft on the intermediate shaft.
- Apply about 3 g (0.11 oz) of Moly 77 paste to the contact areas of the outboard joint and the front wheel bearing.
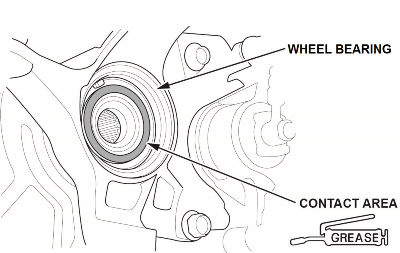
- Install the outboard joint into the hub assembly.

- Install the lower arm ball joint, and finger tighten the two new self-locking nuts and new flange bolt.
- Make sure the new driveshaft is fully set as shown in the INSPECTION PROCEDURE.
- If the new driveshaft pops out, check your work again. Call Tech Line if needed.
- If the new driveshaft is fully set, go to the next step.
- Install the new spinde nut with a small amount of engine oil on the seating surface. Torque the nut to 245 N·m (181 lb-ft).
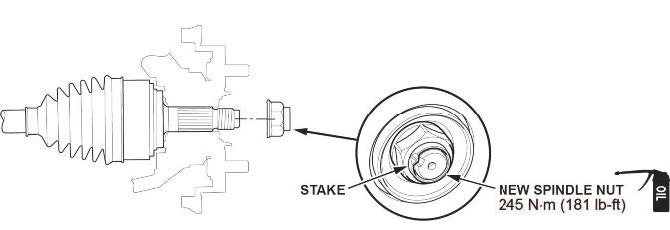
- Use a drift punch to stake the spindle nut shoulder against the notch in the driveshaft.
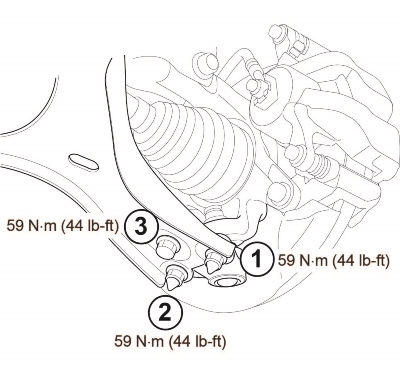
- Torque the lower arm ball joint self-locking nuts and flange bolt to 59 N·m (44 lb-ft) in the sequence shown.
- Fill the transmission with the recommended fluid into the filler plug until the ATF overflows. Always use Acura ATF Type 2. Using the wrong type ATF can affect shift quality.
NOTES
There are two types of transmission: Type A and Type B (indicated by a tab). Be careful of the transmission fluid capacity in reference to the following list.
- Type A: 4.1 L (4.3 US qt)
- Type B: 3.9 L (4.1 US qt)
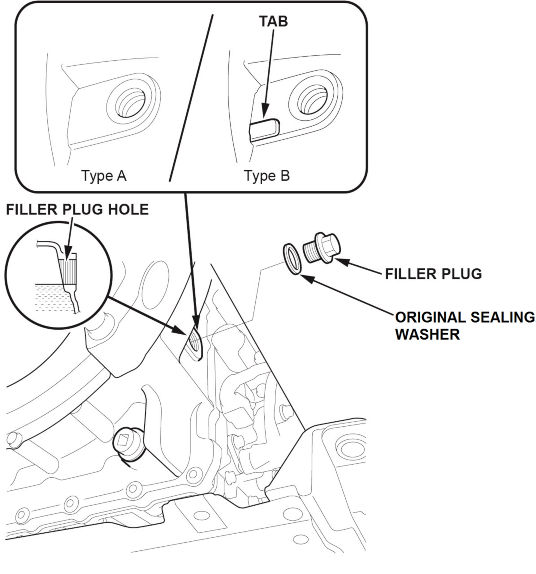
- Temporarily install the filler plug with the original sealing washer.
- Lower the vehicle.
- Start the engine.
- While firmly pressing on the brake pedal, shift the transmission to P>R>N>D>S>D>N>R>P, and wait at least 3 seconds in each gear.
- Turn the ignition to OFF.
- Raise the vehicle.
- Remove the filler plug and the original sealing washer.29. Make sure the ATF is dripping from the filler plug hole.
- Install the filler plug with a new sealing washer, and torque the plug to 44 N·m (32 lb-ft).
- Install the engine undercover.
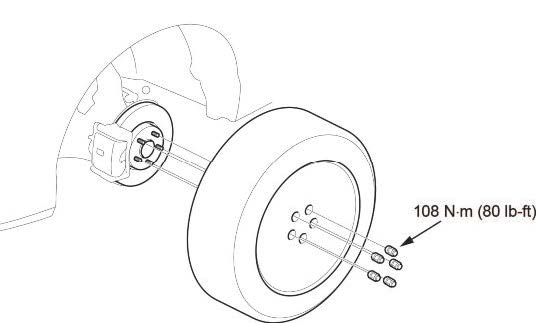
- Install the right front wheel, and torque the wheel nuts to 108 N·m (80 lb-ft).
- Make sure the vehicle functions correctly in each gear.
- Do an alignment inspection and adjustment.
- Park the vehicle on a flat and level surface with the steering wheel in the straight ahead position.
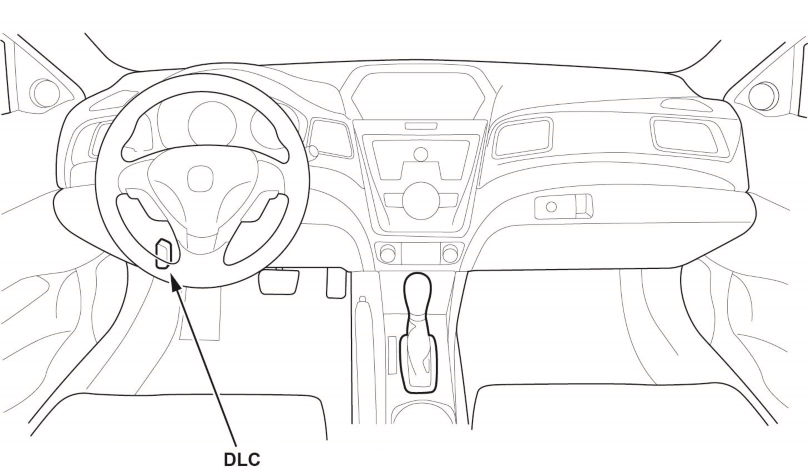
- Connect the i-HDS to the DLC, and turn the ignition to ON.
- Do the VSA Neutral Position Memorization. Using the i-HDS, select VSA ADJUSTMENT, then select ALL SENSORS, and follow the screen prompts.
- Do the Steering Angle Sensor Neutral Position Clear. Select EPS ADJUSTMENT, then select EPS STEERING ANGLE SENSOR VALUE CLEAR and follow the screen prompts.
- Test-drive the vehicle to check the repairs.
END
4 Affected Products
Vehicle
| MAKE | MODEL | YEAR |
| ACURA | ILX | 2016-2019 |
13 Associated Documents
Media Information for Immediate Release Statement by Acura Regarding Right Driveshaft Recall: 2016-2019 Acura ILX
RMISC-19V424-1997.pdf 102.632KB
 Loading...
Remedy Instructions and TSB
RCRIT-19V424-6345.pdf 1345.596KB
Loading...
Defect Notice 573 Report
RCLRPT-19V424-4776.PDF 216.006KB
Loading...
Remedy Instructions and TSB
RCRIT-19V424-0907.pdf 1357.399KB
Loading...
DEFECT INFORMATION REPORT
RMISC-19V424-6695.pdf 241.714KB
Loading...
Manufacturer Notices(to Dealers,etc) – June 7, 2019 Subject Safety Recall: 2016-19 ILX Driveshaft Inspection
RCMN-19V424-7608.pdf 202.555KB
Loading...
Recall Acknowledgement
Loading...
Recall Quarterly Report #2, 2019-4
RCLQRT-19V424-9187.PDF 211.26KB
Loading...
Manufacturer Notices(to Dealers,etc) – Subject 2016-19 ILX Driveshaft Inspection – Parts Return Instructions
Loading...
Recall Quarterly Report #1, 2019-3
RCLQRT-19V424-9682.PDF 211.153KB
Loading...
Remedy Instructions and TSB
RCRIT-19V424-2058.pdf 1494.497KB
Loading...
ISSUED Owner Notification Letter(Part 577)
RCONL-19V424-5764.pdf 351.074KB
Loading...
Manufacturer Notices(to Dealers,etc) – 10 01 2019 Subject The October Episode of Tech2Tech® Is Here!
Loading...
Latest Recalls Documents
For the Latest and Most Recent Recalls Information Visit the link below…
https://www-odi.nhtsa.dot.gov/acms/cs/documentList.xhtml?docId=19V424&docType=RCL
No products found.