
| “This site contains affiliate links for which OEMDTC may be compensated” |
NHTSA Campaign Number: 18V795
Manufacturer Honda (American Honda Motor Co.)
Components LATCHES/LOCKS/LINKAGES
Potential Number of Units Affected 107,774
Power Sliding Doors May Open While Moving
If the power sliding doors fails to latch, the doors may open while moving, increasing the risk of injury.
Summary
Honda (American Honda Motor Co.) is recalling certain model year 2018 and 2019 Honda Odyssey vehicles. The latch assemblies for the power sliding doors may stick and not properly latch to the door strikers.
Remedy
Honda will notify owners, and dealers will replace the left and right power sliding door rear latch assemblies, free of charge. The recall is expected to begin December 20, 2018. Owners may contact Honda customer service at 1-888-234-2138. Honda’s numbers for this recall are Z33 and O36.
Notes
Owners may also contact the National Highway Traffic Safety Administration Vehicle Safety Hotline at 1-888-327-4236 (TTY 1-800-424-9153), or go to www.safercar.gov.
Check if your Honda has a Recall
A18-128
November 10, 2018
Version 1
Safety Recall: Power Sliding Door Rear Latches
AFFECTED VEHICLES
| Year | Model | Trim | VIN Range |
| 2018-19 | Odyssey | ALL except LX | Check the iN VIN status for eligibility. |
BACKGROUND
The rear latch assemblies on the power sliding doors may generate higher than normal friction, causing the mechanism to stick. A stuck rear latch mechanism may restrict doors from fully closing, allowing the doors to open unexpectedly and increasing the risk of injury for occupants seated in the second and third row seats.
CUSTOMER NOTIFICATION
Owners of affected vehicles will be sent a notification of this campaign.
Do an iN VIN status inquiry to make sure the vehicle is shown as eligible.
Some vehicles affected by this campaign may be in your new or used vehicle inventory.
Failure to repair a vehicle subject to a recall or campaign may subject your dealership to claims or lawsuits from the customer or anyone else harmed as a result of such failure. To see if a vehicle in inventory is affected by this safety recall, do a VIN status inquiry before selling it.
CORRECTIVE ACTION
Replace both the left and right power sliding door rear latches.
If the vehicle needs to be returned to the customer before the repair can be done, disable the power sliding doors. Disabling the doors will mitigate the risk of the doors opening while driving. The sliding doors can still be opened and closed manually until the latches are replaced.
NOTE
You must make sure the service advisor has received customer approval before doing the POWER SLIDING DOOR DISABLE PROCEDURE. This is a temporary measure only and requires the customer bring the vehicle back to have the sliding door latches replaced.
Service Advisor:
If the vehicle must be returned before the latches can be replaced, refer to Job Aid Safety Recall: Power Sliding Door Rear Latches – Frequently Asked Questions for information about communicating the power sliding door disabling procedure with the customer.
PARTS INFORMATION
| Part Name | Part Number | Quantity |
| Power Sliding Door Latch Assembly Kit (Includes Both Left and Right Side) | 06720-THR-308 | 1 |
WARRANTY CLAIM INFORMATION
| Operation Number | Description | Flat Rate Time | Defect Code | Symptom Code | Template ID | Failed Part Number |
| 7441E4 | Replace both the left and right power sliding door rear latches. | 1.6 hr | 6PS00 | O3600 | A18128A | 72650-THR-A11 |
Use the following warranty information if the power sliding doors need to be disabled using the POWER SLIDING DOOR DISABLE PROCEDURE. Customers must approve the power sliding doors being disabled.
| 7370E0 | Remove the fuses and disconnect the power sliding door switch to disable the power sliding doors. | 0.3 hr | 6PD00 | Z3300 | A18128B | 72650-THR-A11 |
Use the following warranty information if the power sliding door needs to be enabled after the power sliding door latches were replaced.
| Operation Number | Description | Flat Rate Time | Defect Code | Symptom Code | Template ID | Failed Part Number |
| 7441E4 | Replace both the left and right power sliding door rear latches. | 1.6 hr | 6PS00 | O3600 | A18128C | 72650-THR-A11 |
| A | Install the fuses and connect the power sliding door switch to enable the power sliding doors. | 0.1 hr |
Skill Level: Repair Technician
REPAIR PROCEDURE
NOTE
The images in this repair procedure show the left side of the vehicle. The right side is a mirror image of these images.
- Remove the second row outer seats.
NOTE
Remove any child or booster seats that are installed in the second row seats, and place them in the cargo area for the customer to reinstall.
- Lower both power sliding door windows to the fully open position.
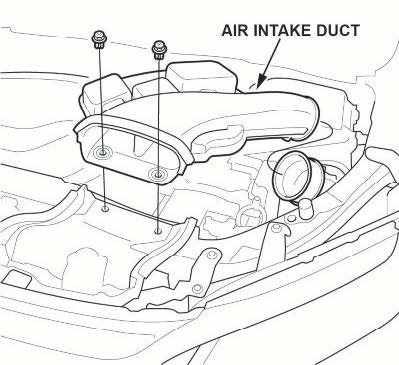
- Remove the air intake duct.
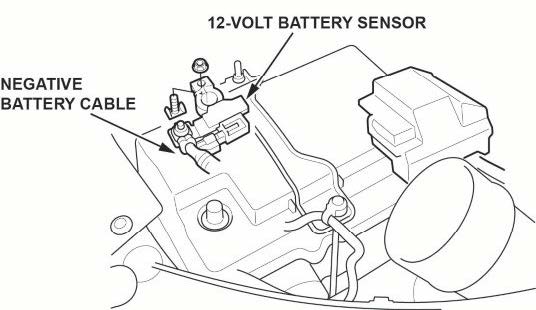
- Disconnect the 12-volt battery.
NOTES
- Always disconnect the negative terminal first.
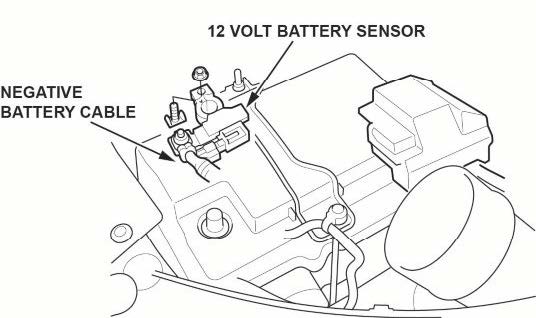
- To protect the battery sensor connector from damage, do not hold it when removing the terminal.
- Do not disconnect the 12-volt battery sensor from the cable.
4.1 Make sure the ignition is turned to OFF.
4.2 Disconnect and isolate the negative cable with the 12-volt battery sensor from the 12-volt battery.
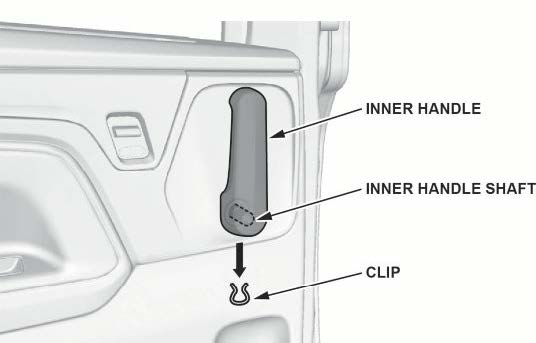
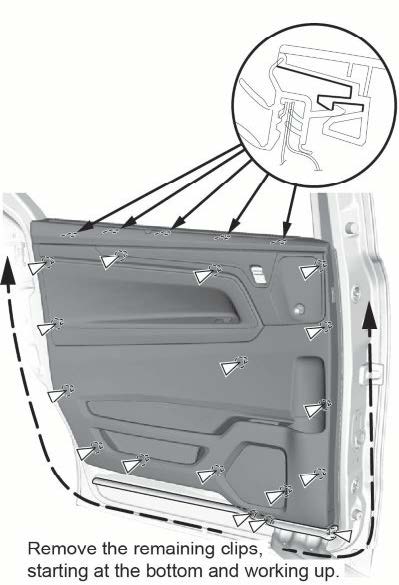
- Using a wire hook, pull the clip off of the inner handle shaft, and remove the inner handle.
- Remove the two clips at the bottom of the door panel first to release the lower door seal from the door panel.
NOTE
Removing the two clips prevents pulling the door seal off of the door as the door panel is lifted and removed.
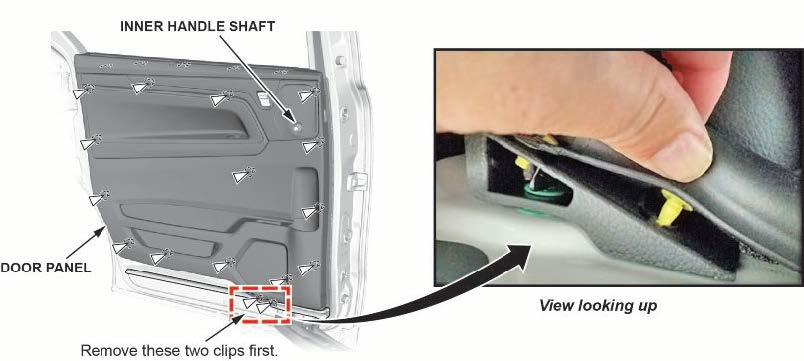
- Starting at the bottom edge of the door panel, remove the remaining clips with a commercially available trim pad remover.
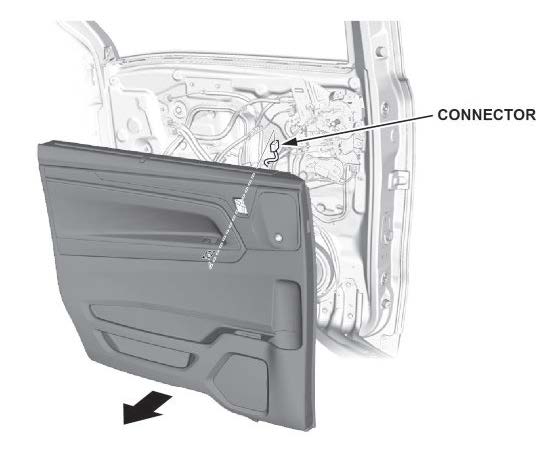
- Starting at the rear, pull the door panel upward while making sure the clips from step 6 are free and not pulling on the lower door seal. Pull the door panel away from the inner handle shaft, and lift it upward.
- While holding the sliding door panel away from the door, disconnect the connector. Then, remove the door panel.
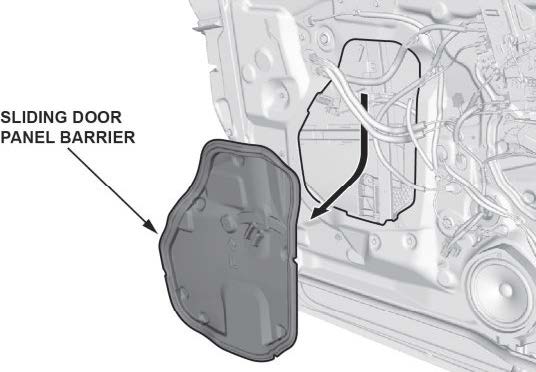
- Remove the sliding door panel barrier.
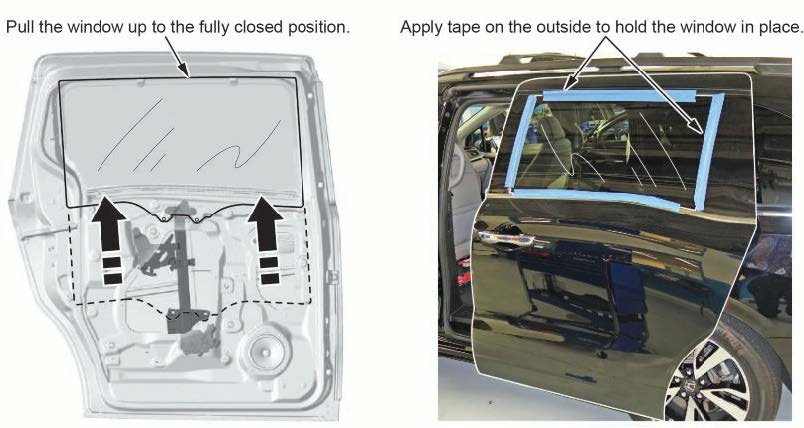
- Remove the sliding door glass bolts from the regulator.
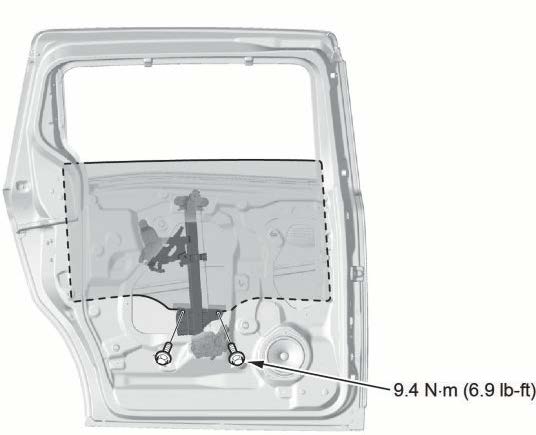
- Slide the window up, and apply low-tack tape to the outside of the glass and the sliding door as shown to hold the window in the fully closed position.
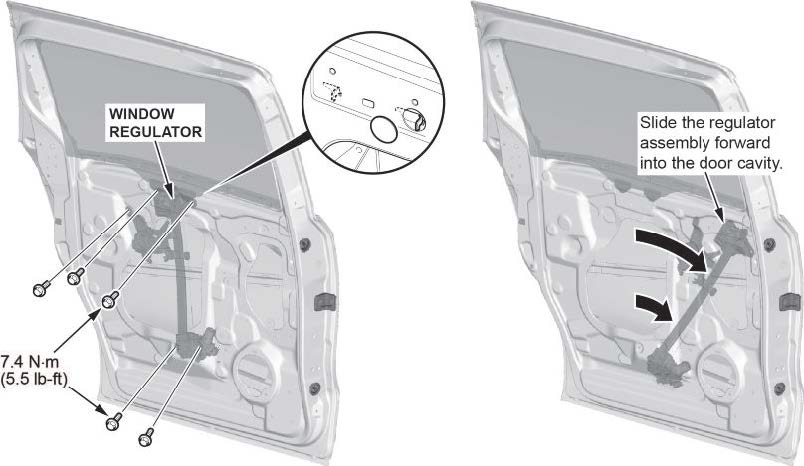
- Remove the five regulator bolts, and slide the window regulator forward into the door cavity as shown.
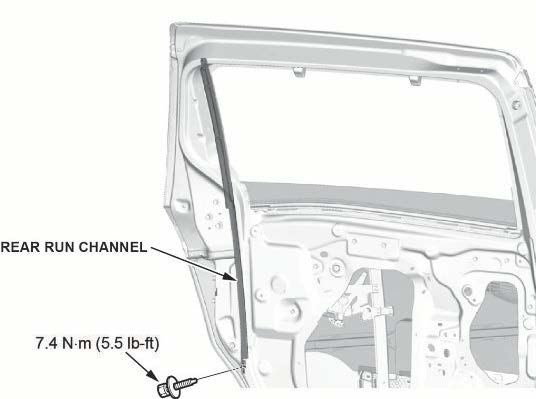
- Remove the lower bolt from the sliding door rear run channel.
- Release the cable holders and the cable fasteners.
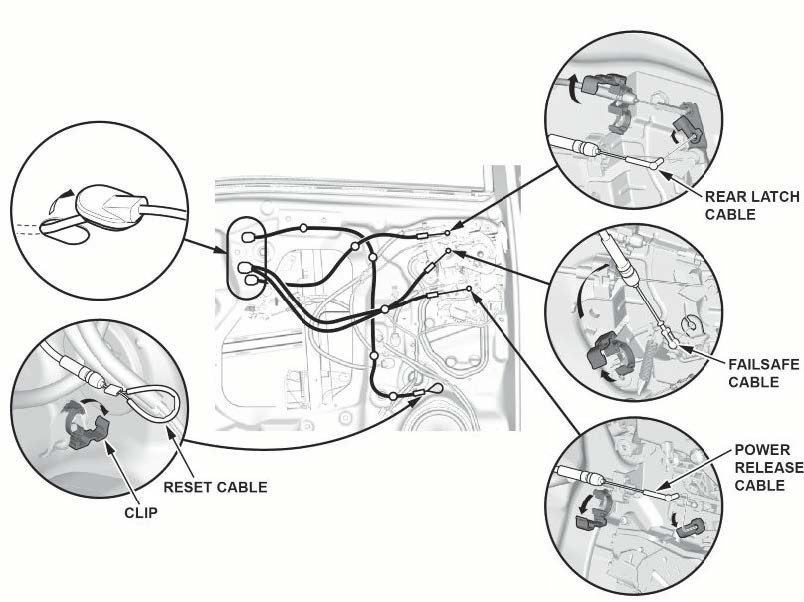
- Disconnect the rear latch cable, the failsafe cable, the power release cable, and the reset cable.
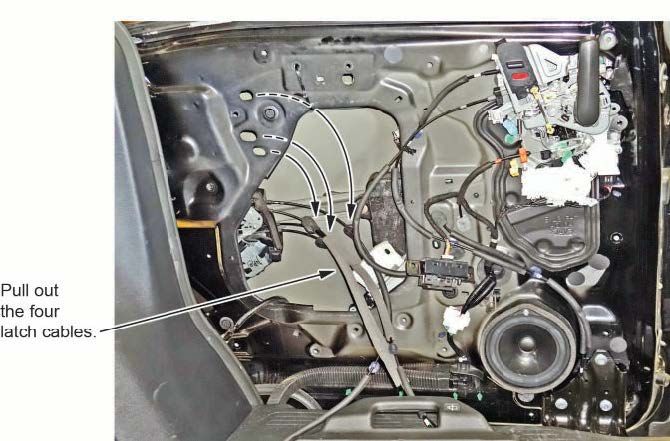
- Push the cable grommets in through the cable openings. Then, pull the cables into the door cavity and out through the sliding door panel barrier opening.
- Remove the four rear latch fastener bolts and the clip.

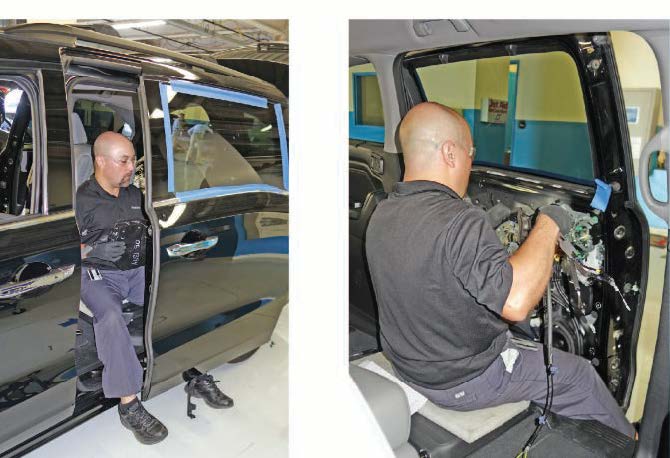
- Sit in the open door with one leg on either side of the lower roller bracket, and pull the door forward to access the rear latch opening as shown.
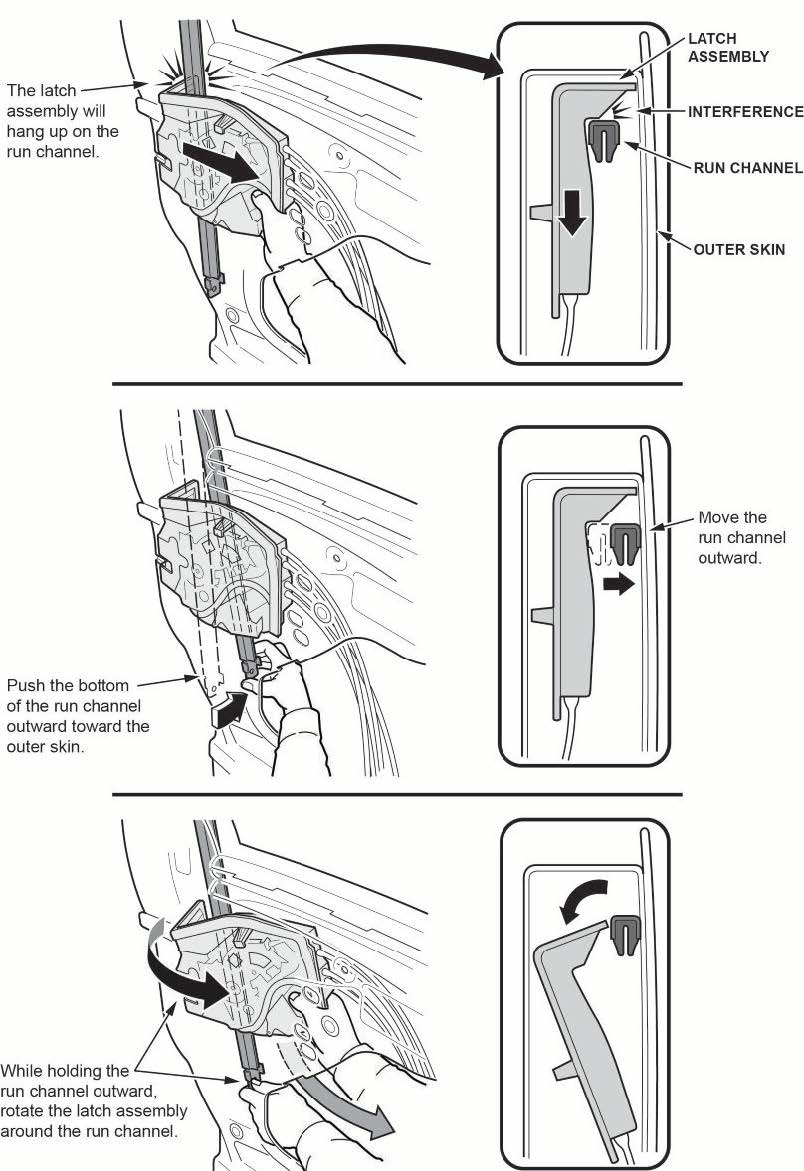
- While pushing the bottom of the sliding door rear run channel outward, pull the rear latch forward into the door cavity.
- Once the latch is in the opening, disconnect the connectors, then remove the latch.
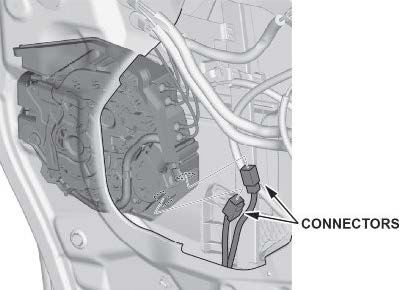
- Place the new latch in the opening, and connect the connectors.
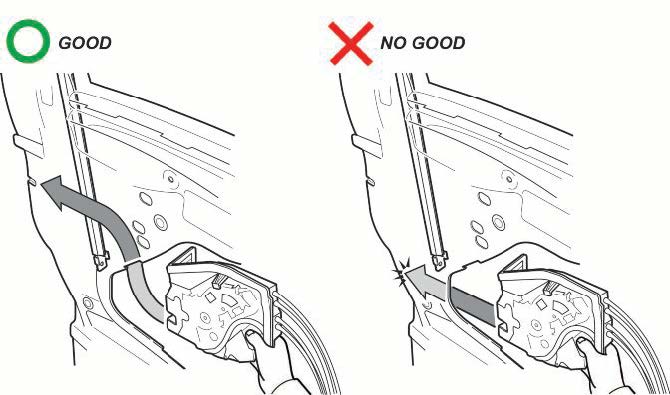
- While pushing the bottom of the sliding door rear run channel outward, push the new latch rearward, rotating it around and behind the run channel, lining up the latch mechanism with the latch opening in the door skin.
NOTE
The latch cannot be inserted past the sliding door rear run channel if the latch is inserted below this position.
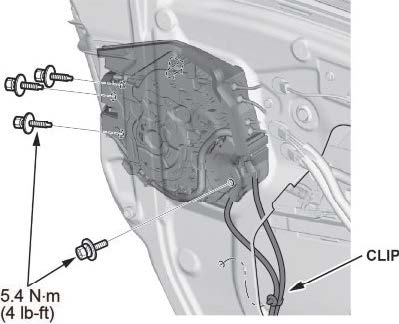
- Install and torque the four rear latch fastener bolts to 4 N·m (4 lb-ft), and install the clip.
- Install the remaining removed parts in the reverse order of removal, tightening all fasteners to the specified torque.
- Repeat steps 5 thru 26 to replace the rear latch on the opposite door.
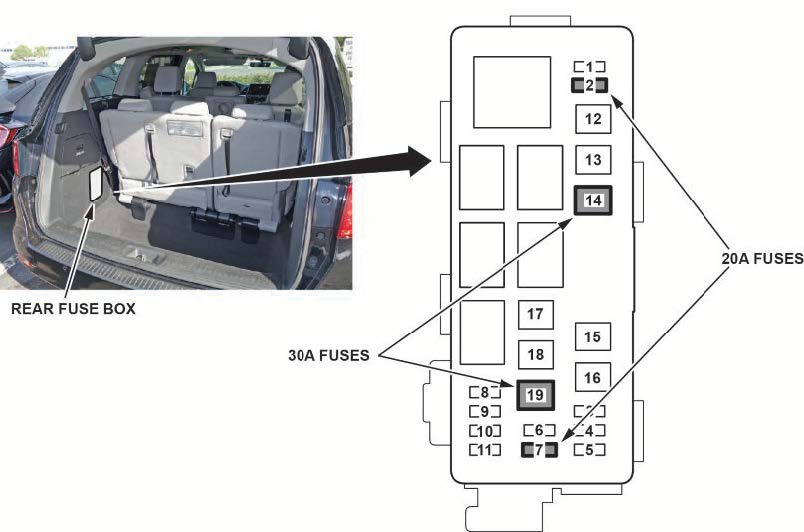
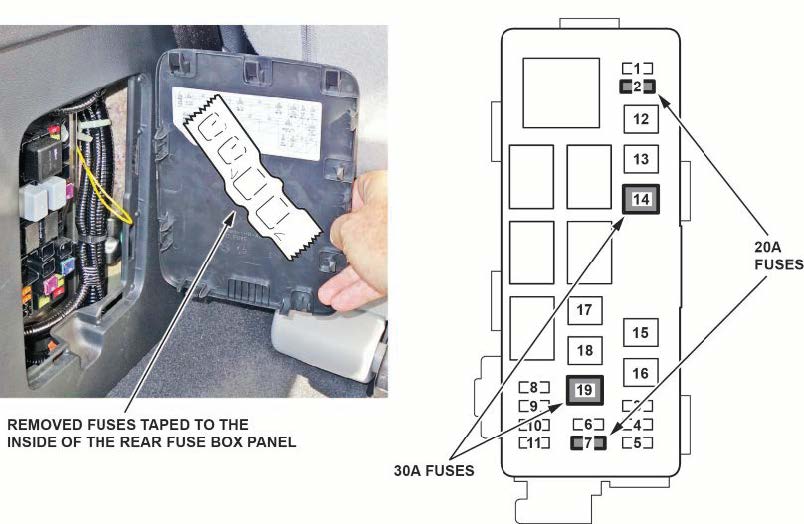
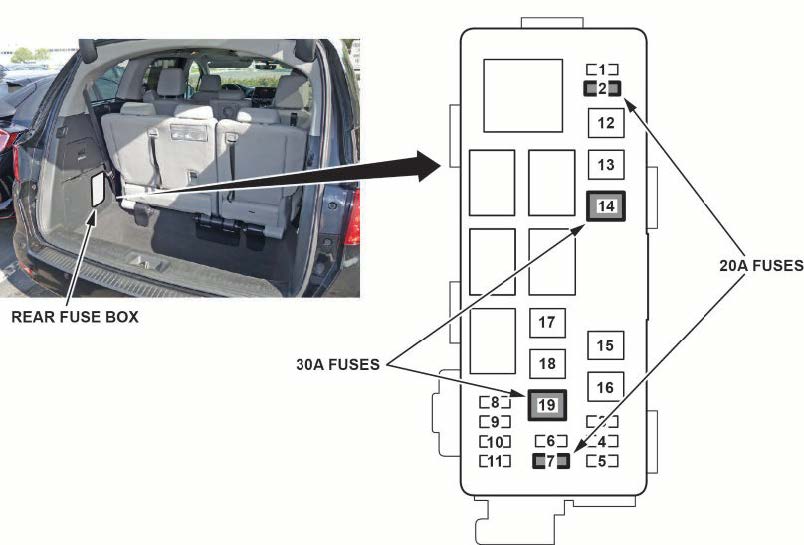
- Remove the rear fuse box access panel. Check if fuses F2, F7, F14, and F19 are installed.
- The power sliding door was disabled to prevent it from opening unexpectedly by removing 4 fuses and disconnecting the main switch connector. To enable the power sliding door do the following:
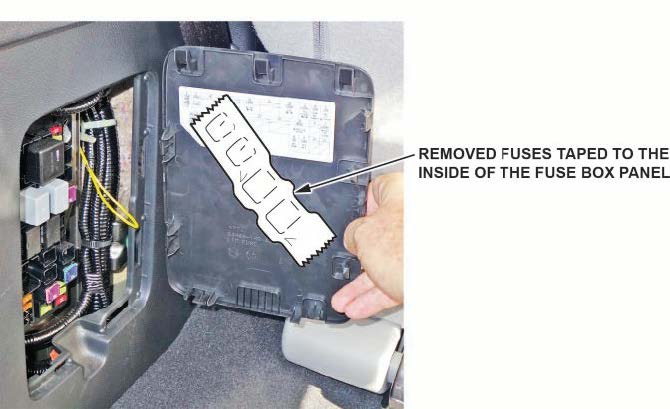
29.1 The fuses should be taped to the inside of the fuse box panel. Remove the fuses from the tape and install the 20 amp fuses into the F2 and F7 locations, then install the 30 amp fuses in locations F14 and F19.
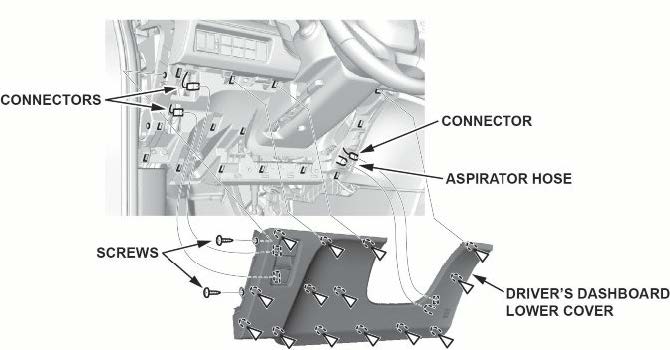
29.2 Remove the driver’s dashboard side cover.

29.3 Remove the driver’s dashboard lower cover.
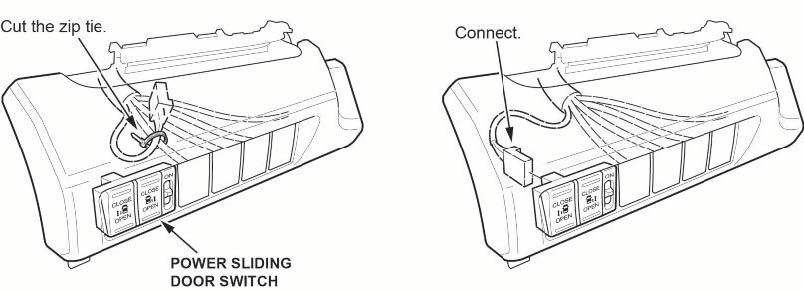
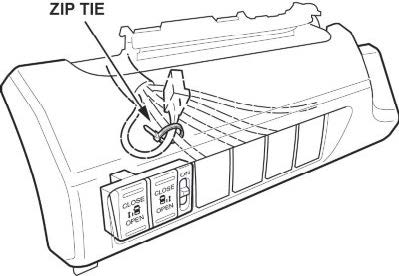
29.4 Cut the zip tie, and connect the power sliding door main switch connector.
29.5 Install the driver’s dashboard side cover and the driver’s dashboard lower cover.
- Connect the battery, and turn the power sliding door main power to ON. Confirm the latches work properly by using the power door feature to open and close both power sliding doors.
- Install the second row outer seats.
31.1 Insert the front seat hooks into the front floor strikers.
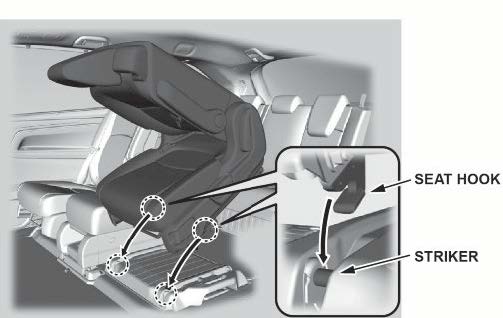
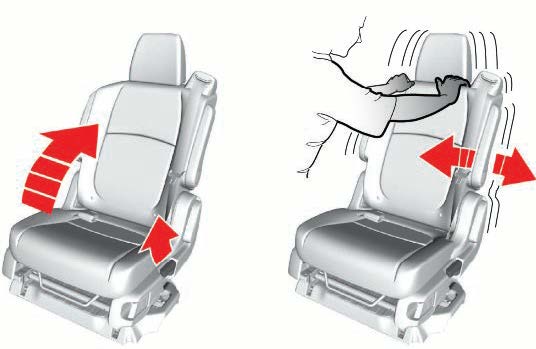
31.2 After confirming both front hooks are fully inserted into the front strikers, begin to lower the seat then allow it to drop and lock to the rear strikers.
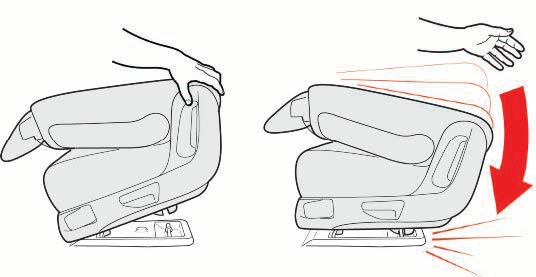
31.3 Raise the seat-back to an upright position, then rock the seat back and forth to confirm both the inner and outer latches are securely locked into position.
POWER SLIDING DOOR DISABLE PROCEDURE
NOTES
- Make sure the service advisor has received the customer’s approval before doing the POWER SLIDING DOOR DISABLE PROCEDURE. For more information, refer to Job Aid Safety Recall: Power Sliding Door Rear Latches – Frequently Asked Questions.
- Make sure you follow these steps in order to disable the power sliding door. If you do not, you may set DTCs and/or sliding door warning messages in the MID.
- Close both power sliding doors, and confirm both the front and rear latches are fully engaged.
- If both of the power sliding door rear latches fully engage, go to step 2.
- If at least one of the power sliding door rear latches does not fully engage, do not disable the power sliding doors. Both rear latches must be replaced.
- Remove the air intake duct.

- Disconnect the 12-volt battery.
NOTES
- Always disconnect the negative terminal first.
- To protect the 12-volt battery sensor connector from damage, do not hold it when removing the terminal.
- Do not disconnect the 12-volt battery sensor from the cable.
3.1 Make sure the ignition is turned to OFF.
3.2 Disconnect and isolate the negative cable with the 12-volt battery sensor from the 12-volt battery.
- Remove the driver’s dashboard side cover.

- Remove the driver’s dashboard lower cover.

- Disconnect the power sliding door main switch connector.
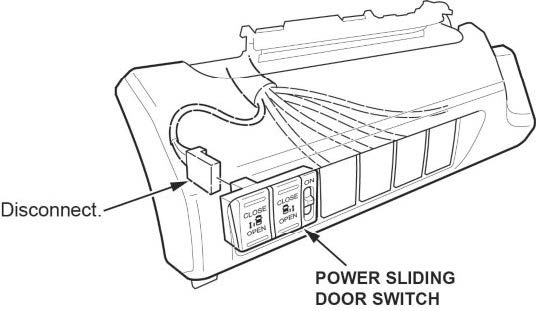
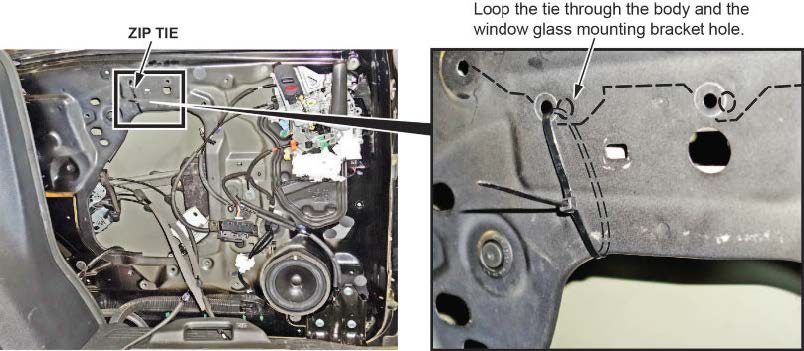
- Secure the connector with a zip tie as shown to prevent it from rattling.
- Install the driver’s dashboard lower cover and the driver’s dashboard side cover.
- Remove the rear fuse box panel and remove the 20 amp fuses from F2 and F7 and the 30 amp fuses from F14 and F19 as shown.
- Tape the fuses to the inside of the fuse box panel as shown because when the new latches are installed, the fuses will be needed to restore the power sliding door function.
- Connect the battery.
- Start the vehicle, and manually open and close both sliding doors. Confirm the MID is not displaying any sliding door warning indicators or messages.
END
November 2018
Version 1
Safety Recall: Power Sliding Door Rear Latches – Frequently Asked Questions
Question: What is the issue?
Answer: The power sliding door rear latches may generate higher than normal friction, causing them to stick. If they stick, the power sliding doors may not be able to fully close, allowing them to open unexpectedly and increase the risk of injury for second and third row seat passengers.
Question: What is the fix?
Answer: The left and right power sliding door rear latches must be replaced. This is covered in service bulletin 18-128, Power Sliding Door Rear Latches, which was recently released.
Question: Are there any special concerns with this recall?
Answer: If your dealership does not have parts to repair your customer’s vehicle, service bulletin 18-128 directs the service technician to disable the power sliding doors with your customer’s permission. Doing this keeps the door latch from getting stuck, mitigating the risk of an unintended opening.
Keep in mind this is just a temporary measure and does not fix the vehicle; your customer must accept to have this done and return when the parts are available. Make sure to note on the RO your customer’s acceptance before proceeding.
Question: What if my customer declines the recommendation to have the doors disabled?
Answer: If your customer declines to have this done, make sure you explain the risk of an unintended door opening then note on the RO that you explained this and your customer declined. Advise your customer if the power sliding doors fail to latch, the vehicle must not be driven and must be towed to a dealer.
Question: How will the power sliding doors operate once they are disabled?
Answer: With the power sliding doors disabled, your customer will need to close the door with more force, making sure both the front and rear of the door are flush. If your customer does not apply enough force, the rear latch will not engage. Also, to avoid denting or damage to the door when closing it, your customer should not press on the outside door sheet metal.
Question: How long will the power sliding doors be disabled?
Answer: Dealers will be receiving parts on a weekly basis. Once parts are available, you can arrange with your customer to have the repair completed.
A18-128
November 10, 2018
Version 1
https://static.nhtsa.gov/odi/rcl/2018/RCRIT-18V795-2903.pdf
 Loading...
Safety Recall: Power Sliding Door Rear Latches – Frequently Asked
Questions
https://static.nhtsa.gov/odi/rcl/2018/RCMN-18V795-6594.pdf
Loading...
Manufacturer Notice
November 10, 2018
https://static.nhtsa.gov/odi/rcl/2018/RCMN-18V795-3294.pdf
Loading...
DEFECT INFORMATION REPORT
https://static.nhtsa.gov/odi/rcl/2018/RMISC-18V795-0201.pdf
Loading...
Chronology
https://static.nhtsa.gov/odi/rcl/2018/RMISC-18V795-7656.pdf
Loading...
Recall Acknowledgement
November 20, 2018
https://static.nhtsa.gov/odi/rcl/2018/RCAK-18V795-4235.pdf
Loading...
Recalls Documents
https://www-odi.nhtsa.dot.gov/acms/cs/documentList.xhtml?docId=18V795&docType=RCL

- One canister of Armor All Car Cleaning Wipes, 90 Count
- Interior car cleaner in convenient lint free wipes for easy cleanup as a dust remover and upholstery cleaner wipes
- Car vinyl cleaner removes ground-in dirt from all surfaces, including your dash, upholstery and carpet in convenient disposable wipes
- Car detailing wipes won't dry out, damage or fade your car's interior
- Wipe down all surfaces with the car interior wipes for quick cleaning

- [Car Kit]: Armor All Car Wipes Multi-Pack includes a 30-pack canister of Armor All Protectant Wipes, a 30-pack canister of Armor All Glass Wipes and a 30-pack canister of Armor All Cleaning Wipes
- [Detailed Look]: With effective cleaning in convenient, disposable car wipes, this car kit includes wipes that clean your vehicle’s interior surfaces and exterior glass surfaces to provide a “just-detailed” look
- [Car Cleaning Wipes]: Armor All Cleaning Wipes lift away dirt and debris to reveal your car’s rich, natural beauty without harming delicate automotive surfaces
- [Protects Vehicle Surfaces]: Armor All Original Protectant Wipes help preserve your vehicle’s rich look by protecting the interior of your vehicle from harmful elements, including UV rays and oxidation
- [Shiny Glass]: Armor All Glass Wipes remove filmy residue, road grime, bugs and fingerprints to leave a crystal clear, streak-free shine on your car’s glass surfaces

- One 30 count canister of Armor All Original Formula Car Protectant Wipes
- A convenient wipe with the proven protection of Armor All Original Protectant
- Safely cleans automotive interiors, including vinyl, plastic and rubber
- Protects against UV damage to prevent cracking and fading
- Adds shine to restore the rich, deep look of your dashboard, console, door panels and vinyl seats

- [Value Size Cleaning Wipes]: 75-count canister of Armor All Heavy Duty Cleaning Wipes targets tough dirt and grime
- [Cuts Through Tough Dirt and Grime]: Car cleaning wipes feature powerful scrubbing textures to loosen the most difficult buildups of dirt, grease, oil and beverage spills
- [Cleaning Wipes]: Use car wipes for more than just your vehicle – these surface cleaning wipes are perfect for use with your tools or lawn and garden equipment
- [Car Interior & Exterior Wipes]: Exterior and interior car wipes will make plastic, metal and vinyl surfaces shine once again
- [Safe on Hands]: The grease-cutting formula of these car wipes is safe on hands

- Protectant Car Wipes: One 20 count flat pack of Armor All Original Formula Car Protectant Wipes
- Convenient Interior Cleaner: A convenient wipe with the proven protection of Armor All Original Protectant
- Safe for Surfaces: Safely cleans automotive interiors, including vinyl, plastic and rubber
- Helps Prevent Cracking & Fading: Helps protect against UV damage to help prevent cracking and fading
- Renews & Shines: Adds shine to renew the rich, deep look of your dashboard, console, door panels and vinyl seats

- Powerful cleaning for automotive surfaces
- Convenient disposable wipe removes ground-in dirt, dust & grime
- Great for car dash, vinyl, fabric, carpet, consoles, leather & more
- Won’t dry out, damage or fade automotive surfaces and leaves a matte finish
- Lint-free disposable wipes will not leave a greasy residue on your hands

- Six Canisters of Armor All Orange Air Freshening Car Cleaning Wipes (25 count each)
- Convenient, disposable auto wipes formulated with powerful orange cleaner from Armor All
- Scented wipes freshen your car with orange fragrance
- Degreasers power through tough dirt, dust and grime
- Lint-free and matte finish for a natural appearance

- MULTI-PURPOSE wipes are effective for cleaning the whole car: dash, vinyl, fabric, carpet, clear plastic, console and more
- DISPOSABLE: Convenient, lint-free disposable wipes help maintain the beauty of your car's interior surfaces
- ALL-IN-ONE cleaning solution for that “just detailed” look
- POWERFUL CLEANING: Easily removes tough dirt, dust and grime.
- ON-THE-GO: Keep a resealable package in your car for on the go cleaning

- [Interior Car Cleaning Kit]: Armor All Car Interior Car Cleaning Wipes Kit includes Armor All Leather Care Wipes, Armor All Glass Wipes, Armor All Disinfectant Wipes, and Armor All Protectant Wipes
- [Car Cleaning Wipes]: Four count car wipes that keep car interiors looking sparkly clean while not damaging surfaces
- [Car Leather Care Wipes]: Preserves the plush appearance and conditioned feel of leather upholstery
- [Car Glass Wipes]: Leaves a crystal clear, streak-free shine on delicate glass surfaces in car interiors
- [Car Disinfectant Wipes]: Reveals the car’s rich, natural beauty while lifting away dirt and debris without harming delicate automotive surfaces
- One 25 ct container of Armor All Extreme Shield Car Protectant Wipes
- Car interior wipes prevent dust, dirt and lint buildup and enhance the car interior depth of color
- Stain blocker and UV protectant in the car interior wipes protect your interior
- Use car wipes to clean plastic, vinyl and rubber for quick, convenient cleaning
- The moisture lock lid keeps wipes moist for one year
Last update on 2024-03-24 / Affiliate links / Images from Amazon Product Advertising API
This product presentation was made with AAWP plugin.