
| “This site contains affiliate links for which OEMDTC may be compensated” |
NHTSA Campaign Number: 17V706
Manufacturer Honda (American Honda Motor Co.)
Components POWER TRAIN
Potential Number of Units Affected 5,404
The improper heat treatment can result in the halfshaft breaking, preventing the engine from moving the vehicle, and can allow a possible roll away situation if the parking brake is not engaged. This can increase the risk of a crash.
Summary
Honda (American Honda Motor Co.) is recalling certain 2017 Honda Civic Sedan and Coupe vehicles. The right halfshaft may have been improperly heat treated, reducing its strength.
Remedy
Honda will notify owners, and dealers will inspect the halfshaft’s serial number, replacing it as necessary and aligning the front wheels, free of charge. The recall began December 8, 2017. Owners may contact Honda customer service at 1-888-234-2138. Honda’s number for this recall is K0E.
Notes
Owners may also contact the National Highway Traffic Safety Administration Vehicle Safety Hotline at 1-888-327-4236 (TTY 1-800-424-9153), or go to www.safercar.gov.
Check if your Honda has a Recall
Service Bulletin
A17-091
November 3, 2017
07667 Version 2
Safety Recall: Right-Side (Passenger) Driveshaft
Supersedes 17-091, dated November 3, 2017 to revise the information highlighted in yellow
AFFECTED VEHICLES
| Year | Model | Trim | VIN Range |
| 2017 | Civic | 1.5 L CVT | Check the iN VIN status for eligibility |
REVISION SUMMARY
Revised the serial number range under INSPECTION.
BACKGROUND
The right (passenger) front driveshaft may fracture due to improper heat treatment. This may cause loss of engine power when accelerating and may also cause the vehicle to roll away in Park if the electric parking brake is not applied; increasing the risk of a crash/accident.
CUSTOMER NOTIFICATION
Owners of affected vehicles will be sent a notification of this campaign.
Do an iN VIN status inquiry to make sure the vehicle is shown as eligible.
Some vehicles affected by this campaign may be in your new or used vehicle inventory. These vehicles must be repaired before they are sold.
Failure to repair a vehicle subject to a recall or campaign may subject your dealership to claims or lawsuits from the customer or anyone else harmed as a result of such failure. To see if a vehicle in inventory is affected by this safety recall, do a VIN status inquiry before selling it.
CORRECTIVE ACTION
Inspect the right-side driveshaft, and depending on the serial number, do one of the following:
- Replace the right-side driveshaft.
- The driveshaft is OK. Submit a claim for the inspection.
REQUIRED MATERIALS
| Part Name | Part Number | Quantity |
| Moly 77 Paste (one tube repairs 50 vehicles) | 08798-9010 |
1 |
PARTS INFORMATION
NOTE: Only order parts AFTER you have inspected the vehicle.
| Part Name | Part Number | Quantity |
| Right-Side Driveshaft Assembly | 44305-TBC-A51 | 1 |
| Set Ring (28 x 2.0 mm) | 44319-S84-300 |
1 |
| Spindle Nut (24 mm) | 90305-SD4-003 |
1 |
| Self-Locking Nut | 90215-SB0-003 |
3 |
WARRANTY CLAIM INFORMATION
NOTE:
- Every replaced driveshaft will be called in 21 days after the claim submission, hold on to the part until you receive a request. That may go beyond the 30 days retention policy.
- You must store all warranty parts in accordance with the retention guidelines in Section 8 of the Service Operations Manual. DO NOT ship any warranty parts until you receive a call-in request for them.
- Fill out a Warranty Parts ID Tag, and attach it to the part.
- You will receive an iN-generated recycling call-in request 21 days after claim payment.For more information, see PIB A08-005.
- Make sure that you enter the serial number in the DTC fields of the warranty entry screen. The 12-digit number will require using three DTC fields. Failure to enter the serial number may result in your claim being debited.
- If you can not read the label or it is missing, enter No Label in the DTC fields.
| Operation Number | Description | Flat Rate Time | Defect Code | Symptom Code | Template ID | Failed Part Number |
| 2195B0 | Inspect right-side driveshaft. No replacement needed. | 0.3 hr | 6DS00 | K0E00 | A17091A | 44305-TBC-A51 |
| 2191BP | Inspect right-side driveshaft and replace it. (includes wheel alignment) | 0.9 hr | 6DS00 | K0E00 | A17091B | 44305-TBC-A51 |
Skill Level: Repair Technician
INSPECTION
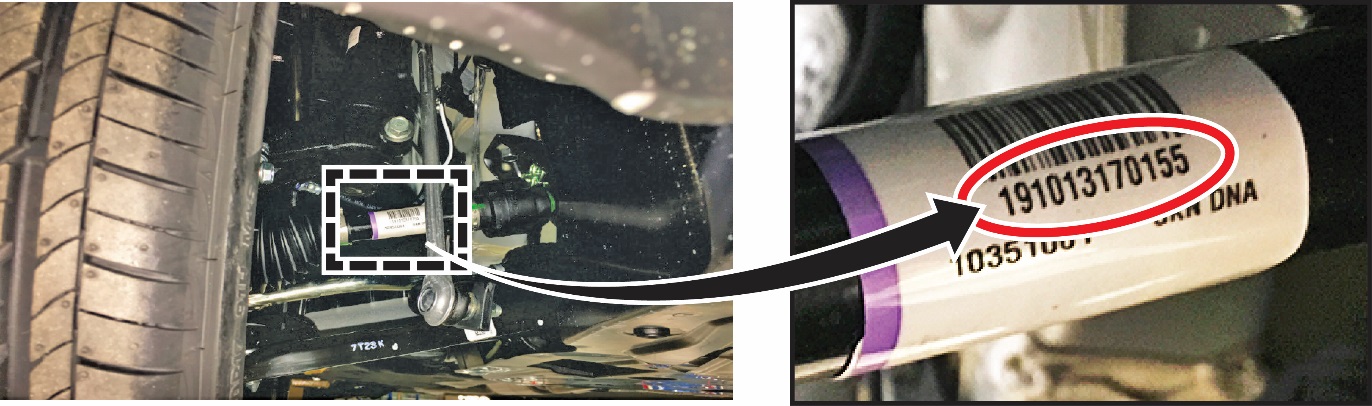
- Raise the vehicle on a lift.
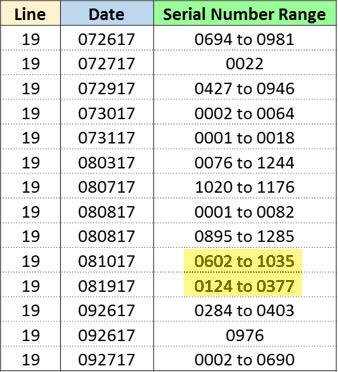
- Locate the right (passenger) side driveshaft label and write down the 12 numbers below the BAR code. NOTE:
- You will need the serial number to determine if the driveshaft needs to be replaced, and the warranty clerk will need the serial number to file a claim.
- If you can not read the label or if the label is missing, take a photo of the label or where the label would be and attach it to the RO, then go to the REPAIR PROCEDURE.
- Using a permanent marker, divide the serial number as shown below.
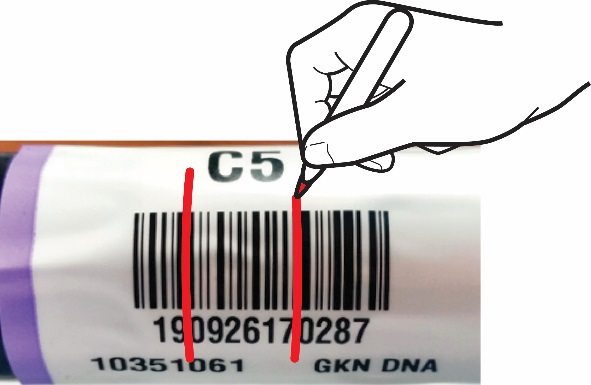
- Write the numbers on the RO.
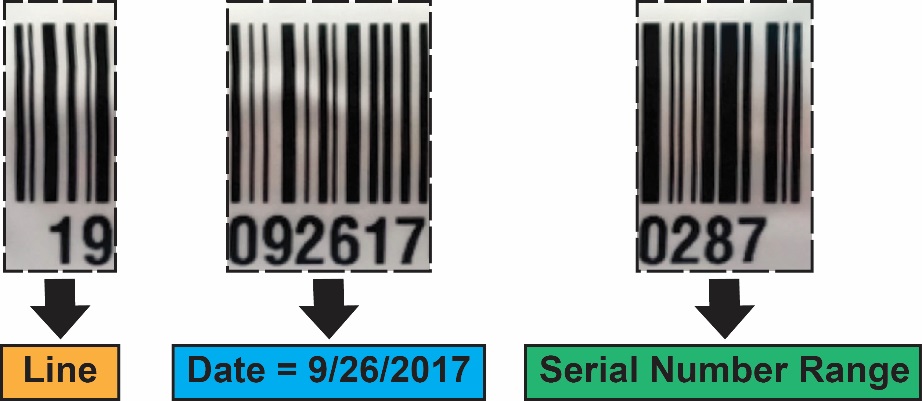
19 092617 0287
The 12 numbers are broken up into three categories as shown below. The date and serial number range will determine if the driveshaft needs to be replaced or not.
The example below shows how to use the chart to determine if the driveshaft needs to be replaced.
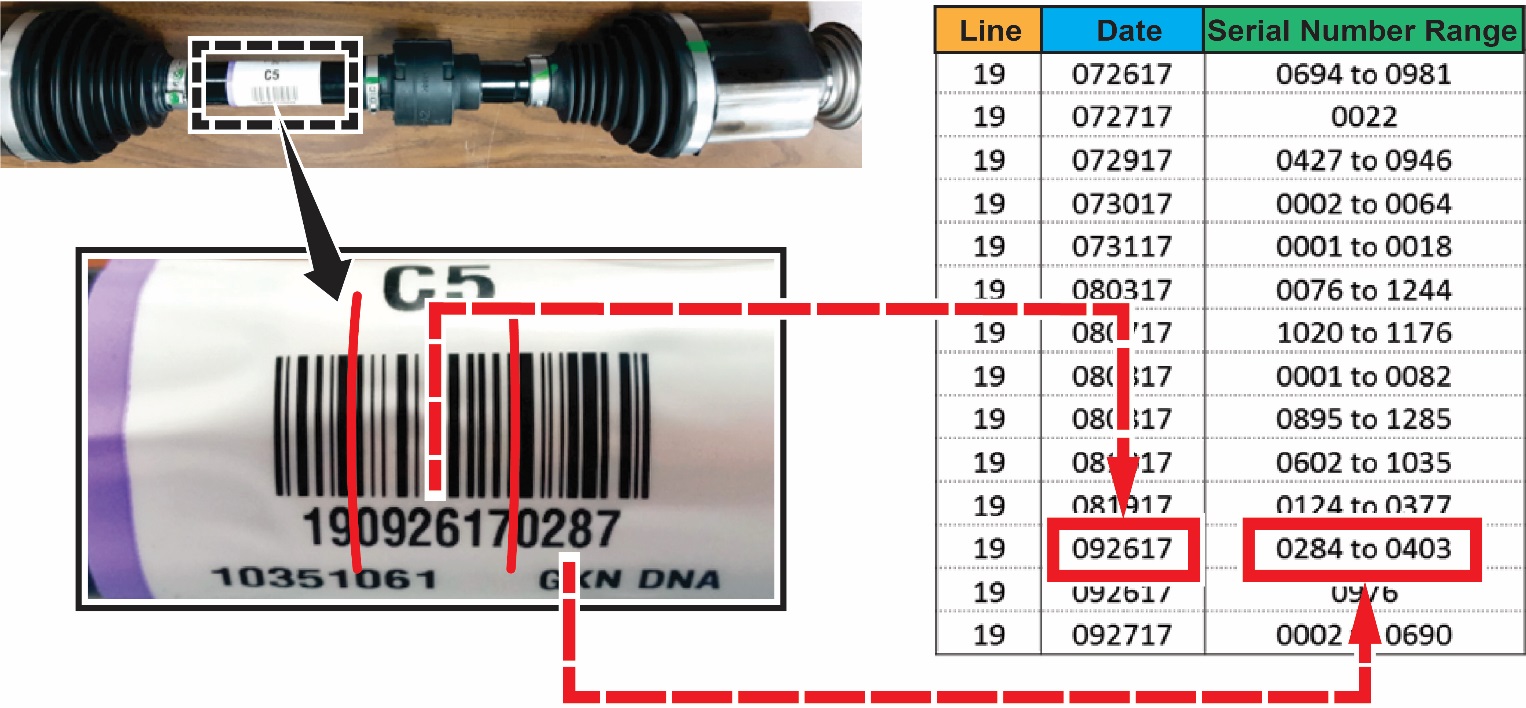
- Compare the numbers from the label on the right-side driveshaft against the chart below to determine if it is affected.
NOTE: If you can not read the label or if the label is missing, take a photo of the label or where the label would be and attach it to the RO, then go to the REPAIR PROCEDURE.
- Check that the the driveshaft was built on Line 19.
- If the shaft was built on Line 19, go to the date check.
- If the shaft was not built on Line 19, the driveshaft is OK. Submit a warranty claim for the inspection.
- Check the manufacturing date against the affected date in the table below.
- If the driveshaft was manufactured on one of the affected dates, go to the serial number check.
- If the driveshaft was not manufactured on one of the affected dates, the driveshaft is OK. Submit a warranty claim for the inspection.
- Check the affected date serial number.
- If the serial number is between the numbers listed for the affected date, go to REPAIR PROCEDURE.
NOTE: The serial number range includes the beginning and ending serial number listed below. For example, if you find 0694 manufactured on 072617 and on line 19, replace it.
- If the serial number is outside of the range listed, the driveshaft is OK. Submit a warranty claim for the inspection.
REPAIR PROCDURE
- Lift the vehicle.
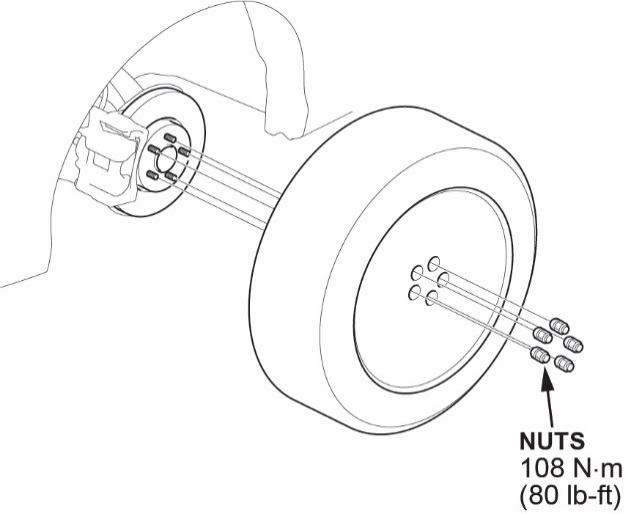
- Remove the right front wheel.
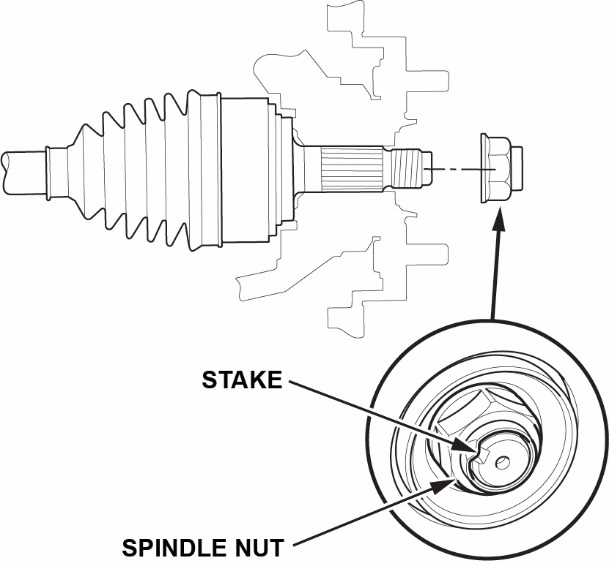
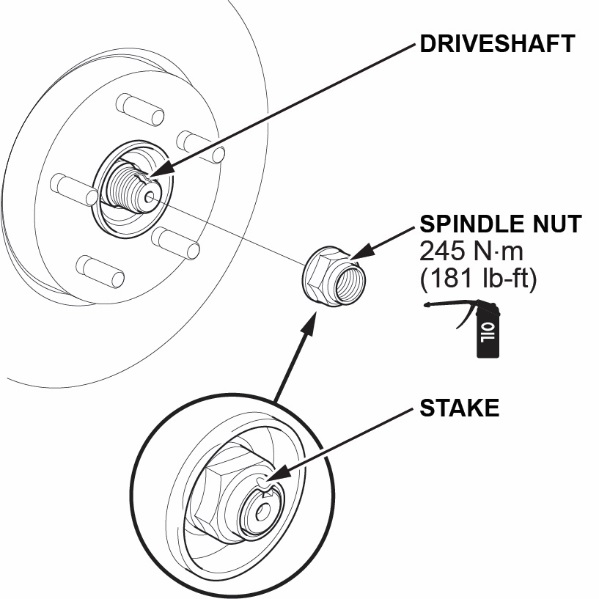
- Pry up the stake on the spindle nut, then remove the nut.
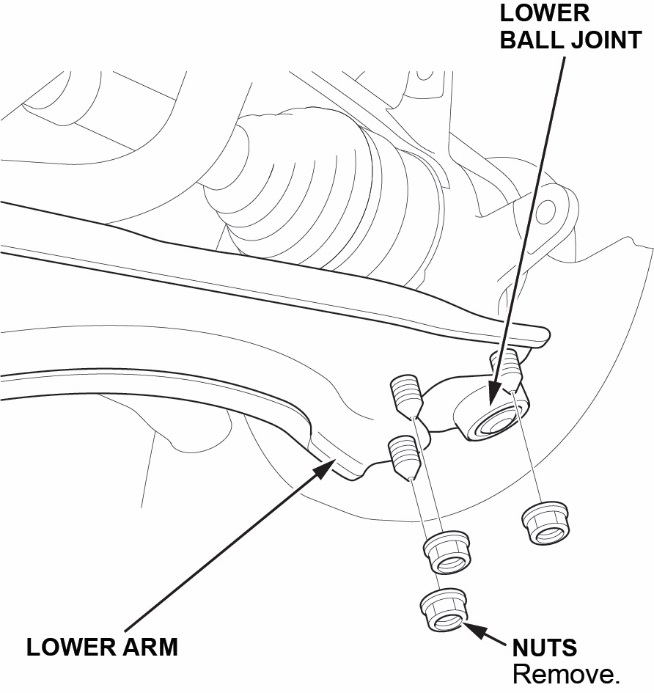
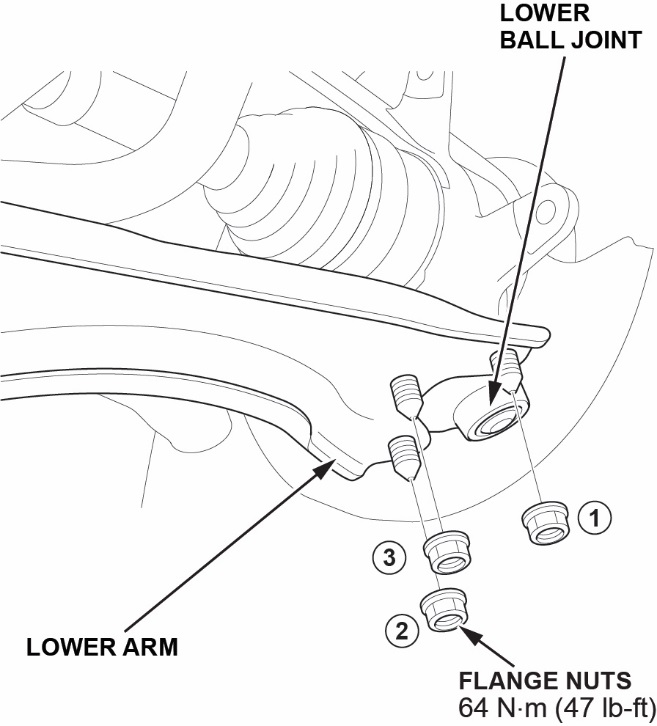
- Remove the nuts and disconnect the lower ball joint from the lower arm.
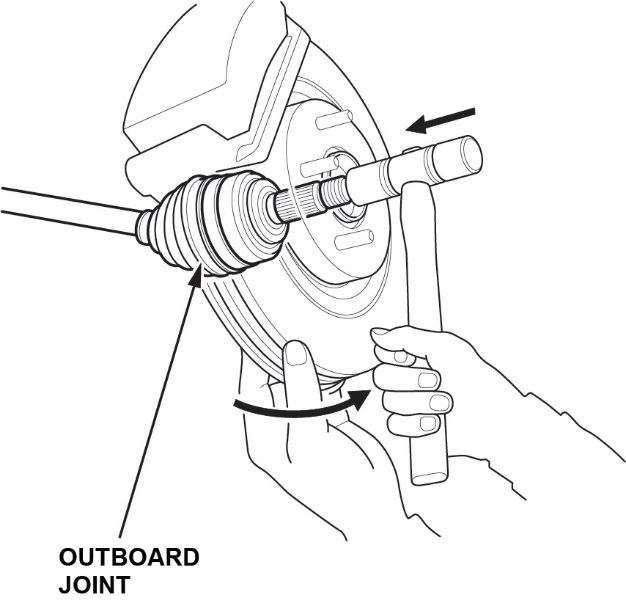
- Disconnect the outboard joint.
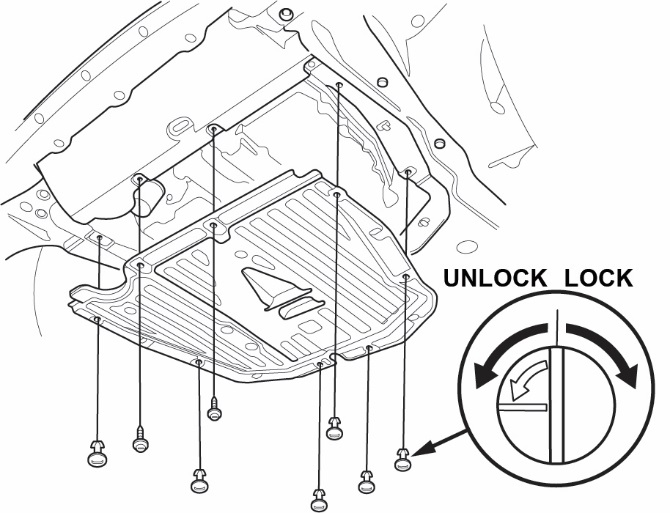
- Remove the engine undercover plate.
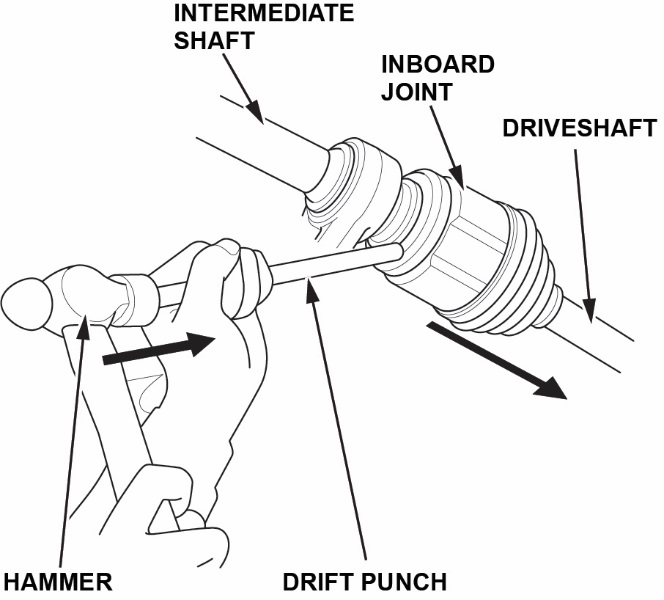
- Remove the inboard joint off of the intermediate shaft using a drift punch and a hammer.
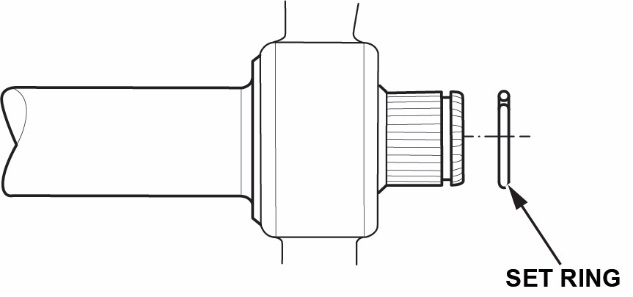
- Remove the set ring on the intermediate shaft and replace it with a new set ring.
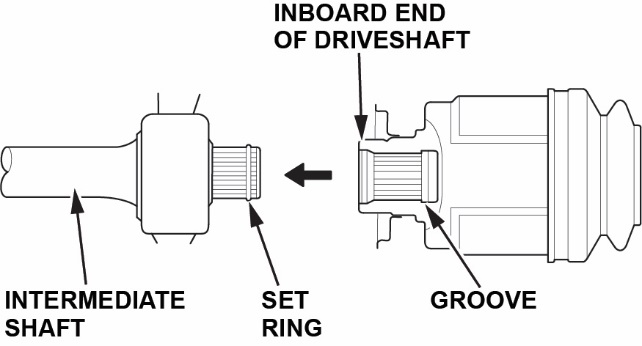
- Insert the inboard end of the new driveshaft into the intermediate shaft until the set ring locks in the groove.
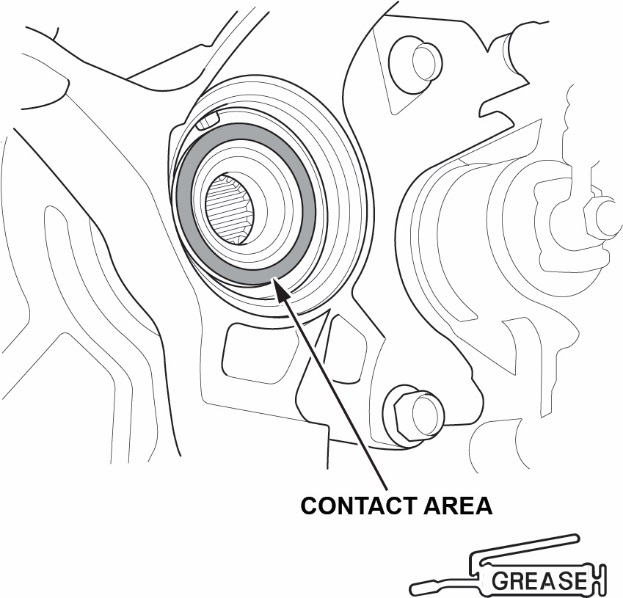
- Apply about 3 g (0.11 oz) of molly 77 paste (P/N 08798-9010) to the contact area of the outboard joint and front wheel bearing. Then install the outer joint into the hub. NOTE: The paste helps prevent noise and vibration.
- Install the lower ball joint to the lower arm with new flange nuts and torque in the sequence shown.
- Install the engine undercover plate.

- Install a new spindle nut and torque it to 245 N•m (181 lbf-ft). Use a drift to stake the spindle nut shoulder against the driveshaft.
- Install the right front wheel.
- Do the front wheel alignment. Refer to the service information.
END
A17-091
November 3, 2017
07667 Version 2
https://static.nhtsa.gov/odi/rcl/2017/RCRIT-17V706-4204.pdf
 Loading...
Owner Notification Letter
December 2017
https://static.nhtsa.gov/odi/rcl/2017/RCONL-17V706-4889.pdf
Loading...
A17-091
November 3, 2017
07667 Version 1
https://static.nhtsa.gov/odi/rcl/2017/RCRIT-17V706-5080.pdf
Loading...
Statement by American Honda
Nov. 29, 2017
https://static.nhtsa.gov/odi/rcl/2017/RMISC-17V706-1322.pdf
Loading...
Manufacturer Notice
November 8, 2017
https://static.nhtsa.gov/odi/rcl/2017/RCMN-17V706-8628.pdf
Loading...
Manufacturer Notice
November 3, 2017
https://static.nhtsa.gov/odi/rcl/2017/RCMN-17V706-4314.pdf
Loading...
Manufacturer Notice
November 3, 2017
https://static.nhtsa.gov/odi/rcl/2017/RCMN-17V706-1508.pdf
Loading...
Recall Acknowledgement
November 29, 2017
https://static.nhtsa.gov/odi/rcl/2017/RCAK-17V706-9844.pdf
Loading...