| “This site contains affiliate links for which OEMDTC may be compensated” |
A14-077
March 5, 2015
01149-01630 Version 3
Pop or Clunk From The Rear In Cold Weather Over Bumps
Supersedes 14-077, dated January 22, 2015, to revise the information highlighted in yellow
AFFECTED VEHICLES
| Year | Model | Trim | VIN Range |
| 2006-14 | Ridgeline | ALL | ALL |
REVISION SUMMARY
- Under PART INFORMATION was updated.
- Under WARRANTY CLAIM INFORMATION Failed Part Number was updated
SYMPTOM
A pop or clunk is heard from the rear suspension in cold weather going over bumps.
POSSIBLE CAUSES
The rear bump stops have loosened and are moving in the top mounting cap for the rear dampers.
CORRECTIVE ACTION
Apply a small amount of adhesive to the upper surface of the bump stop.
REQUIRED MATERIALS
| Part Name | Part Number | Quantity |
| Lord Fusor 148, 50ml
One tube repairs about 5 vehicles (10 Damper assemblies) |
08713-0009 | 1 |
| Application Gun | 08713-0010 |
1 |
| Mixer Tip
(Package of 12) |
08713-0011 | 1 |
PART INFORMATION
| Part Name | Tool Number | Quantity |
| Nut, Flange (10MM) | 90002-S10-000 |
2 |
| Bolt, Flange (18×76) | 90119-SJC-A10 |
2 |
| Bolt, Flange (10×42) | 90172-SJC-A01 | 6 |
| Bolt, Rear Knuckle (16×90) | 90174-SJC-A00 |
2 |
| Nut, Self-Lock (12MM) (NYLON) | 90362-SJP-A00 | 2 |
| Nut, Self-Lock (10MM) (NYLON) | 90364-S5D-A01 | 2 |
WARRANTY CLAIM INFORMATION
The normal warranty applies.
| Operation Number | Description | Flat Rate Time | Template ID | Failed Part Number |
| 4171C3 | Apply Adhesive to Bump Stops.
Includes disassemble both rear damper assemblies, apply adhesive to the bump stops and reassemble (includes check wheel alignment and adjust if necessary.) |
2.3 hrs | 14-077A | 52610-SJC-A01 |
Defect Code: 00504
Symptom Code: 04201
Skill Level: Repair Technician
REPAIR PROCEDURE
- Raise and support the vehicle.
- Remove the rear wheels.
- Position a floor jack at the connecting point of lower arm B and the knuckle. Raise the floor jack until the suspension begins to compress.
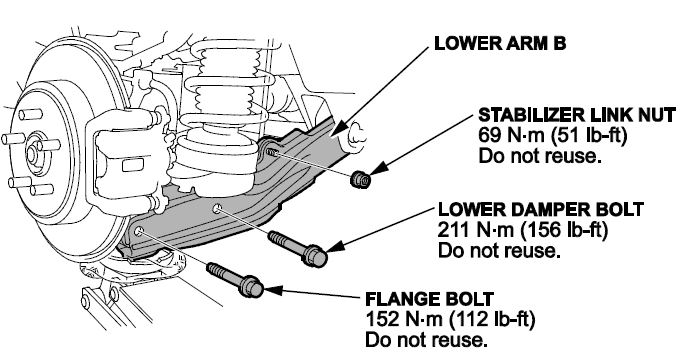
- Remove the stabilizer link nut, then remove the flange bolt that attaches lower arm B to the rear knuckle, then lower the floor jack gradually.
- Remove the flange bolt for the rear damper.
- Mark the cam positions of the adjusting bolt and the adjusting cam plate, then remove the self-locking nut, the adjusting cam plate, and the adjusting bolt.

- Remove the lower arm B
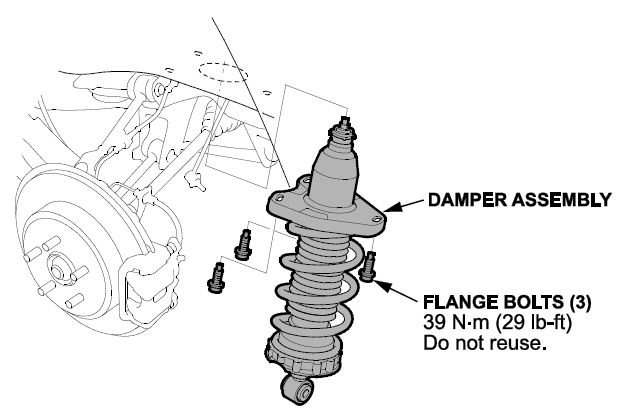
- Remove the three flange bolts from the top of the damper, and then remove the damper assembly.
- Compress the damper spring, then remove the self-locking nut while holding the damper shaft with a hex wrench. Do not compress the spring more than necessary to remove the self-locking nut.
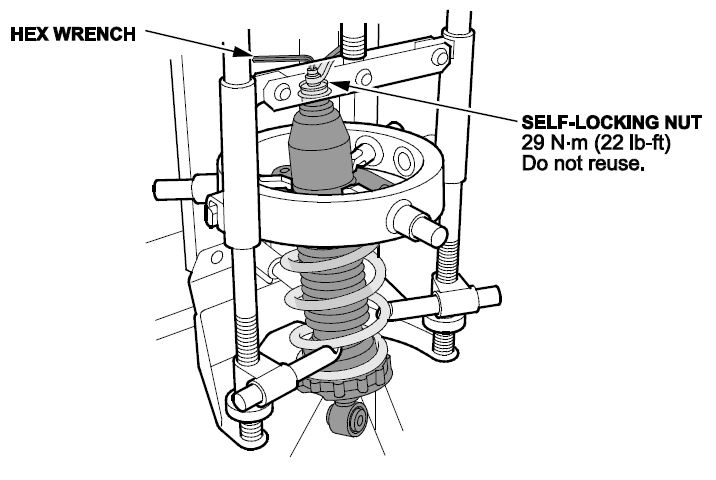
- Release the pressure from the spring compressor, and then disassemble the damper.
- Thoroughly clean the upper surface of the bump stop.
- Apply a small amount of adhesive to the upper surface of the bump stop.

- Hold the bump stop plate against the bump stop until the adhesive cures (approximately 2 minutes).
- Reassemble the damper spring using a new self-locking nut. Torque the nut to 29 N∙m (22 lb-ft).
- Reinstall the damper assembly into the vehicle then loosely install new flange bolts.
- Install lower arm B in the reverse order of removal and note these items
- Install all of the components and lightly tighten the bolts and nuts, then raise the suspension to load it with the vehicle’s weight before fully tightening to the specified torque.
- Align the cam positions of the adjusting bolt and adjusting cam with the marked positions then tighten the nut to 83 N∙m (61 lb-ft).
- Torque the flange bolt that attaches lower arm B to the rear knuckle to 152 N∙m (112 lb-ft).
- Torque the lower damper bolt to 211 N∙m (156 lb-ft).
- Torque the stabilizer link nut to 69 N∙m (51 lb-ft).
- Torque the three upper damper bolts to 39 N∙m (29 lb-ft).
- Repeat steps 3-16 for the other side.
- Install the rear wheels.
- Lower the vehicle.
- Check the wheel alignment and adjust if necessary.
END
 Loading...


